
803 - Smartphone TOSHIBA - Free user manual and instructions
Find the device manual for free 803 TOSHIBA in PDF.


| Product Type | Smartphone |
| Brand | Toshiba |
| Model | 803 |
| Network | 3G (Vodafone 3G) |
| Camera | 2 megapixel with digital zoom and light |
| Memory Card Slot | miniSD (expandable) |
| Display | Main and external (exact sizes not specified) |
| Battery | Removable Li-Ion |
| Music Player | Built-in with stereo speakers and headset support |
| Video Calling | Yes (rear camera only, no front camera) |
| Messaging | MMS, SMS |
| Connectivity | USB, Bluetooth (typical), 3G |
| Software | Vodafone live!, Media Player, Organiser & Tools |
| Operation | Press and hold End key to power on/off |
| Maintenance | Clean with soft dry cloth; avoid moisture |
| Safety | Follow user manual; do not expose to liquids |
| Spare Parts | Battery, miniSD card (third-party available) |
Frequently Asked Questions - 803 TOSHIBA
User questions about 803 TOSHIBA
0 question about this device. Answer the ones you know or ask your own.
Ask a new question about this device
Download the instructions for your Smartphone in PDF format for free! Find your manual 803 - TOSHIBA and take your electronic device back in hand. On this page are published all the documents necessary for the use of your device. 803 by TOSHIBA.
USER MANUAL 803 TOSHIBA
The Toshiba 803 quick start guide
1
natural_image
Diagram showing two views of a mobile phone casing with red connectors, no text or symbols presentIn just a few minutes we'll show you how easy it is to use the new features of your Toshiba 803. This advanced phone can take advantage of the faster 3G network, and we have specially enhanced it to make the most of the Vodafone live! multimedia service.
You'll see how quickly you can make video calls, take pictures and video clips with its built-in 2 megapixel digital camera, send pictures, sounds and video clips in multimedia messages (MMS), and connect to Vodafone live!.
You'll also be able to personalise your phone by downloading new ringtones, games and wallpapers.
Finally, we'll show you how to transfer music files to your phone and use it as a music player!

Getting started

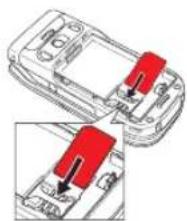
1. Insert your SIM card:
Slide off the back cover, and remove the battery. Slide your Vodafone SIM card (with the gold contacts facing downwards) into its holder, making sure that the cut-out corner is aligned. Replace the battery and cover.
2. Insert the miniSD™ memory card:
Open the side miniSD™ slot and slide the memory card in as shown. This enlarges your phone's memory.
3. Turn it on:
Make sure the battery is charged (see the User Manual for details). Open the handset, then press and hold the 🔗 key. (You do the same to turn it off again.)

The phone

Keys and navigation

Navigation key: press the centre to select an action or highlighted menu item, or select the middle icon at the bottom of the screen. (In standby mode it opens the main Menu.)

Move the navigation key sideways to move around icons and menu lists. (In standby mode, up opens the Shortcut Menu, right opens Calendar, down opens Contacts List and left opens Create Message.)


Soft keys: select the option displayed in the bottom left or right of the screen. (In standby mode left opens Messaging, right opens Vodafone live!)

Call key: makes or answers a call. In standby mode, goes to the voice and video Dialled Numbers.

End key: press to end a call, or to exit an application and return to the standby screen. Press and hold to turn the phone on and off.

Media Player key: press to choose and play music.

Multi Task key: press to switch to another open application, or to go to the Organiser & Tools menu without closing the application you're using (see page 11).

Camera key: press to start the camera, or press and hold to start the video recorder.
Music player controller (on cover): use this to choose and play your music (see page 12).
The 3G network & Video calling
3

: 3G service indicator
When the 3G symbol appears next to the signal bars, you'll be able to take advantage of the faster, richer experience of the Vodafone 3G service. Of course, you'll still be able to use the existing network at other times. The 3G network is growing rapidly – contact Vodafone for more information on where the service is available.

The 3G network is designed to carry data faster, giving you new levels of speed and service. As well as enabling video calling (see below), you'll experience significantly faster downloads, you'll find richer content, and you can stream video and music too.
Vodafone is introducing new services designed just for the 3G network such as live! TV and Full Track Music Downloads (see page 10). These are already available in some countries, so check out Vodafone live! for more information.
Make and receive a video call
When the 3G symbol [ ] appears you can make and receive video calls with your Toshiba 803. The other person you are calling must have a compatible 3G phone and be in a 3G area too. Please note that the Toshiba 803 has no internal camera, so the other person will just see the view from the camera on the back.
Make a call:
In standby mode, enter the number using the keypad and then press [Options]/Video Call. Press ⚙ to dial, and 📋 to end the call.
When the connection is made, the sound will switch to the loudspeaker. Press [Options] for more options during the call.
To use your Call logs, press 📋 in standby mode. Scroll to the number you want and press [Options]/Video Call to start dialling. You can also do the same from your Contacts (press 🔔 in standby mode).
Answer a call:
Press ↗ to answer a video call.

Using the camera
4

natural_image
A dog wearing a colorful artem with its head, standing on a paved surface with blurred background figures (no text or symbols visible)With the built-in 2 megapixel camera with digital zoom it's easy to take pictures and video clips. You can send these to family and friends as a picture or video message (MMS – see page 6).
Take and send a picture
1. Choose the size of your picture:
You can choose two different camera modes: Portrait mode, where you hold the phone upright, uses lower resolution files (best for sending pictures or using as wallpaper). Landscape mode (held sideways) uses much higher resolution, but the fi le sizes are much higher, too.
With the camera active, press 2 to switch between Portrait and Landscape modes, 9 to change the picture size, or 5 to change the quality (press 1 to see a full list of commands). Press [Options] for more options.
2. Take a picture:
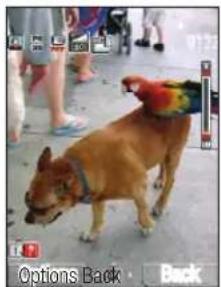
In standby mode, brief y press the front camera key 📄/µ to start the camera (you can also brief y press the side camera key 📄, or go to the main menu and select Camera). Use the volume keys or
to zoom in or out (except at highest picture sizes), and press * to turn the camera light on and off. Press the side camera key again (or press ●) to take the picture.
3. Save and send the picture:
It's saved automatically. Portrait (upright) photos are in Menu/My Items/Pictures, while Landscape (sideways) photos are in Pictures/Digital Camera. Press [ ] to send it As MMS, or as Postcard (see page 10).Press [Back] to take another picture, or [Options]/Delete to delete it.

natural_image
Photo of a dog with a colorful parrot perched on its back, showing posture (no text or symbols visible)Take and send a video clip
1. Take a video clip:
In standby mode, press and hold the front or side camera key, or go to Menu/Camera/Record Video.
Press 2 to switch between the two recording modes: For MMS mode (upright), limits the length and quality so it can be sent to other people. Camcorder mode (sideways) lets you take higher quality for longer, but you won't be able to send it as an MMS message.
Press either or the side camera key to start recording (you'll hear a brief sound when it starts), and press it again to stop.
2. Save and send the video:
It's saved automatically (in Menu/My Items/Videos). Press [ ] to send it As MMS. You can also add it to a video message later – see page 6. Press [Options]/Play to watch it, [Back] to take another video, or [Options]/Delete to delete it.
3. Settings:
With the video camera active, press 2 to change the recording mode, 5 to change the quality, or 8 for full-screen mode (press 1 to see a full list of commands). Press [Options] for more options. Use the volume or up/down keys to zoom.
Messaging
With picture and video messaging (MMS) you can send more than just text messages – you can send pictures, video clips and sounds as well!
![Page 1 000.0/ 100.0 Kbytes Send to [Add Picture] [Add Text] [Add Sound] [Add Video] [Add Other Files] Options Back](/content/2026/06/1147990/images/3c519ed6a891183e2a974392c7bf5b5896e5fa7d52585a5e192c9eefc641f937.jpg)
Create and send an MMS (Multimedia message)
1. Start a new message:
To send a picture or video message, press the - key in standby mode (or select Menu/Messaging). Select Create Message, then MMS.
2. Add a picture or video clip:
Select [Add Picture] or [Add Video], then choose My Pictures or My Videos. Select the picture or video clip you want, then press ⬙ to attach it and return to the MMS screen. Note: you can add either a picture or a video clip to a message. If you send a large video clip you may not be able to add any more to the message.
3. Enter the text:
Select [Add Text], then use the keypad to write your text. To enter punctuation or other characters, press 1 or press the #0.2 key and select the symbol you want. For a space, press 0. Press the *A# key to cycle through capitals, numeric, etc. (shown at the top of the screen). Press ● to return to the MMS screen.
4. Add a sound clip:
Select [Add Sound]. Choose your clip and press ⚙ to attach it and return to the MMS screen.
5. Preview the message:
Select [Options]/Preview Message to see and hear your message. To change an item highlight it in the MMS screen, then press [Options]/Edit... or Delete... Then press ⚙.
Text entry:
Press and hold 🧑️ to change from Predictive text (T9) to Multi-tap (abc). In T9, use 🔒 to cycle through the alternative words, then press 🔒 or 0 to select the one you want. If the word you want isn't available, switch to Multi-tap to enter it.
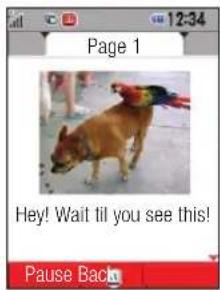
Pages:
You can add more than one picture, sound or video clip to your message by adding a new page. In the MMS screen press [Options]/Add Page.
6. Choose who you send it to:
Select Send to. Choose From Contacts to enter a contact number or email address from your Contacts
List. To send it to a mobile choose Enter Recipient and enter the number, or choose [Options]/Input method/abc to enter an email address (press the 1 key once for the [.] symbol, three times for the [@]).
Then press ◦.
7. Send your message:
Select Send, and press Ⓞ to send it. Or press [Options]/Add Recipients to send it to more people.
Messaging tips
Sending to a mobile:
Try sending one to yourself to see how it works. You'll find it in Menu/Messaging/Inbox.
If the receiving phone isn't picture message or video message compatible, they'll be sent a web address to view your message on.
Adding a new picture or video clip:
To add a new picture or video to your message you can choose Take Picture or Record Video in the [Add Picture] or [Add Video] menus.
Vodafone live!

Vodafone live! brings you new and exciting ways to communicate, to access information, music and games, and to personalise your phone. You can find more details in the Vodafone live! guide to services or on the Vodafone website (www.vodafone.co.uk/live).
Connect to vodafone live!
1. Connect:
In standby mode, press [Olive!] and select Vodafone live! to connect you to the Vodafone live! homepage. To exit, press the key.
2. Browsing:
Simply highlight the item you want to select, then press ⬤ to open that page. Press [Back] to go back a page. Press [Options] for the Browser Option menu.
3. Bookmarks:
To go directly to a favourite page, press [Options]/Bookmarks/View List to select a saved bookmark or Bookmarks/Add Bookmark to add a new one.
4. Direct links:
In standby mode, go to Menu/Vodafone live!. Here you can go directly to your bookmarks before connecting. You'll also find direct links to the main Vodafone live! sections, including news, downloads and sport.
5. What's new:
Vodafone live! is always evolving to bring you new and better services – keep checking to see what's new.

Note: your view of the homepage may be slightly different.
Downloads
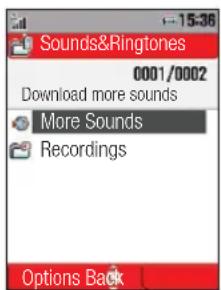
Change your Toshiba 803 whenever you want by downloading new real music ringtones, videos, games, applications and background wallpaper from Vodafone live!. You can also stream (view or listen only) video and audio...
Download to your phone
1. Wallpaper, screensavers and ringtones:
Go to Menu/My Items. Choose Pictures/More Pictures for images and wallpaper, or Sounds & Ringtones/More Sounds for ringtones and sounds. Follow the instructions to download.
After downloading, you'll be given options to view or use your new download.
Otherwise, to set a downloaded sound as your new ringtone, go to Menu/Settings/Phone Profiles then choose Normal (or any other profile)/[Options]/Personalise. Select Assign Ringtone, choose Voice Call, then press My Sounds/Sounds&Ringtones and select your new ringtone. Press [Options]/Play, then [Assign].
To set an image as your wallpaper, go to Menu/Settings/Display Settings, then choose Main Display/Wallpaper. Select My Pictures, and then choose the picture you want.
2. Games:
For games, go to Menu/Games&More/Applications/More Games. Follow the instructions to download.
3. Streaming video/audio:
Go to Menu/My Items/Videos/More Videos, and follow the instructions. Your video or audio stream will automatically start playing.
live! Postcard & live! Studio
1. live! Postcard:
Now you can send a picture from your phone as an actual postcard. Go to Menu/Messaging/Create Message/live! Postcard, and add a picture and text (up to 200 characters). Select Send to and add the address, then select Send/Send. Vodafone will have it printed on a postcard and sent by mail.
2. live! Studio:
You can also upload selected pictures to an online album where you and your friends can access them remotely. Go to Menu/My Items/Pictures, select the picture you want and choose [Options]/Send/To live! Studio. To see your album on the Vodafone live! portal, go to Menu/Messaging/live! Studio. You can also log in to your homepage on your local Vodafone website and select the live! Studio option. (Note: you can also send other items like ringtones, MMS messages and videos to your album.)
Exclusive services for Vodafone live! 3G customers
1. live! TV:
A great way to get video news and entertainment, TV clips and sport. Connect to Vodafone live! and choose live! TV. Choose a clip – this will be streamed to you directly, so you don't have to store it.
2. Full Track Music Downloads:
Listen to the music you want – whenever you want and wherever you are. Go to Music on Vodafone live!, then select and buy a track from the catalogue. Download it, save it and play it whenever you choose. Use your stereo headphones for the best playback.
Other functions
For more information see the User Guide. You can also find out more about Vodafone 3G and other services by going to your local Vodafone website, or contacting your local Customer Services.
Phone hints
1. Silent profile:
In standby mode, press and hold the #e2 key. You'll see a 'silent' icon at the top of the screen. Press and hold the #e2 key again to return to the previous profile.
2. External keys lock:
When the phone is closed, press and hold the side camera Ⓞ key. This locks the external keys. Press and hold the key again to unlock.
3. Application switch key:
You can use more than one application at the same time. Press ☐, then select Organiser & Tools, and choose a new application. For example, while creating a message you can also view your calendar appointments. To switch between applications, press ☐ and select a new one.
You can also dial a number to make a voice or video call while using applications. Press 📋 and go to [Options]/Dial Number and enter your number. To select a number from your Contacts list, go to Menu/Contacts/Contacts List.
If you try and open more than two applications at the same time, you may run out of memory.

Media Player
12

natural_image
Line drawing of a medical or electronic device with wires and connectors (no text or symbols)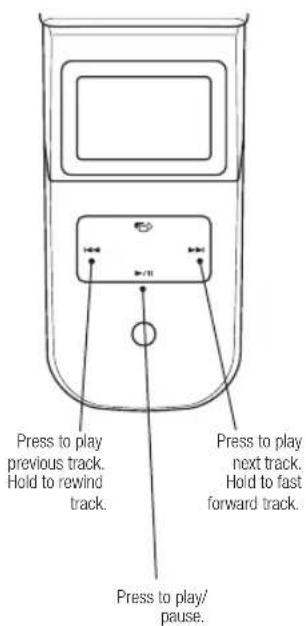
Your Toshiba 803 is also a personal music player! Download music from Vodafone live! (see page 10), or transfer it from your PC, then listen to it through headphones or the stereo speakers. The front control panel makes it even easier!
Transfer and play music
1. Transfer music from your PC:
First format your miniSD™ card on your phone (warning: this deletes all previous data!): go to Menu/Settings/Memory Settings/Memory Card/Format Card, then enter the password 0000.
Install the supplied Toshiba Mobile Music software onto your PC, and run the program. Click the top left button on the screen to add music files to the program library. Connect your phone to your PC using the supplied USB cable, and press Yes to switch to Music Transfer mode. Then check that the destination folder on your PC is set to the handset.
Highlight the music tracks you want to transfer, then click on the Transfer icon (on the right), and wait until the transfer is complete.
2. Organise music:
Press the Media Player key on your phone, then select Playlists/Create Playlist. Give it a name, then add the music files you want. You can make up to 10 playlists. You can also add tracks to your Favourites list.
3. Play music:
With the phone closed, press the 📄 icon on the front panel. Use the panel as a controller to open and play your playlists, following the onscreen prompts. You can also use the controller on the supplied stereo headset. Adjust the volume using the side volume keys, or the headset controller. Press and hold the 🔒 key to lock and unlock the controller.
- The Toshiba 803 quick start guide
- Getting started
- Insert your SIM card:
- Insert the miniSD™ memory card:
- Turn it on:
- The phone
- Keys and navigation
- The 3G network & Video calling
- : 3G service indicator
- Make and receive a video call
- Make a call:
- Answer a call:
- Using the camera
- Take and send a picture
- Choose the size of your picture:
- Take a picture:
- Save and send the picture:
- Take and send a video clip
- Take a video clip:
- Save and send the video:
- Settings:
- Messaging
- Create and send an MMS (Multimedia message)
- Start a new message:
- Add a picture or video clip:
- Enter the text:
- Add a sound clip:
- Preview the message:
- Text entry:
- Pages:
- Choose who you send it to:
- Send your message:
- Messaging tips
- Sending to a mobile:
- Adding a new picture or video clip:
- Vodafone live!
- Connect to vodafone live!
- Connect:
- Browsing:
- Bookmarks:
- Direct links:
- What's new:
- Downloads
- Download to your phone
- Wallpaper, screensavers and ringtones:
- Games:
- Streaming video/audio:
- live! Postcard & live! Studio
- live! Postcard:
- live! Studio:
- Exclusive services for Vodafone live! 3G customers
- live! TV:
- Full Track Music Downloads:
- Other functions
- Phone hints
- Silent profile:
- External keys lock:
- Application switch key:
- Media Player
- Transfer and play music
- Transfer music from your PC:
- Organise music:
- Play music:
Brand : TOSHIBA
Model : 803
Category : Smartphone