BR591W - Refrigerator Tricity Bendix - Free user manual and instructions
Find the device manual for free BR591W Tricity Bendix in PDF.


| Product Type | Refrigerator with 3-star freezer compartment |
| Model | BR591W |
| Brand | Tricity Bendix |
| Height | 820/870 mm (adjustable via feet) |
| Width | 596 mm |
| Depth | 547 mm |
| Weight | 37 kg |
| Gross Capacity (Total) | 140 litres |
| Net Capacity (Total) | 132 litres |
| Net Freezer Capacity | 19 litres |
| Voltage | 220-240 V ~ 50 Hz |
| Energy Class | Not specified (complies with EEC Directive 87/308) |
| Climate Class | Not specified (intended for domestic use) |
| Thermostat Control | Rotary knob, settings 0 (off) to 6 (coldest), medium 2-3 recommended |
| Interior Light | 15W bulb, replaceable (screw-in type) |
| Door Reversibility | Yes, door hinge can be moved to opposite side (instructions included) |
| Defrosting | Fridge: automatic defrost; Freezer: manual defrost (recommended when frost ~6 mm thick) |
| Refrigerant | Not specified (contains refrigerant; requires 2-hour settling after installation) |
| Installation Type | Built-in or freestanding (adjustable feet, requires ventilation) |
| Accessories | Ice tray, egg racks, salad crispers, adjustable shelves |
Frequently Asked Questions - BR591W Tricity Bendix
User questions about BR591W Tricity Bendix
0 question about this device. Answer the ones you know or ask your own.
Ask a new question about this device
Download the instructions for your Refrigerator in PDF format for free! Find your manual BR591W - Tricity Bendix and take your electronic device back in hand. On this page are published all the documents necessary for the use of your device. BR591W by Tricity Bendix.
USER MANUAL BR591W Tricity Bendix
Better Products. Better Value.
natural_image
Illustration of various household appliances including refrigerator, washing machine, microwave, and kitchen appliance (no text or symbols)OPERATING AND INSTALLATION INSTRUCTIONS
MODEL NO
BR 591 W
IMPORTANT USER INFORMATION

PLEASE READ THIS INSTRUCTION BOOK BEFORE USING THE APPLIANCE
IT IS MOST IMPORTANT THAT THIS INSTRUCTION BOOK SHOULD BE RETAINED WITH THE APPLIANCE FOR FUTURE REFERENCE. SHOULD THE APPLIANCE BE SOLD OR TRANSFERRED TO ANOTHER OWNER, OR SHOULD YOU MOVE HOUSE AND LEAVE THE APPLIANCE, ALWAYS ENSURE THAT THE BOOK IS SUPPLIED WITH THE APPLIANCE IN ORDER THAT THE NEW OWNER CAN BE ACQUAINTED WITH THE FUNCTIONING OF THE APPLIANCE AND THE RELEVANT WARNINGS.
THESE WARNINGS ARE PROVIDED IN THE INTEREST OF SAFETY, YOU MUST READ THEM CAREFULLY BEFORE INSTALLING OR USING THE APPLIANCE.
- Any electrical work required to install this appliance should be carried out by a qualified electrician or competent person. Under no circumstances should you attempt to repair the appliance yourself. Repairs carried out by inexperienced persons may cause injury or more serious malfunctioning. This product should be serviced by an authorised service engineer and only genuine Tricity Bendix Spare Parts should be used.
- It is dangerous to alter the specifications or modify this product in any way. This product is designed for domestic use only and should be operated by adults. Children should not be allowed to tamper with the controls or play with the product.
- The appliance should be left for 2 hours after installation before it is turned on to allow the refrigerant to settle. Care must be taken to ensure that the appliance does not stand on the electrical supply cable.
- Many parts at the back of this appliance heat up and should not be exposed. When positioning this appliance ensure there is adequate ventilation. Failure to do this will result in component failure and possible food loss. This appliance is heavy. Care should be taken when moving it.
- Tricity Bendix domestic fridges, freezers and fridge freezers are designed to be used specifically for the storage of edible food stuffs only. Food manufacturers storage recommendations should be strictly adhered to. Refer to relevant instructions.
-
Care must always be taken when handling food in the home. Always follow the basic rules of food hygiene to prevent bacterial and microbial growth and cross contamination when defrosting, preparing, cooking, cooling, reheating and freezing foods.
-
Before defrosting, cleaning or maintenance work is carried out, be sure to switch off the appliance and unplug it.
- Your appliance is designed for operation in a domestic household. If it is used in a non-domestic situation the guarantee may be invalidated.
- The evaporator plate and aluminium lining or refrigerated freezer shelves in this appliance contain channels through which the refrigerant passes. If these are punctured this would cause substantial damage to the appliance and result in food loss. DO NOT USE SHARP INSTRUMENTS to scrape off frost or ice. Under no circumstances should ice be forced off the lining or shelves. Solid ice should be allowed to thaw when defrosting the appliance. See defrost instructions.
- Do not place carbonated fizzy drinks in the freezer as it creates pressure on the container which may cause it to explode resulting in damage to the appliance.
- Ice lollies can cause frost burns if consumed straight from the freezer.
- Frozen food must not be refrozen once it has thawed out.
• Manufacturers' food storage recommendations should be strictly adhered to. Refer to relevant instructions. - Care must be taken when removing contents not to touch frozen interior surfaces, particularly if hands are wet.
CONTENTS
Conservation Page 4
Specifications Page 4
Installation Page 5
Electrical Connections Page 9
General Features Page 10
Using Your Refrigerator Page 11
Health And Safety Guidelines Page 14
Maintenance And Cleaning Page 15
What Happens If Something Goes Wrong? Page 16
Rating Plate Page 17
Help Us To Help You Page 17
Tricity Bendix Service Centres Page 18
Guarantee Page 19
CONSERVATION
In The Interests Of The Environment:
When disposing of your old fridge, freezer or fridge/freezer:
Check with your local Council or Environmental Health Officer to see if there are facilities in your area for collecting the gas from the appliance for re-cycling. This will help reduce the amount of CFC gas released into the atmosphere.
Help to keep your countryside tidy - use authorised disposal sites for your old appliances.
For Maximum Efficiency:
Make sure that the appliance is cleaned properly.
Make sure that the door is closed properly.
Do not position the appliance near to sources of heat.
Do not over-fill your appliance, air MUST be allowed to circulate.
SPECIFICATIONS
Dimensions: BR 591 W
| Height: | 820/870mm |
| Width: | 596mm |
| Depth: | 547mm |
| Weight: | 37kg |
Capacity
| Gross Total: | 140 litres |
| Net Total: | 132 litres |
3 Star Freezer:
| Net: | 19 litres |
Voltage: 220/240V
| Frequency: | 50Hz |
INSTALLATION
This appliance is designed to be fitted into a space with the dimensions shown in Fig. 1.

Fig. 1
Final adjustment for height can be achieved by adjusting the feet on the base of the appliance (Fig. 2).

natural_image
Technical diagram of a structural frame with mounting feet and directional arrows indicating rotation (no text or symbols)Fig. 2
Reversing the door
Remove the 2 screws that hold the top hinge to the door.
Lay the appliance carefully on its back and remove the plastic insert.
Remove the 2 screws that hold the bottom hinge to the door.
Remove the 4 screws that hold the bottom hinge to the base of the appliance and remove the hinge.
Slide the door downwards from beneath the top hinge.
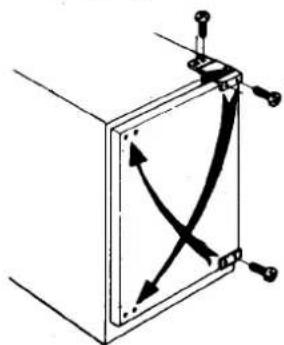
Remove the 2 plastic caps from the top and bottom of the door and fit to the opposite side (Fig. 3).

natural_image
Pure diagram of a 3D rectangular frame with intersecting curved arrows indicating direction (no text or symbols)Fig. 3
Remove the 4 screws that hold the top hinge to the top of the appliance and remove the hinge.
Lay the appliance door on a flat surface and transfer the clamping nuts to the adjacent fixings to the right. Next, clear out the hinge fixing holes on the left hand top and bottom of the door and fit the screws in order to clear the threads (Fig. 4).

natural_image
Simple line drawing of a rectangular panel with four circular arrows indicating rotation or movement (no text or symbols)Fig. 4
Take the hinge that was removed from the top of the appliance and, using the screws which were removed from the base, fit to the base of the appliance.
Slide the door behind the hinge and then fit the other hinge to the top of the appliance. Fit the 2 front fixing screws to the top and bottom hinges (Fig. 5).
natural_image
Pure electrical circuit lines without any symbolsFig. 5
Finally, check door alignment and closure. Leave for 2 - 3 hours before switching on.
Door Reversal (Freezer Compartment)
While carrying out the door reversal process, it is advisable to reverse the inner door for the freezer compartment. Proceed as follows:
To remove the small hinge from the door, unscrew the 2 securing screws, see Fig. 6.

natural_image
Technical line drawing of a mechanical assembly with a rotating component (no text or symbols)Fig. 6
You can then remove the freezer compartment door and the upper hinge. After removing the door, the closure hook must be removed by unscrewing it and then replace the hook on the opposite side. (See Fig. 7).

natural_image
Pure mechanical diagram showing a rectangular component with internal arrows and mounting points, no text or symbols present.Fig. 7
Re-fit the upper hinge on the opposite side and re-fit the door and secure the lower hinge, see Fig. 8.

natural_image
Diagram of a mechanical assembly with directional arrows indicating movement (no text or symbols)Fig. 8
Mounting the cupboard door panel
Place the appliance into the position where it will be installed adjusted to the required height via the front and rear feet.
Place the paper template horizontally so that the line 'X' is along the top edge of the appliance door (Fig. 9).
On the scale 'Y' either end of the template above the line 'X', select whichever graduation line corresponds with the top of the adjacent cupboard door or drawer lines (the graduations marked 1 - 24) (Fig. 9).
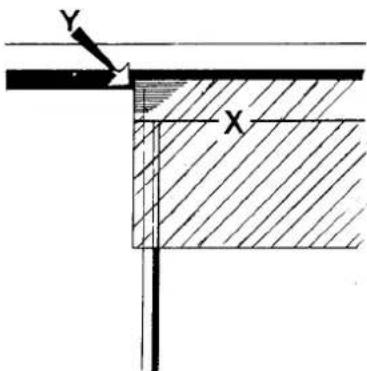
Fig. 9
Once you have selected the graduation line, lay the wooden door panel face downwards and align the paper template on the graduation line along the top edge of the door panel (Fig. 10).
Maintaining the above alignment determine the centre of the door aligning the lines 'Z' situated at either end of the template so that the number of the graduation corresponds on both sides (Fig. 10).
When the above steps have been completed mark the positions of of holes 'A' through the template onto the wooden door (Fig. 10).

Fig. 10
Place the template lengthways along the left hand side aligning positions 'C' along the edge of the wooden door.
Place position 'A' over the mark already made on the door and mark position 'B' through the template onto the wooden door (Fig. 11).
Repeat this procedure for the right hand side of the door.

Fig. 11
Before removing the mounting brackets from the appliance make a note of the mounting position of them on the appliance.
Place the brackets across the top and bottom of the wooden door placing the outer fixing holes over the marks made earlier and screw into position.
Use as many screws necessary to ensure a firm fixing.
WARNING: Do not use screws that are liable to pierce the front face of the wooden door.
Loosen the hexagonal clamping nuts on the appliance door enough to ensure easy fitting of the wooden door panel to the appliance. Open the appliance door and slide the wooden door panel brackets sidewards from left to right onto the clamping nuts at the top and bottom (Fig. 12).

Fig. 12
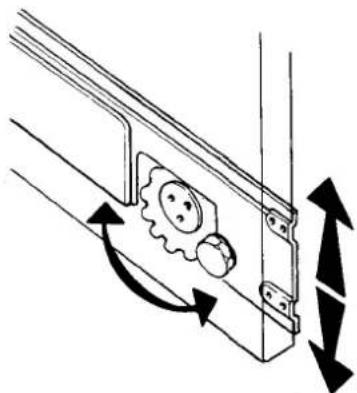
To align the top edge of the wooden panel with adjacent doors or drawers rotate the lower cam wheels 'B' (Fig. 13).
natural_image
Diagram of a mechanical assembly with directional arrows indicating motion (no text or symbols)Fig. 13
To adjust the vertical line of the door, slide the door on the clamping nuts to the left or right as required.
If it is necessary to adjust the door aoutwards loosen the back section of the clamping nut from the appliance door to the required distance (Fig. 13A).

natural_image
Technical diagram of a mechanical assembly with arrows indicating direction (no text or symbols)Fig. 13A
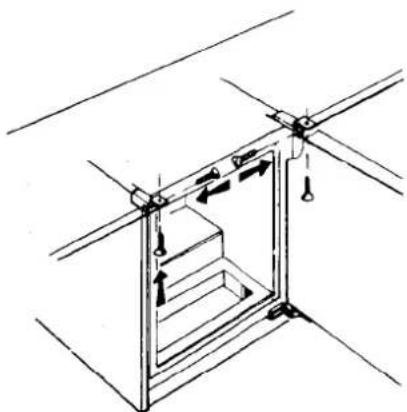
When the door is fully aligned tighten the clamping nuts onto the fixing brackets and fix the appliance to the adjacent cabinets and underside of the work surface (Fig. 14).
natural_image
Technical line drawing of a mechanical assembly with no visible text or symbolsFig. 14
If the appliance has been installed in a cavity that is 820mm high and the plinth is 100mm maximum height, fit the black infill strip by clipping the two vertical tags into the rectangular slots on the underside of the vent housing. The infill strip can be adjusted either backwards or forwards in these slots (Fig. 15)

Fig. 15
If the plinth is between 100mm-135mm cut the infill strip as shown in Fig. 17 and fit as described above.
If the plinth is between 135mm - 170mm cut it as shown in Fig. 15.

Fig. 16
If the appliance has been installed in a cavity that is 870mm high and the plinth is 150mm maximum height, fit the black infill strip as described above.
If the plinth is between 150mm-185mm cut the infill strip as shown in Fig. 17.
If the plinth is between 185-220mm cut is as shown in Fig. 15.

Fig. 17
ELECTRICAL CONNECTIONS
WARNING: THIS APPLIANCE MUST BE EARTHED.
The manufacturer declines any liability should this safety measure not be observed.
If the plug this is fitted to your appliance is not suitable for your socket outlet, it must be cut off and the appropriate plug fitted.
Remove the fuse from the cut off plug. The cut off plug should then be disposed of to prevent the hazard of shocks in case it should be plugged into a 13amp socket in another part of your home.
IMPORTANT
The wires in the mains lead are coloured in accordance with the following code:
| Green and Yellow | - Earth |
| Blue | - Neutral |
| Brown | - Live |
If you fit your own plug, the colours of the wires in the mains lead of your appliance may not correspond with the markings identifying the terminals in your plug, proceed as follows, see Fig. 18:

Fig. 18
Connect the Green and Yellow (earth) wire to the terminal in the plug which is marked with the letter 'E' or the earth symbol or coloured green and yellow.
Connect the blue (neutral) wire to the terminal in the plug which is marked with the letter 'N' or colored black.
Connect the brown (live) wire to the terminal in the plug which is marked with the letter 'L' or coloured red.
The plug moulded onto the lead incorporates a fuse. For replacement, use a 13amp BSI362 fuse. Only ASTA or BSI approved fuses should be used.
The plug must not be used if the fuse cover/carrier is lost. The cover/carrier is indicated by the coloured insert at the base of the plug.
A replacement cover/carrier can be obtained from your local Tricity Bendix Customer Service Centre.
This appliance complies with E.E.C. Directive no 87/308 of 2.6.87 relative to radio interference suppression.
- Please ensure that when the appliance is installed it is easily accessible for the engineer in the event of a breakdown.
GENERAL FEATURES
USING YOUR REFRIGERATOR
THE THERMOSTAT CONTROL KNOB
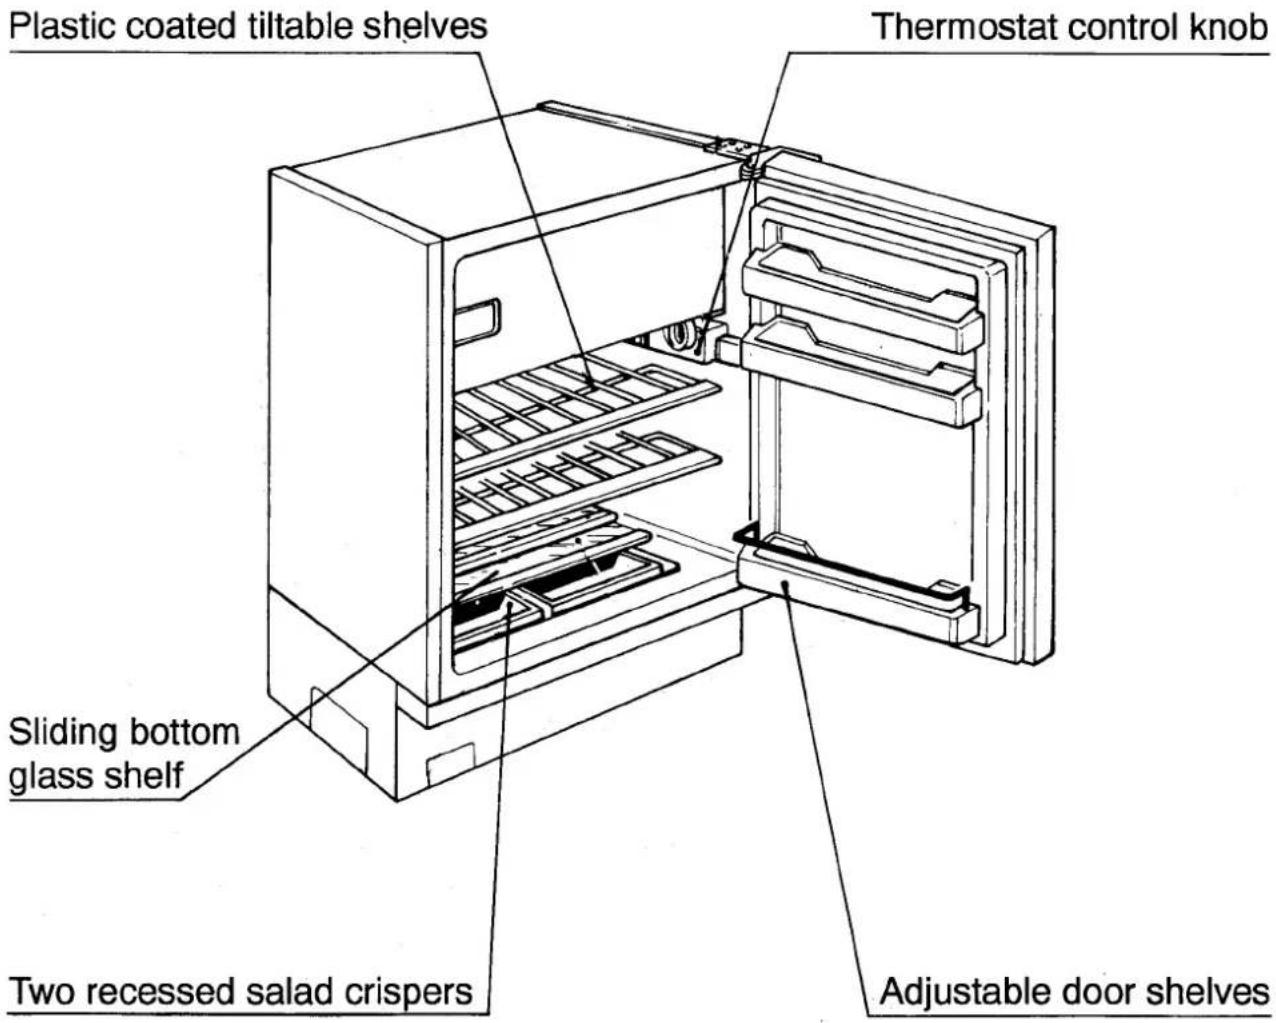
The thermostat control knob is situated in the top right hand corner (as you are facing the machine), also in the housing is the light bulb.
The thermostat control knob is numbered 0 - 6. The highest number is the coldest setting.
Open the door and turn the thermostat control knob to '0' position.
The temperature adjustment is obtained by turning the thermostat control to the required setting. A medium setting of 2 to 3 is generally most suitable. However, the internal temperature will be affected by the location, room temperature, the amount of food being stored and the number of times which the door is being opened.
The fresh food compartment has been designed to operate between 0°C (32°F) and 5°C (41°F) and is in accordance with British and European Standards.
Turn the thermostat control knob clockwise to obtain a lower temperature and anticlockwise if a less cold temperature is required. (See Fig. 19).

natural_image
Technical line drawing of a mechanical clamp or bracket assembly (no text or symbols)Fig. 19
Storage times will vary according to the food type and how fresh it is when put into the fridge, no food should be stored longer than the times advised by the food manufacturer.
To obtain the best results from your fridge, neither hot food or liquids which may evaporate, should be placed in the fridge compartment.
The coldest area in the fridge is immediately below the frozen food storage compartment and this is where the most perishable foods should be kept.
* You should cover all food, especially items with a strong smell.
* Do not pack the fridge too tightly or cover shelves with paper or card, as this would obstruct the free circulation of air.
* Place meat to be stored, in an airtight container.
* Cooked food should be well covered.
* Fruit, salads and vegetables should be thoroughly cleaned and placed in plastic bags in the salad drawers.
* Butter and cheese should be placed in special airtight containers, wrapped in foil, or put in polythene bags and exclude as much air as possible.
* Milk bottles should have a cap and should be stored in the bottle rack on the door.
Food should NOT touch the cooling plate in the appliance.
DOOR SHELVES
The shelves can be located in 3 different positions to suit your own storage requirements.
To remove a shelf, hold the shelf at each end and lift upward.
To refit the shelf, engage the groove on either end of the shelf into the door location and slide the shelf downward.
CABINET SHELVES
The shelves can be adjusted to different positions to suit the size and amount of food being stored and may also be tilted for the storage of bottles of wine etc..
To remove the shelves, hold the shelf with
both hands and pull forward, tilting and lifting upward, off the runners.
The bottom glass shelf, slides back to allow access to the salad crispers.
FROZEN FOOD COMPARTMENT
- This 3 star compartment is not designed to freeze fresh food or cooked food.
- The 3 star frozen food compartment of the refrigerator is designed to maintain temperature below - 18°C. This temperature will allow medium term storage of frozen food up to 3 months providing the correct setting has been selected.
IMPORTANT
If temperature rises in frozen foods because of:
a. non compliance with manufacturers instructions.
b. Electric power failure or faults
c. During defrosting then storage life may be reduced and storage times recommended may not then apply.
Any frozen food which thaws accidentally should either be used immediately or thrown away.
ICE MAKING
Fill the ice tray with fresh drinking water to just below the top of each cube compartment and place in the top compartment where it will freeze quickly.
To release the ice cubes, twist the ice tray along its length and the cubes will come out. They can then be stored in a container to use at a later date.
THAWING
Thaw frozen food in the fridge or at room temperature, depending on the time available.
Some small items may be cooked from frozen, but please allow extra time for cooking.
Any frozen food which has defrosted accidentally should either be consumed as soon as possible or thrown away. If the thawed food is uncooked and has not been completely defrosted, can be cooked and refrozen.
DEFROSTED FOOD MUST NEVER BE REFROZEN.
Important points to remember ...
Do...
* Use the frozen food stored in date order, ensuring that you are consuming food at its best.
Do Not ...
* Use a SHARP INSTRUMENT to remove ice and frost.
NOTE
- Do not place sealed containers of carbonated liquids such as fizzy drinks into the freezer as it creates pressure on the container which may cause it to explode resulting in damage to the freezer.
- Water ices and ice lollies should not be consumed immediately after removal from the freezer as it may result in low temperature skin abrasions.
WARNING
Do NOT remove items from the freezer if your hands are damp/wet, as this could cause skin abrasions or 'frost/freezer' burns.
HELPFUL HINTS WHEN BUYING
FOOD
- Always ensure that fresh food you purchase is of a good quality and in prime condition.
- Shop at a reliable source and buy the 'freshest' looking packages avoid shopworn labels or produce covered in dust.
- Avoid buying frozen food, if you cannot store it straight away. The use
of insulated container is advisable. When you arrive home place the frozen food in the freezer immediately.
Important Points To Remember ...
Do ...
* Cover liquids and wrap food, particularly those with strong odours.
* Put vegetables and salad in the salad drawer, in plastic bags.
* Cover melons and pineapples and only store for short periods.
Do Not ...
* Let food or containers touch the fridge cooling plate.
* Obstruct the air flow in the fridge by tightly packing stored items.
* Store bananas in the fridge, as they go black.
* Place the salad boxes in a dishwasher. They are NOT dishwasher proof.
DEFROSTING
The fridge compartment
The fridge compartment is equipped with a fully automatic defrosting arrangement which comes into operation at each cycle of the thermostat.
The resultant water runs into the channel below the cooling plate and down through a tube into the evaporating tray at the rear of the appliance.
The defrost water then evaporates automatically. The defrost water drain hole should be cleaned at regular intervals. To do this, use the special cleaner provided (See Fig. 20).

natural_image
Illustration of a hand holding a pen or ruler above a vertical line, with no text or symbols present.Fig. 20
The freezer compartment
The frost should be occasionally removed using either a stiff bristle brush or a plastic scraper.
Heavy frosting (about 1/4" thick) will reduce the freezer's efficiency and complete defrosting should be carried out at this stage.
It is preferred that you defrost the freezer compartment when there is little or no food in it, the procedure is as follows:
Any remaining frozen food should be placed in newspaper and wrapped in blankets and stored in a cardboard box which you should then put in a cool, dry place, or put the food in another freezer.
Then turn the thermostat off and switch off at the mains.
Defrosting can be speeded up by putting bowls of hot (NOT boiling) water in the compartment.
When the ice has melted, remove the water collected in the base.
After defrosting, clean and dry the interior of the compartment, plug the appliance in and switch on at the electricity supply.
Replace the frozen food and check that the thermostat is at the correct setting.
\* Please note:
If the temperature of the frozen food is allowed to rise during defrosting, its storage life may be shortened.
HEALTH AND SAFETY GUIDELINES
Because of consumer demand, preservatives have been removed from many pre-prepared food.
This together with the changes in shopping habits to a once-a-week shop, mean that the safe handling and storage of food is even more important than ever.
The following tips should help you to ensure that the food in your home is in as perfect a condition as possible.
* Keep the time between buying chilled and frozen food and placing it in your fridge or freezer as short as possible. Tests showed that the temperature of 1 litre of orange juice rose to 22°C in an hour between the supermarket and home.
It then took 11 hours to get down to 7°C in the fridge.
* Keep the fridge door closed as much as possible. Remember that warm air is flowing in as you are looking in to decide what to have for tea!
* Do not push food together too much, air must be allowed to circulate around each item.
* Cool food as quickly as possible but do not place in the fridge or freezer until cool. (Leave food in as cool a place as possible in order that it can be placed in the fridge or freezer as soon as possible).
* Do not store food uncovered.
* The best way to defrost food is to put it in the fridge to thaw slowly.
* Remove suspect food from your fridge and clean the interior with a solution of bicarbonate of soda in warm water (5ml to 0,5 litre of water).
* Never allow food spillage to dry and harden.
* It is important that food is used before its 'best before' date.
* Store eggs in the egg racks provided. Discard any broken or chipped eggs.
* Regularly check the fridge door seal to ensure that it is clean and free from bits and pieces.
* Always wash your hands with soapy water and dry them with a clean towel before handling food.
* Keep work surfaces clean and avoid cross contamination by not using the same work surface or knife, for raw and cooked food without washing them thoroughly in between.
* Use clean kitchen roll wherever possible for cleaning up food. If you use a dishcloth be sure to boil it frequently.
MAINTENANCE AND CLEANING
Before any maintenance or cleaning DISCONNECT the appliance from the electricity supply and remove ALL loose accessories.
Cleaning The Interior Cabinet
Clean the interior cabinet, door and accessories with a clean cloth dampened with a solution of warm water and bicarbonate of soda (5ml to 0,5 litre of water).
Strong smelling food may leave the fridge with a light odour. A small dish of bicarbonate of soda solution placed in the fridge should slowly absorb these smells.
NEVER USE DETERGENTS, ABRASIVE POWDER, HIGHLY PERFUMED CLEANING MATERIALS OR WAX POLISHES TO CLEAN THE INTERIOR OF THE APPLIANCE AS THESE WILL DAMAGE THE SURFACES AND LEAVE A STRONG SMELL.
Cleaning The Exterior Cabinet
It is a good idea occasionally to remove the appliance from the cabinet and clear a build up of dust and pluff from them and the areas behind them.
A small amount of wax polish or silicon spray should be used to maintain the gloss finish of the outside cabinet.
During periods when the appliance is not in use, please take the following precautions:
* Unplug the appliance from the electricity supply.
* Remove all food from the appliance.
* Clean the interior and all accessories and leave the door ajar after emptying. Clean and dry the compartments to allow fresh air to circulate.
Replacing the interior light bulb
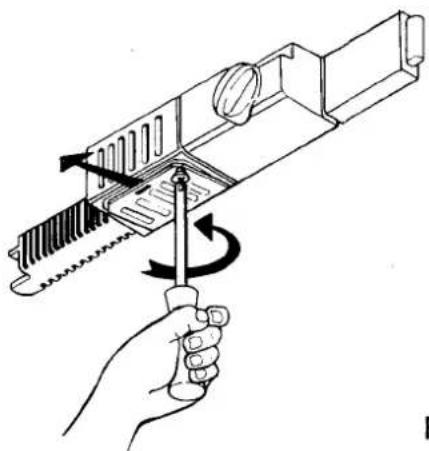
If the interior light does not come on when the door is opened, you will need to gain access to the interior light bulb. To do this, remove the bulb housing cover by unscrewing the screw and by sliding it out (Fig. 21).
Check that the bulb is correctly screwed into its socket. If it is burnt out, replace with a similar 15W bulb. Replace the cover by sliding it back in. Fasten it by means of the previously removed screw.
natural_image
Illustration of a hand using a screwdriver to adjust a mechanical component (no text or symbols present)Fig. 21
Replacement bulbs can be obtained from your local Tricity Bendix Service Centre.
WHAT HAPPENS IF SOMETHING GOES WRONG?
If your appliance fails to work properly and you have followed these instructions carefully, contact your local Tricity Bendix Service Centre, whose details can be found at the back of this instruction booklet.
Before you do this, however, it is worth making the following checks:
* Is the plug firmly connected to the wall socket and is the socket switched on?
* Check the power supply by plugging in another appliance which you know is working.
* Check that there is not a power cut, switch on your household lights.
* Is the fuse in the plug intact and are the wires in the mains lead correctly connected to the plug? (See Electrical Connections).
* Have you turned the thermostat to the correct setting?
* Has the door been left open causing the temperature to rise?
IN-GUARANTEE CUSTOMERS SHOULD ENSURE THAT THE ABOVE CHECKS HAVE BEEN MADE AS THE ENGINEER WILL MAKE A CHARGE IF THE FAULT IS NOT A MECHANICAL OR ELECTRICAL BREAKDOWN.
* Please note that it will be necessary to provide proof of purchase for any in-guarantee service calls.
Rating Plate
The rating plate is situated inside the cabinet behind the salad drawer of freezer bin. It gives the model and serial numbers which should be quoted in any communication. For future reference record the information below:
| Model No: | |
| Serial No: | |
| Date of Purchase: |
HELP US TO HELP YOU
Service
Before calling out an engineer, please ensure you have followed the checklist.
Telephone numbers are detailed on the list headed "Tricity Bendix Service Centres".
When you contact us we need to know:
- Your name, address and post code.
- Your telephone number.
- Clear and concise details of the fault.
- The model number.
- When it was purchased.
Please note that all enquiries concerning service should be addressed to your local service centre.
Keep the receipt with this booklet as proof of purchase.
Customer care
For general enquiries concerning your Tricity Bendix appliance, or further information on Cookers, Microwaves, Refrigeration or Home Laundry equipment you are invited to contact our Customer Care Department by letter or telephone as follows:
Customer Relations Department, Tricity Bendix Ltd, 99 Oakley Road, Luton, Bedfordshire, LU4 9QQ
Tel: 0582 585858
TRICITY BENDIX SERVICE CENTRES
| Service Centre | Postcode Areas | Telephone | Address |
| ABERDEEN | DD IV KW AB PH | 0224 696569 | Emaco Aftersales8 Cornhill Arcade,Cornhill Drive,Aberdeen AB2 5UT |
| NORTHERNREGION CENTRE | CA DL DH NE SR TSSK M BL OL BBLA FY PR WN CW CH LL L WA | 091-493-2025 or0325-3014000282-744621051 254 1724 | Emaco AftersalesPO Box 40 Preston RoadAycliffe Industrial Estate,Newton Aycliffe,Co. Durham DL5 6XL |
| BELFAST | BT | 0232 746591 | Emaco AftersalesUnit C3,Edenderry Industrial Estate,326 Crumlin Road,Belfast BT14 7EE |
| BIRMINGHAM | WR DY B WV TF ST SY WSGL HP NN OX SL RG | 021 358 7076 or021 358 50510993-704411 | Emaco Aftersales8 Lammermoor Ave,Great Barr,Birmingham B43 6ET |
| CARDIFF | CF HR LD NP SA | 0222 460131 | Emaco AftersalesGuardian Industrial Estate,Clydesmuir Road, Tremorfa,Cardiff CF2 2QS |
| GLASGOW | DG KA ML G PAKY EH TD FK | 041 647 4381031-557-8383 | Emaco Aftersales20 Cunningham Road,Clyde Estate, Rutherglen,Glasgow G73 1PP |
| LEEDS | S DN HU YO WF HX HD LS HG BD | 0532 608511 | Emaco Aftersales64-66 Cross Gates Road,Leeds LS15 7NN |
| LEICESTER | LE DE CV NG LN PE IP NR | 0533 515131 | Emaco Aftersales10-12 Buckminster Road,Leicester LE3 9AR |
| LONDONREGION CENTRE | RM CM SS CO IGE EC WC N NW W ENSE SM CR BR SWAL CB LU MK SG WD HA UB TW | 0268 694144081 443 3464081 658 9069081 965 9699 | Emaco Aftersales2-4 Sandhurst,King Road,Canvey Island SS8 0QY |
| SOUTHERNREGION CENTRE | BH DT PO SO SP KT GUBA BS SN TATQ EX TR PL | 0705 6674110272 2118760626 65909 | Emaco AftersalesLimberline Road, Hilsea,Portsmouth PO3 5JJ |
| TONBRIDGE | CT DA ME TNBN RH | 0732 3577220273-694341 | Emaco Aftersales61-63 High Street,Tonbridge TN9 1SD |
GUARANTEE
This guarantee is offered to you as an extra benefit and does not affect your legal rights.
Tricity Bendix products are carefully designed, manufactured, tested and inspected and in consequence we undertake to replace or repair any part found to be defective in material or workmanship, within one year of delivery to the original purchaser, free of charge.
The Company does not accept liability for defects arising from neglect, misuse, or accident. The interior lightbulb and glassware on refrigerators and larders are also excluded from the guarantee.
There are certain conditions which may invalidate this guarantee:
a) It is dependent upon the appliance being correctly installed and used in accordance with the Company's instructions under normal domestic conditions within the United Kingdom or the Republic of Ireland.
b) Service at all times must be carried out by a Tricity Bendix Representative or authorised agent.
c) This guarantee may be invalidated by unauthorised repair or modification of the appliance.
Proof of the date of purchase will be required before service under guarantee is provided. Addresses or telephone numbers for service requests as listed on page 18.
We must point out that this guarantee does not cover liability for loss of food or other contents, but would draw your attention to the insurance facilities described on the separate leaflet.
Important Notice
In line with our continuing policy of research and development, we reserve the right to alter models and specifications without prior notice.
This handbook is accurate at the date of printing, but will be superseded and should be disregarded if specifications or appearance are changed.
TRICITY BENDIX
we'll do the homework
TRICITY BENDIX, 99 OAKLEY ROAD, LUTON, BEDFORDSHIRE, LU4 9QQ.
A Division of Emaco Limited - Registered in England No. 176547 - Registered Office. 101 Oakley Road, Luton LU4 9RJ.
MODEL NO
BR 591 W
PART NO
2222 521 - 01
- IMPORTANT USER INFORMATION
- THESE WARNINGS ARE PROVIDED IN THE INTEREST OF SAFETY, YOU MUST READ THEM CAREFULLY BEFORE INSTALLING OR USING THE APPLIANCE.
- CONTENTS
- CONSERVATION
- In The Interests Of The Environment:
- When disposing of your old fridge, freezer or fridge/freezer:
- For Maximum Efficiency:
- SPECIFICATIONS
- INSTALLATION
- Reversing the door
- Door Reversal (Freezer Compartment)
- Mounting the cupboard door panel
- ELECTRICAL CONNECTIONS
- WARNING: THIS APPLIANCE MUST BE EARTHED.
- The manufacturer declines any liability should this safety measure not be observed.
- IMPORTANT
- GENERAL FEATURES
- USING YOUR REFRIGERATOR
- THE THERMOSTAT CONTROL KNOB
- DOOR SHELVES
- CABINET SHELVES
- FROZEN FOOD COMPARTMENT
- ICE MAKING
- THAWING
- Important points to remember ...
- Do...
- Do Not ...
- NOTE
- WARNING
- HELPFUL HINTS WHEN BUYING
- FOOD
- Do ...
- DEFROSTING
- The fridge compartment
- The freezer compartment
- \* Please note:
- HEALTH AND SAFETY GUIDELINES
- MAINTENANCE AND CLEANING
- Cleaning The Interior Cabinet
- Cleaning The Exterior Cabinet
- During periods when the appliance is not in use, please take the following precautions:
- Replacing the interior light bulb
- WHAT HAPPENS IF SOMETHING GOES WRONG?
- Rating Plate
- HELP US TO HELP YOU
- Service
- Customer care
- GUARANTEE
- Important Notice
- TRICITY BENDIX
Brand : Tricity Bendix
Model : BR591W
Category : Refrigerator