
Pacifier - Baby monitor BT - Free user manual and instructions
Find the device manual for free Pacifier BT in PDF.


| Product Type | Baby Monitor |
| Brand | BT |
| Model | Pacifier |
| Parent Unit Dimensions | 7.5 x 4.5 x 2 cm |
| Baby Unit Dimensions | 6.5 x 6.5 x 8 cm |
| Parent Unit Weight | 80 g |
| Baby Unit Weight | 100 g |
| Power Supply (Parent Unit) | Rechargeable Li-ion battery 3.7V 1000mAh |
| Power Supply (Baby Unit) | AC adapter 5V 1A |
| Range | Up to 300 m (open area) |
| Technology | Digital DECT |
| Display | 2.8-inch color LCD |
| Main Functions | Two-way talk, night vision, temperature sensor, lullabies, sound-activated LED |
| Maintenance & Cleaning | Clean with soft dry cloth; do not immerse in water |
| Safety Features | Low battery warning, out-of-range alarm, secure digital transmission |
| Spare Parts & Repairability | Replaceable battery; AC adapter available separately; other parts not user-serviceable |
| General Information | FCC and CE certified; operating temperature 0°C to 40°C |
Frequently Asked Questions - Pacifier BT
User questions about Pacifier BT
0 question about this device. Answer the ones you know or ask your own.
Ask a new question about this device
Download the instructions for your Baby monitor in PDF format for free! Find your manual Pacifier - BT and take your electronic device back in hand. On this page are published all the documents necessary for the use of your device. Pacifier by BT.
USER MANUAL Pacifier BT
BT Digital Baby Monitor & Pacifier
User Guide
BT

Bringing it all together


Welcome...
to your BT Digital Baby Monitor & Pacifier
- Digital sound quality with high definition sound (Hi-ds TM ) lets you hear your baby breathe, gurgle, snuffle or cry with complete clarity
- Wireless range of up to 300m outdoors and up to 50m indoors (in ideal conditions, where there is a clear line of sight between the units) – giving you the freedom to move around with clear reception and no interference from other baby monitors
- Out of range warning
- Link light provides continuous confidence that the Parent unit is receiving a signal from the Baby unit and will alert you if the link is lost
• 19 Songs or play your own music from the Baby unit - Talk Back feature lets you instantly reassure and calm your baby
- Adjustable nightlight brightness on Baby unit
• Lightshow with adjustable brightness on Baby unit
• Room temperature monitor
• Crying alert on Parent unit
• Feed timer and alert on Parent unit - Torch on Parent unit
This User Guide provides you with all the information you need to get the most from your BT Digital Baby Monitor & Pacifier.
Please read this guide carefully and keep it for future reference.
Need help?
If you have any problems setting up or using your BT Digital Baby Monitor & Pacifier (or would like any additional or replacement batteries), call our free Helpline on 0808 100 6554*.
Our dedicated advisors are more likely to be able to help you than the retailer where you made your purchase.
Alternatively, you may find the answer in the 'Help' section at the back of this guide.
Additional answers to Frequently Asked Questions are also available from www.bt.com/producthelp
* Calls made from within the UK mainland network are free. Mobile and international call costs may vary.
Got everything?
- Baby unit
- Parent unit
- 2 x AA NiMH 1300mAh rechargeable batteries for Parent unit (pre-installed)
- Parent unit charger
• 2 x power adapters (item code 057711)
• 3.5mm aux audio lead
• Travel bag (located underneath top layer)
Important safety information
- Your BT Digital Baby Monitor & Pacifier is designed to be an aid and should not be used as a substitute for responsible and proper adult supervision.
- Make sure the Baby unit, Parent unit and mains adapter cables are kept out of reach of your baby – at least one metre away.
- Never place the Baby unit inside your baby's cot, bed or playpen.
- Never cover your Parent or Baby units (e.g. with clothes, towels or blankets).
- Never use or place your Parent or Baby units in moist places or near water.
- If travelling abroad, make sure that the voltage shown on the mains power adapter corresponds to the local mains power before connecting to the power supply.
- There is a risk of explosion if the batteries are replaced by an incorrect type.
- Always dispose of batteries in accordance with applicable waste disposal regulations, never in your household rubbish.
- During continual use the Baby unit and Parent unit power adapters may become warm to the touch. This is normal and is not something to be concerned about.
- In the event of a power failure, when the power is restored all your settings will remain unchanged.
In this guide
Important safety information ......4
Your BT Digital Baby Monitor & Pacifier 7
Parent unit ....7
Parent unit display icons ....8
Parent unit charger 9
Baby unit 10
Back of Baby unit ......11
Parent unit menu map......12
Setting up 13
Parent unit ....13
Baby unit 15
Switch on and link the Parent and Baby units ....15
Using your BT Digital Baby Monitor & Pacifier ....17
Switch the Baby unit on .....17
Switch the Parent unit on ......17
Switch the Baby unit off ......17
Switch the Parent unit off ......18
Baby sound level LED indicators .....18
Adjust the loudspeaker volume .....19
Mute All feature – Parent unit only ....20
Mute Low – Parent unit only ......20
Talk Back 21
Find 22
Torch 22
The Parent unit menu ......23
Lightshow 24
Switch lightshow on/off using the Baby unit ....24
Switch lightshow on/off using the Parent unit ....24
Select the lightshow brightness level using the Parent unit ......25
Set the lightshow timer .....25
Adjusting the lightshow angle and focus 25
Nightlight 26
Switch nightlight on/off using the Baby unit ....26
Switch nightlight on/off using the Parent unit ....26
Select the nightlight brightness level using the Parent unit ......27
Set the nightlight timer .....27
Play music from the Baby unit .....28
Turn music on/off using the Baby unit ....28
Turn music on/off using the Parent unit ....29
Choose a song to play using the Parent unit 29
Connect an auxiliary player ....30
Set a play time for music ....30
Feed Timer ....31
Set the feed timer countdown duration ....31
Start the feed timer countdown .....32
Cancel the feed timer countdown .....32
Switch timer repeat option on or off ..33
Select the type of feed timer alert .....33
Temperature monitor ....34
Temperature monitor indicators .....34
Select the type of temperature alert ..35
Temperature alert options ......35
Crying alert 36
Select the type of crying alert ......36
Backlight 37
List of tones ....37
Reset the units ......38
Reset the Parent unit ....38
Reset the Baby unit ....38
Help 39
General information 41
Cleaning 41
Guarantee 41
Product disposal instructions .....42
R&TTE 43
Declaration of Conformance .....43
User Guide formats ......43
Your BT Digital Baby Monitor & Pacifier
Parent unit
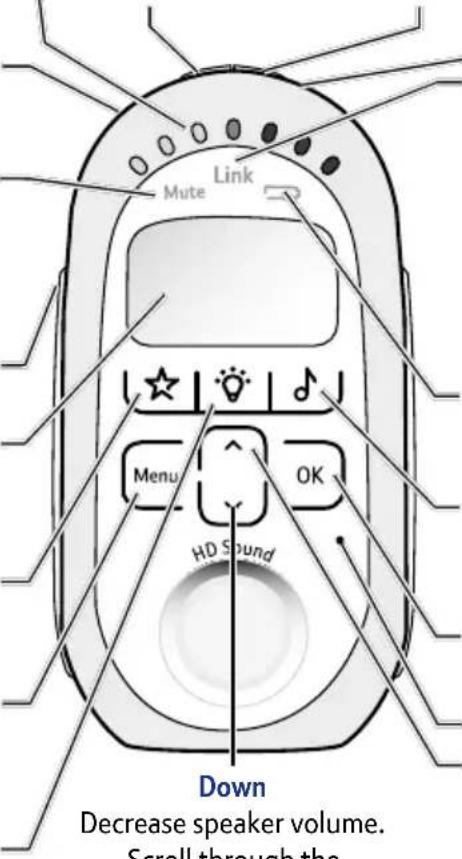
Baby sound level LEDs Indicates the level of received sound. The LEDs will light up progressively as the sound increases. See page 18 for further information.
Torch (on back of unit) Press to switch the torch feature on and off.
Mute LED
Red indicates that Mute All has been switched on. Amber indicates that Mute Low has been switched on.
Talk (on side of unit)
Press to talk to your baby.
LCD Display
Power saving backlight turns on when you press any button and then switches off after 15 seconds.

Press to switch the Lightshow on the Baby unit on or off.
Menu
Press to open the menu. Press and hold to exit the menu and return to the idle screen.

Press to switch the Nightlight on the Baby unit on or off.
Mute Low
(on top of unit)
Press to toggle the Baby unit microphone sensitivity between normal and Mute Low.
Mute All
(on top of unit)
Press to toggle the Parent unit receive volume between on and off.
Power on/off
(on top of unit)
Press and hold to switch the power on or off.
Link indicator
Steady green indicates that the Baby and Parent units are linked. Flashes green if no link established for 30 seconds. Flashes red if no link established after 30 seconds. Also flashes green when the Talk button is pressed on the Parent unit to initiate parental talk back.
Battery status LED
Red light indicates the batteries are low and need re-charging.

Press to switch the music on the Baby unit on or off.
OK
Press to confirm the menu option displayed.
Microphone
Up
Increase speaker volume.
Scroll through the menu options.
Parent unit display icons
Menu options:
Lightshow Nightlight Music Feed Timer Setup
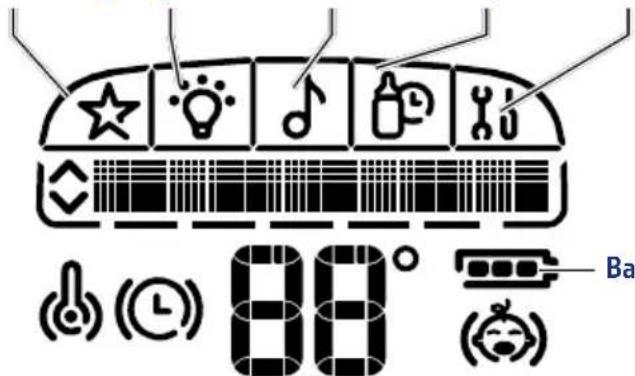
Battery status

Temperature alert (vibrate on)

Temperature alert (vibrate off)

Displays the temperature as measured at the Baby unit

Crying alert (vibrate on)

Crying alert (vibrate off)

Feed timer on (vibrate on)

Feed timer on (vibrate off)

Full charge (75-100%)

Medium charge (51-74%)

Low charge (25-50%)

Empty (8-24%)

Flashing (0-7%). Typically you will be able to use your Parent unit for at least one hour after the battery icon starts to flash.

Icon will scroll when charging
Indicates when you can scroll up or down through the menu options
Parent unit charger
Front
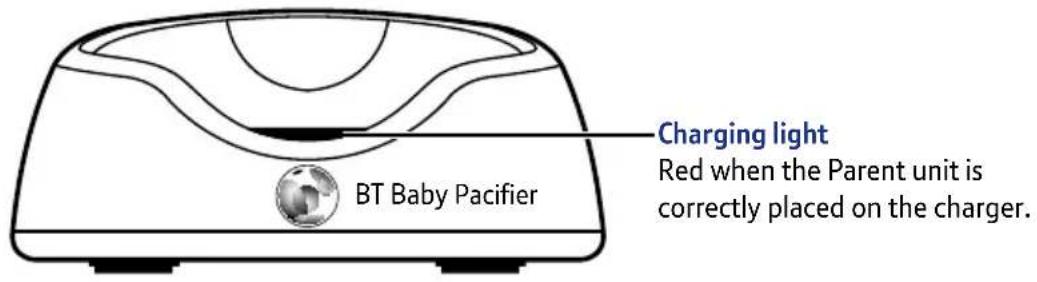
Back

Baby unit
Nightlight Press to switch the Nightlight on or off. Lightshow Press to switch the Lightshow on or off. Microphone Power on/off Press and hold to switch the power on or off. Find (on side of unit) Press to emit an alert beep from the Parent unit- useful for finding the Parent unit if you've misplaced it. Nightlight Illuminates around the base.

Temperature sensor
Make sure the sensor is placed with clear space around it and not in contact with any surfaces to ensure it works effectively.
Music
Press to switch music on at the Baby unit (the music and duration will be as last set at the Parent unit). Press again to switch the music off.
Volume +/-
Increase or decrease the loudspeaker volume for playing music or for parental talk back.
Link indicator
Steady green indicates that the Baby and Parent units are linked. Flashes green if no link established for 30 seconds. Flashes red if no link established after 30 seconds. Also flashes green when the Talk button is pressed on the Parent unit to initiate parental talk back.
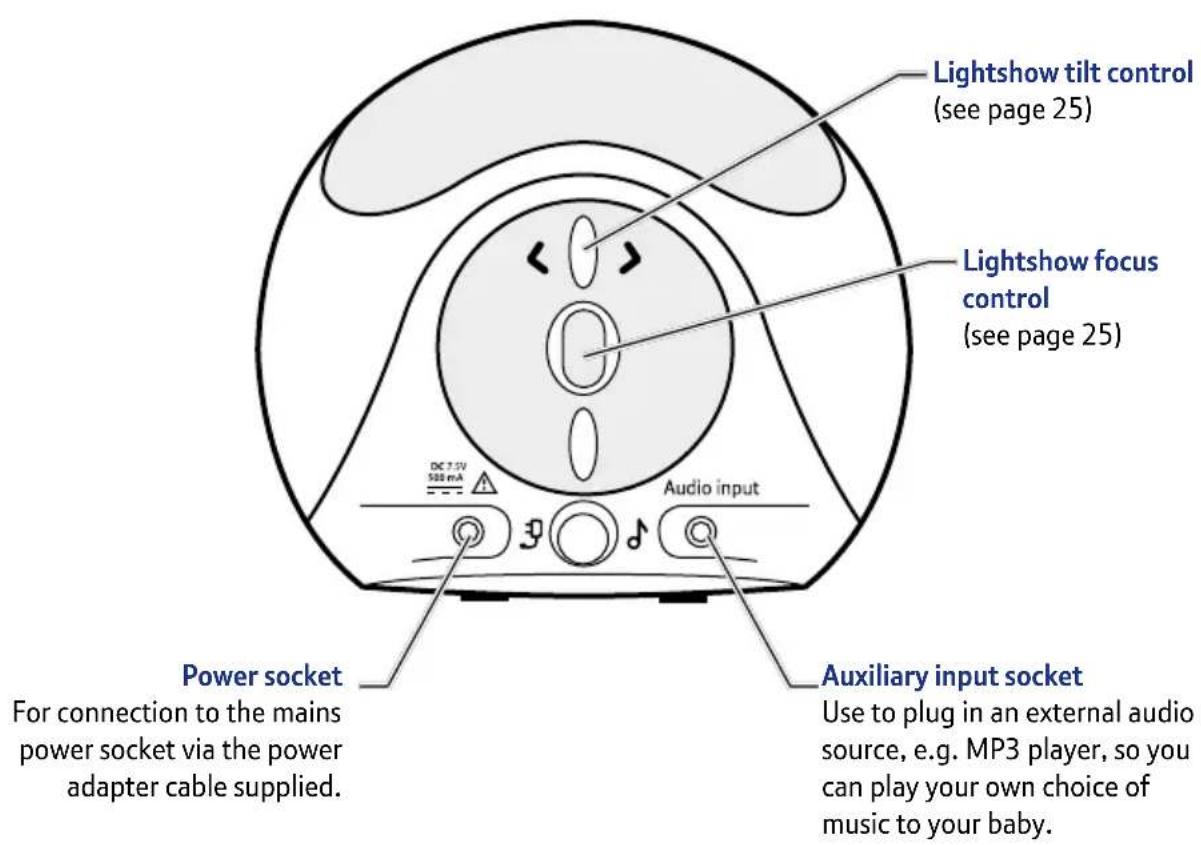
Back of Baby unit
![graph TD A["Menu"] --> B["Lightshow"] A --> C["Nightlight"] A --> D["Music"] A --> E["Feed Timer"] A --> F["Setup"] B --> G["Turn (On/Off)?"] B --> H["Brightness"] B --> I["Timer"] G --> J["High Medium Low"] G --> K["5 min 10 min 15 min Constant"] H --> L["Turn (On/Off)?"] H --> M["Brightness"] H --…](/content/2026/05/1084714/images/67e8eddc7de4e7723465627673989d9137e4ccb7d09e5d142556bf808db8a3a6.jpg)
If you experience any problems, please call the Helpline on Freephone 0808 100 6554* or visit www.bt.com/producthelp
Parent unit
- Plug one of the power adapter cables into the socket marked 3 on the back of the Parent unit charger and plug the other end into the mains power wall socket and switch the power on.

- Activate the batteries by pulling the plastic tab away from the back of the Parent unit.

WARNING!
Only use the power adapters supplied. Using incorrect power adapters may permanently damage your product.
Battery performance
Rechargeable batteries in the Parent unit will last approximately 20 hours in normal use. Please note that new batteries do not reach full capacity until they have been in normal use for several days.
The charge capacity of rechargeable batteries will reduce with time as they wear out, so reducing the performance time of the Parent unit. Eventually they will need to be replaced. New batteries can be obtained from the BT Digital Baby Monitor & Pacifier Helpline 0808 100 6554*.
The Parent unit rechargeable batteries will lose charge over a period of time, even if switched off.
Battery low warning – Parent unit
When the batteries are low – approximately within 1 hour of running out – the Parent unit will emit a low battery alert, the low battery indicator will turn red, the display will show Low Battery and the icon will flash. Place the Parent unit back on the charger to charge the batteries. To speed up the charging process turn the Parent unit off when charging if it's not being used.
- Place the Parent unit into the charger. The red charging light will illuminate on the charger and the battery icon will start scrolling on the Parent until display to indicate that the batteries are being charged.

Leave the batteries to charge for 16 hours (if turned off) or 24 hours (if turned on) to reach maximum charge. When the batteries are fully charged the battery icon on the display will show a full charge 📄.
Baby unit
- Plug the remaining power adapter cable into the socket marked 📋 on the back of the Baby unit and plug the other end into the mains power and switch on.

Switch on and link the Parent and Baby units
-
Press and hold the ⏻ button on the Baby unit until the nightlight briefly illuminates and the green Link indicator flashes.
-
Press and hold the ⏻ button on the Parent unit until all the LEDs on the unit briefly illuminate. The green Link indicator will flash and the display will show I'm Linking.
WARNING
Never use non-rechargeable batteries in the Parent unit. Only use the recommended type - 2 x AA NiMH 1300mAh batteries. Using other types could permanently damage the unit. Charge the batteries as instructed in this user guide. The Parent unit can still be used when it is in the charger.
Removing the batteries
If you ever need to remove the batteries, simply slide open the battery compartment cover and use the ribbon to eject the batteries.
Positioning your units
The Baby unit should ideally be within 1m-2m of your baby for best performance.
If you place the Parent and Baby units too close together you will hear a high pitched noise, this is normal. The units are designed to be located at a distance from one another, e.g. in separate rooms.
Once the units are linked the green Link indicator on the Parent unit and the Baby unit will stop flashing and remain a steady green. The units are now ready to use.
Important:
The link confirmation between the two units is vital for use so they can communicate. If the link between the units is broken at any time, the Link indicators on both units will flash green as they try to search for each other. The Parent unit displays I'm Linking... After 30 seconds, if the link is still broken, the Baby and Parent units Link indicators will flash red. The Parent unit display will show No Link and you will hear an alert signal.
If the link is broken:
- check that the mains power is plugged in and switched on at the Baby unit
- check that both units are switched on
- check that the batteries are charged in the Parent unit
- check that the Parent and Baby units are within range of each other (in ideal conditions the range is up to 300 metres outdoors and 50m indoors)
Using your BT Digital Baby Monitor & Pacifier
Switching on/off
Switch the Baby unit on
- Press and hold the ⏻ button until the nightlight briefly illuminates and the green Link indicator flashes.
Once linked the green Link indicator will remain on.
Switch the Parent unit on
- Press and hold the ⏻ button on the Parent unit until all the LEDs briefly illuminate. The green Link indicator will flash and the display will show I'm Linking.
Once the units are linked the green Link indicators on the Parent and Baby units will stop flashing and remain a steady green. The units are now ready to use.
Switch the Baby unit off
- Press and hold the ⏻ button on the Baby unit. The green Link indicator will switch off.
Switch the Parent unit off
- Press and hold the ⏻ button on the Parent unit until an audible alert sounds. The green Link indicator will switch off and the display will go blank.
Baby sound level LED indicators
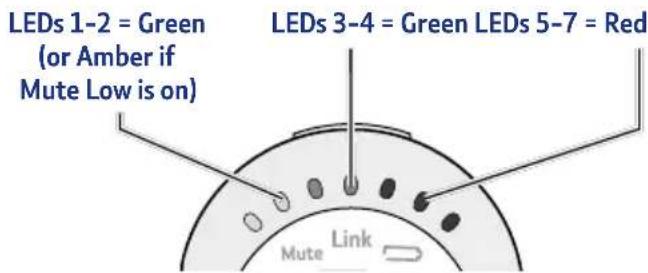
The seven LEDs across the top of the Parent unit light up to indicate the level of sound being received from the Baby unit. The LEDs light up progressively as the sound increases.
LEDs 1-2 light up Green (or Amber if Mute Low is on, see page 18) when sounds of 57dB and 63dB are received.
LEDs 3-4 light up Green when sounds of 69dB and 75dB are received.
LEDs 5-7 light up Red when sounds of 83dB, 89dB or 95dB are received.
Equivalent sound
level examples:
60dB-70dB =
normal conversation
75dB = loud conversation
83-95dB = loud traffic noise
Adjust the loudspeaker volume
At the Parent unit:
- Press ▲ or ▼ select the required level. The first press will show the current setting. There are 5 volume levels and off (Mute). The volume level will be shown on the display at each press, e.g. Level 3 is shown as Volume ■■■ If you wish to switch the volume off, keep pressing ▼ until the display shows Volume Off. The Mute All indicator will illuminate.
At the Baby unit:
There are 5 volume settings.
-
When Music is being played or Talk back is in progress from the Parent unit, press the Vol + or Vol - button to adjust the volume.
-
If no music or Talk back is in use, pressing the 📋 or 📋 buttons will adjust the volume and a beep will sound at the appropriate volume level set.
If you try and set the volume higher or lower than the 5 settings available on either unit you will hear an error tone.
Setting the Parent unit to Volume Off is the equivalent of switching the Mute All feature on. See page 20 for more information on Mute All.
The default loudspeaker volume on both units is Level 3.
Be careful not to accidentally switch the torch feature on as Mute All is automatically activated when this is done.
If the Talk or Find buttons are pressed whilst Mute All or Mute Low has been set then Mute All or Low will be switched off and the loudspeaker volume will return to Level 3 automatically.
Mute All feature – Parent unit only
The Mute All feature prevents any sound coming from the Parent unit loudspeaker. With Mute All on you can still monitor your baby using the Baby sound level LED indicators (page 18) and the Crying Alert (page 36).
-
To switch Mute All on, press the Mute All button located on the top of the unit. The Mute indicator will illuminated red.
-
To switch Mute All off, press the Mute All button again. The red Mute indicator will switch off.
Mute Low – Parent unit only
For discreet operation when you do not wish to hear any low level sounds, you can still monitor your baby using the Baby sound level LED indicators (page 18). When Mute Low is switched on, any sounds from the Baby unit to the Parent unit will be muted unless a sound is made above a set level. The set level are sounds that are louder than the first two green LEDs would register, as described in ‘Baby sound level LED indicators on page 18.
If the Parent unit receives sound up to the level of the first two LEDs then they will turn amber but no sound will be heard, if the sound rises above this level then the unit will un-mute so you can hear the sounds.
-
To switch Mute Low on, press the Mute Low button located on the top of the Parent unit. The Mute indicator will turn amber.
-
To switch Mute Low off, press the Mute Low button again. The amber indicator will switch off.
Talk Back
You can use the Parent unit Talk Back feature as a one way intercom to comfort and reassure your baby. By speaking into the Parent unit your baby will hear your voice from the Baby unit. Please note that when using Talk Back you will not be able to hear your baby until you release the Talk button.
- Press and hold down the 📂 talk button on the Parent unit to speak to your baby.
Whilst the Talk button is depressed the display will show Talk and the green Link indicators will flash on both units.
Once the Mute Low sound threshold has been exceeded, baby sounds will be able to be heard for a further six seconds even if they do not reach the Mute Low threshold.
You will be able to activate Talk Back mode even if other functions have been activated at the Baby unit like Music playback or Nightlight on.
Press 🧑 or 🧑 on the Baby unit to adjust the Talk Back volume level of the Baby unit loudspeaker.
Do not press the Talk button when the Baby unit and Parent unit are positioned in the same room. High-pitch noise will be generated if the Talk button is pressed when Baby unit and Parent unit are close to each other or within 3 metres distance.
When using Talk Back, hold the Parent unit approximately 30cm in front of your mouth when talking to baby.
Find
You can press the Find on on the Baby unit to make the Parent unit sound an alert to help you find it if it's been misplaced. If the Parent unit loudspeaker volume had been Muted (or set to volume off), the volume level will be reset to the default setting of Level 3.
- Press Find on the Baby unit. The paging alert will sound at the Parent unit and the display will show Here I am!
- To stop the alert, press any button on the Parent unit or press the Find button again on the Baby unit. If no button is pressed after 2 minutes then the alert will automatically stop.
Torch
The Parent unit has a high intensity white LED torch that can be used when the Parent unit is switched on or off.
- Press the Torch button located on the back of the Parent unit to switch the Torch on and off.
When the Torch is switched on it will automatically switch Mute All on as well. If you then press the Button Mute will be disabled and the Torch will remain on. When the Torch is switched off, the previous Mute setting will be restored (No Mute, Mute All or Mute Low).
The Parent unit menu
The Meru button on the Parent unit can be used to select and change settings on the Baby unit without having to risk disturbing your baby. You can access the settings by:
-
Press Menu then press 🔊 to √ll through the menu options shown on the top of the display. Press OK when the option you want is displayed.
-
The first sub menu option will be displayed, press to scroll through the options. The (arrows) indicate when you can scroll either up or down. Press OK when the option you want is displayed.
-
To exit the menu at any time, press Menu briefly and step back one menu level at a time, or press and hold Menu to return to the idle screen. If no buttons are pressed for 10 seconds whilst accessing the menu, the display will return to idle and any unsaved changes will be lost.
The Baby unit must be switched on for the Lightshow to work but need not be linked to the Parent unit.
You can also switch the Lightshow on/off using the Parent unit menu using the Lightshow menu option.
Lightshow
The Baby unit has a Lightshow feature that projects a starry image onto the ceiling of your baby's room. There are 3 brightness levels to choose from and you can set a period of time for the Lightshow to illuminate using the Parent unit menu.
Switch lightshow on/off using the Baby unit
- To switch on, press the ☆ button. The brightness level and period of time for the lightshow to illuminate for will be as last set using the Parent unit.
- To switch off, press the ☆ button.
Switch lightshow on/off using the Parent unit
- To switch on, press the ☆ button. The display will briefly show Lightshow On and the Baby unit lightshow will turn on.
- To switch off, press the ☆ button. The display will briefly show Lightshow Off and the lightshow will turn off.
Select the lightshow brightness level using the Parent unit
-
Press Menu. Lightshow is displayed, press ok
-
Turn On? is displayed, press ▼ to display Brightness and press OK.
-
Press ▲ or ▼ display either Low, Medium or High and press ok to select. The display will show Saved briefly and you'll hear a confirmation tone.
Set the lightshow timer
-
Press Menu. Lightshow is displayed, press ok
-
Turn On? is displayed, press √ until Timer is displayed and press OK.
-
Press ▲ or ▼ display either 5 min, 10 min, 15 min or Constant and press ok to select. The display will show Saved briefly and you'll hear a confirmation tone.
Adjusting the lightshow angle and focus
Use the manual controls on the Baby unit (page 11) to tilt the lightshow to one side of the current position.
The focus wheel should be used to obtain a clear picture on the wall or ceiling.
The default setting is Medium.
The default setting is Constant.
The Baby unit must be switched on for the nightlight to work, but need not be linked to the Parent unit.
To adjust the brightness level or set the Nightlight timer, see page 27.
You can also switch the Nightlight on/off using the Parent unit menu using the Nightlight menu option.
Nightlight
You can set a comforting nightlight on the Baby unit. There are 3 brightness levels to choose from and you can set a period of time for the nightlight to illuminate.
Switch nightlight on/off using the Baby unit
- To switch on, press the 🎨 button.
- To switch off, press the 🎨 button again.
Switch nightlight on/off using the Parent unit
-
To switch on, press the 🎨 button. The display will briefly show Light On and the Baby unit nightlight will illuminate.
-
To switch off, press the 🎨 button. The display will briefly show Light Off and the nightlight will turn off.
Select the nightlight brightness level using the Parent unit
-
Press Menu. Lightshow is displayed, press display Nightlight and press OK.
-
Turn On? is displayed, press ▼ to display Brightness and press OK.
-
Press ▲ or ▼ display either Low, Medium or High and press OK to select. The display will show Saved briefly and you'll hear a confirmation tone.
Set the nightlight timer
-
Press Menu. Lightshow is displayed, press display Nightlight and press OK.
-
Turn On? is displayed, press √ until Timer is displayed and press OK.
-
Press ▲ or ▼ display either 5 min, 10 min, 15 min or Constant and press OK to select. The display will show Saved briefly and you'll hear a confirmation tone.
The default setting is Medium.
The default setting is Constant.
The default music setting is Lullaby, Play All songs Constantly.
After power-on, there may be a delay of a few seconds before the Baby unit is ready to play music.
Adjust the volume of the music using the + or - buttons on the Baby unit.
If music is played at greater than volume 3, the Crying Alert may activate if Mute All is used.
Play music from the Baby unit
The Baby unit has 19 songs that can be played to gently soothe your baby. The songs have been grouped into 3 categories: Lullabies, Nature and Classical.
You can select one song to play repeatedly or select the Play All option for a medley of the songs from your selected category. The songs can be set to play in a loop for 5, 10 or 15 minutes or you can leave them playing constantly.
You can also plug in an external audio source like an MP3 or CD player and play music or audio books of your choice to your baby. The auxiliary port is located on the back of the Baby unit.
Turn music on/off using the Baby unit
-
To turn the music on, press the 🎧 button. The most recently selected song will start playing at the time period last selected using the Parent unit.
-
To turn the music off, press the 🎧 button.
Turn music on/off using the Parent unit
- To turn the music on, press the 📟 button. The display will briefly show Music On and music will start playing from the Baby unit.
- To turn the music off, press the 📂 button. The display will briefly show Music Off and the music will turn off.
Choose a song to play using the Parent unit
- Press Menu. Lightshow is displayed, press will Music is displayed and press OK.
- Play? is displayed, press ▼ to display Choose Songs and press OK.
- Use the 🔊 or 🔍 buttons to display the category of song you want: Lullabies, Nature or Classical or External if you want to play music from your own audio source and press OK to select.
- Use the 🔒 and buttons to scroll through the individual song titles and press OK when the option you want is displayed. Or, you can select Play All, to play a medley of the songs from your selected category. The display will show Saved briefly and you'll hear a confirmation tone.
You can also switch the music on/off using the Parent unit menu using the Music menu option.
Connect an auxiliary player
- Plug your player into the auxiliary input socket on the back of the Baby unit using the aux audio lead supplied.
- The music selection will immediately change to External but it won't start playing until you switch the music feature on.
Set a play time for music
-
Press Menu. Lightshow is displayed, press 📋 til Music is displayed and press OK
-
Play? is displayed, press will Timer is displayed and press ok.
-
Use the ▲ or ▼ buttons to scroll through the options: 5 min, 10 min, 15 min or Constant and press ok when the option you want is displayed. The display will show Saved briefly and you'll hear a confirmation tone.
Feed Timer
You can set a Feed Timer on the Parent unit to act as a countdown timer that will alert you when you next need to feed your baby. You have a choice of alert types (beep, beep & vibe and vibrate) and you can set the timer to repeat itself once the alert sounds.
Set the feed timer countdown duration
- Press Menu. Lightshow is displayed, press will Feed Timer is displayed and press OK.
- Start ? is displayed, press ▼ to display Duration and press OK.
- The display will show 02h:00m (or the currently set timer). Use the ▲ and ▼ buttons to select the first digit and press OK. Repeat this procedure for each digit and press OK. The display will show Saved and you'll hear a confirmation beep.
The timer can be set from 1 minute to 99 hours 59 minutes.
The feed timer default countdown duration is set at 02:00 (2 hours).
If the Parent unit is switched off, the feed timer countdown will be cancelled and you will need to start it again when the unit is switched back on. The duration, alert type and repeat settings will still be retained.
Start the feed timer countdown
- Press Menu. Lightshow is displayed, press 📋 til Feed Timer is displayed and press OK.
- Start? is displayed, press OK. The display will briefly show Timer On and then the timer will be shown counting down the seconds from the time you set.
When the timer has finished counting down to 📄: 📄 you will hear an alert beep and the timer and 📄 icon will flash. Press any button on the Parent unit to stop the alert. If you do not stop the alert it will automatically stop after 2 minutes (or it will start again if Timer Repeat has been set to On).
Cancel the feed timer countdown
-
Press Menu. Lightshow is displayed, press 📋 til Feed Timer is displayed and press OK.
-
Stop? is displayed, press ok. The display will briefly show Timer Off, the timer will then disappear and the display will return to idle.
Switch timer repeat option on or off
-
Press Menu. Lightshow is displayed, press will Feed Timer is displayed and press OK.
-
Start? is displayed, press √ until Timer Repeat is displayed and press OK.
-
Use the 🔊 and Buttons to display either Repeat On or Repeat Off and press OK to select. The display will show Saved and you will hear a confirmation beep. When Repeat On has been set, the feed timer countdown will start again once the alert has sounded if it is not switched off.
Select the type of feed timer alert
-
Press Menu. Lightshow is displayed, press until Feed Timer is displayed and press OK.
-
Start? is displayed, press √ until Timer Alert is displayed and press OK.
-
Use the 🔊 and Buttons to display either Beer, Beer&Vibe or Vibrate and press OK to select. The display will show Saved and you will hear a confirmation beep.
The default setting is Repeat On.
Feed timer alert options:
Beer = Parent unit will emit an alert beep only.
Beer&Vibe = Parent unit will emit an alert beep and vibrate.
Vibrate = Parent unit will vibrate only.
The default setting is
Beer&Vibrate.
IMPORTANT!
The temperature sensor used in this BT Digital Baby Monitor & Pacifier is intended as a guide, to provide parents with an indication of the room temperature in which the Baby unit has been placed.
It is designed to operate within an approximate tolerance of +/- 1°C and is not intended to be as accurate as some medical devices. Please note that your own temperature reference e.g. your central heating thermostat may not be as accurate, possibly due to tolerances and positioning of the thermostat in relation to the Baby Monitor & Pacifier sensor.
Healthcare professionals advise that the ideal temperature for your baby's room is between 16°C and 20°C .
Your Parent unit has a built-in mechanism to prevent repeated annoying audible alerts if the room temperature hovers around an alerting threshold.
Temperature monitor
There is a temperature sensor on the Baby unit to constantly monitor the temperature in your baby's room and you'll be alerted if it gets too hot, too warm or too cold by the colour of the Baby unit nightlight changing and the Parent unit will vibrate, sound an alert beep and display a message on the screen. The alerts on the Parent unit can be changed, see page 35. The temperature will be constantly shown on the Parent unit display in ° C. To stop an alert beep, press any button on the Parent unit.
Temperature monitor indicators
| Temperature On the Baby unit On the Parent unit | ||
| Below 16°C Nightlightglows Blue | Display showsToo Cold | |
| 16 – 20°C Nightlightglows Yellow | ||
| 21 – 24°C Nightlightglows Orange | Display showsToo Warm | |
| Over 24°C Nightlightglows Red | Display showsToo Hot | |
Select the type of temperature alert
- Press Menu. Lightshow is displayed, press will Setup is displayed and press ok.
- Crying Alert is displayed, press √ until Temp Alert is displayed and press OK.
- Use the 🔊 and buttons to display either Beef, Beef&Vibe, Vibrate, Screen Only or Off and press OK to select. The display will show Saved and you will hear a confirmation beep. To stop an alert beep, press any button on the Parent unit.
Temperature alert options
Beep = Parent unit will beep. 🎨 icon will flash. Beep&Vibe = Parent unit will beep and vibrate. icon will flash.
Vibrate = Parent unit will vibrate. 🔊 icon will flash.
Screen Only = 🔊 icon will flash.
Off = No alerts. 🙏 icon will not be displayed.
All of the above alerts will also display the appropriate message: Too Hot or Too Cold.
Pre-set temperature alert range
The Baby unit comes with pre-set maximum and minimum temperatures, as recommended by the UK Department of Health as part of the recommendations to reduce the risk of cot death. If the temperature falls below or goes above the setting an alert will sound on the Parent unit and the display will show Too Cold or Too Hot as appropriate. If it's too hot, the Baby unit nightlight will turn red and if too cold it will turn blue. The temperature alert pre-set temperatures are 15°C (and below) and 25°C (and above).
Alerts will be repeated if the temperature creeps by 2° C into an alerting range.
The default setting is Beer&Vibrate.
Crying alert options
Beef = Parent unit will beep, Crying Alert will be displayed and icon will flash.
Beer&Vibe = Parent unit will beep and vibrate. Cryins Alert will be displayed and when will flash.
Vibrate = Parent unit will vibrate only (no alert beep will sound). Crying Alert will be displayed and the user will flash.
Screen Only = Crying Alert will be displayed and the icon will flash.
The default setting is Beep&Vibrate.
The Crying Alert is a ‘user alert’ as described on page 37.
Crying alert
The crying alert will only be activated if Mute All has been switched on (or if the Parent unit volume has been switched to volume off), see page 20 for information on the Mute All feature.
With Mute All switched on, if your baby starts to cry you will not be able to hear the cries, but if the cries sound above a certain level i.e. if they reach 83dBA, which is the 1st red Baby sound level LED, then the Parent unit will activate the crying alert. The default crying alert is for the Parent unit to vibrate and emit an audible beep but you can select a different alert if you want to.
Select the type of crying alert
- Press Menu. Lightshow is displayed, press 📋 til Setup is displayed and press OK.
- Crying Alert is displayed, press OK
- Use the 📤 and 🏠 buttons to display either Beer, Beer&Vibe, Vibrate or Screen Only and press OK to select. The display will show Saved and you will hear a confirmation beep. To stop an alert beep, press any button on the Parent unit.
Backlight
You can select whether or not the LCD backlight comes on when an alert is activated. When the backlight comes on it will stay on for 15 seconds. The default setting is On.
-
Press Menu. Lightshow is displayed, press until Setup is displayed and press OK.
-
Crying Alert is displayed, press until Backlight is displayed and press ok.
-
Use the 🔊 and 🔒 buttons to display either On w alerts or Off w alerts and press OK to select. The display will show Saved and you will hear a confirmation beep.
List of tones
Your Baby Monitor & Pacifier unit can produce various tones. They have the following meaning:
| Tone Meaning | |
| Single tone Confirmation tone e.g. setting saved. | |
| Double tone (fast) Error tone e.g. max volume reached when adjusting volume. | |
| Double tone (slow) User alert e.g. crying alert, paging alert etc. | |
| Triple tone (fast) System alert e.g. link lost, battery low etc. |
Resetting the units is only advisable if you are experiencing difficulties with your product. It is a useful feature that ensures your Baby Monitor is returned to its new “out of the box” settings.
User Alert tones can be silenced by pressing any button on the Parent unit.
System Alerts can be silenced for a 5 minute period by pressing any button on the Parent unit.
Reset the units
Resetting either units will return the settings at that unit back to its default settings.
Reset the Parent unit
- Within 3 seconds of the Parent unit being switched on, press and hold the 🔗 button for at least 10 seconds. The display will show Reset for 2 seconds during the reset and then you will hear a confirmation beep once the reset has been performed.
Reset the Baby unit
- Within 3 seconds of the Baby unit being switched on, press the 🎨 button for at least 10 seconds. You will hear a confirmation beep once the reset has been performed.
Helpline
If you have any problems using your BT Digital Baby Monitor & Pacifier, call 0808 100 6554*.
Link light does not come on
- Check that both the Baby and Parent units are switched on.
- Check that the batteries in the Parent unit are correctly installed and that they are charged.
- Check that the mains power is plugged in and switched on at the Baby unit.
- Check that the units are within range of each other.
Link light is flashing green
- If you have pressed 📂 to use the Talk Back feature, the Link light will flash to indicate one-way communication between the units.
-
The units are searching for a communication link.
-
Check units are within range of one another.
- Check both units are turned on.
Link light is red
- The link between your units is broken. You will also hear an alert on the Parent unit to let you know there is no communication between the units. If this happens, check that the mains power (or batteries) is correctly connected and that the units are within range of one another. See page 15 for instructions on linking the units.
Battery low on Parent unit
- Put the Parent unit back on the charger to charge.
- Place Parent unit back on the charger as frequently as possible or ideally leave it on the charger to ensure the batteries remain charged.
- To shorten the charging time you can turn the Parent unit off if it is not being used while it is charging.
Parent unit remains silent or very quiet
- You may have set the volume too low, see page 19 to increase the volume.
- You may have switched a Mute feature on, see pages 20-21.
You can hear a high pitched noise
- The units might be too close to each other.
- The volume setting might be too high, see page 19.
Talk back feature is not working
- Check that the volume is loud enough at the Baby unit, see page 19.
- Check the units are linked, see page 15.
Cleaning
Both units have splash resistant grilles and casing. To clean, wipe with a damp cloth.
Guarantee
Your BT Digital Baby Monitor & Pacifier is guaranteed for a period of 12 months from the date of purchase.
Subject to the terms listed below, the guarantee will provide for the repair of, or at BT's or its agent's discretion the option to replace the BT Digital Baby Monitor & Pacifier or any component thereof, which is identified as faulty or below standard, or as a result of inferior workmanship of materials. Products over 28 days old from the date of purchase may be replaced with a refurbished or repaired product.
The conditions of this guarantee are:
- The guarantee shall only apply to defects that occur within the 12 month guarantee period.
• Proof of purchase is required. -
The equipment is returned to BT or its agent as instructed.
-
This guarantee does not cover the batteries and any faults or defects caused by accidents, misuse, fair wear and tear, neglect, tampering with the equipment, or any attempt at adjustment or repair other than through approved agents.
- This guarantee does not affect your statutory rights.
Within the 12 month guarantee period
Prior to returning your product, please read the Help section beginning on page 39 or contact the BT Digital Baby Monitor & Pacifier Helpline on 0808 100 6554* for assistance. Additional answers to Frequently Asked Questions are available from www.bt.com/producthelp
In the unlikely event of a defect occurring, the Helpdesk will issue a Fault Reference Authorisation (FRA) number and instructions for replacement or repair. Please note you will need the FRA number before returning the product. This does not affect your statutory rights.
Outside of the 12 month guarantee period:
If your product needs repair after the guarantee period has ended or if you require technical assistance outside of the 12 month guarantee period, please call BT's approved technical support agent, Discount Communications Ltd on 0800 980 8999.
Returning your product
If the Helpline is unable to remedy your problem they will issue a Fault Reference Authorisation number and ask you to return the product to your original place of purchase. Where possible, pack the product in its original packaging. Please remember to include all parts, including the power supply adapters and the original batteries.
For guarantee purposes proof of purchase is required so please keep your receipt.
Product disposal instructions
The symbol shown here and on the product means that the product is classed as Electrical or Electronic Equipment and should not be disposed with other household or commercial waste at the end of its working life.

The Waste of Electrical and Electronic Equipment (WEEE) Directive (2002/96/EC) has been put in place to recycle products using best available recovery and recycling techniques to minimize the impact on the environment, treat any hazardous substances and avoid the increasing landfill.
Product disposal instructions for residential users
When you have no further use for it, please remove any batteries and dispose of them and the product as per your local authority's recycling processes. For more information please contact your local authority or the retailer where the product was purchased.
Product disposal instructions for business users
Business users should contact their suppliers and check the terms and conditions of the purchase contract and ensure that this product is not mixed with other commercial waste for disposal.
R&TTE
This product is intended for use within the UK.
This equipment complies with the essential requirements for the Radio Equipment and Telecommunications Terminal Equipment Directive 1999/5/EC.
Declaration of Conformance
Hereby, CCT declares that this BT Digital Baby Monitor & Pacifier is in compliance with the essential requirements and other relevant provisions of Directive 1999/5/EC.
The Declaration of Conformance for the BT Digital Baby Monitor & Pacifier is available from www.bt.com/producthelp
User Guide formats
This document is also available in other formats, such as Large print, Braille and Audio CD. If you would like a copy, please call 0808 100 6554*.
Offices worldwide
The services described in this publication are subject to availability and may be modified from time to time. Services and equipment are provided subject to British Telecommunications plc's respective standard conditions of contract. Nothing in this publication forms any part of any contract.
© British Telecommunications plc 2011.
Registered Office: 81 Newgate Street, London EC1A 7AJ.
Registered in England No. 1800000.
Printed in China.
Designed and produced by The Art & Design Partnership Ltd.
BT Digital Baby Monitor & Pacifier (03/11) Issue 2
BT

CE





- BT DIGITAL BABY MONITOR & PACIFIER
- USER GUIDE
- WELCOME
- TO YOUR BT DIGITAL BABY MONITOR & PACIFIER
- NEED HELP
- GOT EVERYTHING
- IMPORTANT SAFETY INFORMATION
- IN THIS GUIDE
- IMPORTANT SAFETY INFORMATION ......4
- YOUR BT DIGITAL BABY MONITOR & PACIFIER 7
- SETTING UP 13
- USING YOUR BT DIGITAL BABY MONITOR & PACIFIER ....17
- YOUR BT DIGITAL BABY MONITOR & PACIFIER
- PARENT UNIT
- MUTE LED
- TALK (ON SIDE OF UNIT)
- LCD DISPLAY
- MENU
- MUTE LOW
- MUTE ALL
- POWER ON/OFF
- LINK INDICATOR
- BATTERY STATUS LED
- OK
- MICROPHONE
- UP
- PARENT UNIT DISPLAY ICONS
- MENU OPTIONS
- PARENT UNIT CHARGER
- BABY UNIT
- TEMPERATURE SENSOR
- MUSIC
- VOLUME
- BACK OF BABY UNIT
- WARNING
- BATTERY PERFORMANCE
- BATTERY LOW WARNING – PARENT UNIT
- SWITCH ON AND LINK THE PARENT AND BABY UNITS
- REMOVING THE BATTERIES
- POSITIONING YOUR UNITS
- IMPORTANT
- USING YOUR BT DIGITAL BABY MONITOR & PACIFIER
- SWITCHING ON/OFF
- SWITCH THE BABY UNIT ON
- SWITCH THE PARENT UNIT ON
- SWITCH THE BABY UNIT OFF
- SWITCH THE PARENT UNIT OFF
- BABY SOUND LEVEL LED INDICATORS
- ADJUST THE LOUDSPEAKER VOLUME
- MUTE ALL FEATURE – PARENT UNIT ONLY
- MUTE LOW – PARENT UNIT ONLY
- TALK BACK
- FIND
- TORCH
- THE PARENT UNIT MENU
- LIGHTSHOW
- SWITCH LIGHTSHOW ON/OFF USING THE BABY UNIT
- SWITCH LIGHTSHOW ON/OFF USING THE PARENT UNIT
- SELECT THE LIGHTSHOW BRIGHTNESS LEVEL USING THE PARENT UNIT
- SET THE LIGHTSHOW TIMER
- ADJUSTING THE LIGHTSHOW ANGLE AND FOCUS
- NIGHTLIGHT
- SWITCH NIGHTLIGHT ON/OFF USING THE BABY UNIT
- SWITCH NIGHTLIGHT ON/OFF USING THE PARENT UNIT
- SELECT THE NIGHTLIGHT BRIGHTNESS LEVEL USING THE PARENT UNIT
- SET THE NIGHTLIGHT TIMER
- PLAY MUSIC FROM THE BABY UNIT
- TURN MUSIC ON/OFF USING THE BABY UNIT
- TURN MUSIC ON/OFF USING THE PARENT UNIT
- CHOOSE A SONG TO PLAY USING THE PARENT UNIT
- CONNECT AN AUXILIARY PLAYER
- SET A PLAY TIME FOR MUSIC
- FEED TIMER
- SET THE FEED TIMER COUNTDOWN DURATION
- START THE FEED TIMER COUNTDOWN
- CANCEL THE FEED TIMER COUNTDOWN
- SWITCH TIMER REPEAT OPTION ON OR OFF
- SELECT THE TYPE OF FEED TIMER ALERT
- FEED TIMER ALERT OPTIONS
- TEMPERATURE MONITOR
- SELECT THE TYPE OF TEMPERATURE ALERT
- TEMPERATURE ALERT OPTIONS
- PRE-SET TEMPERATURE ALERT RANGE
- CRYING ALERT OPTIONS
- CRYING ALERT
- SELECT THE TYPE OF CRYING ALERT
- BACKLIGHT
- LIST OF TONES
- RESET THE UNITS
- RESET THE PARENT UNIT
- RESET THE BABY UNIT
- HELPLINE
- LINK LIGHT DOES NOT COME ON
- LINK LIGHT IS FLASHING GREEN
- LINK LIGHT IS RED
- BATTERY LOW ON PARENT UNIT
- PARENT UNIT REMAINS SILENT OR VERY QUIET
- YOU CAN HEAR A HIGH PITCHED NOISE
- TALK BACK FEATURE IS NOT WORKING
- CLEANING
- GUARANTEE
- THE CONDITIONS OF THIS GUARANTEE ARE
- WITHIN THE 12 MONTH GUARANTEE PERIOD
- OUTSIDE OF THE 12 MONTH GUARANTEE PERIOD
- RETURNING YOUR PRODUCT
- PRODUCT DISPOSAL INSTRUCTIONS
- PRODUCT DISPOSAL INSTRUCTIONS FOR RESIDENTIAL USERS
- PRODUCT DISPOSAL INSTRUCTIONS FOR BUSINESS USERS
- R&TTE
- DECLARATION OF CONFORMANCE
- USER GUIDE FORMATS
- OFFICES WORLDWIDE
Brand : BT
Model : Pacifier
Category : Baby monitor