
PGF-267X - Video projector SHARP - Free user manual and instructions
Find the device manual for free PGF-267X SHARP in PDF.


| Product Type | Video Projector |
| Model Number | PGF-267X |
| Brand | Sharp |
| Display Technology | DLP (estimated) |
| Native Resolution | XGA (1024x768) based on signal info |
| Brightness | Not specified (estimated 2500-3000 ANSI lumens for conference projectors) |
| Contrast Ratio | Not specified |
| Lamp Type | Not specified (likely metal halide or P-VIP) |
| Lamp Life | Displayed as percentage via status |
| Input Terminals | COMPUTER/COMPONENT (mini D-sub 15 pin), DVI-I, S-Video, Video (RCA), Audio 1/2 (RCA), LAN (RJ-45), RS-232C (mini DIN 9 pin), USB Type B |
| Output Terminal | COMPUTER/COMPONENT monitor output (mini D-sub 15 pin) |
| Network Control | Via web browser (Internet Explorer 5.0+), Telnet, RS-232C, PJLink Class 1 compliant |
| RS-232C Baud Rate | 9600 or 115200 bps (configurable) |
| Picture Modes | Standard, Presentation, Movie, Game, sRGB |
| Keystone Correction | Vertical (-45 to +45 steps) |
| Lamp Settings | Bright, Eco+Quiet (adjustable) |
| Audio | Built-in speaker, audio inputs (2), volume control |
| Power Consumption | Not specified (estimated 300-400W) |
| Dimensions (W x D x H) | Not specified (approximately 12 x 10 x 5 inches / 300 x 250 x 125 mm for similar models) |
| Weight | Not specified (approximately 7-9 lbs / 3-4 kg) |
| Standby Power Consumption | Configurable: Standard or Eco mode |
| Safety | Auto Power Off, cover detection, temperature monitoring |
| Accessories | LAN cable (not included), RS-232C adapter (optional), power cord |
Frequently Asked Questions - PGF-267X SHARP
User questions about PGF-267X SHARP
0 question about this device. Answer the ones you know or ask your own.
Ask a new question about this device
Download the instructions for your Video projector in PDF format for free! Find your manual PGF-267X - SHARP and take your electronic device back in hand. On this page are published all the documents necessary for the use of your device. PGF-267X by SHARP.
USER MANUAL PGF-267X SHARP
Connecting Pin Assignments ...... 2
RS-232C Specifications and Commands .... 4
Setting up the Projector Network Environment...9
-
Connecting the Projector to a Computer .....10
-
Setting an IP Address for the Computer .....11
-
Setting up a Network Connection for the Projector....13
Controlling the Projector via LAN 15
Controlling the Projector Using Internet Explorer (Version 5.0 or later)....15
Confirming the Projector Status (Status) .....16
Controlling the Projector (Control) ......16
Setting and Adjusting the Projector (Settings & Adjustments) ......17
Setting the Security (Network – Security) .....17
Making General Settings for the Network (Network – General) 18
Setting for Sending E-mail when an Error Occurs (Mail – Originator Settings) ......18
Setting Error Items and Destination Addresses to which E-mail is to be Sent when an Error Occurs (Mail – Recipient Settings) .....19
Setting Error Items and the URL that are to be Displayed when an Error Occurs (Service & Support – Access URL) ....19
Setting up the Projector Using RS-232C or Telnet 20
When Connecting Using RS-232C 20
When Connecting Using Telnet .....21
SETUP MENU (Main Menu) 22
ADVANCED SETUP MENU 22
View Setting Detail List ([V]View All Setting) ......23
Set Items ......23
Save Settings and Quit ([S]Save & Quit) .....24
Quit without Saving Settings ([Q]Quit Unchanged)...24
IP Address Setting ([1]IP Address) 25
Subnet Mask Setting ([2]Subnet Mask) .....25
Default Gateway Setting ([3]Default Gateway) .....25
User Name Setting ([4]User Name) 25
Password Setting ([5]Password) 26
RS-232C Baud Rate Setting ([6]RS-232C Baud Rate) 26
Projector Name Setting ([7]Projector Name) .....26
DHCP Client Setting ([8]DHCP Client) .....26
Disconnecting All Connections ([D]Disconnect All)
Entering ADVANCED SETUP MENU ([A]Advanced Setup)
Setting Auto Logout Time (ADVANCED[1]Auto Logout Time) ......27
Data Port Setting (ADVANCED[2]Data Port) .....27
Carrying out Network Ping Test (ADVANCED[5]Network Ping Test) ......28
Setting of Accept IP Address (ADVANCED [6]Accept IP Addr(1) - [8]Accept IP Addr(3)) ..28
Accepting All IP Addresses (ADVANCED[9]Accept All IP Addr) .....28
Setting of Search Port (ADVANCED[0]Search Port)
Return to Default Settings (ADVANCED[!]Restore Default Setting) ......29
Return to Main Menu (ADVANCED[Q]Return to Main Menu) ......29
Resetting the Lamp Timer of the Projector via LAN 30
Troubleshooting....32
COMPUTER/COMPONENT input and COMPUTER/COMPONENT output Terminals: mini
D-sub 15 pin female connector

Pin No. Signal Pin No. Signal
| 1. | Video input (red) | 1. | PR (CR) |
| 2. | Video input (green/sync on green) | 2. | Y |
| 3. | Video input (blue) | 3. | PB (CB) |
| 4. | Not connected | 4. | Not connected |
| 5. | Not connected | 5. | Not connected |
| 6. | Earth (red) | 6. | Earth (PR) |
| 7. | Earth (green/sync on green) | 7. | Earth (Y) |
| 8. | Earth (blue) | 8. | Earth (PB) |
| 9. | Not connected | 9. | Not connected |
| 10. | GND | 10. | Not connected |
| 11. | Not connected | 11. | Not connected |
| 12. | Bi-directional data | 12. | Not connected |
| 13. | Horizontal sync signal: TTL level | 13. | Not connected |
| 14. | Vertical sync signal: TTL level | 14. | Not connected |
| 15. | Data clock | 15. | Not connected |
DVI-I Terminal: 29 pin connector
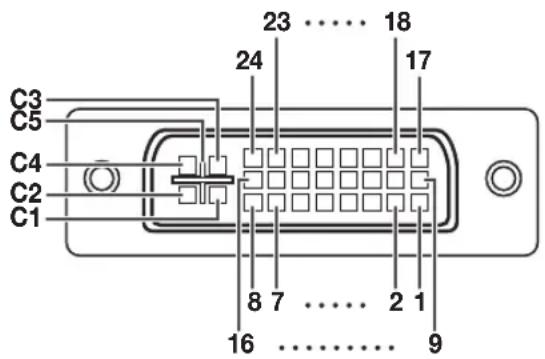
DVI Digital Input•
Pin No. Signal Pin No. Signal
| 1. | T.M.D.S data 2- | 16. | Hot plug detection |
| 2. | T.M.D.S data 2+ | 17. | T.M.D.S data 0- |
| 3. | T.M.D.S data 2 shield | 18. | T.M.D.S data 0+ |
| 4. | Not connected | 19. | T.M.D.S data 0 shield |
| 5. | Not connected | 20. | Not connected |
| 6. | DDC clock | 21. | Not connected |
| 7. | DDC data | 22. | T.M.D.S clock shield |
| 8. | Not connected | 23. | T.M.D.S clock+ |
| 9. | T.M.D.S data 1- | 24. | T.M.D.S clock- |
| 10. | T.M.D.S data 1+ | C1. | Not connected |
| 11. | T.M.D.S data 1 shield | C2. | Not connected |
| 12. | Not connected | C3. | Not connected |
| 13. | Not connected | C4. | Not connected |
| 14. | +5V power | C5. | Ground |
| 15. | Ground |
DVI Analog RGB Input• DVI Analog Component Input•
Pin No. Signal Pin No. Signal Pin No. Signal Pin No. Signal
| 1. | Not connected | 16. | Hot plug detection | 1. | Not connected | 16. | Not connected |
| 2. | Not connected | 17. | Not connected | 2. | Not connected | 17. | Not connected |
| 3. | Not connected | 18. | Not connected | 3. | Not connected | 18. | Not connected |
| 4. | Not connected | 19. | Not connected | 4. | Not connected | 19. | Not connected |
| 5. | Not connected | 20. | Not connected | 5. | Not connected | 20. | Not connected |
| 6. | DDC clock | 21. | Not connected | 6. | Not connected | 21. | Not connected |
| 7. | DDC data | 22. | Not connected | 7. | Not connected | 22. | Not connected |
| 8. | Vertical sync | 23. | Not connected | 8. | Not connected | 23. | Not connected |
| 9. | Not connected | 24. | Not connected | 9. | Not connected | 24. | Not connected |
| 10. | Not connected | C1. | Analog input Red | 10. | Not connected | C1. | Analog input Pr/Cr |
| 11. | Not connected | C2. | Analog input Green(Sync On Green) | 11. | Not connected | C2. | Analog input Y |
| 12. | Not connected | 12. | Not connected | C3. | Analog input Pb/Cb | ||
| 13. | Not connected | C3. | Analog input Blue | 13. | Not connected | C4. | Not connected |
| 14. | +5V power | C4. | Horizontal sync(Composite Sync) | 14. | Not connected | C5. | Ground |
| 15. | Ground | 15. | Ground | ||||
| C5. | Ground |
RS-232C Terminal: mini DIN 9 pin female connector
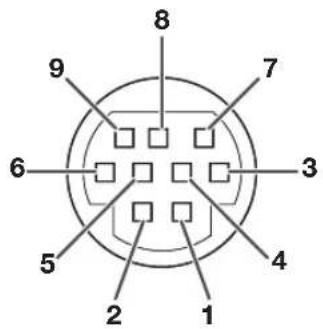
Pin No. Signal Name I/O Reference
| 1. | Not connected | |||
| 2. | RD | Receive Data | Input | Connected to internal circuit |
| 3. | SD | Send Data | Output | Connected to internal circuit |
| 4. | Not connected | |||
| 5. | SG | Signal Ground | Connected to internal circuit | |
| 6. | Not connected | |||
| 7. | RS | Request to Send | Connected to CS in internal circuit | |
| 8. | CS | Clear to Send | Connected to RS in internal circuit | |
| 9. | Not connected |
RS-232C Terminal: D-sub 9 pin male connector of the DIN-D-sub RS-232C adaptor
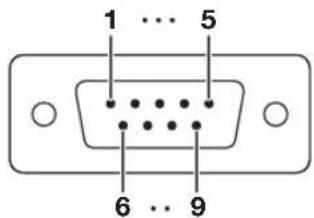
Pin No. Signal Name I/O Reference
| 1. | Not connected | |||
| 2. | RD | Receive Data | Input | Connected to internal circuit |
| 3. | SD | Send Data | Output | Connected to internal circuit |
| 4. | Not connected | |||
| 5. | SG | Signal Ground | Connected to internal circuit | |
| 6. | Not connected | |||
| 7. | RS | Request to Send | Connected to CS in internal circuit | |
| 8. | CS | Clear to Send | Connected to RS in internal circuit | |
| 9. | Not connected |
RS-232C Cable recommended connection: D-sub 9 pin female connector

Pin No. Signal Pin No. Signal
- Depending on the controlling device used, it may be necessary to connect Pin 4 and Pin 6 on the controlling device (e.g. computer).

USB Terminal: Type B USB connector

Pin No. Signal Name Pin No. Signal Pin No
| 1. | VCC | USB power | 1. | TX+ | 5. | |
| 2. | USB- | USB data- | 2. | TX- | 6. | RX- |
| 3. | USB+ | USB data+ | 3. | RX+ | 7. | |
| 4. | SG | Signal Ground | 4. | 8. |
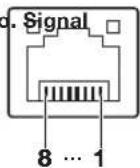
RS-232C Specifications and Commands
Computer control
A computer can be used to control the projector by connecting an RS-232C serial control cable (cross type, commercially available) to the projector. (See page 24 of the projector's operation manual for connection.)
Communication conditions
Set the serial port settings of the computer to match that of the table.
Signal format: Conforms to RS-232C standard. Parity bit: None
Baud rate*: 9,600 bps / 115,200 bps Stop bit: 1 bit
Data length: 8 bits Flow control: None
*Set the projector's baud rate to the same rate as used by the computer.
Basic format
Commands from the computer are sent in the following order: command, parameter, and return code. After the projector processes the command from the computer, it sends a response code to the computer.
Command format

Command 4-digit Parameter 4-digit
Response code format
Normal response
| O | K |
| Return code (0DH) |
Problem response (communication error or incorrect command)
| E | R | R |
| Return code (0DH) |

Info
- When controlling the projector using RS-232C commands from a computer, wait for at least 30 seconds after the power has been turned on, and then transmit the commands.
- After sending an input selection or picture adjustment command and then receiving an "OK" response code, the projector may take some time to process the command. If a second command is sent while the projector is still processing the first command, you may receive an "ERR" response code. If this happens, try resending the second command.
- When more than one code is being sent, send each command only after the response code for the previous command from the projector is verified.
- "POWR?????", "TABN ____ 1", "TLPS ____ 1", "TPOW ____ 1", "TLPN ____ 1", "TLTT ____ 1", "TLTM ____ 1", "TLTL ____ 1", "TNAM ____ 1", "MNRD ____ 1", "PJNO ____ 1"
- When the projector receives the special commands shown above:
* The on-screen display will not disappear.
* The "Auto Power Off" timer will not be reset.
- The special commands are available for applications that require continuous polling.

Note
- If an underbar (_) appears in the parameter column, enter a space.
- If an asterisk (*) appears in the parameter column, enter a value in the range indicated in brackets under Control Contents.
PJLink™ Compliant:
This product conforms with the PJLink standard Class 1 and all Class 1 commands are implemented.
This product confirms with the PJLink standard specification version 1.00.
For additional information, visit "http://pjlink.jbmia.or.jp/english/".
Commands
Example: When turning on the projector, make the following setting.
Compuer Projector
| P | O | W | R | _ | _ | _ | 1 | ←→ | O | K | ← |
| CONTROL CONTENTS COMMAND PARAMETER | RETURN | |||||||||||
| Power ON | Standby mode(or 30-second startup time) | |||||||||||
| Power On P O W R | - | - | - | 1 OK or ERR OK | ||||||||
| Off | P | O | W | R | - | - | - | 0 OK | OK or ERR | |||
| Status | P | O | W | R | ? | ? | ? | ? | 1 | 0 | ||
| Projector Condition | T | A | B | N | - | - | - | 1 | 0: Normal1: Temp High8: Lamp Life 5% or less16: Lamp Burn-out32: Lamp Ignition Failure | 0: Normal1: Temp High2: Fan Error4: Cover Open8: Lamp Life 5% or less16: Lamp Burn-out32: Lamp Ignition Failure64: Temp Abnormally High | ||
| Lamp | Status | T | L | P | S | - | - | - | 1 | 0: Off, 1: On, 2: Retry3: Waiting, 4: Lamp Error | 0: Off, 4: Lamp Error | |
| Power Status | T | P | O | W | - | - | - | 1 | 1: On, 2: Cooling | 0: Standby | ||
| Quantity | T | L | P | N | - | - | - | 1 | 1 | |||
| Usage Time(Hour) | T | L | T | T | - | - | - | 1 | 0 - 9999(Integer) | |||
| Usage Time(Minute) | T | L | T | M | - | - | - | 1 | 0, 15, 30, 45 | |||
| Life(Percentage) | T | L | T | L | - | - | - | 1 | 0% - 100%(Integer) | |||
| Name | Model Name Check | T | N | A | M | - | - | - | 1 | PGF267X | ||
| Model Name Check | M | N | P | D | - | - | - | 1 | PG-F267X | |||
| Projector Name Setting 1(First 4 characters) *1 | P | J | N | 1 | * | * | * | * | OK or ERR | |||
| Projector Name Setting 2(Middle 4 characters) *1 | P | J | N | 2 | ^ | * | * | * | OK or ERR | |||
| Projector Name Setting 3(Last 4 characters) *1 | P | J | N | 3 | * | * | * | * | OK or ERR | |||
| Projector Name Check | P | J | N | 0 | - | - | - | 1 | Projector Name | |||
| Input Change | Computer | I | R | G | B | - | - | - | 1 OK or ERR ERR | |||
| DVI | I | R | G | B | - | - | - | 2 OK or ERR ERR | ||||
| DVI-D-Computer select *2 | I | B | D | S | - | - | - | 1 OK or ERR ERR | ||||
| DVI-D-Video select *2 | I | B | D | S | - | - | - | 2 OK or ERR ERR | ||||
| DVI-Analog select *2 | I | B | D | S | - | - | - | 3 OK or ERR ERR | ||||
| S-Video | I | V | E | D | - | - | - | 1 OK or ERR ERR | ||||
| Video | I | V | E | D | - | - | - | 2 OK or ERR ERR | ||||
| Input RGB Check | I | R | G | B | ? | ? | ? | ? | 1: Computer, 2: DVI or ERR | ERR | ||
| Input Video Check | I | V | E | D | ? | ? | ? | ? | 1: S-Video, 2: Video or ERR | ERR | ||
| Input Mode Check | I | M | O | D | ? | ? | ? | ? | 1: RGB, 2: Video | ERR | ||
| Input Check | I | C | H | K | ? | ? | ? | ? | 1: Computer2: DVI3: S-Video4: Video | ERR | ||
| Volume | Volume(0 - 60) | V | O | L | A | - | - | * | * | OK or ERR | ERR | |
| Volume up/down(-10 - +10) | V | O | U | D | - | * | * | * | OK or ERR | ERR | ||
| Keystone | -45 - +45 | K | E | Y | S | ^ | ^ | ^ | * | OK or ERR | ERR | |
| AV Mute | On | I | M | B | K | - | - | - | 1 OK or ERR ERR | |||
| Off | I | M | B | K | - | - | - | 0 OK or ERR ERR | ||||
| Freeze | On | F | R | E | Z | - | - | - | 1 OK or ERR ERR | |||
| Off | F | R | E | Z | - | - | - | 0 OK or ERR ERR | ||||
| Auto Sync | Start | A | D | J | S | - | - | - | 1 OK or ERR ERR | |||
| Resize | Computer | Normal | R | A | S | R | - | - | - | 1 OK or ERR ERR | ||
| Stretch | R | A | S | R | - | - | - | 2 OK or ERR ERR | ||||
| Dot By Dot | R | A | S | R | - | - | - | 3 OK or ERR ERR | ||||
| Full | R | A | S | R | - | - | - | 5 OK or ERR ERR | ||||
| Border | R | A | S | R | - | - | - | 6 OK or ERR ERR | ||||
| Area Zoom | R | A | S | R | - | - | 1 | 0 OK or ERR | ERR | |||
| V-Stretch | R | A | S | R | - | - | 1 | 1 OK or ERR | ERR | |||
| DVI | Normal | R | B | S | R | - | - | - | 1 OK or ERR ERR | |||
| Stretch | R | B | S | R | - | - | - | 2 OK or ERR ERR | ||||
| Dot By Dot | R | B | $ | R | - | - | - | 3 OK or ERR ERR | ||||
| Full | R | B | S | R | - | - | - | 5 OK or ERR ERR | ||||
| Border | R | B | S | R | - | - | - | 6 OK or ERR ERR | ||||
| Area Zoom | R | B | S | R | - | - | 1 | 0 OK or ERR | ERR | |||
| V-Stretch | R | B | S | R | - | - | 1 | 1 OK or ERR | ERR | |||
| CONTROL CONTENTS COMMAND PARAMETER | RETURN | ||||||||||
| Power ON | Standby mode(or 30-second startup time) | ||||||||||
| Resize S-Video Normal R A S V | - | - | - | 1 OK or ERR ERR | |||||||
| Stretch R A S V | - | - | - | 2 OK or ERR ERR | |||||||
| Border R A S V | - | - | - | 3 OK or ERR ERR | |||||||
| Area Zoom R A S V | - | - | 1 | 0 OK or ERR R | E RR | ||||||
| V-Stretch | R A S V | - | - | 1 | 1 OK or ERR R | E RR | |||||
| Video | Normal R B S V | - | - | - | 1 OK or ERR ERR | ||||||
| Stretch R B S V | - | - | - | 2 OK or ERR ERR | |||||||
| Border R B S V | - | - | - | 3 OK or ERR ERR | |||||||
| Area Zoom R B S V | - | - | 1 | 0 OK or ERR R | E RR | ||||||
| V-Stretch | R B S V | - | - | 1 | 1 OK or ERR R | E RR | |||||
| ALL Reset | AL RE | - | - | - | 1 OK or ERR ERR | ||||||
| Computer INPUT | Picture Mode Standard | R A P S | - | - | 1 | 0 OK or ERR R | E RR | ||||
| Presentation | R A P S | - | - | 1 | 1 OK or ERR R | E RR | |||||
| Movie | R A P S | - | - | 1 | 2 OK or ERR R | E RR | |||||
| Game | R A P S | - | - | 1 | 3 OK or ERR R | E RR | |||||
| sRGB | R A P S | - | - | 1 | 4 OK or ERR R | E RR | |||||
| Contrast | -30 - +30 | R A P I | - | * | * | * OK or ERR ERR | |||||
| Bright | -30 - +30 | R A B R | - | * | * | * OK or ERR ERR | |||||
| Red | -30 - +30 | R A R D | - | * | * | * OK or ERR ERR | |||||
| Blue | -30 - +30 | R A B E | - | * | * | * OK or ERR ERR | |||||
| Color | -30 - +30 | R A C O | - | * | * | * OK or ERR ERR | |||||
| Tint | -30 - +30 | R A T I | - | * | * | * OK or ERR ERR | |||||
| Sharp | -30 - +30 | R A S H | - | * | * | * OK or ERR ERR | |||||
| CLR Temp | -1 - +1 | R A C T | - | - | * | * OK or ERR | ERR | ||||
| BrilliantColorTM | 0 - +2 | R A W E | - | - | - | * OK or ERR ERR | |||||
| Progressive | 2D Progressive | R A I P | - | - | - | 0 OK or ERR ERR | |||||
| 3D Progressive | R A I P | - | - | - | 1 OK or ERR ERR | ||||||
| Film Mode | R A I P | - | - | - | 2 OK or ERR | ERR | |||||
| DNR | Off | R A N R | - | - | - | 0 OK or ERR ERR | |||||
| Level 1 R A N R | - | - | - | 1 OK or ERR ERR | |||||||
| Level 2 R A N R | - | - | - | 2 OK or ERR ERR | |||||||
| Picture Reset | R A R E | - | - | - | 1 OK or ERR ERR | ||||||
| Signal Type | Auto | I A S I | - | - | - | 0 OK or ERR ERR | |||||
| RGB I A S I | - | - | - | 1 OK or ERR ERR | |||||||
| Component | I A S | - | - | - | 2 OK or ERR ERR | ||||||
| Audio Input | Audio 1 | R A A I | - | - | - | 1 OK or ERR ERR | |||||
| Audio 2 | R A A I | - | - | - | 2 OK or ERR ERR | ||||||
| DVI INPUT | Picture Mode Standard | R B P S | - | - | 1 | 0 OK or ERR R | E RR | ||||
| Presentation | R B P S | - | - | 1 | 1 OK or ERR R | E RR | |||||
| Movie | R B P S | - | - | 1 | 2 OK or ERR R | E RR | |||||
| Game | R B P S | - | - | 1 | 3 OK or ERR R | E RR | |||||
| sRGB | R B P S | - | - | 1 | 4 OK or ERR R | E RR | |||||
| Contrast | -30 - +30 | R B P I | - | * | * | * OK or ERR ERR | |||||
| Bright | -30 - +30 | R B B E | - | * | * | * OK or ERR ERR | |||||
| -30 - +30 | R B C O | - | * | * | * OK or ERR ERR | ||||||
| Color | -30 - +30 | R B T I | - | * | * | * OK or ERR ERR | |||||
| -30 - +30 | R B S H | - | * | * | * OK or ERR ERR | ||||||
| Sharp | -30 - +1 | R B C T | - | - | * | * OK or ERR | ERR | ||||
| CLR Temp | -1 - +1 | R B W E | - | - | - | * OK or ERR ERR | |||||
| BrilliantColorTM | 0 - +2 | R B I P | - | - | - | 0 OK or ERR ERR | |||||
| Progressive | 2D Progressive | R B I P | - | - | - | 1 OK or ERR ERR | |||||
| 3D Progressive | R B I P | - | - | - | 2 OK or ERR ERR | ||||||
| Film Mode | R B I P | - | - | - | 0 OK or ERR ERR | ||||||
| DNR | Off | R B N R | - | - | - | 1 OK or ERR ERR | |||||
| Level 1 R B N R | - | - | - | 2 OK or ERR ERR | |||||||
| Level 2 R B N R | - | - | - | 1 OK or ERR ERR | |||||||
| Picture Reset | R B R E | - | - | - | 1 OK or ERR ERR | ||||||
| Signal Type | Auto I B S I | - | - | - | 0 OK or ERR ERR | ||||||
| RGB I B S I | - | - | - | 1 OK or ERR ERR | |||||||
| Component | I B S I | - | - | - | 2 OK or ERR ERR | ||||||
| Audio Input | Audio 1 | R B A I | - | - | - | 1 OK or ERR ERR | |||||
| Audio 2 | R B A I | - | - | - | 2 OK or ERR ERR | ||||||
| Dynamic Range | Auto | H M B D | - | - | - | 0 OK or ERR ERR | |||||
| Standard | H M B D | - | - | - | 1 OK or ERR ERR | ||||||
| Enhanced | H M B D | - | - | - | 2 OK or ERR ERR | ||||||
| CONTROL CONTENTS COMMAND PARAMETER | RETURN | |||||||||||
| Power ON | Standby mode(or 30-second startup time) | |||||||||||
| S-Video INPUT Picture Mode Standard V A P S | - | - | 1 | 0 | O K o r E R R E | R R | ||||||
| P r e s e n t a t i o n | n | V | A | P | $ - | 1 | 1 | O K o r E R R E | R R | |||
| M o v i e V A P S | - | - | 1 | 2 | O K o r E R R E | R R | ||||||
| G a m e V A P S | - | - | 1 | 3 | O K o r E R R E | R R | ||||||
| Contrast -30 - +30 VAP | I | - | * | * | * | OK or ERR | ERR | |||||
| Bright | -30 - +30 | V A B R | - | * | * | OK or ERR | ERR | |||||
| Red | -30 - +30 | V A R D | - | * | * | OK or ERR | ERR | |||||
| Blue | -30 - +30 | V A B E | - | * | * | OK or ERR | ERR | |||||
| Color | -30 - +30 | V A C O | - | * | * | OK or ERR | ERR | |||||
| Tint | -30 - +30 | V A T I | - | * | * | OK or ERR | ERR | |||||
| Sharp | -30 - +30 | V A S H | - | * | * | OK or ERR | ERR | |||||
| CLR Temp | -1 - +1 | V A C T | - | - | * | OK or ERR | ERR | |||||
| BrilliantColorTM | 0 - +2 | V A W E | - | - | * | OK or ERR | ERR | |||||
| Progressive | 2D Progressive | V A I P | - | 0 | OK or ERR | ERR | ||||||
| 3D Progressive | V A I P | - | - | 1 | OK or ERR | ERR | ||||||
| Film Mode | V A I P | - | - | 2 | OK or ERR | ERR | ||||||
| DNR | Off | V A N R | - | - | 0 | OK or ERR | ERR | |||||
| Level 1 | V A N R | - | - | 1 | OK or ERR | ERR | ||||||
| Level 2 | V A N R | - | - | 2 | OK or ERR | ERR | ||||||
| Picture Reset | V A R E | - | - | 1 | OK or ERR | ERR | ||||||
| Audio Input | Audio 1 | V A A I | - | - | 1 | OK or ERR | ERR | |||||
| Audio 2 | V A A I | - | - | 2 | OK or ERR | ERR | ||||||
| Video INPUT | Picture Mode | Standard | V B P S | - | 1 | 0 | O K o r E R R E | R R | ||||
| Presentation | V B P S | - | 1 | 1 | O K o r E R R E | R R | ||||||
| Movie | V B P S | - | 1 | 2 | O K o r E R R E | R R | ||||||
| Game | V B P S | - | 1 | 3 | O K o r E R R E | R R | ||||||
| Contrast -30 - +30 V B P | - | * | * | OK or ERR | ERR | |||||||
| Bright | -30 - +30 | V B B R | - | * | * | OK or ERR | ERR | |||||
| Red | -30 - +30 | V B R D | - | * | * | OK or ERR | ERR | |||||
| Blue | -30 - +30 | V B B E | - | * | * | OK or ERR | ERR | |||||
| Color | -30 - +30 | V B C O | - | * | * | OK or ERR | ERR | |||||
| Tint | -30 - +30 | V B T I | - | * | * | OK or ERR | ERR | |||||
| Sharp | -30 - +30 | V B S H | - | * | * | OK or ERR | ERR | |||||
| CLR Temp | -1 - +1 | V B C T | - | - | * | OK or ERR | ERR | |||||
| BrilliantColorTM | 0 - +2 | V B W E | - | - | * | OK or ERR | ERR | |||||
| Progressive | 2D Progressive | V B I P | - | - | 0 | OK or ERR | ERR | |||||
| 3D Progressive | V B I P | - | - | 1 | OK or ERR | ERR | ||||||
| Film Mode | V B I P | - | - | 2 | OK or ERR | ERR | ||||||
| DNR | Off | V B N R | - | - | 0 | OK or ERR | ERR | |||||
| Level 1 | V B N R | - | - | 1 | OK or ERR | ERR | ||||||
| Level 2 | V B N R | - | - | 2 | OK or ERR | ERR | ||||||
| Picture Reset | V B R E | - | - | 1 | OK or ERR | ERR | ||||||
| Audio Input | Audio 1 | V B A I | - | - | 1 | OK or ERR | ERR | |||||
| Audio 2 | V B A | - | - | 2 | OK or ERR | ERR | ||||||
| C.M.S. Setting | On | C M C S | - | 1 | 1 | O K o r E R R E | R R | |||||
| Off | C M C S | - | 0 | 0 | O K o r E R R E | R R | ||||||
| C.M.S. | Hue | Red | C M H R | - | * | * | OK or ERR | ERR | ||||
| Yellow | C M H Y | - | * | * | OK or ERR | ERR | ||||||
| Green | C M H G | - | * | * | OK or ERR | ERR | ||||||
| Cyan | C M H C | - | * | * | OK or ERR | ERR | ||||||
| Blue | C M H B | - | * | * | OK or ERR | ERR | ||||||
| Magenta | C M H M | - | * | * | OK or ERR | ERR | ||||||
| Reset | C M R E | - | - | 2 | OK or ERR | ERR | ||||||
| Saturation | Red | C M S R | - | * | * | OK or ERR | ERR | |||||
| Yellow | C M S Y | - | * | * | OK or ERR | ERR | ||||||
| Green | C M S G | - | * | * | OK or ERR | ERR | ||||||
| Cyan | C M S C | - | * | * | OK or ERR | ERR | ||||||
| Blue | C M S B | - | * | * | OK or ERR | ERR | ||||||
| Magenta | C M S M | - | * | * | OK or ERR | ERR | ||||||
| Reset | C M R E | - | - | 3 | OK or ERR | ERR | ||||||
| Value | Red | C M V R | - | * | * | OK or ERR | ERR | |||||
| Yellow | C M V Y | - | * | * | OK or ERR | ERR | ||||||
| Green | C M V G | - | * | * | OK or ERR | ERR | ||||||
| Cyan | C M V C | - | * | * | OK or ERR | ERR | ||||||
| Blue | C M V B | - | * | * | OK or ERR | ERR | ||||||
| Magenta | C M V M | - | * | * | OK or ERR | ERR | ||||||
| Reset | C M R E | - | - | 4 | OK or ERR | ERR | ||||||
| C.M.S. All Reset | C M R E | - | - | 1 | OK or ERR | ERR | ||||||
| Clock | -150 - +150 | I N C L | * | * | * | * | OK or ERR | ERR | ||||
| Phase | -30 - +30 | I N P H | - | * | * | OK or ERR | ERR | |||||
RS-232C Specifications and Commands
| CONTROL CONTENTS COMMAND PARAMETER | RETURN | |||||||||||
| Power ON | Standby mode(or 30-second startup time) | |||||||||||
| H - position | - 1 5 0 - + 1 5 0 I A H | P | * | * | * | * | O | K | o | r E R R E R R | ||
| V-position -60 - +60 I A V P | - | * | * | * | OK or ERR | ERR | ||||||
| Fine Sync Adjustment Reset | I A R E | - | - | - | 1 | OK or ERR | ERR | |||||
| Image Shift | -96 - +96 | L | N | D | S | - | * | * | * | O K or r E R R | E R R | |
| OSD Display | On | I | M | D | I | - | - | - | 1 | OK or ERR | ERR | |
| Off | I M D I | - | - | - | 0 | OK or ERR | ERR | |||||
| Video System | Auto | M | E | S | Y | - | - | - | 1 | OK or ERR | ERR | |
| PAL | M | E Y | - | - | - | 2 | OK or ERR | ERR | ||||
| SECAM | M | E S Y | - | - | - | 3 | OK or ERR | ERR | ||||
| NTSC4.43 | M | E S Y | - | - | - | 4 | OK or ERR | ERR | ||||
| NTSC3.58 | M | E S Y | - | - | - | 5 | OK or ERR | ERR | ||||
| PAL-M | M | E Y | - | - | - | 6 | OK or ERR | ERR | ||||
| PAL-N | M | E Y | - | - | - | 7 | OK or ERR | ERR | ||||
| PAL-60 | M | E Y | - | - | - | 8 | OK or ERR | ERR | ||||
| Background | Logo | I | - | - | - | M | OK d#ERR | ERR | ||||
| Blue | I | M | B | G | - | - | - | 3 | OK or ERR | ERR | ||
| None | I | M | B | G | - | - | - | 4 | OK or ERR | ERR | ||
| Lamp Setting | Bright | T | H | M | D | - | - | - | 0 | OK or ERR | ERR | |
| Eco + Quiet | T | H | M | D | - | - | - | 1 | OK or ERR | ERR | ||
| Auto Sync | On | A | A | D | J | - | - | - | 1 | OK or ERR | ERR | |
| Off | A | A | D | J | - | - | - | 0 | OK or ERR | ERR | ||
| Auto Power Off | On | A | P | O | W | - | - | - | 1 | OK or ERR | ERR | |
| Off | A | P | O | W | - | - | - | 0 | OK or ERR | ERR | ||
| Auto Restart | On | A | R | E | S | - | - | - | 1 | OK or ERR | ERR | |
| Off | A | R | E | S | - | - | - | 0 | OK or ERR | ERR | ||
| STANDBY Mode | Standard | M | O | U | T | - | - | - | 1 | OK or ERR | ERR | |
| Eco | M | O | U | T | - | - | - | 0 | OK or ERR | ERR | ||
| PRJ Mode | Reverse | On | I | M | R | E | - | - | - | 1 | OK or ERR | ERR |
| Off | I M R E | - | - | - | 0 | OK or ERR | ERR | |||||
| Invert | On | I M I N | - | - | - | 1 | OK or ERR | ERR | ||||
| Off | I M I N | - | - | - | 0 | OK or ERR | ERR | |||||
| Language | English | M | E | L | A | - | - | - | 1 | OK or ERR | ERR | |
| Deutsch | M | E L A | - | - | - | 2 | OK or ERR | ERR | ||||
| Español | M | E L A | - | - | - | 3 | OK or ERR | ERR | ||||
| Nederlands | M | E L A | - | - | - | 4 | OK or ERR | ERR | ||||
| Français | M | E L A | - | - | - | 5 | OK or ERR | ERR | ||||
| Italiano | M | E L A | - | - | - | 6 | OK or ERR | ERR | ||||
| Svenska | M | E L A | - | - | - | 7 | OK or ERR | ERR | ||||
| 日本語 | M | E L A | - | - | - | 8 | OK or ERR | ERR | ||||
| Português | M | E L A | - | - | - | 9 | OK or ERR | ERR | ||||
| 汉语 | M | E L A | - | - | 1 | 0 | OK or ERR | ERR | ||||
| 한국어 | M | E L A | - | - | 1 | 1 | OK or ERR | ERR | ||||
| Русский | M | E L A | - | - | 1 | 2 | OK or ERR | ERR | ||||
| عربي | M | E L A | - | - | 1 | 3 | OK or ERR | ERR | ||||
| polski | M | E L A | - | - | 1 | 4 | OK or ERR | ERR | ||||
| Türkçe | M | E L A | - | - | 1 | 5 | OK or ERR | ERR | ||||
| فارسی | M | E L A | - | - | 1 | 6 | OK or ERR | ERR | ||||
| Magyar | M | E L A | - | - | 1 | 7 | OK or ERR | ERR | ||||
| Setup Guide | On | S | E G U | - | - | - | 1 | OK or ERR | ERR | |||
| Off | S | E G U | - | - | - | 0 | OK or ERR | ERR | ||||
| System Sound | On | S | S N D | - | - | - | 1 | OK or ERR | ERR | |||
| Off | S | S N D | - | - | - | 0 | OK or ERR | ERR | ||||
| Internal Speaker | On | A | S P K | - | - | - | 1 | OK or ERR | ERR | |||
| Off | A | S P K | - | - | - | 0 | OK or ERR | ERR | ||||
| RGB Frequency Check | Horizontal | T | F R Q | - | - | - | 1 | kHz(*.* or ERR) | ERR | |||
| Vertical | T | F R Q | - | - | - | 2 | Hz(*.* or ERR) | ERR | ||||
| Fan Mode | Normal | H | L M D | - | - | - | 0 | OK or ERR | ERR | |||
| High | H L M D | - | - | - | 1 | OK or ERR | ERR | |||||
| Lamp Timer Reset *3 | L P R E | 0 | 0 | 0 | 1 | ERR | OK or ERR | |||||
*1 For setting the projector name, send the commands in the order of PJN1, PJN2 and PJN3.
*2 This command should be sent only after the "IRGB ____ 2" command is sent and an "OK" response code is received.
*3 The Lamp Timer Reset command is available only in standby mode.

Setting up the Projector Network Environment
This section describes the basic procedure for using the projector via the network.
If the network is already constructed, the projector's network settings may need to be changed. Please consult your network administrator for assistance with these settings.
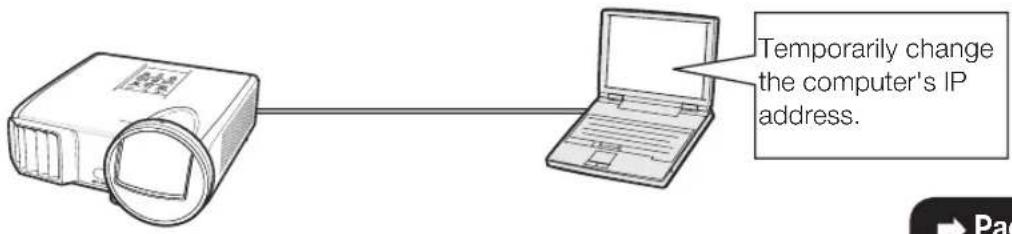
You can make network settings both on the projector and on the computer. The following procedure is for making settings on the computer.
Network settings on the computer
1. Connecting the projector to a computer
Connect a LAN cable (Category 5, cross-over type) between the computer and projector.


2. Setting an IP address for the computer
Adjust the IP settings of the computer to enable one-to-one communications with the projector.

3. Setting up a network connection for the projector
Adjust the projector network settings to conform to your network.


- Microsoft®, Windows® and Windows Vista® are registered trademarks of Microsoft Corporation in the United States and/or other countries.
- PJLink is a registered trademark or an application trademark in Japan, the United States and/or other countries/regions.
- All other company or product names are trademarks or registered trademarks of their respective companies.
1. Connecting the Projector to a Computer
Establishing a one-to-one connection from the projector to a computer. Using a commercially available LAN cable (UTP cable, Category 5, cross-over type) you can confi gure the projector via the computer.
1 Disconnect the computer's LAN cable from the existing network.
2 Connect a commercially available LAN cable (UTP cable, Category 5, cross-over type) to the projector's LAN terminal and connect the other end of the cable to the computer's LAN terminal.
3 Plug the power cord into the AC socket of the projector.
4 Turn on the computer.

Info
Confir rm that the LINK LED on the rear of the projector illuminates. If the LINK LED does not illuminate, check the following:
- The LAN cable is properly connected.
- The power switches of both the projector and the computer are on.


natural_image
Diagram showing a printer connected to a laptop via cable, with no text or symbols present.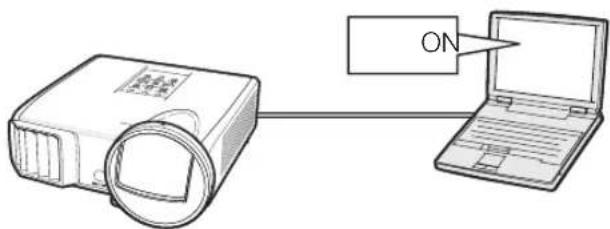
This completes the connection. Now proceed to "2. Setting an IP Address for the Computer".
2. Setting an IP Address for the Computer
The following describes how to make settings in Windows Vista®.
1 Log on the network using the administrator's account for the computer.
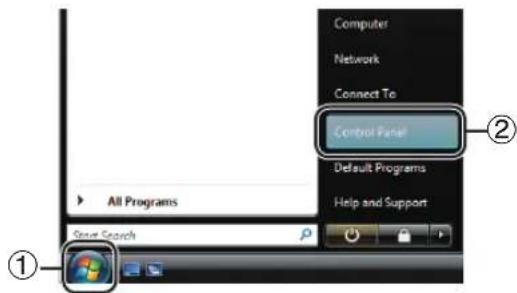
2 Click "start", and click "Control Panel".
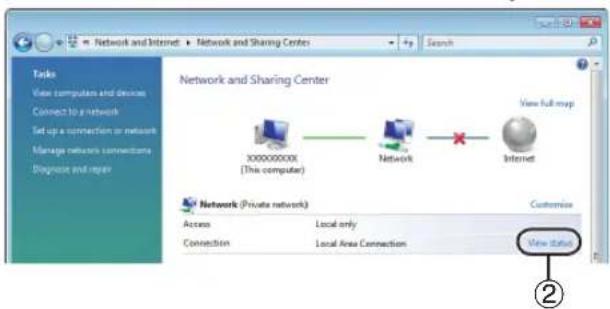
3 Click "View network status and tasks" of "Network and Internet", and click "View status" in the new window.
- This manual uses examples to explain the operations in Category View. If you are using Classic View, double-click "Network and Sharing Center".
4 Click "Properties".
- When the user account control display is displayed, click "Continue".


Setting up the Projector Network Environment
5 Click "Internet Protocol Version 4 (TCP/IPv4)", and click the "Properties" button.

6 Confi rm or change an IP address for the setup computer.
①Confi rm and note the current IP address, Subnet mask and Default gateway.
Make sure to note the current IP address,
Subnet mask and Default gateway as you
will be required to reset them later.
② Set temporarily as follows:
IP address: 192.168.150.3
Subnet mask: 255.255.255.0
Default gateway: (Do not input any values.)


Note
- The factory default settings for the projector are as follows:
DHCP Client: OFF
IP address: 192.168.150.2
Subnet mask: 255.255.255.0
Default gateway: 0.0.0.0
7 After setting, click the "OK" button, and then restart the computer.
After confirming or setting, proceed to "3. Setting up Network Connection for the Projector".
3. Setting up a Network Connection for the Projector
Settings for such items as the projector's IP address and subnet mask are compatible with the existing network.
Set each item on the projector as follows. (See page 50 of the projector's operation manual for setting.)
DHCP Client: Off
IP Address: 192.168.150.002
Subnet Mask: 255.255.255.000
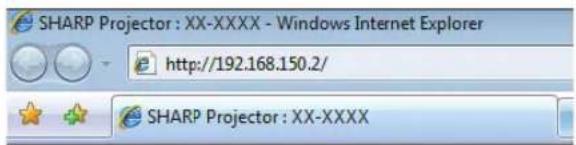
1 Start Internet Explorer (version 5.0 or later) on the computer, and enter "http://192.168.150.2/" in "Address", and then press the "Enter" key.
2 If a user name and a password have not yet been set, just click the "OK" button.
- If a user name and a password have been set, input the user name and the password, and click the "OK" button.
- If the user name or password is entered incorrectly three times, an error message will be displayed.
- When you are using Internet Explorer 7, other setup screen may be displayed. In this case, make the proper adjustments for the setup screen.
3 When the screen as shown on the right appears, click "TCP/IP".


4 The TCP/IP setting screen appears, ready for network settings for the projector.
| Items Setting example / Remarks | |
| New Password | You can set the password to protect the TCP/IP setting. |
| DHCP Client | Select “ON” or “OFF” to determine whether to use DHCP Client. |
| IP Address | You can set this item when “DHCP Client” is set to “OFF”.Factory default setting: 192.168.150.2Enter an IP address appropriate for the network. |
| Subnet Mask | You can set this item when “DHCP Client” is set to “OFF”.Factory default setting: 255.255.255.0Set the subnet mask to the same as that of the computer and equipment on the network. |
| Default Gateway | You can set this item when “DHCP Client” is set to “OFF”.Factory default setting: 0.0.0.0* When not in use, set to “0.0.0.0”. |
| DNS Server | Factory default setting: 0.0.0.0* When not in use, set to “0.0.0.0”. |

Note
- Confirm the existing network's segment (IP address group) to avoid setting an IP address that duplicates the IP addresses of other network equipment or computers. If "192.168.150.2" is not used in the network having an IP address of "192.168.150.XXX", you don't have to change the projector IP address.
- For details about each setting, consult your network administrator.
5 Click the "Apply" button.
6 The set values appear. Confi rm that the values are set properly, and then click the "Confi rm" button.
Network - TCP/IP
| New Password | (4 digits) |
| Reconfirm |
This password is for protection of the TCP/IP setting.

| DHCP Client | @ OFF @ ON | |||
| IP Address | 192 | 168 | 150 | 2 |
| Subnet Mask | 255 | 255 | 255 | 0 |
| Default Gateway | 0 | 0 | 0 | 0 |
| * '0.0.0' means 'Using no default gateway.' | ||||
| DNS Server | 0 | 0 | 0 | 0 |
| * '0.0.0' means 'Using no DNS server.' | ||||
Network - TCP/IP
| New Password | (4 digits) |
| Reconfirm |
This password is for protection of the TCP/IP setting.

| DHCP Client | @ OFF C ON | |||
| IP Address | 192 | 188 | 160 | 2 |
| Subnet Mask | 255 | 255 | 255 | 0 |
| Default Gateway | 0 | 0 | 0 | 0 |
| * '0.0.0' means "Using no default gateway." | ||||
| DNS Server | 0 | 0 | 0 | 0 |
| * '0.0.0' means "Using no DNS server." | ||||

Network - TCP/IP
The TCP/IP settings will be changed as below.
DHCP Check OFF
ID Address 192.168.150.2
Subnet Mask 255.255.255.0
Default Gateway 0000
DNS Server : 0.0.0.0
Do you want to change the TCP/IP settings?

After you click "Confirm", if you want to continue to operate this projector via the network, please wait for about 15 seconds and then re-access to "192.168.150.2".
- Close the browser.
• This completes the network settings.
• After setting items, wait for about 15 seconds and then re-access. - Change the IP address of the setting computer back to its original address, which you have noted down in Step 6-① on page 12, and then connect the computer and the projector to the network.
Controlling the Projector via LAN
After connecting the projector to your network, enter the projector IP address in "Address" on Internet Explorer (version 5.0 or later) using a computer on the network to start a setup screen that will enable control of the projector via the network.
Controlling the Projector Using Internet Explorer
(Version 5.0 or later)
Complete connections to external equipment before starting the operation. (See pages 21-25 of the projector's operation manual.) Complete the AC cord connection. (See page 25 of the projector's operation manual.)

Note
- When connecting the projector to the LAN, use a commercially available LAN cable (UTP cable, Category 5, cross-over type). When connecting the projector to a hub, use a straight-through cable.
1 Start Internet Explorer (version 5.0 or later) on the computer.
2 Enter "http://" followed by the projector IP address set by the procedure on page 14 followed by "/" in "Address", and then press the "Enter" key.
- When "DHCP Client" is set to "OFF" on the projector, IP address is 192.168.150.2. If you did not change the IP address in "3. Setting up a Network Connection for the Projector" (pages 13-14), enter "http://192.168.150.2/".
3 A screen for controlling the projector appears, ready for performing various status conditions, control, and settings.

Confirming the Projector Status (Status)
Status
| Sharp XX-XXXX (192.168.150.2) | |
| MAC Address | XXXXXXXXXX |
| Power | ON |
| Condition | Normal |
| Lamp Timor | 1hour(s) 15minute(s) |
| Lamp Life | 99% |
| Input | COMPUTER |
| Signal Info | 1024x768 (H 48.3kHz /V 60.0 Hz) |
| Serial Number | |
Refresh
On this screen, you can confi rm the projector status. You can confi rm the following items:
- MAC Address
- Power
- Condition
- Lamp Timer
- Lamp Life
- Input
- Signal Info
- Serial Number

Note
- If you click the "Refresh" button before the screen is displayed completely, an error message ("Server Busy Error") will be displayed. Wait for a moment and then operate again.
- For details about each item, refer to the projector's operation manual.
Controlling the Projector (Control)
Control
| Power | ○ STANDBY ○ ON |
| Input Select | COMPUTER |
| Volume | 1 |
| AV Mute | ○ OFF ○ ON |
Refresh
On this screen, you can perform projector control. You can control the following items:
- Power
- Input Select
• Volume - AV Mute

Note
- If you click the "Refresh" button before the screen is displayed completely, an error message ("Server Busy Error") will be displayed. Wait for a moment and then operate again.
- You cannot operate this page while the projector is warming up.
- While the projector is in standby mode, you can only control "Power ON".
- For details about each item, refer to the projector's operation manual.
Setting and Adjusting the Projector (Settings & Adjustments)
Example: "Picture" screen display for COMPUTER Settings & Adjustments - Picture COMPUTER
| Picture Mode | Presentation |
| CLR Temp | |
| BrilliantColorTM | 2 |
| Lamp Setting | Bright |
Reset
| Signal Type | Auto |
Refresh
On these screens, you can make projector settings or adjustments. You can set or adjust the following items:
- Picture Mode
- CLR Temp
- BrilliantColor™
- Progressive
• DNR - Lamp Setting
- Resolution Setting
- Signal Type
- Video System
- Dynamic Range
- Resize
- OSD Display
-
Background
-
Setup Guide
- Projection Mode
- OSD Language
- Auto Sync
- Auto Power Off
- Auto Restart
- System Sound
- Internal Speaker
- Audio Input
- RS-232C Speed
- Fan Mode
- All Reset

Note
- If you click the "Refresh" button before the screen is displayed completely, an error message ("Server Busy Error") will be displayed. Wait for a moment and then operate again.
- You cannot operate this page while the projector is warming up.
- For details about each item, refer to the projector's operation manual.
Setting the Security (Network – Security)
Network - Security
| User Name | (MAX 3 characters) |
| Password | (MAX 3 characters) |
This user name / password is for accessing via Web browser and Telnet. *You will need to re-login with the new user name / new password after you change the user name / password
| Accept IP Address | All IP AddressesFrom only specific IP addressesAddress 1 0 0 0 0Address 2 0 0 0 0Address 3 0 0 0 0 |
Apply
Refresh
On this screen, you can make settings relating to security.
| Items Description | |
| User Name Setting of user name for security protection. | |
| Password Setting of password for security protection. | |
| Accept IP Address | It is possible to set up to three IP addresses allowing connection to the projector. |
| All IP Addresses | No limits are set to IP addresses connecting to the projector. |
| From only specific IP addresses | For security improvement, only an IP address set by “Address 1-3” can be connected to the projector. |

Note
- User Name and Password can be up to 8 characters.
- You can input the characters below: a-z, A-Z, 0-9, -, _
Making General Settings for the Network (Network - General)
Network - General
| Projector Name | XX-XXXX(MAX 12 characters) |
| Auto Logout Time | 5 minute(s)(0-65535)* If the set value is made 0, the Auto Logout function is disabled. |
| Data Port | 10002(1025-65535) |
| Search Port | 5006(1025-65535) |
Apply
Refresh
On this screen, you can make general settings relating to the network.
| Items Description | |
| Projector Name | Setting the projector name. |
| Auto Logout Time | Setting the time interval in which the projector will be automatically disconnected from the network in units of a minute (from 1 to 65535 minutes). If the set value is made 0, the Auto Logout function is disabled. |
| Data Port Setting | ing the TCP port number used when exchanging data with the projector (from 1025 to 65535). |
| Search Port Setting | ting the port number used when searching for the projector (from 1025 to 65535). |
After clicking the “Apply” button, the set values appear. Confi rm that the values are set properly, and then click the “Confi rm” button.

Note
• After setting items, wait for about 15 seconds and then re-access.
- Projector Name can be up to 12 characters.
- You can input the characters below:
A-Z, 0-9, -, _, (,), space
(When "a-z" are input, they are converted to "A-Z" automatically.)
Setting for Sending E-mail when an Error Occurs (Mail – Originator Settings)
Mail - Originator Settings
| SMTP Server | |
| (MAX 64 characters) | |
| Originator E-mail Address | |
| (MAX 64 characters) | |
| Originator Name | |
| (MAX 64 characters) |
Apply
Refresh
On this screen, you can make settings for sending e-mail to report when the projector has generated an error.
| Items Setting example / Remarks | |
| SMTP Server S | Setting an SMTP server address for e-mail transmission.e.g.1: 192.168.150.253e.g.2: smtp123.sharp.co.jp* When using a domain name, make settings for the DNS server. |
| Originator E-mail Address | Setting the projector's e-mail address.The e-mail address set here becomes Originator E-mail Address. |
| Originator Name | Setting the sender's name. The name set here appears in the “Originator Name” column of the body of the message. |

Note
- SMTP Server, Originator E-mail Address and Originator Name can be up to 64 characters.
- You can input the characters below:
SMTP Server and Originator E-mail Address:
a-z, A-Z, 0-9, !, #, \$, %, &, *, +, -, /, =, ?, ^, {, |, },
\~, _, ', , @,
(You can input “@” only one time for “Originator E-mail Address”.)
Originator Name : a-z, A-Z, 0-9, -, _, (,), space
- If the settings of "3. Setting up a Network Connection for the Projector" on pages 13 and 14 are incorrectly set, e-mail will not be sent.
Setting Error Items and Destination Addresses to which E-mail is to be Sent when an Error Occurs (Mail - Recipient Settings)
Mail - Recipient Settings
| Recipient Addresses | E-mail Address (MAX 64 characters) | Error Mail | |||
| Lamp | Temp | Fan | Cover | ||
| 1 | |||||
| 2 | |||||
| 3 | |||||
| 4 | |||||
| 5 | |||||
Apply
Refresh
On this screen, you can input e-mail destinations to which error notification (error items) e-mails are sent.
| Items Description | |
| E-mail Address | Set addresses to which error notifi cation e-mail is sent. You can set up to fi ve addresses. |
| Error Mail (Lamp, Temp, Fan,Cover) | Error e-mail is sent on the error items checked in their check boxes. |
| Test Send test | e-mail. This allows you to confi rm that the settings for e-mail transmission are properly set. |

Note
• E-mail Address can be up to 64 characters.
- You can input the characters below:
a-z, A-Z, 0-9, !, #, \$, %, &, *, +, -, /, =, ?, ^, {, |, },
\~ , _, ', ., @,
(You can input "@" only one time.)
- For details about error items, refer to the projector's operation manual.
Setting Error Items and the URL that are to be Displayed when an Error Occurs (Service & Support - Access URL)
Service & Support - Access URL Registration
| Access URL | Condition | |||||
| (MAX 64 characters) | Always | Lamp | Temp | Fan | Cover | |
| 1 | Test | |||||
| 2 | Test | |||||
| 3 | Test | |||||
| 4 | Test | |||||
| 5 | Test | |||||
Apply
Refresh
On this screen, you can make settings of the URL and error items that are to be displayed when the projector has generated an error.
| Items Description | |
| Access URL Set the URL that is to be displayed when an error occurs. You can set up to fi ve addresses. | |
| Condition (Always, Lamp, Temp, Fan,Cover) | The URL is displayed when an error checked in their check boxes occurs. |
| Test The set URL site is test-displayed. This allows you to confi rm that the URL site is properly displayed. | |
Example of the display when an error occurs
Status
| Sharp XX-XXXX (192.168.150.2) | |
| MAC Address | XXXXXXXXXXXXXX |
| Power | STANDBY |
| Condition | The cooling fan is not operating |
| Access URL1 http://www.sharp-world.com/projector/ | |
| Lamp Timer | 1hour(s) 15minute(s) |
| Lamp Life | 99% |
| Input | ---- |
| Signal Info | ---- |
| Serial Number | 1234567 |
Refresh
Setting up the Projector Using RS-232C or Telnet
Connect the projector to a computer using RS-232C or Telnet, and open the SETUP MENU on the computer to carry out various settings for the projector.
When Connecting Using RS-232C
1 Launch general purpose terminal emulator.
2 Input settings for the RS-232C port of the terminal emulator as follows.
Baud Rate : 9600 bps*
Data Length : 8 bit
Parity Bit : None
Stop Bit : 1 bit
Flow Control: None
* This is the factory default setting. If the value of Baud Rate for the projector has been changed, set Baud Rate here according to the changed value on the projector.
3 Input "PJS11234" and press the "Enter" key.
4 "OK" is displayed. Input "PJS25678" and press the "Enter" key within 10 seconds.
5 "User Name:" is displayed. Input the user name and press the "Enter" key.
- If a user name has not yet been set, just press the "Enter" key.
6 "Password:" is displayed. Input the password and press the "Enter" key.
- If a password has not yet been set, just press the "Enter" key.
7 Input "setup" and press the "Enter" key. - SETUP MENU will be displayed.
▼SETUP MENU
----SETUP MENU---- [1]IP Address [2]Subnet Mask [3]Default Gateway [4]User Name [5]Password [6]RS-232C Baud Rate [7]Projector Name [8]DHCP Client [A]Advanced Setup [D]Disconnect All [V]View All Setting [S]Save & Quit [Q]Quit Unchanged
setup>

Note
- User name and password are not set in the factory default settings.
- If the user name or password is entered incorrectly three times, SETUP MENU will be quit.
When Connecting Using Telnet
1 Click "Start" from the Windows ^® desktop and select "Run".
2 Enter "telnet 192.168.150.2" in the text box that opens up. (If the IP address of the projector is 192.168.150.2.)
3 Click the "OK" button.
4 "User Name:" is displayed. Input the user name and press the "Enter" key.
- If a user name has not yet been set, just press the "Enter" key.
5 "Password:" is displayed. Input the password and press the "Enter" key.
- If a password has not yet been set, just press the "Enter" key.
6 Input "setup" and press the "Enter" key.
- SETUP MENU will be displayed.
▼SETUP MENU
-SETUP MENU-
[1]IP Address [2]Subnet Mask [3]Default Gateway
[4]User Name [5]Password
[6]RS-232C Baud Rate [7]Projector Name [8]DHCP Client
[A]Advanced Setup [D]Disconnect All
[V]View All Setting [S]Save & Quit [Q]Quit Unchanged
setup>

Note
- If the IP address has been changed, be sure to enter the new IP address in step 2.
- User name and password are not set in the factory default settings.
- If the user name or password is entered incorrectly three times in steps 4 or 5, SETUP MENU will be quit.
SETUP MENU (Main Menu)
▼SETUP MENU
-SETUP MENU-
[1]IP Address [2]Subnet Mask [3]Default Gateway
[4]User Name [5]Password
[6]RS-232C Baud Rate [7]Projector Name [8]DHCP Client
[A]Advanced Setup [D]Disconnect All
[V]View All Setting [S]Save & Quit [Q]Quit Unchanged
setup>
[1] IP Address
IP address settings. (Page 25)
[2] Subnet Mask
Subnet mask settings. (Page 25)
[3] Default Gateway
Default gateway settings. (Page 25)
[4] User Name (Factory default setting: Not Required)
Setting of user name for security protection. (Page 25)
[5] Password (Factory default setting: Not Required)
Setting of password for security protection. (Page 26)
[6] RS-232C Baud Rate (Factory default setting: 9600 bps)
Baud rate settings for the RS-232C terminals. (Page 26)
[7] Projector Name
It is possible to assign a projector name. (Page 26)
[8] DHCP Client
DHCP Client settings. (Page 26)
[A] Advanced Setup
Enters ADVANCED SETUP MENU. (Page 27)
[D] Disconnect All
Disconnect all connections. (Page 27)
[V] View All Setting
Displays all setting values. (Page 23)
Can also be used with ADVANCED SETUP MENU.
[S] Save & Quit
Save set values and quit menu. (Page 24)
[Q] Quit Unchanged
Quit menu without saving setting values. (Page 24)

Note
- When "DHCP Client" is set to "OFF" on the projector:
IP address: 192.168.150.2
Subnet mask: 255.255.255.0
Default gateway: 0.0.0.0
ADVANCED SETUP MENU
▼ADVANCED SETUP MENU
ADVANCED SETUP MENU
[1]Auto Logout Time [2]Data Port
[5]Network Ping Test
[6]Accept IP Addr(1) [7]Accept IP Addr(2) [8]Accept IP Addr(3)
[9]Accept All IP Addr [0]Search Port
[Q]Return to Main Menu
advanced>
[1] Auto Logout Time (Factory default setting: 5 minutes)
Setting of time until automatic disconnection of network connection. (Page 27)
[2] Data Port (Factory default setting: 10002)
Setting the TCP port number used when exchanging data. (Page 27)
[5] Network Ping Test
It is possible to confirm that a network connection between the projector and a computer etc. is working normally. (Page 28)
[6] Accept IP Addr(1)
[7] Accept IP Addr(2)
[8] Accept IP Addr(3)
[9] Accept All IP Addr (Factory default setting: Accept All)
For improved security, it is possible to set up to three IP addresses allowing connection to the projector.
Set IP addresses can be cancelled using [9] Accept All IP Addr. (Page 28)
[0] Search Port (Factory default setting: 5006)
Setting the port number used when searching for the projector. (Page 29)
[Q] Return to Main Menu
Return to the main SETUP MENU. (Page 29)
Enter number or symbol of item to be selected on the SETUP MENU. When setting, input the details to be set. Setting is carried out one item at a time, and saved at the end.
View Setting Detail List
([V]View All Setting)
▼SETUP MENU
----SETUP MENU-
[1]IP Address [2]Subnet Mask [3]Default Gateway
[4]User Name [5]Password
[6]RS-232C Baud Rate [7]Projector Name [8]DHCP Client
[A]Advanced Setup [D]Disconnect All
[V]View All Setting [S]Save & Quit [Q]Quit Unchanged
setup>v
Model Name : XX-XXXX
Projector Name : XX-XXXX
MAC Address : XX:XX:XX:XX:XX:XX
DHCP Client : Disable
IP Address : 192.168.150.2
Subnet Mask : 255.255.255.0
Default Gateway : Not Used
RS-232 Baud Rate : 9600 bps
Password : Not Required
********(Advanced Status)
Data Port : 10002
Accept IP Address : Accept All
Auto Logout Time : 5 minutes
Search Port : 5006
① Enter "v" and press the "Enter" key.
Display all setting values(*).
Set Items
Example: When setting IP Address (change from 192.168.150.2 to 192.168.150.3)
▼SETUP MENU
![----SETUP MENU---- [1]IP Address [2]Subnet Mask [3]Default Gateway [4]User Name [5]Password [6]RS-232C Baud Rate [7]Projector Name [8]DHCP Client [A]Advanced Setup [D]Disconnect All [V]View All Setting [S]Save & Quit [Q]Quit Unchanged setup>1 ① IP Address : 192.168.150.2 *1 Please Enter : 192.168.150.3 ② (change) -> 192.168.150.3 *2 ----SETUP MENU---- [1]IP Address [2]Subnet Mask [3]Default Gateway [4]User Name [5]Password [6]RS-232C Baud Rate [7]Projector Name [8]DHCP Client [A]Advanced Setup [D]Disconnect All [V]View All Setting [S]Save & Quit [Q]Quit Unchanged setup>v ③ Model Name : XX-XXXX * Projector Name : XX-XXXX * MAC Address : XX:XX:XX:XX:XX:XX DHCP Client : Disable *3 IP Address : 192.168.150.3 * Subnet Mask : 255.255.255.0 * Default Gateway : Not Used RS-232C Baud Rate : 9600 bps * Password : Not Required **********(Advanced Status)********** Data Port : 10002 Accept IP Address : Accept All Auto Logout Time : 5 minutes Search Port : 5006](/content/2026/05/1084272/images/a25d9f60585a689a2edf7fae7a716ad06324f7a109ba2530e7e1311d75631a8d.jpg)
① Enter “1” (number of item to be set), and press the “Enter” key.
Display current IP address (*1).
② Enter IP address to be set and press the "Enter" key.
Display IP address after change (*2).
③ Enter "v" and press the "Enter" key to verify setting detail list.
IP address is being changed (*3).

Note
• Verification of setting detail list can be omitted.
- Setting details are not effective until they have been saved. (Page 24)
- If an invalid number is entered, an error message ("Parameter Error!") will be displayed.
Save Settings and Quit ([S]Save & Quit)
Save set values and quit menu.
▼SETUP MENU
| ----SETUP MENU---- | |
| [1]IP Address [2]Subnet Mask [3]Default Gateway | |
| [4]User Name [5]Password | |
| [6]RS-232C Baud Rate [7]Projector Name [8]DHCP Client | |
| [A]Advanced Setup [D]Disconnect All | |
| [V]View All Setting [S]Save & Quit [Q]Quit Unchanged |
| setup>s | 1 |
| All Connection will be disconnect. | |
| Continue(y/n)? y | 2 |
| Apply New setting...Done. |
① Enter "s" and press the "Enter" key.
② Enter "y" and press the "Enter" key.
Quit without Saving Settings ([Q]Quit Unchanged)
Quit menu without saving setting values.
▼SETUP MENU
| ----SETUP MENU---- | |
| [1]IP Address [2]Subnet Mask [3]Default Gateway | |
| [4]User Name [5]Password | |
| [6]RS-232C Baud Rate [7]Projector Name [8]DHCP Client | |
| [A]Advanced Setup [D]Disconnect All | |
| [V]View All Setting [S]Save & Quit [Q]Quit Unchanged |
| setup>q | 1 |
| Quit Without Saving(y/n)? y | 2 |
| Setting Unchanged. |
① Enter "q" and press the "Enter" key.
② Enter "y" and press the "Enter" key.
The setting procedure for each item will be explained. For the basic procedure, please refer to “Set Items” on page 23.
IP Address Setting
([1]IP Address)
Setting of IP address.

① Enter "1" and press the "Enter" key.
② Enter numerical value to be set and press the “Enter” key.
Display IP address after change (*).
Subnet Mask Setting
([2]Subnet Mask)
Setting subnet mask.

① Enter "2" and press the "Enter" key.
② Enter numerical value to be set and press the “Enter” key.
Display subnet mask after change (*).
Default Gateway Setting
([3]Default Gateway)
Setting default gateway.
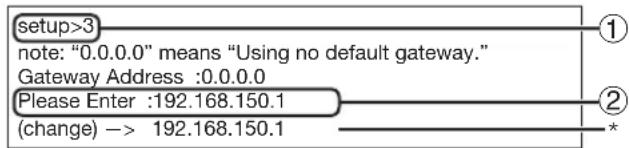
① Enter "3" and press the "Enter" key.
② Enter numerical value to be set and press the “Enter” key.
Display gateway address after change (*).
![SHARP PGF-267X - ([3]Default Gateway) - 2](/content/2026/05/1084272/images/7d2c66cfeaaadab29435960bc57f4592c13e5efa4b479d9236ff2b2dda74260b.jpg)
Note
- If the values for IP Address, Subnet Mask or Gateway of the projector have been changed via Telnet, the computer cannot be connected to the projector depending on the computer's network settings.
User Name Setting
([4]User Name)
Carrying out security protection using user name.

① Enter "4" and press the "Enter" key.
② Enter user name and press the "Enter" key.
Display set user name (*).
![SHARP PGF-267X - ([4]User Name) - 2](/content/2026/05/1084272/images/691272d8f259018c27895981ec331c19899961d09ccfe023891028af8233c9a4.jpg)
Note
- User name can be up to 8 characters.
- You can input the characters below: a-z, A-Z, 0-9, -, _
- In the default state, user name is not set.
Password Setting ([5]Password)
Carrying out security protection using password.

① Enter "5" and press the "Enter" key.
② Enter password and press the "Enter" key. Display set password (*).
![SHARP PGF-267X - Password Setting ([5]Password) - 2](/content/2026/05/1084272/images/bc96f7e279cb78dc42b80a86229aeeceb4aab7d8ada7eb2a3670733eec883626.jpg)
Note
- Password can be up to 8 characters.
- You can input the characters below: a-z, A-Z, 0-9, -,
- In the default state, the password is not set.
RS-232C Baud Rate Setting ([6]RS-232C Baud Rate)
Setting of baud rate for RS-232C terminals.
![setup>6 0 ... 9600 bps 2 ... 115200 bps Baud Rate Select[0, 2] :2 RS-232C Baud Rate : 115200 bps ① ②](/content/2026/05/1084272/images/3f81f48f3d5b72f098f0c5b423cae0c3c2e54e7642bac799c7da5887ffa85aec.jpg)
①Enter "6" and press the "Enter" key.
②Select and enter the number 0 or 2 and press the "Enter" key.
Display set baud rate (*).
![SHARP PGF-267X - RS-232C Baud Rate Setting ([6]RS-232C Baud Rate) - 2](/content/2026/05/1084272/images/fc2597c39ed4c58602d34fd24cc6ed7fb7f6558ca5b522bf3b02209f7a23bd06.jpg)
Note
- Set the projector's baud rate to the same rate as that used by the computer.
Projector Name Setting ([7]Projector Name)
It is possible to assign a projector name.

①Enter "7" and press the "Enter" key.
②Enter projector name. Display set projector name (*).
![SHARP PGF-267X - Projector Name Setting ([7]Projector Name) - 2](/content/2026/05/1084272/images/cf086e38b15f9828763693610acc7792a96fc28698e2cca228473d58f3cdf000.jpg)
Note
- Projector name can be up to 12 characters.
- You can input the characters below: A-Z, 0-9, -, _, (,), space (When "a-z" are input, they are converted to "A-Z" automatically.)
- It is the same as the name which can be confirmed or set, using RS-232C commands "PJN0", "PJN1", "PJN2" and "PJN3".
DHCP Client Setting ([8]DHCP Client)
Setting DHCP Client to "Enable" or "Disable".
Example: When setting DHCP Client to "Enable"
![setup>8 note: It sets DHCP Client. 0 ... Disable 1 ... Enable DHCP Select[0-1] : 1 DHCP Client : Enable Success get data from DHCP server. [MAC Address ] : [XX:XX:XX:XX:XX:XX] [IP Address ] : [192.168.150.2] [Subnet Mask ] : [255.255.255.0] [Default Gateway ] : [0.0.0.0] [DHCP IP Address] : [192.168.150.1]](/content/2026/05/1084272/images/7f73416dd6397d3db87646dca58942c5676b43d7e4a5845ace163d347a915d9e.jpg)
①Enter "8" and press the "Enter" key.
② Enter "1" and press the "Enter" key. Display the obtained values (*).
Disconnecting All Connections ([D]Disconnect All)
It is possible to disconnect all the TCP/IP connections currently recognized by the projector. Even if the COM Redirect port is fixed in the Busy status due to a problem, it is possible to force the Ready status back by carrying out this disconnection.
![SHARP PGF-267X - Disconnecting All Connections ([D]Disconnect All) - 1](/content/2026/05/1084272/images/abaac0bfcc9bcd0a224a6e6f6350b63817ab38c6c244168536235c45dca2e873.jpg)
flowchart
graph LR
    A["setup>d"] --> B["Disconnect All Connections(y/n)?y"]
    B --> C["Now Disconnecting..."]
① Enter "d" and press the "Enter" key.
②Enter "y" and press the "Enter" key.
![SHARP PGF-267X - Disconnecting All Connections ([D]Disconnect All) - 2](/content/2026/05/1084272/images/853f37c5d4d5209603c136fd15b2556515c3faa520ca56b772bb5c3bd8a95ef4.jpg)
Note
- If Disconnect All is performed, the connection to the projector via network will be forcibly disconnected.
Entering ADVANCED SETUP MENU
([A]Advanced Setup)
Enters ADVANCED SETUP MENU.
![setup>a ADVANCED SETUP MENU [1]Auto Logout Time [2]Data Port [5]Network Ping Test [6]Accept IP Addr(1) [7]Accept IP Addr(2) [8]Accept IP Addr(3) [9]Accept All IP Addr [0]Search Port !!Restore Default Setting [Q]Return to Main Menu advanced>](/content/2026/05/1084272/images/49b2681cfd5bd49d7b598409237eb5a9b3150cb238072101df38fef0b71d9d25.jpg)
①Enter “a” and press the “Enter” key.
Setting Auto Logout Time (ADVANCED[1]Auto Logout Time)
If there is no input after a fixed time, the projector automatically disconnects network connection using the Auto Logout function. It is possible to set the time until the projector is automatically disconnected in units of a minute (from 1 to 65535 minutes).

①Enter "1" and press the "Enter" key.
② Enter numerical value and press the "Enter" key.
Display set numerical value (*).
![SHARP PGF-267X - Setting Auto Logout Time (ADVANCED[1]Auto Logout Time) - 2](/content/2026/05/1084272/images/9ba0e0628517e09b54a0bbec14d9bfe081f981d46fe6cb1882a2570067ae59c1.jpg)
Note
- If the set value is made 0, the Auto Logout function is disabled.
- If an invalid number is entered, an error message ("Parameter Error!") will be displayed and the screen returns to the ADVANCED SETUP MENU.
Data Port Setting (ADVANCED[2]Data Port)
Setting of TCP port number. It is possible to set in the range of 1025 to 65535.

①Enter “2” and press the “Enter” key.
② Enter numerical value and press the "Enter" key.
Display set numerical value (*).
![SHARP PGF-267X - Data Port Setting (ADVANCED[2]Data Port) - 2](/content/2026/05/1084272/images/fc78f49ea54ee8472d7495ba5febe82ca4afed76b3e1c05422532f7d34262c6c.jpg)
Note
- Set according to need. Normally, use with the factory default setting.
Carrying out Network Ping Test (ADVANCED[5]Network Ping Test)
It is possible to confirm that a network connection between the projector and a computer etc. is working normally.

①Enter "5" and press the "Enter" key.
② Enter IP address of device to be tested and press the "Enter" key.
Display entered IP address (*1).
Display test result (*2).
![SHARP PGF-267X - Carrying out Network Ping Test (ADVANCED[5]Network Ping Test) - 2](/content/2026/05/1084272/images/021d62e1e196b76a8c1bc72a5dce14874b399bc7cf9339f3c6829f2b880b3cab.jpg)
Note
- If the "Enter" key is pressed without entering an IP address, the Ping Test IP address used previously is entered.
- If there is a fault with the connection, "Error: No answer" is displayed after a 5 second retry. In this case, please confirm the settings for the projector and the computer, and contact your network administrator.
Setting of Accept IP Address (ADVANCED[6]Accept IP Addr(1) - [8]Accept IP Addr(3))
It is possible to improve security of the projector by allowing connection from only a prescribed IP address. It is possible to set up to three IP addresses allowing connection to the projector.

① Enter "6", "7" or "8" and press the "Enter" key.
② Enter numerical value and press the "Enter" key.
Display set numerical value (*).
![SHARP PGF-267X - Setting of Accept IP Address (ADVANCED[6]Accept IP Addr(1) - [8]Accept IP Addr(3)) - 2](/content/2026/05/1084272/images/c97e96591559c369cc197e97e69628205f700faa3a83dfa51d2e5668743e1b16.jpg)
Note
- To invalidate the Accept IP Address being currently set, enter "0.0.0.0".
- If there is one or more Accept IP Addr being set, no connections are allowed from IP addresses that are not yet set. They can be cancelled using [9]Accept All IP Addr.
Accepting All IP Addresses (ADVANCED[9]Accept All IP Addr)
Removes IP addresses set with "Accept IP Addr".
![SHARP PGF-267X - Accepting All IP Addresses (ADVANCED[9]Accept All IP Addr) - 1](/content/2026/05/1084272/images/d5797b04f58add743c89032582f56df38a0730ead0fc0dd399f282c6260be4f2.jpg)
flowchart
graph LR
    A["advanced>9"] --> B["Accept All IP Addresses(y/n)? y"]
    B --> C["①"]
    B --> D["②"]
①Enter "9" and press the "Enter" key.
②Enter "y" and press the "Enter" key.
![SHARP PGF-267X - Accepting All IP Addresses (ADVANCED[9]Accept All IP Addr) - 2](/content/2026/05/1084272/images/339dd429d97dbe1896debe12fd7603a12a164af40d149bc205e36c32aa8570c0.jpg)
Note
- At the point in time where "y" was entered, the numerical values for Accept IP Addr(1)-(3) are reset to "0.0.0.0".
- If "n" is entered, setting is not altered.
Setting of Search Port (ADVANCED[0]Search Port)
Sets the port number used when searching for the projector from the network.

①Enter "0" and press the "Enter" key.
② Enter numerical value and press the "Enter" key.
Display set numerical value (*).
![SHARP PGF-267X - Setting of Search Port (ADVANCED[0]Search Port) - 2](/content/2026/05/1084272/images/216406397e8cbb7b76bfd9037c0b844a2687008768dfb2b4dbd41075382011f8.jpg)
Note
- Set according to need. Normally, use with the factory default setting.
Return to Default Settings (ADVANCED[!]Restore Default Setting)
Returns all menu setting values to the default state.
![SHARP PGF-267X - Return to Default Settings (ADVANCED[!]Restore Default Setting) - 1](/content/2026/05/1084272/images/ff303f5065e56b3161c1b92188a2b72a2e6bc7c098c8db674d5056dd5ec2f334.jpg)
flowchart
graph LR
    A["advanced>"] --> B["Restore All Setting to Default(y/n)? y"]
    B --> C["User Setting Initialized"]
    C --> D["①"]
    C --> E["②"]
①Enter “!” and press the “Enter” key.
②Enter "y" and press the "Enter" key.
![SHARP PGF-267X - Return to Default Settings (ADVANCED[!]Restore Default Setting) - 2](/content/2026/05/1084272/images/fd62e984a1593680686d8b53cbd1f404761c94f446329bb97e816604e3c929ea.jpg)
Note
- If the values for IP Address, Subnet Mask or Gateway of the projector have been returned to the default settings via Telnet, the computer cannot be connected to the projector depending on the computer's network settings.
Return to Main Menu (ADVANCED[Q]Return to Main Menu)
Returns to the main SETUP MENU.
![advanced>q ----SETUP MENU---- [1]IP Address [2]Subnet Mask [3]Default Gateway [4]User Name [5]Password [6]RS-232C Baud Rate [7]Projector Name [8]DHCP Client [A]Advanced Setup [D]Disconnect All [V]View All Setting [S]Save & Quit [Q]Quit Unchanged setup>](/content/2026/05/1084272/images/0e333b039257c625c04b292a315968246c146c812521e0879a47bb896d53af13.jpg)
① Enter "q" and press the "Enter" key. Returns to the SETUP MENU.
![SHARP PGF-267X - Return to Main Menu (ADVANCED[Q]Return to Main Menu) - 2](/content/2026/05/1084272/images/a1ed074cf36a45b6a5bb3ea93fead425d2894651a2d5fd2c4d3a6056915c8412.jpg)
Resetting the Lamp Timer of the Projector via LAN
When the projector is connected to a network, you can use the communications program to send a command to reset the lamp timer. The example below uses Windows ^ XP as the operating system. When you use Windows Vista ^ , use other communications program referring to the following steps, because Windows Vista ^ does not come with HyperTerminal.
1 Click "Start" – "All Programs" – "Accessories" – "Communications" – "HyperTerminal".
- If you do not have HyperTerminal installed, see the operation manual of your computer.
- Depending on the settings of your computer, you may be required to enter your area code and other details. Enter the information as required.
2 Enter a name in the "Name" fi eld, and click "OK".

3 If you are required to enter the area code, enter it in the "Area code" fi eld. From the "Connect using" drop-down menu, select "TCP/IP (Winsock)", and click "OK".

4 Enter the IP address of the projector in the "Host address" fi eld (see "TCP/IP" on the "Network" menu of the projector), and enter the data port of the projector in the "Port number" fi eld ("10002" is the factory default setting), and click "OK".

Resetting the Lamp Timer of the Projector via LAN
5 Click "Properties" on the "File" menu.

6 Click the "Settings" tab, and then click "ASCII Setup".
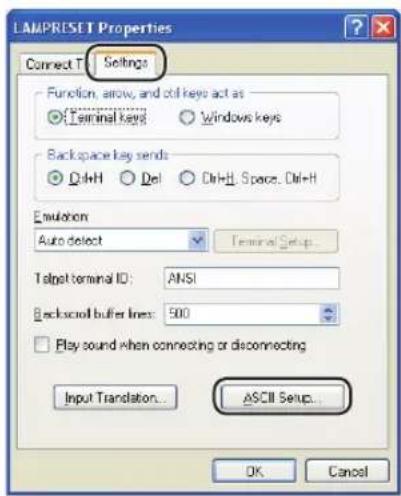
7 Select the check boxes next to "Send line ends with line feeds", "Echo typed characters locally", and "Append line feeds to incoming line ends", and click "OK".
- The LAMPRESET Properties window appears, click "OK".

8 If a user name and/or password is set for the projector, enter the user name and password.
9 Send the lamp reset command "LPRE0001".
- This command can only be sent when the projector is in standby mode.
- When "OK" is received, this indicates that the lamp was successfully reset.

10 Close HyperTerminal.
When connecting the projector using serial-connection
Check that the RS-232C terminal of the projector and a computer or the commercially available controller are connected correctly.
◀ Check that the RS-232C cable is a cross-over cable.
Check that the RS-232C port setting for the projector corresponds to the setting for the computer or the commercially available controller.
When connecting the projector to a computer using network (LAN)-connection
Check that the cable's connector is firmly inserted in the LAN terminal of the projector.
Check that the cable is firmly inserted into a LAN port for a computer or a network device such as a hub.
◀ Check that the LAN cable is a Category 5 cable.
Check that the LAN cable is a cross-over cable when connecting the projector to a computer directly.
Check that the LAN cable is a straight-through cable when connecting the projector with a network device such as a hub.
Check that the power supply is turned on for the network device such as a hub between the projector and a computer.
Check the network settings for the computer and the projector
◀ Check the following network settings for the projector.
- IP Address
Check that the IP address for the projector is not duplicated on the network. - Subnet Mask
When the gateway setting for the projector is "0.0.0.0" (Not Used), or the gateway setting for the projector and the default gateway setting for the computer are the same: - The subnet masks for the projector and the computer should be the same.
- The IP address parts shown by the subnet mask for the projector and the computer should be the same.
(Example)
When the IP address is "192.168.150.2" and the subnet mask is "255.255.255.0" for the projector, the IP address for the computer should be "192.168.150.X" (X=3-254) and the subnet mask should be "255.255.255.0".
- Gateway
When the gateway setting for the projector is "0.0.0.0" (Not Used), or the gateway setting for the projector and the default gateway setting for the computer are the same:
- The subnets for the projector and the computer should be the same.
- The IP address parts shown by the subnet mask for the projector and the computer should be the same.
(Example)
When the IP address is "192.168.150.2" and the subnet mask is "255.255.255.0" for the projector, the IP address for the computer should be "192.168.150.X" (X=3-254) and the subnet mask should be "255.255.255.0".

- When "DHCP Client" is set to "OFF" on the projector:
IP address: 192.168.150.2
Subnet mask: 255.255.255.0
Gateway address: 0.0.0.0 (Not Used)
- For network settings for the projector, refer to page 13.
Take the following steps for checking the network settings for the computer.
-
Open a command prompt.
-
In the case of Windows® 2000: click "start" → "Programs" → "Accessories"
→ "Command Prompt" in order. -
In the case of Windows® XP, Windows Vista®: click "start" → "All Programs"
→ "Accessories" → "Command Prompt" in order. -
After launching the command prompt, enter the command "ipconfi g", and press the "Enter" key.

Note
- Communication may not be established even after carrying out the network settings for the computer. In such cases, restart your computer.
C:>ipconfig


Note
- Usage examples of ipconfi g C:>ipconfi g/? displays how to use "ipconfi g.exe". C:>ipconfi g displays the set IP address, subnet mask and default gateway. C:>ipconfi g/all displays all the setting information related to TCP/IP.
- To return to the Windows ^® screen, enter "exit" and press the "Enter" key.
Troubleshooting
Check if the "TCP/IP" protocol is operating correctly using the "PING" command. Also, check if an IP address is set.
-
Open a command prompt.
-
In the case of Windows® 2000: click "start" → "Programs" → "Accessories" → "Command Prompt" in order.
-
In the case of Windows® XP, Windows Vista®: click "start" → "All Programs" → "Accessories" → "Command Prompt" in order.
-
After launching the command prompt enter a command "PING".
Entry example C:>ping XXX.XXX.XXX.XXX
"XXX.XXX.XXX.XXX" should be entered with an IP address to be connected to, such as the projector.
- When connecting normally, the display will be as follows.
(The screen may be slightly different depending on the OS type.)

- When a command cannot be sent, "Request time out" will be displayed.
Check the network setting again.
If communication can still not be established properly, contact your network administrator.
- To return to the Windows ^® screen, enter "exit" and then press the "Enter" key.
When the projector cannot be connected, even though the "PING" command is checked:
- When "Accept IP Address" is set on the projector, set the IP address of the PC to be connected.
-
When a security software is installed on the PC, or when a fire wall has been set up for the network system, connection may not be possible. Consult the system administrator when, for example, you want to change the settings to enable use of the TCP port set as the data port.
-
When neither of the above two items applies, change the settings for the data port.
A connection cannot be made because you have forgotten your user name or your password.
Initialize the settings. (See page 51 of the projector's operation manual.)
◀ After the initialization, carry out setting again.
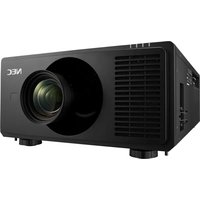



- COMPUTER/COMPONENT input and COMPUTER/COMPONENT output Terminals: mini
- DVI Digital Input•
- DVI Analog RGB Input• DVI Analog Component Input•
- RS-232C Terminal: mini DIN 9 pin female connector
- RS-232C Terminal: D-sub 9 pin male connector of the DIN-D-sub RS-232C adaptor
- RS-232C Cable recommended connection: D-sub 9 pin female connector
- USB Terminal: Type B USB connector
- RS-232C Specifications and Commands
- Computer control
- Communication conditions
- Basic format
- Info
- Note
- Commands
- Setting up the Projector Network Environment
- Network settings on the computer
- Connecting the projector to a computer
- Setting an IP address for the computer
- Setting up a network connection for the projector
- The TCP/IP setting screen appears, ready for network settings for the projector.
- Click the "Apply" button.
- The set values appear. Confi rm that the values are set properly, and then click the "Confi rm" button.
- Network - TCP/IP
- Controlling the Projector via LAN
- Controlling the Projector Using Internet Explorer
- Start Internet Explorer (version 5.0 or later) on the computer.
- Enter "http://" followed by the projector IP address set by the procedure on page 14 followed by "/" in "Address", and then press the "Enter" key.
- A screen for controlling the projector appears, ready for performing various status conditions, control, and settings.
- Confirming the Projector Status (Status)
- Controlling the Projector (Control)
- Setting and Adjusting the Projector (Settings & Adjustments)
- Setting the Security (Network – Security)
- Making General Settings for the Network (Network - General)
- Setting for Sending E-mail when an Error Occurs (Mail – Originator Settings)
- Setting Error Items and Destination Addresses to which E-mail is to be Sent when an Error Occurs (Mail - Recipient Settings)
- Setting Error Items and the URL that are to be Displayed when an Error Occurs (Service & Support - Access URL)
- Example of the display when an error occurs
- Setting up the Projector Using RS-232C or Telnet
- When Connecting Using RS-232C
- ▼SETUP MENU
- When Connecting Using Telnet
- SETUP MENU (Main Menu)
- ADVANCED SETUP MENU
- ▼ADVANCED SETUP MENU
- View Setting Detail List
- ([V]View All Setting)
- Set Items
- Save Settings and Quit ([S]Save & Quit)
- Quit without Saving Settings ([Q]Quit Unchanged)
- IP Address Setting
- ([1]IP Address)
- Subnet Mask Setting
- ([2]Subnet Mask)
- Default Gateway Setting
- ([3]Default Gateway)
- User Name Setting
- ([4]User Name)
- Password Setting ([5]Password)
- RS-232C Baud Rate Setting ([6]RS-232C Baud Rate)
- Projector Name Setting ([7]Projector Name)
- DHCP Client Setting ([8]DHCP Client)
- Disconnecting All Connections ([D]Disconnect All)
- Entering ADVANCED SETUP MENU
- ([A]Advanced Setup)
- Setting Auto Logout Time (ADVANCED[1]Auto Logout Time)
- Data Port Setting (ADVANCED[2]Data Port)
- Carrying out Network Ping Test (ADVANCED[5]Network Ping Test)
- Setting of Accept IP Address (ADVANCED[6]Accept IP Addr(1) - [8]Accept IP Addr(3))
- Accepting All IP Addresses (ADVANCED[9]Accept All IP Addr)
- Setting of Search Port (ADVANCED[0]Search Port)
- Return to Default Settings (ADVANCED[!]Restore Default Setting)
- Return to Main Menu (ADVANCED[Q]Return to Main Menu)
- Resetting the Lamp Timer of the Projector via LAN
- Click "Start" – "All Programs" – "Accessories" – "Communications" – "HyperTerminal".
- Enter a name in the "Name" fi eld, and click "OK".
- If you are required to enter the area code, enter it in the "Area code" fi eld. From the "Connect using" drop-down menu, select "TCP/IP (Winsock)", and click "OK".
- Enter the IP address of the projector in the "Host address" fi eld (see "TCP/IP" on the "Network" menu of the projector), and enter the data port of the projector in the "Port number" fi eld ("10002" is the factory default setting), and click "OK".
- When connecting the projector using serial-connection
- When connecting the projector to a computer using network (LAN)-connection
- Check the network settings for the computer and the projector
- Troubleshooting
- A connection cannot be made because you have forgotten your user name or your password.
Brand : SHARP
Model : PGF-267X
Category : Video projector