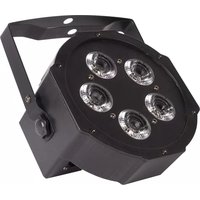
WaferPar Hex 5 - Effects machine ColorKey - Free user manual and instructions
Find the device manual for free WaferPar Hex 5 ColorKey in PDF.


| Product Type | LED Par Light (Effect Light) |
| Brand | ColorKey |
| Model | WaferPar Hex 5 |
| Power Supply | AC100-240V, 50/60Hz |
| Light Source | 5 x 6-in-1 LEDs (Red, Green, Blue, White, Amber, UV) |
| Power Consumption | 40W |
| Control Modes | Auto, Master/Slave, DMX 512, Sound Active |
| DMX Channel Modes | 6CH and 10CH |
| Working Temperature | Up to 40°C (104°F) |
| IP Rating | IP20 |
| Housing Material | Metal |
| Connectors | 3-pin XLR DMX In/Out, Power cord |
| Warranty | 1-year limited |
| Safety Distance | Minimum 5 m (164 ft) from lighted objects |
| Sound Activation | Built-in microphone with sensitivity adjustment |
| DMX Termination | 120Ω resistor recommended at last fixture |
| Display | LED with MENU, ENTER, UP, DOWN buttons |
| Cooling | Passive (no fan) |
| Included Accessories | 1x WaferPar Hex 5, 1x Power cord, User Manual |
Frequently Asked Questions - WaferPar Hex 5 ColorKey
User questions about WaferPar Hex 5 ColorKey
0 question about this device. Answer the ones you know or ask your own.
Ask a new question about this device
Download the instructions for your Effects machine in PDF format for free! Find your manual WaferPar Hex 5 - ColorKey and take your electronic device back in hand. On this page are published all the documents necessary for the use of your device. WaferPar Hex 5 by ColorKey.
USER MANUAL WaferPar Hex 5 ColorKey
natural_image
Black adjustable lighting fixture with four circular light fixtures mounted on a stand (no text or symbols visible)USER MANUAL
Introduction
Thank you for purchasing the ColorKey WaferPar HEX 5 . Please read these instructions carefully before use. Operating this fixture according to these instructions is important to avoid any possible damage or accidents caused by misuse.
➢ Packing list
■ 1x WaferPar HEX 5
■ 1x Power cord
■ User Manual
Safety
Caution! Opening this unit voids warranty. Contact ColorKey for any service requests.
Warning! To avoid electrical shock, be sure to disconnect power before any service or when moving or setting up the fixture.
Caution! Avoid direct eye exposure with the fixture when on.
This fixture is for indoor use only.
This fixture must be installed a minimum distance of 5 meters (164) away from any lighted objects.
Do not install or operate this fixture near flammable materials.
This device must be installed, operated, and maintained by a qualified professional.
Do not touch the fixture with bare hands during operation as the surface temperature of the fixture can exceed 60 馈 (140 馍). Turn off power and wait 15 minutes for the fixture to cool before attempting to touch it.
➢ Please check if the voltage is in accordance with the rated power before installing.
Do not operate this fixture if the power cord has been damaged. Turn off fixture and replace with a power cord of similar rating.
Technical Information
Power supply: AC100-240V;50-60Hz
Light source: 5×6in1 LEDs
Red, Green, Blue, White,
Power consumption: 40W
Control: Auto, Master/Slave, DMX 512, Sound active
Channel: 2 channel model: 6CHs+10CHs
Working temperature: up to 40C
IP rate: IP20
Notice to consumer: ColorKey offers a 1-year limited warranty. Please visit our website at www.ColorKeyLED.com to register your product.
Please note: As we continue to work towards improving our products and your experience as a user, we recommend that you check our website periodically for updates to user manuals and specifications at www.ColorKeyLED.com or you may contact us directly at info@colorkeyled.com.
Master/Slave Mode Operation
Master/Slave
Master/Slave mode allows you to connect multiple units together using one (1) unit to control others in a chain. When a fixture is set to Master Mode, this unit will always act as a controlling unit until it is switched out of Master Mode. The Master unit will send out signal via DMX to Slave units which will react in synchronization. When a fixture is set into Slave Mode, this fixture will receive the Master signal. To avoid master signal and DMX signal interference, do not connect DMX when using Master/Slave mode. If using a DMX run longer than 60 meters and/or over 32 units, a signal amplifier may be required.
Troubleshooting
| Problem | Solutions |
| No DMX control | ◆ Make sure that the DMX cable is properly connected ◆ Make sure that the DMX controller is operational ◆ Check the DMX cable for tears or breaks ◆ Make sure that the fixture is in DMX mode |
| Fixture does not respond to sound | ◆ Make sure that the fixture is in Sound Active mode. |
Display Operation

➢ MENU: Access the menu/Scroll through menu options
ENTER: Open/Select the current menu option
UP: Scroll through menu selection or parameter increase
DOWN: Scroll through menu selection or parameters decrease
Menu Guide
| d001 001~512 6channel mode |
| A001 001~512 10channel mode |
| r255 000~255 Red dimming (from bright to dark) |
| G255 000~255 Green dimming (from bright to dark) |
| b255 000~255 Blue dimming (from bright to dark) |
| u255 000~255 White dimming (from bright to dark) |
| y255 000~255 Amber dimming (from bright to dark) |
| P255 000~255 UV dimming (from bright to dark) |
| FH99 01~99 Strobe (change the speed by "up/down") |
| CL01 01~08 Changing colors |
| CC99 01~99 Colors jump (speed adjustment) |
| DE99 01~99 Colors growing/lading (speed adjustment) |
| CP99 01~99 Colors pulse (speed adjustment) |
| SU01 01~09 Colors (sound active changing effects) |
DMX Values
| Channel value Function | ||
| 1 0-255 | Red dimming (from dark to bright) | |
| 2 0-255 | Green dimming (from dark to bright) | |
| 3 0-255 | Blue dimming (from dark to bright) | |
| 4 0-255 | White dimming (from dark to bright) | |
| 5 0-255 | Amber dimming (from dark to bright) | |
| 6 0-255 | UV dimming (from dark to bright) | |
10 Channels
| Channel value Function | ||
| 1 0-255 | Master Dimmer RGBWA+UV(from dark to bright) | |
| 2 0-255 | Red dimming (from dark to bright) | |
| 3 0-255 | Green dimming (from dark to bright) | |
| 4 0-255 | Blue dimming (from dark to bright) | |
| 5 0-255 | White dimming (from dark to bright) | |
| 6 0-255 | Amber dimming (from dark to bright) | |
| 7 0-255 | UV dimming (from dark to bright) | |
| 8 0-255 | Strobe (speed adjustment) | |
| 9 (macro) | 0-50 | No function |
| 51-100 Colors output | ||
| 101-150 | Colors Jump Changing | |
| 151-200 | Colors growing/fading | |
| 201-250 | Colors Pulse Change | |
| 251-255 | Sound-Active | |
| 10 | 0-255 | Speed for macro function |
DMX Connections
DMX Cable:
The WaferPar HEX 5 can be controlled via DMX using a 3-pin XLR connection. The standard DMX connection is XLR is: one end connects to the male plug, and the other connects to the female. As below: pin 1: ground, pin 2: negative signal, pin 3: positive signal

| XLR Pin Configuration |
| Pin 1 = Ground |
| Pin 2 = Data Compliment (negative) |
| Pin 3 = Data True (positive) |

Noted: In order to avoid failures and interference signal transmission, we connect a resistance120Ω (1/4W) at the end of the DMX connecting as below:

Termination reduces signal errors and avoids signal transmission problems and interference. It is always advisable to connect a DMX terminal, (Resistance 120 Ohm 1/4 W) between PIN 2 (DMX-) and PIN 3 (DMX +) of the last fixture.
The Conversion between 3 pin and 5 pin XLR
If the output cable of DMX512 controller is the 5PIN, please use 1pc 5PIN to 3PIN cable
| 3-Pin XLR to 5-Pin XLR Conversion | ||
| Conductor | 3-Pin XLR Female (Out) | 5-Pin XLR Male (In) |
| Ground/Shield | Pin 1 | Pin 1 |
| Data Compliment (- signal) | Pin 2 | Pin 2 |
| Data True (+ signal) | Pin 3 | Pin 3 |
| Not Used | Do Not Use | |
| Not Used | Do Not Use | |
Brand : ColorKey
Model : WaferPar Hex 5
Category : Effects machine