
DT 01 - Telephone BLAUPUNKT - Free user manual and instructions
Find the device manual for free DT 01 BLAUPUNKT in PDF.


| Product Type | DECT Cordless Phone |
| Brand | Blaupunkt |
| Model | DT 01 |
| Number of Handsets | 1 |
| Display | Backlit LCD with caller ID and clock |
| Keypad | Illuminated alphanumeric keypad |
| Power Supply - Base | AC 220-240V, 50Hz |
| Power Supply - Handset | 2x AAA NiMH rechargeable batteries (600mAh) |
| Talk Time | Up to 10 hours |
| Standby Time | Up to 100 hours |
| Range (Indoor) | Up to 50 meters |
| Range (Outdoor) | Up to 300 meters |
| Phonebook Capacity | 50 contacts |
| Caller ID | Yes (requires network subscription) |
| Redial | Last 10 numbers |
| Speakerphone | Yes, hands-free operation |
| Mute | Yes |
| Ringer Volume Control | Off/Low/Medium/High |
| Weight (Handset) | Approx. 150 g |
| Dimensions (Handset) | 165 x 50 x 28 mm |
| Cleaning | Wipe with a soft dry cloth; avoid liquids |
| Safety | Do not expose to moisture or heat sources |
| Spare Parts | Replacement batteries and charger base available |
| Warranty | 2 years |
Frequently Asked Questions - DT 01 BLAUPUNKT
User questions about DT 01 BLAUPUNKT
0 question about this device. Answer the ones you know or ask your own.
Ask a new question about this device
Download the instructions for your Telephone in PDF format for free! Find your manual DT 01 - BLAUPUNKT and take your electronic device back in hand. On this page are published all the documents necessary for the use of your device. DT 01 by BLAUPUNKT.
USER MANUAL DT 01 BLAUPUNKT
- Health and Safety .... 3
- Product specifications .... 6
- Getting to know your phone....6
- Installation 8
- Powering On/Off....9
- Call functions ...... 9
6.1 Make a call....9 6.2 Answer the call 9 6.3 Making emergency calls 9 6.4 Functions available during a call 9 6.5 ECT 10
- Menu functions ...... 11
7.1 Contacts.... 11 7.2 Call logs / History 11 7.3 Settings....12 7.4 FM Radio 14 7.5 Messaging .... 14 7.6 Music 15 7.7 Extra....15 7.8 File Explorer 15 7.9 Memory Cleanup 15
- Charging the battery .... 15
8.1 To Charge the phone 15 8.2 Low Battery Warning....16
- Declaration of Conformity .... 16
1. Health and Safety
Please read the safety instructions carefully, as ignoring them may be dangerous or illegal.
The owner of the device is responsible for the use of this appliance.
The main power socket used must be close to the charger/holder and easily accessible, so that it can be used as an 'on/off' facility.
RF/SAR INFORMATION
Your phone contains a transmitter and receiver. When powered ON it receives and transmits low-level radio-frequency (RF). Country governments all over the world adopt state security guidelines developed by independent scientific organisations such as ICNIRP and IEEE. These guidelines establish permitted levels of RF energy for the general population. The guidelines include a substantial safety margin designed to ensure the safety of all persons, regardless of age and health. Specific Absorption Rate (SAR) is the unit of measurement for absorbed radio quantity when using mobile devices. SAR tests are conducted using standard operating positions with the phone transmitting at its highest certified power level, however, the actual SAR level of the phone while operating can be well below the maximum value. In general, the closer you are to a base station, the lower the power output of the phone. The SAR values may vary, depending on different models of phones. To ensure the safety and health of the users, the phone is designed and manufactured to meet the radio exposure guidelines. The ICNIRP SAR limit for mobiles devices used by the general public is 2W/kg and highest SAR value for this device is tested for use at the ear is below the SAR limit recommended by ICNIRP.
BATTERIES
- Never use a charger or battery that is damaged in any way. Use the battery correctly.
- Do not short-circuit the battery, which may damage it, cause heat or cause fire.
- Do not dispose of batteries in high temperature or in a fire as they may explode. Return the waste battery to the dealer or appointed recycle locations.
- Do not dispose as household waste. Battery charging time depends on the remaining
EN
battery charge, the type of battery, and the charger used. The battery can be charged and discharged hundreds of times, but it will gradually wear out.
- When the operation time is noticeably shorter than normal, it is time to replace the battery with a new one.
- Use only original or approved chargers and batteries. Unplug the charger from the electrical plug and the device when not in use.
- Do not over charge as this will damage the battery and shorten its life. Leaving the battery in extremely hot or cold places will reduce the capacity of the battery. Batteries are particularly affected by temperatures below 0°C.
OPERATING ENVIRONMENT
- Remember to follow any special regulations in force in the area you are in, and always switch OFF your phone whenever it is forbidden to use it, or it may cause danger.
- It is recommended that the equipment should only be used in the normal operating position.
- Do not expose the equipment to temperatures below -10°C or above 55°C.
MEDICAL DEVICES
Ensure that you switch OFF your phone in areas near electronic medical equipment that require the phone to be switched OFF (such as heart pacemakers, hearing aids, etc.). Most medical devices can shield the phone's RF signal, but some cannot. If you have any doubts, or need to find out more, please consult your doctor or medical device manufacturer.
PACEMAKERS
Pacemaker manufacturers advise that the distance between your phone and a heart pacemaker should be at least 6 inches (15.3 cm); otherwise, the phone could interfere with the pacemaker. People fitted with a pacemaker should note the following:
- Always keep a distance (at least 6 inches) between the phone and the pacemaker when the phone is switched ON.
- Listen to the phone using the ear furthest from the pacemaker.
Switch OFF your phone if you feel there is interference and consult the doctor as soon as possible.
This phone, like any wireless phone, operates using radio signals, which cannot guarantee connection in all conditions. Therefore, you should never rely solely on any wireless phone for essential communications like medical emergencies. To make or receive calls, the phone must be switched ON and in a service area with adequate signal strength. To make an emergency call, enter the local emergency number in standby mode and press the call button.
CARE AND MAINTENANCE
Your phone is a product of superior design and craftsmanship and should be treated with care. The suggestions below will allow you to enjoy this product for many years.
- Keep your phone away from small children and pets. They may accidentally damage the phone or choke on small parts.
- Keep the phone dry and avoid liquids that corrode the phone. Do not use the phone with wet hands, which may cause an electric shock.
- Do not store the phone in hot areas, which can shorten the life of electronic devices, damage batteries, or melt accessories.
- Do not store the phone in cold areas. When the phone warms up to its normal operating temperature, moisture can build up inside the phone, which may damage the phone's electronic circuit boards.
- Do not expose your phone to hot sunlight which may cause it to over-heat.
- Do not place your phone near inflammable liquids, gas or explosive substances.
- Do not drop or knock the phone. Rough handling can break internal circuit boards.
- When cleaning the phone, use a damp or anti-static cloth. Do not use a dry or static cloth.
- Do not use chemicals such as cleaning solvents to clean the surface. Switch OFF the phone first before cleaning.
- Do not paint the phone. Paint can prevent proper operation.
- If the phone or battery gets wet and the label on the phone is damaged, phone repairs are no longer guaranteed by the manufacturer's warranty, even if the warranty for your phone has not expired.
2. Product specifications
The device handles a Mini (normal) SIM card.
Power Supply Features:
- Input: (AC), 100-240 V - 50/60 Hz - 0.15 A • Output: (DC), 5 V - 1A
Battery Type and Voltage:
• Li-ion battery, 3.7 V, 1000 mAh
Network type:
• GSM 850/900/1800/1900 MHz • WCDMA 900/2100 MHz - LTE FDD B1/3/7/20
SAR values:
• 1.814 W/Kg (Body)
3. Getting to know your phone
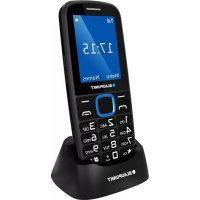
- LCD
- Handset position (Hooker)
- Left soft key/Menu
- Call/Answer
- Speaker
- Alphanumeric keypad
- Navigation keys
- Right soft key/Back/Delete
- Power ON/OFF key/End call/Screen
active key
- Mute
- ECT – Explicit Call Transfer
- Redial
- M1 speed dial key
- M2 speed dial key
- M3 speed dial key
- Loudspeaker key
- Antenna connection
- Battery cover
- USB Port
- Battery connect port
- SIM card slot
- SD card slot
- RJ11 receiver connector
EN

4. Installation
1. Open and remove the phone back protection cover

2. Insert the SIM into the device. The golden contacts on the SIM card face down and the edges align with the corresponding edges of the SIM card.

3. Insert the battery into the slot on the back of the battery cover that matches the phone's contact and battery.

4. Connect the charging plug into the charger USB port for charging
5. Connect external antenna to antenna interface
5. Powering On/Off
- Press and hold down the power key until the display logo lights
- If you require a PIN code after power on, enter the correct PIN. If you enter the wrong number, press the right soft key to delete the number.
- To turn off the phone, press and hold the power key until the screen turns off.
6. Call functions
6.1 Make a call
- When the phone is in standby mode, dial the number you want to call using the alphanumeric keypad.
- If you have input a wrong number, press the Right soft key to delete the last number or press and hold the Right soft key to delete all numbers.
- Press the Dial key to dial the number. If the number is in the phone book, the contact name appears on the screen.
- Press Power on/off/END key to end the call.
6.2 Answer the call
When you receive a call, the phone rings, and the display shows the number or contact name (if stored in the phone book):
Pick up the receiver or press Call key to answer the call.
6.3 Making emergency calls
You can make emergency calls even if you have not registered to the local network or do not have a SIM card. Enter the local emergency number and then press the Dial key to make an emergency call.
6.4 Functions available during a call
Some operations and services are available during an active call. Many of these depend on network support; please check with your network service provider for these options. Press the left soft key [Options] to access the call options during the active call in the menu.
These are the following (some functions can only be used under special conditions):
- Mute: You can mute your device's microphone when you need to make a conversation while you are on the call so that someone on the other side of the line does not hear it.
- Hold / Continue: Hold an active call or keep it from hold.
- Add call: You can manually enter a phone number to call it.
- Send message: You can enter the messages menu.
- Swap: * You can exchange the held and active calls.
- Merge calls: * Combine calls to a conference call. • ECT: * Transfer the active call and exit from the conversation.
- Manage conference call/Separate call: * Separate the conference call.
- Manage conference call/Hang up: * Hang up the selected call.
Note: The menu items marked with [*] only work under special conditions. Such as: "Swap", which can only be achieved if one of the calls is held on the other active. To access the conference call, you need a service that you can activate with your network operator.
6.5 ECT
The Explicit Communication Transfer (ECT) service enables a user to transfer an ongoing call to a third party so that the other two parties can communicate with each other.
If you have another active call that you want to answer, you can do so below.
You will have to press the Answer button and two options will appear:
- Hold current call and Answer
- Hang up current call and Answer.
If you select the first one, the incoming call will be answered and the first call will be put on hold.
Then, when you press the ECT key, the Call Transfer is done and the device exits the call. Additionally, you can select ECT from the Options menu after selecting Hold and Answer, and the call will be transferred in the same way.
7. Menu functions
7.1 Contacts
In Menu mode, enter [Contacts] menu or press Right soft key on Idle screen.
Move the cursor to first input box for search the contact record quickly, you can input the character or number to search from the records list, and the matched records will list on the LCD.
Press [Menu key] to enter [Options] menu, with the following options:
- Select → Open the contact details
- Add contact → Create a new contact • Edit → Edit an existing contact
- Add to speed dial → Add the selected contact to the Speed dial list
- Contacts to display → Select the displayed contacts source (SIM/Phone/Both)
- Import/Export → Import or Export contacts from/to Internal/External storage
- Batch delete → Delete one or more contacts • SIM capacity → Check the SIM card storage • Phone capacity → Check the Phone storage
Create a new contact:
- Select Menu/Contacts/Options/Add contact
- Choose the contact locations (Phone/SIM card) • Enter contact info (Name, Phone number) • To save contact, select Options/Save
7.2 Call logs / History
In standby state, enter Menu/History menu. All call log will be listed here. The following operations are available in this menu: Select, Add to blacklist, Clear call logs To call a number from the list, press the Call key.
7.3 Settings
In standby state, enter Menu/Settings menu.
7.3.1 Sound
You can set below items.
Volumes: You can adjust Music, Ringtone & notifications and Alarm volumes.
Phone ringtone: Customize the ringtone.
Default notification sound: Customize the default notification sound.
Tap sounds: Set it as on or off.
Screen lock sound: On/Off
7.3.2 Display
You can set below items.
Brightness: Adjust the LCD display brightness
Sleep: Set the display sleep time.
Menu mode: Choose between Grid and Page options
7.3.3 Call settings
In Voice call menu, you can set
• Voice mail: Select the voice mail service operator and the voice number. - Call forward: Divert the incoming calls to other phone number. This function requests network's support. Please contact your operator for details. - Call barring: Use the menu to set the call barring. It contains outgoing calls, incoming calls, Cancel all, Change barring password. This function requests network's support. Please contact your operator for details.
• Additional settings: You can set Caller ID and call waiting function.
In General settings menu, you can set:
- Fade-in ringer: When enabled, the incoming calls ring volume will be turned up.
- Speed dial: Enable or disable the speed dial function and set the speed dial list.
- Family number: In this menu, you can set the 3 family number for the M1, M2 and M3 buttons
- Delay dial: Select the delay time of the automatic dial method.
7.3.4 Wi-Fi
Connect and disconnect the WLAN
7.3.5 Bluetooth
Connect and disconnect the other device through Bluetooth.
7.3.6 Data usage
Query the data usage of the Mobile or the Wi-Fi network.
7.3.7 Security
Screen lock: Set the screen lock and password.
Set up SIM card lock: You can set PIN lock to On or Off and change PIN. The default PIN code is provided by your SIM operator.
7.3.8 Date and Time
Set Automatic date & time; Automatic time zone; Set date; Set time; Select time zone; Use 24-hour format.
7.3.9 Language
Set the phone language.
7.3.10 Wallpaper settings
Select the device wallpaper.
7.3.11 Scheduled power on/off
You can set the time when the device automatically turning on/off.
7.3.12 Reset
Factory data reset: Restore the phone settings to factory data status.
7.3.13 About phone
Display some phone information, such as Status, Model number, Android version, Baseband version and so on.
7.3.14 More
Tethering & portable Hotspot: Set the phone as a USB or Wi-Fi Hotspot.
Mobile networks: You can set Data connection, Data roaming, VoLTE function, Network Mode and Access Point Names.
7.4 FM Radio
In standby state, enter Menu/FM Radio menu, the following are the options:
Turn off, Auto search, Radio list, Mute, Manual input
7.5 Messaging
In standby state, enter Menu/Messaging menu.
7.5.1 Write Message
In the edit mode, you can edit SMS content and add recipient.
When editing SMS, press the [Menu key] to enter [options] menu, as listed below:
- Insert contacts number to SMS recipient.
- Insert common phrases: Insert template message.
- Back: Exit the current editing interface.
After you wrote the message, choose Options/Send, to send out the message.
7.5.2 Reading new message
When you receive a new message, the phone will beep and display it on the status bar.
From the main menu, Enter "Messaging". The list of messages received from the most recent to the oldest is displayed.
7.5.3 Message setting
You can set the function for Text message in Menu/Messaging/Options/Settings.
Here you can choose from
General settings:
Font size, Delete old messages automatically, Text message limit, SMS forward number, Encode type, Notifications, Sounds, Common phrase
SIM card settings:
Delivery reports, SMS validity, Manage SIM card messages, Save SMS On SIM, SMS service Center
7.6 Music
In standby state, enter Menu/Music menu. All media files will be listed on the LCD when the phone enters the music menu, and you can select one to play. Some operations as below will be done in the music player interface:
Play, Add to playlist, Set as ringtone, Delete, Share, Delete more, Shuffle, Repeat.
7.7 Extra
In the Menu/Extra menu, you can choose from the following applications: Blacklist, Calculator, Calendar, Clock.
7.8 File Explorer
In standby state, enter Menu/File manager menu. You can Open, Rename or Delete the file in Micro SD card memory.
7.9 Memory Cleanup
Close the recently not used applications from the background.
8. Charging the battery
8.1 To Charge the phone
- Connect charging base with USB cable.
- Connect USB cable with any home use power adaptor.
- If the connection is correct, the charging indicator appears on the status bar.
8.2 Low Battery Warning
When the battery is in low power status (15%), a pop-up message will show. You must place the handset on the base or connect the power adapter to charge the battery.
If the phone battery is out of power, it will stop working and cannot make or receive calls.
9. Declaration of Conformity
The Blaupunkt DT 01 is compliant with the essential requirements and relevant provisions of RoHS Directive 2014/53/EU and 2011/65/EU. The Declaration of Conformity is available on our website.

Designed and Engineered by
Blaupunkt Competence Center Mobile Europe
HTM Mobile Kft.
Assembled in P.R.C by
EFONE INTERNATIONAL CO., LIMITED
Address: 12/F., San Toi Building, 137-139 Connaught Road Central, Hong Kong, China
For more information on this product, visit our website at www.htmmobile.hu or www.blaupunkt.com.


- HEALTH AND SAFETY
- RF/SAR INFORMATION
- BATTERIES
- OPERATING ENVIRONMENT
- MEDICAL DEVICES
- PACEMAKERS
- CARE AND MAINTENANCE
- PRODUCT SPECIFICATIONS
- GETTING TO KNOW YOUR PHONE
- INSTALLATION
- POWERING ON/OFF
- CALL FUNCTIONS
- MAKE A CALL
- ANSWER THE CALL
- MAKING EMERGENCY CALLS
- FUNCTIONS AVAILABLE DURING A CALL
- ECT
- MENU FUNCTIONS
- CONTACTS
- CREATE A NEW CONTACT
- CALL LOGS / HISTORY
- SETTINGS
- SOUND
- DISPLAY
- CALL SETTINGS
- WI-FI
- BLUETOOTH
- DATA USAGE
- SECURITY
- DATE AND TIME
- LANGUAGE
- WALLPAPER SETTINGS
- SCHEDULED POWER ON/OFF
- RESET
- ABOUT PHONE
- MORE
- FM RADIO
- MESSAGING
- WRITE MESSAGE
- READING NEW MESSAGE
- MESSAGE SETTING
- MUSIC
- EXTRA
- FILE EXPLORER
- MEMORY CLEANUP
- CHARGING THE BATTERY
- TO CHARGE THE PHONE
- LOW BATTERY WARNING
- DECLARATION OF CONFORMITY
Brand : BLAUPUNKT
Model : DT 01
Category : Telephone