PoV - Webcam Ipevo - Free user manual and instructions
Find the device manual for free PoV Ipevo in PDF.


| Product Type | Webcam |
| Brand | IPEVO |
| Model | PoV |
| Dimensions (L x W x H) | 95 x 30 x 24 mm |
| Weight | 70 g |
| Interface | USB 1.1 / 2.0 |
| Sensor | CMOS, VGA (640 x 480) |
| Maximum Frame Rate | 30 fps |
| Color Depth | 24 bit |
| Focus Range | 6 cm to infinity (macro mode at 6 cm) |
| Digital Zoom | 100% - 200% (not available above 800x600 resolution) |
| Microphone | Built-in |
| Stand | Included with clip and base for monitor or desk use |
| Software | Point of View (on CD) with image sharing and remote monitoring |
| Compatibility | Skype, MSN, and other instant messaging applications |
| Power Supply | USB powered |
| Warranty | 12 months from original purchase |
| Package Contents | PoV webcam, stand and base, software CD, quick guide |
| Special Features | Snapshot button, send-out button, adjustable focus ring, macro mode, remote monitoring with password protection |
| Image Control | Brightness, contrast, gamma, exposure (auto mode) |
| Effects | Various frames and effects for images and video |
| Care and Maintenance | Clean lens with a soft, dry cloth; avoid exposure to liquids |
| Safety | Do not disassemble; keep away from children; avoid extreme temperatures |
Frequently Asked Questions - PoV Ipevo
User questions about PoV Ipevo
0 question about this device. Answer the ones you know or ask your own.
Ask a new question about this device
Download the instructions for your Webcam in PDF format for free! Find your manual PoV - Ipevo and take your electronic device back in hand. On this page are published all the documents necessary for the use of your device. PoV by Ipevo.
USER MANUAL PoV Ipevo
natural_image
Black IPEVO digital camera with a green control knob, shown on a stand (no text or symbols on device body)- Quick Installation 003
- What is PoV? 006
- Use PoV as a general purpose webcam 009
- Point of View software 012
- Point of View advanced operation 017
FAQ 021
Warranty and after service 024
1. Quick Installation
Attention:
• To avoid hardware conflict, please uninstall other webcam drivers currently running on your (PC)system.
- Please install the software driver from the CD prior to connecting the PoV to your USB port.
1-1 Insert the included CD
After inserting the CD, the set-up guide will begin.

(If you do not see this screen or if the program fails to load automatically, please double-click on "IPEVO.exe" located on the CD to manually start the program)
1-2 Install Skype
From the main installation page, select "Link to Skype software" to install the Skype program, or from your browser, go to http://www.skype.com to get the latest version.

* PoV will function as a high-quality webcam even without Skype installed. Using PoV along with Skype will provide enhanced “shoot and send” functionality.
1-3 Install PoV driver
Step 1.
After installing Skype, please select "Install PoV driver" from the main menu.
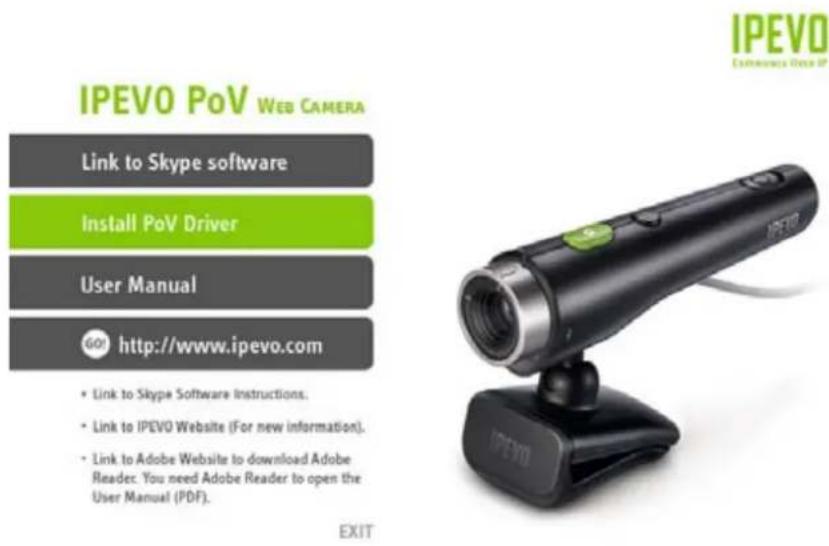
The PoV driver will also automatically install Point of View software which works with Skype to enable image sharing and remote control features.


In some cases, you may receive a warning [the software you are installing has not passed Window Logo testing to verify it's compatibility with Windows XP]. If you see this warning screen, please click "continue anyway" to proceed with the installation
Step 2.
When the installation is complete, you may insert the PoV into your computer's USB port. Windows will automatically detect the new setting and start "Found New Hardware Wizard". Please follow the instructions on the screen to finish installing the software.
If you see a warning screen, please click "continue anyway" to install the PoV software.


Step 3.

Point of View
A shortcut to begin using the PoV software will be added on your computer desktop after the installation is complete.
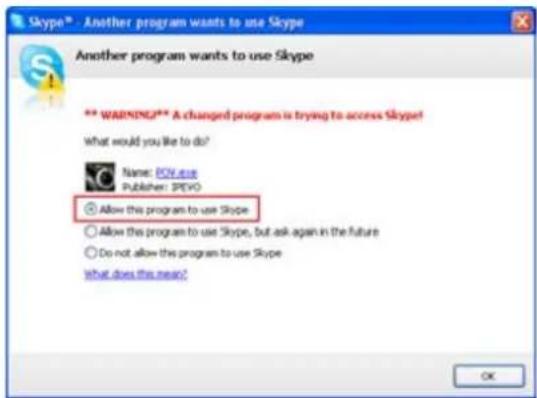
Start using the PoV and enable Skype file sharing and the "Remote Monitor" by double clicking the PoV icon on your desktop or by selecting the program from your Window's Start menu. To prevent future pop-ups, select "allow this program to use Skype".

1-4 Uninstalling the PoVDriver
To uninstall the PoV, go to Start-All Program-IPEVO, choose "PoV uninstall" and follow the instructions on your screen to uninstall the program.
2. What's PoV?
2-1 PoV – function keys and led indicators

A. Snapshot button: Captures a still image. Please see the User Guide located on the CD for more information.
B. Send-Out button: Please see the User Guide located on the CD for more information.
C. USB power switch: Turn your PoV on and off with this switch.
D. Adjustable focus ring: Get a clear image by adjusting the focus ring -or- get up close by using Macro mode. Please see "2-2 how to adjust focus on PoV"
E. Microphone: Built in microphone can capture sound for video conferencing or video capture. Please see instruction "3. Use PoV as a Webcam" inside the CD.
F. Power indicator (green): Indicates that the camera is on. The PoV is ready for use.
G. Shooting indicator (red): Indicates that the PoV is actively recording or transmitting live video.
H. Stand
I. Base
2-2 How to adjust the PoV focus

PoV comes with the 6cm\~infinity focus ring. The ring can be rotated up to 270 degrees to focus exactly on a selected subject or object of interest.
Normal mode (40cm\~ infinity): This range is the standard focal distance for PoV under most video talking circumstances. Rotate the focus ring for total control when objects are located between 40cm and infinity.
Macro mode (6cm): Rotating the focus ring counter clockwise. The small flower icon located on the focus ring shows the starting position to activate Macro mode.
2-3 PoV stand set up
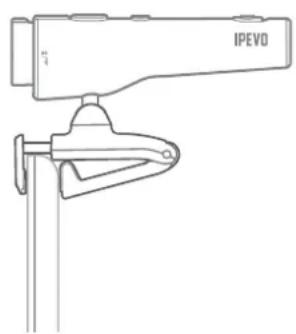
- Set up PoV on LCD or Notebook Monitor
natural_image
Technical line drawing of a mechanical clamp or bracket with IPEVO label (no text or symbols beyond label)
natural_image
Technical line drawing of a mechanical device labeled 'IPEVD' (no additional text or symbols)There are two options when attaching the PoV on your notebook or LCD monitor.
(1) Use the spring loaded clip to grip the edge of your screen like a vice.
(2) Hang your PoV stand in a 'L' shaped hinge against the back of your monitor.
- Use the PoV on your desk or a flat surface by using the stand along with the base.

natural_image
Line drawing of a mechanical device with labeled IPEVO component (no text or symbols on the device itself)2-4 Using the PoV as a hand held camera

We didn't just design the PoV to sit patiently on top of your monitor. Pick up the PoV and hold it like a pen or laser pointer. Aim at specific objects or show-off your surroundings to reveal your 'point of view' with friends, family and contacts. Don't just be a 'talking head' during an internet video chat. Grab the PoV and let your audience see what you see.

natural_image
Line drawing of a hand holding an IPEVO-branded object next to a teacup (no text or symbols on the diagram itself)3. Use PoV as a general purpose webcam
The PoV is simple and easy to use. In addition to Skype, PoV can be used with almost any internet chat and communication software or service.
3-1 PoV with Skype
Step 1.
Please open Skype, click "tool" and choose "option"

Step 2.
Choose “video setting” on left, and check “enable Skype video”. Then choose “PoV” on the list of “select webcam”. Check the preview screen to ensure the PoV is working. While on a call, the PoV will activate and display your selected image to your contact.

Note:
If you didn't check "start my video automatically when I am in a call", you can also start the video manually whenever you are talking with your families or friends.
Step 3.
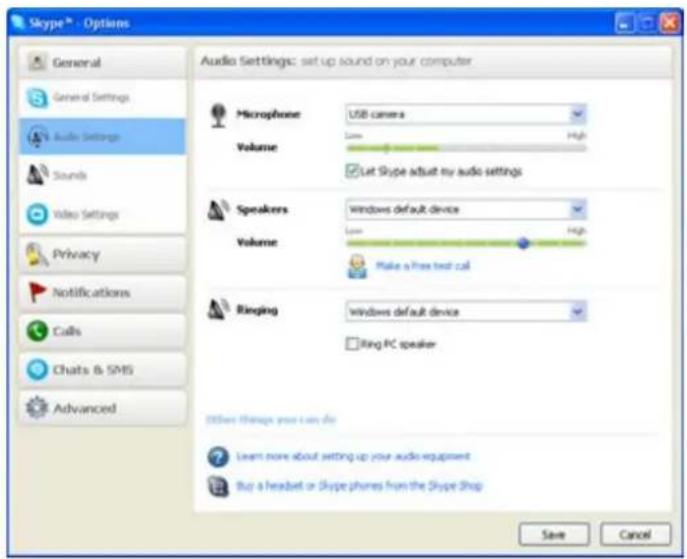
Please go to "Audio setting" on the screen below. Select "USB camera" for Microphone. If you chose not to use the PoV as a microphone, please choose the appropriate device you would like to use for audio input.
Step 4.
After you click "Save", PoV will function as your webcam for Skype.
3-2 PoV with MSN
Step 1.
Please open MSN, click "tools" and choose "audio and video set up"

Step 2.
Please follow the screen to choose the device you want to use for speaker and microphone.


In the step 3, please choose PoV as the default camera. The PoV is ready to use when you can see the image displayed in the preview window.

Step 3.
Once you've completed these settings, you'll be able to enjoy the PoV to capture still images and video.
4. Point of View Software
The Point of View software includes two unique applications to get the most out of your PoV: (1) Image Sharing and (2) Remote Viewing.
Start the Point of View application by using any of these three options
- Double click on the Point of View Icon or shortcut .

Point of View
- Press and hold the snapshot button on the PoV camera until the "Point of View" application starts.
- Double click the Point of View icon in bottom right task bar.

4-1 "Shoot and Send" Function

You can see the current preview image in the "PoV preview" window on the left. After pressing the snapshot button, the photos will show in "picture preview" window on the right. You can easily send the snapshot to any Skype contact by pressing the "send photo" button on your Point of View screen.
You can also send the Point of View software to any Skype contact by clicking "send software" icon.
4-2 Snapshot Function
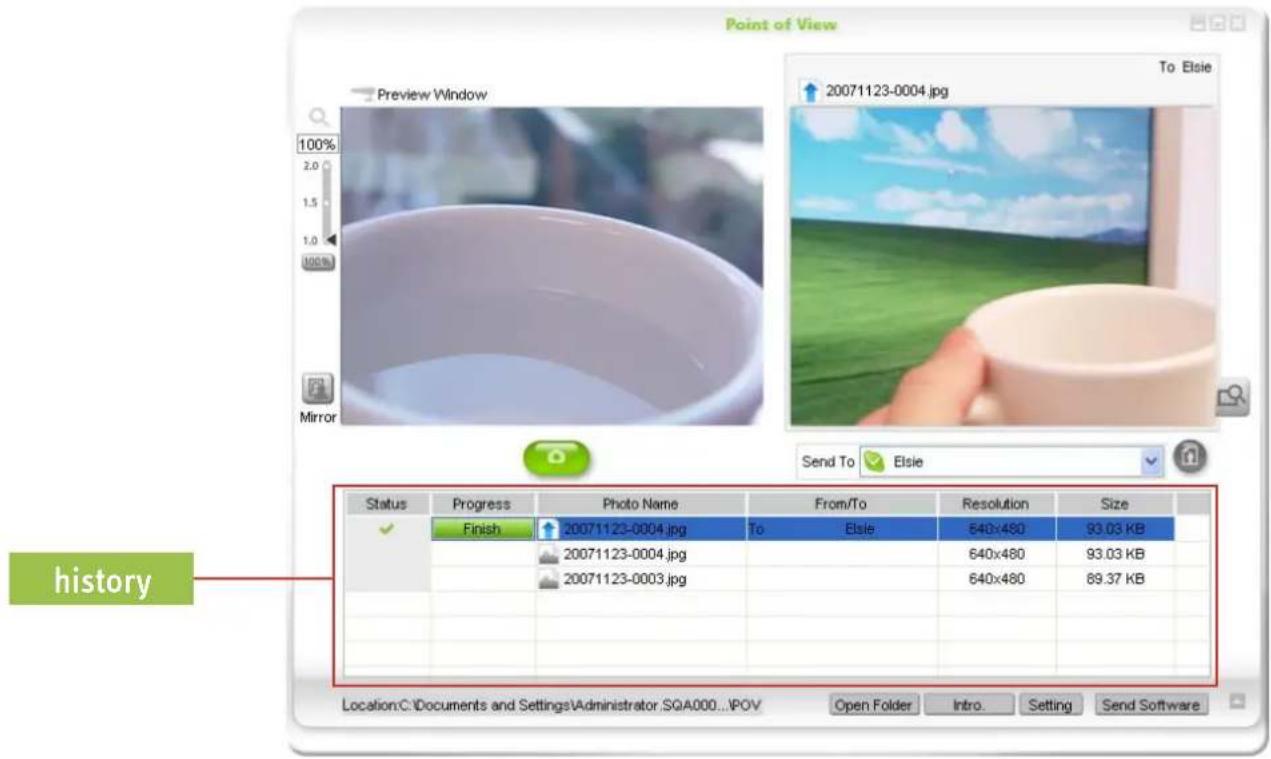
Pressing the snapshot button on the PoV will capture an image and save it directly to your computer. The history window will display file names, resolution information, and size. All photos will be saved in the "PoV" folder located in "My Documents/My Pictures" ("My document/ My Pictures/ PoV")
4-3 Remote-Monitor Function
PoV is more than just a basic webcam, it can also function as a password protected remote monitoring device. For example, if you want to check on your home while you are at the office or on vacation, just set up the PoV remote monitor function. Once activated, you can dial in through Skype. Enter your password and the PoV will give you viewing access from anywhere on the internet when you are using the "Point of View" software.
How to set up remote monitor function:
- From the Point of View application window, select "setting" and go to "remote monitor" tab.

- Enter a new password which will be used when you log-on remotely. Press "ok" to confirm your entry.(you can press "change" to change your password anytime.)
- Check "Enable automatic answering Skype incoming calls function and start Skype video"
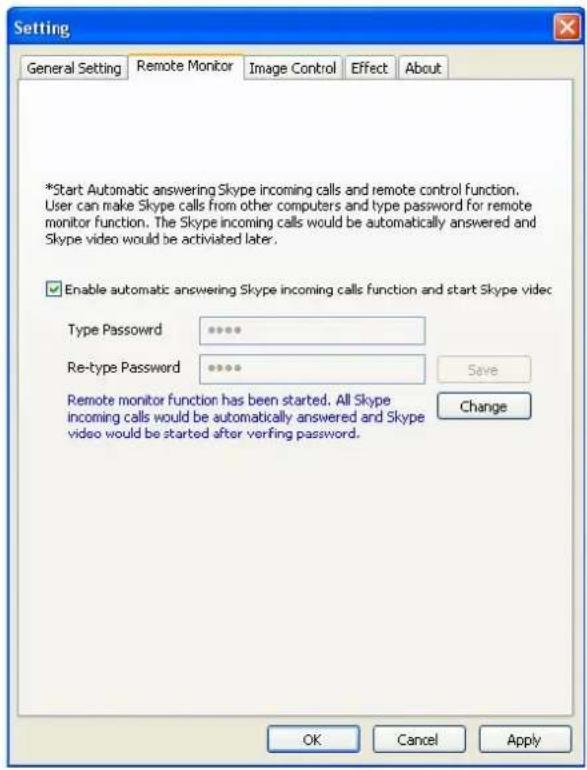
- The Set-up is confirmed once you press `Ok". All Skype incoming calls will be answered automatically.
How to enable Remote Viewing:
- Place a Skype call to the computer (Skype ID) where you set-up a PoV with the "Remote Monitor" application enabled.
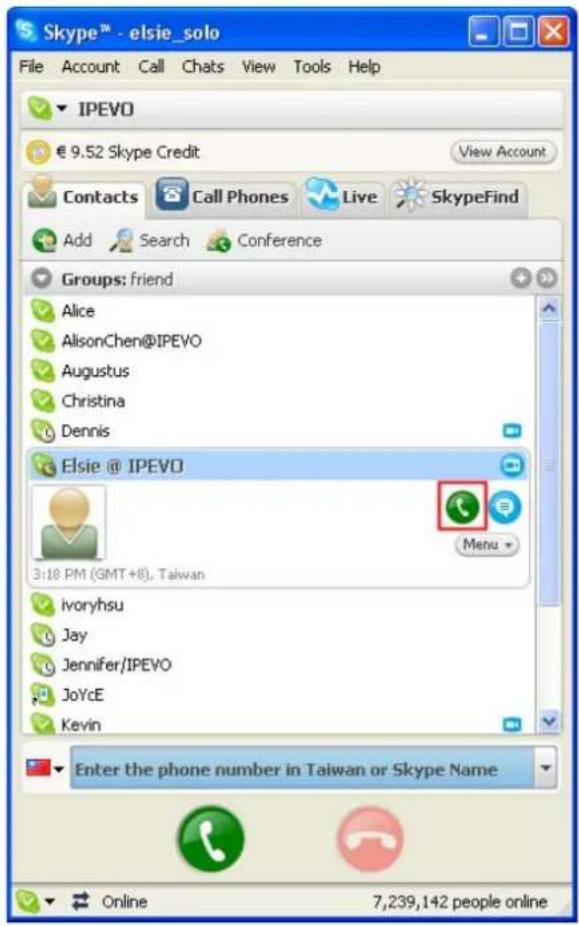
- Within your Skype chat window, will be prompted to enter your password.
![Eisie @ IPEVO (Online) Skype® Chat Add Send More Options Bookmark Chat history enabled What does this mean? Show messages from: This conversation | Today: [ This week ] Last 30 days | Beginning Eisie @ IPEVO says: 11.04.29 AM Please enter password. Eisie @ IPEVO Menu Add more people to this chart! Emoticons Videos Set Font IPEVO Personalize > Online History on](/content/2026/05/1082501/images/a7631ce4dd06d898dcbcdb991ecf3aff8a54e5e22569c0d114b801f61eda601e.jpg)
- Once your password is verified, you will be able to begin viewing the remote PoV in your Skype window (For security purposes, the call will be canceled if you enter the wrong password more than three times.)
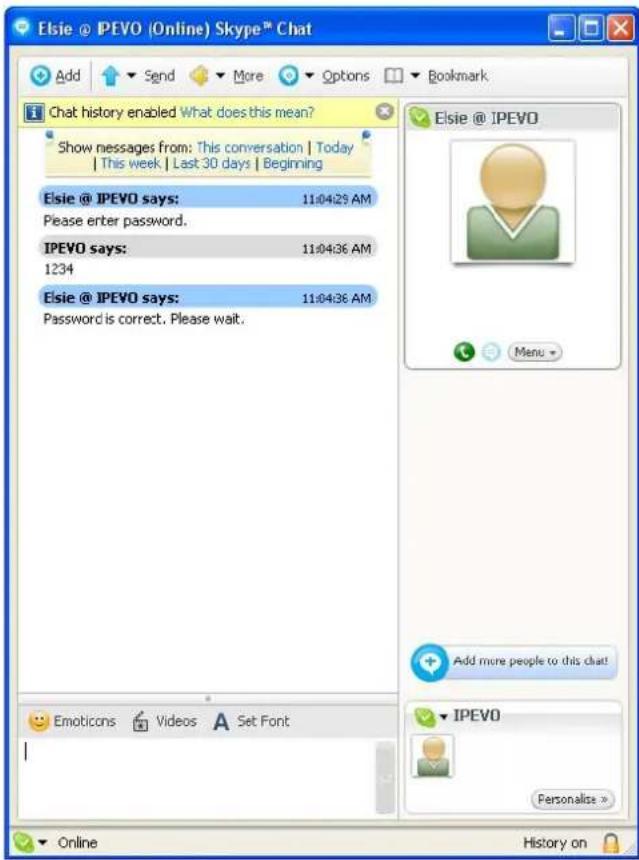

Suggestion: Set up a new Skype account if you plan to use remote monitor function frequently. While the remote monitoring program is running, all incoming calls may be answered automatically by the Point of View application
5. Advanced Applications of the PoV
5-1 Point of View main window

A. Adjust screen: You can close or minimize the screen to fits your needs.
B. PoV display window: Use this window to preview your image. Adjust the focus ring on your PoV and compose the image with ease using this window to guide the perfect shot.
C. Photo review window: Displays the latest captured image or most recent photograph sent by another PoV user.
D. Digital zoom: Use the slider or enter the exact digital zoom amount (from 100%-200%) with the digital zoom tool. The digital zoom is not available when the images resolution is set to 800x600 or greater.
E. Mirror: Reflects the image horizontally.
F. view photo: Previews the image with a default viewer and displays the file resolution.
G. "Capture photo" button: Use this button as an alternative to pressing the snapshot button on the PoV camera. A convenient way to use the PoV as a handheld camera.
H. Skype contact list: When you're logged onto Skype, your contact list will appear in this drop down list. You can send photos immediately to members in your contact list by selecting a contacts Skype ID and clicking "send photo" button.
The recipient must also be running the "Point of View" software. You may freely distribute the "Point of View" software to friends, family and contacts who use Skype.
I. "Send photo" button: Use this button as an alternative to pressing the 'send photo' button on your PoV Camera.
J. History: A history of all images taken or sent are listed.
K. "open folder": Opens the folder where your PoV images are stored. By default, the images are saved in "PoV" folder located in My Document\ My Picture ( my document\ my picture \ pov)
L. "Intro": View an introduction of the PoV.
M. "Setting": Used to adjust general settings, activate "Remote Monitor", image control and effects.
N. "Send Software": In order to fully enjoy the enhanced features of the PoV, the sender and recipient must both have the "Point of View" software. Users can send the software to their Skype contacts by following the "Send Software" proced
The icons in the lower right bottom display the current status of the PoV camera:
 | PoV is not connected |
 | PoV connected |
 | Remote monitor connected |
 | Logged off from Skype |
5-2 General Setting
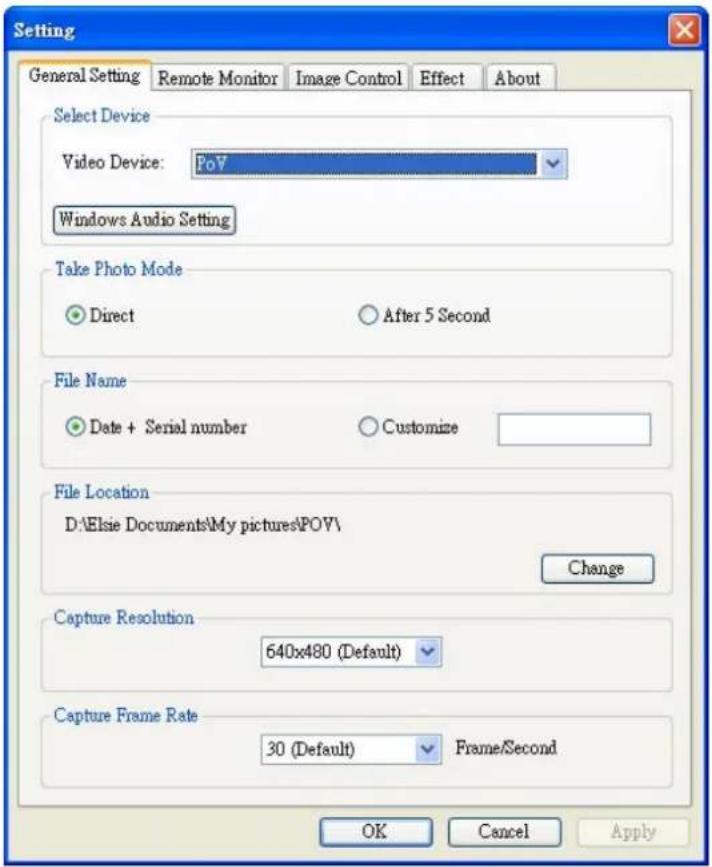
- Select Device: Please choose PoV in the list of Video Device. The "window audio setting" is used to set up audio input/output. Ensure you've selected the original speaker or headphone in the "sound playback". Choose the PoV or other microphone as the default device in the "sound recording".
- Take photo mode: Point of View provides two choices to capture images. You can take an instant snapshot by selecting "direct." PoV also has a timer function to delay the image capture. A countdown will appear in the preview screen after you've set the "After 5 seconds" radio button.
- File Name: The default file name format for images in PoV is "date + serial number.", You can change this setting by choosing "customize".
- File location: All the images captured or received is located in: my document\ my picture ( my document \My picture\ PoV). If you want to customize the location, select the " change" button.
- Capture resolution: The PoV default capture resolution is 640x480. For larger images, change the resolution to 800x600. Other options include :320x240 , 176x144 or 160x120
- Capture frame rate: The default capture frame rate of the PoV is set at 30 frames per second. Frame rates will vary for each PC. For slower computers, a lower frame rate is recommended to improve performance.
5-3 Image Control
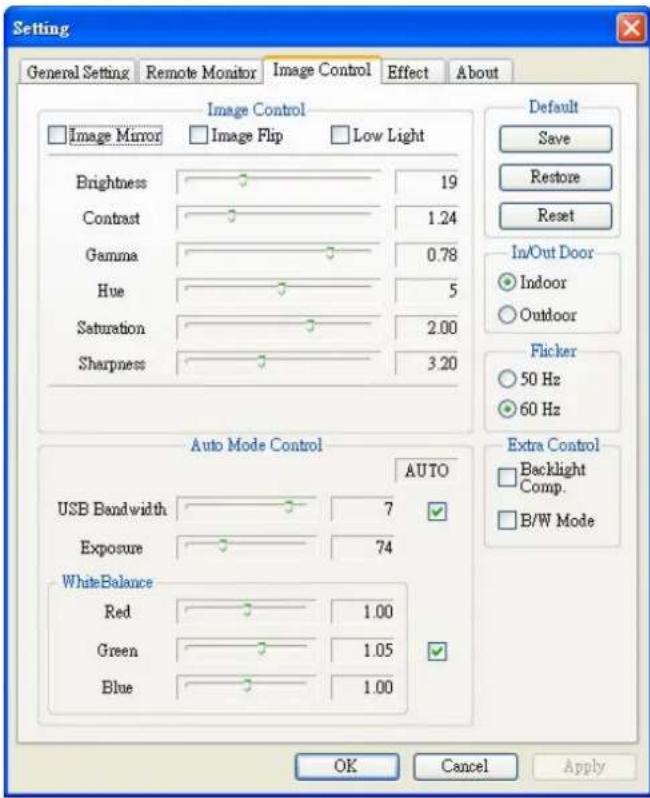
In the image control tab, you can adjust the brightness, contrast, gamma...etc. Under the "Auto Mode Control", you can adjust exposure to make your images lighter or darker.
5-4 Effect

Within the “Effect” tab, you’re able to select a variety of effects or frames for your images by selecting the radio button next to the effect name you wish to use. The effect can be used for images as well as video in Skype or other internet messaging applications.
5-5 Use PoV as the device to discuss documents
PoV can capture images or objects as close as 6 centimeters. With this Macro lens feature, users are able to get up close to documents or objects. The PoV is easily enables you to share close-up video and images.

The steps:
1. Share software:
In order to maximize the PoV experience, users must have the software to share images and video. Users can send the software to their Skype contacts by following the procedures at “Send Software.”
2. Tune the PoV to macro mode:
Adjust the focus lens to the macro mode and point to the document you want to capture. You can view the image in the preview window and adjust the focus ring or change distance between the camera and subject matter.
3.Shoot and Send:
After you press “snapshot” button on the PoV, the image will be displayed on the photo preview window in the right. After clicking the “send out” button, the contact you’ve selected will be able to view the image. If you want to continue capturing and sending images, just repeat clicking the “snapshot” and “send out” buttons.
5-6 Other ways to use PoV
Has typing and chatting become bland and boring ? IPEVO offers the ideal solution to enhance your IM, Skype, or webcam experience. The PoV, is the idea webcam to capture handheld shots and share your Point of View.
FAQ
1. Why can't I install PoV?
Please uninstall or disable other webcam drivers currently running in your computer. Please install the software driver from the CD prior to connecting the PoV to your USB port.
2. Why I can't see the images in the preview window?
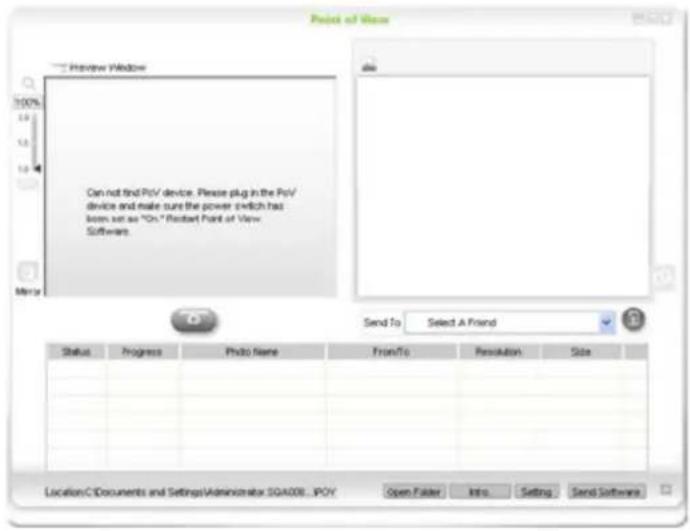
a. please check that the PoV switch is on.
b. Close other programs which is using PoV,(for example: Skype or MSN video conversation.) then restart the Point of View again.
3. How can I send out images faster?
To alter the speed rate, click the "setting" button, go to "general setting" page, and change the setting in "capture resolution".

4. Why can't I use some functions in Point of View?
Some of the functions such as “shoot and send” and “remote monitor” are integrated with Skype. Some functions are not compatible with other instant messenger program.
5. Why can't I send out images by using Point of View?
Check the API access control and the connection between you and your contact to begin using PoV with Skype.
Follow these steps: click "tool" on your Skype screen and choose "option". In the option screen, choose advance, then click "updates". On the bottom, you should see "manager other programs' access to Skype". Choose "PoV.exe", and check "allow this program to use Skype.


6. Why there are some ripples in my preview window?
a. If you are using a PC with USB ports in the front and back, please try to insert PoV to the USB port in the rear instead of the front ports. If you are using a USB hub, it should be connected to an external power adapter. The problem could be that there is not enough power being supplied to your USB ports.
b. The Problem could be caused by insufficient bandwidth. We suggest you use USB2.0, or change image capture to a smaller resolution.
7. Why does my preview window blink?
The screen might blink if the screen frequency setting does not match the AC current. Please open the Point of View, and click "setting" button. Choose "image control" tab and change the setting.
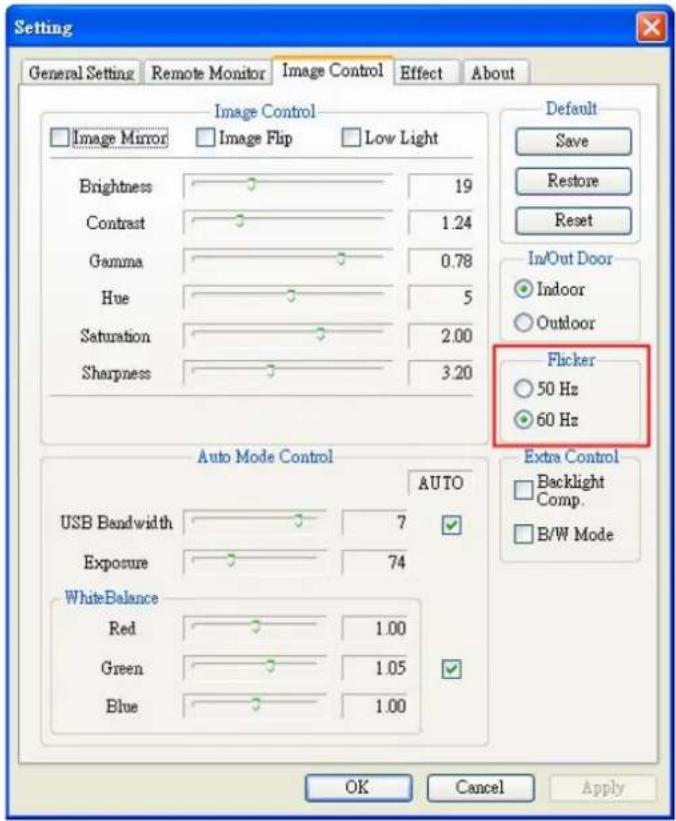
For example: the frequency commonly used in the USA is "60 Hz". See the list below for additional listings
| A C Current Suitable Countries | |
| 50Hz China, | Hong Kong, Japan, Singapore, England, French, Germany |
| 60Hz Taiwan, | South Korea, USA, Canada, Brazil, Australia, New Zealand. |
8. Why do I get the message: "USB Controller Bandwidth Exceeded"?
When you deploy the PoV and are using other USB devices simultaneously, it may slow the overall bandwidth. As a result, the "USB controller bandwidth exceeded" message will pop up. Here are several solutions to consider:
a. Close the Point of View and reopen it again after you start your video conversation.
b. You can also lower the USB bandwidth of PoV. Open Point of View and click the "setting"
button, choose the "image control" page and change the USB bandwidth setting.
c. Please use alternative USB ports if required.
Warranty and after service
Warranty
- The warranty is valid only in the country in which the product was originally purchased.
- The warranty is only valid for hardware, and only insofar as the product has been used and stored.
- The warranty period runs 12 months from the day on which the customer originally purchased the product from IPEVO. This limited warranty does not cover damage results from natural disaster, improper installation, misuse, insufficient or excessive electrical supply, abnormal mechanical or environmental conditions, or any unauthorized disassembly, repair, or modification. Proof of purchase will be required for any limited warranty.
- For the defect products happed in the warranty, IPEVO can choose:
Not sure what word was supposed to be in yellow?
- Use new product to exchange the defect product. New or used products that are still still functional parts to exchange the defect parts. Exchanged parts are the property of IPEVO, Inc.
Package content
- IPEVO PoV Webcam (stand and holding base included)
- PoV software installation CD
- Quick Guide
Product Specification
• Interface: USB1.1, 2.0 Compatible
- Sensor: CMOS
- Sensor resolution: VGA(640x480)
- Focus: 6 cm \~ infinity
• Max. frame rate: 30fps
• Color depth: 24 bit
- Adjustable manual focus, multiple digital zoom, automatic white balance, gamma correction.
• Build-in Microphone
• Size: 95x30x24 mm (LxWxH)
- Weight: 70g
Contact information
If you still have any question regarding our products, please contact with us:
Customer service: cs@ipevo.com
customer service hot line : 1-877-269-4738
- Quick Installation
- Attention:
- 1-1 Insert the included CD
- 1-2 Install Skype
- 1-3 Install PoV driver
- Step 1.
- Step 2.
- Step 3.
- 1-4 Uninstalling the PoVDriver
- What's PoV?
- 2-1 PoV – function keys and led indicators
- 2-2 How to adjust the PoV focus
- 2-3 PoV stand set up
- 2-4 Using the PoV as a hand held camera
- Use PoV as a general purpose webcam
- 3-1 PoV with Skype
- Note:
- Step 4.
- 3-2 PoV with MSN
- Point of View Software
- 4-1 "Shoot and Send" Function
- 4-2 Snapshot Function
- 4-3 Remote-Monitor Function
- How to set up remote monitor function:
- How to enable Remote Viewing:
- Advanced Applications of the PoV
- 5-1 Point of View main window
- 5-2 General Setting
- 5-3 Image Control
- 5-4 Effect
- 5-5 Use PoV as the device to discuss documents
- Share software:
- Tune the PoV to macro mode:
- 3.Shoot and Send:
- 5-6 Other ways to use PoV
- FAQ
- Why can't I install PoV?
- Why I can't see the images in the preview window?
- How can I send out images faster?
- Why can't I use some functions in Point of View?
- Why can't I send out images by using Point of View?
- Why there are some ripples in my preview window?
- Why does my preview window blink?
- Why do I get the message: "USB Controller Bandwidth Exceeded"?
- Warranty and after service
- Warranty
- Package content
- Product Specification
- Contact information
Brand : Ipevo
Model : PoV
Category : Webcam