BMR-7075 - Bread maker German Pool - Free user manual and instructions
Find the device manual for free BMR-7075 German Pool in PDF.


| Product Type | Bread Maker |
| Brand | German Pool |
| Model | BMR-7075 |
| Dimensions (W x D x H) | Approx. 30 x 25 x 30 cm |
| Weight | Approx. 5.0 kg |
| Power Supply | 220-240V, 50/60Hz |
| Power Consumption | 600 W |
| Capacity | Up to 2 lb (907 g) loaf |
| Programs | 12 automatic programs including Basic, Whole Wheat, Gluten-Free, Dough, Jam, etc. |
| Crust Control | 3 settings: Light, Medium, Dark |
| Timer | Up to 13 hours delay start |
| Keep Warm | Up to 1 hour after baking |
| Viewing Window | Yes, with internal light |
| Baking Pan | Non-stick coated, removable |
| Kneading Paddle | Single, removable |
| Material | Stainless steel and plastic body |
| Safety Features | Overheat protection, cool-touch handle, lid lock |
| Cleaning | Wipe exterior with damp cloth; wash pan and paddle with warm soapy water |
| Spare Parts Availability | Baking pan, kneading paddle, measuring cup and spoon available from manufacturer |
| Repairability | Refer to user manual for basic troubleshooting; professional service recommended |
| Certifications | CE, EMC, RoHS |
| Included Accessories | Measuring cup, measuring spoon, user manual, recipe booklet |
Frequently Asked Questions - BMR-7075 German Pool
User questions about BMR-7075 German Pool
0 question about this device. Answer the ones you know or ask your own.
Ask a new question about this device
Download the instructions for your Bread maker in PDF format for free! Find your manual BMR-7075 - German Pool and take your electronic device back in hand. On this page are published all the documents necessary for the use of your device. BMR-7075 by German Pool.
USER MANUAL BMR-7075 German Pool
natural_image
Line drawing of a German 441 watermelon maker with control panel and ventilation slots (no text or symbols on device body)Please read these instructions and warranty information carefully before use and keep them handy for future reference.
使用説明書 USER MANUAL
請即進行保用登記!
Please register your warranty information now!
For Warranty Terms & Conditions,
please refer to the last page of these operating instructions.
目錄
natural_image
Illustration of two hands operating a device in a container, one with a curved arrow indicating rotation (no text or symbols present)- 從主機裡取出麵包桶。
natural_image
Simple line drawing of a container with liquid being poured into it (no text or symbols)- 先倒入水及液體材料。

natural_image
Simple line drawing of a container with liquid and a funnel, no text or symbols present- 最後,高筋麵粉放在最上層。

natural_image
Illustration of a hand pouring liquid into a mixing bowl on a machine (no text or symbols)- 把麵包桶裝入主機內。

bar_stacked
| Time | 烘烤 | 烘烤 | 保温 | 保温 | |------|------|------|-------|-------| | 3:36:00 | 1.08:00 | | | | | 3:36:36 | | | | | | 3:36:52 | | | | | | 3:36:88 | | | | | | 3:37:24 | | | | | | 3:37:50 | | | | | | 3:37:86 | | | | | | 3:38:22 | | | | | | 3:38:58 | | | | | | 3:39:14 | | | | | | 3:39:40 | | | | | | 3:48:88 | | | | | | 3:48:24 | | | | | | 3:48:50 | | | | | | 3:48:86 | | | | | | 3:49:22 | | | | | | 3:49:58 | | | | | | 3:50:14 | | | | | | 3:50:40 | | | | | | 3:51:88 | | | | | | 3:52:24 | | | | | | 3:52:50 | | | | | | 3:52:86 | | | | | | 3:53:22 | | | | | | 3:53:58 | | | | | | 3:54:14 | | | | | | 3:54:40 | | | | | | 3:55:88 | | - | - | - | | 3:56:24 | - | - | - | - | | 3:56:50 | - | - | - | - | | ... (additional values) are estimated based on the visual representation of the horizontal bars and labels for the time intervals.時間分佈
參考食譜
Operating Instructions 26
- Control Panel & Buttons 26
- LCD Display & Indicators 28
- Other Functions 29
- Operation 30
Programme Specifications 32
- Settings & Functions 32
- Operating Procedures 34
Suggested Recipe 36
Troubleshooting 39
-Bread Making 39
- Operation 41
Care & Maintenance 42
Technical Specifications 42
Warranty Terms & Conditions 43
Quick Operating Guide
Note: Please see detailed operating instructions (P.26)

natural_image
Illustration of two hands operating a device in a container, one with a curved arrow indicating rotation (no text or symbols present)- Remove Baking Pan from unit body.

natural_image
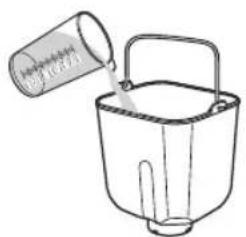
Simple line drawing of a bucket pouring liquid into a container (no text or symbols)- Pour in water & liquids.

natural_image
Simple line drawing of a container with liquid and a funnel, no text or symbols present- Lastly, add flour to the top-most layer.
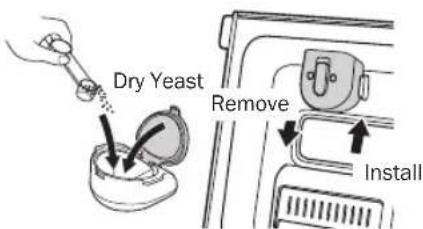
- Put yeast in Yeast Dispenser. Then fix it to lid.
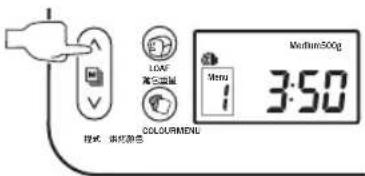
- Prepare and well weigh ingredients.

- Add sugar, salt, milk powder, butter and other solid ingredients.

natural_image
Illustration of a hand pouring liquid into a container using a microwave oven (no text or symbols visible)- Fit Baking Pan inside unit body.

- Place dried fruits or nuts in Fruits & Nuts Dispenser. Then fix it to lid.
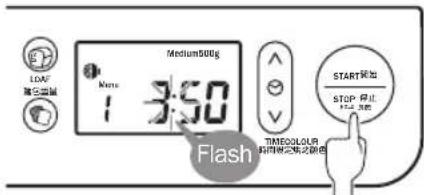
- For safety purpose, you should read the instructions carefully before using the appliance for the first time. Save the instructions for future reference.
-
The appliance is designed for domestic use and may only be installed and operated in accordance with this instruction manual.
-
Before plugging in the appliance, check that the electrical rating shown on the rating plate corresponds with your house electricity supply.
- Plug the appliance to the wall outlet properly and securely to avoid electric shock or a fire caused by overheating. Do not use damaged or loose power cord or plug to avoid short circuit, electric shock or a fire.
- Always make sure the cover is completely closed before operation to ensure proper operation and baking results.
- Do not use the appliance on an inclined or unsable surface.
- Do not touch the appliance during or immediately after operation to avoid burns.
- Do not touch or cover the ventilation holes to avoid burns or block ventilation.
- Always take out the baking pan with heat-resistant gloves to avoid burns of the heating elements.
- Always leave the kneading blade inside the bread and take out only after cooling down to avoid burns.
- Do not touch the metal parts of the socket or unplug with force.
- Do not immerse the appliance into any liquid or spray water on it to avoid short circuit or electric shock.
- Do not clean or immerse the power cord and socket in any liquid or wipe the socket with wet cloth. Do not plug or unplug with wet hands.
- Do not place the appliance near any source of heat or cover the appliance with any objects to avoid ventilation problems.
- Always keep the distance of the appliance from the wall no less than 10cm.
- Do not clean with any acidic or alkaline detergent to avoid electric shock or damage.
- Do not clean the appliance and any accessory in a dish washer.
- Always unplug before moving or cleaning the appliance.
- Do not place any heavy objects on the appliance to avoid damage.
- The appliance is not intended for use by persons, including children, with reduced physical, sensory or mental capabilities, or any individual lacking experience and knowledge unless they have been given supervision or instruction by a person responsible for their safety.
- Children should be under supervision to ensure that they do not play with the appliance.
- If the power cord is damaged, it must be replaced by the manufacturer, its service agent or similarly qualified persons in order to avoid a hazard.
- Do not use any damaged power cord or socket to avoid electric shock, short circuit or fire hazard.
- The maximum quantities of flour and raising agent that may be used are 400g and \~5g respectively.
- The appliance is not intended to be operated by means of any separate remote-control system.
Product Structure
Main Body




Operating Instructions
Attention
- Always check if the socket corresponds with the voltage stated.
- Always unplug before cleaning or dismantling.
- Always remove baking pan with heat-resistant gloves to avoid burns.
- Do not immerse the appliance and baking pan in any liquid.
- Do not touch the appliance surface and any heating elements inside during or after use to avoid burns.
I. Control Panel & Buttons

- 14 programmes available for selection.
- Press ∧ and ∨ to select a programme.
- See "Programme Specification" for programme details.
Loaf Size Button

- Press to select loaf size (500g or 750g).
- This function is applicable to programme 1 - 5.
Crust Colour Button

- Press to select crust colour (Light, Medium or Dark).
Operating Instructions
Timer

- Delay-start function is applicable to Bread Mode (Programme 1-6) and “Dough” (Programme 9).
Press and to set operation time for 13 hours at maximum. Press once to increase or decrease 10 minutes, twice for 20 minutes and so on. (See descriptions of "Delay-start").
- Press ∧ and ∨ to adjust operation time when using Function Mode (Programme 11 - 14):
| # Programme | Default Timer (hour : min) | Timer-Setting Duration | Caution |
| 11 Slow Knead 00:10 1 | - 20min - Interval: 1 min | - Do not operate continuously for 30 minutes- If the break time between repeated kneading is less than 5 minutes, the total operation time should not be more than 30 minutes | |
| 12 Fast Knead 00:20 1 | - 30min | ||
| 13 Rise 01:00 5min - 6hours | - Interval: 5 min- Do not open the lid during operation in order to keep the best rising result | ||
| 14 Bake 00:50 5min - 1.5hours | - Interval: 5 min- Do not bake when the appliance is empty- Do not bake food other than bread |
Note: Time setting is not applicable to programme 7, 8 and 10.
Start/ Stop Button

- Press to start operation after putting all the ingredients in baking pan, as well as selecting a programme, loaf size and crust colour.
- Press and hold this button for 3 seconds or longer when the programme is completed to terminate operation.
Operating Instructions
II. LCD Display & Indicators

Loaf Size Indicator
- The corresponding light will be on after loaf size selection.
Dispenser Indicator
- It indicates that the appliance will give indicative sound during operation when the indicator is on.
- It is applicable to programmes 1 to 6.
Delay-Start Indicator
- It indicates the delay-start function is activated when this indicator is on.
- Press ∧ and ∨ to set the time according to actual needs.
- Example: It is now 8:30pm and the bread should be ready at 6:00am. Between 8:30 pm and 6:00am there are 9 hours 30 minutes, which is the time to be set.
Time-Setting Indicator
- This indicator shows programme operation time countdown and indicates the programme completed by showing 0:00.
Crust Colour Indicator
- The corresponding light will be on after crust colour selection.
Process Indicator
- Four programmes:knead,rise1,rise2 and bake.
- This indicator shows the selected programme process.
Programme Number Indicator
- This indicator shows the number of selected programme.
Operating Instructions
III. Other Functions
Yeast Dispenser
- Before operation, put yeast in this dispenser and the yeast will be dispensed into the baking pan automatically at proper time during operation and gives an indicative sound.
Fruits & Nuts Dispenser
- Before operation, put fruits & nuts in this dispenser and they will be dispensed into the baking pan automatically at proper time during operation and it gives an indicative sound.
Attention
- Vegetables, fruits & juice should be added and kneaded with other ingredients when start making bread. Vegetables and fruits added should not be more than 20% of flour. Water should be reduced by the same amount if using juice instead.
- Items that are of less water content or can hardly be melted should be cut into small pieces (50mm × 50mm) before putting into the dispenser. Do not put too much ingredients to avoid failure of dispense.
- Items that are sticky or can be easily melted, items of high water content or tiny size should be added by the indicative sound. The amount added should not be more than 20% of flour.
Power-Failure Memory
- If the plug is removed unintentionally or power failure occurs during operation and it lasts for less than 7 minutes, the appliance can operate at the previous setting after re-connecting with power, but the overall operation time will then be delayed. Programme reset is required if power failure lasts for more than 7 minutes.
- If power failure occurs before the appliance starts operation, the LCD display will be at stand-by mode after re-connecting with power and the appliance can operate as normal.
Auto Keep Warm
- Auto keep warm function will be automatically activated for 1 hour immediately after the programme is completed to keep the bread warm if the programme operation is not terminated and the cover is not opened.
Delay-Start
- 13 hours maximum timer setting for programme 1 to 10.
- Press ∧ and ∨ to delay the starting time according to the actual needs.
Attention
- Do not use Delay-Start function if it contains perishable ingredient, such as vegetables, egg and milk.
Operating Instructions
IV. Operation
Attention:
- Always ensure that the lid is completely closed and the baking pan is properly positioned before activating the appliance.
- Do not touch the appliance surface during operating to avoid burns.
- Do not touch the control panel during operation to avoid false commands caused by pressing the function buttons unintentionally.
- Do not open the lid during operation to avoid improper operation of programmes and dispensers.
- Do not open the lid during rising process to avoid unsatisfying rise result caused by the internal temperate decrease.
-
Restart the appliance when it has been cooled down for at least 1 hour to avoid improper operation caused by overheating.
-
Turn the baking pan left at a titled angle and put it out. Attach the kneading blade on the rotary shaft.
- Put all the ingredients in proper order in the baking pan according to the selected programme or actual needs.
- Put the baking pan back in the original position in the appliance and turn right to fix.
-
Pull the yeast dispenser downward and remove, put yeast of the required amount in it. Close the dispenser cover and place it to the original position and pull it upward to fix.
-
Wipe yeast dispenser dry before use to avoid failure of yeast dispense.
-
Place yeast dispenser properly and push upward until it touches the inner lid edge.
-
(If applicable) Push the fruits & nuts dispenser upward and remove, put the ingredients of required amount in it. Close the dispenser cover and place it to the original position and pull it downwards to fix.
- Put ingredients that are of less water content or can hardly be melted in the dispenser, and avoid putting the below ingredients in it.
Items that can be easily melted, e.g. chocolate and caramel
Items of large size
Items in liquid form
Items of high water content, e.g. fresh fruits
Items of tiny size, e.g. sesame seeds
Operating Instructions
- Close the lid and connect with power. The LCD display will be on and at stand-by mode. After that, select programme, loaf size and crust colour, and press and hold the Start/ Stop button for 3 seconds to activate the appliance. The time on LCD display will then start to count down.
To stop the appliance for programme reset, press and hold Start/Stop button for 3 seconds again. The appliance will give an indicative sound and the LCD display will return to stand-by mode for programme reset.
- When programme is completed, timer indicator will show [00:00] and the appliance will give an indicative sound and once per minute in the next 10 minutes. After 10 minutes, the appliance will give short indicative sound for 10 times and the LCD display will return to stand-by mode.
When programme is completed and the LCD display shows [00:00], press and hold Start/Stop button for 3 seconds to immediately stop operation and the indicative sounds, and LCD display will then return to stand-by mode.
- Unplug the appliance and take out the baking pan using heat-resistant gloves. Hold the baking pan bottom tightly and take out the bread by shaking the baking pan for several times or slightly turn the rotary shaft at the baking pan base.
-
Cool down the bread on a net or a plate for 15-30 minutes and take out the kneading blade inside the bread with a kneading blade remover.
-
Always remove the bread using heat-resistant gloves to avoid burns.
- It is suggested to take out the bread immediately after programme is completed to keep the bread tasty and crispy.
- Do not take out the bread with sharp or metal objects to avoid damage of baking pan because it cause difficulty in taking out the bread if the baking pan coating is scratched.
-
Pour warm or hot water into the baking pan to the level close to the height of the kneading blade and inside the baking pan.
-
After the programme is finished, keep the cover closed and Auto Keep Warm function will be activated automatically for 1 hour to keep the crustiness of the bread inside.
- If darker crust colour is required or the baking result is not satisfactory after programme completion, activate the Bake programme and press Timer to set the operation time according to actual needs.
Programme Specifications
I. Settings & Functions
| Programme | Loaf Size | Default Time | Crust Color | Yeast | Fruits & Nuts | Time Adjust | Delay Start | Pre-heat | Keep Warm | Function | ||
| 1 | Bread Mode | Soft Bread | 500 g 750 g | 4:38 4:40 | ● ● | ● ● | ○ ● | To make fluffy & moist bread (for recipes using bigger amount of dairy products) | ||||
| 2 | Basic Bread | 500 g 750 g | 3:23 3:26 | ● ● | ● ● | ○ ● | To make basic white bread | |||||
| 3 | Whole Wheat Bread | 500 g 750 g | 3:54 3:58 | ● ● | ● ● | ● ● | For recipes using whole wheat or rice flour | |||||
| 4 | French Bread | 500 g 750 g | 3:33 3:35 | ● ● | ● ● | ○ ● | To make French-style bread with crispy crust | |||||
| 5 | Sweet Bread | 500 g 750 g | 3:21 3:25 | ● ● | ● ● | ○ ● | To make sweet bread (for recipes using bigger amount of sugar) | |||||
| 6 | European Bread | / 3:30 | ○ ● | ● ● | ○ ● | To make crusty, soft European-style bread | ||||||
| 7 | Special Mode | Sticky Rice | / 1:23 | ○ ○ | ○ ○ | ○ ○ | To make Asian rice cake | |||||
| 8 | 0:30 | ○ ○ | ○ ○ | ○ ○ | To create a pasta/ noodle dough for cooking | |||||||
| 9 | 1:30 | ○ ● | ○ ● | ○ ○ | To create a raw dough (blended & risen) | |||||||
| 10 | 1:05 | ○ ○ | ○ ○ | ○ ○ | To made homemade jam | |||||||
● Available ○ Unavailable
Programme Specifications
| Programme | Loaf Size | Default Time | Crust Color | Yeast | Fruits & Nuts | Time Adjust | Delay Start | Pre-heat | Keep Warm | Function | ||
| 11 | Function Mode | Slow Knead | / 0:10 | ○ ○ | ○ ● | ○ ○ | To knead dough and develop gluten (short period of time) | |||||
| 12 | Fast Knead | / 0:20 | ○ ○ | ○ ● | ○ ○ | To knead dough and develop gluten (long period of time) | ||||||
| 13 Rise / | 1:00 | ○ ○ | ○ ● | ○ ○ | To rise a dough in suitable temperature | |||||||
| 14 Bake / | 0:50 | ○ ○ | ○ ● | ○ ○ ● | To bake a pre-knead & pre-risen dough | |||||||
● Available ○ Unavailable
Programme Specifications
II. Operating Procedures
Programme

Time
Programme Specifications
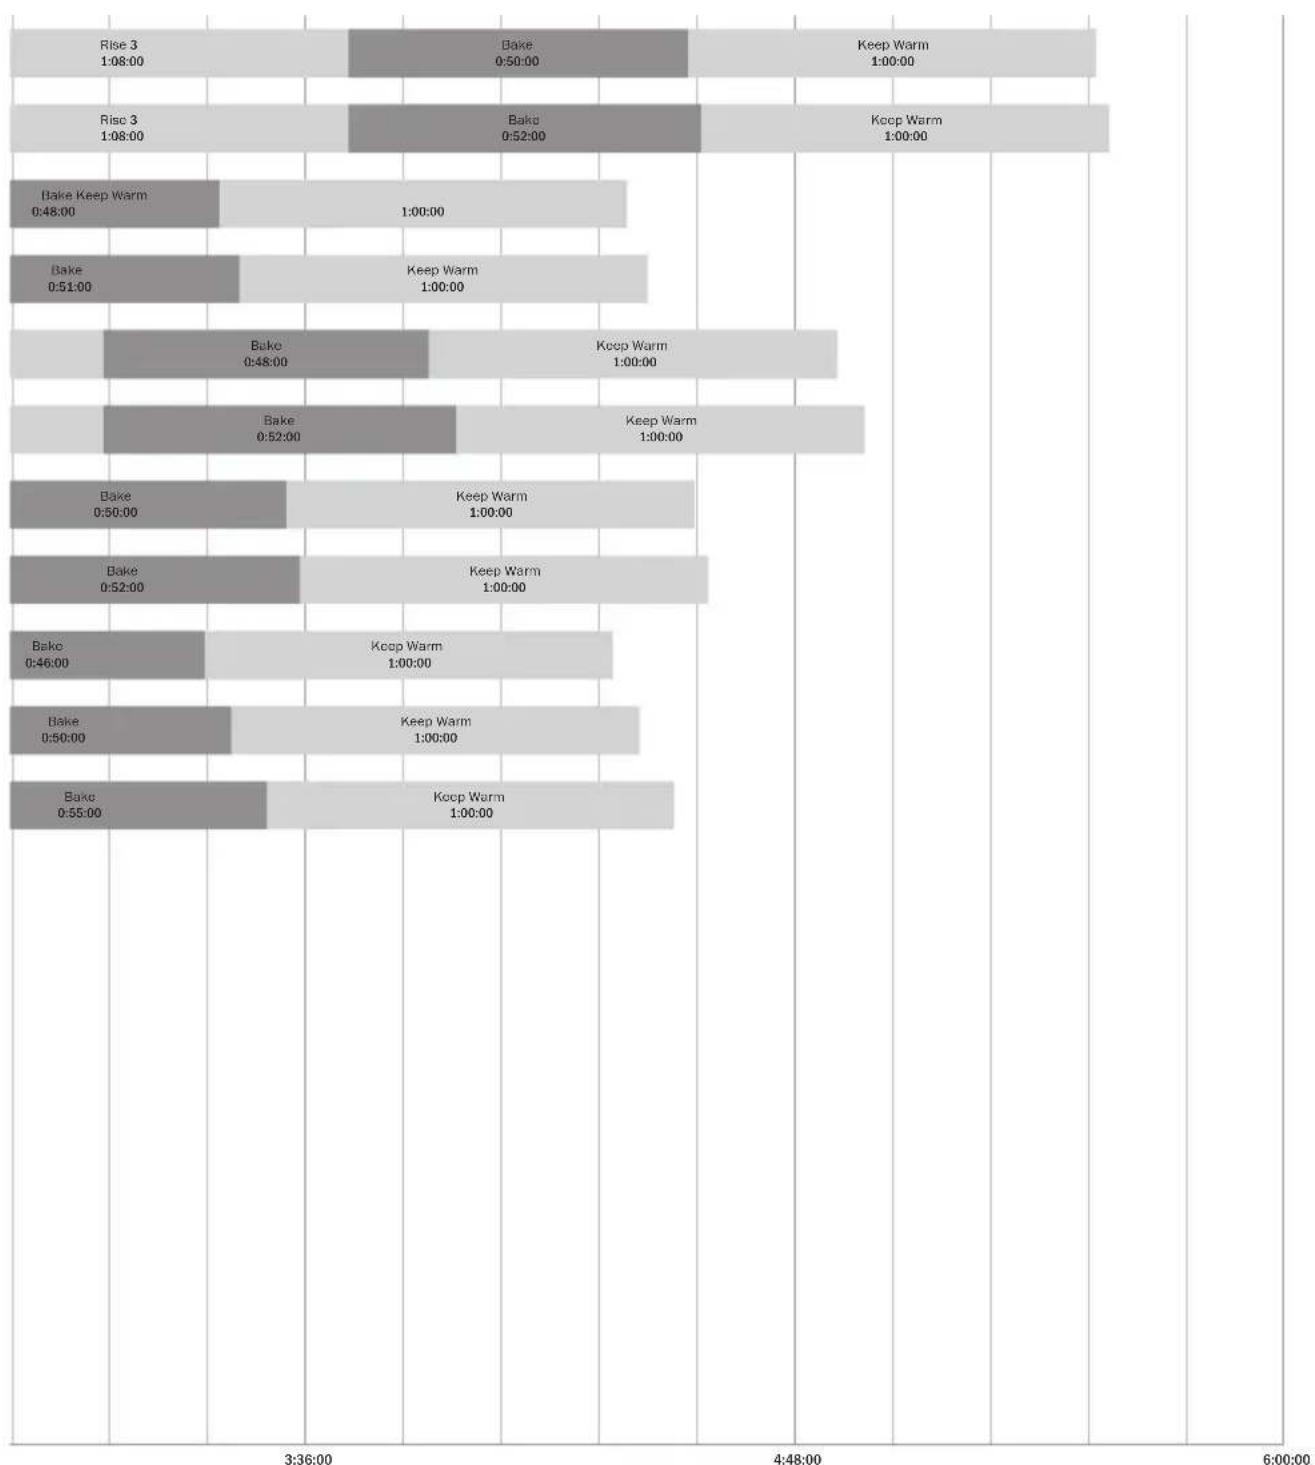
bar_stacked
| Time Period | Bake | Bake Keep Warm | Keep Warm | | ----------------- | ------ | -------------- | --------- | | Rise 3 1:08:00 | | | | | Bake 0:50:00 | | | | | Keep Warm 1:00:00 | | | | | Riso 3 1:08:00 | | | | | Bake 0:52:00 | | | | | Keep Warm 1:00:00 | | | | | Bake Keep Warm 0:48:00 | | | | | Bake 0:51:00 | | | | | Bake 0:48:00 | | | | | Keep Warm 1:00:00 | | | | | Bake 0:52:00 | | | | | Keep Warm 1:00:00 | | | | | Bake 0:50:00 | | | | | Bake 0:52:00 | | | | | Keep Warm 1:00:00 | | | | | Bake 0:46:00 | | | | | Keep Warm 1:00:00 | | | | | Bake 0:50:00 | | | | | Keep Warm 1:00:00 | | | | | Bake 0:55:00 | | | | The data is already in CSV format with the original text. The actual output of the table is as follows: | The extracted data is presented in the code.e Distribution
Suggested Recipe
| Milk Bread | |
| Programme: (1) Soft Bread | |
| Portion: 750 g | |
| Milk 225 ml | |
| Condensed Milk 75 g | |
| Egg (beaten) 1 pc | |
| Sugar 15 g | |
| Salt 8 g | |
| Unsalted Butter 60 g | |
| Bread Flour 420 g | |
| Dried Yeast 6 g | |
| White Toast | |
| Programme: (2) Basic Bread | |
| Portion: 750 g | |
| Water 280 g | |
| Sugar 20 g | |
| Salt 6 g | |
| Milk Powder 20 g | |
| Unsalted Butter 20 g | |
| Bread Flour 400 g | |
| Dried Yeast 8 g | |
| Whole Wheat Bread | |
| Programme: (3) Whole Wheat Bread | |
| Portion: 750 g | |
| Water 255 g | |
| Sugar 23 g | |
| Salt 6 g | |
| Unsalted Butter 30 g | |
| Whole Wheat Flour | 75 g |
| Bread Flour | 300 g |
| Dried Yeast | 4.5 g |
The information provided in these recipes is for reference only. The actual outcome is subject to the type, quantity and quality of ingredients used.
Suggested Recipe
| French Bread | |
| Programme: (4) French Bread | |
| Portion: 750 g | |
| Water 230 g | |
| Salt 5.4 g | |
| Cake Flour 70 g | |
| Bread Flour 260 g | |
| Dried Yeast 2 g | |
| Sweet Italian Bread | |
| Programme: (5) Sweet Bread | |
| Portion: 750 g | |
| Egg (beaten) 1.5 pc | |
| Milk & Egg (combined) | 255 ml |
| Sugar 60 g | |
| Salt 6 g | |
| Unsalted Butter 90 g | |
| Bread Flour 375 g | |
| Dried Yeast 4.5 g | |
| Cheese & Herb Bread | |
| Programme: (6) European Bread | |
| Portion: 750 g | |
| Water 170 g | |
| Sugar 23 g | |
| Milk Powder 17 g | |
| Salt 3 g | |
| Unsalted Butter 21 g | |
| Bread Flour 360 g | |
| Dried Yeast 3 g | |
| Grated Cheese 50 g | |
| Herb 2 tea spoons | |
The information provided in these recipes is for reference only. The actual outcome is subject to the type, quantity and quality of ingredients used.
Suggested Recipe
| Rice Cake | ||
| Programme: (7) Sticky Rice | ||
| Water 380 g 1. Rinse glutinous rice grain. Drain. | 2. Put rice and water in Baking Pan.3. Select “Sticky Rice” programme. Press “Start”. | |
| Glutinous Rice Grain 560 g | ||
| Udon Noodles | ||
| Programme: (8) Pasta | ||
| Water 150 g 1. Add all ingredients. | 2. Select “Pasta”. Press “Start”.3. Remove dough. Let sit for 30 min.4. Roll out. Cut into thin strips. | |
| Plain Flour 300 g | ||
| Salt 12 g | ||
| Pizza Dough | |
| Programme: (9) Dough | |
| Portion: 4 thick pies | |
| Water 210 g | |
| Sugar 10 g | |
| Salt 5 g | |
| Milk Powder 8 g | |
| Olive Oil 20 g | |
| Bread Flour 330 g | |
| Dried Yeast 3 g | |
| Strawberry Jam | |
| Programme: (10) Jam | |
| Strawberry 350 g | |
| Sugar 120 g | |
| Lemon Juice 1/2 pc | |
The information provided in these recipes is for reference only. The actual outcome is subject to the type, quantity and quality of ingredients used.
Troubleshooting
I. Bread Making
| Phenomenon Possible causes & solutions | ||
| The crust colour is too dark | Dried Yeast Bread | ad does not rise and becomes darker if not enough yeast. |
| Sugar Too much | sugar and milk used will darken the crust colour.Different kinds of sugar vary in their weight even at the same volume. Measure the right quantity by means of a scale. | |
| Milk Powder | ||
| Water | Too little water will make dough harder and darken the crust colour. | |
| Temperature | Residual heat will darken the bread. Take out bread from the unit once done. | |
| The crust colour is too light | Dried Yeast | Too much yeast will make bread over rise and lighten crust colour. |
| Sugar Too little | sugar and milk powder will lighten crust colour.* French bread does not contain sugar & milk powder, so it has light crust colour. | |
| Milk Powder | ||
| Salt If no salt added bread will over rise and have lighter crust colour. | ||
| The bread does not rise | Dried Yeast | Not enough yeast or the yeast used is too old |
| Rise of bread will be affected when yeast contacts directly with water, sugar or salt. | ||
| Flour | Bread does not rise if flour used is too much and too old, or flour used is of poor quality. | |
| Sugar | Too little sugar will take longer to rise.Artificial sugar cannot nurture yeast, hence is not suitable for making bread. | |
| Salt Too much salt will hinder rising. | ||
| The bread has risen too much | Dried Yeast | Too much yeast produces too much gas and makes bread over rise. |
| Sugar | Too much sugar produces too much gas and makes bread over rise. | |
| Salt Too little salt will make the bread rise too much | ||
| Room Temperature | Bread may over rise if room temperature is higher than 30°C. | |
Troubleshooting
| Phenomenon Possible causes & solutions | ||
| The bread is full of air holes | Dried Yeast | Too much yeast produces too much gas and makes coarse texture. |
| Sugar | Too much sugar produces too much gas and makes coarse texture. | |
| Room Temperature | Bread may over rise and has coarse texture if room temperature is higher than 30°C. | |
| The crust is wrinkly Butter | Ingredients cannot be mixed well if frozen butter is used. Let butter sit in room temperature and cut into small cubes before use. | |
| The heights and shapes of bread is different every time | Conditions/ Ingredients | The heights and shapes of bread vary even when the same programme is used. Room temperature, quantity and quality of ingredients, delay-start time, all these factors will affect the rise and crust color of bread. |
| The bread overflows the baking pan | Check the recipe and measure the right quantity by using a scale. Use right quantity of yeast. Too much yeast will make the bread over rise and overflow the baking pan. | |
| Can fresh yeast be used for making bread? | Fresh yeast takes longer time to rise, hence is not suitable to be used in Bread Maker. Instant dried yeast is used in this guide. | |
Troubleshooting
II. Operation
If you encounter the following common troubles, please solve according to the following instructions. If the problem cannot be solved or a cause cannot be found, please contact our customer service centre.
Note: For safety purpose, do not dismantle the product for repair by yourself.
| Phenomenon Possible | causes Solutions | |
| Programme cannot be started | Whether the power plug is loosely connected | Whether the power plug is connected properly |
| Whether Start / Stop button is pressed | Press Start / Stopbutton to start operation after selecting programme, loaf size and crust colour | |
| Programme cannot be stopped | Whether Start / Stop button is pressed and held for at least 3 second | Press and hold Start / Stop button for at least 3 second |
| Whether Start / Stop button is pressed with gloves on | Take off the gloves and press Start / Stop button again | |
| LCD display shows E01 | Whether the appliance has been operated for too long | Take out the baking pan and let the appliance cool down completely |
| LCD display shows E00 | The temperature of operation area is lower than -5°C | Use the appliance in an area with temperature higher than -5°C before re-start |
| LCD display shows EEE | Whether none of the functions can be activated | Temperature sensor failure which requires repair by the manufacturer |
| LCD display shows HHH | ||
| Smoke and smell come out from ventilation holes | Whether any ingredients are stuck on the heating elements | Ingredients of tiny size may be stuck on the heating elements, which can be cleaned after the appliance has been completely cooled down. |
| Socket is removed unintentionally or power failure occurs | Whether it happens within 7 minutes | The appliance can operate at the previous setting if it is reconnected with power within 7 minutes, or else programme reset is required |
Attention:
- Always ensure that the appliance and heating elements have been completely cooled down and disconnected from power before cleaning.
-
Do not immerse the appliance and baking pan into any liquid.
-
Clean the appliance surface and back side of the lid using a soft, wet cloth and neutral detergent. Do not clean with hard brush or rough surface cloth.
- Do not immerse the baking pan into any liquid to avoid improper operation.
- Clean the kneading blade, outer and inner baking pan and dispensers, as well as ingredients splashed on the inside of the appliance using soft, wet cloth or sponge and leave the parts to dry.
- Pour warm or hot water into the baking pan to the level close to the height of kneading blade for easy cleaning of the residual dough stuck on the kneading blade and inside the baking pan.
- Turn the kneading blade to the right and pull it out for easy cleaning. If it is difficult to take it out, turn the rotary shaft at the baking pan base slightly, and then turn the kneading blade to the right and pull it out.
Technical Specifications
| Model no BMR-7075 | |
| Voltage 220-240 V | |
| Frequency | 50 Hz |
| Power | 710W |
| Dimensions (H) 326 | mm(W) 235 mm(D) 325 mm |
| Net weight | 8.2 kg |
Specifications are subject to change without prior notice.
If there is any inconsistency or ambiguity between the English version and the Chinese version, the Chinese version shall prevail.
Refer to www.germanpool.com for the most up-to-date version of the Operating Instructions.
請填妥以下空格並與發票一併保存,以便維修時核對資料。用戶提供本公司之所有資料必須正確無誤,否則免費保用將會無效。Please fill out the form below. This information and the purchase invoice will be required for any repairs. Warranty will be invalid if information provided is found to be inaccurate.
Warranty Terms & Conditions
Under normal operations, the product will receive a 1-year full warranty provided by German Pool (effective starting from the date of purchase).
* This warranty is not valid until Customer's registration information is returned to and received by our Service Centre within 10 days of purchase via one of the following methods:
1) Visit our website and register online: www.germanpool.com/warranty.
2) Complete all fields on the attached Warranty Card and mail it back to our Customer Service Centre along with a photocopy of the purchase invoice (Warranty Card and invoice copy will not be returned to Customer).
- Customer who fails to present original purchase invoice will be disqualified for free warranty.
- Customer should always follow the operating instructions. This warranty does not apply to:
- labour costs for installation, on-site check-up, replacement of parts and other transportation costs;
- damages caused by accidents of any kind (including transport and others);
- Plastic parts and accessories
-
operating failures resulted from incorrect voltage, improper operations and unauthorized installations or repairs.
-
This warranty is invalid if:
- purchase invoice is modified by unauthorized party;
- product is used for any commercial or industrial applications;
- product is repaired or modified by unauthorized personnel, or unauthorized parts are installed;
-
serial number is modified, damaged or removed from the product.
-
German Pool will, in its discretion, repair or replace any defective part.
-
This warranty will be void if there is any transfer of ownership from the original purchaser.
Customer Service & Repair Centre
German Pool (Hong Kong) Limited 8/F, China Travel (Cargo) Logistics Centre 1 Cheong Tung Road
Hung Hom, Kowloon, Hong Kong
Tel : +852 2333 6249
Fax : +852 2356 9798
Email : repairs@germanpool.com
GERMAN
POOL

德國實
Kok Road. Tokwawan. Kowloon. Hong Kong.
電話 Tel: +852 2773 2888
傳真 Fax:+852 2765 8215
中國
China
廣東省佛山市順德區
大良南國東路德順廣場三層
3/F, Takshun Plaza, Nanguo East Road,
Shunde, Foshan, Guangdong
Alameda Dr. Carlos D'Assumpcao No. 263,
Edif. China Civil Plaza, 15 Andar, I. Macau
© All rights reserved. Copying, reproducing or using the contents of this manual is not allowed without prior authorization from German Pool, violators will be prosecuted.
www.germanpool.com
- 目錄
- Quick Operating Guide
- Product Structure
- Operating Instructions
- Attention
- Control Panel & Buttons
- Loaf Size Button
- Crust Colour Button
- Timer
- Start/ Stop Button
- LCD Display & Indicators
- Loaf Size Indicator
- Dispenser Indicator
- Delay-Start Indicator
- Time-Setting Indicator
- Crust Colour Indicator
- Process Indicator
- Programme Number Indicator
- Other Functions
- Yeast Dispenser
- Fruits & Nuts Dispenser
- Power-Failure Memory
- Auto Keep Warm
- Delay-Start
- Operation
- Attention:
- Programme Specifications
- Operating Procedures
- Suggested Recipe
- Troubleshooting
- Operation
- Technical Specifications
- Warranty Terms & Conditions
- Customer Service & Repair Centre
Brand : German Pool
Model : BMR-7075
Category : Bread maker