
CAPRIO - Kitchen appliance MOULINEX - Free user manual and instructions
Find the device manual for free CAPRIO MOULINEX in PDF.

| Brand | Moulinex |
| Model | Caprio |
| Product type | Drip coffee maker |
| Color | White and black (estimate) |
| Main material | Plastic and glass (carafe) |
| Reservoir capacity | Approximately 1 liter (10 cups) |
| Power | Approximately 1000 W |
| Voltage | 220-240 V ~ 50/60 Hz |
| Dimensions (L x W x H) | Approximately 25 x 20 x 30 cm |
| Weight | Approximately 1.2 kg |
| Indicator light color | Red (on) |
| Stop-drip function | Yes, allows serving before the end |
| Filter type | Paper filter size #4 |
| Washable filter holder | Yes, dishwasher safe |
| Glass carafe | With lid, do not use in microwave |
| Recommended descaling | Every 40 cycles |
| Warranty | Warranty conditional on regular descaling |
| Use | Household use only |
| Spare parts | Carafe, filter holder, measuring spoon (available at authorized service center) |
Frequently Asked Questions - CAPRIO MOULINEX
User questions about CAPRIO MOULINEX
0 question about this device. Answer the ones you know or ask your own.
Ask a new question about this device
Download the instructions for your Kitchen appliance in PDF format for free! Find your manual CAPRIO - MOULINEX and take your electronic device back in hand. On this page are published all the documents necessary for the use of your device. CAPRIO by MOULINEX.
USER MANUAL CAPRIO MOULINEX
natural_image
Line drawing of a modern coffee maker with control panel and side legs (no text or symbols)F
GB
I
P
E
RUS
UA
AR

natural_image
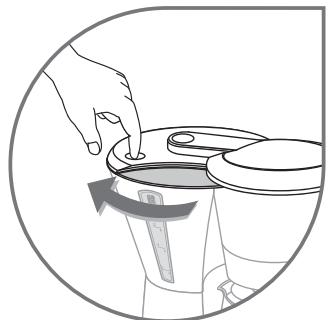
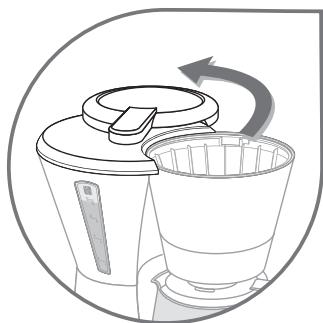
Illustration of a hand pressing down on a mechanical component with a circular arrow indicating rotation (no text or symbols)fig.1
natural_image
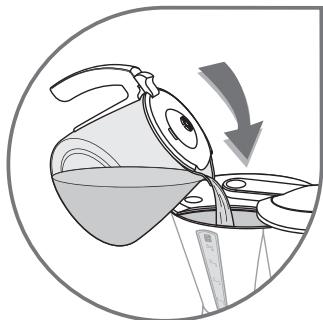
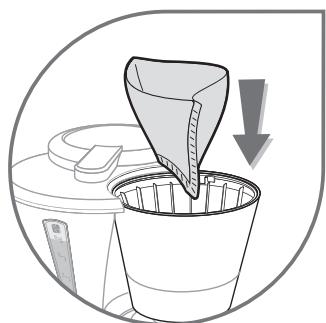
Illustration of a kettle pouring liquid into a container with a downward arrow indicating flow (no text or symbols)fig.2
natural_image
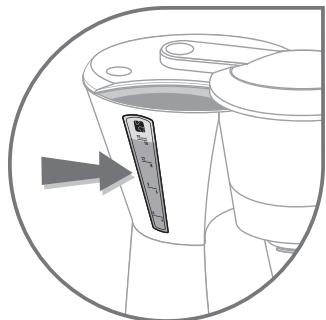
Diagram of a toilet with a control panel and indicator lights, no text or symbols presentfig.3
natural_image
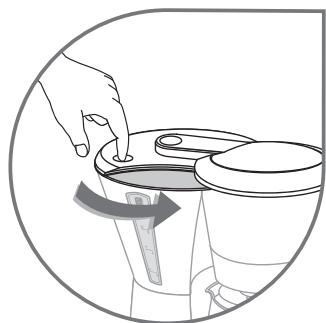
Illustration of a hand placing a small object into a container with a rotating arrow (no text or symbols)fig.4a
natural_image
Illustration of a blender with a circular arrow indicating rotation (no text or symbols)fig.4b
natural_image
Illustration of a hand pouring liquid into a container with a downward arrow indicating flow (no text or symbols)fig.5
natural_image
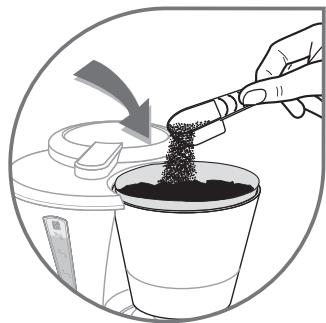
Illustration of a hand pouring granular material into a cup, with a downward arrow indicating waste or disposal (no text or symbols present)fig.6
natural_image
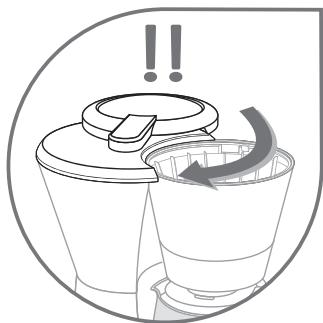
Diagram of a blender with a circular outline and warning symbols (no text or labels)fig.7
natural_image
Illustration of a hand pressing down on a kettlebell with a curved arrow indicating motion (no text or symbols)fig.8
DESCRIPTION
natural_image
Symbol of a trash bin crossed with no text or labels, accompanied by a black rectangular block below (no text or symbols present)a Lid
b Tank
c Filter holder
d Warming plate
e On / off button or control panel
f Measuring spoon
g Jug
SAFETY RECOMMENDATIONS
- Read the instructions for use carefully before using your appliance for the first time: the manufacturer does not accept responsibility for use that does not comply with the instructions.
- This appliance is not intended for use by: children; or persons who may suffer from a mental and/or physical impairment - unless they are adequately supervised in its operation and use. Persons who have a limited or no understanding in the operation and use of this appliance must first read and fully understand the contents of this instruction booklet, and where appropriate seek additional guidance on its operation and use from the person responsible for their safety.
- Before plugging the appliance in, make sure that the power it uses corresponds to your electrical supply system and that the outlet is earthed.
- Only use this coffee maker on a flat, stable, heat-resistant surface away from water splashes and any heat sources.
Any error in the electrical connection will negate your guarantee.
- Your appliance is designed for domestic use only. Any commercial use, inappropriate use or failure to comply with the instructions, the manufacturer accepts no responsibility and the guarantee will not apply.
- Unplug the appliance when you have finished using it and when you clean it.
-
Do not use the appliance if it is not working properly or if it has been damaged. If this occurs, contact an authorised service centre.
-
All interventions other than cleaning and everyday maintenance by the customer must be performed by an authorised service centre.
- Do not use the appliance if the power cord or plug is damaged. The power cord must be replaced by an authorised centre to prevent any danger.
- Do not immerse the appliance, power cord or plug in water or any other liquid.
- Do not leave the power cord within reach of children.
- The power cord must never be close to or in contact with the hot parts of your appliance, near a source of heat or over a sharp edge.
- For your safety, only use the manufacturer's accessories and spare parts designed for your appliance.
- Do not pull on the cord to unplug the appliance.
- Do not use the jug over a flame or on the hob of a cooker.
- Do not pour water into the appliance if it is still hot.
- Always close the lid (a) when running the coffee maker.
- All appliances are subject to strict quality control procedures. These include actual usage tests on randomly selected appliances, which would explain any traces of use.
- Never place your jug in a microwave oven, in a dishwasher or on a cooking hob.
- Do not use the jug without the lid.
- Run the coffee maker for the first time without coffee, rinsing the circuit with 1 litre of water.

MAKING COFFEE
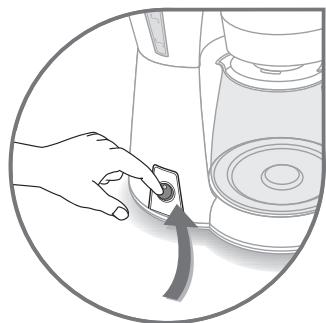
(Follow illustrations 1 to 8)
- Use cold water only and a No. 4 paper filter.
- Do not exceed the maximum amount of water indicated on the water tank level indicator.
- Close the lid of the filter holder firmly before switching on the coffee maker to avoid the risk of hot water flowing on to the work surface.
- This coffee maker is equipped with a drip-stop feature so that you can serve a cup of coffee before all the water has finished flowing through. Return the jug to its base quickly to avoid spillage.
Operation:
- Press the red " " button; the red indicator light comes on and the coffee maker begins to run.
- Press the " " button again to stop operation.

CLEANING
- To dispose of the used coffee grounds, remove the filter holder (c) from the coffee maker.
- Unplug the appliance.
- Do not clean the appliance while hot.
-
Clean with a damp cloth or sponge.
-
Never put the appliance in water or under running water.
- The filter holder can be washed in the dishwasher.

DESCALING
- Descale your coffee maker after every 40 cycles. You can use:
- of commercial limescale remover diluted as per the instructions on the packet.
• or 2 cups of white vinegar. - Pour into the tank (b) and switch the coffee maker on (without coffee).
-
Let the equivalent of one cup flow into the jug (g), then switch off.
-
Leave to stand for one hour.
- Switch the coffee maker back on to run the rest of the liquid through.
- Rinse the coffee maker by running 1 litre of water through it 2 or 3 times.
The guarantee does not cover coffee makers that do not work properly or do not work at all because they have not been descaled.

TROUBLESHOOTING
- Check:
• that it is plugged in properly. - that the switch or the On / off button (red indicator light on) is in the "ON" position.
-
that the filter holder is locked in place correctly.
-
The water flow-through time is too long or makes too much noise:
- descale your coffee maker.
If your appliance still doesn't work please contact an authorised service centre or the Helpline number below.

DISPOSAL OF ELECTRICAL OR ELECTRONIC APPLIANCES
natural_image
Symbol of a trash bin crossed with no text or labels, accompanied by a black rectangular block below (no text or symbols present)Environment protection first!
Your appliance contains valuable materials which can be recovered or recycled..
Leave it at a civic waste collection point.
HELPLINE:
If you have any product problems or queries, please contact our Customer Relations Team first for expert help and advice:
0845 602 1454 - UK
(01) 677 4003 - Ireland
Or consult our web site: www.moulinex.co.uk
DESCRIZIONE
natural_image
Symbol of a trash bin crossed with no text or labels, accompanied by a black rectangular block below (no text or symbols present)natural_image
Symbol of a trash bin crossed with a diagonal line, no text or labels presentnatural_image
Symbol of a trash bin crossed with a diagonal line, no text or labels presentnatural_image
Symbol of a trash bin crossed with no text or labels, representing waste sorting or disposal (no text present)natural_image
Symbol of a trash bin crossed with a diagonal line, no text or labels presentnatural_image
Simple line drawing of a trash bin with two crossed lines indicating no waste or restriction (no text or symbols)للمساعدة: