USER MANUAL DJC2 MOULINEX
natural_image
Line drawing of two identical electric cookers with wavy roof patterns and control knobs (no text or symbols)
Français p. 6
English p. 8
Deutsch S. 11
Nederlands p. 13
Español p. 15
Português p. 17
Italiano p. 19
عربي ص 21
Русский с. 23
Україньска с. 26
Latviešu I. 28
Lietuvių p. 30
Eesti I. 32
Thank you for choosing an appliance from the Moulinex range, which is intended solely for making yoghurts.
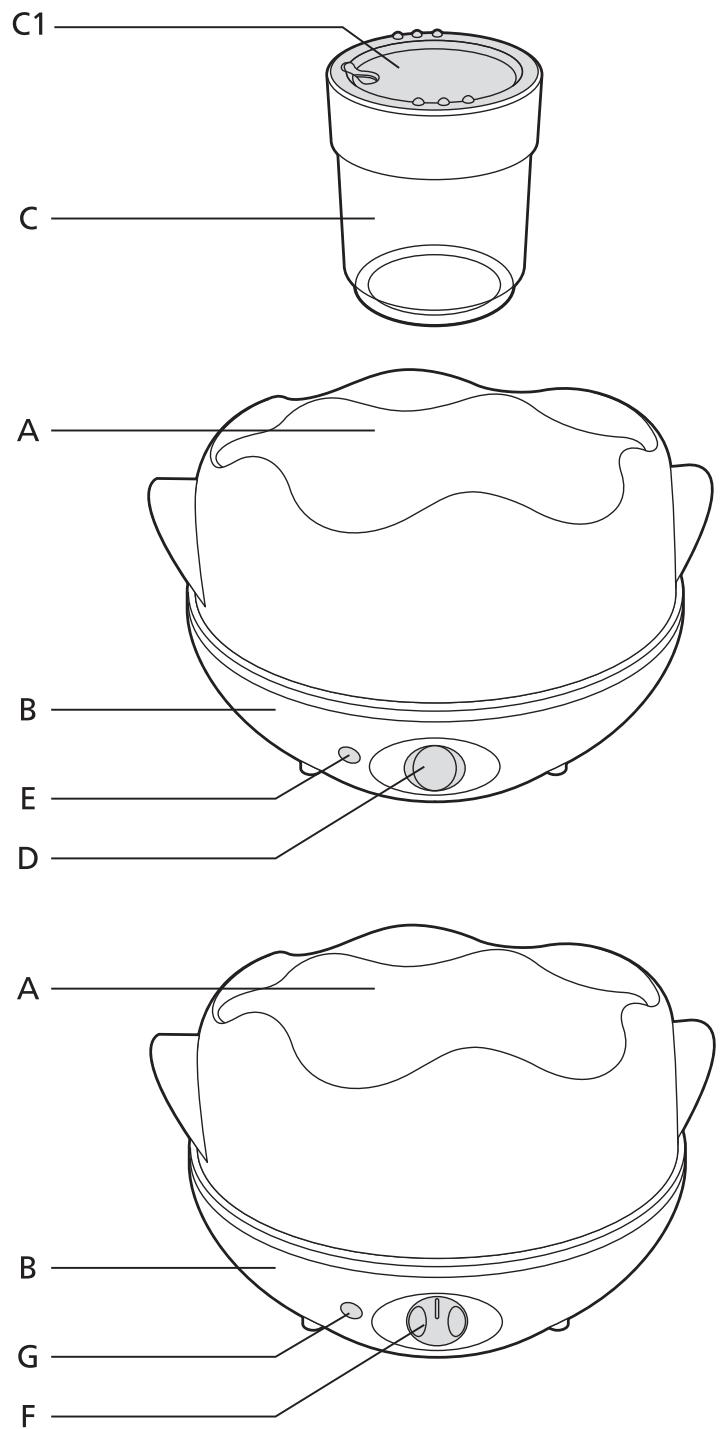
Description
A Lid
B Body
C Pots
C1 Dater lids
Depending on model:
D Switch
E Indicator light
or
F Electronic timer
G Luminous start button
Safety instructions
- Please read the instructions for use carefully before using your appliance for the first time and retain them for future reference: any use which does not conform to these instructions will absolve Moulinex from all liability.
- Never leave the appliance within reach of children without supervision. The use of this appliance by young children or by disabled persons must be supervised at all times.
Wiring instructions for U.K and Ireland only :
APPLIANCES WITH FITTED PLUG
Important : For your convenience this appliance is supplied complete with a plug incorporating a 3 amp fuse.
In the event of replacing a fuse in the plug supplied, a 3 amp fuse approved by ASTA to BS1362 must be used.
If the socket outlets are not of the 13A BS 1363 type, and therefore do not accept the plug connected to this appliance, cut off the plug if moulded type or remove the plug if connected by screw terminals.
When the plug is a moulded type and this is cut off from the appliance, the connected wires are a shock hazard. Do not under any circumstances connect a cut off plug into the electrical socket outlet. The cut off plug must be disposed of in a safe manner that prevents any form of connection.
If the fuse cover is detachable, never use the plug with the cover omitted. Replacement covers can be obtained from your service agent.
Fit the appropriate plug according to the instructions in paragraph «Fitting a plug». With alternative plugs a 5 amp fuse must be fitted either in the plug or adaptor or at the main fuse box.
APPLIANCES WITHOUT FITTED PLUG
FITTING A PLUG - IMPORTANT
The wires in the mains lead are coloured in accordance with the following code:
BLUE : NEUTRAL
BROWN : LIVE
But the colours may not correspond with the coloured markings identifying the terminals in your plug, proceed as follows:
The wire which is coloured BLUE must be connected to the terminal which is marked with the letter ‘N’ or coloured black. The wire which is coloured BROWN must be connected to the terminal which is marked with the letter ‘L’ or coloured red.
This appliance is manufactured to conform to the Low Voltage Electrical Equipment (Safety) Regulations 1989 and is designed to comply with BS 3456. It complies with the requirements of the EEC Directive (89/336/EEC).
- Check that the power rating of your appliance does in fact match that of your household electrical wiring system. Any connection error will render the guarantee null and void.
- Your appliance is intended exclusively for domestic and indoor use.
- Unplug your appliance as soon as you have finished using it and when you are cleaning it.
- Never use your appliance if it is not working correctly, or if it has been damaged. If this happens, contact an approved Moulinex service centre (see list in service booklet).
- Any intervention other than cleaning and normal maintenance by the customer must be carried out by an approved Moulinex service centre.
- Never put the appliance, the power cord or the plug into water or any other liquid.
- Never allow the power cord to hang down within reach of children.
- The power cord must never be close to or in contact with the hot parts of your appliance, close to a source of heat or resting on a sharp edge.
- If the power cord or the plug are damaged, do not use your appliance. To avoid any risk, they must be replaced by an
approved Moulinex service centre (see list in service booklet).
- For your own safety, use only accessories and spare parts which are suitable for your appliance.
- All appliances are subjected to strict quality control. Practical user tests are performed with appliances selected at random, which explains any traces of use.
Using your appliance
- Before first use, clean the pots (C) and their lids (C1) in hot, soapy water. Rinse and dry.
To prepare the pots of the yoghurt maker, you will need one litre of milk and a yoghurt bacillus.
1) CHOICE OF MILK
- It is best to select whole or semi-skimmed milk which does not need to be boiled (UHT long-life milk or powdered milk).
Untreated or pasteurised milk has to be boiled, then cooled down and strained to eliminate the skin.
Notes:
- Whole milk makes the yoghurt smoother and gives it more flavour.
- To obtain yoghurts which are more consistent, you may add 2 or 3 tablespoons of powdered milk to a litre of milk, mixing thoroughly.
- It takes 8 to 15 hours to obtain good yoghurts, depending on the type of milk used.
This is made either:
. from a natural commercial yoghurt (preferably whole) with a use-by date as long as possible.
. from a yoghurt you have made yourself.
. from a freeze-dried bacillus (bought from pharmacies or specialist health food stores). You will need to prolong the time for first preparation by two hours.
Important: do not use a yoghurt based on your own home-made bacillus more than ten times, as the yoghurts will not be as good.
3) CREATING YOGHURTS
- Mix a litre of milk with the bacillus very thoroughly.
- To obtain a good mixture, beat the yoghurt to turn it into a nice, smooth paste and
then add the milk, continuing to beat at the same time.
- Distribute the mixture between the pots (C).
- Place the pots (C), without their lids (C1), in the yoghurt maker.
- Put the lid (A) on the yoghurt maker and plug it in.
. Model without timer:
The marking on the lid (A) (from 1 to 12) can be used to show the time when the yoghurts will be ready:
. match the scale to the mark situated on the body (B) of the appliance.
Example: if it is midday and if you have opted for a preparation time of 8 hours, set the scale to the figure 8.
- Press the switch (D) to start preparation.
The indicator light (E) will come on.
At the end of preparation, press the switch (D) and unplug the appliance.
. Model with timer:
- Select the preparation time using the button on the timer (F) and press the start button (G).
Once the time is up, the yoghurt maker stops automatically.
- Unplug the appliance.
Notes :
- Never move the yoghurt maker when it is in use.
- Avoid locations subject to vibrations, or exposed to draughts.
- Preparation will be speeded up by gently heating the milk (37 to 40°).
- Remove the lid (A), taking care to prevent the condensation from dripping into the pots.
- Cover the pots with the dater lids (C1).
- Indicate, using the manual dater situated on each lid, the date limit for consumption.
- Place the yoghurts in the fridge for at least one hour before eating them. If you wait 24 hours, they will be firmer.
Notes :
- The maximum length of time the yoghurts can be stored, in the fridge, is 8 to 10 days.
- The date limit for consumption will consequently be D+8 or D+10, D being the date of preparation.
- Never put the appliance in the fridge.
5) PRACTICAL TIP
- Place the lids of the pots on top of the lid
of the yoghurt maker during preparation of the yoghurts.
Cleaning
- Always unplug the appliance before cleaning it.
- Never immerse the body of the appliance in water. Wipe it with a damp cloth and hot, soapy water. Rinse and dry.
- The yoghurt pots (C), the lids of the pots (C1) and the lid (A) of the yoghurt maker can be washed in the dishwasher.
What to do if your appliance does not work
- Firstly, check the electrical connection. If you have followed all the instructions and your appliance still does not work, please contact your retailer or an approved Moulinex service centre (see list in the “Moulinex service” booklet).