RVDVD2.0 - Radio MB QUART - Free user manual and instructions
Find the device manual for free RVDVD2.0 MB QUART in PDF.


| Product Type | Car Multimedia Receiver with DVD Playback |
| Brand | MB Quart |
| Model | RVDVD2.0 |
| Category | Radio / Car Stereo |
| Form Factor | 2-DIN (approx. 178 x 100 mm) |
| Weight | Approx. 2.0 kg |
| Power Supply | 12V DC (negative ground) |
| Display | Touchscreen LCD (size not specified, likely 6-7 inches) |
| Audio Output | 4 x 50 watts max (typical) |
| Radio Tuner | AM/FM with RDS |
| Playback Formats | CD, DVD, MP3, WMA, JPEG |
| Connectivity | Bluetooth, USB, AUX input, rear camera input |
| GPS Navigation | Not confirmed (likely not included) |
| Steering Wheel Control | Compatible with adapter (sold separately) |
| Remote Control | Included |
| Maintenance | Clean with a soft dry cloth; avoid liquids |
| Safety | Do not disassemble; use only specified fuses |
| Spare Parts | Contact MB Quart customer service for replacement parts |
Frequently Asked Questions - RVDVD2.0 MB QUART
User questions about RVDVD2.0 MB QUART
0 question about this device. Answer the ones you know or ask your own.
Ask a new question about this device
Download the instructions for your Radio in PDF format for free! Find your manual RVDVD2.0 - MB QUART and take your electronic device back in hand. On this page are published all the documents necessary for the use of your device. RVDVD2.0 by MB QUART.
USER MANUAL RVDVD2.0 MB QUART
RV DVD Player and Media Receiver
PRE-INSTALLATION CHECKLIST
Thank you for purchasing the MB Quart RVDVD2.0 multi-zone RV radio with AM/FM, USB, Bluetooth audio streaming and a built-in DVD player. Please take a few minutes to review the user manual before attempting installation and operation.
Additional support documentation can be found at MBQUART.com or by emailing support@maxxsonics.com.
FEATURES
• AM/FM Radio (selectable USA/Europe)
- Weather Band (WB) Radio
• Built-In CD/DVD Player
- Bluetooth Audio Streaming (HSP)
- USB Media Input (MP3/WMA/Video/Photo)
• HDMI Video Output with ARC Support
- Front Panel AUX 1 Audio Input
- Rear Panel AUX 2 Audio Input
- Multi-Zone Operation
• Four (4) Built-In Speaker Outputs
- Front/Rear Preamp Outputs for External Amplifiers
• Built-In Wake Up Alarm and Auto-Off Sleep Modes
- Wired Headphone Output (Privacy Listening)
- Separate USB Quick-Charge Port
• Infra-red Remote Control
CHECKLIST
- Please read the instruction manual carefully before installing the unit. This unit is intended for only 12V DC electrical systems.
- Remove the two transport screws on the top of the DVD unit marked with red tabs before proceeding with installation.
- Make insulated connections to the unit as outlined in this instruction manual. Complete all wired connections before powering on the unit. Incorrect connections may cause damage to the unit.
- Secure any loose wires after installation.
- For HDMI rear-connected cables, please keep the overall length 12 feet or less.
WIRING & INSTALLATION
REAR PANEL DETAIL

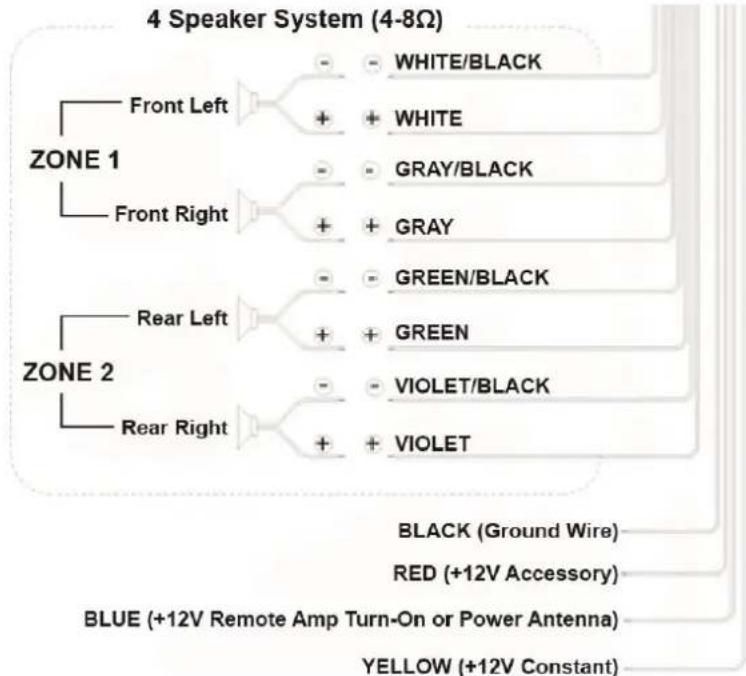
flowchart
graph TD
    A["4 Speaker System (4-8Ω)"] --> B["Front Left"]
    A --> C["Front Right"]
    A --> D["Rear Left"]
    A --> E["Rear Right"]
    B --> F["WHITE/BLACK"]
    B --> G["WHITE"]
    C --> H["GRAY/BLACK"]
    C --> I["GRAY"]
    D --> J["GREEN/BLACK"]
    D --> K["GREEN"]
    E --> L["VIOLET/BLACK"]
    E --> M["VIOLET"]
    N["ZONE 1"] --> O["Black (Ground Wire)"]
    N --> P["RED (+12V Accessory)"]
    Q["ZONE 2"] --> R["BLUE (+12V Remote Amp Turn-On or Power Antenna)"]
    Q --> S["YELLOW (+12V Constant)"]
WIRING & INSTALLATION
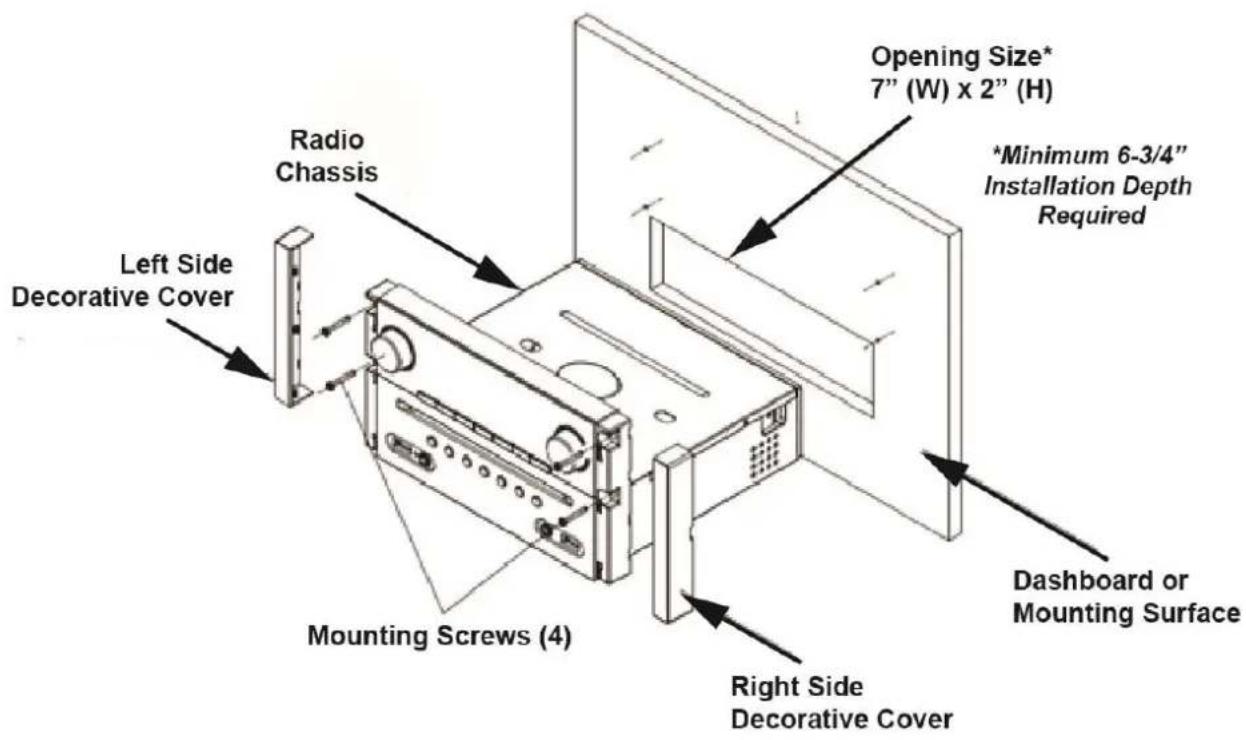
INSTALL THE UNIT
- Please note: This unit requires a minimum 6-3/4" mounting depth which includes space for the electrical/speaker plugs and any A/V input and output connections.
- Cut or utilize a mounting opening 7"(H) x 2" W).
- Remove the left and right decorative covers as shown in the diagram.
- Insert the unit into the mounting opening.
- Attach the unit using the four (4) supplied mounting screws.
- Replace decorative side covers over mounting screws.
FRONT PANEL CONTROLS & INPUTS

BUTTON FUNCTIONS FOR ICONS (applies to AM/FM/WB, DVD, USB and Bluetooth Sources)

Play Pause
(or AM/FM/WB Preset 1)

Fast-Forward Next Song or File (or Next AM/FM/WB Station)

Rewind Previous Song or File (or Previous AM/FM /WB Station)
FRONT PANEL FUNCTIONS (BY MODE)
| BUTTON | ACTION | RADIO | DISC/USB | AUX IN 1/2 | BT MUSIC |
| POWER | Short | Power ON/Mute ON/OFF | Power ON/Mute ON/OFF | Power ON/Mute ON/OFF | Power ON/Mute ON/OFF |
| Long | Power OFF | Power OFF | Power OFF | Power OFF | |
| ZONE 1 | Short | Zone 1Acve / Unavailable | Zone 1Acve / Unavailable | Zone 1Acve / Unavailable | Zone 1Acve / Unavailable |
| Long | Zone 1 Mute On/O | Zone 1 Mute On/O | Zone 1 Mute On/O | Zone 1 Mute On/O | |
| ZONE 2 | Short | Zone 2Acve / Unavailable | Zone 2Acve / Unavailable | Zone 2Acve / Unavailable | Zone 2Acve / Unavailable |
| Long | Zone 2 Mute On/O | Zone 2 Mute On/O | Zone 2 Mute On/O | Zone 2 Mute On/O | |
| MODE | Short | Change Source | Change Source/SCH:7 | Change Source | Change Source |
| Long | / | Video/Photo/Music change | / | BT(o/link) | |
| ALARM | Short | Alarm ON/OFF | Alarm ON/OFF /SCH:8 | Alarm ON/OFF | Alarm ON/OFF |
| Long | Alarm Seng | Alarm Seng | Alarm Seng | Alarm Seng | |
| SLEEP | Short | Sleep ON/OFF | Sleep ON/OFF /SCH:9 | Sleep ON/OFF | Sleep ON/OFF |
| Long | Sleep Seng | Sleep Seng | Sleep Seng | Sleep Seng | |
| DIM | Short | Dimmer H/M/L/O | Dimmer H/M/L/O | Dimmer H/M/L/O | Dimmer H/M/L/O |
| Long | / | DIR SCH/NUM SCH | / | / | |
| DISP | Short | Info/Clock | Info/Clock/SCH:0 | Info/Clock | Info/Clock |
| Long | Clock Seng | Clock Seng | Clock Seng | Clock Seng | |
| VOL | Rotary | Volume Up/Down | Volume Up/Down | Volume Up/Down | Volume Up/Down |
| MENU(PUSH VOL) | Short | BAS-TRE-BAL-EQ-LOUD | BAS-TRE-BAL-EQ-LOUD | BAS-TRE-BAL-EQ-LOUD | BAS-TRE-BAL-EQ-LOUD |
| Long | BEEP/CLOCK/P_VOL/CT/AREA/DX/ST | BEEP/CLOCK/P_VOL | BEEP/CLOCK/P_VOL | BEEP/CLOCK/P_VOL | |
| SEEK | Rotary | Seek Up/Down | Next/Previous File | / | Next/Previous File |
| BAND/TUNE(PUSH SEEK) | Short | Band/Manual | / | / | / |
| Long | Auto Store | FF/FR | / | / | |
| 1/PAU | Short | Recall M1 staon | play/pause/SCH:1 | / | / |
| Long | Save staon to M1 | / | Show MCU version | / | |
| 2/INT | Short | Recall M2 staon | INT on/o/SCH:2 | / | / |
| Long | Save staon to M2 | / | Show DVD version | / | |
| 3/RPT | Short | Recall M3 staon | RPT(ONE/ALL)/SCH:3 | / | / |
| Long | Save staon to M3 | / | Reset(5 seconds) | / | |
| 4/RDM | Short | Recall M4 staon | RDM on/o/SCH:4 | / | / |
| Long | Save staon to M4 | / | / | / | |
| 5/DIR- | Short | Recall M5 staon | DIR-/SCH:5 | / | / |
| Long | Save staon to M5 | -10 | / | / | |
| 6/DIR+ | Short | Recall M6 staon | DIR+/SCH:6 | / | / |
| Long | Save staon to M6 | +10 | / | / |
OPERATION
POWER AND BASIC ADJUSTMENTS
Turn the Unit ON or OFF
Press (1) button to turn the unit ON. When the unit is switched on, press and hold (2) button for 2 seconds to switch the unit OFF. A "GOOD BYE" message is displayed to confirm power down.
MUTE
To mute the unit, quickly press and release 📋 button. "MUTE" is displayed. Repeat the process to unmute the unit.
Sound Adjustments
Press and release VOLUME/SEL knob to choose sound settings in the following order: BASS-TRE-BAL-EQ
- Bass – Choose from -7 to +7
- Treble – Choose from -7 to +7
• Balance – Choose Left or Right (up to 7 steps in either direction) - EQ – If “OFF” turn knob to the right and choose from pre-programmed tone settings*:
○ Classical
○ Rock
○ Pop
○ Flat
○ Jazz
- EQ OFF
*Note: If one of the EQ sound settings is chosen, manual Bass and Treble adjustments are disabled. Only "BAL" and the name of the EQ setting will show in the Sound Adjustment menu. To disable the EQ and allow manual Bass/Treble setting, simply scroll through the settings until "EQ OFF" is displayed.
- LOUD – Choose from ON or OFF**.
**Note: Loudness gives a boost of low and high frequencies at low volumes, but can add more distortion at high volumes. We recommend leaving in the OFF position and using an EQ setting to achieve the sound profile that achieves the best low and high volume performance for your system.
Setting Adjustments (DVD, USB, Bluetooth or AUX Sources)
Press and hold VOLUME/SEL button for the setting menu: BEEP ON/OFF-CLOCK 12/24 - P_VOL
- In each menu item, rotating the VOLUME/SEL knob selects them and allow you to rotate through the sub-settings.
- BEEP – Choose ON or OFF
○ CLOCK – 12 or 24 hour format
o P_VOL – Preset volume level (see next page)
OPERATION
POWER AND BASIC ADJUSTMENTS (Continued)
Setting Adjustments (AM/FM Source ONLY)
The AM/FM source adds additional settings to the adjustment menu. Press and hold VOLUME/SEL button for the setting menu: BEEP ON/OFF-CLOCK 12/24 - P_VOL - CT SYNC or CT INDEP - AREA USA or AREA EUR-DX or LOC - STEREO or MONO
- In each menu item, rotating the VOLUME/SEL knob selects them and allow you to rotate through the sub-settings. The additional AM/FM settings are:
- BEEP – Choose ON or OFF
- CLOCK – 12 or 24 hour format
o P_VOL – Preset volume level (see below) - CT SYNC or CT INDEP – allows the clock to synch with the radio station's RDS time feed (SYNC) or to be set independently (INDEP) by the user
○ AREA USA or AREA EUR – Selects the region: USA or Europe - DX or LOC – Selects distance (DX) or local (LOC) for optimized reception
- STEREO or MONO – Selects a stereo or mono broadcast reception
Beep Setting
The audible beep function allows you to hear the beep tone through the speakers whenever a button is pressed on the unit.
- To set the audible beep, advance to the "BEEP" function in the settings menu and rotate the VOLUME/SEL knob to choose the "ON" or "OFF."
Clock Setting Procedure
The clock allows you to select between 12 or 24 hour time formats.
- To set the 12 or 24 hour time format, advance to the "CLOCK" function in the settings menu and rotate the VOLUME/SEL knob to choose the format.
- To set the clock time, press and hold DISP button and the HH (hours) flash. Rotate the VOLUME/SEL knob to set the hour. Press DISP (or VOLUME/SEL) button until the MM (minutes) flash. Rotate the VOLUME/SEL knob to set the minutes. Once complete, press DISP (or VOLUME/SEL) button to exit.
Preset (P\_VOL) Setting
This function allows the user to set the volume level at which the unit powers up again depending on what level was recorded when the unit was last turned off.
- To set the P_VOL threshold, advance to the "P_VOL" function in the settings menu and rotate the VOLUME/SEL knob to choose the volume setting.
- When the volume threshold at the time of unit turn off is less than P_VOL value, the next time turns on the unit the volume will be the same as last time turned off.
- When the volume threshold at the time of unit turn off is greater than P_VOL value, the next time turns on the unit the volume will default to the lower P_VOL preset threshold.
OPERATION
ZONES, DISPLAY, ALARM & SLEEP
ZONE 1 Operation
ZONE 1 is connected to the unit's on-board FRONT speaker and preamp-level RCA outputs.
- Quickly press and release the ZONE 1 button to select between the zone being active or disabled. The LCD screen will indicate the status of the zone above the button.
- Rotate the VOLUME/SEL knob up or down to adjust the ZONE 1 volume when it is in the active state.
- When ZONE 1 is in the disabled state, the VOLUME/SEL knob only controls the active zone. Otherwise, the ZONE 1 volume remains where it was left when disabled. To match the output of ZONE 2 after re-enabling, simply turn the volume all the way down and back to the desired level for both zones which then display equally.
- To mute ZONE 1, press and hold the ZONE 1 button to toggle between ON or OFF. The LCD screen indicates the muting status.
ZONE 2 Operation
ZONE 2 is connected to the unit's on-board REAR speaker and preamp-level RCA outputs.
- Quickly press and release the ZONE 2 button to select between the zone being active or disabled. The LCD screen will indicate the status of the zone above the button.
- Rotate the VOLUME/SEL knob up or down to adjust the ZONE 1 volume when it is in the active state.
- When ZONE 2 is in the disabled state, the VOLUME/SEL knob only controls the active zone. Otherwise, the ZONE 2 volume remains where it was left when disabled. To match the output of ZONE 1 after re-enabling, simply turn the volume all the way down and back to the desired level for both zones which then display equally.
- To mute ZONE 2, press and hold the ZONE 2 button to toggle between ON or OFF. The LCD screen indicates the muting status.
Show Clock or Source Information
Press DISP button to show either the clock or source information. Depending on the source, text information about the song or movie playing may be available on the display (such as RDS-enabled FM stations, USB music files or Bluetooth streamed music).
Alarm Operation
The alarm built into the unit functions as a wake-up alarm. It could also be used to automatically turn the unit on at a specific time.
- On the front panel using the "ALARM" button, turn ALARM to "ON" and set the wake-up alarm time (see next page Alarm Time Setting). When the wake-up alarm time is set, the unit will generate a wake-up beeping sound at the preset time. The beep sound stops when any key pressed.
OPERATION
Alarm Time Setting Procedure
When ALARM is set to "ON", press and hold the "ALARM" button again to set the time.
If the ALARM setting is “OFF”, simply press and hold the “ALARM” button to go directly to setting the alarm. This will not turn the alarm on, it will only set the time. If no alarm time has begun setting within 5 seconds, the alarm time setting mode is automatically cancelled.
- After entering the alarm time setting mode, the HH (hours) flash. Rotate the VOLUME/SEL knob to set the hour. Next, press VOLUME/SEL knob. The MM (minutes) flash. Rotate the VOLUME/SEL knob to set the minutes. Press the VOLUME/SEL or "ALARM" button to exit.
- If the ALARM was not already set to "ON", press the "ALARM" button to enable the alarm for the time you just set.
Sleep Operation
The sleep function built into the unit allows the user to set a specific time when the unit will automatically turn off from 1-59 minutes later.
- On the front panel using the "SLEEP" button, turn SLEEP to "ON" then set the sleep time (see below Sleep Time Setting). When the sleep time is set, the unit will power off automatically at the preset time.
Sleep Time Setting Procedure
When SLEEP is set to "ON", the next menu item is SLEEP SET.
If the SLEEP setting is "OFF", simply press and hold the "SLEEP" button to go directly to setting the sleep time. This will not turn the sleep setting on, it will only set the time. If no sleep time has begun setting within 5 seconds, the sleep time setting mode is automatically cancelled.
- After entering the sleep time setting mode, the sleep timer will flash. Rotate the VOLUME/SEL knob to set it between 01-59 minutes. Press VOLUME/SEL or "SLEEP" button to exit.
- If the SLEEP function was not already set to "ON", press the "SLEEP" button to enable the sleep timer for the preset countdown time.
Display Dimmer
The LCD display brightness is adjustable.
- Press the DIM button below the disc slot and it toggles between LOW-MID-HIGH-OFF.
Unit Reset
When errors occur in the display or functions (such as a DVD not playing and won't eject), you can reset the unit to its initial status.
- Using a paper clip or small pen tip, press the RESET button on the face of the unit to reset the unit. This will erase all settings and memory functions and reset to factory defaults.
OPERATION
DVD PLAYER, HDMI ARC, AUX INPUTS & HEADPHONES
DVD/CD Player
This unit plays DVDs and audio CDs. For DVDs, the V-OUT 1 and/or HDMI output must be connected to a monitor to display the picture. You can connect both outputs and two separate TVs if you wish - one via HDMI and the other via V-OUT 1 (Composite Video).
- To play an audio CD or DVD, insert the disc into the slot on the face of the unit. Depending on the content on the disc (such as a full-length movie), the player may take a few seconds to fully read the disc and be ready for play. When ready, the disc will begin play automatically.
- When the disc is playing, the “disc” icon in the upper left corner of the display will indicate spinning and the display shows the disc information. In a DVD, this is generally the “chapter” on the left and the “elapsed time” on the right.
- To advance to another chapter or song, or to revisit a previous chapter or song, use the TUNE (▶)Abb. The display will indicate the NEXT or PREVIOUS chapter or song***. Slow turning goes one-by-one. Faster turning goes more quickly.
***Note: Some DVDs have preview tracks at the beginning which disable the player to manually skip ahead. After these play, the "NEXT" and "PREVIOUS" functions are allowed to work as described.
- To pause the disc, press the 1/▶II (play/pause) button. "PAUSE" will appear in the display and the disc icon will not appear to spin. To resume play, press the 1/▶II (play/pause) button again.
- If a disc contains a combination of music, video and/or photos, you can also access each file type individually. To access these functions, press and hold the MODE button while in the DISC mode to select: Music-->Video-->Photo.
- To eject the disc, press the eject button at the right side of the disc slot.
HDMI ARC (Audio Return Channel) Functionality
Using an ARC-enabled HDMI connection to the TV, the audio from whatever is playing on the TV (such as a satellite broadcast or over-the-air television channel) can be routed to the unit's HDMI connection and allow the audio to play through the unit's speakers and/or preamp outputs.
- Press the MODE button to switch to HDMI ARC. Ensure the HDMI cable on the TV is connected either to a port labeled "HDMI ARC" or that ARC is enabled in the TV settings menu.
AUX Inputs
There are two methods for selecting an auxiliary input.
- Press the MODE button to switch to AUX IN 1 or AUX IN 2 mode when an auxiliary audio signal input is desired.
- Choose AUX IN 1 for front panel 3.5mm jack. Choose AUX IN 2 for preamp-level RCA input on the back of the unit.
OPERATION
AM/FM/WB RADIO
Receive a Radio Station
There are 3 FM station groups - FM1, FM2 and FM3. There is one weather band (WB) selection. There are 2 AM station groups - AM1 and AM2.
- To select a radio station group, press the MODE button to select the radio mode. Next press BAND button to select desired group (FM1, FM2, FM3, WB, AM1 or AM2). Press and quickly release BAND (▶▶/◀◀) button to select the station group.
- Rotate the BAND (▶▶/▶◀) knob to tune by automatically seeking up or down to the next available radio station frequency.
- Press and hold BAND (▶▶/▶◀) button once to switch to manual tuning up or down to the desired frequency. Then rotate the same knob to manually tune stations.
Manually Store and Recall AM/FM Radio Station Presets
The unit offers 6 presets for each of the AM and FM station groups. There are a total of 18 FM presets and 12 AM presets.
- To store radio station presets, press and hold one of the preset button (1 through 6) for 2 seconds. The current station is stored into the number button.
- To recall a given radio station preset, quickly press the preset button (1 through 6) to directly listen the station saved in the corresponding preset button.
Auto-Store Stations
This is a useful method to populate available AM/FM radio stations in a new area.
- Press and hold BAND button for 2 seconds to automatically store stations to numeric buttons 1 through 6 of band 1, 2 or (if FM) 3. Stations will store in the order of scanning and reception. Use front panel buttons 1 through 6 to recall presets.
Weather Band Operation
The unit includes 6 weather band channels between 162.400-162.550MHz. Five are preset.
- To select the weather band, press the MODE button to select the "WB" radio mode. Rotate the BAND (▶▶/▶◀) knob to change to manually change WB stations.
○ WB Preset 1: 162.400MHz
○ WB Preset 2: 162.425MHz
○ WB Preset 3: 162.450MHz
○ WB Preset 4: 162.475MHz
○ WB Preset 5: 162.500MHz
○ WB Preset 6: 162.525MHz
○ Rotate the BAND (▶▶/▶◀) knob to change to the remaining WB station at 162.550 MHz. Further rotation scrolls through the other WB channels again.
OPERATION
USB Sources
Connecting a USB Device
This unit supports USB source devices such as a thumb drive or portable media player.
- Insert the USB device into the front panel USB port labeled "MEDIA."
- If the USB drive only contains music files, these will begin to play automatically.
Playing or Viewing USB Files
The unit supports playback of MP3 and WMA files. It also supports mixed-media on a single USB device to include music, video and photo files.
- To select USB as the source, press the MODE button until the USB mode display appears.
- If a video monitor is connected to the unit, you can also view videos and photos for USB sources that contain mixed media files. To access these functions, press and hold the MODE button while in the USB mode to select: Music-->Video-->Photo.
Selecting Files
Selecting the files uses the icon-based buttons below the LCD to the right. Refer to page 5 for the icon button locations.
- Rotate the NEXT ▶ or PREVIOUS ◀ function on the TUNE knob to skip to next/previous file. Slow turning goes one-by-one. Faster turning goes more quickly.
Play/Pause
To play or pause the file:
- Press 1/ ▶ button to play/pause the file.
INTRO Function
The INTRO function plays the first 10 seconds of each file. To initiate INTRO:
- Press 2/INT button.
- Press again to stop this function.
Repeat (RPT) Function
The REPEAT function simply repeats the same chosen file(s) or folder again and again until de-selected.
- Press 3/RPT button to select RPT mode.
- RPT FOLD: Repeat all files of the folder.
- RPT ONE: Repeat the same file.
- RPT ALL: Repeat all files.
OPERATION
USB Sources (Continued)
Random (RDM) Function
The RANDOM function simply randomizes all files. This is also called "shuffle" on some devices.
- Press 4/RDM button to choose RDM on/off.
- RDM ON: Plays all files in random order.
- RDM OFF: Turns off the random function.
Directory+/- Function (for MP3/WMA files only)
If you have a USB device set up with folders (such as by artist or playlist), the Directory function allows you to navigate the folders for MP3 and WMA music files.
- Press DIR+/DIR- button to select next/previous folder to play. Once in the directory function, use the +10/-10 to navigate the folders.
- Press and hold DIR+/DIR- button for 2 seconds it will skip +10/-10 file to play.
Search MP3/WMA Songs – Direct Mode (DIR)
The unit allows users to rotate through the dial to quickly get to a specific song (file) on the USB device.
- To numerically search songs on a USB device, press and hold the DIM button on the front panel. Alternatively, press the USB/DISC button on the remote. "DIR SCH" is displayed on the unit's LCD screen.
- Rotate VOLUME/SEL (or BAND (▶▶/◀◀) knob to advance and select the file/folder.
- If you need to go back, press and hold VOLUME/SEL (or BAND (▶▶/▶◀) knob to go back to the previous file or folder.
- Once you are at your chosen file/folder, press VOLUME/SEL (or BAND (▶▶/▶◀) knob to confirm and play.
OPERATION
USB Sources (Continued)
Search MP3/WMA Songs – Numeric Search Mode (NUM)
The unit allows users to directly input a song number or rotate through the dial to quickly get to a specific song (file) on the USB device.
- To numerically search songs on a USB device, press and hold the DIM button on the front panel.
- Quickly press the DIM button again to enter Numeric Search mode. Alternatively, press the USB/DISC button twice on the remote. The display shows "NUM ****."
- Rotate VOLUME/SEL (or BAND (▶▶/▶◀) knob to scroll through the numbers. Press the VOLUME/SEL (or BAND (▶▶/▶◀) knob to choose a number after scrolling. Continue entering until you complete the numeric entry.
-
You can also directly enter numbers using the front panel buttons. Select each number by pressing the VOLUME/SEL (or BAND (▶▶/◀◀) knob after the selection:
-
For the number 1: Use preset button 1
- For the number 2: Use preset button 2
- For the number 3: Use preset button 3
- For the number 4: Use preset button 4
- For the number 5: Use preset button 5
- For the number 6: Use preset button 6
- For the number 7: Use the MODE button
- For the number 8: Use the ALARM button
- For the number 9: Use the SLEEP button
- For the number 0: Use the DISP button
OPERATION
HEADPHONES, VIDEO IN/OUT and BLUETOOTH
Headphone Jack
There is a 3.5mm headphone jack in the front panel to allow for use of wired headphones.
- When a headphone plug is inserted into the jack, the unit's speakers are muted.
Video-OUT 1
Video-OUT 1 (V-OUT 1) is a composite video connection on the unit's rear panel intended to connect to a video screen with a composite video input. This can be used with or as an alternative to the HDMI video output.
Video-IN / Video-OUT 2 Function
Video-IN and Video-OUT 2 is a pass-through video connection in the event you have existing video wiring separate of what will display the unit's DVD and USB Media. There is no switching or control of this video connection within the unit. It's simply a pass through.
Bluetooth Pairing
You must first pair a Bluetooth-enabled device to stream music to your unit.
- Select "search" or "discover" on the Bluetooth device while the unit is in the BT MUSIC mode. "RVDVD2.0" should appear in the list of available devices. Select "RVDVD2.0."
- If a password is required, input "0000."
- When successfully paired, BT MUSIC is displayed on LCD.
- If no Bluetooth device is paired, "UNPAIRED" will show in the LCD display.
Stream Bluetooth Audio
This unit supports Bluetooth music streaming using the Headset Profile (HSP). It also supports text readout from compatible BT streams.
- Using a Bluetooth-enabled device, press MODE button to switch to BT MUSIC source. It will play a song from the BT device automatically as long as it's been selected in the music player on the device.
- Press the 1/ ▶ button to play/pause the song. Rotate the BAND (▶▶/▶◀) knob to select next/previous song.
Disconnect Bluetooth Device
This is useful for mobile phones where the user wishes to place or receive a call.
- When the Bluetooth device is paired with the unit. Press and hold MODE button (or BT button on the remote) to disconnect the Bluetooth. "BT OFF" is displayed.
Reconnect Bluetooth Device
This is useful if a Bluetooth-enabled mobile phone user has completed a call and wishes to continue playing music via Bluetooth.
- Press and hold MODE button (or BT button on the remote) again to connect the previously paired Bluetooth device. "LINKED" is displayed.
REMOTE CONTROL
IR Remote Operation

REMOTE CONTROL
| KEYS | ACTION | RADIO | DISC | USB | AUX IN | BT MUSIC |
| POWER | Short | Power ON/Mute ON/OFF | Power ON/Mute ON/OFF | Power ON/Mute ON/OFF | Power ON/Mute ON/OFF | Power ON/Mute ON/OFF |
| Long | Power OFF | Power OFF | Power OFF | Power OFF | Power OFF | |
| A | Short | Zone 1 Active / Unavailable | Zone 1 Active / Unavailable | Zone 1 Active / Unavailable | Zone 1 Active / Unavailable | Zone 1 Active / Unavailable |
| Long | Zone 1 Mute ON/OFF | Zone 1 Mute ON/OFF | Zone 1 Mute ON/OFF | Zone 1 Mute ON/OFF | Zone 1 Mute ON/OFF | |
| B | Short | Zone 2 Active / Unavailable | Zone 2 Active / Unavailable | Zone 2 Active / Unavailable | Zone 2 Active / Unavailable | Zone 2 Active / Unavailable |
| Long | Zone 2 Mute ON/OFF | Zone 2 Mute ON/OFF | Zone 2 Mute ON/OFF | Zone 2 Mute ON/OFF | Zone 2 Mute ON/OFF | |
| C | Short | / | Video/Photo/Music Change | Video/Photo/Music Change | / | / |
| Long | / | / | / | / | / | |
| MUTE | Short | Zone 1/2 Mute ON/OFF | Zone 1/2 Mute ON/OFF | Zone 1/2 Mute ON/OFF | Zone 1/2 Mute ON/OFF | Zone 1/2 Mute ON/OFF |
| Long | / | / | / | / | / | |
| VOL+ | Short | Volume Up | Volume Up | Volume Up | Volume Up | Volume Up |
| Long | Volume Up Fast | Volume Up Fast | Volume Up Fast | Volume Up Fast | Volume Up Fast | |
| VOL- | Short | Volume Down | Volume Down | Volume Down | Volume Down | Volume Down |
| Long | Volume Down Fast | Volume Down Fast | Volume Down Fast | Volume Down Fast | Volume Down Fast | |
| DISC | Short | Switch to DISC Mode | DIR SCH/ NUM SCH | Switch to DISC Mode | Switch to DISC Mode | Switch to DISC Mode |
| Long | / | / | / | / | / | |
| AM/FM SAVE | Short | AM/FM Band Change | Switch to Radio Mode | Switch to Radio Mode | Switch to Radio Mode | Switch to Radio Mode |
| Long | Auto Store | / | / | / | / | |
| AUX | Short | Switch to AUX Mode | Switch to AUX Mode | Switch to AUX Mode | / | Switch to AUX Mode |
| Long | / | / | / | / | / | |
| USB | Short | Switch to USB Mode | Switch to USB Mode | DIR SCH/ NUM SCH | Switch to USB Mode | Switch to USB Mode |
| Long | / | / | / | / | / | |
| BT | Short | Switch to BT Mode | Switch to BT Mode | Switch to BT Mode | Switch to BT Mode | / |
| Long | BT OFF/LINK | BT OFF/LINK | BT OFF/LINK | BT OFF/LINK | BT OFF/LINK | |
| 0/DISP | Short | Info/Clock | Info/Clock/SCH:0 | Info/Clock/SCH:0 | Info/Clock | Info/Clock |
| Long | Clock Setting | Clock Setting | Clock Setting | Clock Setting | Clock Setting | |
| 1/PAU | Short | Recall M1 Station | Play/Pause/SCH:1 | Play/Pause/SCH:1 | / | Play/Pause |
| Long | Save Station to M1 | / | / | / | / |
REMOTE CONTROL
| 2/INT | Short | Recall M2 Station | INT On/Off/SCH:2 | INT On/Off/SCH:2 | / | / |
| Long | Save Station to M2 | / | / | / | / | |
| 3/RPT | Short | Recall M3 Station | RPT(ONE/ALL)/SCH:3 | RPT(ONE/ALL)/SCH:3 | / | / |
| Long | Save Station to M3 | / | / | / | / | |
| 4/RDM | Short | Recall M4 Station | RDMOn/Off/SCH:4 | RDMOn/Off/SCH:4 | / | / |
| Long | Save Station to M4 | / | / | / | / | |
| 5/DIR- | Short | Recall M5 Station | DIR-/SCH:5 | DIR-/SCH:5 | / | / |
| Long | Save Station to M5 | -10 | -10 | / | / | |
| 6/DIR+ | Short | Recall M6 Station | DIR+/SCH:6 | DIR+/SCH:6 | / | / |
| Long | Save Station to M6 | +10 | +10 | / | / | |
| 7/EQ/LOUD | Short | FLAT-POP-ROCK-CLAS-EQ OFF | FLAT-POP-ROCK-CLAS-EQ OFF/SCH:7 | FLAT-POP-ROCK-CLAS-EQ OFF/SCH:7 | FLAT-POP-ROCK-CLAS-EQ OFF | FLAT-POP-ROCK-CLAS-EQ OFF |
| Long | LOUD ON/OFF | LOUD ON/OFF | LOUD ON/OFF | LOUD ON/OFF | LOUD ON/OFF | |
| 8/I<< | Short | Seek Down | PreviousFile/SCH:8 | PreviousFile/SCH:8 | / | Previous File |
| Long | Manual Turn Down | FR | FR | / | / | |
| 9/>>I | Short | Seek up | Next File/SCH:9 | Next File/SCH:9 | / | Next File |
| Long | Manual Turn Up | FF | FF | / | / | |
| REW << | Short | Manual Turn Down | FR | FR | / | / |
| Long | / | / | / | / | / | |
| FWD >> | Short | Manual Turn Up | FF | FF | / | / |
| Long | / | / | / | / | / | |
| SEL | Short | BAS-TRE-BAL-EQ-LOUD | BAS-TRE-BAL-EQ-LOUD/Confirm | BAS-TRE-BAL-EQ-LOUD/Confirm | BAS-TRE-BAL-EQ-LOUD | BAS-TRE-BAL-EQ-LOUD |
| Long | BEEP/CLOCK(12/24)/P_VOL/CT(sync/indep)/AREA(USA/EUR)/DX/STEREO | BEEP/CLOCK(12/24)/P_VOL | BEEP/CLOCK(12/24)/P_VOL | BEEP/CLOCK(12/24)/P_VOL | BEEP/CLOCK(12/24)/P_VOL |
REMOTE CONTROL
| ALARM | Short | Alarm ON/OFF | Alarm ON/OFF | Alarm ON/OFF | Alarm ON/OFF | Alarm ON/OFF |
| Long | Alarm Setting | Alarm Setting | Alarm Setting | Alarm Setting | Alarm Setting | |
| SLEEP | Short | Sleep ON/OFF | Sleep ON/OFF | Sleep ON/OFF | Sleep ON/OFF | Sleep ON/OFF |
| Long | Sleep Setting (1-59 Minutes) | Sleep Setting (1-59 Minutes) | Sleep Setting (1-59 Minutes) | Sleep Setting (1-59 Minutes) | Sleep Setting (1-59 Minutes) | |
| DIM | Short | Dimmer H/M/L/Off | Dimmer H/M/L/Off | Dimmer H/M/L/Off | Dimmer H/M/L/Off | Dimmer H/M/L/Off |
| Long | / | / | / | / | / | |
| ^ | Short | / | Cursor Up Move | / | / | / |
| Long | / | / | / | / | / | |
| ∨ | Short | / | Cursor Down Move | / | / | / |
| Long | / | / | / | / | / | |
| < | Short | / | Cursor Left Move | / | / | / |
| Long | / | / | / | / | / | |
| > | Short | / | Cursor Right Move | / | / | / |
| Long | / | / | / | / | / | |
| OK | Short | / | Confirm | Confirm | / | / |
| Long | / | / | / | / | / | |
| STOP | Short | / | Stop | / | / | / |
| Long | / | / | / | / | / | |
| SETUP | Short | / | Setup Menu | / | / | / |
| Long | / | / | / | / | / | |
| ZOOM | Short | / | Zoom In | / | / | / |
| Long | / | / | / | / | / | |
| TITLE | Short | / | Back to TITLE Menu | / | / | / |
| Long | / | / | / | / | / | |
| GOTO | Short | / | GOTO | / | / | / |
| Long | / | / | / | / | / | |
| AUDIO MO/ST | Short | MONO/STEREO | Audio | Audio | / | / |
| Long | / | / | / | / | / | |
| SUB-T | Short | / | Sub-Title | / | / | / |
| Long | / | / | / | / | / |
SPECIFICATIONS
GENERAL
Power Supply Requirements: DC 12 Volts, Negative Ground
Current Drain: 10 Ampere (max.)
Maximum Output Power: 4 x 16 watts into 4 Ohms @ 14.4V DC
Preamp Output Voltage: 2.2V (with AUX, USB, or AM/FM/WB Source)
1.5V (with BT Source) or 2.1V (with DVD Source)
Chassis Dimensions: 6-3/4" (W) x 2" (H) x 5-7/8" (D)
*Note: Installation depth requires 6-3/4" minimum
Tone Controls
• Bass (at 100 Hz): ±10 dB
• Treble (at 10 kHz): ±10 dB
AM/FM/WB RADIO
Frequency Coverage
IF
Sensitivity
FM Stereo Separation
FM
87.5 to 108 MHz
10.7 MHz
4μV(S/N=30dB)
25dB
AM
520 to 1710 kHz
450 KHz
36dBuV(S/N=20dB)
N/A (AM is Mono)
WB
162.400-162.550MHz
TROUBLESHOOTING
| Symptom | Cause | Solution |
| No power. | The vehicle's ignition switch is not on. | If the power supply is connected to the vehicle's accessory circuits, but the engine is not moving, switch the ignition key to “ACC”. |
| The fuse is blown. | Replace the fuse. | |
| The unit turns on, but has no sound. | Volume is on minimum | Adjust volume to a desired level. |
| Audio wiring is not properly connected. | Check wiring connections to preamp outputs, speakers or both. | |
| The buttons on the unit do not respond. | The built-in microcomputer is not operating properly due to noise. | Press the reset button on the front panel. |
| The radio does not Work. The radio station automatic selection does not work. | The antenna cable is not connected. | Insert the antenna cable firmly. |
| The signals are too weak. | Select a station manually. |
FCC Notice
This equipment has been tested and found to comply with the limits for a Class B digital device, pursuant to part 15 of the FCC Rules. These limits are designed to provide reasonable protection against harmful interference in a mobile installation. This equipment generates, uses and can radiate radio frequency energy and, if not installed and used in accordance with the instructions, may cause harmful interference to radio communications. However, there is no guarantee that interference will not occur in a particular installation.
WARNING: Changes or modifications not expressly approved by the party responsible for compliance could void the user's authority to operate the equipment.
This equipment complied with FCC radiation exposure limits set forth for an uncontrolled environment. This equipment should be installed and operated with minimum distance 20cm between the radiator & your body.
WARRANTY
Maxxsonics USA Inc. warrants this product, to the original consumer purchaser, to be free from defects in material and workmanship for a period of one (1) year from the date of purchase. Maxxsonics USA Inc. will, at its discretion, repair or replace defective products during the warranty period. Components that prove to be defective in materials and workmanship under proper installation and use must be returned to the original authorized Maxxsonics USA Inc. retailer from where it was purchased. A photocopy of the original receipt must accompany the product being returned. The costs associated with removal, re-installation and freight are not the responsibility of Maxxsonics USA Inc. This warranty is limited to defective parts and specifically excludes any incidental or consequential damages connected therewith. To view the full warranty, please visit the website.
The Bluetooth® word mark and logos are registered trademarks owned by the Bluetooth SIG, Inc. and any use such marks by MB Quart is under license.
All product names, logos, and brands are property of their respective owners. All company, product and service names used in this literature are for identification purposes only. Use of these names, logos, and brands does not imply endorsement.
MBQuart products are designed and engineered in the USA by

MAXXSONICS
www.maxxsonics.com
Rev_1.0_5-1-2019_FINAL

- PRE-INSTALLATION CHECKLIST
- FEATURES
- CHECKLIST
- WIRING & INSTALLATION
- INSTALL THE UNIT
- FRONT PANEL CONTROLS & INPUTS
- OPERATION
- POWER AND BASIC ADJUSTMENTS
- Turn the Unit ON or OFF
- MUTE
- Sound Adjustments
- Setting Adjustments (DVD, USB, Bluetooth or AUX Sources)
- POWER AND BASIC ADJUSTMENTS (Continued)
- Setting Adjustments (AM/FM Source ONLY)
- Beep Setting
- Clock Setting Procedure
- Preset (P\_VOL) Setting
- ZONES, DISPLAY, ALARM & SLEEP
- ZONE 1 Operation
- ZONE 2 Operation
- Show Clock or Source Information
- Alarm Operation
- Alarm Time Setting Procedure
- Sleep Operation
- Sleep Time Setting Procedure
- Display Dimmer
- Unit Reset
- DVD PLAYER, HDMI ARC, AUX INPUTS & HEADPHONES
- DVD/CD Player
- HDMI ARC (Audio Return Channel) Functionality
- AUX Inputs
- AM/FM/WB RADIO
- Receive a Radio Station
- Manually Store and Recall AM/FM Radio Station Presets
- Auto-Store Stations
- Weather Band Operation
- USB Sources
- Connecting a USB Device
- Playing or Viewing USB Files
- Selecting Files
- Play/Pause
- INTRO Function
- Repeat (RPT) Function
- USB Sources (Continued)
- Random (RDM) Function
- Directory+/- Function (for MP3/WMA files only)
- Search MP3/WMA Songs – Direct Mode (DIR)
- Search MP3/WMA Songs – Numeric Search Mode (NUM)
- HEADPHONES, VIDEO IN/OUT and BLUETOOTH
- Headphone Jack
- Video-OUT 1
- Video-IN / Video-OUT 2 Function
- Bluetooth Pairing
- Stream Bluetooth Audio
- Disconnect Bluetooth Device
- Reconnect Bluetooth Device
- REMOTE CONTROL
- SPECIFICATIONS
- GENERAL
- Tone Controls
- FM
- AM
- WB
- FCC Notice
- WARRANTY
Brand : MB QUART
Model : RVDVD2.0
Category : Radio