
CB1500 G - Heating MILL - Free user manual and instructions
Find the device manual for free CB1500 G MILL in PDF.


| Product Type | Patio Heater (Outdoor Heating) |
| Model | CB1500 G |
| Power | 1500 W |
| Voltage | 230 V ~ 50 Hz |
| Amperage | 10 A |
| Fuse Requirement | Type B (slow blow not required) |
| Heating Lamp Type | Gold infrared lamp |
| IP Rating | IP65 (dust tight and water jets) |
| Dimensions (cm) | 54.0 x 10.0 x 16.5 |
| Weight | 2.6 kg |
| Cable Length | 1.9 m |
| Remote Control | No |
| App Control | No |
| Mounting Options | Wall-mount (bracket included) or ceiling-mount (chain not included) |
| Minimum Installation Height | 1.8 m from floor |
| Safety Distance (front) | At least 1 m |
| Safety Distance (sides) | At least 0.5 m from walls/objects |
| Installation Angle | Up to 45 degrees |
| Heating Lamp Replacement | Easy Fix System (EFS) – user replaceable |
| Warranty | 2 years |
| Maintenance | Wipe with dry cloth when off and cold. Do not use abrasive cleaners. |
Frequently Asked Questions - CB1500 G MILL
User questions about CB1500 G MILL
0 question about this device. Answer the ones you know or ask your own.
Ask a new question about this device
Download the instructions for your Heating in PDF format for free! Find your manual CB1500 G - MILL and take your electronic device back in hand. On this page are published all the documents necessary for the use of your device. CB1500 G by MILL.
USER MANUAL CB1500 G MILL
Series: Outdoor Heating
This operation and assembly manual covers the following models:
CB1500G
CB2000GD
CB3000GD
CB2000BT-ULG
Please read the manual carefully and make sure that the patio heater is installed according to the provided instructions. The use and maintenance of the product must follow the operation manual as well. Failure to carefully observe these instructions may result in damage to the patio heater and personal injury. If you have any questions about the product assembly or operation, please contact the product importer.
Contents
Important Safety Information....3
Specifications....5
Installation....6
Operation....8
Troubleshooting....10
Replacement of Heating Lamp....11
Maintenance....14
Guarantee and Waste Management 14
Important Safety Information
You should always take standard safety precautions when using electrical appliances, especially in the presence of children.
WARNING! In order to avoid electric shock or heat-related damages, always make sure that the plug has been disconnected from the electric socket prior to moving or cleaning the product.
• Please read the operation manual carefully.
• Make sure that the product is connected to the ordinary domestic mains (230V) as shown on the product marking.
• Make sure there are no fragments (polystyrene/cardboard) from the packaging left on the heating lamp. Such fragments have to be removed in order to avoid unpleasant odours.
- Avoid overheating the product – do not cover
• Pay special attention if the product is used in the presence of children, the elderly or the infirm.
• The product must not be installed right under an electric socket.
• Make sure that no one can stumble upon the cable.
- The product must not be used if the cable or the plug is damaged or if it has been dropped to the ground or is damaged in any other way, thus preventing normal operation.
- If the power cable is damaged, it has to be repaired by the manufacturer or a qualified technician in order to avoid hazardous situations.
- Avoid using an extension cord since it can get overheated and possibly start a fire.
• The product must not be installed on flammable materials due to risk of fire.
• The product must never be used in places where petrol, paint or any other easily inflammable liquids are stored.
• The product has an IP rating of IP65.
• Never handle the product with wet hands.
- Do not touch the heating lamp with bare fingers. If the heating lamp has been touched in connection with a fault, any fingerprints have to be wiped off using a soft cloth moistened with denatured alcohol. The fingerprints leave grease which can burn to the heating lamp. This shortens the service life of the heating lamp.
• The product becomes hot when switched on. Please be careful so that you do not burn your skin.
• The product has to be turned off, its plug disconnected and the oven cold before it can be moved.
- Do not overload the mains (circuit) to which the product is connected. Exercise caution if another electric appliance is connected to the same electric socket or circuit.
• Make sure that the product is installed in a safe manner and is mounted securely on a wall or an approved stand.
- The product may not be used by children aged 8 years or younger, or by persons with reduced physical or mental capacity, or persons who lack proper knowledge and experience unless they are supervised or receive instructions on the use of the appliance in a safe manner, and understand the dangers involved.
• Children must not play with the product. Cleaning and maintenance may not be carried out by children without proper supervision.
• Children aged 3 years or less must be kept away from the product unless they are under constant supervision.
Children aged 3-8 years are only allowed to turn the product ON/OFF, provided that the product has been installed according to the assembly manual and that the children have received proper instruction on or are being supervised regarding the safe use of the product, and that they understand all dangers involved.
• ALLOW THE PRODUCT TO COOL DOWN FOR AT LEAST 30 MINUTES BEFORE REPLACING THE HEATING LAMP.
Risk of Fire
- The patio heater must not be placed at a distance of less than 1 metre to furniture, curtains or any other flammable material (pay special attention when the product is installed on a CB STAND). If the product is to be used outdoors, it has to be connected to an electric socket approved for outdoor use, or to an indoor electric socket.
• The product must not be covered or placed close to flammable liquids, gasses or any other flammable materials.
KEEP THIS OPERATION MANUAL FOR FUTURE REFERENCE!
NEVER TOUCH THE PRODUCT WITH WET HANDS. NEVER COVER YOUR PATIO HEATER
THE PRODUCT IS HOT—DO NOT TOUCH


Specifications
| Model | Heating lamp | Cable | Fuse requirements | Ampere requirements | Amperage | Power (W) | IP rating |
| CB1500G | Gold | White 1,9 m ** | B | 10A | ~230V/50Hz | 1500 | IP65 |
| CB2000GD | Gold | White 1,9 m ** | C (slow blow) | 10A | ~230V/50Hz | 2000 | IP65 |
| CB3000GD | Gold | White 1,9 m ** | C (slow blow) | 16A | ~230V/50Hz | 2*1500 | IP65 |
| CB2000BT-ULG | ULG * | White 1,9 m ** | C (slow blow) | 10A | ~230V/50Hz | 2000 | IP65 |
* ULG = Ultra Low Glare
** Maximum length that is permitted under European Standard
| Model | Dimensions (cm) | Weight | Remote control | Remote control distance | APP |
| CB1500G | 54,0*10,0*16,5 | 2,6 kg | No | - | No |
| CB2000GD | 63,0*10,0*16,5 | 2,8 kg | Yes | 5 meter | No |
| CB3000GD | 113,0*10,0*16,5 | 4,2 kg | Yes | 5 meter | No |
| CB2000BT-ULG | 55,6*13,0*17,5 | 2,5 kg | Yes | 5 meter | Yes |
Installation
- When unpacking the patio heater, check for missing parts and make sure that it is not faulty or defective.
- Keep the packaging away from children as it can be dangerous.
• Make sure that the mains voltage matches the rated voltage on the type plate.
• Do not disassemble any of the heater components
• Never pull the power cable in order to move the patio heater.
• Make sure that the wall is firm and solid before any wall drilling or screwing. - When using a stand, always make sure that it is designed to support the patio heater and that the stand has been installed according to the assembly instructions.
- Always use the supplied bracket when installing the product on a wall. Inspect it for damages and make sure it is intact.
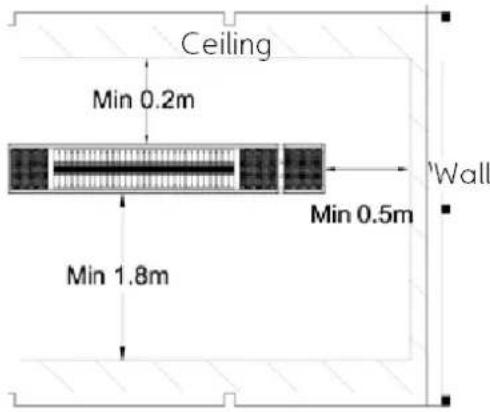
- The patio heater should be installed at a distance of at least 1.8 m from the floor and 0.2 m from the ceiling or superstructure (see the drawing on the next page).
- The patio heater should be placed at a distance of at least 0.5 m from adjacent walls or any other objects on both sides (see the drawing).
- The patio heater should be installed at an angle of 45 degrees (see the drawing on the next page)
• There should always be a safety distance of at least 1 m in front of the heater.
• The heater must be connected to an earthed socket.
• Do not turn on the patio heater before the installation is complete.
Bracket: Attach to the wall/ceiling. Connect the bracket and the patio heater using the two wing nuts. See the illustration below.

natural_image
Close-up of a metallic mechanical bracket with mounting holes and mounting holes (no text or symbols visible)Alle models are equipped with the ability to hang them with chains (supplied only for CB3000GD) from the ceiling. See drawing below for a description of how you attach the hook to the back of the product.

flowchart
graph LR
    A["Hook"] --> B["Hook"]
    B --> C["Link Attachment"]
    C --> D["Load Balance"]
    D --> E["Load"]
Installation continued
Minimum distances in case of wall assembly:
Minimum distances in case of ceiling assembly:
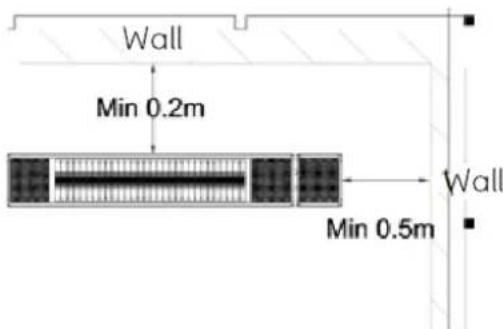
NB! The minimum distance between the wall/ceiling and the patio heater is derived from the length of the supplied bracket.
The patio heater can be installed on the ceiling by using the supplied bracket or a chain (chain and attachment hooks can be purchased from an ordinary ironmongery. Attach the hook and the chain at the back to the two holes at the back of the patio heater).
Recommended angle (45 degrees). Use an Umbraco key to set the desired angle of the attachment bracket at the back of the product. See the illustration below.

Operation
Model: CB1500G
To switch the heater on: Put the plug into an electric socket.
To switch the heater off: Pull the plug out of the electric socket.
Model: CB2000GD + CB3000GD (+ CB2000BT-ULG)
The wireless remote control can turn the patio heater on/off and adjust the heat by setting the Watt power to different levels. Please note that the product requires a slow blow fuse (fuse type C or slower).
PRIOR TO OPERATION: PUT THE PATIO HEATER IN STANDBY MODE BY PRESSING THE ON/OFF BUTTON ON THE SHORT SIDE OF THE HEATER (I=ON, O=OFF).
 | Up arrow | Up one heating level |
| Down arrow | Down one heating level | |
| MAX | The heater goes directly to the highest heating level. | |
| On | To switch the heater on:Press ON. The patio heater has a soft start function of 33% power (NB! requires fuse type C).4 seconds after the heater has been turned on, it will automatically switch to the last heating level used. In case of first-time use, after 4 seconds the heater will automatically switch to 100% power. | |
| Off | To switch the heater off:Press OFF. The heater will switch to standby mode (the receiver indicator will light up). |
Operation continued
Model: ONLY CB2000BT-ULG
A free app for iOS and Android is available for download.
You can do the following by connecting CB2000BT-ULG to the iOS/Android device:
- Switch the heater on/off
- Stepless heat adjustment (0-100%)
- Activate the timer function
- Change the name of the heater
- Use password protection
• Control the heater individually or together with other CB2000BT-ULG units
To download the app, search for "mill Outdoor Heating" in Appstore or Google Play and install the app on your device.
Prior to operation:
- Make sure Bluetooth is activated on your iOS/Android device.
- Put the patio heater in standby mode by pressing the ON/OFF button on the short side of the heater (I=ON, O=OFF).
Please note that the product requires a slow blow fuse (fuse type C or slower).
HINT!
There is a black button under the standby button. This button has two functions:
1) To reset the password: Press and hold the button for 10 seconds.
2) To adjust the heater manually: When you press the button, CB2000BT-ULG will go through the different power levels (100%, 66%, 33% and 0%)
Troubleshooting
Before you go through the troubleshooting procedure below, please check the following:
- Check if there is electricity in the socket.
- Check that the correct fuse type is used. See page 5 for an overview of the fuse types required by the different models.
- Make sure that the product is in standby mode (does not apply to CB1500G). In other words, the ON/OFF switch on the right side is in position I and the receiver indicator on the front right is turned on.
| Fault | Cause | Remedy |
| The product does not generate heat and the receiver light does not respond when a remote control button is pressed. | The battery has been improperly inserted in the remote control, flat battery or defective remote control | Check whether the battery is properly inserted and make sure that the battery is not flat.In case the problem persists after the abovementioned corrections, contact Mill and request a new remote control |
| The product does not generate heat but the receiver light responds as if the heater is switched on when pressing different heating levels on the remote control. | Defective heating lamp | Contact Mill and request a new heating lamp. For more information, please see the next page for a description of the EASY FIX system. |
| The product does not generate heat and the receiver indicator is not on | Defective product | Make sure that you have checked items 1-3 above. If the problem persists, the product is defective. Return the product to the dealer. |
Heating Lamp Replacement —EASY FIX SYSTEM (EFS)
ALLOW THE PRODUCT TO COOL DOWN FOR AT LEAST 30 MINUTES BEFORE REPLACING THE HEATING LAMP. PULL THE PLUG OUT OF THE ELECTRIC SOCKET. A new heating lamp can be obtained from your dealer or directly from Mill International AS.
- Unscrew the panel on the left side of the product (this is the side opposite the standby button of models CB2000GD, CB3000GD and CB2000BT-ULG)

natural_image
Technical line drawing of a mechanical tool or screwdriver with a cylindrical head and flanged shaft (no text or symbols)- Pull both front lids and the grating

natural_image
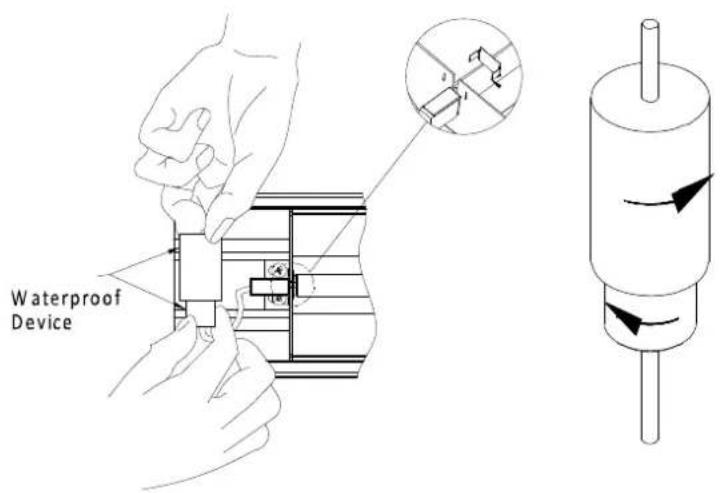
Line drawing of a hand holding a stringed object with vertical bars, no text or symbols present- Loosen the lock on the heating lamp on both sides. Open the housing by rotating it in the direction shown on the drawing.
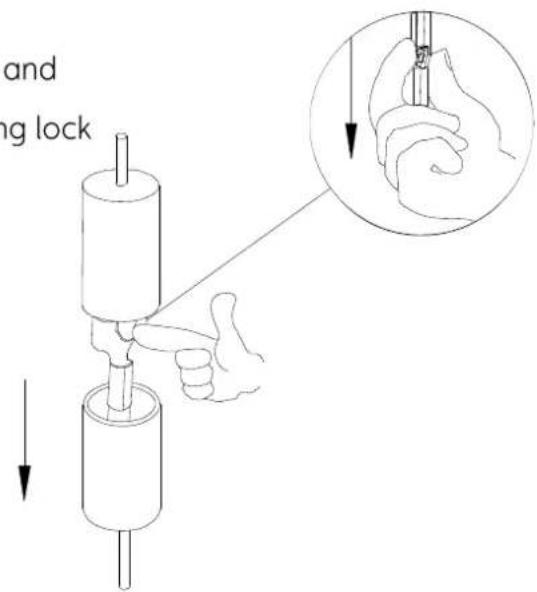
- Loosen the connection on each side of the heating lamp and pull the cables away from each other (NB! Press the blocking lock when drawing the cables away from each other)
- Remove the heating lamp and insert the new one. NB! Do not touch the heating lamp with bare fingers. If the heating lamp has been touched in connection with a fault, any fingerprints have to be wiped off using a soft cloth moistened with denatured alcohol. The fingerprints leave grease which can burn to the heating lamp. This shortens the service life of the heater.

- Connect the cables, screw the housing and secure the locks on both sides of the heating lamp.

- Put the two front lids and the grating in place again

natural_image
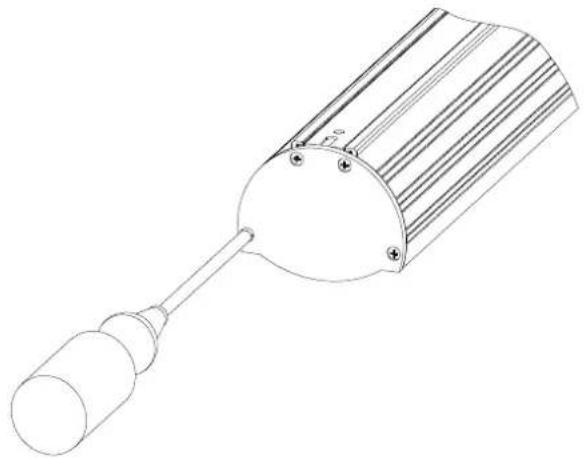
Line drawing of a hand holding a spring-loaded metal frame (no text or symbols)- Screw the panel on the left side of the product (this is the side opposite the standby button of models CB2000GD, CB3000GD and CB2000BT-ULG)
natural_image
Technical line drawing of a mechanical component with cylindrical body and curved top (no text or symbols)Maintenance
The maintenance is simple and does not involve dismantling or moving parts. Make sure that the power is off and that the heater is cold before wiping the product with a dry cloth.
Do not touch the heating lamp with your hands or with hard objects.
Do not use abrasive or corrosive agents to wash the patio heater.
Guarantee
The guarantee is valid for a period of two years. If a fault occurs during this period, the product will be repaired or replaced. In order for the guarantee to apply, the product must be used according to the instructions described in this operation manual and a receipt must be presented. In case of a product fault, please contact the store, where you have purchased the product, or the product importer.
Waste Management
The symbol 📄 indicates that this product may not be thrown away along with ordinary household waste. In order to prevent possible damage to the environment or to human health, the product must be delivered for refurbishment of electric and electronic equipment. Your local electricity company or recycling station can manage the environmentally friendly destruction or refurbishment of such products.
In case of a complaint, please indicate the serial number and enclose the original receipt.
In case of a complaint, questions about the product or spare parts, please contact your dealer or Mill International AS

Mill International AS

- Contents
- Important Safety Information
- Risk of Fire
- KEEP THIS OPERATION MANUAL FOR FUTURE REFERENCE!
- NEVER TOUCH THE PRODUCT WITH WET HANDS. NEVER COVER YOUR PATIO HEATER
- THE PRODUCT IS HOT—DO NOT TOUCH
- Installation
- Installation continued
- Operation
- Operation continued
- Prior to operation:
- HINT!
- Troubleshooting
- Heating Lamp Replacement —EASY FIX SYSTEM (EFS)
- Maintenance
- Guarantee
- Waste Management
- In case of a complaint, please indicate the serial number and enclose the original receipt.
- Mill International AS
Brand : MILL
Model : CB1500 G
Category : Heating