
LW-2003SS - Hand blender Jocel - Free user manual and instructions
Find the device manual for free LW-2003SS Jocel in PDF.


| Product Type | Hand Blender / Immersion Blender |
| Model | LW-2003SS |
| Brand | Jocel |
| Power Supply | 120V ~ 60Hz |
| Power Consumption | 300W |
| Motor Type | Universal motor |
| Speed Settings | 2 speeds + Turbo boost |
| Blade Material | Stainless steel |
| Shaft Material | Stainless steel |
| Mixing Beaker Included | Yes, 600ml plastic beaker |
| Whisk Attachment | Included (stainless steel whisk) |
| Chopper Attachment | Included (500ml bowl with mini blade) |
| Cord Length | 1.2 m |
| Dimensions (Blender Body) | 37 x 6 x 7 cm |
| Weight (Net) | 1.1 kg |
| Material Casing | Plastic (ABS) with soft-grip handle |
| Dishwasher Safe Parts | Blade shaft, mixing beaker, whisk, chopper bowl (except motor unit) |
| Safety Features | Overheat protection, non-slip handle, detachable shaft for easy cleaning |
| Spare Parts Availability | Replacement blades and accessories available via Jocel service partners |
| Warranty | 1 year from date of purchase |
Frequently Asked Questions - LW-2003SS Jocel
User questions about LW-2003SS Jocel
0 question about this device. Answer the ones you know or ask your own.
Ask a new question about this device
Download the instructions for your Hand blender in PDF format for free! Find your manual LW-2003SS - Jocel and take your electronic device back in hand. On this page are published all the documents necessary for the use of your device. LW-2003SS by Jocel.
USER MANUAL LW-2003SS Jocel
natural_image
Exterior view of a modern JOCEC kitchen mixer with black and silver casing (no text or symbols visible)INSTRUCTION MANUAL MANUAL DE INSTRUCIONES INSTRUCTION MANUAL
PORTUGUÊS
INFORMAÇÕES IMPORTANTES
natural_image
Close-up of a metallic mechanical component with circular features and a white arrow pointing to a hole (no text or symbols visible)
natural_image
Close-up of a black button with a white power symbol (no text or numbers visible)natural_image
Close-up of a black button with a white power symbol (no text or numbers visible)natural_image
3D rendered image of a mechanical device with an arrow indicating direction (no text or symbols)
natural_image
Illustration of a hand mixer in a bowl with an arrow indicating motion (no text or symbols)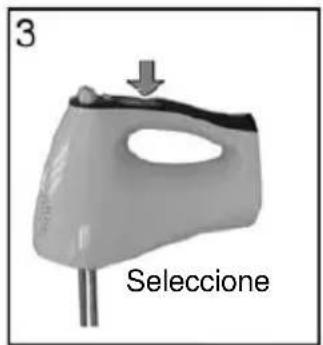


natural_image
3D rendered image of a kitchen mixer with a bowl and handle, no text or symbols present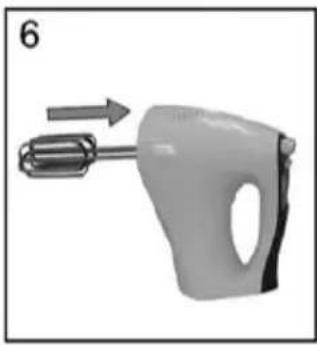
natural_image
Illustration of a hand tool with an arrow indicating motion (no text or symbols)
natural_image
White kitchen mixer with a bowl and handle, no visible text or symbols
natural_image
White kitchen mixer with a metal bowl and directional arrows indicating motion (no text or symbols)
natural_image
Close-up of a kitchen mixer with a rotating handle and handle, no visible text or symbolsPRECAUCIONES IMPORTANTES
Uso previsto
natural_image
Close-up of a metallic cylindrical mechanical part with bolt holes and a white arrow pointing to a feature (no text or symbols visible)
natural_image
Close-up of a black button with a white power symbol (no text or numbers visible)natural_image
Two circular buttons with black and white symbols: one minus sign, the other plus sign (no text or numbers visible)natural_image
Close-up of a black button with a white power symbol (no text or numbers visible)natural_image
3D rendered mechanical component with metallic rods and a handle, no visible text or symbols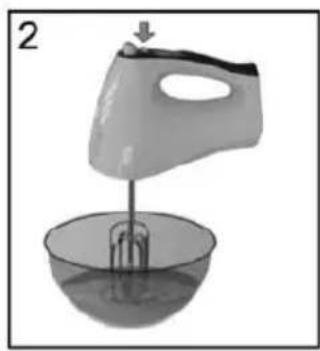
natural_image
Illustration of a hand mixer blending liquid into a bowl (no text or symbols)

natural_image
3D rendered image of a kitchen mixer with a bowl and handle, no text or symbols present
natural_image
3D rendering of a hand tool with an arrow indicating motion (no text or symbols)
natural_image
White kitchen mixer with a metal bowl and handle, no visible text or symbols
natural_image
White kitchen mixer with metal bowl and directional arrows indicating motion (no text or symbols)
natural_image
Mechanical mixing bowl with a stand mixer, no visible text or symbolsYour new digital mixer is equipped with 16 speed settings. This allows you to select the speed that is ideal for the ingredients you wish to prepare.
We hope that you will be entirely satisfied with your purchase.
The safety warnings in this booklet are printed on a grey background.
This is how supplementary information is shown.
Although the appliance is equipped with safety systems, read the safety instructions carefully and use the appliance only as described in this manual to avoid accidental injury or damage. Keep this manual for future reference. When handing over the appliance to another person, remember to include this manual.
At a glance

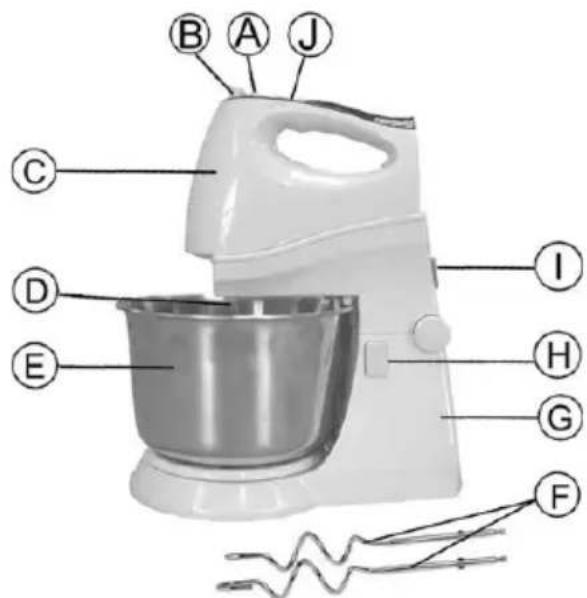
PARTS NAME
A. ON/OFF Key
B. Eject Key
C. Motor
D. Beaters
E. Stainless Stell Bowl
F. Dough Hooks
G. Stand
H. Stand knob
I. Bracket knob
J. Speed knob +/-
IMPORTANT SAFEGUARDS
Intended use
The appliance is designed to process suitable ingredients and is for household use only.
Hazard to children
Children often underestimate the hazards that can be caused by improver use of electrical appliances. Do not leave children unattended with this appliance.
This appliance is not intended for use by children or other persons without assistance or supervision if their physical, sensory or mental capabilities prevent them from using it safely. Children should be supervised to ensure that they do not play with the appliance.
Electrical hazards
Be sure to connect the appliance to properly installed socket with earthing contacts that is within reach and whose mains voltage complies with the technical data of the appliance.
The appliance must not be immersed in water or other liquids. There is the risk of an electric shock. Therefore the appliance should not be used in proximity of the kitchen sink.
Unplug the appliance from the mains,
- Before you attach or remove the wire beaters or dough hooks.
- .after every use.
- .before cleaning the appliance.
- .if disturbances arise while in use.
Do not use the mixer if the appliance or the power cord is visibly damaged or the appliance has fallen down.
Do not make any modifications to the article or the mains connecting lead. The mains connecting lead must not be replaced by the user. Have repair carried out by a specialized workshop or by an electrician. Inexpert repair may result in a considerable risk of injury to the user.
Other causes of injury
Only use the wire beaters and dough hooks provided in the delivery scope.
Replace the wire beater and respectively dough hooks if they show any signs of damage.
The attachments continue to rotate after being switched off. Wait until the have cone go a full stop before handling the appliance.
Never poke any kitchen utensils such as spoons, knives, etc. into the rotating dough hooks / wire beater and do not reach into the mixing bowl while they are rotating.
Never leave the appliance unattended while in use.
Caution-Damage to the appliance
Never use an extension cord and be careful not to let the power cord come into contact with the rotating dough hooks and respectively wire beaters.
Do not place the appliance and the mains connection lead near sources of heat.
Never allow the mains connection lead to hang over the edge of a table. Always unwind the power supply lead completely before use.
USE OF THE HAND MIXER
Fitting wire beater / dough hooks.
Danger: Unplug the appliance from the mains socket before you attach or remove the wire beaters or the dough hooks.
One of the wire beaters is equipped with a marker ring (see arrow).
- Insert the wire beater with the marker ring into the large opening. It will not lock into place when inserted into the other opening.
- Insert the wire beater that does not have an marker ring into the smaller opening.

natural_image
Close-up of a metallic mechanical component with circular holes and a white arrow pointing to a feature (no text or symbols visible)
CAUTION: Never poke any kitchen utensils such as spoons, knives, etc. into the rotating dough hooks / wire beater and do not reach into the mixing bowl while they are rotating.
The hand mixer is designed for short-time operation of maximal 10 minutes. Switch it off after 10 minutes, and let the motor cool off for at least 30 minutes before using the hand mixer again.

natural_image
Close-up of a black button with a white power symbol (no text or numbers visible)- Fully unwind the mains lead and plug the power plug into a socket.
- Press the white button. The display starts to flash.
The timepiece in the display starts running, 1 appears in the speed display and the dough hooks, or the wire beaters start rotating.
- Adjust the speed with the -/+ keys.

You have a choice of 16 different speed settings Keep the - or + key scrolled to skip speed settings.
After 9 minutes and 59 seconds, the timepiece jumps back to 0 minutes and 00 seconds and starts counting again.
Hint : To avoid excessive spattering and flour dusting, lower the wire beaters of dough hooks fully into the ingredients that are to be processed before turning the mixer ON, and turn it OFF before removing.
Start at the lowest setting, to prevent the dry ingredients from dusting and liquids from spattering. You can vary the speed settings while the hand mixer is in use. We recommend the user of a higher setting for heavier dough.
natural_image
Close-up of a black button with a white power symbol (no text or numbers visible)- Press the white button, to switch the mixer off.

For batters, beaten egg whites, whipped cream, creams, curd cheese desserts, mayonnaise. For mixing gravies and pudding mix.
Operating time: 2\~5 minutes Speed: setting1-12

For yeast doughs or short pastries as well as potato dough's for making dumplings and potato fritters.
Operating time: 5\~10 minutes Speed: setting8-16
STANDARD VALUES FOR SPEED SELECTION
Setting1: To knead dough or to start beating ingredients
Setting2-3: To mix dry ingredients, to fold in or blend in ingredients, or when a low speed setting is necessary
Setting 4: To mix liquid ingredients or when adding liquids to dry ingredients
Setting 5-6: Particularly suited for bread dough
Setting 7: For the alternate addition of dry and liquid ingredients
Setting 9-10: To mixer packaged cake mixes or when a medium speed setting is necessary
Setting 11: For example to beat whipped butter and sugar icings
Setting 12-13: To a light, fluffy consistency, for example sugar icing
Setting 14: To whip mashed potatoes
Setting 15: To whip cream
Setting 16: To whip egg-whites, or when a high speed setting is necessary
HOW TO USE THE APPLIANCE
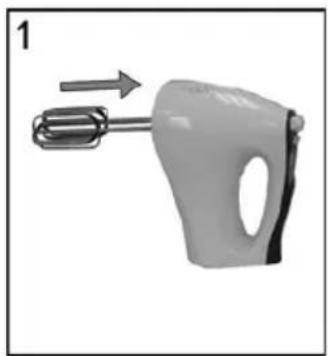
- Insert the beaters or dough hooks until they are locked into place. Always insert the accessory equipped with a toothed crown into the opening indicated on the appliance by a crown which is similarly toothed. (Fig.1)
- Plug in the appliance.
- Depending on the quantity to be prepared. Place the ingredients in an appropriate container.
- Plunge the beaters or hooks into the container and start the appliance by press the ON/OFF key. (Fig.2)
- Adjust the speed with the -/+ keys. (Fig.3)
- When you have finished using it, press the ON/OFF key, to switch the mixer off.
- Unplug the appliance.
- Eject the beaters or dough hooks by pushing the eject handle. (Fig.4)
- Place the bowl in the stand. (Fig.5)
- Insert the beaters or dough hooks. (Fig.6)
- Mount the main unit onto the bracket.(Fig.7) And then start the appliance, choose the appropriate speed.
- Take out the main unit. Please press the bracket button. (Fig.8)
- When turn the bracket, you must be press stand button. (Fig.9)
natural_image
3D rendered image of a mechanical tool with a metallic handle and arrow indicating direction (no text or symbols)
natural_image
Illustration of a hand mixer blending liquid into a bowl (no text or symbols)
natural_image
3D rendered image of a handheld device with a downward arrow and label 'SELECT' (no readable text or symbols on the device itself)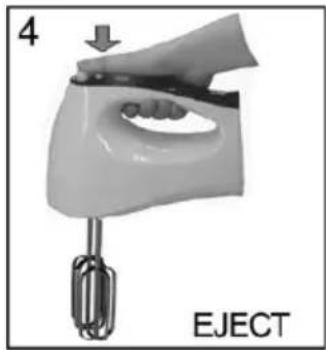
natural_image
Mechanical device with a metallic hook and handle, labeled 'EJECT' (no other text or symbols visible)
natural_image
3D rendered image of a kitchen mixer with a bowl and handle, no text or symbols present
natural_image
3D rendering of a hand mixer with an arrow indicating motion (no text or symbols)
natural_image
White kitchen mixer with a metal bowl, showing a downward arrow indicating motion (no text or symbols visible)
natural_image
White kitchen mixer with a metal bowl, shown in side profile (no text or symbols visible)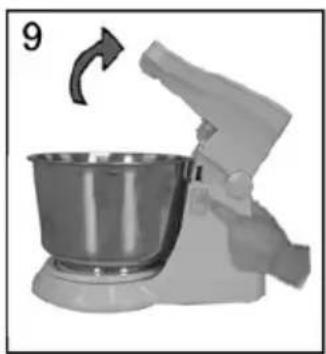
natural_image
Illustration of a kitchen mixer with a rotating handle and handle, no text or symbols presentDanger: unplug the power plug from the mains socket before cleaning the hand mixer.
The hand mixer must not be immersed in water or other liquids.
Cleaning of wire beaters and dough hooks
- Press the EJECT key and remove the attachments to clean.
- Rinse the wire beater and dough hooks with water and washing-up liquid.
The attachments are also dishwasher safe.
Cleaning the hand mixer
Wipe off the casing with a damp cloth.
FAULT / REMEDY
No function Is the hand mixer plugged in?
Is the appliance switched on?
Wire beater / dough
hooks are blocked. Add liquids.
- If necessary replace the dough hook / wire beater
- Choose a higher speed setting.
DISPOSAL
Dispose of the packaging appropriately:
Should you wish to dispose of this article, do so in accordance with the latest provisions.
Details are available from you local authority.
JOCEL®
ASSISTÊNCIA TÉCNICA ASISTENCIA TÉCNICA TECHNICAL ASISTANCE
Telef. 00 351 252 910351
Fax: 00 351 252 910367
E-mail: assistencia@jocel.pt
http://www.jocel.pt
- PORTUGUÊS
- INFORMAÇÕES IMPORTANTES
- PRECAUCIONES IMPORTANTES
- Uso previsto
- PARTS NAME
- IMPORTANT SAFEGUARDS
- Intended use
- Hazard to children
- Electrical hazards
- Other causes of injury
- Caution-Damage to the appliance
- USE OF THE HAND MIXER
- Fitting wire beater / dough hooks.
- STANDARD VALUES FOR SPEED SELECTION
- HOW TO USE THE APPLIANCE
- Cleaning of wire beaters and dough hooks
- Cleaning the hand mixer
- FAULT / REMEDY
- DISPOSAL
- JOCEL®
Brand : Jocel
Model : LW-2003SS
Category : Hand blender