
KSSI 2201 C - Iron Kernau - Free user manual and instructions
Find the device manual for free KSSI 2201 C Kernau in PDF.


| Product Type | Built-in Induction Hob |
| Brand | Kernau |
| Model | KSSI 2201 C |
| Power Supply | 230 V / 50 Hz |
| Total Power | 7.4 kW |
| Number of Cooking Zones | 4 |
| Dimensions (W x D x H) | 59 x 52 x 5.5 cm |
| Cutout Dimensions | 56 x 49 cm |
| Weight | 10 kg |
| Control Type | Touch Control |
| Functions | Booster, Timer, Child Lock, Residual Heat Indicator |
| Cleaning | Wipe with damp cloth after cooling |
| Safety Features | Automatic Shut-off, Overheat Protection |
| Spare Parts Availability | Contact Kernau service center |
| Energy Efficiency Class | A+ |
| Certifications | CE, RoHS |
Frequently Asked Questions - KSSI 2201 C Kernau
User questions about KSSI 2201 C Kernau
0 question about this device. Answer the ones you know or ask your own.
Ask a new question about this device
Download the instructions for your Iron in PDF format for free! Find your manual KSSI 2201 C - Kernau and take your electronic device back in hand. On this page are published all the documents necessary for the use of your device. KSSI 2201 C by Kernau.
USER MANUAL KSSI 2201 C Kernau
SZANOWNY KLIENCIE,
Thank you for choosing this product.
This User Manual contains important safety information and instructions on the operation and maintenance of your appliance. Please take the time to read this User Manual before using your appliance and keep this book for future reference.
| Icon Caption Description | ||
 | Warning Risk of serious injury or death | |
 | Risk of electric shock Dangerous voltage | |
 | Fire | Risk of fire / flammable materials |
 | Attention | Risk of injury or material damage |
 | Important/Note | Information on correct operation of the system |
 | Read the instructions | |
 | Hot surface | |
CONTENTS
CHAPTER 1. Important safeguards ....14
CHAPTER 2. Parts directory....15
CHAPTER 3. Before the first use....16
CHAPTER 4. How to use ....16
CHAPTER 5. Water tank filling....17
CHAPTER 6. Dry ironing....17
CHAPTER 7. Spraying ....17
CHAPTER 8. Steam ironing....17
CHAPTER 9. Burst of steam....18
CHAPTER 10. Self-cleaning....18
CHAPTER 11. Anti calc system ....18
CHAPTER 12. Automatic shut off....18
CHAPTER 13. When you finish ironing....19
CHAPTER 14. Care and cleaning....19
CHAPTER 15. Disposal of used equipment....19
CHAPTER 1. IMPORTANT SAFEGUARDS
- Please read the instruction manual before and save it for future reference.
- Before switching on check that voltage indicated on the rating label corresponds to the main voltage in your home.
- For home use only, Do not use for industrial purposes. Use the steam iron only for its intended use.
- Do not use in outdoor or in damp area.
- Do not immerse the steam iron and cord in water or other liquids.
- Never pull the cord while disconnecting form the power outlet; instead, grasp the plug only and pull to disconnect.
- Do not allow the cord to touch sharp edges and hot surfaces.
- Always unplug the steam iron form the power supply when filling with water or emptying and when not in use.
- Do not operate the steam iron with damaged cord or plug, or after the appliance malfunctions, or has been dropped or damaged in any manner. To avoid risk of electric shock, do not disassemble the steam iron, take it to a service center for examination, repair or mechanical adjustment.
- This appliance is not intended to use by persons (including children) with reduced physical, sensory or mental capabilities or lack of experience and knowledge, unless they have been given supervision or instruction concerning use of the appliance by a person responsible for their safety.
- Children should be supervised to ensure that they do not play with the appliance.
- Do not leave the iron unattended while hot or connected or on an ironing board.
- If ironing is interrupted, stand iron on heel rest only, do not place the steam iron on metal or rough surfaces.

CAUTION:
To avoid circuit overload, do not operate another high wattage appliance on the same circuit.
CHAPTER 2. PARTS DIRECTORY

A. Soleplate
B. Water tank
C. Temperature control dial
D. Power cord protector
E. Burst steam button
F. Spray button
G. Steam regulator
H. Water inlet cover
I. Spray nozzle
CHAPTER 3. BEFORE THE FIRST USE
Some parts of the steam iron have been slightly greased and as a result the iron may slightly smoke when switched on for the first time. After a short time this will cease.
Remove protection cover from the soleplate and clean it with a soft cloth.
CHAPTER 4. HOW TO USE
Always check whether a label with ironing instructions is attached to an article to be ironed. Follow these instructions in all cases.
Insert the main plug into the wall socket. The indicator light will turn on.
Turn the temperature control dial to set the appropriate temperature indicated in ironing instructions or fabric label.
When the indicator light goes out you may start ironing.
If you set the temperature control dial to lower setting after ironing at a high temperature. it is not recommended to iron before the pilot light switches on again.
| LABEL TYPE OF TEXTILE | |
 | Do not iron this article |
| ■ | Synthetics, Nylon, Acrylics, Polyester, Rayon |
| ■■ | Wool, Silk |
| ■■■ | Cotton, Linen |
CHAPTER 5. WATER TANK FILLING
Unplug the iron before filling the water tank.
Hold the steam iron in horizontal position.
Slowly pour water through the water inlet.
Do not fill higher than mark on the water tank, in order to avoid spilling out of water.

NOTE:
Your steam iron is designed to use tap water, however, if the water is very hard in your area, it is advisable to use distilled water or purified water.
The water tank should be emptied after each use.

NOTE:
If you empty the water tank after using, set the steam iron upright position on its heel rest, plug it in and set the temperature control dial to the maximum position, heat for 2 minutes. Unplug the steam iron from the power supply.
CHAPTER 6. DRY IRONING
The steam iron can be used on the dry setting with or without water in the water tank, it is best to avoid having the water tank full while dry ironing.
Turn the variable steam control to the minimum position.
Select the setting on the temperature control dial best suited for the fabric to be ironed.

CAUTION:
If the steam iron has been used for a long time, it is hot and there is no water. Do not refill it with water until the steam iron cools down.
CHAPTER 7. SPRAYING
As long as there is enough water in the water tank, you may use the spray button at any temperature setting during steam or dry ironing.
Press the spray button several times to activate the pump while you are ironing.
CHAPTER 8. STEAM IRONING
Set the temperature control dial to the “...” or “MAX” position.
Set the steam regulator to the desired position.

CAUTION:
Avoid coming in contact with ejected steam.
CHAPTER 9. BURST OF STEAM
The burst of steam feature provides additional steam for removing stubborn wrinkles.
Turn the temperature control dial to the “...” or “MAX” position.
Turn the steam regulator to the "OFF" position.
Press the burst steam button repeatedly with pausing for 5 seconds at least.

NOTE:
To Prevent water leakage from the soleplate, do not keep the powerful steam button pressed for more than 5 seconds.
CHAPTER 10. SELF-CLEANING
Fill the water tank to Max level.
Set the temperature control dial to maximum position.
Insert the main plug into the wall socket.
Allow the iron to heat up until the indicator light goes out.
Unplug the steam iron.
Holding the iron horizontally over the sink, push the steam regulator to the self-cleaning position and hold on it until boiling water, steam and impurities come out from the holes of soleplate (around 1mins.) Use this function once every two weeks.
When self-cleaning is completed, plug into the power supply again, switch the steam regulator to the „OFF” position and dry heating the iron until the indicator light turn off. Turn the temperature control dial to the “OFF” position. Disconnect the iron from the electric outlet. Turn the iron upside down and allow water to drain out.
CHAPTER 11. ANTI CALC SYSTEM
A special resin filter inside the water tank softens the water and prevents scale build-up in the plate. The resin filter is permanent and does not need replace.

NOTE:
Do not use chemical additives, scented substances or decalcifiers. Failure to comply with the above mentioned regulations leads to the loss of guarantee.
CHAPTER 12. AUTOMATIC SHUT OFF
The automatic shut off device trips after the iron has been left for approx. eight minutes in the upright position or unused for approx. Thirty seconds in the horizontal position. There will be warning sound to indicate that shut off has tripped. As soon as you move the iron, the sound stop and the iron starts working again.
CHAPTER 13. WHEN YOU FINISH IRONING
Set the temperature control dial to the "OFF" position.
Unplug the appliance from the power supply.
Empty the water tank (do it after each use) and allow steam iron to cool down completely.
Wrap the cord around the heel rest.
To protect the soleplate, place the steam iron in an upright position on its heel rest.
CHAPTER 14. CARE AND CLEANING
Before cleaning the steam iron ensure it is unplugged from the power supply and has completely cooled down.
Do not use abrasive cleaners.
CHAPTER 15. DISPOSAL OF USED EQUIPENT
This device has been designed and manufactured of high-quality reusable materials and components.
The symbol of the crossed waste container placed on the product (Fig. A) means that the product is subject to selective collection in accordance with the provisions of Directive 2012/19/EU of the European Parliament and of the Council. a crossed-out wheelie bin symbol (Fig. B) placed on the product means that the product contains batteries that are subject to separate collection in accordance with the provisions of Directive 2006/66/EC of the European Parliament and of the Council. Such marking informs that electrical and electronic equipment and batteries (if any) must not be disposed of with other household waste after the period of use.
The user is obliged to return waste equipment and batteries (if any) to collection points for waste electrical and electronic equipment and batteries (if any). Collectors of such waste, including waste equipment collectors, treatment plants, distributors (shops), municipal waste separate collection points (municipal units), and other entities specified by law form an appropriate system to return this kind of equipment.
Correct disposal of waste equipment and batteries (if any) allows avoiding consequences that may be harmful to health and the environment, caused by the possible presence of hazardous components in the equipment and batteries, and inappropriate storage and processing of such equipment and batteries. Households play an important role in contributing to the reuse and recovery, including recycling, of waste equipment. At this stage, attitudes are formed, affecting the common good, which is a clean natural environment.
Moreover, households are one of the largest users of small equipment and the rational management thereof at this stage affects the recovery of secondary raw materials. Penalties may be imposed in accordance with national legislation for improper disposal of this product. If the device has a lock, please remove it for the safety of all persons who may later come into contact with the device. Some refrigerators and freezers contain insulation material and CFC refrigerant. Therefore, be careful not to pollute the environment when you dispose of your old refrigerator.
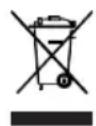
Fig. A

Fig. B
KERNAU
NÁVOD K POUŽITÍ
ŽEHLIČKA
KSSI 2201 C




- SZANOWNY KLIENCIE
- THANK YOU FOR CHOOSING THIS PRODUCT
- CONTENTS
- CHAPTER 1. IMPORTANT SAFEGUARDS
- CAUTION
- CHAPTER 2. PARTS DIRECTORY
- CHAPTER 3. BEFORE THE FIRST USE
- CHAPTER 4. HOW TO USE
- CHAPTER 5. WATER TANK FILLING
- NOTE
- CHAPTER 6. DRY IRONING
- CHAPTER 7. SPRAYING
- CHAPTER 8. STEAM IRONING
- CHAPTER 9. BURST OF STEAM
- CHAPTER 10. SELF-CLEANING
- CHAPTER 11. ANTI CALC SYSTEM
- CHAPTER 12. AUTOMATIC SHUT OFF
- CHAPTER 13. WHEN YOU FINISH IRONING
- CHAPTER 14. CARE AND CLEANING
- CHAPTER 15. DISPOSAL OF USED EQUIPENT
- KERNAU
- NÁVOD K POUŽITÍ
Brand : Kernau
Model : KSSI 2201 C
Category : Iron