
FMY 99 HS XS CCC - Oven FRANKE - Free user manual and instructions
Find the device manual for free FMY 99 HS XS CCC FRANKE in PDF.


| Product Type | Built-in Electric Oven |
| Brand | Franke |
| Model | FMY 99 HS XS CCC |
| Dimensions (HxWxD) | 595 x 595 x 548 mm |
| Weight | 35 kg |
| Power Supply | 230 V / 50 Hz |
| Energy Efficiency Class | A+ |
| Capacity | 77 L |
| Number of Functions | 9 (Convection, Grill, Fan, etc.) |
| Cleaning Type | Catalytic liners (back wall) |
| Display Type | TFT Touchscreen |
| Control Type | Touch + Rotary knobs |
| Safety Features | Child lock, Cool door, Automatic shut-off |
| Door Type | Soft-close, triple glazed |
| Accessories Included | Baking tray, Wire rack, Grill rack |
| Spare Parts Availability | Yes, via Franke service centers |
| Repairability Index | 8.2 / 10 |
| Installation Type | Built-in (under counter or column) |
| Warranty | 2 years (standard) |
| Manual Languages | EN, ZH, and more (PDF) |
Frequently Asked Questions - FMY 99 HS XS CCC FRANKE
User questions about FMY 99 HS XS CCC FRANKE
0 question about this device. Answer the ones you know or ask your own.
Ask a new question about this device
Download the instructions for your Oven in PDF format for free! Find your manual FMY 99 HS XS CCC - FRANKE and take your electronic device back in hand. On this page are published all the documents necessary for the use of your device. FMY 99 HS XS CCC by FRANKE.
USER MANUAL FMY 99 HS XS CCC FRANKE
Model: FMY 99 HS XS CCC
User Manual
Steam Oven
EN User manual Steam Oven
Table of Contents
Overview....4
Control Panel....4
Accessories....5
Functions....6
How to Use the Touch Display....7
First Use....7
Daily Use....9
Tips for Use....14
Cooking Assistant Cooking Table....20
Cleaning and Maintenance....23
Troubleshooting....25
Support....25
Disposal....26
User Guide
Overview


Please note: The pulley can be installed on any baking level.
Features
Thank you for purchasing!
Click "Next" to continue with the home settings.
3. Setting the time and date
- Press "SET" to confirm.

After setting the time, you need to set the date.
.Click the relevant numbers to set the date.
.Press "SET" to confirm.
4. Setting functions
13 amps
16 amps
- Click "OK" to complete the initial setup.
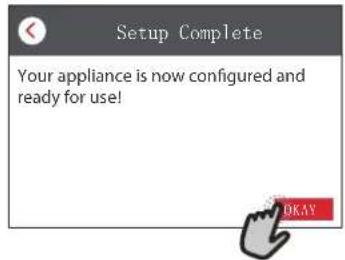
Your appliance is now configured!
5. Heating the oven
If the function allows, you can click to start the preheating function.

Cooking duration
Cooking instructions
Preheating complete
Now place the food inside
Done
Normal mode Timer finished 200°C
Kitchen timer Light Self-cleaning
Kitchen timer
Control lock
Lock the product
Slide to unlock

More modes
- Close the oven door completely.
Grip the oven door firmly with both hands - do not grab the handle.
COOKASSIST COOKING TABLE....20
CLEANING AND MAINTENANCE....23
TROUBLESHOOTING 25
SUPPORT 25
OVERVIEW

- Control panel
- Fan
- Circular heating element (not visible)
- Shelf guides (the level is indicated on the front of the oven)
- Door
- Water drawer
- Upper heating element/grill
- Lamp
- Identification plate (do not remove)
- Lower heating element (not visible)
CONTROL PANEL

- ON / OFF For switching the oven on and off.
- HOME For gaining quick access to the main menu.
- FAVORITE For retrieving up the list of your favorite functions.
- DISPLAY
- TOOLS
To choose from several options and also change the oven settings and preferences.
- CANCEL
To stop any oven function except the Clock, Kitchen Timer and Control Lock.
ACCESSORIES
Use to cook food or as a support for pans, cake tins and other ovenproof items of cookware.

Use as an oven tray for cooking meat, fish, vegetables, focaccia, etc. or position underneath the wire shelf to collect cooking juices.

Use for cooking all bread and pastry products, but also for roasts, fish en papillotte, etc.
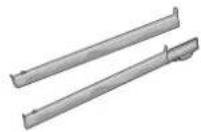
To facilitate inserting or removing accessories.
STEAM TRAY

This makes it easier for steam to circulate, which helps cook the food evenly. Place the drip tray on the level below to collect the cooking juices.
* Available only on certain models
The number and the type of accessories may vary depending on which model is purchased.
Other accessories can be purchased separately from the After-sales Service.
INSERTING THE WIRE SHELF AND OTHER ACCESSORIES
Insert the wire shelf horizontally by sliding it across the shelf guides, making sure that the side with the raised edge is facing upwards.
Other accessories, such as the drip tray and the baking tray, are inserted horizontally in the same way as the wire shelf.
REMOVING AND REFITTING THE SHELF GUIDES
• To remove the shelf guides, lift the guides up and then gently pull the lower part out of its seating: The shelf guides can now be removed.
• To refit the shelf guides, first fit them back into their upper seating. Keeping them held up, slide them into the cooking compartment, then lower them into position in the lower seating.
FITTING THE SLIDING RUNNERS (IF PRESENT)
Remove the shelf guides from the oven and remove the protective plastic from the sliding runners. Fasten the upper clip of the runner to the shelf guide and slide it along as far as it will go. Lower the other clip into position. To secure the guide, press the lower portion of the clip firmly against the shelf guide.
Make sure that the runners can move freely. Repeat these steps on the other shelf guide on the same level.
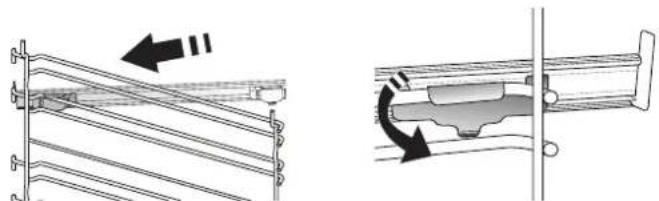
Please note: The sliding runners can be fitted on any level.

MANUAL FUNCTIONS
- CONVENTIONAL*
For cooking any kind of dish on one shelf only.
• CONVECTION BAKE
For cooking meat, baking cakes with fillings on one shelf only.
- FORCED AIR
For cooking different foods that require the same cooking temperature on several shelves (maximum three) at the same time. This function can be used to cook different foods without odours being transferred from one food to another.
• GRILL
For grilling steaks, kebabs and sausages, cooking vegetables au gratin or toasting bread. When grilling meat, we recommend using a drip tray to collect the cooking juices: Position the tray on any of the levels below the wire shelf and add 500 ml of drinking water.
• TURBO GRILL
For roasting large joints of meat (legs, roast beef, chicken). We recommend using a drip tray to collect the cooking juices: Position the pan on any of the levels below the wire shelf and add 500 ml of drinking water.
- FAST PREHEATING
For preheating the oven quickly.
• MULTICOOKING FUNCTIONS
For cooking different foods that require the same cooking temperature on four levels at the same time. This function can be used to cook cookies, tarts, round pizzas (also frozen) and to prepare a complete meal. Follow the cooking table to obtain the best results.
• STEAM
» PURE STEAM
For cooking natural and healthy dishes using steam to preserve the food's natural nutritional value. This function is particularly suited to cooking vegetables, fish and fruit, and also for blanching. Unless otherwise indicated, remove all packaging and protective film before placing the food in the oven.
» FORCED AIR + STEAM
Combining the properties of steam with those of the forced air, this function allows you to cook dishes pleasantly crispy and browned outside, but at the same time tender and succulent inside. To achieve the best cooking results, we recommend to select a HIGH steam level for fish cooking, MEDIUM for meat and LOW for bread and desserts.
- SPECIAL FUNCTIONS
» DEFROST
To speed up defrosting of food. Place food on the middle shelf. Leave food in its packaging to prevent it from drying out on the outside.
» KEEP WARM
For keeping just-cooked food hot and crisp.
» RISING
For optimal proving of sweet or savoury dough. To maintain the quality of proving, do not activate the function if the oven is still hot following a cooking cycle.
» CONVENIENCE
To cook ready-made food, stored at room temperature or in the refrigerator (biscuits, cake mix, muffins, pasta dishes and bread-type products). The function cooks all the dishes quickly and gently and can also be used to heat food already cooked. The oven does not need to be pre-heated. Follow the instructions on the packaging.
» MAXI COOKING
For cooking large joints of meat (above 2.5 kg). It is advisable to turn the meat over during cooking, to obtain even browning on both sides. It is best to baste the meat every now and again to prevent it from drying out.
» ECO FORCED AIR*
For cooking stuffed roasting joints and fillets of meat on a single shelf. Food is prevented from drying out excessively by gentle, intermittent air circulation. When this ECO function is in use, the light will remain switched off during cooking. To use the ECO cycle and therefore optimise power consumption, the oven door should not be opened until the food is completely cooked.
• FROZEN COOK
The function automatically selects the ideal cooking temperature and mode for 5 different types of ready frozen food. The oven does not have to be preheated.

COOKASSIST
These enable all types of food to be cooked fully automatically. To use at best this function, follow the indications on the relative cooking table.
The oven does not have to be preheated.
HOW TO USE THE TOUCH DISPLAY

To scroll through a menu or a list:
Simply swipe your finger across the display to scroll through the items or values.

To select or confirm:
Tap the screen to select the value or menu item you require.
To go back to the previous screen:
Tap < .
To confirm a setting or go to the next screen:
Tap "SET" or "NEXT".
FIRST TIME USE
You will need to configure the product when you switch on the appliance for the first time.
The settings can be changed subsequently by pressing to access the "Tools" menu.
1. SELECT THE LANGUAGE
You will need to set the language and the time when you switch on the appliance for the first time.
- Swipe across the screen to scroll through the list of available languages.
| Čeština, Český Jazyk Czech | |
| Dansk Danish |  |
| Deutsch German | |
- Tap the language you require.
| ΕλλνικάGreek, Modern | |
| EnglishEnglish |  |
| EspañolSpanish | |
Tapping will take you back to the previous screen.
2. SELECT SETTINGS MODE
Once you have selected the language, the display will prompt you to choose between "STORE DEMO" (useful for retailers, for display purposes only) or continue by tapping "NEXT".

3. SETTING THE TIME AND DATE
Connecting the oven to your home network will set the time and date automatically. Otherwise you will need to set them manually.
- Tap the relevant numbers to set the time.

- Tap "SET" to confirm.

Once you have set the time, you will need to set the date.
- Tap the relevant numbers to set the date.
- Tap "SET" to confirm.
4. SET THE POWER CONSUMPTION
The oven is programmed to consume a level of electrical power that is compatible with a domestic network that has a rating of more than 3 kW (16 Ampere). If your household uses a lower power, you will need to decrease this value (13 Ampere).
- Tap the value on the right to select the power.

- Tap "OKAY" to complete initial setup.
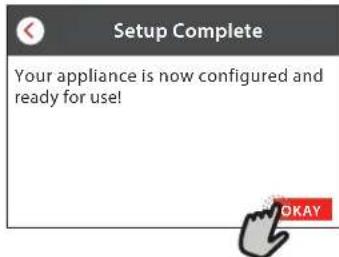
5. HEAT THE OVEN
A new oven may release odours that have been left behind during manufacturing: this is completely normal.
Before starting to cook food, we therefore recommend heating the oven with it empty in order to remove any possible odours.
Remove any protective cardboard or transparent film from the oven and remove any accessories from inside it.
Heat the oven to 200 °C for around one hour.
It is advisable to air the room after using the appliance for the first time.
DAILY USE
1. SELECT A FUNCTION
• To switch on the oven, press or touch anywhere on the screen. The display allows you to choose between Manual and CookAssist Functions. - Tap the main function you require to access the corresponding menu.

- Scroll up or down to explore the list.
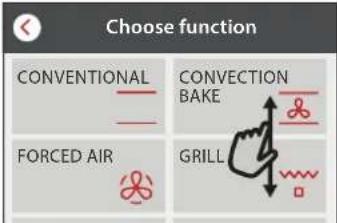
- Select the function you require by tapping it.

2. SET MANUAL FUNCTIONS
After having selected the function you require, you can change its settings. The display will show the settings that can be changed.
TEMPERATURE / GRILL LEVEL
If allowed by the function, you can tap ⚙ to deactivate preheating.
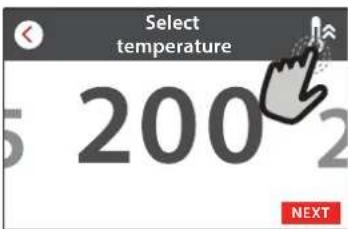
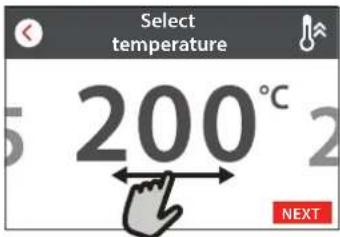
- Scroll through the suggested values and select the one you require.
DURATION
You do not have to set the cooking time if you want to manage cooking manually. In timed mode, the oven cooks for the length of time you select. At the end of the cooking time, the cooking is stopped automatically.
- To start setting the duration, tap "Set Cook Time".

- Tap the relevant numbers to set the cooking time you require.

- Tap "NEXT" to confirm.
3. SET COOKASSIST FUNCTIONS
The COOKASSIST functions enable you to prepare a wide variety of dishes, choosing from those shown in the list. Most cooking settings are automatically selected by the appliance in order to achieve the best results.
- Choose a recipe from the list.
Functions are displayed by food categories in the "COOKASSIST FUNCTION" menu (see relative tables) and by recipe features in the "COOKASSIST PRO" menu.
- Once you have selected a function, simply indicate the characteristic of the food (quantity, weight, etc.) you want to cook to achieve the perfect result.
- Follow the on-screen prompts to guide you through the cooking process.
4. SET START TIME DELAY
You can delay cooking before starting a function: The function will start at the time you select in advance.
- Tap "DELAY" to set the start time you require.

- Once you have set the required delay, tap "START DELAY" to start the waiting time.
- Place the food in the oven and close the door: The function will start automatically after the period of time that has been calculated.
To program a delayed cooking start time, the oven preheating phase must be disabled: The oven will reach the temperature you require gradually, meaning that cooking times will be slightly longer than those listed in the cooking table.
• To activate the function immediately and cancel the programmed delay time, tap ☑.
5. START THE FUNCTION
- Once you have configured the settings, tap "START" to activate the function.
You can change the values that have been set at any time during cooking by tapping the value you want to amend.
If the oven is hot and the function requires a specific maximum temperature, a message will be shown on the display.
- Press to stop the active function at any time, or tap the duration value and then select "STOP".
6. PREHEATING
If previously activated, once the function has been started the display indicates the status of the preheating phase.

Once this phase has been finished, an audible signal will sound and the display will indicate that the oven has reached the set temperature.

- Open the door.
- Place the food in the oven.
- Close the door and cooking will resume automatically.
Placing the food in the oven before preheating has finished may have an adverse effect on the final cooking result.
Opening the door during the preheating phase will pause it. The cooking time does not include a preheating phase.
7. PAUSING COOKING
Some of the COOKASSIST functions will require you to turn the food during cooking. An audible signal will sound and the display shows the action that must be done.
- Open the door.
- Carry out the action prompted by the display.
- Close the door, then tap "DONE" to resume cooking.
Before cooking ends, the oven may prompt you to check the food in the same way.
An audible signal will sound and the display shows the action that must be done.
- Check the food.
- Close the door and cooking will resume automatically.
8. END OF COOKING
An audible signal will sound and the display will indicate that cooking is complete.
With some functions, once cooking has finished you can give your dish extra browning, extend the cooking time, or save the function as a favorite.
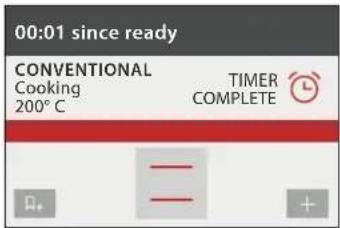
- Tap to save it as a favorite.
- Select "Extra Browning" to start a five-minute browning cycle.
- Tap ⊕ to save and prolong the cooking.
9. FAVORITES
The Favorites feature stores the oven settings for your favorite recipe.
The oven automatically recognizes the most used functions. After a certain number of uses, you will be prompted to add the function to your favorites.
HOW TO SAVE A FUNCTION
Once a function has finished, by tapping on 🎨 you can save it as a favorite. This will enable you to use it quickly in the future, keeping the same settings.
The display allows you to save the function by indicating up to 4 favorite meal times including breakfast, lunch, snack, and dinner.
- Tap the icons to select at least one.
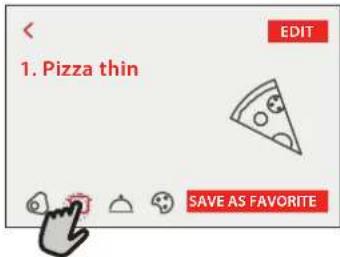
- Tap "SAVE AS FAVORITE" to save the function.

ONCE SAVED
To view the favorite menu, press 📋: the functions will be divided by different meal times and some suggestions will be offered.
- Tap the meals icon to view the relevant lists.
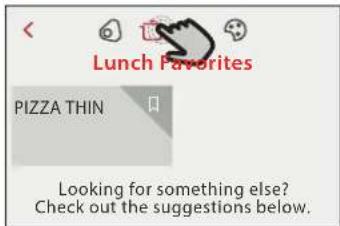
- Scroll through the prompted list.
- Tap the recipe or function you require.
- Tap "START" to activate the cooking.
CHANGING THE SETTINGS
In the favorite screen, you can add an image or name to each favorite to customize it to your preferences.
- Select the function you want to change.
- Tap "EDIT".
- Select the attribute you want to change.
- Tap "NEXT": The display will show the new attributes. • Tap "SAVE" to confirm your changes.
In the favorite screen you can also delete functions
you have saved:
- Tap the 🎨 on the function.
- Tap "REMOVE IT".
You can also adjust the time when the various meals are shown:
- Press
- Select "Preferences".
- Select "Times and Dates".
- Tap "Your Meal Times".
- Scroll through the list and tap the relevant time. • Tap the relevant meal to change it.
It will be possible to combine a time slot only with a meal.
10. TOOLS
Press to open the "Tools" menu at any time.
This menu enables you to choose from several options and also change the settings or preferences for your product or the display.
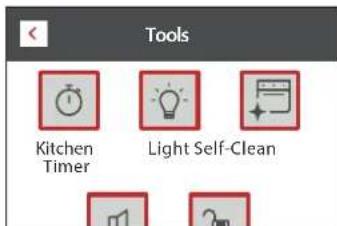

KITCHEN TIMER
This function can be activated either when using a cooking function or alone for keeping time.
Once started, the timer will continue to count down independently without interfering with the function itself.
Once the timer has been activated, you can also select and activate a function.
The timer will continue counting down at the top-right corner of the screen.
To retrieve or change the kitchen timer:
- Press
- Tap
An audible signal will sound and the display will indicate once the timer has finished counting down the selected time.
- Tap "DISMISS" to cancel the timer.
- Tap "SET NEW TIMER" to set the timer again.

LIGHT
To switch on or off the oven lamp.

CLEANING
Activate the "Self-Clean" function for optimum cleaning of the internal surfaces.
It is recommended not to open the oven door during the cleaning cycle to avoid a loss of water vapor that could have an adverse effect on the final cleaning result.
- Remove all accessories from the oven before activating the function.
- Pour 200 ml of drinking water on the bottom of the oven.
- Tap "START" to activate the cleaning function.
Once the cycle has been selected, you can delay the start of automatic cleaning. Tap "DELAY" to set the end time as indicated in the relevant section.

DRAIN
The drain function allows the water to be drained in order to prevent stagnation in the tank. It is advisable to always carry out draining every time the oven has been used.

Anyway, after a certain number of cooking cycles, this action will be mandatory, and it will not be possible to start a steam function before doing it.
Once the "Drain" function is selected or when suggested by the display,
start the function and follow the actions indicated: Open the door and place a large jug under the drain nozzle located at the bottom right of the panel. Once the draining has started, keep the jug in position until the operation is completed.
The display will indicate when the tank has to be completely drained.
Please note: it is not possible to perform this activity before 4 hours have elapsed from the last cycle (or the last time the product was powered). During this wait time, the display will show the following feedback "water is TOO HOT wait until the temperature decreases. When it will be cold enough it will be possible to proceed by pressing CONTINUE".
The jug must be at least 2 liters large.
The drain function allows the water to be drained in order to prevent stagnation in the tank. It is advisable to always carry out draining every time the oven has been used. Pour or drain water when requested through display message.

DESCALE
This special function, activated at regular intervals, allows you to keep the tank and the steam circuit in the best condition.
The function is divided into several phases: draining, descaling, rinsing. Once the function is started, follow all the steps indicated on the display.
The average duration of the full function is around 190 minutes.
Please note: If the function is stopped at any time, the entire
descaling cycle must be repeated.
» DRAINING
Before descaling, it will be necessary to drain tank: to perform the operation in the best way, proceed as described in the relative paragraph.
Please note: it is not possible to perform this activity before 4 hours have elapsed from the last cycle (or the last time the product was powered). During this wait time, the display will show the following feedback "water is TOO HOT wait until the temperature decreases. When it will be cold enough it will be possible to proceed by pressing CONTINUE". The jug must be at least 2 liters large.
» DESCALING
For best results in descaling, we recommend filling the tank with the specific solution available at after sale Service.
Once the descaling phase has been completed, the tank has to be drained.
» RINSING
To clean the tank and the steam circuit, a rinse cycle has to be done. Fill the tank with drinking water until the display shows "TANK FULL", then start the rinsing. At the end, the display will prompt to repeat this phase by draining and rinsing again.
Do not turn off the oven until all the steps required by the function have been completed.
Cooking functions cannot be activated during the cleaning cycle.
Please note: A message will be shown on the display to remind you to execute this operation regularly.
Pour or drain water when requested through the display message.

MUTE
Tap the icon to mute or unmute all the sounds and alarms.

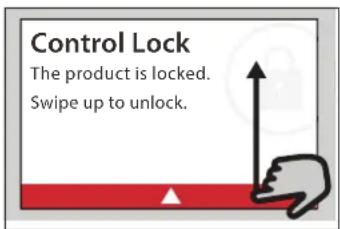
CONTROL LOCK
The "Control Lock" enables you to lock the buttons on the touch pad so they cannot be pressed accidentally.
To activate the lock:
- Tap the icon. To deactivate the lock:
- Tap the display.
- Swipe up on the message shown.

MORE MODES
For selecting Sabbath mode and accessing Power Management.
Sabbath mode keeps the oven on in baking mode until disabled. Sabbath mode uses the conventional function. All other cooking and cleaning cycles are disabled. No tones will sound, and the displays will not indicate temperature changes. When the oven door is opened or closed, the oven light will not turn on or off, and the heating elements will not turn on or off immediately.
To disable and exit Sabbath mode, press ⏻ or then press and hold the display screen for 3 seconds.

PREFERENCES
For changing several oven settings.

INFO
For switching off "Store Demo Mode", resetting the product and obtaining further information about the product.
USEFUL TIPS
HOW TO READ THE COOKING TABLES
The tables list: recipes, if preheating is needed, temperature (°C), grill level, cooking time (minutes), accessories and level suggested for cooking.
Cooking times start from the moment food is placed in the oven, excluding preheating (where required). Cooking temperatures and times are approximate and depend on the amount of food and the type of accessory used. Use the lowest recommended values to begin with and, if the food is not cooked enough, move on to higher values.
CONVENTIONAL
The heating elements at the top and bottom of the oven cavity heat the inside of the oven evenly.
Use the 3rd shelf. To cook pizza, savoury pies and sweets with liquid fillings, use the 1st or 2nd shelf. Preheat the oven before placing food inside.
This function is the best cooking mode for cooking delicate desserts on one shelf only.
Use dark-coloured metal cake tins and always position them on the wire shelf supplied. When using the supplied trays, remove any other accessories you are not using from the oven cavity to achieve optimal results and save energy.
Use the accessories supplied and preferably dark-coloured metal cake tins and oven trays. You can also use pans and accessories in pyrex or stoneware, but bear in mind that cooking times will be slightly longer. To obtain the best results, carefully follow the advice given in the cooking table for the choice of accessories (supplied) to be placed on the various shelves.
To check whether a cake is cooked, insert a wooden toothpick into the centre of the cake. If the toothpick comes out clean, the cake is ready.
If using non-stick cake tins, do not butter the edges as the cake may not rise evenly around the edges. If the cake "sinks" during cooking, set a lower temperature the next time, perhaps reducing the amount of liquid in the mixture and mixing more gently.
The fish is cooked when the dorsal fin comes off easily. Begin by selecting the lowest indicated temperature, even when preparing larger fish. In general, the larger the fish, the lower the temperature must be and therefore the longer the cooking time.
| Recipe | Preheat | Temperature (°C) | Cook Time (Min.) | Level and Accessories |
| Leavened cakes / Sponge cakes | Yes | 170 | 30 - 50 | |
| Cookies / Shortbread | Yes | 150 | 20 - 40 | |
| Small cakes / Muffin | Yes | 170 | 20 - 40 | |
| Choux buns | Yes | 180 - 200 | 30 - 40 | |
| Meringues | Yes | 90 | 110 - 150 | |
| Pizza / Bread / Focaccia | Yes | 190 - 250 | 15 - 50 | |
| Frozen pizza | Yes | 250 | 10 - 15 | |
| Vols-au-vent / Puff pastry crackers | Yes | 190 - 200 | 20 - 30 | |
| Lasagne / Flans / Baked pasta / Cannelloni | Yes | 190 - 200 | 45 - 65 | |
| Lamb / Veal / Beef / Pork 1 kg | Yes | 190 - 200 | 80 - 110 | |
| Chicken / Rabbit / Duck 1 kg | Yes | 200 - 230 | 50 - 100 | |
| Turkey / Goose 3 kg | Yes | 190 - 200 | 80 - 130 | |
| Baked fish / en papillote (fillets, whole) | Yes | 180 - 200 | 40 - 60 |
| ACCESSORIES | Wire shelf | Oven tray or cake tin on wire shelf | Drip tray / Baking tray or oven tray on wire shelf | Drip tray / Baking tray | Drip tray with 500 ml of water |
GRILL
The top heating element enables optimum results to be achieved when grilling. Place food on the 4th or 5th shelf. When grilling meat, use the drip tray to collect the cooking juices. Position it on the 3rd/4th shelf, adding approx 500 ml of drinking water. The oven does not have to be preheated.
During cooking, the oven door must remain closed.
If you want to grill meat, choose cuts with an even thickness all over in order to achieve uniform cooking results. Very thick pieces of meat require longer cooking times.
To prevent the meat from burning on the outside, lower the position of the wire shelf, keeping the food further away from the grill. Turn food halfway through cooking.
To collect the cooking juices it is advisable to place a drip-tray with half a litre of drinking water directly under the grill on which the meat is placed. Top-up when necessary.
| Recipe | Preheat | Grill Level | Cook Time (Min.) | Level and Accessories |
| Toast — 3 (High) 3 - 6 | 5 | |||
| Fish fillets / Steaks — 2 (Mid) 20 - 30 | 43 | |||
| Sausages / Kebabs / Spare ribs / Hamburgers — 2 - 3 (Mid - High) 15 - 30 | 54 |
TURBO GRILL
In this function, the top heating element and the fan are activated at the same time.
Use the drip tray to collect the cooking juices.
Position it on the 1st/2nd shelf, adding 500 ml of drinking water. The oven does not have to be preheated. During cooking the oven door must remain closed.
Turn food two thirds of the way through cooking.
Use any kind of oven tray or pyrex dish suited to the size of the piece of meat being cooked. For roast joints, it is best to add some stock to the bottom of the pan, basting the meat during cooking for added flavour. When the roast is ready, let it rest in the oven for another 10-15 minutes, or wrap it in aluminium foil.
| Recipe | Preheat | Grill Level | Cook Time (Min.) | Level and Accessories |
| Roast chicken 1-1.3 kg | — | 2 (Mid) | 55 - 70 | 21 |
| Leg of lamb / Shanks | — | 2 (Mid) | 60 - 90 | 3 |
| Roast potatoes | — 2 (Mid) | 35 - 55 | 3 | |
| Vegetable gratin | — | 3 (High) | 10 - 25 | 3 |
| ACCESSORIES | Wire shelf | Oven tray or cake tin on wire shelf | Drip tray / Baking tray or oven tray on wire shelf | Drip tray / Baking tray | Drip tray with 500 ml of water |
FORCED AIR
The round heating element and the fan are activated at the same time. The fan on the rear wall distributes the hot air evenly around the oven.
Using the "Forced Air" function, you can cook different foods which require the same cooking temperature at the same time (for example fish or vegetables), using different shelves. Remove the food which requires less cooking time and leave food which requires longer cooking time in the oven.
Use the 4th shelf to cook on one shelf only, the 1st and 4th to cook on two shelves, and the 1st, 3rd and 5th to cook on three shelves. Always place cake tins on the wire shelf. Preheat the oven before cooking. To achieve uniform browning, make sure that all portions of dough are the same thickness.
When cooking pizza, lightly grease the trays to ensure the pizza has a crispy base. Scatter the mozzarella over the pizza two thirds of the way through cooking.
| Recipe | Preheat | Temperature (°C) | Cook Time (Min.) | Level and Accessories |
| Leavened cakes / Sponge cakes | Yes 170 30 - 50 | 2 | ||
| Yes 160 30 - 50 | 4 1 | |||
| Filled cakes (cheesecake, strudel, apple pie) | Yes | 160 - 200 | 35 - 90 | 4 1 |
| Cookies / Shortbread | Yes 140 30 - 50 | 4 | ||
| Yes 140 | 30 - 50 | 4 1 | ||
| Yes 135 | 40 - 60 | 5 3 1 | ||
| Small cakes / Muffin | Yes 150 | 30 - 50 | 4 | |
| Yes 150 | 30 - 50 | 4 1 | ||
| Yes 150 | 40 - 60 | 5 3 1 | ||
| Choux buns | Yes | 180 - 190 | 35 - 45 | 4 1 |
| Yes | 180 - 190 | 35 - 45 * | 5 3 1 | |
| Meringues | Yes | 90 | 130 - 150 | 4 1 |
| Yes | 90 | 140 - 160 * | 5 3 1 | |
| Pizza / Bread / Focaccia | Yes | 190 - 230 | 20 - 50 | 4 1 |
| Pizza (Thin, thick, focaccia) | Yes | 220 - 240 | 25 - 50 * | 5 3 1 |
| Frozen pizza | Yes 250 | 10 - 20 | 4 1 | |
| Yes | 220 - 240 | 15 - 30 | 5 3 1 | |
| Savoury pies (vegetable pie, quiche) | Yes | 180 - 190 | 45 - 60 | 4 1 |
| Yes | 180 - 190 | 45 - 70 * | 5 3 1 | |
| Vols-au-vent / Puff pastry crackers | Yes | 180 - 190 | 20 - 40 | 4 1 |
| Yes | 180 - 190 | 20 - 40 * | 5 3 1 | |
| Lasagna & Meat | Yes | 200 | 50 - 100 * | 4 1 |
| Meat & Potatoes | Yes | 200 | 45 - 100 * | 4 1 |
| Fish & Vegetables | Yes | 180 | 30 - 50 * | 4 1 |
* Estimated length of time: dishes can be removed from the oven at different times depending on personal preference.
MULTICOOKING
| Recipe | Dish | Preheat | Temperature (°C) | Cook Time (Min.) | Level and Accessories |
| Cookies | Cookies | Yes | 135 | 50 - 70 | 5431 |
| Tarts Tarts Yes 170 50 - 70 | 5431 | ||||
| Round pizzas | Round Pizza | Yes | 210 | 40 - 60 | 5421 |
| Complete meal: | |||||
| Fruit tart (level 5)roasted vegetables (level 4)lasagna (level 2)cuts of meat (level 1) | Cook 4 menu | Yes 190 | 40 - 120 | 5421 |
CONVECTION BAKE
Use this function for quiches and vegetable tarts or desserts with moist fillings, such as cheesecake and fruit pie.
It is also ideal for cooking foods with a high water content. The fan distributes heat evenly throughout the oven. This helps to maintain a constant temperature and cook food more evenly, crisping
up the top while sealing in moisture and creating crustier breads.
Use the 3rd or 2nd shelf. Wait for the end of preheating before placing food inside.
If the pastry base is soggy, lower the shelf and sprinkle the bottom of the cake with biscuit crumbs before adding the filling.
| Recipe | Preheat | Temperature (°C) | Cook Time (Min.) | Level and Accessories |
| Filled cakes (cheesecake, strudel, apple pie) | Yes | 160 - 200 | 30 - 85 | |
| Savoury pies (vegetable pie,quiche) | Yes | 180 - 190 | 45 - 55 | |
| Stuffed vegetables (tomatoes, courgettes, aubergines) | Yes | 180 - 200 | 50 - 60 |
PURE STEAM
| Recipe | Preheat | Temperature (°C) | Cook Time (Min.) | Level and Accessories | |
| Fresh vegetables (Whole) | - | 100 | 30 - 80 | 2 | 1 |
| Fresh vegetables (Pieces) | - | 100 | 15 - 40 | 2 | 1 |
| Frozen vegetables - 100 20 - 40 | 2 | 1 | |||
| Whole fish - 90 40 - 50 | 2 | 1 | |||
| Fish fillets | - | 90 | 20 - 30 | 2 | 1 |
| Chicken fillets | - 100 15 - 50 | 2 | 1 | ||
| Eggs | - | 100 | 10 - 30 | 2 | 1 |
| Fruit (Whole) | - | 100 | 15 - 45 | 2 | 1 |
| Fruit (Pieces) | - | 100 | 10 - 30 | 2 | 1 |
FORCED AIR + STEAM
| Recipe | Steam Level | Preheat | Temperature (°C) | Cook Time (Min.) | Level and Accessories |
| Shortbread / Cookies | LOW | - | 140 - 150 | 35 - 55 | 3 |
| LOW | - 140 30 - 50 | 4 1 | |||
| LOW | - 140 40 - 60 | 5 3 1 | |||
| Small cake / Muffin | LOW | - | 160 - 170 | 30 - 40 | 3 |
| LOW | - | 150 | 30 - 50 | 4 1 | |
| LOW | - 150 40 - 60 | 5 3 1 | |||
| Leavened cakes | LOW | - | 170 - 180 | 40 - 60 | 2 |
| Sponge cakes | LOW | - | 160 - 170 | 30 - 40 | 2 |
| Focaccia | LOW | - | 200 - 220 | 20 - 40 | 3 |
| Bread loaf | LOW | - | 170 - 180 | 70 - 100 | 3 |
| Small bread | LOW | - | 200 - 220 | 30 - 50 | 3 |
| Baguette | LOW | - | 200 - 220 | 30 - 50 | 3 |
| Roast potatoes | MID | - | 200 - 220 | 50 - 70 | 3 |
| Veal / Beef / Pork 1 kg | MID | - | 180 - 200 | 60 - 100 | 3 |
| Veal / Beef / Pork (pieces) | MID | - | 160 - 180 | 60 - 80 | 3 |
| Roast Beef rare 1 kg | MID | - | 200 - 220 | 40 - 50 | 3 |
| Roast Beef rare 2 kg | MID | - | 200 | 55 - 65 | 3 |
| Leg of lamb | MID | - | 180 - 200 | 65 - 75 | 3 |
| Stew pork knuckles | MID | - | 160 - 180 | 85 - 100 | 3 |
| Chicken / guinea fowl / duck 1 - 1.5 kg | MID | - | 200 - 220 | 50 - 70 | 3 |
| Chicken / guinea fowl / duck (pieces) | MID | - | 200 - 220 | 55 - 65 | 3 |
| Stuffed vegetables (tomatoes, courgettes, aubergines) | MID | - | 180 - 200 | 25 - 40 | 3 |
| Fish fillet | HIGH | - | 180 - 200 | 15 - 30 | 3 |
MAXI COOKING
This function is very useful for cooking large joints of meat (over 2.5 kg). It is advisable to turn the meat over during cooking for more even browning. It is best to baste the meat every now and again to prevent it from drying out.
Use the 1st or 2nd shelves, depending on the size of the joint. The oven does not have to be preheated before cooking.
bottom of the pan, basting the meat during cooking for added flavour. When the roast is ready, let it rest in the oven for another 10-15 minutes, or wrap it in aluminium foil.
If the meat is too lean, add a little liquid, drizzle the joint with fat, or cover it with strips of bacon, for example.
In terms of turning the roast, make sure you place it rind-side down first.
For roast joints, it is best to add some stock to the
| Recipe | Preheat | Temperature (°C) | Cook Time (Min.) | Level and Accessories |
| Roast pork with crackling 2 kg — 170 110 - 150 | 2 |
ECO FORCED AIR
It is advisable to use the 3rd level. The oven does not have to be preheated.
| Recipe | Preheat | Temperature (°C) | Cook Time (Min.) | Level and Accessories |
| Stuffed roasting joints — 200 80 - 120 * | 3 | |||
| Cuts of meat (rabbit, chicken, lamb) — 200 50 - 100 * | 3 |
* Estimated length of time: dishes can be removed from the oven at different times depending on personal preference.
RISING
It is always best to cover the dough with a damp cloth before placing it in the oven. Dough proving time with this function is reduced by approximately one third compared to proving at room temperature (20-25°C).
Proving time for a 1 kg batch of pizza dough is around one hour.
WARM KEEPING
The keep warm function enables you to keep ready-made meals warm. This prevents condensation from forming and eliminates the need to clean the cooking compartment.
It is not advisable to keep ready-made meals warm for over two hours.
Remember that some foods continue cooking while they are kept warm: Cover them, if necessary, to prevent them drying out.
DEFROSTING
Boiled foods, stews and meat-based sauces will defrost better if stirred occasionally while defrosting. Separate the food items once they begin to defrost: the separated portions will defrost more quickly.
| Recipe Suggested quantity | Turn (Of cook time) | Level and Accessories | |||
| Casseroles/Baked Pasta | Fresh Lasagna 500 - 3000 g - | 2 | |||
| Frozen Lasagna 500 - 3000 g - | 2 | ||||
| Rice & Cereals | Rice | White rice 100 - 500 g - | 2 1 | ||
| Brown rice 100 - 500 g - | 2 1 | ||||
| Wholegrain rice 100 - 500 g - | 2 1 | ||||
| Seeds & Cereals | Quinoa 100 - 300 g - | 2 1 | |||
| Millet 100 - 300 g - | 2 1 | ||||
| Spelt 100 - 300 g - | 2 1 | ||||
| Barley 100 - 300 g - | 2 1 | ||||
| Meat | Beef | Roast beef | 600 - 2000 g - | 3 | |
| Hamburger | 1.5 - 3 cm | 3/5 | 5 | ||
| Pork | Pork | 600 - 2500 g - | 3 | ||
| Pork ribs | one grid | 2/3 | 5 4 | ||
| Roasted Chicken | Roast chicken | 600 - 3000 g - | 2 | ||
| Chicken fillet / Breast | 1 - 5 cm | 2/3 | 5 | ||
| Steamed meat | Chicken fillets | 1 - 5 cm | - | 2 1 | |
| Turkey fillets | 1 - 5 cm | - | 2 1 | ||
| Meat Dishes | Kebab one grid 1/2 | 5 4 | |||
| Sausages & Wurstel | 1.5 - 4 cm | 2/3 | 5 4 | ||

| Recipe Suggested quantity | Turn (Of cook time) | Level and Accessories | ||||
| Fish & Seafood | Roasted fillets & steaks | Fish fillets/slices 0.5 - 2.5 cm - | 5 | |||
| Frozen fillets 0.5 - 2.5 cm - | 4 | |||||
| Steamed fillets & steaks 📋 | Fish fillets/slices 0.5 - 2.5 cm - | 2 | 1 | |||
| 18.8.2f | ||||||
| Frozen fillets 0.5 - 2.5 cm - | 2 | 1 | ||||
| Grilled seafood | Scallops gratin one tray - | 4 | ||||
| Mussels gratin one tray - | 4 | |||||
| Shrimps one tray - | 4 | 3 | ||||
| Prawns one tray - | 4 | 3 | ||||
| Steamed seafood 📋 | Gratin scallops 500 - 1000 g - | 2 | 1 | |||
| 18.8.2f | ||||||
| Mussels 500 - 3000 g - | 2 | 1 | ||||
| 18.8.2f | ||||||
| Shrimps 100 - 1000 g - | 2 | 1 | ||||
| 18.8.2f | ||||||
| Prawns 500 - 1500 g - | 2 | 1 | ||||
| Squid | 100 - 500 g | - | 2 | 1 | ||
| 18.8.2f | ||||||
| Octopus | 500 - 2000 g - | 2 | 1 | |||
| Vegetables | Roasted Vegetables | Potatoes - Fresh | 500 - 1500 g - | 3 | ||
| Stuffed vegetables | 100 - 500 g | - | 3 | |||
| Other vegetables | 500 - 1500 g - | 3 | ||||
| Gratin Vegetables | Potatoes | one tray - | 3 | |||
| Tomatoes one tray - | 3 | |||||
| Peppers one tray - | 3 | |||||
| Broccoli | one tray - | 3 | ||||
| Cauliflowers | one tray - | 3 | ||||
| Others | one tray - | 3 | ||||
| Steamed Fresh Vegetables 📋 | Potatoes Whole | 50 - 500 g | - | 2 | 1 | |
| Potatoes small / pieces | one tray - | 2 | 1 | |||
| 18.8.2f | ||||||
| Peas | 200 - 2500 g - | 2 | 1 | |||
| 18.8.2f | ||||||
| Broccoli | 200 - 3000 g - | 2 | 1 | |||
| Cauliflowers 200 - 3000 g - | 2 | 1 | ||||
| Steamed Vegetables Frozen 📋 | Peas | 200 - 3000 g - | 2 | 1 | ||
| Fruits | Steamed Fruits 📋 | Whole | 100 - 400 g | - | 2 | 1 |
| 18.8.2f | ||||||
| Pieces 500 - 3000 g | - | 2 | 1 | |||
| Cakes and pastries | Sponge Cake in tin 500 - 1200 g - | 2 | ||||
| Cookies 200 - 600 g - | 3 | |||||
| Croissants one tray * - | 3 | |||||
| Choux pastry one tray * - | 3 | |||||
| Tart in tin one tray - | 3 | |||||
| Strudel 400 - 1600 g - | 3 | |||||
| Fruit filled pie 500 - 2000 g - | 2 | |||||
| Salty cakes 800 - 1200 g - | 2 | |||||
| Bread | Rolls 🎨 | 60 - 150 g each - | 3 | |||
| Sandwich Loaf in tin 🎨 | 400 - 600 g each | - | 2 | |||
| Big bread 🎨 | 700 - 2000 g | - | 2 | |||
| Baguettes 🎨 | 200 - 300 each | - | 3 | |||
| Pizza | Frozen | 1 - 4 layers * - | 2 | |||
| 4 1 | ||||||
| 5 3 1 | ||||||
| 5 4 2 1 | ||||||
| Thin | round - tray * | - | 2 | |||
| Thick | round - tray * | - | 2 | |||
| ACCESSORIES | Wire shelf | Oven tray or cake tin on wire shelf | Drip tray / Baking tray or oven tray on wire shelf | Drip tray / Baking tray | Drip tray with 500 ml of water | Steam Tray |
CLEANING AND MAINTENANCE
Make sure that the oven has cooled down before carrying out any maintenance or cleaning.
Do not use steam cleaners.
Do not use wire wool, abrasive scourers or abrasive/corrosive cleaning agents, as these could damage the surfaces of the appliance.
Wear protective gloves. The oven must be disconnected from the mains before carrying out any kind of maintenance work.
EXTERIOR SURFACES
- Clean the surfaces with a damp microfibre cloth. If they are very dirty, add a few drops of pH-neutral detergent. Finish off with a dry cloth.
- Do not use corrosive or abrasive detergents. If any of these products inadvertently comes into contact with the surfaces of the appliance, clean immediately with a damp microfibre cloth.
INTERIOR SURFACES
After every use, leave the oven to cool and then clean it, preferably while it is still warm, to remove any deposits or stains caused by food residues. To dry any condensation that has formed as a result of cooking foods with a high water content, let the oven cool completely and then wipe it with a cloth or sponge. Activate the "Self-Clean" function for optimum cleaning of the internal surfaces.
REMOVING AND REFITTING THE DOOR
To remove the door, open it fully and lower the catches until they are in the unlock position.
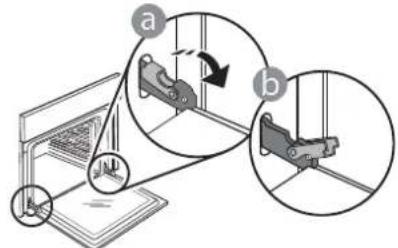
Close the door as much as you can. Take a firm hold of the door with both hands – do not hold it by the handle. Simply remove the door by continuing to close it while pulling it upwards at the same time until it is released from its seating. Put the door to one side, resting it on a soft surface.

- Clean the glass in the door with a suitable liquid detergent.
- The oven door can be removed to facilitate cleaning.
ACCESSORIES
Soak the accessories in a washing-up liquid solution after use, handling them with oven gloves if they are still hot. Food residues can be removed using a washing-up brush or a sponge.
TANK
To ensure that the oven always works at optimum performance and to help prevent the build-up of limescale deposits over time, we recommend using the "Drain" and "Descale" functions regularly.
After a long period of non-use of the steam functions, it is highly suggested to activate a cooking cycle with the empty oven by filling completely the tank.
Refit the door by moving it towards the oven, aligning the hooks of the hinges with their seating and securing the upper part onto its seating.
Lower the door and then open it fully. Lower the catches into their original position: Make sure that you lower them down completely.

Apply gentle pressure to check that the catches are in the correct position.
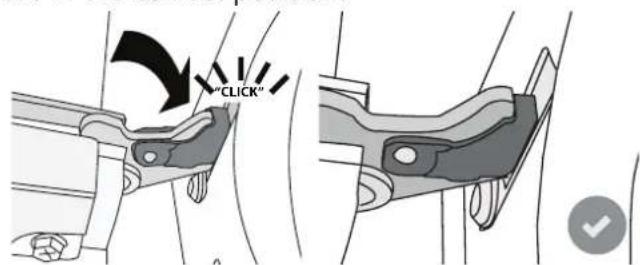
- Try closing the door and check to make sure that it lines up with the control panel. If it does not, repeat the steps above: The door could become damaged if it does not work properly.
REPLACING THE LAMP
- Disconnect the oven from the power supply.
- Remove the shelf guides.
- Remove the lamp cover.
- Replace the lamp.
- Reposition the lamp cover, pushing it on firmly until it snaps into place.
- Refit the shelf guides.
- Reconnect the oven to the power supply.


Please note: Only use 20-40 W/230 \~ V type G9, T300°C halogen bulbs. The bulb used in the product is specifically designed for domestic appliances and is not suitable for general room lighting within the home (EC Regulation 244/2009). Light bulbs are available from our After-sales Service.
When using halogen bulbs, do not handle them with your bare hands as your fingerprints could cause damage. Do not use the oven until the light cover has been refitted.
TROUBLESHOOTING
| Problem Possible cause Solution | ||
| The oven is not working. | Power cut.Disconnection from the mains. | Check for the presence of mains electrical power and whether the oven is connected to the electricity supply.Turn off the oven and restart it to see if the fault persists. |
| The display shows the letter “F” followed by a number or letter. | Oven failure. | Contact you nearest Client After-sales Service Centre and state the number following the letter “F”.Press , tap and then select “Factory Reset”. All settings saved will be deleted. |
| The home power goes off. | Power setting wrong. | Verify if your domestic network has at least a rating of more than 3 kW. If no, decrease the power to 13 Ampere.To change it, press , select “More Modes” and then select “Power Management”. |
| The function is not available in demo mode. | Demo mode is running. | Press , tap “info” and then select “Store Demo Mode” to exit. |
| The door will not open. | Cleaning cycle in progress. | Wait for the function to finish and for the oven to cool down. |
| Steam leaves the drawer during cooking. | Low water level in the tank. | Add a glass of drinking water. |
WWW.FRANKE.COM
© Franke Technology and Trademark Ltd, Switzerland
SUPPORT
In the event of any operation problems, contact a Franke Technical Service Centre.
Never use the services of unauthorized technicians.
Specify:
- the type of fault
- the appliance model (art./Code)
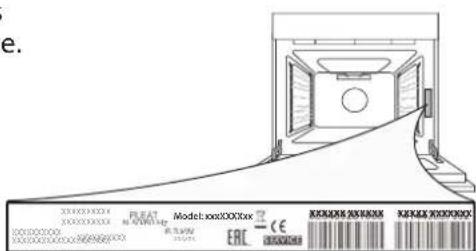
- the serial number (S.N.) on the rating plate, located on the right hand edge of the oven cavity (visible when the oven door is open).
When contacting our Service Centre, please state the codes provided on your product's identification plate.
Franke (China) Kitchen Systems Co., Ltd.
No. 318 Yinglang Industrial Zone, Shaping Town, Heshan City, Guangdong Province
Tel: 0750-8419288
Fax: 0750-8412399
- TABLE OF CONTENTS
- USER GUIDE
- OVERVIEW
- FEATURES
- SETTING THE TIME AND DATE
- SETTING FUNCTIONS
- HEATING THE OVEN
- COOKING DURATION
- MORE MODES
- CONTROL PANEL
- ACCESSORIES
- STEAM TRAY
- INSERTING THE WIRE SHELF AND OTHER ACCESSORIES
- REMOVING AND REFITTING THE SHELF GUIDES
- FITTING THE SLIDING RUNNERS (IF PRESENT)
- MANUAL FUNCTIONS
- CONVENTIONAL
- CONVECTION BAKE
- FORCED AIR
- GRILL
- TURBO GRILL
- FAST PREHEATING
- MULTICOOKING FUNCTIONS
- STEAM
- PURE STEAM
- FORCED AIR + STEAM
- SPECIAL FUNCTIONS
- DEFROST
- KEEP WARM
- RISING
- CONVENIENCE
- MAXI COOKING
- ECO FORCED AIR
- FROZEN COOK
- COOKASSIST
- HOW TO USE THE TOUCH DISPLAY
- FIRST TIME USE
- SELECT THE LANGUAGE
- SELECT SETTINGS MODE
- SET THE POWER CONSUMPTION
- HEAT THE OVEN
- DAILY USE
- SELECT A FUNCTION
- SET MANUAL FUNCTIONS
- TEMPERATURE / GRILL LEVEL
- DURATION
- SET COOKASSIST FUNCTIONS
- SET START TIME DELAY
- START THE FUNCTION
- PREHEATING
- PAUSING COOKING
- END OF COOKING
- FAVORITES
- HOW TO SAVE A FUNCTION
- ONCE SAVED
- CHANGING THE SETTINGS
- TOOLS
- KITCHEN TIMER
- LIGHT
- CLEANING
- DRAIN
- DESCALE
- DRAINING
- DESCALING
- RINSING
- MUTE
- CONTROL LOCK
- PREFERENCES
- INFO
- USEFUL TIPS
- HOW TO READ THE COOKING TABLES
- WARM KEEPING
- DEFROSTING
- CLEANING AND MAINTENANCE
- EXTERIOR SURFACES
- INTERIOR SURFACES
- REMOVING AND REFITTING THE DOOR
- TANK
- REPLACING THE LAMP
- TROUBLESHOOTING
- SUPPORT
- SPECIFY
Brand : FRANKE
Model : FMY 99 HS XS CCC
Category : Oven