
XWC-360WPRO - Refrigerator KeepOut - Free user manual and instructions
Find the device manual for free XWC-360WPRO KeepOut in PDF.


| Product Type | CPU Liquid Cooling System (AIO) |
| Model | XWC-360WPRO |
| Brand | KeepOut |
| Radiator Dimensions | 394 x 120 x 27 mm (LxWxH) |
| Radiator Material | Aluminum |
| Fan Dimensions | 120 x 120 x 25 mm (each fan) |
| Number of Fans | 3 |
| Fan Speed | 800-1800 ±10% RPM |
| Airflow | 81.5 CFM |
| Fan Noise Level | 35.1 dB(A) |
| Fan Bearing Type | Fluid Bearing |
| Pump Speed | 2600 ±10% RPM |
| Pump Noise Level | 23 dB(A) |
| Pump Connector | 3-pin PWM + 9-pin USB |
| Fan Connector | 4-pin PWM + 3-pin ARGB |
| LED Type | ARGB |
| LED Voltage | 5 VDC |
| Compatible Sockets | Intel LGA115X/1200/1700/1365/2011/2066, AMD AM5/AM4 |
| Tube Length | 400 mm |
| Power Consumption (Pump) | 3.4 W |
| Power Consumption (Fans max) | 12 W per fan |
| Operating Temperature | Max 30°C |
| Installation | Requires mounting on CPU socket with included accessories |
| Package Contents | Water cooling unit, mounting accessories, thermal silicone, user guide |
Frequently Asked Questions - XWC-360WPRO KeepOut
User questions about XWC-360WPRO KeepOut
0 question about this device. Answer the ones you know or ask your own.
Ask a new question about this device
Download the instructions for your Refrigerator in PDF format for free! Find your manual XWC-360WPRO - KeepOut and take your electronic device back in hand. On this page are published all the documents necessary for the use of your device. XWC-360WPRO by KeepOut.
USER MANUAL XWC-360WPRO KeepOut
Thank you for purchasing the XWC-360PRO - XWC-365WPRO water cooling model (depending on color), this model features three 12cm fans, temperature display screen and ARGB lighting. With our new state-of-the-art water technology you will enjoy exclusive cooling, guaranteeing optimal performance for your CPU in a silent way. Light up your SetUp thanks to the ARGB lighting system with 3-pin connection which makes it compatible with most ARGB devices on the market. Take it to the next level!
Packaging contents
XWC-360PRO-XWC-360WPRO water cooling
Mounting accessories.
Thermal silicone.
User Guide.
NOTE: Make sure your packaging contains the items described above. If you find that any item is missing or damaged, please contact your dealer.
CPU socket compatibles: Intel (LGA115X/1200/1700/1365/2011/2066) y AMD (AM5/AM4).
Radiator Specifications: Dimensions: 394x120x27mm (LxWxH). Radiator material: Aluminum.
Tube Specifications: Tube length: 400mm
Pump Specifications: Speed: 2600±10% RPM. Temperature display screen. Noise: 23dB(A). Connector: 3 pins (PWM) + 9 pins (USB). Voltage: 12 VDC. Current: 0.35A. Power consumption: 3.4W.
Fan Specifications: Dimensions: 360x120x25mm (LxWxH). Speed: 800-1800±10% RPM.
Airflow: 81.5CFM. Noise: 35.1dB(A). Conector: 4 pines (PWM) + 3 pines (ARGB). Bearing type: Fluid bearing. Voltage: 12VDC. Current: 1A±10% max. Power consumption: 12W±10%.
LED Specifications: Led Type: Led ARGB. Nominal LED voltage: 5VDC. Rated LED power: 1.8W (PUMP) / 1.44W x3 (FANS). Conector: 3 pines (+5V).
Installation and configuration : First, place the 3 fans of the XWC-360PRO on top of the radiator. Next, use the "1" screws to screw the fans to the radiator and the "K" screws to your tower as shown in the picture. Place the fans in the position that suits you best, and then connect your cables to your board or HUB. (Image does not match)
Installation for Intel : Place the "A" accessory on the back of your motherboard. (As shown in the image.). Place the Intel "C" accessory on the pump of the XWC-360PRO using the "L" screws. (As shown in the image.), Remove the protective plastic from the pump from the XWC-360PRO and remove the old thermal paste from your processor. Now apply the provided thermal silicone to the CPU installed in your computer. This process must be down for Intel and AMD processors. Place the 4 "D" screws, 4 "F" springs, and 4 "H" washers over the Intel anchors on the pump. (As shown in the image.) Next, place the pump of the XWC-360PRO on the motherboard anchors and screw it in. (As shown in the image.)
Installation for AMD
Place the Intel "E" accessory on the pump of the XWC-360PRO using the "L" screws. (As shown in the image.) Remove the protective plastic from the pump from the XWC-360PRO and remove the old thermal paste from your processor. Now apply the provided thermal silicone to the CPU installed in your computer. This process must be done for Intel and AMD processors.
Place the 4 "B" screws, 4 "F" springs, and 4 "H" washers over the pump's AMD anchors. (As shown in the image.) Next, place the pump of the XWC-360PRO on the motherboard anchors and screw it in. (As shown in the image.)
Cable Management
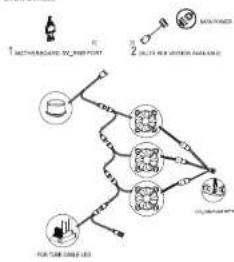
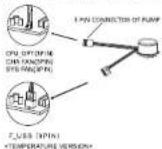
Install the 3Pin PWM connector of the XWC-360PRO pump to the "CPU_FAN" connector on your motherboard. Install the 4Pin PWM connector of the XWC-360PRO fans to the "AID_PUMP" connector on your motherboard. Install the XWC-360PRO's 9Pin USB pump connector to the "F_USB" connector on your motherboard. Connect the ARGB connector on the pump and fans of the XWC-360PRO to each other.
Connect the XWC-360PRO's 3-pin ARGB connector to a SV RGB connector on your motherboard. Note: each fan has its own 3Pin ARGB male/female and 4Pin PWM male female connectors. For these to work in series, you'll need to connect these connectors together. The last ARGB link, connect it to the ARGB connector of the pump. In this way, the pump and fans will work in series.
Similarly, you can connect the 4Pin PWM connector of the fans to each other so that they work in series.
Technical support: For more information about the installation and configuration of this product, please visit our website https://keep-out.eu/ or send an e-mail to the following address: support@keep-out.eu
Safety and maintenance instructions
Read this guide before using your device. Never open the device, the internal parts are in danger of electric shock. Be careful with the 3-pin ARIBUR male connector, in case of not using it, make sure it is always protected with its connector protector. Short-circuit hazard. Do not install this unit near a water source, such as in a damp basement, an excellent safety and safety system. The device has been used to ensure that it is necessary to be able to use the device. They can come into contact with voltage points and cause short circuits (in the parts and cause fire or electric shock). Do not spill any liquid on the unit: Never throw the product into a heat or fire source. Always keep the product at room temperature, maximum 30^ . Do not drop the product, do not sit on it, do not bend the cord. Danger of breakage. If you are not going to use the product for a period of time, charge it every three months (only for models with a battery). The product for a soft, dry cloth. Always with the device turned off Follow local ordinances to dispose of the product.
Recycling
AEE RI-RAET 5548. In this manual, the symbol of the crossed out container indicates that the product is subject to a European directive, 2012/19/EU, electrical or electronic products, batteries, accumulators and other accessories must necessarily be subject to separate collection. At the end of the device's life, make use of the recycling bins. This gesture will help reduce health risks and preserve the environment. Municipalities and distributors will provide you with the essential denials regarding the recycling of your old device. If this device has an internal battery, it must be used for a paper management. Please recycle. The packaging of this product is not applicable. The product box is made of cardboard and must be recycled in the blue or cardboard container and the internal preparations and bags are made of plastic and must be recycled in the yellow container or destined for plastic. Together we can help conserve the planet.

Radiator Installation

Pump Bracket installation

Intel
Back plate

INTEL LGA1366/115X/17XX installation

INTEL LGA2066/2011 installation

AMD
Radiator Installation

Pump Bracket installation

Back plate
AMD original backplane

AMD AM5/AM4/AM3/FM2 installation

EN
A. Motherboard bottom support
B. AMD Screws
C. Intel Support
D. Screws LGA20KKI
E. AMD Support
F. Intel screw springs
G. Intel Screws
H. Arundelco
I&K, Fan screws
I. CPU support screws
M. Double-sided Thermal Pad
N. Thermal paste
ES
A. Soporte inferior place madre
B. Tomillos AMD
C. Soporte Intel
D. Tomillos LGA20XX
E. Soporte AMD
F. Mueles tomlos Intel
G. Tomillos Intel
H. Aranhelas
I & K. Tomillos ventiladores
I. Tomillos para soporte CPU
M. Pad Térmico doble cara
N. Pasta térmica
PT
A. Suporte inferior da placa-mãe
B. Paraífusos AMD
C. Suporte Intel
D. Paraífusos LGA20XX
E. AMD Suporte
F. Molas de paraífuso Intel
G. Paraífusos Intel
H. Arandelos
IKK. Paraífusos do ventilador
I. Paraífusos de suporte da CPU
M. Almofada térmica de dupla face
N. pasta termos
A. MULTIPLE FANS AND PUMP RUB CABLE CONNECT WITH
Cables
FAN/PUMP cable installation

flowchart
graph TD
    A["1. MATHERSARID DRIP POINT"] --> B["2. 2.0.0.0.0.0.0.0.0.0.0.0.0.0.0.0.0.0.0.0.0.0.0.0.0.0.0.0.0.0.0.0.0.0.0.0.0.0.0.0.0.0.0.0.0.0.0.0.0.0.0.1"]
    B --> C["FOR TUNICUMBER"]
    C --> D["OR/OR/OR/OR/OR/OR/OR/OR/OR/OR/OR/OR/OR/OR/OR/OR/OR/OR/OR/OR/OR/OR/OR/OR/OR/OR/OR/OR/OR/OR/OR/OR/OR/OR/OR/OR/OR/OR/OR/OR/OR/OR/OR/OR/OR/OR/OR/OR/OR/OR/OR"]
    D --> E["OR/OR/OR/OR/OR/OR/OR/OR/OR/OR/OR/OR/OR/OR/OR/OR/OR/OR/OR/OR/OR/OR/OR/OR/OR/OR/OR/OR/OR/OR/OR/OR/OR/OR/OR/OR/OR/OR/OR/OR"]
B. MULTIPLE FANS AND PUMP RGB CABLE CONNECT WITH

flowchart
graph TD
    A["Input"] --> B["Processing"]
    B --> C{Decision}
    C -->|Yes| D["Output"]
    C -->|No| E["Feedback Loop"]
    E --> B
    style A fill:#f9f,stroke:#333
    style D fill:#ccf,stroke:#333
    style E fill:#cfc,stroke:#333
C. MULTIPLE FANS AND PUMP RGB CABLE CONNECT WITH EACH OTHER.
flowchart
graph TD
    A["1. Methionine"] --> B["2. Carboxylate"]
    B --> C["3. sulfate"]
    C --> D["4. CO2"]
    D --> E["5. CH2OH"]
    E --> F["6. CH2OH"]
    F --> G["7. CH2OH"]
    G --> H["8. CH2OH"]
    H --> I["9. CH2OH"]
    I --> J["10. CH2OH"]
    J --> K["11. CH2OH"]
    K --> L["12. CH2OH"]
    L --> M["13. CH2OH"]
    M --> N["14. CH2OH"]
    N --> O["15. CH2OH"]
    O --> P["16. CH2OH"]
    P --> Q["17. CH2OH"]
    Q --> R["18. CH2OH"]
    R --> S["19. CH2OH"]
    S --> T["20. CH2OH"]
D CONNECT THE PUMP TO "CPU OPT" ON THE MOTHERBOARD
Brand : KeepOut
Model : XWC-360WPRO
Category : Refrigerator