
M600620 - Scale ADE - Free user manual and instructions
Find the device manual for free M600620 ADE in PDF.


| Product Type | Electronic bed scale for hospitals and dialysis centres |
| Model | M600620 |
| Brand | ADE |
| Housing Dimensions (HxWxD) | 18.6 cm x 9.5 cm x 10 cm |
| Weight (without battery) | 0.4 kg |
| Power Supply | Mains adapter 115 or 230 VAC, 50/60 Hz, or rechargeable battery |
| Battery Type | Rechargeable Lithium Ion, 3.7V, 4000mAh (2x 18650) |
| Battery Operation Time | Up to 200 hours in saving mode |
| Charging Time | 12-16 hours (first charge 24 hours) |
| Display | 6-digit LCD, 21.2 mm digits |
| Weighing Capacity | Not explicitly stated (typical bed scale up to 300 kg) |
| Functions | Weighing, tare, preset tare, hold, BMI calculation, print, zero setting |
| Connectivity | RS-232 serial interface for printer, PC, or remote display |
| Operating Temperature | -10°C to +40°C (legal) |
| Storage Temperature | -25°C to +70°C |
| Humidity | 0–95% relative humidity |
| Housing Material | ABS plastic, white |
| Cleaning | Use damp cloth or conventional disinfectant; avoid liquids entering the scale |
| Warranty | 2 years from date of delivery (excludes batteries, cables, mains units) |
| Certification | CE, Class III scale per German regulations |
Frequently Asked Questions - M600620 ADE
User questions about M600620 ADE
0 question about this device. Answer the ones you know or ask your own.
Ask a new question about this device
Download the instructions for your Scale in PDF format for free! Find your manual M600620 - ADE and take your electronic device back in hand. On this page are published all the documents necessary for the use of your device. M600620 by ADE.
USER MANUAL M600620 ADE
natural_image
Modern medical or laboratory equipment chassis with multi-tiered wheels and a digital display unit (no visible text or symbols)M600620-210422-Rev006-UM-e
Contents
Introduction 4
Assembly and set up 4
Scope of delivery....4
Power supply 4
Replacing rechargeable batteries....5
Tips for handling the batteries....5
Display 6
Description....6
Connecting additional devices 6
Housing and connections 7
Safety....7
Settings....7
Setting date and time 8
Operation 8
Modes of operation 8
Before weighing 9
Weighing 9
Tare function....9
Hold function 10
Determining the Body Mass Index (BMI) 10
10
Print out a record 10
Care, servicing and recalibration 10
Cleaning 10
Error messages 11
Waste disposal 11
Storage and transport conditions 11
Warranty 11
Technical specifications....13
Declaration of conformity 14
Introduction

This symbol means: "Consult operating instructions". To achieve accurate results, read the instructions for use carefully before use and follow all instructions provided therein. Keep the instructions for use for future reference.
Your ADE electronic bed-scale is a quality, sturdy and durable product manufactured under the high standards and regulations for calibrated class III scales in accordance with national regulations in Germany. The scale is designed and manufactured primarily for the daily practice in hospitals and dialysis centres.
ADE instruction manuals have been prepared to provide the user with all the necessary knowledge about the safe use of ADE scales and their related accessory equipment.
For further questions about how to use the products or about this or other service manuals, feel free to contact your local ADE representative or visit our web page at www.ade-hamburg.de
In order to achieve the best possible results kindly read and follow the operation manual in all respects.
Assembly and set up
The ADE bed scale is supplied in a fully assembled condition. Please insure that your scale is being placed vibration-free at a dry place. Dismantle packaging and foil carefully and remove the transport securing devices. Place the weighing feet on a plain, dry and level surface before the weighing procedure.
Scope of delivery
- 4 Weighing shoes/ measuring feet with integrated ramp (numbered 1-4)
- 4 Locking aids
- 1 Mains adapter
– Equipment trolley with integrated terminal box for connection to weighing shoes (numbered 1-4) and already mounted indicator - Operating Manual including "Certificate of Conformity"
Power supply
Power is supplied either by the rechargeable battery in the display unit or by the mains power via the supplied power unit. The imprinted voltage value at the mains adapter must match the mains voltage at the place of use. Connect the mains cable to the indicator and to a socket.
The wall socket must be located near to the unit and be easily accessible. Please use only the mains adapter supplied by ADE. The mains adapter is charging the battery pack during normal operation.
When the battery is being charged for the first time a sufficient charging period of approx. 24 hours is necessary to achieve a full battery load.
If the unit is in battery mode and the display indicates – Lo, the battery needed to be recharged with the mains adapter. For a full battery load a charging period of 12-16 hours is required with the scale being switched off. If–Lo still appears at the display inform your service partner.
Replacing rechargeable batteries
The battery compartment is located at the front of the unit (see right picture).

1) Open the battery compartment.
2) Remove the battery cable and the corresponding connector carefully from C to H . Disconnect the old battery pack. Connect the wires/plug (red to red, black to black) with the new battery pack and insert the new battery into the housing.
3) Close the battery compartment again.
Only use original rechargeable batteries and mains adapter from ADE. The warranty does not cover any damage caused by using other types of batteries or charger units.
Tips for handling the batteries
The life of a battery depends on the frequency of use, temperatures, settings and the accessories being used.
- New batteries or batteries that have been stored for a long period require a longer charging period.
- Charge the batteries at room temperature.
- Never expose the batteries to temperatures below -10^ (14°F) or above 45^ (113°F).
- Rechargeable batteries lose their charging capacity over the time and require a longer charging period the older they are. If the battery performance drops considerably, then it is time to replace the battery.
- New batteries are supplied in partial charged condition. Batteries achieve their full capacity after several complete charge and discharge cycles.
- Do not throw old rechargeable batteries into the domestic waste. Ensure that the valid legal and municipal regulations of your country are being followed.
- Never dispose of batteries in fire as they can leak or explode!
Display
Description

pic. 1-1 Indicator and operation panel
| No. | Name Description | |
| 1 | Display LCD display for weight, mode, settings and configuration information. | |
| 2 | Battery charge level Status of the battery charge level. | |
| 3 | Switching points 1 & 2 In program mode: Status indicator for switching points 1 & 2. | |
| 4 | BMI status indicator (HI, OK, LO) | Status of the automatic BMI (Body Mass Index) evaluation. |
| 5 | Net status indicator | LCD on - net weight is being displayed.LCD off - gross weight is being displayed. |
| 6 | Status indicator →0← | The scale is at zero level. |
| 7 | Hold - button Activates the hold function. | |
| 8 | On/off, zero - button On and off switch and re-set of the display. | |
| 9 | Tare- button Activate/ deactivate the tare function. | |
| 10 | Preset tare - button | Press briefly to access the tare function.Press for a long period to enter and save the tare value. |
| 11 | BMI - Button Enter to proceed with BMI mode. | |
| 12 | Units - Button | Switch button between primary and secondary units. Not available for CE approved class III scales |
| 13 | Number pad | Figures 0-9, Clear, Enter and Navigation functions: Key 6 menu direction to the right; Key 4 menu direction to the left; Key 8 menu direction down; Key 2 menu direction up. For better understanding see Pic. 1.1 the blue arrows. Used to navigate through menus, to select numerical values and to increase or lower the value. |
| Special function:"0" key"Enter" key Function in weight mode: "Print" if printer has been connected. | ||
| 14 | Standstill status indicator (14) ▲▲: | The scale is at a standstill. The weight is stable with no movement. This is mandatory for functions like reset, print and tare. |
| 15 | "Hold" | If displayed is the hold function is activated. |
| 16 | "kg" | If displayed is the weight is displayed in kilograms. |
| "g" | If displayed is the weight is displayed in grams. | |
Connecting additional devices
Printer, PC or remote-display could be connected by the RS-232 interface. For connection of additional devices kindly ask your local representative or authorized ADE dealer for further instructions.
Housing and connections
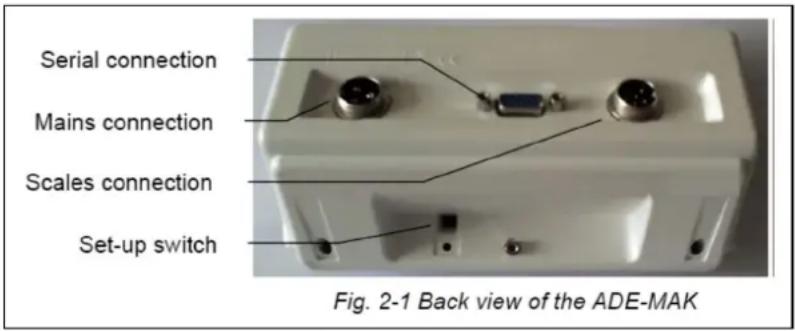
The connections to mains adapter, serial port and to the load cells are located at the back of the ADE display. The set-up switch to start the configuration mode is underneath the housing. It is protected by a cover plate and secured by a screw (not shown in Fig. 2-1).

Do not use the set-up button, as otherwise calibration will be lost. This procedure is only allowed by authorized service personnel appointed by ADE (GmbH & Co.). Any unauthorized manipulations made to the configuration mode will affect the warranty agreement.
Safety
The ADE-display unit (MAK) corresponds to the latest state of the art technology and complies with standard regulations and directives. Kindly follow the safety instructions in this operating manual, the country-specific installation standards as well as the applicable safety conditions and accident prevention regulations in all aspects. Electronic medical devices are restricted to special safety regulations in respect of their electromagnetic compatibility. For positioning and operation, follow the instructions of this operation manual.
- Portable and mobile HF-communication systems may influence electronic medical devices.
- Make sure that the mains cable does not pose any potential trip hazard.
- Do not drop the weighing bridges/shoes or subject them to violent shocks.
- Do not operate the unit in hazardous or unstable conditions.
- Do not dip or submerge the unit into water or other liquids.
- Have all repairs and calibration carried out by professional personnel authorised by ADE.
- Set up the unit as far away as possible from equipment that generates electromagnetic or other interference.
- Only use original rechargeable batteries and mains adapter from ADE. The warranty does not cover any damage caused by using other types of batteries or charger units.
Safe operation is no longer guaranteed:
- If the power unit shows visible damage.
- If the power unit is not working properly.
- After longer periods of storage in damp areas.
- In these cases, contact your service partner for your own safety!
Settings
The following functions are available in setting mode:
- Configuration of the serial interface
- Set up of date, time and consecutive printout numbers
- Set up of print format
- Set up of switching points
- Test functions
The setting mode is not made for metrological parameters. Access the function menu by pressing the CLEAR (13) key until TIME appears on the display. Use the key pad (13) to navigate within the menus, to select numerical values and to increase or lower the values. Press the ENTER key to save the values entered and to return to the super ordinate menu level.
Menus structure of setting mode:
After entering the clear button following options are available and appear on the screen when moving with the navigation buttons:
| FILTER SERIAL PROGR PFORMT | SETPTS | TEST TIME DATE | VERS | ||||
Setting date and time
- Enter the CLEAR key for approx. 4 sec; FILTER appears on the display.
- Press key "6" six times and TIME appears on the display.
- Press ENTER key and SHOW appears on the display.
- Press key "6" one time and HOUR appears on the display.
- Press ENTER key and set the hours using the arrow keys "↑2", "←4", "6→" and "8↓".
- Press the ENTER key and set the minutes and seconds.
- Go back by pressing key "2"; TIME appears on the display.
- Press key "6" one time and DATE appears on the display like the time entry.
- Press key "2" two times and EXIT Y appears on the display.
- Confirm with ENTER and date & time are set.
Operation
Modes of operation
- Weighing mode
The "weighing mode" is of course the standard mode of your scale. After initial configuration and sealing (by attaching a calibration sticker to the back of the unit), the ADE-scale can only be operated in this mode.
- Setting mode
Date, time and consecutive numbers for print commands are being set in this mode. To start setting mode, hold the GROSS/NET key pressed until TIME appears on the display.
- Configuration mode (set-up mode)
The values for different parameters including the calibration could be set in the configuration mode. This function is for authorized service personnel only.
- Test mode
There are different diagnostic functions for the ADE-MAK in test mode. This is for service personnel only.

Manipulations to test and configuration modes can revoke the calibration status and will result in loss of warranty!
Before weighing
- Move the bed onto the weighing feet.
- The constructions of the weighing feet do not allow to pass over the weighing platform. In any case ensure that the wheels of the bed are secured and the brakes are engaged. Additionally make use of the plastic securing devices in order to fix the wheels.
- Switch on the scale.
- An automatic function test will lead to zero indication (0.0). The weight of the bed is being ignored automatically.
- Place the patient into the bed. The displayed weight is the weight of the patient.
- If the weight of the patient should be ignored as well (e.g. for dialysis purposes), follow the instruction under the point "Tare function".
- If the weight of the bed including bed-clothes is already being stored follow the instruction under the point "Restore the preset tara value"
Weighing
Press the ON key for at least 3 seconds to turn the scales on. An automatic function test will be conducted afterwards. The test is done when the display shows zero. The scale is now ready for the weighing procedure.
Resetting the scales back to zero: Wait until the standstill status indicator ▲▲ (14) appears. By entering the ZERO key (8), measuring inaccuracies after switching on the scale are being compensated. The zero key re-starts the scale. The status indicator (6) →0←appears when the scale is being resetted.
Tare function
The TARE key (9) is useful for many weighing operations. Tare might be useful in case the patient is being place on the scale/bed with items (e.g. clothing, bed clothing shoes or other items) which should be ignored by the scale. Weigh these items first. After the weight is displayed, press the TARE key (9) to reset the display back to zero. The display changes to net mode (NET status indicator (5) is on) and shows zero.
Note: Taring the bed with subsequent determination of the patient weight is not possible/practical, as the bed weight is subtracted from the maximum load of the scale and thus only a small weighing range is available. To determine the patient weight, proceed according to section "Before Weighing" on this page.
Entering manually tare - values
The user is able to insert manually the gross weight, which is for example mentioned at the identification plate of the bed. Enter the appropriate tare value just by using the key pad under normal weighing mode. The value will be stored after use of the ENTER key (or TARE). The ADE-display is now ready for weighing and changes to net mode [NET status indicator (5) is on]. Enter the tare button to leave this mode.
Preset tara
Press and hold the PRESET TARE key (10) for approx. 3 seconds. PRO PT X appears on the display. Select the memory location 1-10. Now enter the TARE VALUE which you would like to be ignored by the scale and confirm same with ENTER. The value is displayed as a negative figure and will be deducted when a load is being placed on the scale. Enter the on/off, zero – button (8) to leave this mode.
Restore the preset tara value
Press the PRESET TARE key (10). "Pt x" appears on the display. Enter a number from 0-9 (memory location for the tare value). If no new number will be inserted to change the already displayed value within five seconds, the unit will turn back to weighing mode and displays the last stored value as negative figure as above.
Enter the on/off, zero – button (8) to leave this mode.
Displaying the gross weight, net weight and tare value
Press the "0" key to change between the net weight (gross weight minus the tared value) and the gross weight.
Hold function
The determined weight could be continued being displayed even when the load has already been removed. That enables taking care of the patient first before reading the results.
To use the hold function the scale must be at standstill. The standstill status indicator ▶(14) is on and Hold appears at the digital display. Deactivate the HOLD function by pressing the key again.
Determining the Body Mass Index (BMI)
The BMI figure is an index showing the ratio between height and weight.
$$ \mathrm{BMI} = \frac {\text { body weight }}{\left(\text { height }\right) ^ {2}} \quad \begin{array}{l} \text { To determine this value you need the height of the person. } \ \text { Start the scale and weigh the person following the steps under weighing. Then } \ \text { press the BMI key(11)to start BMI mode. The last value entered appears on the } \end{array} $$
display. Use the numerical key pad to enter a new value for the height (in cm) or retain the value, which is already been displayed. Confirm the value entered with the ENTER key or delete same by using the CLEAR key. After the entry has been confirmed by the ENTER key, the BMI value will be calculated using the weight on the scales. The display changes between weight value and BMI value "b xx.x" (every two seconds) for a period of 3 minutes. Press the BMI key (11) to cancel before this time has expired.
Evaluating Body Mass Index
BMI evaluation according to WHO
$$ \begin{array}{l} \text { BMI } < 1 6 \text { Severely underweight } \ 1 6 - 1 7 \text { Moderately underweight } \ 1 7 - 1 8. 5 \quad \text { S l i g h t l y u n d e r w e i g h t } \ \end{array} $$
BMI 18.5 - 25 Normal weight
BMI 25 - 30 Overweight
$$ 3 0 - 3 5 \text { Obese Class I } $$
$$ 3 5 - 4 0 \text { Obese Class II } $$
$$
4 0 \quad \text { Obese Class III } $$
Print out a record
The scales must be at standstill, e.g. standstill status display ▲▲ (14) appears at the screen.
Press the ENTER key (13) to send the data to the serial interface.
Note: Printing is not possible if the net weight is 0. The print function only produces one print-out. A reset is required to print out another copy.
Care, servicing and recalibration
Cleaning
Remove the mains plug before cleaning the unit. Do not use any aggressive cleaning materials for cleaning; only use a damp cloth or conventional disinfectant. Ensure that no liquids or any fluid gets into the scale.
Error messages
| Error mes-sage | Description Problem solution | |
 | Overload display | Weight exceeds max. capacity of the scales. |
 | Overflow indicator (negative) | Negative weight indicated – weight too low to be displayed (<=99999). |
 | Overflow indicator (positive) | Positive weight indicated – weight too high to be displayed (>=999999). |
AD LOW | A/D above negative range | Check if the scales are correctly as-sembled or if they are damaged. |
AD HI | A/D above positive range | Check if the scales are correctly as-sembled or if they are damaged. |
EE SUM | Parameter or calibration error | Recalibrate – please contact your sup-plier or service partner: |
EE WR | EEPROM indicates an error | Please contact your supplier or service partner. |
PM SUM | Internal program indicates a check error | Please contact your supplier or service partner. |
HOFSET | Switch on – above zero | Please remove the weight from the scales and restart. |
LOFSET | Switch on – below zero | Check scales for damage and inform your service partner: |
UOFSET | Irregular | Do not touch the scales after they have been switched on. |
Waste disposal
Used electrical equipment and batteries do not belong in the domestic waste.
Please dispose of defective or used equipment and batteries according to legal regulations of your specific country!

Please make sure that only discharged batteries or batteries with insulated "poles" are disposed of as otherwise they may short-circuit!
Storage and transport conditions
Keep all packaging in case you need to return the item, in order to avoid any potential transport damage.
Disconnect all connected cables before dispatch.
Warranty
ADE will repair or replace this product within a period of 2 years from date of delivery applying to defects occurred due to poor material or workmanship (presentation of invoice is necessary). All moveable parts – batteries, cables, mains units, rechargeable batteries etc. – are excluded. Warranty does not include natural wear, damages caused by incorrect or negligent handling, overuse or unsuitable or improper storage. The cost of transport will be borne by the customer should the equipment be located anywhere other than the customer's premises. In the event of transport damage, claims under warranty can be accepted subject to using the complete original packaging and the equipment secured the way it was packed and secured originally. All the packaging should therefore be retained.
Any warranty claim will be rejected if the equipment is opened by persons not authorized expressively by ADE to do so.
Customers abroad are kindly requested to contact their local dealer for any warranty claim, customer service and spare parts.
Technical specifications
Power supply
Mains Adapter:
Mains voltage 115 or 230VAC
Frequency 50 or 60HZ
Power Consumption 11W in-charger, 2W off-charger
Main power circuit
Input Voltage 5.0VDC
Max. Current (in-charger) 1000mA
Battery Requirement: Rechargeable Lithium Ion Cylindrical (18650x2) Cell 3.7V 4000mAh
Battery Operation:
Charger 7\~10 Hours
Saving (350ohm, Backlight-ON 30Sec,
Shutdown 5Min) 200Hours
Serial Communications
EDP Port Full duplex RS-232
38400,19200,9600, 4800, 2400, 1200 bps
Printer Port Output-only RS-232 or active 20 mA current loop, 9600, 4800, 2400, 1200 bps
Both Ports 7 or 8 data bits; even, odd, or no parity
Operator Interface
Display
6-digit LCD display. 7-segment, 0.815 in (21.2 mm) digits
LCD annunciator
net, center of zero, standstill, kg/lb/g/oz/ units,
Battery, Set points, Hold, HI/OK/LO
Keyboard
24-key flat membrane panel
Environmental
Operating Temperature
-10 to +40°C (legal);
Storage Temperature
-25 to +70°C
Humidity 0–95% relative humidity
Altitude
2000 m (6500 ft) maximum
Housing
Dimensions
18.6 cm x 9.5 cm x 10 cm
Weight
0.4 kg (without battery)
Material
ABS plastic, white
CE
Declaration of conformity by the manufacturer
These scales have been manufactured in accordance with the harmonised European standards. They conform to the regulations of the EC-directives listed below:
- EMC Directive 2014/30/EU
– Low Voltage Directive 2014/35/EU
– RoHS Directive 2011/65/EU
in the currently valid versions.
This declaration loses its validity if modifications are made to the scale without our approval.
Hamburg, April 2021
ADE Germany GmbH
- Contents
- Introduction
- Assembly and set up
- Scope of delivery
- Power supply
- Replacing rechargeable batteries
- Tips for handling the batteries
- Display
- Description
- Connecting additional devices
- Housing and connections
- Safety
- Settings
- Menus structure of setting mode:
- Setting date and time
- Operation
- Modes of operation
- - Weighing mode
- - Setting mode
- - Configuration mode (set-up mode)
- - Test mode
- Before weighing
- Weighing
- Tare function
- Entering manually tare - values
- Preset tara
- Restore the preset tara value
- Displaying the gross weight, net weight and tare value
- Hold function
- Determining the Body Mass Index (BMI)
- Evaluating Body Mass Index
- Print out a record
- Care, servicing and recalibration
- Cleaning
- Error messages
- Waste disposal
- Storage and transport conditions
- Warranty
- Technical specifications
- Serial Communications
- Operator Interface
- Environmental
- Housing
- CE
- Declaration of conformity by the manufacturer
- ADE Germany GmbH
Brand : ADE
Model : M600620
Category : Scale