
SCHE 103 A+ - Freezer SCHNEIDER - Free user manual and instructions
Find the device manual for free SCHE 103 A+ SCHNEIDER in PDF.


| Product Type | Chest Freezer |
| Brand | Schneider |
| Model | SCHE 103 A+ |
| Energy Class | A+ |
| Net Capacity | 103 L |
| Freezing Capacity | 10 kg/24h |
| Climate Class | N-ST (16°C - 38°C) |
| Dimensions (H x W x D) | 85 x 55 x 60 cm |
| Net Weight | 35 kg |
| Power Supply | 220-240 V, 50 Hz |
| Annual Energy Consumption | 220 kWh/year |
| Noise Level | 40 dB(A) |
| Defrost System | Manual |
| Controls | Mechanical thermostat |
| Interior Light | No |
| Lockable Lid | Yes |
| Refrigerant | R600a (isobutane) |
| Spare Parts Availability | Through authorized service centers for 10 years |
| User Manual | Included in multiple languages |
Frequently Asked Questions - SCHE 103 A+ SCHNEIDER
User questions about SCHE 103 A+ SCHNEIDER
0 question about this device. Answer the ones you know or ask your own.
Ask a new question about this device
Download the instructions for your Freezer in PDF format for free! Find your manual SCHE 103 A+ - SCHNEIDER and take your electronic device back in hand. On this page are published all the documents necessary for the use of your device. SCHE 103 A+ by SCHNEIDER.
USER MANUAL SCHE 103 A+ SCHNEIDER
natural_image
Top-down view of a white refrigerator with a grid-out rack and open lid (no text or symbols visible)Manual de Usuario
Í NDICEÍ NDICE
IN STALACI Ó NIN STALACI Ó N
Product description....3
Specifications....3
Installation....4
Unpacking your freezer 4
Adjusting your freezer 4
Air circulation 4
Electrical requirements......5
Install limitations....5
Using the freezer 6
Temperature control....6
Food storage basket....6
Defrosting and Draining 7
Food storage information....7
Normal operating sounds....7
Cleaning and maintenance....8
Cleaning....8
Maintenance 8
Troubleshooting....9
SAFETY PRECAUTIONSS SAFETY PRECAUTIONS
Read all instructions before using this appliance. When using this appliance, always exercise basic safety precautions, including the following:
- Use this appliance only for its intended purpose as described in this user manual.
- This freezer must be properly installed in accordance with the installation instructions before it is used. See grounding instructions in the installation section.
- Never unplug your freezer by pulling on the power cord. Always grasp the plug firmly and pull straight out from the outlet.
- Repair or replace immediately all electric service cords that have become frayed or otherwise damaged. Do not use a cord that shows abrasion damage along its length, the plug, or the connector end.
- Unplug your freezer before cleaning or before making any repairs. Note: if this product requires service for any reason we strongly recommend that a certified technician performs the service (+34 91 678 49 31 or postventa@schneiderespana.es).
- Do not use any electrical device or any Sharp instrument in defrosting your freezer.
- If your old freezer is not being used we recommend that you remove the doors as this will reduce the risk of danger to children.
- While your freezer is in operation do not touch the cold surfaces in the freezer compartment, particularly if your hands are damp or wet. Skin may adhere to these extremely cold surfaces.
- Do not refreeze foods that have been thawed.
- Thawed ground meats, poultry, or fish that have any off-odor or off-color should not be refrozen or eaten. Thawed ice-cream should be discarded. If the odor or color of any food is poor or questionable discard it as it may be dangerous to eat.
- This refrigerator should not be recessed or built in an enclosed cabinet. It is designed for freestanding installation only.
- Do not operate your refrigerator in the presence of explosive fumes.
- The appliance is not intended for use by people (including children) with reduced physical, sensory or mental capabilities, or lack of experience and knowledge, unless they have been given supervision or instruction concerning use of the appliance by a person responsible for their safety. Children should be supervised to ensure that they don't play with the appliance, even when it is not being used as they could get trapped inside. To void this risk take off the door if you do not use the appliance.
- If the model contains R600a (see name plate under refrigerant -the coolant isobutene-) naturals gas that, is very environmentally friendly but also combustible. When transporting and installing the unit care must be taken to ensure that none of the refrigeration circuit components become damaged. In the event of damage avoid naked flames or ignition sources and ventilate the room in which the unit is placed for a few minutes.
Keep these instructions for your future reference.
P R O D U C T DESCR IPTIO N P R O D U C T DESCR IPTIO N
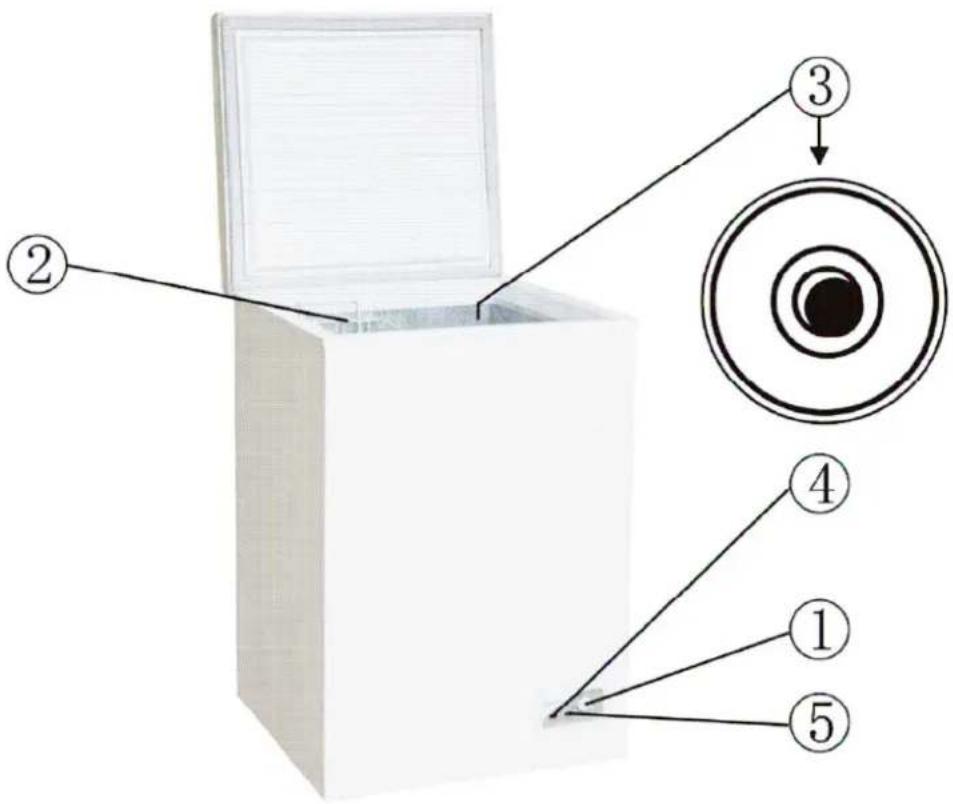
- Temperature control adjustment
- Vinyl coated wire basket
- Inside drain dial
- Power on indicator (red)
- Compressor on indicator (green)
SP ECIFICATION S: SP ECIFICATION S :
| MODEL MODEL103 A+ | SCHE 103 A+SCHE 103 SCHE 143 A+SCHE 15000203A+ | ||
| SITARRARMOG | 4 | 4 | 4 |
| CAPRANTY | 103L | 143L | 203L |
| FREERIZIONOUPRANTY(8/94th) | 5 | 6,5 | 9,5 |
| ABLUMMIDOTOCBWPY | YES | YES | YES |
| CLOMMAHIEUCBSSS | 0 | 0 | 0 |
| ENERGY CLASSICATES A+ A+ | |||
| NOISE (dB)NOISE (dB) | 42 | 42 | 42 |
| RUNNINGLIGHTRUNNING LIGHT | YES | YES | YES |
| HANDLEHANDLE | RECESSED | RECESSED | RECESSED |
| COLOR | WHITE | WHITE | WHITE |
| BASKET | YES | YES | YES |
| GAS | R600a | R600a | R600a |
| DOOR | Top | Top | Top |
| DBRAMINGSSEEM | YES | YES | YES |
| ABDJUSTABLEFLETHROOMSSTAT | YES | YES | YES |
| DIMENSIONENSIO | 567×547×839 | 720×560×839 | 940×560×839 |
| PAGRICIDOTHERSSES | 625×585×883 | 775×595×890 | 995×595×890 |
| WAVEIGHT(NELECTROSSEKKG | 31/34 | 35/40 | 40/45 |
| COMPARATION | OUTSIDE | OUTSIDE | OUTSIDE |
INSTALLATION
Unpacking your freezer
Remove all packaging materials, including foam base and all adhesive tape holding the freezer accessories inside and outside.
Inspect and remove any remains of packaging, tape or printed materials before powering on the freezer.
Adjusting your freezer
Your freezer is designed for freestanding installation only. It should not be recessed or built-in.
Place the freezer on a floor strong enough to support it fully loaded.
When moving the freezer, never tilt it more that a 45^ angle. This could damage the compressor and the sealed system.
If the freezer is tilted let it stand in an upright position for at least 24 hours prior to plugging. This is to allow the refrigerator to settle.
Air circulation
To assure your freezer works at the maximum efficiency it was designed for you should install it in a location where there is proper air circulation, plumbing and electrical connections.
The following are recommended clearances around the refrigerator:

Electrical requirements Electrical requirements
Make sure there is a suitable power outlet (220V, 50Hz outlet) with proper grounding to power the fridge.
Avoid the use of an extension cord because of potential safety hazards under certain conditions. If it is necessary to use an extension cord, we strongly recommend that a certified technician performs the service. And note the marked rating of the extension cord must be equal to or greater than the electrical rating of the appliance.
Install limitationsInstall limitations
Do not install your freezer in any location not properly insulated or heated e.g. garage, etc. Your freezer was not designed to operate in temperature settings below 13°C.
Select a suitable location for the freezer on a hard even surface away from direct sunlight or heat source (e.g. radiators, baseboard heaters, cooking appliances, etc.). Any floor unevenness should be corrected.
Once the freezer is in its proper place plug it in an electrical outlet having 220V/50Hz. Turn on the power switch. Power light will come on, the green run light will be lit indicating that the freezer compressor is in operation.
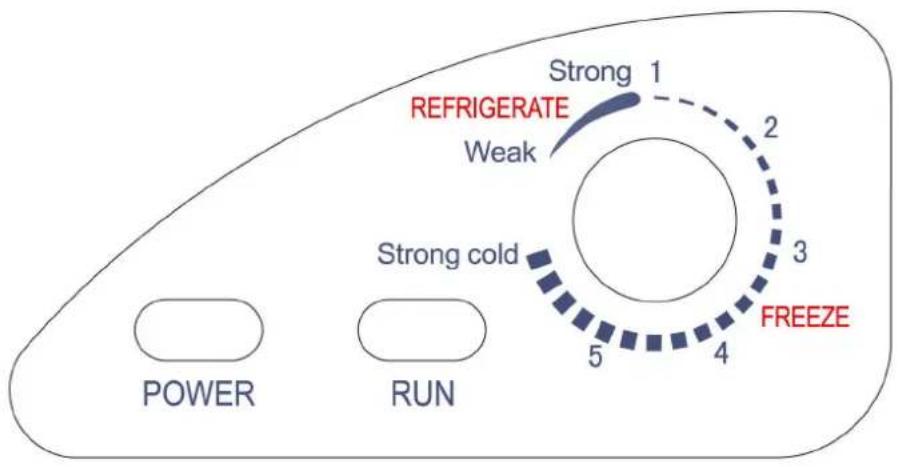
Temperature Tcontrelaburteol
Set the temperature on the temperature control knob, "1" being the warmest and "5" being the coolest. Initially set the temperature control knob on "3". Place food inside the freezer. After 24 hours of operation you can set your desired setting. Note that the first setting marked as "Refrigerate" does not freeze, just refrigerates.
NOTE: In case you unplug your freezer or experience an electrical outage allow 5 minutes before plugging it back in.
Temperature settings:
| Position | Weak → Strong | 1→2 | 2→8 | 3→4 | 4→5 | 5→5 Cold | Str. Cold |
| °C | 10^ -2^ | -2^ -8^ | -8^ -12^ | -12^ -15^ | -15^ -18^ | ≤ -18^ | Turbo |
NOTA: In Weak → Strong position food is not frozen but refrigerated.
Food storage basket
Your freezer has a basket. Removable baskets allow you to store food more accessibly or you can remove it if not needed.
Defrosting and Draining Defrosting and Draining
Defrost whenever the frost becomes 15-20 mm thick. Never use a sharp or metallic instrument to remove the frost, as it may damage the cooling coils (a punctured coil will void the warranty).
Unplug the unit. Remove the drain plug from the inside of the freezer. Defrosting usually takes a few hours. To defrost faster keep the freezer door open.
For draining, place a tray beneath the outer drain dial. Turn the drain dial in a counterclockwise direction to remove it. This will let the water flow out into the tray – monitor the container under the drain to avoid overflow –. When finished, replace the drain dial and turn in a clockwise direction to close.
Wipe the interior of the freeze, replace the electrical plug in the electrical outlet and reset the temperature control to the desired setting.
Food storage Information Food storage information
Wipe containers before storing to avoid needless spills.
Hot food should be allowed to cool before storing in the freezer. This will prevent unnecessary energy use.
When storing meats, keep in the original packaging or rewrap as necessary..
Proper freezer storage requires correct packaging. All foods must be in packages, which do not allow the flow of air or moisture in, or out. Improper storage will result in odor and taste transfer and will result in the drying out of the improperly packaged food.
Follow package or container instructions for proper storage.
NOTE: It is recommended that you mark the freezing date on the packaging.
Normal operating soundsoperating sounds
a. Boiling, gurgling sounds or slight vibrations that are the result of the refrigerant circulating through the cooling coils.
b. The thermostat control will click when the transfer between freezer and refrigeration..
CLEANING AND MAINTENANCEANGE AND MAINTEN
WARNING: To avoid electronic block valve, says a purplify injury or reedze for beefanide cleaning. Re cleaning. Ignoring this warning may result in death or injury. Ignoring this warning may result in death or injury. WARNING: Before using cleaning products always read and follow manufacturer instructions and warning to avoid pre-presiding injury product deal age.
Cleaning
Prepare a cleaning solution of 3-4 tablespoons of baking soda mixed with warm water.
Use a sponge or soft cloth, dampened with the cleaning solution to wipe down your freezer.
Rinse with clean warm water and dry with a soft cloth.
Do not use harsh chemicals, abrasives, ammonia, chlorine bleach, concentrated detergents, solvents or metal scouring pads. Some of these products may dissolve, damage and / or discolor your freezer.
Clean door gaskets every three months according to general instructions. Gaskets must be kept clean and pliable to assure a proper seal.
Petroleum jelly applied lightly on the hinge side of gaskets will keep the gasket pliable and assure a good seal.
Maintenance
Power interruptions
Occasionally there may be power interruptions due to thunderstorms or other causes. Remove the power cord from the AC outlet when power outlet occurs. When power has been restored, re-plug power cord to AC outlet. If outage is for a prolonged period, inspect and discard spoiled or thawed food in freezer. Clean the freezer and plug it back.
Prolonged absences
For long vacations or absences, unplug the unit, empty food from the freezer and clean the door gaskets according to "General Cleaning" section. Prop doors open, so air can circulate inside.
Transportation
When moving always move the freezer horizontally. Do not move with the unit lying down. Possible damage to the sealed system could occur.
TROUBLESHOOTINGTROUBLESHOOTING
Freezer does not operate
- Check if the freezer is correctly plugged in.
- Check if there is a power outage. Check your circuit breaker in case any of your fuses blew.
- Wait for 30-40 minutes to see whether freezer will start, compressor cycle must be completed to operate.
Food temperature appears too warm.
- Frequent door opening may result in slight inner freezer warming.
- Allow time for recently added warm food to reach freezer temperature.
- Check gaskets for proper seal.
- Clean condenser coils (for models with exposed condensed coils).
- Adjust temperature control to colder setting.
Food temperature is too cold
- If temperature control setting is too cold adjust to a warmer setting and allow several hours for temperature to adjust.
All information of this user manual (images included) must be considered as a reference and might be affected by typographic or edition misprints. We work continuously in our products improvement and this may cause that some of the described functions do not match exactly with your appliance features.
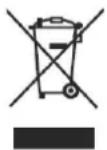
The European directive 2002/96/EC on Waste Electrical and Electronic Equipment (WEEE), requires that old household electrical appliances must not be disposed in the normal unsorted municipal waste stream. Old appliances must be collected separately in order to optimize the recovery and recycling of the materials they contain and reduce the impact on human health and the environment. The crossed out wheeled bin symbol on the product reminds you of your obligation, that when you dispose of the appliance it must be separately collected. Consumers should contact their local authority or retailer for information concerning the correct disposal of their old appliance.


- Í NDICEÍ NDICE
- IN STALACI Ó NIN STALACI Ó N
- Product description....3
- Specifications....3
- Installation....4
- Using the freezer 6
- Cleaning and maintenance....8
- Troubleshooting....9
- SAFETY PRECAUTIONSS SAFETY PRECAUTIONS
- P R O D U C T DESCR IPTIO N P R O D U C T DESCR IPTIO N
- INSTALLATION
- Unpacking your freezer
- Adjusting your freezer
- Air circulation
- Electrical requirements Electrical requirements
- Install limitationsInstall limitations
- Temperature Tcontrelaburteol
- Food storage basket
- Defrosting and Draining Defrosting and Draining
- Food storage Information Food storage information
- CLEANING AND MAINTENANCEANGE AND MAINTEN
- Cleaning
- Maintenance
- Power interruptions
- Prolonged absences
- Transportation
- TROUBLESHOOTINGTROUBLESHOOTING
- Freezer does not operate
- Food temperature appears too warm.
- Food temperature is too cold
Brand : SCHNEIDER
Model : SCHE 103 A+
Category : Freezer