
EAW08E3AJW - Air conditioner ELECTROLUX - Free user manual and instructions
Find the device manual for free EAW08E3AJW ELECTROLUX in PDF.


| Product Type | Window Air Conditioner |
| Cooling Capacity (BTU) | 8,000 |
| Energy Efficiency Ratio (EER) | 12.0 |
| Power Supply | 115V / 60 Hz |
| Amperage | 7.5 A |
| Dimensions (W x H x D) | 18.5 x 12.5 x 15.4 in |
| Net Weight | 55 lbs |
| Recommended Room Size | Up to 350 sq ft |
| Operating Modes | Cool, Fan, Dry |
| Fan Speeds | 3 (Low, Medium, High) |
| Thermostat | Mechanical, adjustable |
| Air Filter | Washable, reusable |
| Remote Control | Included (batteries included) |
| Installation Kit | Window mounting bracket and seal |
| Noise Level (dB) | 52 (approx.) |
| Refrigerant Type | R-32 |
| Energy Star Certified | Yes |
| Safety Features | Overload protection, tip-over switch |
| Maintenance | Clean filter monthly; coil cleaning annually |
| Warranty | 1 year parts and labor |
Frequently Asked Questions - EAW08E3AJW ELECTROLUX
User questions about EAW08E3AJW ELECTROLUX
0 question about this device. Answer the ones you know or ask your own.
Ask a new question about this device
Download the instructions for your Air conditioner in PDF format for free! Find your manual EAW08E3AJW - ELECTROLUX and take your electronic device back in hand. On this page are published all the documents necessary for the use of your device. EAW08E3AJW by ELECTROLUX.
USER MANUAL EAW08E3AJW ELECTROLUX
The Electrolux Group.
The Electrolux Group is the world's largest producer of powered appliances for kitchen, cleaning and outdoor use. More than 55 million Electrolux Group products (such as refrigerators, cookers, washing machines, vacuum cleaners, chain saws and lawn mowers) are sold each year to a value of approx. USD 14 billion in more than 150 countries around the world.
Thinking of you
Electrolux
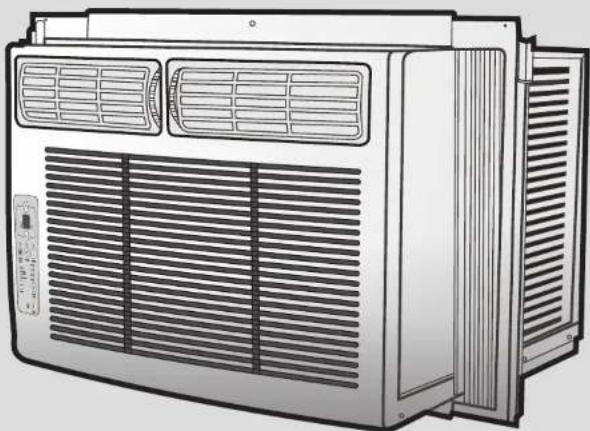
MANUAL DE INSTRUCCIONES / INSTRUCTIONS MANUAL
AIRE ACONDICIONADO DE VENTANA / WINDOW TYPE AIR CONDITIONER
natural_image
Illustration of an air conditioner unit with ventilation grilles and ventilation ducts (no text or symbols)MODELOS / MODELS:
EAW05E3AJW / EAW08E3AJW
EAW12E3AJW
Lea todas las instrucciones antes de utilizar el aparato y guardelas para futuras referencias. Read all instructions prior to using appliance and keep this manual for future reference.
A0(44,45,56)EM BILING
100601P
Fig. 2
natural_image
Line drawing of a wall-mounted air conditioner unit (no text or symbols)Ventanas de PVC
natural_image
Technical line drawing of a mechanical component with ribbed structure and a separate curved part (no text or symbols)Ventanas de madera
natural_image
Technical line drawing of a mechanical assembly with no visible text or symbols
natural_image
Line drawing of a person using a tool on a balcony (no text or symbols)Fig. 11


Modelos 8.000 y 12.000 btu/h

Modelos 5.000 btu/h
Cómo usar
natural_image
Diagram of airflow or heat transfer between two rectangular chambers with directional arrows indicating flow direction (no text or labels)natural_image
Line drawing of a hand inserting a fan into an air conditioner unit (no text or symbols)1 Traqueteo agudo
Welcome to the world of simple handling and no worries.
Thank you for choosing Electrolux for your air conditioner. Our conditioner are developed with high technical and quality standards, with features to offer you even more comfort.
Read all instructions before using this appliance. This book contains valuable information about operation, care and service. Keep it in a safe place. You expect all this from Electrolux...and we deliver.
Environmental advice
The packaging material used is recyclable; we recommend that you separate plastic, paper and cardboard and give them to recycling companies.
According to WEEE (Waste of Electrical and Electronic Equipment) guidelines, waste from electrical and electronic devices should be collected separately. If you need to dispose of this appliance in the future, do NOT throw it away with the rest of your domestic garbage. Instead, please take the appliance to the nearest WEEE collection point, where available.



Inside you will find many helpful hints on how to use and maintain your air conditioner properly. Just a little preventive care on your part can save you a great deal of time and money over the life of your air conditioner. You'll find many answers to common problems in the chart of troubleshooting tips. If you review our chart of Troubleshooting Tips first, you may not need to call for service at all.
Contents
Security....33
Operation of current device....35
Electrical safety rules....36
Care before mounting....37
Parts list....38
Installation....39
Remote control description....48
Control panel description....49
How to use....50
Care and cleaning....55
Normal sounds....57
Solutions for problems....58
Technical informations....61

The appliance that you have bought may be slightly different from the one illustrated in this manual. Please refer to the information related to the model you have.
The appliance you have may carry a different plug than the one illustrated in this manual. The plug that comes with the product follows the electrical specification of the country where it is sold.
The installation is not covered by the purchase of the product.
Contact the authorised service technician for repair or maintenance of this unit.
Contact the installer for installation of this unit.
The air conditioner cannot be use by childrens.
Young children should be supervised to ensure that they do not play with the air conditioner.
If the power cord is to be replaced, replacement work shall be performed by authorised personnel only.
Installation work must be performed in accordance with the national wiring standards by authorised personnel only.
Security
Incorrect operation due to ignoring of instructions may cause harm or damage. The seriousness is classified by the following indications:
Plug in power plug properly:
Otherwise, it may cause electric shock or fire due to excess heat generation.
Do not operate or stop the unit by inserting or pulling out the power plug: It may cause electric shock or fire due to heat generation.
Do not damage or use an unspecified power cord: It may cause electric shock or fire. If the power cord is damaged, it must be replaced by the manufacturer or an authorised service centre or a similarly qualified person in order to avoid a hazard.
Do not modify power cord length or share the outlet with other appliances: It may cause electric shock or fire due to heat generation.
Do not operate with wet hands or in damp environment: It may cause electric shock.
Do not direct airflow at room
occupants only: This could damage your health.
Always ensure effective earthing: Incorrect earthing may cause electric shock.
Do not allow water to run into electric parts: It may cause failure of machine or electric shock.
Always install circuit breaker and a dedicated power circuit: Incorrect installation may cause fire and electric shock.
Unplug the unit if strange sounds, smell, or smoke comes from it: It may cause fire and electric shock.
Do not use the socket if it is loose or damaged: It may cause fire and electric shock.
Do not open the unit during operation: It may cause electric shock.
Keep firearms away: It may cause fire.
Do not use the power cord close to heating appliances: It may cause fire and electric shock.
Do not use the power cord near flammable gas or combustibles, such as gasoline, benzene, thinner, etc.: It may cause an explosion or fire.
Ventilate room before operating air conditioner if there is a gas leakage from another appliance: It may cause explosion, fire and, burns.
Do not disassemble or modify unit: It may cause failure and electric shock.
Do not drink water drained from air conditioner: It contains contaminants and could make you sick.
When the air filter is to be removed, do not touch the metal parts of the unit: It may cause an injury.
Do not clean the air conditioner with water: Water may enter the unit and degrade the insulation. It may cause an electric shock.
Ventilate the room well when used together with a stove, etc.: An oxygen shortage may occur.
When the unit is to be cleaned, switch off, and turn off the circuit breaker: Do not clean unit when power is on as it may cause fire and electric shock, it may cause an injury.
Do not put a pet or house plant where it will be exposed to direct air flow: This could injure the pet or plant.
Use caution when unpacking and installing: Sharp edges could cause injury.
Stop operation and close the window in storm or hurricane:
Operation with windows opened may cause wetting of indoor and soaking of household furniture.
Do not place obstacles around air-inlets or inside of air-outlet: It may cause failure of appliance or accident.
Hold the plug by the head of the power plug when taking it out: It may cause electric shock and damage.
Always insert the filters securely. Clean filter once every two weeks:
Operation without filters may cause failure.
Do not place heavy object on the power cord and ensure that the cord is not compressed: There is danger of fire or electric shock.
Do not use the following items: Warm water (more than 40^ C or 104^ F). The warm water can deform or bleach the window air conditioner.
Never clean the appliances with flammable liquids as alcohol, kerosene, gasoline, some liquid cleaners, some spots removers, turpentine, waxes, wax removers, or cleaners as amoniac, acids, vinagers, soda or abrasives as plastic or steel sponges, steel wool, neither also with chemical products that might release chemical corrosive or toxic vapors that may damage the appliance.
Do not use for special purposes: Do not use this air conditioner to preserve precision devices, food, pets, plants, and art objects. It may cause deterioration of quality, etc.
Turn off the main power switch when not using the unit for a long time: It may cause failure of product or fire.
Ensure that the installation bracket of the outdoor appliance is not damaged due to prolonged exposure: If bracket is damaged, there is concern of damage due to falling of unit.
35 electrolux operation of current device
Operation of current device
The power supply cord contains a current device that senses damage to the power cord. To test your power supply cord do the following:

- Plug in the Air Conditioner.
- The power supply cord will have TWO buttons on the plug head. Press the TEST button. You will notice a click as the RESET button pops out.
- Press the RESET button. Again you will notice a click as the button engages.
- The power supply cord is now supplying electricity to the unit. (On some products this is also indicated by a light on the plug head).


Do not use this device to turn the unit on or off.
Always make sure the RESET button is pushed in for correct operation.
The power supply cord must be replaced if it fails to reset when either the TEST button is pushed, or it cannot be reset. A new one can be obtained from the product manufacturer.
If power supply cord is damaged, it CANNOT be repaired. It MUST be replaced by one obtained from the product manufacturer.
electrical safety rules electrolux 36
Electrical safety rules
Caution
All wiring must comply with local and national electrical codes and be installed by a qualified electrician. If you have any questions regarding the following instructions, contact a qualified electrician.
Never insert your fingers or any foreign objects into the air outlet. Take special care to warn children of these dangers.
To avoid the possibility of personal injury, be sure to disconnect power to the unit before installing and/or servicing and/or cleaning.
If the supply cord is damaged, it must be replaced by the manufacturer or its service agent or a similar qualified person in order to avoid a hazard.
Attention
The power cord is distinguished according to the cord color just as follows (see fig. 1):
For your safety and protection, this unit is grounded through the power cord (see fig. 2). Please contact the manufacturer or its service agent or a similar qualified person if you want to replace it.
For the electric requirements, read the technical information (Pg. 52)
Be sure that the unit being correctly grounded. The wall outlet (Air-break switch) should be provided with reliable earth wire.
The unit should be provided with an individual branch circuit and the fuse size should be same as that of the power cord and wall outlet.(Air-break switch).
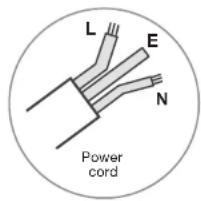
Fig. 1
E - Ground wire, yellow/green
N - Neutral wire, blue
L - Live wire, red/brown

Fig. 2
37 electrolux care before mounting
parts list electrolux 38
Care before mounting
To avoid risk of personal injury, property damage, or product damage due to the weight of this device and sharp edges that may be exposed:
- Air conditioners covered in this manual pose an excessive weight hazard. Two or more people are needed to move and install the unit. To prevent injury or strain, use proper lifting and carrying techniques when moving unit.
- Carefully inspect location where air conditioner will be installed. Be sure it will support the weight of the unit over an extended period of time.
- Handle air conditioner with care. Wear protective gloves whenever lifting or carrying the unit. AVOID the sharp metal fins on front and rear coils.
- Make sure air conditioner does not fall during installation.
Parts list
| PIECE NAME | QTY. | |
| 3/4" screws | 7 | |
| Lock frame (for wooden windows) | 2 | |
| Lock frame (For Vinyl-clad windows) | 2 | |
| Sash lock | 1 | |
| Weather seals (6"x3/4"x1/12") | 5 | |
| Window sash seal foam | 1 | |
| 3/8" Screw | 4 | |
| Top rail | 1 | |

- Save carton and these installation instructions for future reference. The carton is the best way to store unit during winter, or when not in use.
- Do not use any screws other than those specified here.
- Where applicable, the top rail must be securely fastened with all four (4) screws for safety reasons.
Installation
- Remove the air conditioner from the carton and place on a flat surface.
- Remove top rail from the rear of the packaging material as shown in Fig. 1A and 1B.
- Align the hole in the top rail with those on the top of the unit as shown in Fig. 2.
- Secure the top rail to the unit with the 3/8" Screws as shown in Fig. 3.
- Remove the air conditioner from the carton and place on a flat surface.
- Remove top rail from the rear of the packaging material as shown in Fig. 1A and 1B.
- Align the hole in the top rail with those on the top of the unit as shown in Fig. 2.
- Secure the top rail to the unit with the 3/8" Screws as shown in Fig. 3.

Before installing, the top rail must be assembled on the unit:
Before installing, the top rail must be assembled on the unit:

Left and right filler panel assembly
Place unit on floor, a bench or a table. There is a Left and Right side Filler Panels - be sure to use the proper panel for each side. When installed, the flange for securing the panel in place to the window sill will be facing into the room.
- Hold the side Panel in one hand and gently pull back the center to free the open end. See FIG. 1.
-
Slide the free end "I" section of the panel directly into the cabinet as shown in FIG. 2. Slide the panel down. Be sure to leave enough space to slip the top and bottom of the frame into the rails on the cabinet.
-
Once the panel has been installed on the side of the cabinet, make sure it sits securely inside the frame channel by making slight adjustments. Slide the top and bottom ends of the frame into the top and bottom rails of the cabinet. See FIG. 3.
-
Slide the panel all the way in and repeat on the other side.

Fig. 2 "I" Section

natural_image
Simple line drawing of a door with a window and a wall, showing a downward arrow (no text or symbols)Fig. 3 Top rail


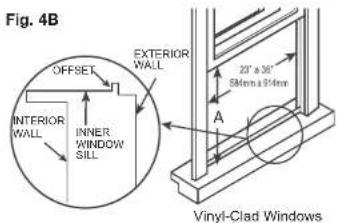
Your air conditioner is designed to install in standard double hung windows with opening widths of 23 to 36 inches (584 mm to 914 mm) (FIG. 4A, FIG. 4B). Lower sash must open sufficiently to allow a clear vertical opening of 13 inches (333 mm) for 5000 Btu/h models, 14 inches (356 mm) for 8000 Btu/h models or 15-1/2 inches (394 mm) for 12000 Btu/h models. Side louvers and the rear of the air conditioner must have clear air space to allow enough airflow through the condenser, for heat removal. The rear of the unit must be outdoors, not inside a building or garage.

A
13 inches (333 mm) for 5000 Btu/h models 14 inches (356 mm) for 8000 Btu/h models 15-1/2 inches (394 mm) for 12000 Btu/h models

Top Rail and Side Panels at each side are offset to provide the proper pitch to the rear of (5/16"). This is necessary for proper condensed water utilization and drainage. If you are not using the Side Panels for any reason, this pitch to the rear must be maintained.
Storm window
If the air conditioner is blocked by Storm Window, add wood as shown in FIG. 5, or remove storm window before air conditioner is installed. If Storm Window Frame must remain, be sure the drain holes or slots are not caulked or painted shut. Accumulated Rain Water or Condensation must be allowed to drain out.
Keep a firm grip on the air conditioner, carefully place the unit into the window opening so the bottom of the air conditioner frame is against the window sill (FIG. 6A & FIG. 6B).

Outside


Extend the side panels out against the window frame (FIG. 7A for wooden windows, FIG. 7B for Vinyl-Clad windows).
Fig. 7A

natural_image
Line drawing of a server unit with ventilation grilles and a close-up of its panel (no text or symbols)Window frame
Wooden Windows

natural_image
Line drawing of a ventilation system with fan and vent (no text or symbols)Vinyl-Clad Windows
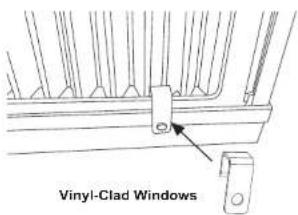
Place the frame lock between the frame extensions and the window sill as shown (FIG. 8A for wooden windows, FIG. 8B for Vinyl-Clad windows).
Fig. 8A

natural_image
Diagram of a window with vertical bars and an arrow pointing to a small object (no text or symbols present)Wooden Windows
Fig. 8B


natural_image
Technical line drawing of a mechanical or electrical component with no visible text or symbolsTo secure lower sash in place, attach right angle sash lock with 3/4" (19mm) screw as shown (FIG. 10).

Fig. 10

natural_image
Line drawing of a person using a tool on a balcony (no text or symbols)Fig. 11
Cut foam window seal and insert it into the space between the upper and lower sashes (FIG. 11).


It is difficult to lock the windows with the sash lock for Vinyl-Clad windows, so you can use lock by window itself.
After the completion of the installation, please check the machine's lean as shown (FIG. 12A & FIG. 12B). It's necessary for proper condensed water utilization and drainage.


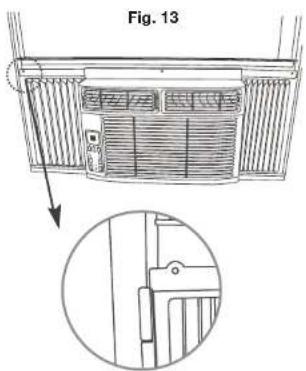
Trim the weather seal (6"X3/4"X1/12") with a proper length, peel off the protective backing and plug any gaps if needed as shown FIG.13.

Remote control description
1 On/off
2 Adjust temp & time
3 Sets mode
(Cool, Energy Saver, Fan Only y Sleep)
4 Light
5 Sets fan speed
6 Activates timer

Removing the air conditioner from window
- Turn the air conditioner off, and disconnect power cord.
- Remove sash seal from between windows, and unscrew sash lock. Remove screws installed through frame and framelock.
- Close (slide) side panels into frame.
- Keeping a firm grip on air conditioner, raise sash and carefully remove.
- Be careful not to spill any condensate water while lifting unit from window. Store parts WITH air conditioner.
49 electrolux control panel description
how to use electrolux 50
Control panel description
1 Adjust time & temperature
2 Activate timer
3 Check filter reset button
4 Sets mode
5 Display: Shows timer and temperature
6 Sleep function
7 Sets fan speed
8 On/off

8.000 y 12.000 btu/h models
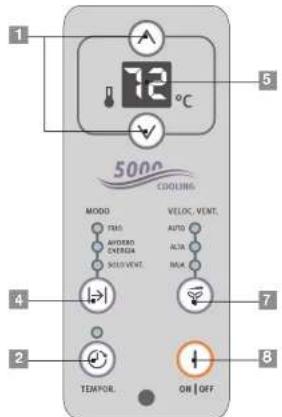
5.000 btu/h models
How to use
The following instructions represent the Touch Pad, the same instructions can be used for the Remote Control.
To turn unit on Press "On/Off" pad.

To change temperature setting: Press "∧" to raise. Press "∨" to lower.
Note: Tap or hold either up(∧) or down(∨) button until the desired temperature is seen on the display. This temperature will be automatically maintained anywhere between 60 °F (16 °C) and 90 °F (32 °C). If you want the display to read the actual room temperature. See "To Operate on Fan Only" section on Page 6.
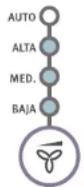
To adjust fan speed: Press "Fan speed" to select fast or slow.


To use fan feature
Press "Fan button" and choose auto. Fan starts at High Speed and adjusts to a slower speed as the room temperature dictates. For example, if the room doesn't get too warm, it will stay at the slowest speed. If the room temperature rises quickly, such as a door being opened, it will
automatically go to the highest speed. The fan speeds will re-adjust back to the slowest speed as the room returns to the original set temperature. Press either the fan slower or fan faster button to adjust the fan speed manually.
VELOC.
VENT.
8.000 y 12.000 btu/h models
VELOC. VENT.

5.000 btu/h
models
To operate on fan only
Press mode button an choose fan only.
Use this function only when cooling is not desired, such as for room air circulation or to exhaust stale air on some models. (Remember to open the vent during this function, but keep it closed during cooling for maximum cooling efficiency.) You can choose any fan speed you prefer. (Except "Auto Fan") During this function, the display will show the actual room temperature, not the set temperature as in the cooling mode.


MODO
To use energy saver feature
Press mode button and choose energy saver.
In this mode, the fan will continue to run for 1 minute after the compressor shuts off. The fan then cycles on for 20 seconds at 10 minute intervals until the room temperature is above the set temperature, at which time the compressor turns back on and cooling starts.
Delay stop/start feature
Press timer button and press temp/timer set button.
To adjust timer setting, tap or hold the UP arrow (∧) or the DOWN arrow (√) to change delay timer at 0.5 hour increments, up to 10 hours, then at 1 hour increments up to 24 hours. The control will count down the time remaining until start (8, 7.5, 7, etc.). The Delay Start mode automatically selects cooling with maximum Fan Speed. The temperature maintained will be the same as previously set. To change the set temperature, press "COOL" then Up or Down arrows until the desired temperature is indicated on the display. After 5 seconds, the control will automatically change the display back to the hours remaining until the unit will start/stop. Turning the unit "ON" or "OFF" at any time will cancel the Delay Start/Stop function. The Delay Start/Stop Feature will work until the unit either starts or stops. Once that happens, the above steps have to be repeated again.


SOLO VENT.

TEMPOR.


For Delay Stop, the unit must be in the On position.
For Delay Start, the unit must be in the Off position.
Sleep feature (only some models)
Press sleep button.
In this mode, the selected
temperature will increase by 2 °F
30minutes after the mode is selected. The temperature will then increase by another 2 °F after an additional 30 minutes.
This new temperature will be maintained for 7 hours before it returns to the originally selected temperature. This ends the "Sleep" mode and the unit will continue to operate as originally programmed. The "Sleep" mode program can be cancelled at any time during operation by again pressing the "Sleep" button.
Check filter feature (only some
models)
Press check filter button.
This feature is a reminder to clean the Air Filter (See Care and Cleaning) for more efficient operation. The LED (light) will illuminate after 250 hours of operation. To reset after cleaning the filter, press the "Check Filter" button and the light will go off.

DORMIR

LIMPAR
FILTRO
Additional things you should know
Now that you have mastered the operating procedure, here are more features in your control that you should become familiar with.
- The "Cool" circuit has an automatic 3 minute time delayed start if the unit is turned off and on quickly. This prevents overheating of the compressor and possible circuit breaker tripping. The fan will continue to run during this time.
- There is a 2-Second delay for the compressor shutting down when selecting FAN ONLY. This is to cover the possibility of having to roll through to select another mode.
- The control will maintain the set temperature within 2 degrees Fahrenheit, between 60F and 90F degrees.
- The control is capable of displaying temperature in degrees Fahrenheit or degrees Celsius. To convert from one to the other and back, press and hold the "TEMP/TIMER" Up (∧) and Down (∨) buttons together for 3 seconds.
- After a power outage, the unit will memorize the last setting and return the unit to the same setting once power is restored.
Air Directional Louvers
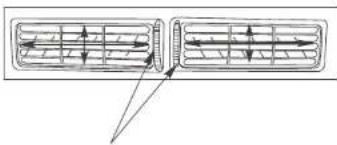
Air directional louvers control air flow direction. Your air conditioner has the louver type described below.
Auger Type
The louvers will allow you to direct the air flow Up or Down and Left or Right throughout the room as needed. Rotate the Auger Wheels until the desired Left/Right direction is obtained. Pivot horizontal louvers until the desired Up/Down direction is obtained.
natural_image
Diagram of a car air vent with airflow arrows indicating direction (no text or labels)Auger wheels
8-WAY for 8000 and 12000 Btu/h models
2-WAY for 5000 Btu/h models

55 electrolux care and cleaning
care and cleaning electrolux 56
Care and cleaning
Clean your air conditioner occasionally to keep it looking new. Be sure to unplug the unit before cleaning to prevent shock or fire hazards.

Air Filter Cleaning
The air filter should be checked at least once a month to see if cleaning is necessary. Trapped particles in the filter can build up and cause an accumulation of frost on the cooling coils.
For 5000 Btu/h models:
- Remove filter by sliding out from the right side.
- Wash the filter using liquid dishwashing detergent and warm water. Rinse filter thoroughly. Gently shake excess water from the filter. Be sure filter is thoroughly dry before replacing.
- Or instead of washing, you may vacuum the filter clean.
For 8000 or 12000 Btu/h models:
- Push the vent handle to the Vent Closed position (where applicable).
- Open the front panel.
- Grasp the filter by the center and pull up and out.
- Wash the filter using liquid dishwashing detergent and warm water. Rinse filter thoroughly. Gently shake excess water from the filter. Be sure filter is thoroughly dry before replacing.
- Or instead of washing, you may vacuum the filter clean.

natural_image
Line drawing of a hand inserting air filters into a fan (no text or symbols)Cabinet Cleaning
- Be sure to unplug the air conditioner to prevent shock or
fire hazard. The cabinet and front may be dusted with an oil-free cloth or washed with a cloth dampened in a solution of warm water and mild liquid dishwashing detergent. Rinse thoroughly and wipe dry.
- Never use harsh cleaners, wax or polish on the cabinet front.
- Be sure to wring excess water from the cloth before wiping around the controls. Excess water in or around the controls may cause damage to the air conditioner.
- Plug in air conditioner.
Winter Storage
If you plan to store the air conditioner during the winter, remove it carefully from the window according to the installation instructions. Cover it with plastic or return it to the original carton.

57 electrolux normal sounds
solutions for problems electrolux 58
Normal sounds

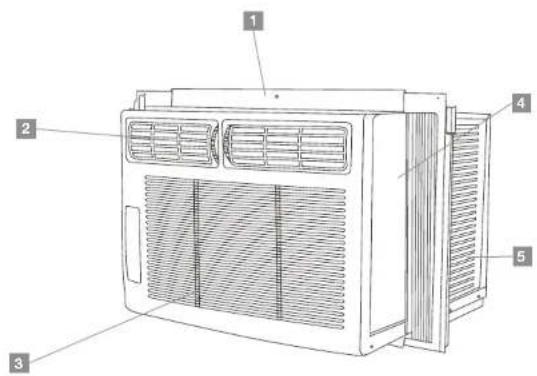
1 High pitched chatter
Today's high efficiency compressors may have a high pitched chatter during the cooling cycle.
2 Sound of rushing air
At the front of the unit, you may hear the sound of rushing air being moved by the fan.
3 Gurgle/Hiss
"Gurgling or hissing" noise may be heard due to refrigerant passing through evaporator during normal operation.
4 Vibration
Unit may vibrate and make noise because of poor wall or window construction or incorrect installation.
5 Pinging or Swishing
Droplets of water hitting condenser during normal operation may cause "pinging or swishing" sounds.
Solutions for problems
Before calling for service, review this list. It may save you time and expense. This list includes common occurrences that are not the result of defective workmanship or materials in this appliance.
Problem Solution
| Air conditioner will not operate. | 1. Wall plug disconnected. Push plug firmly into wall outlet.2. Plug Current Device Tripped. Press the RESET button.3. House fuse blown or circuit breaker tripped. Replace fuse with time delay type or reset circuit breaker.4. Control is OFF. Turn Control ON and set to desired setting. |
| Air from unit does not feel cold enough. | 1. Room temperature below 60°F (16°C). Cooling may not occur until room temperature rises above 60°F (16°C).2. Temperature sensing element touching cold coil, located behind air filter. Straighten away from coil.3. Reset to a lower temperature.4. Compressor shut-off by changing modes. Wait approximately 3 minutes and listen for compressor to restart when set in the COOL mode. |
| Air conditioner cooling, but room is too warm - ice forming on cooling coil behind decorative front. | 1. Outdoor temperature below 60 O F (16 O C). To defrost the coil, set FAN ONLY mode.2. Air filter may be dirty. Clean filter. Refer to Care and Cleaning section. To defrost, set to FAN ONLY mode.3. Temperature is set too low for night-time cooling. To defrost the coil, set to FAN ONLY mode. Then, set temperature to a higher setting. |

| Problem | Solution |
| Air conditioner cooling, but room is too warm - NO ice forming on cooling coil behind decorative front. | Dirty air filter - air restricted. Clean air filter. Refer to Care and Cleaning section.Temperature is set too high. Set temperature to a lower setting.Air directional louvers positioned improperly. Position louvers for better air distribution.Front of unit is blocked by drapes, blinds, furniture, etc. - restricts air distribution. Clear blockage in front of unit.Doors, windows, registers, etc. open - cool air escapes. Close doors, windows, registers, etc.Unit recently turned on in hot room. Allow additional time to remove “stored heat” from walls, ceiling, floor and furniture. |
| Air conditioner turns on and off rapidly. | Dirty air filter - air restricted. Clean air filter.Outside temperature extremely hot. Set FAN speed to a faster setting to bring air through cooling coils more frequently. |
| Noise when unit is cooling. | Air movement sound. This is normal. If too loud, set to lower FAN setting.Window vibration - poor installation. Refer to installation instructions or check with installer. |
| Water dripping INSIDE when unit is cooling. | Improper installation. Tilt air conditioner slightly to the outside to allow water drainage. Refer to installation instructions or check with installer. |
| Water dripping OUTSIDE when unit is cooling. | Unit removing large quantity of moisture from humid room. This is normal during excessively humid days. |
| Problem | Solution |
| Room too cold. | 1. Set temperature too low. Increase set temperature.2. Remote Sensing activated (on some models) and remote control located in Hot Spot - Relocate remote control or deactivate remote sensing. |
| Fault codes. | 1. If the display reads "AS" or "ES", a sensor has failed. Contact your Authorized Electrolux Service Center. |
Informaciones técnicas / Technical informations
| Modelo/Model | EAW05E3AJW |
| Ciclo / Cycle | Frio / Cooling |
| Voltaje - Frecuencia / Voltage-Frequency | 115 V / 60 Hz |
| Peso neto / Net weight | 15,5 kg |
| Dimensiones / Dimensions | 406 x 306 x 335 mm |
| Capacidad / Capacity | 5000 Btu/h |
| Potencia / Power | 515 W |
| Corriente / Current | 4,8 A |
| Refrigerante / Refrigerant | R410A / 245 g |
| Modelo/Model | EAW0BE3AJW |
| Ciclo / Cycle | Frio / Cooling |
| Voltaje - Frecuencia / Voltage-Frequency | 115 V / 60 Hz |
| Peso neto / Net weight | 21,5 kg |
| Dimensiones / Dimension | 530 x 452 x 365 mm |
| Capacidad / Capacity | 8000 Btu/h |
| Potencia / Power | 815 W |
| Corriente max. / Max. current | 7,4 A |
| Refrigerante / Refrigerant | R410A / 365 g |
| Modelo/Model | EAW12E3AJW |
| Ciclo / Cycle | Frio / Cooling |
| Voltaje - Frecuencia / Voltage-Frequency | 115 V / 60 Hz |
| Peso neto / Net weight | 29,4 kg |
| Dimensiones / Dimensions | 482 x 372 x 545 mm |
| Capacidad / Capacity | 12000 Btu/h |
| Potencia / Power | 1220 W |
| Corriente max. / Max. current | 11 A |
| Refrigerante / Refrigerant | R410A / 510 g |
ANOTACIONES / NOTES
| ANOTACIONES / NOTES |
- The Electrolux Group.
- Electrolux
- Cómo usar
- Welcome to the world of simple handling and no worries.
- Environmental advice
- Contents
- Security
- Plug in power plug properly:
- Do not direct airflow at room
- Operation of current device
- Electrical safety rules
- Caution
- Attention
- Care before mounting
- Installation
- Left and right filler panel assembly
- Storm window
- Remote control description
- Removing the air conditioner from window
- Control panel description
- How to use
- To use fan feature
- To operate on fan only
- To use energy saver feature
- Delay stop/start feature
- Sleep feature (only some models)
- Check filter feature (only some
- models)
- Additional things you should know
- Air Directional Louvers
- Auger Type
- Care and cleaning
- Air Filter Cleaning
- For 5000 Btu/h models:
- For 8000 or 12000 Btu/h models:
- Cabinet Cleaning
- Winter Storage
- Normal sounds
- Solutions for problems
- Informaciones técnicas / Technical informations
Brand : ELECTROLUX
Model : EAW08E3AJW
Category : Air conditioner