L32HE13I - Television Logik - Free user manual and instructions
Find the device manual for free L32HE13I Logik in PDF.
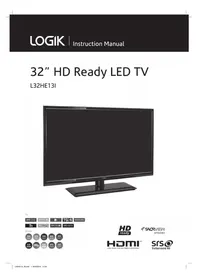


| Product Type | LED Television |
| Brand | Logik |
| Model | L32HE13I |
| Screen Size | 32 inches (81 cm) |
| Display Resolution | 1366 x 768 pixels (HD Ready) |
| Aspect Ratio | 16:9 |
| Refresh Rate | 60 Hz |
| Connectivity | 2 x HDMI, 1 x USB, 1 x VGA, 1 x SCART, 1 x RF In, 1 x Composite, 1 x Audio Out (3.5mm) |
| Tuner | DVB-T/T2/C |
| Audio Output | 2 x 6W speakers |
| Power Consumption | 30W (typical), 0.5W standby |
| Power Supply | AC 100-240V, 50/60Hz |
| Dimensions (with stand) | 732 x 482 x 185 mm |
| Dimensions (without stand) | 732 x 440 x 83 mm |
| Weight (with stand) | 5.2 kg |
| Weight (without stand) | 4.8 kg |
| VESA Mount | 100 x 100 mm |
| Energy Class | A+ |
| Remote Control | Included (batteries not included) |
| Cleaning Instructions | Wipe with a soft, dry cloth. Do not use liquid cleaners. |
| Safety Features | Child lock, auto power-off, anti-tip strap included |
| Spare Parts Availability | Contact Logik support or authorized service centers |
| Warranty | 1 year from date of purchase |
Frequently Asked Questions - L32HE13I Logik
User questions about L32HE13I Logik
0 question about this device. Answer the ones you know or ask your own.
Ask a new question about this device
Download the instructions for your Television in PDF format for free! Find your manual L32HE13I - Logik and take your electronic device back in hand. On this page are published all the documents necessary for the use of your device. L32HE13I by Logik.
USER MANUAL L32HE13I Logik
TV
RTÉ ONE
RTÉ TWO
K
TG4
RTE NEWS NOW
3e
MTE rto
RTÉ ONE
RTÉ AERTEL
Radio


SAORVIEW
APPROVED
HDMI™
HIGH DEFINITION MULTIMEDIA INTERFACE
SRS

TruSurround HD
WE KNOW HOW TO HELP YOU WITH YOUR TV
We want you to be able to enjoy your new TV for many years. From getting it home and setting it up, to helping you get the most out of your new purchase. And in the unlikely event your product lets you down, we can get it working again in no time.
Here are some of our TV services but if you want to know more look us up at knowhow.com/ie or call us on: 1 890 818 575
TV SET UP TO STAND & DEMO
We'll assemble the stand and connect your new TV to the existing equipment. We'll tune your TV so it's ready to watch. We'll also give you a demonstration of your new TV's functions.
TV WALLMOUNT & DEMO
We'll fix your TV to a suitable position on the wall and connect to your existing equipment, so it's all ready to go. We'll use neat wire management so you don't have to look at any untidy cabling and to complete your fuss-free installation, we'll test and demonstrate your TV's functions.
TV & HOME CINEMA INSTALLATION
We'll un-box, connect and set up your new and existing equipment. We'll then configure, calibrate and optimise the equipment. To avoid ugly trailing cables, we'll clip them to your skirting board, if you'd like us to. Then we'll give you a demonstration.
FAULT & FIX SERVICES
With our FAULT & FIX services, we can repair a wide range of products at our new state-of-the-art repair lab. This service is available for:
- Desktops PCs
- Laptops
- Netbooks
- TVs
- Games consoles

KNOWHOW®

Contents
Safety Warnings 5
Unpacking the TV....7
Installing / Removing the Base Stand 8
Mounting the TV to a Wall 8
Front / Right Side View and Controls 9
Rear View and Sockets....10
Installing Batteries in the Remote Control....11
Remote Control Operation Range....11
Remote Control 12
Turning the TV On for the First Time....14
- Connecting an Analogue Device....15
– Channel Selection ....16
- Display Channel Information ....16
– Volume Adjustment....16
Menus....17
– Picture Menu ....17
- Sound Menu....17
- Channel Menu....17
- Feature Menu....18
- Setup Menu....18
Picture Settings - Picture Menu....19
Sound Setting - Sound Menu....20
EPG (Electronic Programme Guide) (DTV Mode) 21
- Switch On / Off EPG....21
- Select a Programme ....21
Time Shift Recording onto a USB Storage Device....22
- Auto TimeShift....22
Recording DTV Programmes onto a USB Storage Device 23
Timer Programming 24
Playing Recorded Programmes 25
Digital Teletext (DTV Mode)....26
- Teletext within Digital Service....26
Listening to the Radio ....26
- CI (Common Interface) (DTV Mode)....27
- Software Upgrade (USB) 28
Clock Settings....28
– HDMI CEC (Consumer Electronics Control) (HDMI Mode) 29
- Restore Factory Default....29
Lock Setting....30
- Lock System 30
- Changing the Pin Code....31
Channel Management ....31
Favorite Channel Management ....32
- Renaming your favorite list.... 32
Connecting a USB Storage Device....32
Media mode - Viewing Photos ....33
Media mode - Listening to Music....34
Media mode - Viewing Movies....35
Media mode - Viewing eBooks ....36
Maintenance....36
Hints and Tips....37
Specifications....38

Safety Warnings
- Read all the instructions carefully before using the unit and keep them for future reference.
- Retain the manual. If you pass the unit onto a third party make sure to include this manual.
- Check that the voltage marked on the rating label matches your mains voltage.
Damage
- Please inspect the unit for damage after unpacking.
- Do not continue to operate the unit if you are in any doubt about it working normally, or if it is damaged in any way - switch off, withdraw the mains plug and consult your dealer.
Location of Unit
- The unit must be placed on a flat stable surface and should not be subjected to vibrations.
- Do not place the unit on sloped or unstable surfaces as the unit may fall off or tip over.
- The mains socket must be located near the unit and should be easily accessible.
- This unit is designed for indoor, domestic use only.
Temperature
- Avoid extreme degrees of temperature, either hot or cold. Place the unit well away from heat sources such as radiators or gas / electric fires.
- Avoid exposure to direct sunlight and other sources of heat.
Naked Flames
- Never place any type of candle or naked flame on the top of or near the unit.
Moisture
• To reduce the risk of fire, electric shock or product damage, do not expose this unit to rain, moisture, dripping or splashing. No objects filled with liquids, such as vases, should be placed on the unit. - If you spill any liquid into the unit, it can cause serious damage. Switch it off at the mains immediately. Withdraw the mains plug and consult your dealer.
Ventilation
• To prevent the risk of electric shock or fire hazard due to overheating, ensure that curtains and other materials do not obstruct the ventilation vents. - Do not install or place this unit in a bookcase, built-in cabinet or in another confined space. Ensure the unit is well ventilated. - Make sure that there is a gap of at least 10 cm on both sides and a gap of 20 cm at the top.

Safety
• Always disconnect the unit from the mains supply before connecting / disconnecting other devices or moving the unit. - Unplug the unit from the mains socket during a lightning storm.
Mains Cable
- Make sure the unit or unit stand is not resting on top of the mains cable, as the weight of the unit may damage the mains cable and create a safety hazard.
- If the mains cable is damaged it must be replaced by the manufacturer, its service agent, or similarly qualified persons in order to avoid a hazard.
Interference
- Do not place the unit on or near appliances which may cause electromagnetic interference. If you do, it may adversely affect the operating performance of the unit, and cause a distorted picture or sound.
Optimum Viewing
- View the unit in moderate light to prevent eye strain. It is recommended to watch the unit from a distance 3-7 times that of the screen height.
LCD Screen
- The LCD screen is manufactured using high-precision technology. However, some tiny black points and / or bright points (red, blue or green in colour) may constantly appear on the LCD screen. These points are generated in the manufacturing process and are normal.
Screen Burn
- A characteristic of Plasma and TV Panels is that displaying the same image for a long time may cause a permanent after-image to remain on the screen. This is called screen burn. Most pictures shown on the unit will be constantly moving and fill the screen.
• Examples of images that you need to watch out for are as follows (this is not an all-inclusive list):
- Black Bars: If black bars appear at the left / right or top / bottom of the screen, it is recommended to change the format so that the picture fills the entire screen.
- TV Channel Logos: e.g. Shopping channel logos and pricing displays - especially if they are bright and stationary. Moving or low-contrast graphics are less likely to cause ageing of the screen.
3. Time Displays
- Teletext: Do not view a stationary page for long periods of time.
5. TV Menus
- Pause Mode: Do not leave the screen in pause mode for long periods of time, e.g. when watching videos.
• To prevent screen burn if viewing any of the above for long periods of time, reduce contrast and brightness when viewing. Once burn-in occurs it will never disappear completely.
Standby
- The ⏻ button on the remote control does not switch off the unit completely. The unit will continue to draw electricity from the mains supply while in standby. In the interests of safety and to avoid unnecessary energy consumption, never leave the unit in standby while unattended for long periods of time, e.g. overnight, while on holiday or while out of the house. Disconnect the mains plug from the mains socket.
Batteries
- Batteries used in the remote control for this unit are easily swallowed by young children and this is dangerous.
- Keep loose batteries away from young children and make sure that the battery holder tray is secure in the remote control. Seek medical advice if you believe a cell has been swallowed.
- Please dispose of batteries correctly by following the guidance in this manual.
- The batteries shall not be exposed to excessive heat such as sunshine, fire or the like.
Supervision
Children should be supervised to ensure that they do not play with the unit and the remote control. Never let anyone, especially children, push anything into the holes, slots, or any other openings in the case - this could result in a fatal electric shock.


The lightning flash with arrowhead symbol, within an equilateral triangle, is intended to alert the user to the presence of uninsulated "dangerous voltage" within the unit's enclosure that may be of sufficient magnitude to constitute a risk of electric shock.

The exclamation point within an equilateral triangle is intended to alert the user to the presence of important operating and maintenance (servicing) instructions in the manual accompanying the unit.
Service
- To reduce the risk of electric shock, do not remove screws. The unit does not contain any user-serviceable parts. Please leave all maintenance work to qualified personnel.
- Do not open any fixed covers as this may expose dangerous voltages.
Maintenance
- Ensure to unplug the unit from the mains socket before cleaning.
- Do not use any type of abrasive pad or abrasive cleaning solutions as these may damage the unit's surface.
- Do not use liquids to clean the unit.
- The wall socket plug is used as a disconnect device, the disconnect device should be readily accessible.
- This equipment is a Class II or double insulated electrical appliance. It has been designed in such a way that it does not require a safety connection to electrical earth.
To prevent the spread of fire, keep candles or other open flames away from this product at all times.
Thank you for purchasing your new Logik 32" HD Ready LED TV.
Your new TV has many features and incorporates the latest technology to enhance your viewing experience. We recommend that you spend some time reading this instruction manual so that you fully understand these features. You will also find some hints and tips to help you resolve any issues.
Read all the safety instructions carefully before use and keep this instruction manual for future reference.

Unpacking the TV
Remove all packaging from the TV. Retain the packaging. If you dispose of it please do so according to local regulations.
The following items are included:

TV
TV Stand
Remote Control / AAA Batteries x 2
Screw x 5 Component Adapter Cable
(YPbPr)
Composite Adapter Cable (AV)

Instruction Manual Quick Start Guide


If items are missing, or damaged please contact Partmaster (UK only). Tel: 0844 800 3456 for assistance.

Installing / Removing the Base Stand

The LCD display is very fragile, and must be protected at all times when installing and removing the base stand. Be sure that no hard or sharp object, or anything that could scratch or damage the LCD display, comes into contact with it. DO NOT exert pressure on the front of the TV at any time because the screen could crack.
- Disconnect all cables connected to the TV.
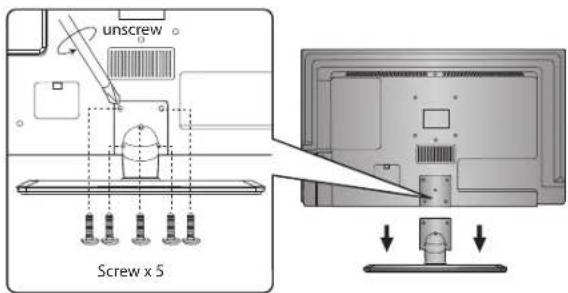
- Lay the TV down on a flat surface ideally on the edge of a table so the base of the TV slightly overhangs the edge of the table, with the back side facing up. Please make sure a soft cushioned material (such as a dry bath towel or thick piece of foam) is placed beneath the screen.
- To install the TV stand, place the stand into the stand recess on the back of the TV.
- Secure the stand using the 5 screws provided.


Mounting the TV to a Wall

Remove the stand assembly before mounting the TV onto the wall.
- To remove the stand assembly, untighten the 5 screws holding the stand assembly to the rear of the TV. Slide the stand assembly out.

Keep all the spare screws should you want to use the stand assembly option.
- Mounting on the wall. This TV is designed to be wall-mounted with a standard 100 mm x 100 mm mounting kit (sold separately) designed for flat-panel TVs. Mount this TV according to the instructions included in the mounting kit. Due to space restrictions, we recommend that you make all connections before mounting on to the wall.


- Please read this instruction manual carefully while setting up your TV.
- If you require additional assistance please call our Call Centre on 1 890 818 575. Our Customer Contact Centre is open Monday-Saturday 8am-8pm or Sunday 8am-6pm.

Front / Right Side View and Controls

Item Description
| 1 POWER LED | Illuminates blue when the TV is turned on. Illuminates red when the TV is in standby mode. The LED will illuminate blue and then blink red and blue confirming that a timer recording programme has started in the standby mode. |
| 2 IR (Infrared Receiver) | Receives IR signals from the remote control.Do not put anything near the sensor, as its function may be affected. |
| 3 SOURCE | Press to select among different input signal sources:DTV / ATV / AV / SCART / YPBPR / HDMI 1 / HDMI 2 / HDMI 3 / PC / USB.Confirmed the selection on OSD menu. |
| 4 MENU Displays the OSD (on screen display) menu. | |
| 5 V + / - | Adjusts the volume.Press to select and adjust a setting in the OSD menu. |
| 6 CH + / - Press to select a channel or select a sub-menu from the OSD menu. | |
| 7 STANDBY Switches the TV on or into standby mode. | |
Rear View and Sockets

Item Description
1 Headphone Connect headphones to listen to your TV without disturbing others.
2 HDMI 1 / HDMI 2 / HDMI 3 Connects to a High-Definition (HD) signal output device, such as a set-top box, blu-ray disc player or AV receiver.
3 SCART Connects to a VCR, DVD Player, or other AV device with a SCART output socket.
4 Coaxial Out Connects to the audio socket on the digital/standard 5.1 audio system.
5 YPbPr Connects to a DVD player, Digital Set-Top-Box, or other AV devices with component (YPbPr) video and audio output sockets.
6 AV IN Connects to the Composite output sockets on external video devices.
7 CICARD In Allows the insertion of a Common Access Module.
8 RF In Connects to the aerial socket on the wall with the RF coaxial cable.
9 PC-RGB In / PC AUDIO In Connects to a computer or other devices with a VGA interface.
10 USB Allows the insertion of a USB storage device to play video, audio, photo and text files (USB mode) and record DTV programmes on to a USB storage device.

Installing Batteries in the Remote Control
- Press and lift the back cover to open the battery compartment of the remote control.
- Insert two AAA size batteries. Make sure to match the (+) and (-) ends of the batteries with the (+) and (-) ends indicated in the battery compartment.
- Close the battery compartment cover.

Handling the Batteries
- Improper or incorrect use of batteries may cause corrosion or battery leakage, which could cause fire, personal injury or damage to property.
- Only use the battery type indicated in this manual.
- When the batteries are exhausted, the remote will not function. Replace both batteries at the same time with new ones.
- Do not install new batteries with used ones and do not mix different types of batteries.
- Do not dispose of used batteries as domestic waste. Dispose of them in accordance with local regulations.


Handling the Remote Control
• Take care of your fingernails when you press and hold the battery release tab. - Do not drop or cause impact to the remote control. - Do not spill water or any liquid on the remote control. - Do not place the remote control on a wet object. - Do not place the remote control under direct sunlight or near sources of excessive heat. - Remove the battery from the remote control when not in use for a long period of time, as it could cause corrosion or battery leakage and may result in physical injury and/or property damage including fire.

Remote Control Operation Range
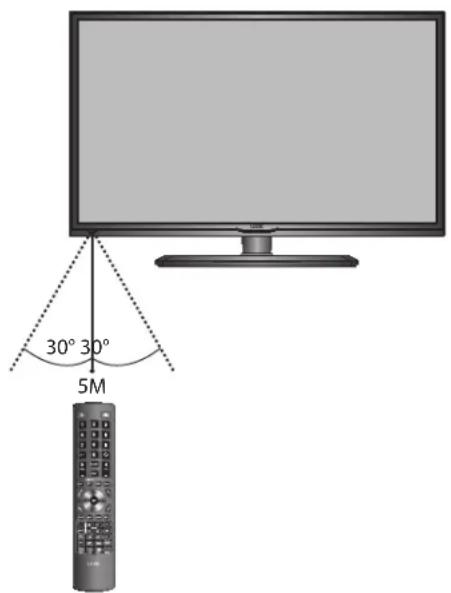
Point the remote control at the TV no more than 5 metres from the remote control sensor on the TV and within 60° in front of the TV. The operating distance may vary depending on the brightness of the room.
Remote Control
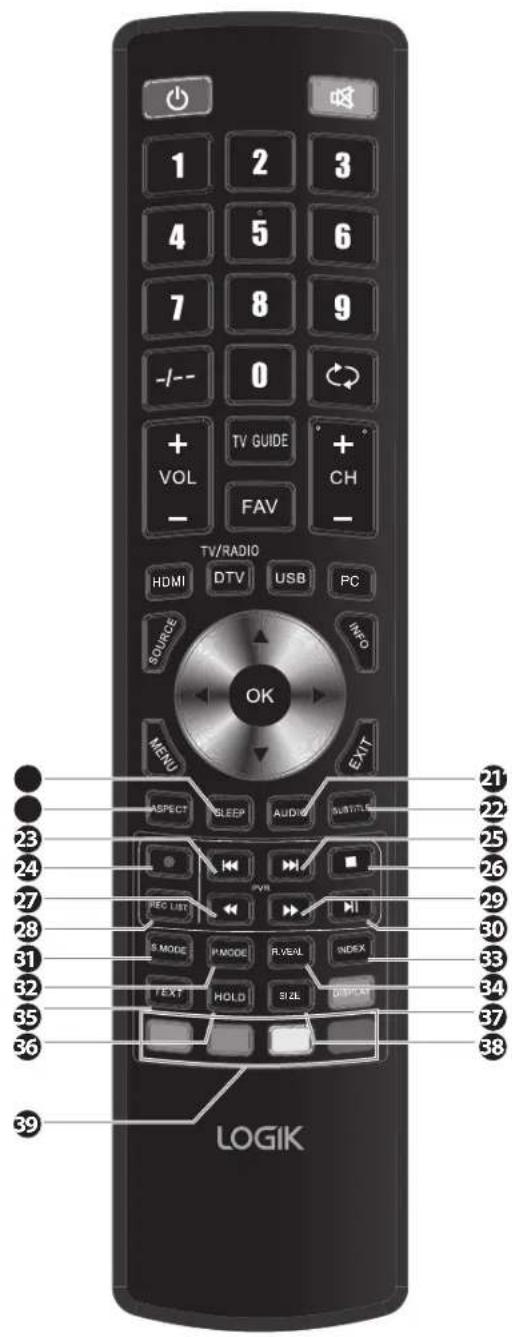
- Power button: Switch the TV between on and standby mode.
- MUTE: Mute and restore your TV sound.
- Number buttons 0-9: Press to select a programme (DTV / RADIO mode).
- -/--: Feature not available.
- RECALL: Return to the previous viewing channel (DTV mode).
- TV GUIDE: Display the EPG (Electronic Programme Guide) (DTV mode).
- VOL + / -: Adjust the volume.
- CH + / -: Select a channel.
- FAV Display the favourite channel list. (DTV mode)
- DTV (TV/RADIO) A short-cut to switch input source to TV / Digital radio channels. (DTV mode)
- HDMI A short-cut to switch input source to HDMI 1, 2, or 3.
- PC A short-cut to switch input source to PC.
- USB A short-cut to switch input source to TV / Digital radio channels. (DTV mode)
- SOURCE Select among the different input signal sources: DTV / ATV / AV / SCART / YPBPR / HDMI 1 / HDMI 2 / HDMI 3 / PC / USB.
- INFO • Display the present channel information such as the current time and channel name. (DTV mode)
- Allow you to navigate the OSD menus and adjust the system settings to your preference.
OK - Confirm the selection in the OSD menus. - Display channel list. (DTV / RADIO mode)
- MENU • Display the OSD (On Screen Display) menu. • Return to the previous menu in the OSD menus.
- Exit Exit the OSD menu.

19. SLEEP
Set the TV sleep timer: OFF / 10 / 20 / ... / 180 / 240 min.
20. ASPECT
Watch the screen in various formats: Auto / 4:3 / 16:9 / Zoom / Smart Zoom / Subtitle.
21. AUDIO
- Switches between the audio languages (only applicable when the TV programme / disc has this feature). (DTV)
22. SUBTITLE
- Select subtitles which are broadcast with the programme. (DTV mode)
23.
To skip to the beginning of the previous track / photo. (USB mode)
24.
Record the current programme. (DTV mode)
25.
To skip to the beginning of the next track / photo. (USB mode)
26.
To stop the playback or recording. (DTV / USB mode)
27.
To reverse playback rapidly. (USB mode)
28. REC LIST
Display the record list. (DTV mode)
29.
To advance playback rapidly. (USB mode)
30.
- To start the timeshift playback. (DTV mode) - To start playback or pause. (DTV mode)
31.S.MODE
Short cut to preset sound modes.
32. P.MODE
Short cut to preset picture modes.
33. INDEX
Function not available.
34. R.VEAL
Function not available.
35. TEXT
Turn on and off the teletext function. (DTV mode)
36. TEXT HOLD
Freeze a multi-page passage on screen in teletext. (Feature not available)
37. DISPLAY
Switches the display on/off. (Radio mode)
38. SIZE
Function not available.
39. Coloured buttons
Access the TELETEXT items (DTV mode) or menu options.

Turning the TV On for the First Time
- Connect one end of the RF coaxial cable to the aerial socket on the wall and the other end of the cable to the AERIAL IN socket at the rear right bottom view of your TV.
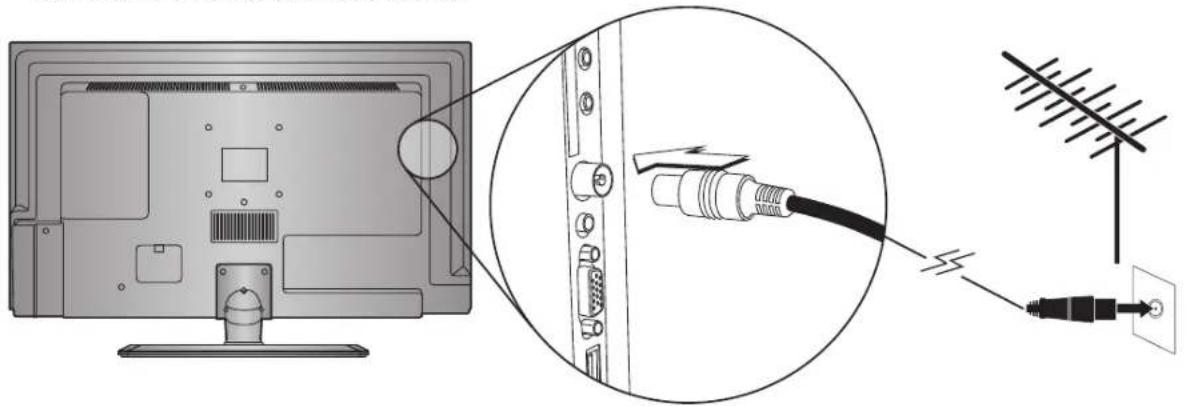
- Connect the mains cable to the mains socket after you have completed all the connections.
- In standby mode, press the ⏻ button on the remote control to turn the TV on. The red LED indicator will turn blue.


Do not connect the TV to the mains supply until you have completed all the connections.

• Always disconnect the TV from the mains socket when not in use for a long period of time. - The STANDBY button on the front right side panel of the TV or the ⏻ button on the remote control is only used for switching the TV into standby, it does not disconnect the TV from the mains power. To completely disconnect the mains power, please remove the mains plug from the mains socket.
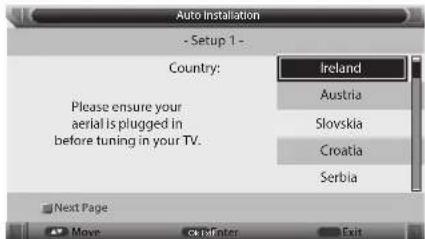
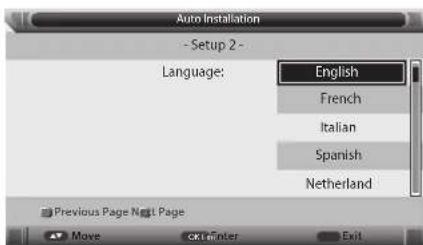
The first time you turn the TV on, the above menu will appear on the screen.
Please ensure the aerial is plugged in.
- Press the ▲▼ buttons to select your desired country. The default country is Ireland. Then press OK.
- Press the ▲▼ buttons to select your desired language. The default language is English. Then press OK.
- Press the OK button. Your TV will now start to tune in all available channels.
The tuning menu will appear, and the tuning process will take a few minutes. When a picture appears, your TV has finished tuning.
Connecting an Analogue Device
If you have connected an analogue device such as a video recorder via the aerial socket on your TV, you will have to tune it in using ATV mode. Ensure the device is switched on before you start the tuning process.
- Press the SOURCE button, press the ▲▼ buttons to select ATV, and press OK.
- Press the MENU button, then press the ▲▼ buttons to select CHANNEL and press OK.
- Press the ▲▼ buttons to select ATV MANUAL SEARCH and press OK.
- Press the ▲▼ buttons to select SEARCH, then press OK. Press the ◀▶ buttons to start the search for your device. The search will automatically stop when the device is found.
- Press the EXIT button to exit the menu.


Channel Selection
- Press the CH + / - buttons on the remote control repeatedly or the 0-9 buttons to select the channel.

Alternative
Press the OK button to enter the Channel List. Then use the ▲▼ buttons to highlight and select the channel. Press the OK button to view the selected channel.
- If a blocked channel is selected, the password screen will be displayed. Press the 0-9 buttons to enter the password, the channel will then be unlocked (refer to Channel Management for details).
- Press the FAV button to view the Favourite List. Then use the ▲▼ buttons to highlight and select the channel. Press the OK button to view the selected channel, the Favourite List will be blank unless you have added your favorites.
- Press the ⬇ button to return to the previously viewed channel.
Display Channel Information
- Press the INFO button to view the current information.
Volume Adjustment
- Press the V + or – button on the right side panel of the TV or the VOL + or – button on the remote control to adjust the volume.
- If you wish to switch the sound off, press the MUTE button. Press the MUTE button again or the VOL + or - button to resume audio listening.
To access the menu press the MENU button. The main is split into 5 sub menus, PICTURE - SOUND - CHANNEL - FEATURE - SETUP. To select a sub menu press the ▼ button to highlight the desired menu and then press OK to enter the menu. The menus are shown below.
Picture Menu

Picture mode: Dynamic - Standard - Mild - User
Brightness: Only accessible if User was selected from Picture Mode.
Contrast: Only accessible if User was selected from Picture Mode.
Sharpness: Only accessible if User was selected from Picture Mode.
Colour: Only accessible if User was selected from Picture Mode.
Tint: Only accessible if User was selected from Picture Mode.
Colour Temperature: Standard - Cool - Warm.
Aspect ratio: Auto - 4:3 - 16:9 - Full - Zoom 1 - Zoom 2 - Cinema - Just Scan.
Noise Reduction: Off - Low - Middle - High
Sound Menu

Sound mode: Standard - Movie - Music - Speech - User - Auto.
Bass: Only accessible if User was selected from Sound Mode.
Treble: Only accessible if User was selected from Sound Mode.
Balance: Adjusts the sound from left and right speakers.
SRS TruSurround HD: On - Off.
SPDIF: Off - PCM - Auto - Multi.
Channel Menu

Channel Management: Opens the Channel Manager menu.
Favorite Management: Opens the Favorite Manager menu.
Country: Select your country from the list.
Auto Search: Opens the Auto Search menu.
DTV Manual Search: Opens the DTV Manual search menu.
ATV Manual Search: Only accessible in ATV mode. Opens the ATV Manual search menu.
- WE KNOW HOW TO HELP YOU WITH YOUR TV
- TV SET UP TO STAND & DEMO
- TV WALLMOUNT & DEMO
- TV & HOME CINEMA INSTALLATION
- FAULT & FIX SERVICES
- CONTENTS
- SAFETY WARNINGS
- DAMAGE
- LOCATION OF UNIT
- TEMPERATURE
- NAKED FLAMES
- MOISTURE
- VENTILATION
- SAFETY
- MAINS CABLE
- INTERFERENCE
- OPTIMUM VIEWING
- LCD SCREEN
- SCREEN BURN
- TIME DISPLAYS
- TV MENUS
- STANDBY
- BATTERIES
- SUPERVISION
- SERVICE
- MAINTENANCE
- UNPACKING THE TV
- INSTALLING / REMOVING THE BASE STAND
- MOUNTING THE TV TO A WALL
- FRONT / RIGHT SIDE VIEW AND CONTROLS
- REAR VIEW AND SOCKETS
- ITEM DESCRIPTION
- INSTALLING BATTERIES IN THE REMOTE CONTROL
- HANDLING THE BATTERIES
- HANDLING THE REMOTE CONTROL
- REMOTE CONTROL OPERATION RANGE
- REMOTE CONTROL
- SLEEP
- ASPECT
- AUDIO
- SUBTITLE
- REC LIST
- S.MODE
- P.MODE
- INDEX
- R.VEAL
- TEXT
- TEXT HOLD
- DISPLAY
- SIZE
- COLOURED BUTTONS
- TURNING THE TV ON FOR THE FIRST TIME
- CONNECTING AN ANALOGUE DEVICE
- CHANNEL SELECTION
- ALTERNATIVE
- DISPLAY CHANNEL INFORMATION
- VOLUME ADJUSTMENT
- PICTURE MENU
- SOUND MENU
- CHANNEL MENU
Brand : Logik
Model : L32HE13I
Category : Television