
NPB-300 - Radio Naxa - Free user manual and instructions
Find the device manual for free NPB-300 Naxa in PDF.


| Type | Portable Radio |
| Brand | Naxa |
| Model | NPB-300 |
| Dimensions (approx.) | 10.5 x 5.5 x 3.0 inches |
| Weight (approx.) | 1.2 lbs |
| Power Source | 4 x AA batteries (not included) or AC adapter (not included) |
| Audio Output | Built-in speaker, 3.5 mm headphone jack |
| Tuning Bands | AM / FM |
| Antenna | Built-in AM loop, telescopic FM antenna |
| Controls | Volume, tuning, AM/FM switch |
| Display | Analog dial with frequency markings |
| Additional Features | Carrying handle, LED power indicator |
| Care and Cleaning | Wipe with dry cloth; do not expose to water |
| Safety | Keep away from heat sources; use only specified batteries |
| Spare Parts and Repairability | Contact Naxa customer service for parts |
| General Information | For home or outdoor use |
Frequently Asked Questions - NPB-300 Naxa
User questions about NPB-300 Naxa
0 question about this device. Answer the ones you know or ask your own.
Ask a new question about this device
Download the instructions for your Radio in PDF format for free! Find your manual NPB-300 - Naxa and take your electronic device back in hand. On this page are published all the documents necessary for the use of your device. NPB-300 by Naxa.
USER MANUAL NPB-300 Naxa
It is important to read this user manual prior to using your new product for the first time.
Powering the Recorder Battery installation
1 To remove the battery compartment door(located on the cabinet bottom)press the snap tab and lift the door off the cabinet back.
-
Insert 4 "R14" (C CELL)-size batteries(not included) into the battery compartment. Be sure the (+) or cap end of each battery is installed as show on the battery diagram.
-
Replace the battery door.

natural_image
Three hand-drawn diagrams of a clipboard with clips, showing different positions (no text or symbols)NOTE: If the recorder begins to sound distorted, or the tape reels turn very slowly or not at all, be sure to check with a new set of batteries or another cassette before seeking service.
IMPORTANT: Be sure to remove the batteries when storing the set for more than a few weeks at a time. Leak batteries can dadly damage the recorder. When discarding batteries, be sure to dispose of them in the proper manner, according to provincial and local regulations.
Always push STOP before storing. This will relieve pressure on certain parts in the recorder that might deform after long periods of time.
AC power converter
The AC Power Converter plugs into the 6-V DC PWR JACK on the recorder(which automatically disconnects the batteries), and plugs into 230-volt AC household power.
IMPORTANT: The AC Power Converter coming with this unit is intended to be correctly orientated in a vertical or floor mount position.
Car adapter(Optional)
Your recorder may be operated from the cigarette lighter socket in a car. The optional Car Adapter plug into the 6-V DC PWR JACK on the recorder, which automatically disconnects the batteries.
Headphone (Not included)
Your can plug a set of headphones to your set. With the headphone plugged in, the speaker is automatically silenced for private listening. Your set is also equipped with EARNPHONE MONITOR capability when recording direct from other sound source such as other tape recorders, radios or phonographs. You can listen to what's being recorded by plugging in a set of headphones and an adapter.
Using your Cassette/Recorder
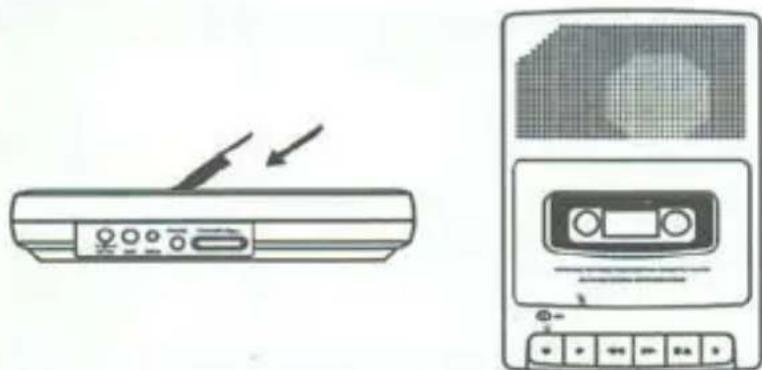
To insert or remove cassette
-
Press STOP/EJECT if any of the buttons are depressed.
-
Press STOP/EJECT to open CASSETTE DOOR.
-
Insert a cassette tape with a full reel at its left and open edge facing towards you, then push on the deck door to close. Unload a cassette tape by following the above steps 1 ans 2, take out the tape, push on the deck door to close.
natural_image
Illustration of a remote control unit and its corresponding CD-ROM device (no text or symbols present)NOTE: Some special formula tapes(chromium dioxide and metal particle tapes) cannot be properly recorded on this product. These tapes can, however be used for playback.
Tape Play
To listen to you recorded tape cassette:
- Insert cassette as explained above.
- Rewind tape to the starting point if necessary.(See REWIND opertation.)
- Press PLAY.
- Adjust VOLUME control.
Built-in microphone recording
- Insert cassette as previously described. Press RECORD(the PLAY button is depressed with it). You are now recording. If the RECORD button does not depress, see“PREVENT ACCIDENTAL ERASURE”.
- Talk normally into the BUILT-IN CONDENSER MICROPHONE. To obtain optimum recording quality, place the recorder with the microphone freely exposed and as close as convenient to the sound source.
3.
NOTE: The automatic level control(ALC)will set the record level for optimum recordings, regardless of volume setting.
Automatic stop
When your recorder is operating in PLAY or RECORD mode and the end of the tape is reached, your unit will automatically shut itself off and return the buttons to the OFF position.
Stand-up microphone recording
The record with stand-up microphone, plug the microphone into the MICROPHONE jack and follow the built-in microphone recording instructions. When the stand-up microphone is used, the built-in microphone is automatically disconnected.
Tape erase
To erase a tape simply record over the unwanted recording.
Rewind
To run the tape back to the beginning of your recording, press REWIND. Then press STOP after you have rewound to the desired point on the tape.
Fast Forward(F-fwd)
Press F-FWD to skip over portions of the tape quickly. Press STOP after you have advanced to the desired point on the tape.
Pause control
Your recorder is equipped with a PAUSE control which will stop PLAY & RECORD operation. Press PAUSE to stop PLAY or RECORD operation. Press again to release PAUSE for continued operation.
USB Play and Recording from MIC
- Insert the USB device to USB port on the top of unit.
- Set USB/TAPE(OFF) switch to USB.
- Press PLAY/PAUSE button to playback music from USB device. Press PLAY/PAUSE button again to stop play, at meantime the red USB indicator will blink once about a second.
- Press and hold the PLAY/PAUSE/REC button to record from the MIC(built-in), the red REC indicator will keep blinking rapidly. Press the PLAY/PAUSE/REC button again to stop Recording.
-
Then press and hold the PLAY/PAUSE/REC button once again to play music or the sound recording from USB device. Press PLAY/PAUSE button again to stop play.
-
Set USB/TAPE(OFF) button to TAPE(OFF) to stop USB playing mode and to TAPE mode.
Recording from Tape to USB
-
Set USB/TAPE(OFF) switch to TAPE and play the tape, insert the USB device to USB port, press and hold the PLAY/PAUSE/REC button to record from the tape, the red REC indicator will keep blinking rapidly. Press the PLAY/PAUSE/REC button again to stop Recording.
-
Set USB/TAPE(OFF) switch USB, Press PLAY/PAUSE button to playback music from USB device. Press PLAY/PAUSE button again to stop play, at meantime the red USB indicator will blink once about a second.
Care & Maintenance
Prevent accidental erasure
Whenever you make a recording, any previous recording on the tape is automatically erased. When you have a recording you want to keep permanently, snap out the rear left tab of the side you want to save as shown in the illustration below.

When a cassette with the tab snapped out is inserted into the tape unit, accidental erasure is prevented by a lever in the mechanism that keeps the RECORD button from depressing. Cellophane tape can be place over the original recording. Similarly, you can record over purchased pre-recorded cassettes.
PLEASE NOTE: Your unit is equipped with a cassette sensing mechanism prevents the RECORD button from being depressed when a cassette is not in the unit.
Cleaning the heads
Iron oxide particles from the magnetic tape can build up on the parts that come in contact with the tape. These deposits can cause incomplete erasure, muffled playback sound, and might prevent automatic stop. To clean a cassette tape, open the compartment door, push the PLAY button and gently and gently clean the heads, capstan, and pinch wheel with a head cleaner.

natural_image
Simple line drawing of a mechanical or fluid system with three blocks and a gear (no text or symbols)Always unplug the power cord before cleaning, and allow 30 minutes drying time when using a liquid cleaner.
Clean heads after every 25 hours of use.
-Demagnetize the head occasionally with a head demagnetizing cassette(available from many audio equipment stores).
- Never use any metal objects on or near the tape heads. Do not allow any cleaning material to fall into the tape assembly.
Tape care
-Don't expose tapes to sunlight or store in hot places. High temperatures may warp the shell or damage the tape itself.
-Keep cassettes in their boxes when not in use.
-Cassette tapes can be erased by magnetic fields produced by magnets, electric motors, electrical transformers, and other devices. Keep tapes away from magnets and magnetic fields.
QUIT SLACKING
A little bit of slack in your tapes can cause scratches on the tape,or worse yet,the tape could break.If you notice some slack in the tape,use a pencil to tighten it up before you insert it.

natural_image
Illustration of a cassette tape with a stand and antenna (no text or symbols)FCC NOTICE
Warning: Changes or modifications to this unit not expressly approved by the party responsible for compliance could void the user's authority to operate the equipment.
NOTE: This equipment has been tested and found to comply with the limits for a Class B digital device, pursuant to Part 15 of the FCC Rules. These limits are designed to provide reasonable protection against harmful interference in a residential installation. This equipment generates, uses and can radiate radio frequency energy and, if not installed and used in accordance with the instructions, may cause harmful interference to radio communications.
However, there is no guarantee that interference will not occur in a particular installation. If this equipment does cause harmful interference to radio or television reception, which can be determined by turning the equipment off and on, the user is encouraged to try to correct the interference by one or more of the following measures:
☐ Reorient or relocate the receiving antenna.
☐ Increase the separation between the equipment and receiver.
☐ Connect the equipment into an outlet on a circuit different from that to which the receiver is connected.
□ Consult the dealer or an experienced radio/TV technician for help.


- Powering the Recorder Battery installation
- AC power converter
- Car adapter(Optional)
- Headphone (Not included)
- Using your Cassette/Recorder
- To insert or remove cassette
- Tape Play
- Built-in microphone recording
- Automatic stop
- Stand-up microphone recording
- Tape erase
- Rewind
- Fast Forward(F-fwd)
- Pause control
- USB Play and Recording from MIC
- Recording from Tape to USB
- Care & Maintenance
- Cleaning the heads
- Tape care
- QUIT SLACKING
- FCC NOTICE
Brand : Naxa
Model : NPB-300
Category : Radio