
DE45EK - Dehumidifier HAIER - Free user manual and instructions
Find the device manual for free DE45EK HAIER in PDF.
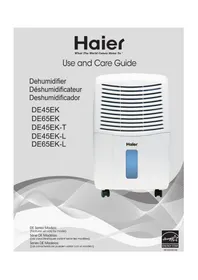


| Product Type | Dehumidifier |
| Model | DE45EK |
| Brand | Haier |
| Dehumidification Capacity | 45 pints per 24 hours (at 80°F, 60% RH) |
| Refrigerant | R410A |
| Power Supply | 115V / 60Hz, 15A |
| Dimensions (Net) | 13.38 x 19.12 x 10.58 inches (W x H x D) |
| Dimensions (Packed) | 14.34 x 20.34 x 12 inches |
| Weight | Approximately 45 lbs |
| Fan Speeds | 2 (Low and High) |
| Humidistat Control | Automatic, range 40%–70% RH (display 30%–90%) |
| Timer | 24-hour programmable ON/OFF |
| Smart Dry Feature | Automatically adjusts fan speed based on humidity |
| Auto Restart | Resumes operation after power outage (3-minute delay) |
| Auto-Defrost | Built-in sensor; stops compressor when ice forms, fan continues |
| Check Filter Indicator | Lights up when filter needs cleaning; press reset after cleaning |
| Bucket Full Indicator | Red light and audible alarm (can be silenced) |
| Continuous Drain Option | Yes, via standard garden hose (1/2 inch) |
| Air Filter | Washable; check every 2-3 weeks |
| Safety Features | Grounded 3-prong plug; auto shut-off when bucket full; thermal protection |
| Warranty | 1 year full; additional 4 years limited on sealed system (compressor, evaporator, condenser) |
Frequently Asked Questions - DE45EK HAIER
User questions about DE45EK HAIER
0 question about this device. Answer the ones you know or ask your own.
Ask a new question about this device
Download the instructions for your Dehumidifier in PDF format for free! Find your manual DE45EK - HAIER and take your electronic device back in hand. On this page are published all the documents necessary for the use of your device. DE45EK by HAIER.
USER MANUAL DE45EK HAIER
What The World Comes Home To
Use and Care Guide
Dehumidifier
Dehumidifier
Dehumidifier
DE45EK
DE65EK
DE45EK-T
DE45EK-L
DE65EK-L
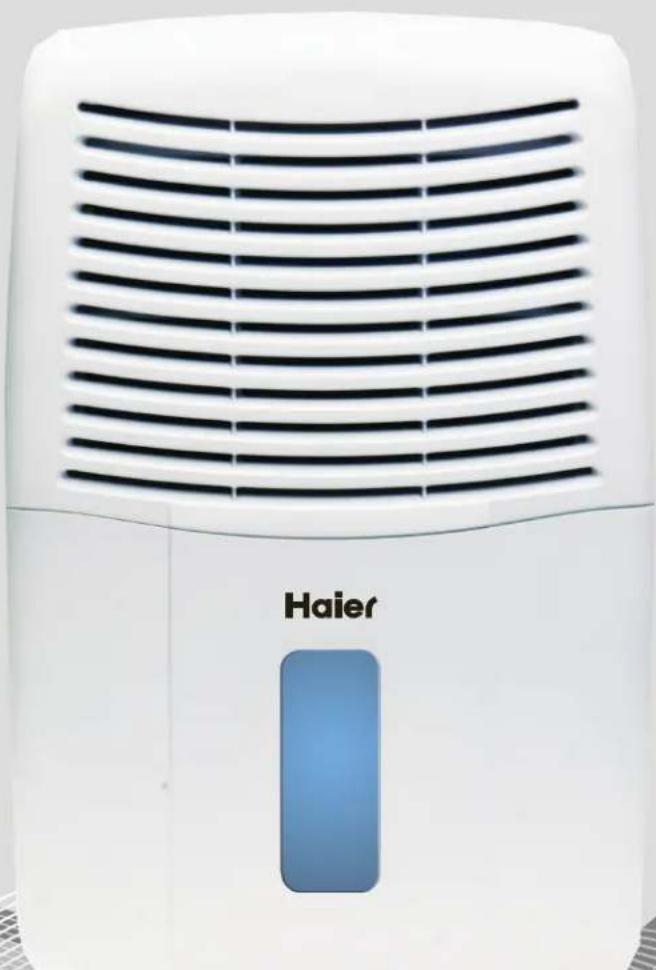

DE Series Models:
(Features will vary by model)
DE Series Models:
PRODUCT RECORDS....3
ELECTRICAL SAFETY 4
DEHUMIDIFIER CONTROLS....5,6
PROPER USE AND CARE....6,7
PARTS 7
TROUBLESHOOTING....8
WARRANTY 9
PRODUCT SPECIFICATIONS....10
DEHUMIDIFIER SAFETY....11
PRODUCT REGISTRATION....11
ELECTRICAL SAFETY....12
DEHUMIDIFIER CONTROLS....13, 14
USE AND CARE INSTRUCTIONS....14, 15
SPARE PARTS....15
TROUBLESHOOTING....16
WARRANTY....17
PRODUCT FEATURES....18
DEHUMIDIFIER SAFETY....19
PRODUCT REGISTRATION....19
YOUR SAFETY IS IMPORTANT TO US.
PLEASE READ INSTRUCTIONS CAREFULLY BEFORE OPERATING DEHUMIDIFIER
Always take these basic precautions:
This dehumidifier must be properly installed and grounded as described in this manual.
Never operate this dehumidifier in an area that is likely to accumulate standing water. If this situation develops, disconnect the power supply before touching, stepping into, or attempting to clean up the water.
Repair and replace immediately all electric service cords that have become frayed or otherwise damaged. DO NOT use a power cord that shows signs of damage anywhere along its length, at the plug, or where it is connected to the appliance.
Always unplug dehumidifier before servicing or moving the unit.
CAUTION
• DO NOT cover the dehumidifier's air vents. • DO NOT allow children to climb on or play with the dehumidifier. • ALWAYS contact a professional for service and repair.
WARNING: You can be killed or seriously injured if you do not follow the instructions in this manual. Please keep these instructions for future reference.
THANK YOU...
... for purchasing this Haier appliance. This easy-to-use manual will help you get the best use out of your dehumidifier.
Please record the model number, serial number, and store information here. The model and serial numbers can be located inside the unit after removing the bucket.
Staple your receipt to this manual. You will need it to obtain warranty service.
Model Number
Serial Number
Date of Purchase
Store Name
Store Address
Store Phone
BEFORE USING YOUR DEHUMIDIFIER
Please read this manual carefully. It contains instructions to help you use, maintain, and get the most use out of your dehumidifier.
Electrical Safety
Grounding
This dehumidifier must be grounded to reduce the risk of electric shock by providing an escape wire for the electric current. This dehumidifier has a power cord with a grounding wire and a grounded 3-prong plug. ONLY PLUG INTO AN OUTLET THAT IS PROPERLY INSTALLED AND GROUNDED.
DO NOT, under any circumstances, cut or remove the third (ground) prong from the power cord.
Power Supply Cord Wiring Requirements
115 Volt (103.5 min. - 126.5 max)
15 amp time-delay fuse or circuit breaker
Adapter plug is not recommended... however...
Since most 2-prong outlets are not grounded, we strongly advise against using an adapter plug.
HOWEVER, a temporary connection may be made where local codes permit if the 2-prong wall outlet is properly grounded.
FOR SAFETY REASONS, make sure the larger prong of the adapter goes into the large slot.
FOR PROPER GROUNDING
Ground the adapter to the outlet by using the outlet cover screw to secure the ground terminal to the outlet box.
Be absolutely certain that the outlet is grounded through the house wiring. DO NOT USE the dehumidifier until a proper ground has been made.
WARNING

Improper use of the grounding plug can result in the risk of an electric shock, injury,
fire, or death. Call a qualified electrician if you do not understand the grounding instructions, or if you are not sure if the dehumidifier is properly grounded. If the wall outlet is not grounded, please contact a professional electrician to have it replaced with a properly grounded outlet.
Extension Cord
If an extension cord is required to reach the nearest wall receptacle, use only a UL-listed, 3-wire, grounding type, 16 AWG, 15A, 125V appliance extension cord.
NO OTHER EXTENSION CORD IS PERMITTED.
FAMILIARIZE YOURSELF WITH THE CONTROLS ON YOUR DEHUMIDIFIER.
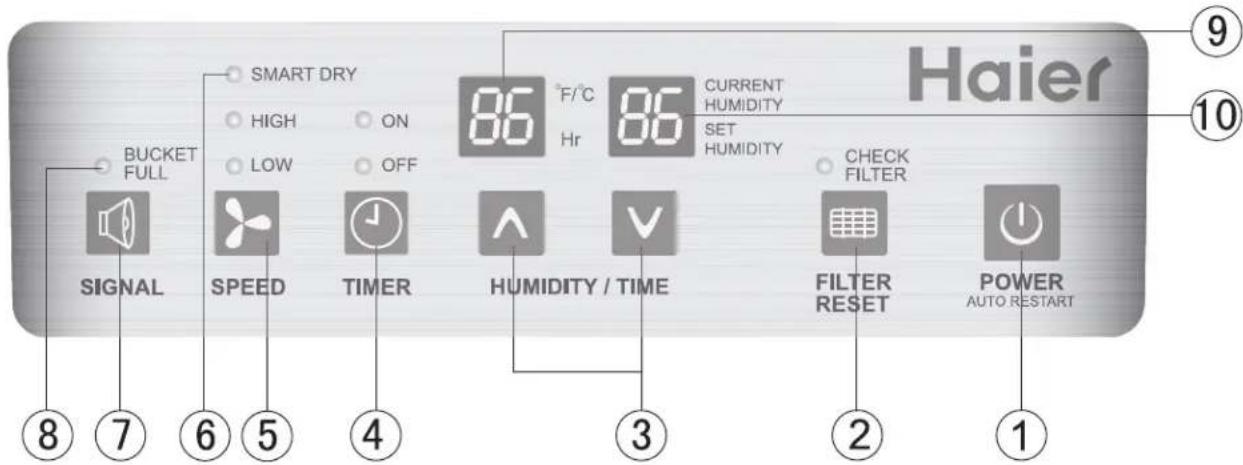
Control Panel
Features:
Power
Press POWER once to turn the dehumidifier ON and press POWER again to turn the dehumidifier OFF.
NOTE: After the unit is plugged in, but before the unit is turned on, press and hold the POWER button for 5 seconds to switch the temperature display between Fahrenheit (F) and Celsius (C) degrees.
Auto Restart
Once the power is restored, after 3 minutes, the unit begins to operate at its previous operation setting depending on the humidity conditions.
NOTE: Auto-Defrost Sensor (built in) When the temperature is 60°F or lower, ice may form on the evaporator coils preventing the removal of moisture. When this occurs, the controller stops the compressor, but allows the fan to continue running. When the ice is no longer present, the compressor will restart.
2 Check Filter Indicator
The "check filter" indicator will flash when the filter needs to be cleaned. Remove the filter, wash it, and put it back in. Press "Filter Reset." The "check filter" indicator will turn off.
Note: Make sure the filter is dry before replacing.
Humidistat
This allows you to adjust the humidity in the air. You can set the humidity to your desired level by pressing ∧ and ∨ keys.
4 Timer
Your dehumidifier can be set to turn on and off at pre-determined times. Pre-setting can be programmed up to 24 hours in advance.
⑤ Two Fan Speeds
This key controls the fan speed. There are two speed levels, LOW and HIGH.
6 Smart Dry
This setting compares the set humidity level with the actual humidity level and adjusts the fan speed automatically.
7 Signal
The bucket full audible signal can be turned on and off by pressing the SIGNAL button. The default setting is set in the ON position. When the bucket is full, the red BUCKET FULL indicator light will blink and the alarm will sound 5 times every 15 minutes.
To turn off the audible signal feature, press the SIGNAL button once, and the LED display will show "OF" for 2 seconds. In this setting, when the bucket is full, the BUCKET FULL indicator light will blink, but the audible alarm will not sound. To reactivate the audible signal, press the SIGNAL button and the LED display to the left will show "ON" for 2 seconds.
Bucket Full Indicator
When the indicator light comes on, automatic flow control stops the unit.
Turn the unit off by pressing the POWER key. Check to see if the bucket is full. If so, empty it. If bucket is not full and indicator light is on, the bucket is not in the proper position. Remove and reinstall it.

Current Temp/Timer Set Display
When the dehumidifier is running, it displays the current temperature. Press the timer key to program the dehumidifier to turn on or off automatically at a pre-determined time.

Current Humidity/Setting Humidity Display
Displays the current humidity level and adjusts the humidity to a desired level.
Setting Humidity Range: 40%RH~70%RH
Display Humidity Range: (LO)30%RH~(HI)90%RH
PROPER USE & CARE
It is normal for the surrounding air to become slightly warmer as the dehumidifier operates. This warming effect further reduces the relative humidity of the surrounding air.
THERE ARE TWO WAYS TO REMOVE WATER FROM THE BUCKET:
1. Empty the bucket manually
When the water bucket is full, the red indicator light "BUCKET FULL" will go on.
- YOU MUST turn the POWER off.
- Wait a few minutes to allow the water to stop dripping.
- Use both side handles to lift and remove the bucket.
- Empty water through opening into a sink or tub.
- Reinstall bucket.
IMPORTANT
Make sure the drain cap is tightened before operating the unit.
2. Attach a standard garden hose
The direct drainage feature can be activated using the following steps.
- Remove the plastic cap at the rear of the unit. (Keep the rubber insert well for use later.) (Fig. #1)
- Tightly screw the purchased garden hose to the direct drain opening. (Fig. #2)
- Position the dehumidifier as close as you can to the floor drain.
- Position the opening end of the drain hose directly over the floor drain and start the unit.
- When the direct drain feature is not being used, remove the drain hose from the direct drain opening and plug it with the rubber cap provided.
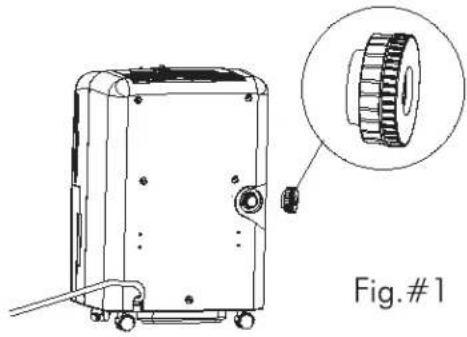
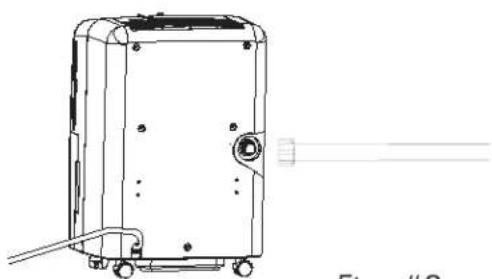
Fig. #2
PROPER USE & CARE
- Place the dehumidifier in a location that does not restrict airflow into the rear coil or out of the front grille.
- The dehumidifier must be operated in an enclosed area to be most effective. Close all doors, windows and other outside openings to the room.
- A dehumidifier operating in a basement will have little or no effect in drying an adjacent enclosed storage area, such as a closet, unless there is adequate circulation of air in and out of the area.
- When the dehumidifier stops, wait at least 3 minutes before restarting.
PROPER CLEANING
- Before cleaning, turn the dehumidifier off and remove the plug from the wall outlet. Use water and a mild detergent to clean the inlet and outlet grilles. DO NOT use bleach or abrasives.
- The air filter is on the front of the dehumidifier. It should be checked at least every 2 to 3 weeks to see if it needs cleaning.
- When the unit is turned on for the first time, the "Bucket Full" light may be lit. If you remove and replace the bucket, the light will shut off.
WARNING

You can be killed or seriously injured if you do not follow the instructions in this manual.
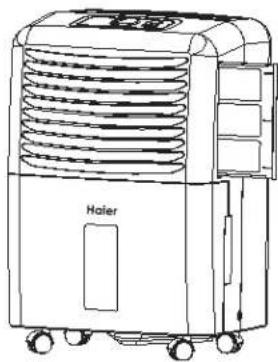
AIR FILTER REMOVAL
- Grasp the filter handle, and pull the filter out. The filter will slide out easily.
- Clean the filter thoroughly using a vacuum cleaner or wash using lukewarm water and mild detergent. Dry thoroughly before re-installing.
- To re-install the air filter, slide the filter back inside the tracks and push inward.
STORAGE
When the dehumidifier is not being used for long time periods, please follow these instructions.
- Disconnect the power cord from the power supply.
- Empty the water tank and wipe (clean) thoroughly.
- Clean air filter thoroughly.
- Re-package the unit in the original carton.
- Store the unit upright in a dry location.
If you experience operational problems, please follow these troubleshooting suggestions before calling Customer Service. If these suggestions fail to solve the problem, call Customer Service toll free at 1-877-337-3639.
Unit not operating
- Check to see if the grounded 3-prong plug is pushed completely into the outlet.
- The fuse may be blown or the circuit has been tripped. Check the house fuse/circuit breaker. Replace fuse or reset breaker as needed.
- The bucket may be full. The dehumidifier automatically turns off when this occurs. The drain bucket needs to be emptied.
- If the bucket is not full, it may be positioned improperly. Remove and reinstall so that it fits all the way into the dehumidifier.
- When the ambient temperature is above 112°F or below 32°F, the unit will shut off. This protects the compressor. Wait 3 minutes and then restart.
Dehumidifier is icing up during initial stage of operation.
- This is normal for a dehumidifier. Frost will usually disappear within 60 minutes unless the temperature is below 60°F.
Airflow is restricted
- Make sure there are no curtains, blinds or furniture blocking the front or back of the dehumidifier.
- Clean the filter. It may be clogged.
NOTE:
After prolonged usage, the condenser coils behind the filter may develop a buildup of residue. Unless cleaned regularly with a soft brush, this residue will harden and may require special cleaning methods by a refrigeration/air conditioning professional.
Unsatisfactory dehumidification
- When first installed, allow at least 3 or 4 days to remove the moisture from the room to maintain the desired dryness.
- Area to be dehumidified may be too large for your model. Check with your dealer.
- The controls may not be set correctly. Adjust controls according to instructions.
- Doors and windows may not be closed. Check that all doors, windows and other openings are closed tightly.
- Clothes dryer may be in operation in the same room. Install the dehumidifier away from the moisture-laden air generated by the dryer. Dryer should be vented to the outside.
- Please note that when room temperature is below 60°F, there might be ice forming on the coils. The unit will go into Auto-Defrost mode to remove the ice before resuming its dehumidification. The defrost operation will reduce the unit's ability for moisture removal.
FULL ONE YEAR WARRANTY
This product is warranted against defects in materials and workmanship for a period of one year from the date of the original purchase by a consumer for home use, and includes the parts and labor required to repair or replace defective parts.
LIMITED FIVE-YEAR WARRANTY
For an additional four-year period (beyond the first year of general coverage) the warrantor will repair or replace at its option any part of the refrigeration system (i.e., COMPRESSOR, EVAPORATOR, CONDENSER OR CONNECTING TUBE) which has failed as a result of defective materials or workmanship. Labor required for such repair or replacement is not covered by this warranty.
EXCLUSIONS
WARRANTOR IS NOT RESPONSIBLE FOR CONSEQUENTIAL DAMAGES or damages to product caused by improper power supply voltage, accident, fire, floods or acts of god. (Some states do not allow the exclusion or limitation of incidental or consequential damages, so the above exclusion or limitation may not apply to you.)
This warranty gives you specific legal rights, and you may also have other rights which vary from state to state. To know what your legal rights are in your state, consult your local or state consumer affairs office or your state's Attorney General.
Warrantor:
Haier America Trading L.L.C.
New York, NY 10018
For toll-free service call 1-877-337-3639.
| Model | DE45EK DE45EK-LDE45EK-T | DE65EK DE65EK-L |
| Refrigerant | R410A | R410A |
| Features | ||
| Dehumidification | √ | √ |
| Automatic Humidistat Control | √ | √ |
| Automatic shut-off | √ | √ |
| 2 speed fan | √ | √ |
| Bucket Full Indicator | √ | √ |
| Timer | 24 Hr On/Off | 24 Hr On/Off |
| Smart Dry | √ | √ |
| Technical data | ||
| Voltage/frequency (V/Hz) | 115/60 | 115/60 |
| Capacity (pints per 24 hours) | 45 pints | 65 pints |
| Net dimension WxHxD (inch.) | 133/8 × 191/2 × 105/8 | 15 × 231/2 × 12 |
| Packed dimension WxHxD (inch.) | 143/4 × 203/4 × 12 | 161/2 × 253/16 × 14 |
YOUR SAFETY IS ESSENTIAL TO US.
READ THE INSTRUCTIONS CAREFULLY BEFORE OPERATING YOUR DEHUMIDIFIER
STORAGE


- USE AND CARE GUIDE
- YOUR SAFETY IS IMPORTANT TO US
- CAUTION
- THANK YOU
- BEFORE USING YOUR DEHUMIDIFIER
- ELECTRICAL SAFETY
- GROUNDING
- POWER SUPPLY CORD WIRING REQUIREMENTS
- ADAPTER PLUG IS NOT RECOMMENDED... HOWEVER
- FOR PROPER GROUNDING
- WARNING
- EXTENSION CORD
- FAMILIARIZE YOURSELF WITH THE CONTROLS ON YOUR DEHUMIDIFIER
- CONTROL PANEL
- FEATURES
- POWER
- AUTO RESTART
- CHECK FILTER INDICATOR
- HUMIDISTAT
- TIMER
- ⑤ TWO FAN SPEEDS
- SMART DRY
- SIGNAL
- BUCKET FULL INDICATOR
- CURRENT TEMP/TIMER SET DISPLAY
- CURRENT HUMIDITY/SETTING HUMIDITY DISPLAY
- PROPER USE & CARE
- THERE ARE TWO WAYS TO REMOVE WATER FROM THE BUCKET
- EMPTY THE BUCKET MANUALLY
- ATTACH A STANDARD GARDEN HOSE
- PROPER CLEANING
- AIR FILTER REMOVAL
- STORAGE
- UNIT NOT OPERATING
- DEHUMIDIFIER IS ICING UP DURING INITIAL STAGE OF OPERATION
- AIRFLOW IS RESTRICTED
- NOTE
- UNSATISFACTORY DEHUMIDIFICATION
- FULL ONE YEAR WARRANTY
- LIMITED FIVE-YEAR WARRANTY
- EXCLUSIONS
- YOUR SAFETY IS ESSENTIAL TO US
Brand : HAIER
Model : DE45EK
Category : Dehumidifier