003-672 - Mechanical sweeper Meec Tools - Free user manual and instructions
Find the device manual for free 003-672 Meec Tools in PDF.


| Product Type | Workbench with integrated tools |
| Model | 003-672 |
| Brand | Meec Tools |
| Dimensions (L x W x H) | 1200 x 600 x 900 mm |
| Weight | 45 kg |
| Work Surface Material | Beech wood |
| Maximum Load Capacity | 150 kg |
| Integrated Tool Type | Bench grinder |
| Power Supply | 230 V ~ 50 Hz |
| Motor Power | 350 W |
| No-Load Speed | 2950 rpm |
| Wheel Diameter | 150 mm |
| Functions | Grinding, sharpening, deburring |
| Maintenance | Regular cleaning, wheel dressing, lubrication of moving parts |
| Safety Features | Spark guards, eye shields, emergency stop button |
| Spare Parts Availability | Grinding wheels, guards, tool rests |
| Repairability | Moderate: replaceable motor brushes and bearings |
| General Information | Suitable for home workshops and light professional use |
Frequently Asked Questions - 003-672 Meec Tools
User questions about 003-672 Meec Tools
0 question about this device. Answer the ones you know or ask your own.
Ask a new question about this device
Download the instructions for your Mechanical sweeper in PDF format for free! Find your manual 003-672 - Meec Tools and take your electronic device back in hand. On this page are published all the documents necessary for the use of your device. 003-672 by Meec Tools.
USER MANUAL 003-672 Meec Tools
003672


SE SOPMASKIN
Operating instructions (Translation of the original instructions) Important! Read the user instructions carefully before use. Save them for future reference.
Värna om miljön!
Care for the environment!
Must not be discarded with household waste! This product contains electrical or electronic components that should be recycled. Leave the product for recycling at the designated station e.g. the local authority's recycling station.
Jula reserves the right to make changes. In the event of problems, please contact our service department.
www.jula.com

Tillverkare/Produsent/Producenci/Manufacturer
Jula AB, Box 363, 532 24 SKARA
Distributör/Distributør/Dystrybutor/Distributor
Jula Poland Sp. z o.o., ul.
EC DECLARATION OF CONFORMITY
EG FÖRSÄKRAN OM ÖVERENSSTÄMMELSE
EF SAMSVARSERKLÆRING
DEKLARACJA ZGODNOŚCI WE

Jula AB, Box 363, SE-532 24 SKARA, SWEDEN
Machinery Directive 2006/42/EC
EN ISO 12100:2010, EN 13019:2001+A1
Electromagnetic Compatibility Directive 2014/30/EU
EN 55012:2007+A1, EN 61000-6-1:2007
Outdoor Noise Directive 2000/14/EC, amended by 2005/88/EC
| Measured sound power level on an equipment representative for this type: Uppmätt ljudeffektinivä på en utrustning som är representativ för denna typ: Målt lydeffektinivä for ustyr som er representativt for vedkommende type: zmierzony poziom mocy akustycznej urządzenia reprezentatywnego dla danego typu: | Guaranteed sound power level: Garanterad ljudeffektiniva: Garantert lydeffektiniva: Gwarantowana moc akustyczna: | Conformity assessment procedure according to 2000/14/EC: Förfarande för bedömning av överensstämmelse enligt 2000/14/EC: Framgangsmåter for samsvarsvurdering iht. 2000/14/EC: Procedura oceny zgodności na podstawie dyrektywy 2000/14/WE: |
| 99,6 dB(A) 103 dB(A) | Annex V / Bilaga V Vedlegg V / Załącznik V |
This product was CE marked in year -17
Name and address of the person authorised to compile the technical file:



10

11

The image is too blurry to recognize any text content.

SÄKERHETSANVISNINGAR
OBS!
There is no oil in the engine on delivery. Fill up with oil before starting the engine.
- Read these instructions carefully before use.
- Familiarise yourself with the controls on the machine and how to use them. Learn how to quickly stop the engine. Failure to follow all the instructions and safety instructions can result in the risk of fire and/or serious personal injury. Save these instructions and safety instructions for future reference.
- Never allow children, or anyone who is unfamiliar with the machine and these instructions, to use it. There may be local regulations for the minimum age of persons allowed to use the machine.
- Never use the machine if you are tired or under the influence of drugs, alcohol or medication.
- The user is responsible for any accidents or risks to other persons or property.
- Carefully inspect the area where the machine is to be used and remove any doormats, boards, wires or other foreign objects.
- Check that all the controls are in neutral mode before starting the engine.
- Pay attention to the surroundings and avoid causing any interference.
- Packaging materials, oil, fuel, used filters and replaced parts, etc. must be recycled in accordance with local regulations.
- Recycle products that have reached the end of their useful life according to local regulations.
Personal safety equipment
- Wear suitable clothing.
- Wear non-slip shoes.
• Always wear safety glasses or a visor when
using, maintaining or repairing the machine. The machine can throw up foreign objects when in use.
- Wear ear protection.
Fuel
- Be careful when handling fuel – it is highly flammable.
- Only store fuel in a suitable container.
- Only refuel outdoors. Use a funnel. Do not smoke when refuelling.
- Fill up with fuel before starting the engine, or switch off the engine first. Never remove the fuel cap or fill up with fuel when the engine is running. Allow the engine to cool before filling with fuel.
- Do not start the machine if fuel has been spilled. Move the machine away from any split fuel before starting. Wipe up spilled fuel immediately.
- Replace the fuel cap and firmly tighten.
• If you get fuel on your clothes, change clothes before starting the engine.
Use
- Do not use the machine in explosive environments, such as in the vicinity of flammable liquids, gases or dust. Electrical contacts and mechanical friction can produce sparks that can ignite dust, gas and fumes.
- Do not run the engine in confined spaces where noxious carbon dioxide can accumulate. Never start the engine indoors or in an enclosed area – risk of carbon monoxide poisoning.
- Only use the machine in daylight, or in good artificial lighting.
- Keep other people, especially children, and pets at a safe distance from the work area.
-
Be careful when working on or crossing entrances, roads, etc. Pay attention to hidden danger.
-
Look out for traffic when using the machine near roads.
• Always work along slopes, never across them. Be very careful when changing direction on slopes. Avoid steep slopes. - Never use the machine if the guards or safety devices are dismantled or damaged.
- Never dismantle or bypass the guards and other safety devices on the machine.
- Do not change the speed governor setting and do not over rev the engine. Over revving can cause personal injury and/or material damage.
- Do not run the machine too fast, to avoid overloading it.
- Switch off the engine and wait until all moving parts have completely stopped before inserting tools or your hands inside the brush guard.
- The machine is intended to be used to remove debris etc. from payments, paths, gardens, driveways and other areas at ground level.
- The machine must only be used to sweep materials such as leaves, snow, dust, gravel and debris.
- All other use than the above is to be considered as incorrect and can result in the risk of personal injury and/or material damage. Examples of improper usage:
- Use above ground on roofs, balconies etc.
- Pulling or pushing loads.
- Transporting children or passengers.
WARNING!
- Be careful when handling fuel – it is highly flammable.
- Never point the machine in the direction of the wind or at people, animals, vehicles, houses or anything that can be damaged by ejected materials. Make sure that no one is in front of the machine.
- Adjust the brush to a suitable angle when using near a fence, a vehicle, or windows etc.
- Keep your hands and feet away from moving parts. Keep the brush clean.
- Switch off the machine immediately if it starts vibrating abnormally, or if the brushes hit a foreign object. Wait until all moving parts have completely stopped and then check the machine. Vibrations usually indicate a problem. Repair any damage before using the machine again.
- Switch off the engine and put all the controls in neutral mode before moving away from the machine.
- Switch off the engine and wait until all moving parts have completely stopped before adjusting, checking, maintaining and/or cleaning (unless otherwise stated in these instructions). Disconnect any electrical cables from the engine (no all models).
- The muffler and other parts of the engine get hot when the engine is running – risk of burn injuries.
- Never run the machine at a fast pace on slippery surfaces. Be very careful when going backwards or pulling the machine towards you. Look for any obstacles behind you, before and while you are going backwards.
- Disconnect the brush when transporting the machine or when it is not in use.
- Make sure you always have a firm footing and a firm grip on the handle. Be careful when using the machine. Never run with the machine.
Maintenance and storage
- Proper maintenance and storage and regular cleaning are essential for the machine to work properly.
- Defective or worn parts should be replaced, not repaired. Only use spare parts recommended by the manufacturer. The use of other spare parts can result in personal injury and/or material damage. The manufacturer cannot accept liability for any damage resulting from failure to follow these instructions.
- If you need to empty the tank do this outdoors, and when the engine is cool.
- Check the machine at regular intervals for any oil or fuel leakage. Leakage is a fire risk.
- If storing the machine with petrol in the tank and/or carburettor, put it in a well-ventilated area away from sources of heat such as a boiler, water heater, tumble dryer and electric motors that can emit sparks to avoid the risk of igniting fuel vapour.
- Allow the engine to cool before putting away.
- Follow the separate instructions if the machine is not going to be used for some time.
WARNING!
- Incorrect use will invalidate the warranty. The manufacturer cannot accept liability for personal injury and/or material damage resulting from improper use of the machine. The full responsibility for any such personal injury or material damage rests on the user.
- The machine must only be used by one person at once.
Symbols
The following warning symbols have been put on the machine to draw attention to the necessary safety precautions when in use.
 | WARNING: |
 | Read the operating instructions before use. |
 | DANGER: Objects can be thrown out and cause serious personal injury and/or material damage. Do not point the brush at people or animals. |
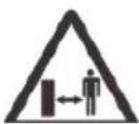 | Keep other people, especially children, and pets at a safe distance from the work area. |
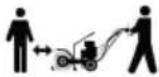 | Keep at a safe distance. |
 | Keep your hands and feet away from moving parts. |
 | Wear ear protection. |
 | Wear safety glasses. |
 | Petrol engines emit carbon monoxide. Never start the engine indoors or in an enclosed area. |
 | Petrol is highly flammable and can in some circumstances be explosive. Switch off the engine and allow it to cool before refilling with fuel. |
 | Risk of fire or explosion. Make sure there are no sparks or naked flames nearby, and do not smoke when filling up with fuel. |
 | Guaranteed sound power level. |
 | Approved as per applicable directives. |
 | Recycle discarded product in accordance with local regulations. |
TECHNICAL DATA
| Engine type 4-stroke |
| Displacement 196 cc |
| Output 3.8 kW |
| Speed, engine 3600/min |
| Speed, brush 400/min |
| Ignition system TMI |
| Spark plug F7RTC |
| Fuel volume 3.6 l |
| Oil volume 0.6 l |
| Recommended oil 5W-30 |
| Sound pressure level, LpA 89.3 dB(A), K = 2.5 dB |
| Measured sound power level, LwA 99.6 dB(A), K = 2.5 dB |
| Guaranteed sound power level, LwA 103 dB(A), K = 2.5 dB |
| Vibration level 5.95 m/s 2 , K = 1.5 m/s 2 |
| Working width 60 cm |
| Weight 77 kg |
Always wear ear protection.
The declared vibration value, which has been measured by a standardised test method, can be used to compare different tools with each other and for a preliminary assessment of exposure.
WARNING!
The actual vibration level when using power tools may differ from the specified maximum value, depending on how the tool is used. It is therefore necessary to determine which safety precautions are required to protect the user, based on an estimate of exposure in actual operating conditions (taking into account all stages of the work cycle, e.g. the time when the tool is switched off and when it is idling, in addition to the start-up time).
DESCRIPTION
| 1. | Wheel |
| 2. | Chassis |
| 3. | Wheel to adjust height |
| 4. | Brush |
| 5. | Cover |
| 6. | Engine |
| 7. | Fuel tank |
| 8. | Handle |
| 9. | Control panel |
FIG. 1
ASSEMBLY
NOTE:
Unpack and assemble the sweeper on a level, stable surface with enough space for the machine and the packaging materials. Use suitable equipment. Do not use the sweeper
if it is not fully assembled.
Unpacking
- Study the assembly instructions carefully.
- Remove all the unassembled parts from the packaging. Make sure not to misplace any components.
- Recycle the packaging in accordance with local regulations.
Assembly of control wires for brush and forward drive
Hook the wires in the respective eyelets. One of the left side and one on the right side.
FIG. 2
FIG. 3
Fitting the handle
The handle is supplied with an installed control panel. The assembly parts are supplied in a separate package in the packaging. Assemble in accordance with the instructions below:
- Put the ends of the handle in the fasteners.
- Align the hole in the handle to the hole in the fastener.
- Put the screws in the holes and lock with the nuts.
FIG. 4
Fitting the drive lever
- Remove the washer (B) and the cotter (C), prefitted on the gear lever (A).
- Put the curved end of the gear lever (A) in the hole in the arm (D) to connect it to the transmission.
- Lock the gear lever (A) and the washer (B)
with the cotter (C).
FIG. 5
Fitting the brush lever
- Remove the washer and nut (B) prefitted on the handle holder.
- Put the holder (A) in the hole in the arm (C).
- Replace the washer and tighten the nut (B).
FIG. 6
USE
NOTE:
There is no oil in the sweeper on delivery. Fill up with oil before starting the engine.
CONTROLS
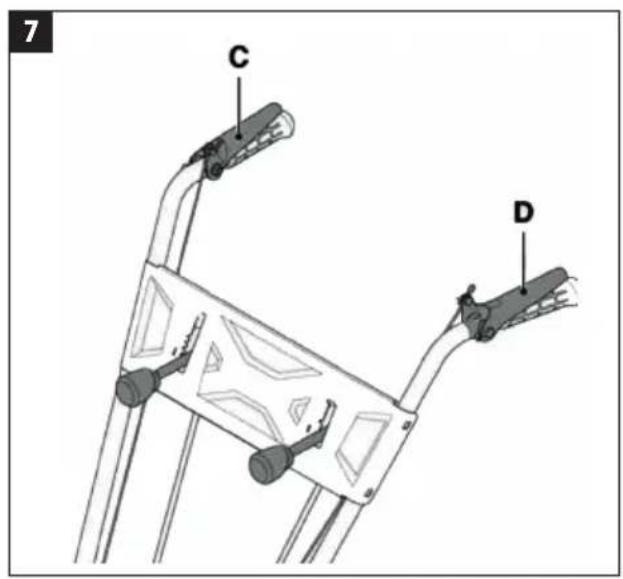
Drive and brush levers
The drive lever engages and disengages the drive for the sweeper. The brush lever engages and disengages the rotation of the brush.
- Press the drive lever (D) against the handle to move forwards.
- Press the brush lever (C) against the handle to start the rotation of the brush.
- Stop the sweeper by releasing the drive lever. The lever returns automatically to the home position.
- If both the drive lever and brush lever are engaged the drive lever will remain engaged when released. It will disengage when the brush lever is also released.
- If only the brush lever is engaged the brush will stop when the lever is released and the lever will automatically return to the home position.
FIG. 7
Gear selector
The drive gear is selected with the gear selector (A). The sweeper has 5 forward gears and 2 reverse gears.
FIG. 8
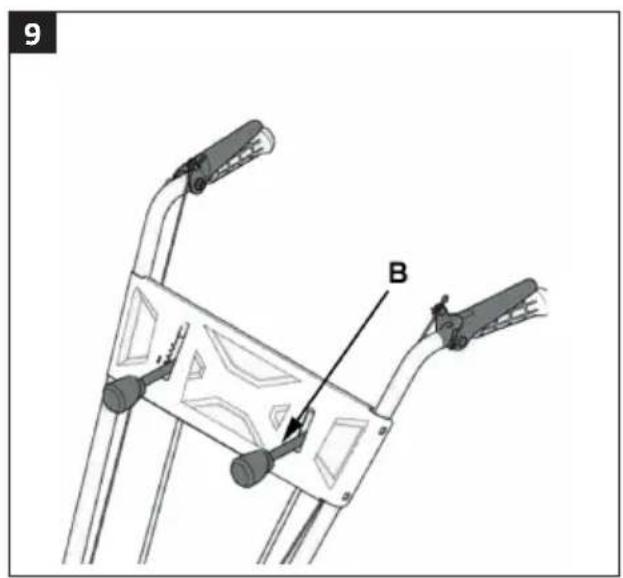
Brush angle
The angle of the brush is set with a selector (B). 3 different angles can be set:
- Lever down: 15° to the right.
- Lever in middle: 0° .
- Lever up: 15° to the left.
FIG. 9
Ignition switch
Used to start and stop the engine. The ignition switch (A) has two positions:
OFF – The engine is stopped and cannot be started.
ON – The engine can be started.
Throttle lever
The following positions are indicated on the control panel:
| Full throttle. The throttle lever must be in this position to start and run. | |
 | Idling. Used when the sweeper is stationary and the engine is warm. |
Choke lever
Used to start a cold engine. The choke lever has two positions:

Choke closed. The right position for starting a cold engine.

Open choke. The right position for starting a warm engine.
Primer bulb
Press the primer bulb to put fuel in the carburettor inlet to start a cold engine (D).
FIG. 10
Starter cord
The starter cord (E) is used to manually start the engine.
USE
NOTE:
Check the oil and fuel levels in the engine before use.
- Move the lever for the brush angle to the required position.
- Select a suitable angle for the surface and the amount of material to be swept away.
- Press the brush lever to enable the rotation of the brush.
- Press the drive lever to enable forward drive.
NOTE:
Always work at full throttle.
Changing gear
- Stop the sweeper by releasing the drive lever and brush lever.
- Put the gear selector in the required position.
- Run forwards and continue sweeping.
WARNING!
The sweeper must be stationary to change
gear. Do not attempt to change gear while the sweeper is moving, this can damage the gearbox.
Stopping
- To stop the sweeper, release the brush lever and drive lever.
- To switch off the engine put the ignition switch in the OFF position.
- Do not attempt to switch off the engine with the choke lever, this can damage the engine.
WARNING!
The engine and exhaust pipe get very hot when in use – risk of burn injuries.
Adjusting the working height of the brush
The small wheels are used to adjust the working height of the brush. Always adjust the working height before use.
- Remove the lock (A).
- Pull out the cotter (B).
- Raise/lower the wheel (C).
- Replace the cotter.
- Replace the lock.
FIG. 11
Cold start
- Put the ignition switch in the ON position.
- Put the throttle lever in the full throttle position.
- Put the choke in position
- Press the primer bulb 2–3 times.
-
Pull the starter cord slowly until it catches, and then pull quickly.
-
Keep a firm grip on the handle and move it slowly back to its original position.
- Repeat until the engine starts.
- Put the choke in position ||↓|.
NOTE:
Allow the engine to run warm for a few minutes before starting to work.
Warm start
- Put the throttle lever in the full throttle position.
- Check that the choke is in position
- Pull the starter cord slowly until it catches, and then pull quickly.
- Keep a firm grip on the handle and move it slowly back to its original position.
- Repeat until the engine starts.
NOTE:
- Do not press the primer bulb to start a warm engine.
- Do not attempt to start more than 3–4 times, otherwise you can flood the engine.
- If the engine does not start, check under Troubleshooting.
WORKING TECHNIQUE
All surfaces
- Adjust the speed and rotation of the brush to the surface and the amount of material to be swept away.
- The brush must not press too hard against the surface. A brush depth of 5–10 cm is usually enough.
• Work at a lower speed on uneven or unhardened surfaces, otherwise the brush can be damaged. - Cut down the speed before switching off
the engine.
Large areas
- Sweep over the middle of the area and then sweep away the remainder in overlapping sweeps. This reduces the strain on the brush.
- Cut down the speed before switching off the engine.
Soil, sand and gravel
• Work with a low brush speed to reduce the amount of dust. If possible work in damp weather, or after rain.
- When sweeping gravel put the brush as high up as possible to avoid throwing up stones and causing damage.
- Cut down the speed before switching off the engine.
Snow
- Newly fallen snow is easiest to remove. Sweep over the area several times to remove all the snow.
- If possible, aim the brush in the direction of the wind. Check in which direction and how far the snow is thrown.
- Cut down the speed before switching off the engine.
MAINTENANCE
NOTE:
- Read all warnings, safety instructions and other instructions. Failure to follow all the instructions and safety instructions can result in death, serious personal injury and/or material damage.
- Stop the sweeper, switch off the engine and remove the ignition key, and wait
until all moving parts have completely stopped before maintenance and/or cleaning.
- Maintenance, adjustments and repairs not described in these instructions should be carried out by an authorised service centre.
- Follow the maintenance instructions for best functionality and useful life.
- Only use spare parts and accessories, recommended by the manufacturer. The manufacturer accepts no responsibility for damage resulting from the use of accessories or spare parts other than those recommended by the manufacturer.
After use
- Clean the sweeper.
- Move all the controls back and forth a number of times to make sure they work smoothly.
- Check that the choke is closed.
- Check that none of the components are loose or damaged. Check and tighten all screw unions and replace any damaged components.
- Do not cover over the sweeper until all the parts are completely cool.
• Make sure that all the screw unions are properly tightened to keep the machine in safe condition. - Check that all screw unions on the ejector are properly tightened at regular intervals.
Refuelling
- Unscrew and remove the fuel cap.
- Place a funnel in the opening to the fuel tank.
-
Fill up with fuel and then remove the funnel.
-
Replace and firmly tighten the fuel cap after filling up with fuel and wipe off any spilt fuel (fig. 10 F).
NOTE:
- Do not overfill the tank.
- Only use fuel of the recommended grade.
- Petrol is a perishable product. Do not allow petrol to remain in the tank for more than one month.
Checking/filling up with oil
NOTE:
• There is no oil in the sweeper on delivery.
• Always check the oil level before using the machine.
Follow the instructions below:
- Place the sweeper on a smooth, level surface.
- Wipe round the oil filler cap, unscrew and pull out the dipstick (fig. 10 H).
- Wipe the dip stick.
- Replace the dipstick, but do not screw in.
- Take out the dipstick again and check the oil level.
- The oil level should be between the MIN and MAX marks. Fill up with new oil if the level is near the MIN mark.
- Do not overfill, this can cause the engine to overheat. If the oil is over the MAX mark, empty out oil to correct level.
NOTE:
Only use the oil specified in the technical data.
Changing the oil
NOTE:
• The oil is hot after the engine is switched
off. Allow the engine to cool for a few minutes before emptying the oil.
- Change the engine oil at the intervals specified in the maintenance table. Change the oil more often if the machine is used in demanding conditions.
Follow the instructions below:
- Place the sweeper on a smooth, level surface.
- Place a suitable container under the drain plug (fig. 10 I).
- Remove the oil filler cap (fig. 10 H).
- Remove the drain plug (fig. 10 I).
- Allow the oil to run out into the container.
- Replace the drain plug.
- Wipe up any spillage.
- Fill with new oil. The oil volume is specified in technical data.
- After filling with oil start the engine and run it on idle for 30 seconds.
- Check that there is no oil leakage.
- Switch off the engine. Wait 30 seconds and check the oil level again.
NOTE:
Used oil must be disposed of in accordance with local regulations.
Spark plug
- Allow the engine to cool and disconnect the spark plug lead from the spark plug.
- Remove the spark plug with a spark plug spanner.
- Clean the spark plug with a wire brush.
- Adjust electrode gap to 0.76 mm by using a feeler gauge.
- Carefully screw in the spark plug by hand to avoid threading problems.
- When it seats, tighten with the spark plug
spanner to compress the sealing washer.
Carburettor
The carburettor is adjusted on delivery. Refer to Troubleshooting to adjust the carburettor.
Air filter
- Undo the wing nut (A) holding the filter cover and take off the cover.
- Undo the wing nut (B) and take out the filter (C).
- Blow clean the filter with compressed air from inside and out.
- Check the filter and replace if damaged.
- Replace all the parts in the reverse order.
FIG. 12
Bevel gear
The bevel gear is placed on the middle of the shaft that holds the brushes. The bevel gear needs to be filled with bearing grease at regular intervals.
CLEANING
NOTE:
Switch off the engine and wait until all moving parts have completely stopped before cleaning and before removing any objects that have fastened in the brush.
• Always clean the sweeper after use.
- Clean the engine with a brush and/or compressed air.
- Do not pour water directly on the engine
• After cleaning with water start the sweeper and run the brush to remove any residual water, otherwise the bearings can be damaged.
WARNING!
Never clean the sweeper with a high-pressure washer, this can damage the electrical components.
Storage
Follow the instructions below if the machine is not going to be used for at least 30 days.
- Changing the engine oil, if this has not been done in the last 3 months.
- Clean the sweeper according to the instructions.
- Check the condition of the sweeper. If it is damaged it must be repaired before being used again.
- Touch up any damage to the paintwork to prevent corrosion.
- Coat other corrosion-sensitive surfaces lightly with oil.
- If possible, store the sweeper under roof.
- Do not put any strain on the brush or brush guard – this can deform the brush.
TRANSPORT
- Use a suitable ramp to load the sweeper on a trailer, or the equivalent.
- The engine must be switched off when loading. Several persons should help to push the sweeper up the ramp.
- Secure the sweeper in a suitable manner.
SERVICE AND REPAIRS
These instructions include the operations intended to be carried out by the user. Maintenance and repairs not described in these instructions should be carried out by an authorised service centre. Operations carried out by unauthorised or unqualified persons will invalidate the warranty. The manufacturer
cannot accept liability for any damage resulting from such operations.
- Warranty repairs and maintenance must only be carried out by an authorised service centre, using identical spare parts.
- The use of other accessories or spare parts will invalidate the warranty. The manu facturer accepts no responsibility for damage resulting from the use of accessories or spare parts other than those recommended by the manufacturer.
- The sweeper should be checked every year by an authorised service centre.
MAINTENANCE SCHEDULE
| Action Frequency | ||
| First time Thereafter | ||
| Check of screw connections – Before using | ||
| Safety check/check of controls – Before using | ||
| General cleaning and inspection – Cleaning of exhaust area | ||
| Cleaning the ejector area – Every 5 working hours/after use | ||
| Cleaning of spark plug – Every 25 working hours/every season | ||
| Replacement of spark plug – Every 100 working hours/every season | ||
| Checking/filling up with oil – Every 5 working hours/after use | ||
| Changing the oil 5 h Every 50 working hours/every season | ||
| Cleaning the air filter – Every 10 working hours/after use | ||
TROUBLESHOOTING
| Problem Possible cause Action | ||
| The engine will not start. | The ignition is switched off. Put the ignition switch in the ON position. | |
| Fuel shortage. Fill the fuel tank with fresh fuel of good quality. | ||
| The choke is open. Close the choke. | ||
| The primer bulb is empty. Press the primer bulb. | ||
| The engine is flooded. Wait a few minutes and then try again. Open the choke, but do not press the primer bulb. | ||
| Defective spark plug. Replace spark plug. | ||
| Old fuel. Empty the old fuel and refill with new. | ||
| Water in the fuel system. Contact an authorised service centre. | ||
| The sweeper starts, but has no power. | Too much material being swept. Reduce the speed. | |
| The fuel cap is blocked or covered by ice or snow. | Clean the fuel cap are the area around it. | |
| The engine does not run smoothly, or runs at low speed. | Choke closed. Open the choke. | |
| Old fuel. Empty the old fuel and refill with new. | ||
| Water in the fuel system. Contact an authorised service centre. | ||
| The carburettor is defective. Contact an authorised service centre. | ||
| Heavy vibrations. | Loose or damaged parts, or loose or damaged brush. | Tighten all the screw connections. Replace any damaged parts at an authorised service centre. |
| Incorrectly fitted handle. | Fit the handle correctly. | |
| Material is swept slowly, or not at all. | The brush is blocked. Clear the brush. | |
| The brush is too high up. | Adjust the small wheels. | |
| The sweeper does not go forward. | The drive lever wire is not properly adjusted | Contact an authorised service centre. |
- SE SOPMASKIN
- EC DECLARATION OF CONFORMITY
- EG FÖRSÄKRAN OM ÖVERENSSTÄMMELSE
- EF SAMSVARSERKLÆRING
- DEKLARACJA ZGODNOŚCI WE
- SÄKERHETSANVISNINGAR
- OBS
- THERE IS NO OIL IN THE ENGINE ON DELIVERY. FILL UP WITH OIL BEFORE STARTING THE ENGINE
- PERSONAL SAFETY EQUIPMENT
- FUEL
- USE
- WARNING
- MAINTENANCE AND STORAGE
- SYMBOLS
- ALWAYS WEAR EAR PROTECTION
- NOTE
- IF IT IS NOT FULLY ASSEMBLED
- UNPACKING
- ASSEMBLY OF CONTROL WIRES FOR BRUSH AND FORWARD DRIVE
- FITTING THE HANDLE
- FITTING THE DRIVE LEVER
- FIG. 5
- FITTING THE BRUSH LEVER
- CONTROLS
- DRIVE AND BRUSH LEVERS
- GEAR SELECTOR
- BRUSH ANGLE
- IGNITION SWITCH
- THROTTLE LEVER
- CHOKE LEVER
- PRIMER BULB
- STARTER CORD
- CHECK THE OIL AND FUEL LEVELS IN THE ENGINE BEFORE USE
- ALWAYS WORK AT FULL THROTTLE
- CHANGING GEAR
- THE SWEEPER MUST BE STATIONARY TO CHANGE
- STOPPING
- ADJUSTING THE WORKING HEIGHT OF THE BRUSH
- COLD START
- WARM START
- WORKING TECHNIQUE
- ALL SURFACES
- LARGE AREAS
- SOIL, SAND AND GRAVEL
- SNOW
- MAINTENANCE
- AFTER USE
- REFUELLING
- CHECKING/FILLING UP WITH OIL
- CHANGING THE OIL
- SPARK PLUG
- CARBURETTOR
- AIR FILTER
- BEVEL GEAR
- CLEANING
- SWITCH OFF THE ENGINE AND WAIT UNTIL ALL MOVING PARTS HAVE COMPLETELY STOPPED BEFORE CLEANING AND BEFORE REMOVING ANY OBJECTS THAT HAVE FASTENED IN THE BRUSH
- NEVER CLEAN THE SWEEPER WITH A HIGH-PRESSURE WASHER, THIS CAN DAMAGE THE ELECTRICAL COMPONENTS
- STORAGE
- TRANSPORT
- SERVICE AND REPAIRS
Brand : Meec Tools
Model : 003-672
Category : Mechanical sweeper