
Freejet 3 in 1 - Vacuum Cleaner CANDY - Free user manual and instructions
Find the device manual for free Freejet 3 in 1 CANDY in PDF.


| Product Type | 3-in-1 Vacuum Cleaner (Cordless Stick, Handheld, and Floor Nozzle) |
| Brand | Candy |
| Model | Freejet 3 in 1 |
| Power Source | Rechargeable NiMH battery |
| Charger Input | 230V (UK 240V) AC, double insulated |
| Charging Time | 24 hours for first use; thereafter as needed |
| Operating Time | Varies; monthly full discharge recommended for battery life |
| Cleaning Modes | Carpet (Turbo ON) and Hard Floor (Turbo OFF) |
| Main Body Components | Main body with on/off switch, turbo switch, handheld unit release button, nozzle release button |
| Handheld Unit | Detachable handheld cleaner with on/off switch, dust container, filter access button, bin empty trigger |
| Accessories Included | Carpet and floor nozzle, crevice tool, dusting brush, rigid extension tube (depending on model) |
| Filter Type | Washable pre-motor filter (Candy part no. S93 C - 35601128) |
| Dust Container Capacity | Instant empty via pull trigger |
| Agitator (Brush Roll) | Replaceable; Candy part no. Y24 C - 35601129 |
| Safety Features | Double insulated charger; not for wet use or picking up flammable liquids; battery disposal instructions |
| Maintenance | Empty dust container after each use; wash filter monthly; check agitator belt |
| Weight | Approx. 3.5 kg (estimated) |
| Dimensions (approx.) | 30 x 25 x 20 cm (main body only; handheld and accessories vary) |
| Warranty | As per local dealer; subject to change |
| Environmental Note | Complies with WEEE directive; recycle at appropriate facility |
Frequently Asked Questions - Freejet 3 in 1 CANDY
User questions about Freejet 3 in 1 CANDY
0 question about this device. Answer the ones you know or ask your own.
Ask a new question about this device
Download the instructions for your Vacuum Cleaner in PDF format for free! Find your manual Freejet 3 in 1 - CANDY and take your electronic device back in hand. On this page are published all the documents necessary for the use of your device. Freejet 3 in 1 by CANDY.
USER MANUAL Freejet 3 in 1 CANDY
natural_image
Simple line drawing of a mechanical component with an arrow indicating direction (no text or symbols)
natural_image
Diagram of a mechanical component with directional arrows indicating movement (no text or symbols)
natural_image
Line drawing of a handheld device with a handle and cable, no text or symbols present
natural_image
Line drawing of hands holding a pen or ruler, no text or symbols present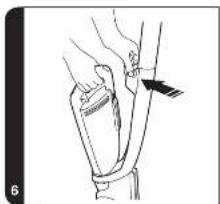
natural_image
Illustration of a hand holding a bandage with a tool, no text or symbols present
natural_image
Line drawing of a hand pouring liquid into a container (no text or symbols)
natural_image
Line drawing of three wooden containers with different shapes, no text or symbols present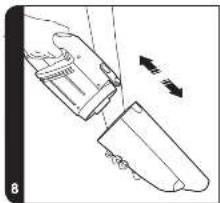
natural_image
Diagram of a mechanical component with directional arrows indicating movement or force (no text or symbols present)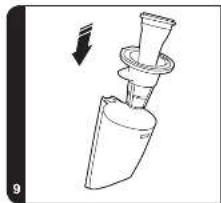
natural_image
Line drawing of a mechanical component with a downward arrow indicating motion (no text or symbols)
IMPORTANT INFORMATION
This cleaner should only be used for domestic cleaning, as described in this user guide. Please ensure that this guide is fully understood before operating the appliance. Use only attachments recommended or supplied by Candy. The charger base is double insulated and must not be earthed.
Electrical Requirements
This Candy appliance is supplied with a double insulated battery charger which is only suitable for insertion in a 230V (UK 240V) socket outlet. Ensure that the charger rating label matches your voltage supply.
SAFETY REMINDERS
- DO NOT let children play with the appliance or its controls. Please supervise the use of the appliance by older children, the elderly or the infirm.
• DO NOT use your cleaner outdoors, on wet surfaces or for wet pickup.
• DO NOT pick up hard or sharp objects, matches, hot ashes, cigarette ends or other similar items. - DO NOT spray with, or pick up flammable liquids such as cleaning fluids, petrol, etc, or their vapours, as they may cause an explosion or fire.
• DO NOT replace the NiMH batteries with non rechargeable batteries.
• DO frequently clean the dust cup and filter assembly. - DO return the appliance to the charger base after use to recharge the batteries. Occasionally fully discharge the batteries to obtain the maximum battery life.
CANDY SERVICE: To ensure the continued safe and efficient operation of this appliance we recommend that any servicing or repairs are only carried out by an authorised Candy service engineer.
PRODUCT COMPONENTS
1 - Main Cleaner 2 - Handheld cleaner 3 - Filters
A. Main Body
B. On/Off Switch
C. On/Off Turbo Switch
D. Push and Go Release button
E. Handheld Cleaning Unit
F. Nozzle release Button
G. Carpet and Floor Nozzle
H. Charger
I. Charger Indicator
J. Power Cord
K. Crevice Tool
L. Dusting Brush
M. Rigid Extension Tube*
N. On/Off Switch
O. Bin Empty Trigger
P. Filter Access Button
Q. Dust Container
R. Filter Screen
S. Filter
PREPARING YOU CLEANER
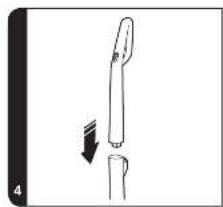
- Line up the handle to the main body of the cleaner and push into the main body until it locks in place. [4]
- Line up the nozzle with the main body and firmly push into the Main Body until the nozzle locks into place. [5]
- Assemble the handheld unit [2] to the main body.
- Place the cleaner on the charger. For first use, charge your cleaner for 24 hours.
- The indicator light will illuminate when charging.
Note: To remove the nozzle press the nozzle release button and pull away from the main body.
Note: Use only the charger supplied with your cleaner to recharge.
Important: When charging the cleaner the On/Off switch must be OFF.
Keep the charger plugged into the socket at all times. It is normal for the charger to become warm to the touch when charging.
If the operating times reduces after repeated use let the cleaner run until it stops then recharge for 24 hours, repeat this monthly for best results.
* Features vary according to model
USING YOUR CLEANER
Main cleaner
- Turn the cleaner on by pressing the On/Off button. [1B]
- Set the On/Off Turbo switch to the desired cleaning mode. [1C]
CARPET: Switch Turbo Nozzle ON (LED will be ON.)
HARD FLOOR: Switch Turbo Nozzle OFF (LED will be OFF.)
Handheld Cleaner
- Press the Push and Go button and lift the handheld unit from the cleaner main body. {6}
- Turn the handheld cleaner on by pressing the On/Off button. [2N]
ACCESSORIES
Rigid Extension Tube\*, Crevice Tool and Dusting brush
All accessories are stored at the rear of the charger. All fit directly onto the handheld unit.
CLEANER MAINTENANCE
Emptying the Dust Container
Hold the unit over a bin and pull the bin empty trigger [20] to instantly empty the dust container. [7]
Cleaning the Filters
- Release the handheld unit from the main body of the cleaner.
- Press the filter access button [2P] and remove the handle section from the dust container. [8]
- Use the filter handle to remove the filter and filter screen from the dust container. [9]
- Wash the filter and screen in hand warm water. Once thoroughly dry return to the dust container.
- Reassemble the handheld unit and return to the cleaner main body.
Note: Do not use hot water or detergents when cleaning the filters. In the unlikely event of the filters becoming damaged, fit a genuine Candy replacement. Do not try and use the product without a filter fitted.
Changing the Agitator
- Using a coin turn the lock to the open position. [10]
- Remove the agitator retainer.
- Unloop the belt and lift the agitator out of the cleaner. [11]
- Loop the belt around the new agitator and return to its original position. Replace the agitator retainer and lock in place.
End of Product Life Battery Disposal
If the cleaner is to be disposed of the batteries should be removed. Used batteries should be taken to a recycling station and not disposed with household waste.
IMPORTANT: Always fully discharge the batteries before removal.
- Run the unit until the batteries run flat.
- Release the handheld unit from the main body of the cleaner.
- Press the filter access button and remove the handle section from the dust container.
- Remove 6 screws and open the unit. [12]
- Remove the motor/battery housing and disconnect the cables.
- Remove the batteries from the housing.
Note: Should you experience any difficulties in dismantling the unit or for more detailed information about treatment, recovery and recycling of this product, please contact your local city office, your household waste disposal service.
* Features vary according to model
CANDY SPARES AND CONSUMABLES
Always replace parts with genuine Candy spares. These are available from your local Candy dealer or direct from Candy. When ordering parts always quote your model number.
• Pre-motor Filter: S93 C - 35601128
• Agitator: Y24 C - 35601129
The Environment:
This appliance is marked according to the European directive 2002/96/EC on Waste Electrical and Electronic Equipment (WEEE). By ensuring this product is disposed of correctly, you will help prevent potential negative consequences for the environment and human health, which could otherwise be caused by inappropriate waste handling of this product. The symbol on the product indicates that this product may not be treated as household waste. Instead it shall be handed over to the applicable collection point for the recycling of electrical and electronic equipment. Disposal must be carried out in accordance with local environmental regulations for waste disposal. For more detailed information about treatment, recovery and recycling of this product, please contact your local city office, your household waste disposal service or the shop where you purchased the product.

natural_image
Symbol of a trash bin with crossed lines indicating no waste, above a solid black rectangle (no text or labels)YOUR GUARANTEE
The guarantee conditions for this appliance are as defined by our representative in the country in which it is sold. Details regarding these conditions can be obtained from the dealer from whom the appliance was purchased. The bill of sale or receipt must be produced when making any claim under the terms of this guarantee.
Subject to change without notice.
natural_image
Symbol of a trash bin with crossed lines indicating no waste or restriction, and a solid black rectangle below (no text or symbols)SU GARANTÍA
- IMPORTANT INFORMATION
- Electrical Requirements
- SAFETY REMINDERS
- PRODUCT COMPONENTS
- - Main Cleaner 2 - Handheld cleaner 3 - Filters
- PREPARING YOU CLEANER
- USING YOUR CLEANER
- Main cleaner
- Handheld Cleaner
- ACCESSORIES
- Rigid Extension Tube\*, Crevice Tool and Dusting brush
- CLEANER MAINTENANCE
- Emptying the Dust Container
- Cleaning the Filters
- Changing the Agitator
- End of Product Life Battery Disposal
- CANDY SPARES AND CONSUMABLES
- The Environment:
- YOUR GUARANTEE
- SU GARANTÍA
Brand : CANDY
Model : Freejet 3 in 1
Category : Vacuum Cleaner