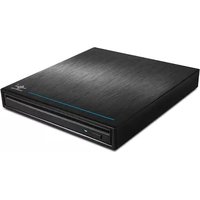
Vantec NST-520S3-BK - NAS

NST-520S3-BK - NAS Vantec - Free user manual and instructions

Find the device manual for free NST-520S3-BK Vantec in PDF.

📄 2 pages English EN Download 💬 AI Question 10 questions ⚙️ Specs
Notice Vantec NST-520S3-BK - page 1
Pick your language and provide your email: we'll send you a specifically translated version.
Product Type 2-Bay NAS Enclosure
Model NST-520S3-BK
Brand Vantec
Supported Drives 2x 3.5" or 2.5" SATA III HDD/SSD
Maximum Storage Capacity Up to 36 TB (2x 18 TB)
RAID Modes RAID 0, RAID 1, JBOD, Spanning
Interface USB 3.0 (Type-B), eSATA
File Sharing Protocols SMB/CIFS, AFP, NFS, FTP
Dimensions (W x H x D) 150 x 100 x 200 mm (5.9 x 3.9 x 7.9 in)
Weight 1.5 kg (3.3 lbs)
Power Supply 12V DC, 3A external adapter
Power Consumption 20 W (typical), 8 W (sleep)
Cooling Fan 1x 80 mm, speed controlled
LED Indicators Power, HDD activity, LAN status
Operating Temperature 0°C to 40°C (32°F to 104°F)
Humidity 5% to 85% RH (non-condensing)
Compatible Operating Systems Windows, macOS, Linux
Maintenance Clean with a soft dry cloth; avoid liquids
Safety Keep away from moisture and heat sources; ensure adequate ventilation
Spare Parts & Repairability No user-serviceable parts inside; contact Vantec support
Package Contents NAS enclosure, power adapter, USB 3.0 cable, quick start guide

Frequently Asked Questions - NST-520S3-BK Vantec

How do I set up the Vantec NST-520S3-BK NAS?
Connect the NAS to your network via Ethernet, install hard drives, power on, and access the web interface using the default IP or software. Refer to the manual for step-by-step instructions.
What RAID modes does the NST-520S3-BK support?
It supports RAID 0 (striping), RAID 1 (mirroring), JBOD (just a bunch of disks), and Spanning (linear) modes.
Can I use both 3.5-inch and 2.5-inch drives?
Yes, the NAS supports both 3.5-inch and 2.5-inch SATA III HDDs or SSDs.
How do I access files remotely?
Enable remote access in the NAS settings, set up DDNS or use the provided cloud service, then connect via FTP or the Vantec app over the internet.
What should I do if the NAS is not detected?
Check network cables, ensure drives are installed correctly, verify power supply, and try using the Vantec search utility. If still not detected, reset the NAS.
Does the NST-520S3-BK support hard drive hot-swapping?
No, this model does not support hot-swapping; power off the NAS before removing or installing drives to prevent data loss.
Can I use the NAS as a print server?
No, the NST-520S3-BK is a pure storage NAS and does not include print server functionality.
How do I update the firmware?
Download the latest firmware from the Vantec support page, log into the NAS web interface, go to System Update, and upload the firmware file.
What is the default username and password?
The default login is usually admin for both username and password. Change it immediately after first use for security.
Is the NAS compatible with Time Machine for Mac?
Yes, it supports Apple Time Machine through AFP protocol. Enable Time Machine support in the NAS settings and select the shared folder as backup destination.

User questions about NST-520S3-BK Vantec

0 question about this device. Answer the ones you know or ask your own.

Ask a new question about this device

The email remains private: it is only used to notify you if someone responds to your question.

No questions yet. Be the first to ask one.

Download the instructions for your NAS in PDF format for free! Find your manual NST-520S3-BK - Vantec and take your electronic device back in hand. On this page are published all the documents necessary for the use of your device. NST-520S3-BK by Vantec.

USER MANUAL NST-520S3-BK Vantec

Optical Drive Enclosure
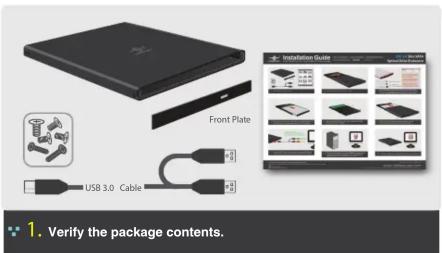
Front Plate USB 3.0 Cable 1. Verify the package contents.

Vantec NST-520S3-BK - Optical Drive Enclosure - 2

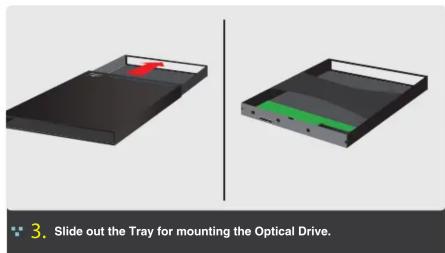
natural_image 3D rendering of a black rectangular electronic device with a red and green internal slot, labeled as 'Carefully slide out the optical drive tray' (no text or symbols on the device itself)
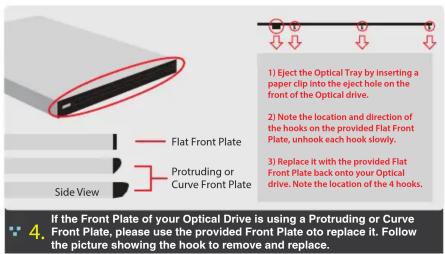
1) Eject the Optical Tray by inserting a paper clip into the eject hole on the front of the Optical drive. 2) Note the location and direction of the hooks on the provided Flat Front Plate, unhook each hook slowly. 3) Replace it with the provided Flat Front Plate back onto your Optical drive. Note the location of the 4 hooks. Flat Front Plate Protruding or Curve Front Plate Side View 3. If the Front Plate of your Optical Drive is using a Protruding or Curve Front Plate, please use the provided Front Plate to replace it. Follow the picture showing the hook to remove and replace.

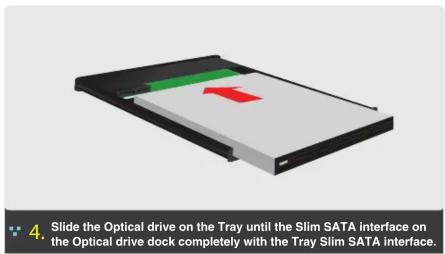
Slide the Optical drive on the Tray until the Slim SATA interface on the Optical drive dock completely with the Tray Slim SATA interface.

5. Secure the Optical Drive to the Tray using the provided small screws on both sides.

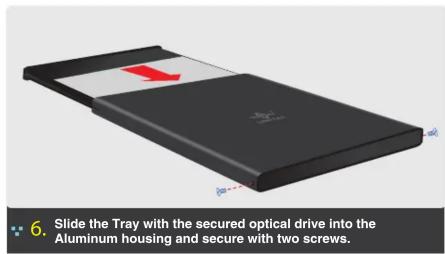
6. Slide the Tray with the secured optical drive into the Aluminum housing and secure with two screws.

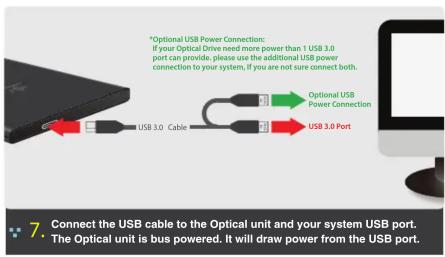
*Optional USB Power Connection: If your Optical Drive need more power than 1 USB 3.0 port can provide, please use the additional USB power connection to your system, if you are not sure connect both. *Optional USB Power Connection USB 3.0 Cable USB 3.0 Port 7. Connect the USB cable to the Optical unit and your system USB port. • The Optical unit is bus powered. It will draw power from the USB port.

8. The Operating System will detect USB Mass storage device connected and load the necessary drivers built into the Operating System. No other drivers are needed.

9. Once the drivers are installed the Optical drive is ready for use.

Information in this document is subject to change without notice.

Reproduction of these materials in any manner whatsoever without written permission is strictly forbidden.

Vantec NST-520S3-BK - Optical Drive Enclosure - 10

Printed in China

Printed on Recycled Paper.

Model: NST-510S3-BK

www.vantecusa.com

Copyright © 2015 Vantec Thermal Technologies. All Right Reserved. | All Registered Trademarks Belong To Their Respective Companies.

Vantec NST-520S3-BK - Optical Drive Enclosure - 11

Installation Guide

For NST-520S3-BK (12.7mm only). For NST-510S3-BK (9.5mm) see back page.

USB 3.0 Slim SATA

Optical Drive Enclosure

Front Plate USB 3.0 Cable Installation Guide 1. Verify the package contents.

2. Remove the two screws holding the back plate and peel away the back plate held by a latch shown.

3. Slide out the Tray for mounting the Optical Drive.

1) Eject the Optical Tray by inserting a paper clip into the eject hole on the front of the Optical drive. 2) Note the location and direction of the hooks on the provided Flat Front Plate, unhook each hook slowly. 3) Replace it with the provided Flat Front Plate back onto your Optical drive. Note the location of the 4 hooks. Flat Front Plate Protruding or Curve Front Plate Side View 4. If the Front Plate of your Optical Drive is using a Protruding or Curve Front Plate, please use the provided Front Plate oto replace it. Follow the picture showing the hook to remove and replace.

5. Slide the Optical drive on the Tray until the Slim SATA interface on the Optical drive dock completely with the Tray Slim SATA interface.

6. Secure the Optical Drive to the Tray using the provided small screws on both sides.

7. Slide the tray into aluminum housing and secure the back plate with • two provided screws.

*Optional USB Power Connection: If your Optical Drive need more power than 1 USB 3.0 port can provide, please use the additional USB power connection to your system, if you are not sure connect both. USB 3.0 Cable Optional USB Power Connection USB 3.0 Port Connect the USB cable to the Optical unit and your system 8. USB port. The Optical unit is bus powered. It will draw power from the USB port.

The Operating System will detect USB Mass storage device connected and load the necessary drives built into the Operating System. No other drives are needed. Once the drives are installed the Optical drive is ready for use.

Information in this document is subject to change without notice.

Reproduction of these materials in any manner whatsoever without written permission is strictly forbidden.

Vantec NST-520S3-BK - Optical Drive Enclosure - 10

Printed in China

Printed on Recycled Paper.

Model: NST-520S3-BK

www.vantecusa.com

Copyright © 2015 Vantec Thermal Technologies. All Right Reserved. | All Registered Trademarks Belong To Their Respective Companies.
Table of contents Click a title to access it
Manual assistant
Powered by Anthropic
Waiting for your message
Product information

Brand : Vantec

Model : NST-520S3-BK

Category : NAS