
BWOS 24200 - Oven BLOMBERG - Free user manual and instructions
Find the device manual for free BWOS 24200 BLOMBERG in PDF.


| Product Type | Built-in Electric Multifunction Oven |
| Brand | Blomberg |
| Model | BWOS 24200 |
| Outer Dimensions (HxWxD) | 595 x 594 x 567 mm (23 27/64" x 23 25/64" x 22 21/64") |
| Installation Dimensions (HxWxD) | 590 or 600 x 560 x min. 550 mm (23 15/64" or 23 5/8" x 22 3/64" x min. 21 21/32") |
| Power Supply | 120/240V ~ 60 Hz |
| Total Power Consumption | 2.5 kW |
| Fuse Protection | min. 20 A |
| Cable Type | BC-SIL 4X15 AWG |
| Cable Length | 3 to 6 feet |
| Oven Functions | Static, Bottom heat, Top/bottom heat with convection, Hot air, 3D, Broil, Broil with convection, Fan only |
| Timer | Digital timer with alarm clock, duration, end of cooking, manual mode |
| Interior Light | 2 x halogen lamps (15-25 W each) |
| Broil Power Consumption | 2.2 kW |
| Cooling Fan | Yes, runs up to 20-30 min after oven off |
| Self-Cleaning | Catalytic walls (porous self-cleaning enamel) |
| Removable Door | Yes, by releasing hinge clips |
| Safety Features | Child safety, automatic shut-off via timer, cooling fan |
| Accessories Included | 1 wire shelf |
| Weight (approx.) | 60 kg |
| Warranty | 1 year limited (parts & labor), 2 years parts, 5 years circuit boards, lifetime parts |
Frequently Asked Questions - BWOS 24200 BLOMBERG
User questions about BWOS 24200 BLOMBERG
0 question about this device. Answer the ones you know or ask your own.
Ask a new question about this device
Download the instructions for your Oven in PDF format for free! Find your manual BWOS 24200 - BLOMBERG and take your electronic device back in hand. On this page are published all the documents necessary for the use of your device. BWOS 24200 by BLOMBERG.
USER MANUAL BWOS 24200 BLOMBERG
⚠️ Please read these instructions before installation or using your appliance!
Dear Customer,
We would like you to obtain best performance with your product that has been manufactured in modern facilities and passed through strict quality control procedures.
Therefore, we advise you to read through this user manual carefully before using your product and keep it for future reference. If you hand over the product to someone else, deliver the user manual as well.
The user manual will help you use the product in a fast and safe way. Important: Save these instructions for the local electrical inspectors use.
The instructions will help you to operate the appliance quickly and safely.
- Upon delivery, please check that the appliance is not damaged. If you note any transport damage, please contact your point of sale immediately and do not connect and operate the appliance!
- Before you connect and start using the appliance, please read this manual and all enclosed documents. Please note in particular the safety instructions.
- Keep all documents so that you can refer to the information again later on. Please keep your receipt for any repairs which may be required under warranty.
- When you pass on the appliance to another person, please provide all documents with it including original date of purchasing. (The warranty does not convey if the unit is sold).
- If you should decide not to use this appliance any longer (or decide to substitute an older model), before disposing of it, it is recommended that it be made inoperative in an appropriate manner in accordance to health and environmental protection regulations, ensuring in particular that all potentially hazardous parts be made harmless, especially in relation to children who could play with old appliances. Remove the door and the warming drawer before disposal to prevent entrapment.
Explanation of symbols
Throughout this User Manual the following symbols are used:
i Important information or useful hints about usage.
⚠ Warning for hazardous situations with regard to life and property.
Warning for electric shock.
Warning for risk of fire.
Warning for hot surfaces.
Table of Contents
1 SAFETY INSTRUCTIONS 4
Basic safety instructions 4
Safety for children 6
Intended use 6
Disposal 7
Packaging material 7
Future transportation....7
2 INSTALLATION 8
Important notes to the consumer.....8
Installation and connection ..... 12
Connection to the main supply ..... 13
Installation 15
3 PREPARATION 16
Tips for saving energy 16
Initial operation 16
Setting the time....16
First cleaning of the appliance ..... 16
Initial heating 17
General information on baking, roasting and broiling 18
Tips for baking. 18
Tips for roasting. 18
Tips for broiling 18
How to use the electric oven ..... 18
How to operate the oven timer ..... 20
Cooking times table....21
How to operate the broil 23
Cooking times table for broiling ..... 24
How to use the alarm clock....24
5 MAINTENANCE AND CARE25
General information 25
Cleaning the control panel....25
Cleaning the oven 25
Removal of oven door 25
Replacing the oven lamp 26
6 GENERAL INFORMATION 27
Technical Data....28
Accessories supplied with the unit....28
7 TROUBLESHOOTING 29
Electrical equipment 29
8 WARRANTY STATEMENT for Blomberg
Electric and gas ranges 30
1 SAFETY INSTRUCTIONS
Basic safety instructions
- The manufacturer reserves its right to make changes in the technical specifications in order to improve the appliance quality without any prior notice. Figures included in this manual are for schematic purpose only and may not match exactly with your appliance. Values stated on the markings of the appliance or in other printed documents supplied with the appliance are obtained under laboratory conditions as per relevant standards. These values may vary according to the usage of the appliance and ambient conditions.
- This appliance is not intended for use by persons (including children) with reduced physical, sensory or mental capabilities, or lack of experience and knowledge, unless they have been given supervision or instruction concerning use of appliance by a person responsible for their safety.
Children should be supervised to ensure that they do not play with the appliance.
- Proper installation - Be sure your appliance is properly installed and grounded by a qualified technician
- Never use your appliance for warming or heating the room.
- Wear proper apparel - loose-fitting or hanging garments should never be word while using the appliance.
- User servicing - Do not repair or replace any part of the appliance unless specifically recommended in the manual. All other servicing should be referred to a qualified technician.
- Use care when opening door-let hot air or steam escape before removing or replacing food.
- Placement of oven racks -always place oven racks in desired location while oven is cool. If rack must be moved while oven is hot, do not let potholder contact hot heating element in oven.
- Use only dry potholders-Moist or damp potholders on hot surfaces may result in burns from steam. Do not let potholder touch hot heating elements. Do not use a towel or other bulky clothes.
- Do not heat unopened food containers- Build-up of pressure may cause container to burst and result in injury.
- Keep oven vent ductsunabstructed.
- Ensure that no flammable materials are adjacent to the appliance as the sides become hot during use.
- Do not place baking trays, dishes or aluminium foil directly onto the bottom of the oven. The heat accumulation might damage the bottom of the oven.
- Keep all ventilation slots clear of obstructions, the furniture cabinet and may cause premature failure of the oven element.
- The manufacturer declines all liability for injury to persons or damage to property caused by incorrect or improper use of the appliance.
- Do not use the oven with front door glass removed or broken.
- Do not use Water on Grease Fires-Smother fire or flame or use dry chemical or foam-type extinguisher.
- Rear surface of the oven gets hot when it is in use. Electric connection should not touch the rear surface, otherwise the main cable may get damaged.
Do not trap the main cable between the hot oven door and frame. Do not route the main cable over the hot cooking section. Otherwise, cable insulation may melt and cause fire as a result of short circuit.
- Never wear loose-fitting or hanging garments while using the appliance. Be careful when reaching for items stored in cabinets over the oven. Flammable materiel could be ignited if brought in
contact with hor surfaces or heating elements and may cause severe burns.
- Flame in the oven can be smothered completely by closing the oven door and turning the oven off or by using a multi-purpose dry chemical or foam-type fire extinguisher.
- Pulling out the rack to the stop-lock is a convenience in lifting heavy foods. It is also a precaution against burns from touching hot surfaces of the door or oven walls.
- Do not use the oven to dry newspapers. If overheated, they can cath on fire.
- Storage in or on Appliance-Flammable materials should not be stored in an oven or near surface units.
- Do not leave paper products, cooking utensils or food in the oven when not in use.
• After broiling, always take any broiler pan out of the oven and clean it. Leftover grease in a broiler pan can catch fire next time you use the pan. - Check that all controls on the appliance are switched off after use.
i IMPORTANT: Call the authorized service for installation of the appliance to be used. After this procedure, guarantee period will be started.
i IMPORTANT: DO NOT TOUCH HEATING
ELEMENTS OR INTERIOR SURFACES OF OVEN – Heating elements may be hot even though they are dark in color. Interior surfaces of an oven become hot enough to cause burns. During and after use, do not touch, or let clothing or other flammable materials contact heating elements or interior surfaces of oven until they have had sufficient time to cool. Other surfaces of the appliance may become hot enough to cause burns – among these surfaces are (identification of surfaces – for example, oven vent openings and surfaces near these openings, oven doors, and windows of oven doors).
Safety for children
CAUTION: Do not store items of interest to children in cabinets above a range or on the backguard of a range - children climbing on the range to reach items could be seriously injured.
- The packaging materials will be dangerous for children. Keep the packaging materials away from children. Please dispose of all parts of the packaging according to environmental standards.
- Accessible parts may be hot when the broil is in use. Young children should be kept away.
- Do not leave children alone - children should not be
left alone or unattended in area where appliance is in use. They should never be allowed to sit or stand on any part of the appliance.
Safety when working with electricity
- Any work on electric equipment and systems may only be carried out by authorized qualified persons.
- In case of any damage, switch off the appliance and disconnect it from the main supply by removing the fuse or switching off the circuit breaker.
- Ensure that the fuse rating is correct.
- Do not operate the appliance barefooted.
- Never touch the appliance with wet hands or feet.
- Do not soak removable heating elements. Heating elements should never be immersed in water.
Intended use
i NOTICE: This product is designed for domestic cooking purposes only. It is not designed for any other uses such as room heating or drying towels and dish cloths. Commercial use will void the guarantee.
- This appliance is not intended to use at mobile homes, recreational vehicles.
- All openings in the wall behind the appliance and in the floor
under the appliance shall be sealed.
- Do not obstruct the flow of ventilation air.
- The manufacturer shall not be held liable for any damage caused by improper use or handling errors.
The appliance can be used for defrosting, baking, roasting and broiling food.
Disposal
Packaging material
⚠️ DANGER: Risk of suffocation by the packaging materials!
Packing elements (i.e. plastic bags, polystyrene foam, nails, packing straps, etc.) should not be left around within easy reach of children, as these may cause serious injuries.
The packaging material and transport locks are made from materials that are not harmful to the environment. Please dispose of all parts of the packaging according to environmental standards. This is beneficial to the environment.
Future transportation
Do not carry out cleaning or mainte-nance operations on the appliance without having previously disconnected it from the electric power supply.
i NOTICE: Do not place other items on the top of the appliance. The appliance must be transported upright.
Store the appliance's original box and transport the appliance in its original carton. Follow the guidance marks that are printed on the carton.
i IMPORTANT: Verify the general appearance of your equipment by identifying possible damage during the transportation.
To prevent the wire shelf and tray inside the oven from damaging the oven door, place a strip of cardboard onto the inside of the oven door that lines up with the position of the trays. Tape the oven door to the side walls.
If you do not have the original carton
Pack the appliance in bubble wrap or thick cardboard and tape it securely in order to prevent damage during transportation.
2
INSTALLATION
i IMPORTANT:
The product should only be installed by suitably qualified electricians.
- Preparation of location and electrical installation for the product is under customer's responsibility.
- The product must be installed in accordance with all local electrical regulations.
- Prior to installation, visually check if the product has any defects on it. If so, do not have it installed.
Damaged products cause risks for your safety.
Before installation
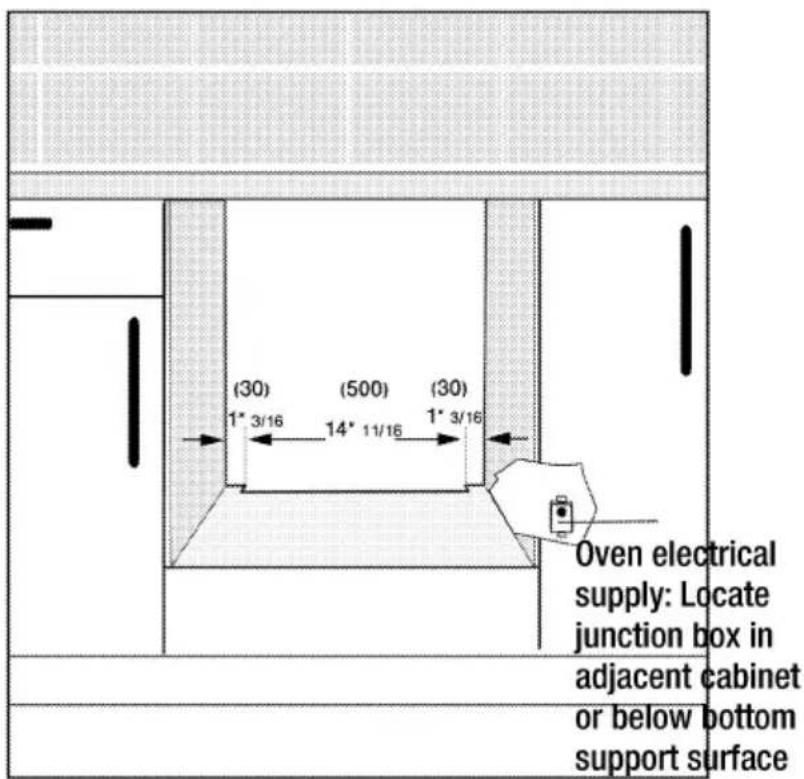
The appliance is intended for installation in commercially available kitchen cabinets. A safety distance must be left between the appliance and the kitchen walls and furniture. See figure (values in mm).
- Surfaces, synthetic laminates and adhesives used must be heat resistant.
- Kitchen cabinets must be set level and fixed.
- If there is a drawer beneath the oven, a shelf must be installed between oven and drawer.
- The following installation drawings are representational and may not match exactly with your appliance
- Product guarantee will be valid after proper installation. Manufacturer will not be responsible any hazard or damage of improper installation or usage.
- Don't pull the oven on the floor during transportation in order to avoid damages on the floor surface. Always carry your product by using two or more people.
- Remove all shipping materials inside or outside of the oven.
- Remove all equipments inside of the oven including the printed documents.
Important notes to the consumer
Keep this manual for future reference.
- As when using any range generating heat, there are certain safety precautions you should follow. These are listed in the front of this manual. Read and follow carefully.
- Be sure your range is installed and grounded properly by a qualified installer or service technician.
Installation Conditions
- All dimensions given in this manual are in millimeters.
- The oven has dimensions given in Figure B.
* : excluding handle
** : minimum
- The product should be installed to the cabinets with the dimensions specified for different types of locations.
- The first step of the installation is to check the dimensions of your existing cut out. For new furniture orders, these dimensions should be considered.
- All cabinet works, if necessary should be completed before installation and all remains of the work should be cleaned before installation.
- Kitchen cabinet should be fixed and level so that the fix oven can't tilt.
- The board of the cabinet on which the oven to placed should withstand 60 kg or more.
- If there is a drawer beneath the oven, a shelf must be installed between the oven and drawer.
Installation Under a Countertop
- The cabinet should have the dimensions in Figure A.
- In the rear of the cabinet, there should be a cut out for sufficient air ventilation.
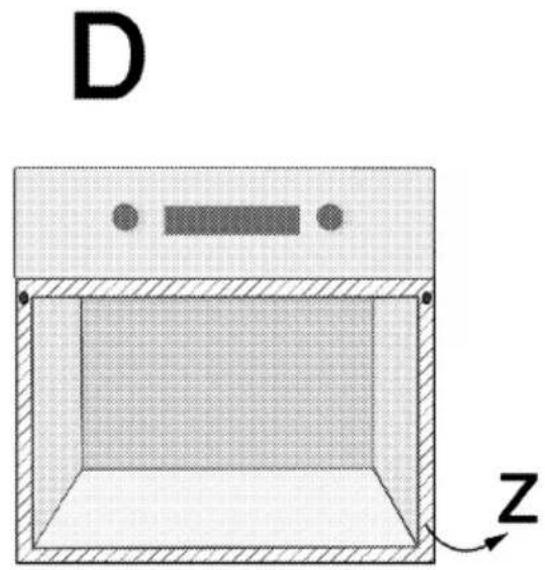
- The air ventilation gap between the oven and countertop (Y in Figure D) should not be closed.
Installation in a High Cupboard
- The cabinet should have the dimensions in Figure C.
- In the rear of the cabinet, both on the bottom and top of the cabinet, there should be a cut out for sufficient air ventilation.
Positioning and Fixing the Oven
- Put the oven into the cabinet by two or more people.
- Don't carry or lift the oven from its handle or front panel. Use plastic slots on both sides of the oven to carry the product.
- Push the oven into the cabinet from the seal area (Z in Figure D). Don't push against the control panel or edges.
- Be sure that oven frame and cabinet front frame overlapped perfectly.
- The supply cord must not be clamped, bent, or squeezed during positioning the oven into the cabinet. If there is a damage on the supply cord, it must be replaced by a qualified electrician with a new supply cord with the technical properties listed in the user manual.
- Fix the oven to the cabinet using the screws provided. Screws should be
inserted through installation plastics mounted on the side frames of the oven (see Figure D). Do not over tighten the screws.
- After installation, check the screws are securely tightened and the product can't be moved. If the oven is not installed and tightened properly, there is a risk of tip over.
Final Check
- Turn on the power source after installing the oven.
- Refer to the user manual for first usage of the oven.
- Check functions.
A


B


natural_image
Diagram of a 3D box with labeled dimensions and internal structure, no readable text or symbolsInstallation and connection
i NOTICE
Material damage!
The door and/or handle must not be used for lifting or moving the appliance.
If the appliance has wire handles, push the handles, back into the side walls after moving the appliances.
- Carry the appliance with at least two persons.
• For installation the appliance must be connected in accordance with all local electrical and/or gas regulations.
DANGER:
Electrical shock hazard!
- Use extreme caution when drilling holes into the wall or floor. There may be concealed electrical wires located behind the wall or under the floor.
Failure to follow these instructions may result in electrical shock or other personal injury.
i IMPORTANT:
Property damage!
- Contact a qualified installer or contractor to determine the proper method for drilling holes through the wall or floor material (such as ceramic tile, hardwood, etc.)
- Do not slide the unit across un unprotected floor.
- Failure to follow these instructions may result in damage to wall or floor coverings.
- The California Safe Drinking water and Toxic Enforcement Act requires the Governor of California to publish a list of substances known to the State of California to cause cancer,
birth defects, or other reproductive harm, and re-quires businesses to warn of potential exposure to such substances.
i IMPORTANT:
This product contains a chemical known to the state of California to cause cancer, birth defects, or other reproductive harm.
This appliance can cause low-level exposure to some of the substances listed, including benzene, formaldehyde, carbon monoxide, and toluene.
Installation Instructions
• Electrical connections:
- Attention Installer
- All electric wall ovens must be hard wired (Direct wired) into an approved junction box. A plug and receptable is not permitted on these product. Do not shorten the flexible conduit. The conduit strain relief clamp must be securely attached to the junction box and the flexible conduit must be securely attached to the clamp. If the flexible conduit will not fit within the clamp, do not install the oven the oven until a clamp of the proper size is obtained.
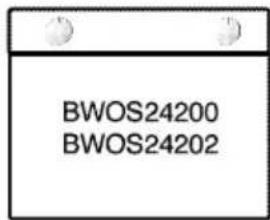
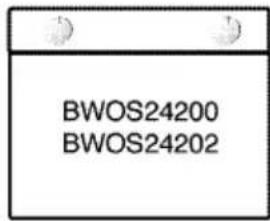
Rating Plate Location
Open the front door to see the rating label.

Electrical Connection
i IMPORTANT: Save for the local electrical inspector's use.
i IMPORTANT: Any work
on electric equipment and systems may only be carried out by authorized qualified persons.
- It is important that the place of installation has an adequate electrical system. Before installing the oven, it should be controlled by a qualified electrician and approved that the addition of the oven will not overload the branch circuit on which it is to be installed. The mains supply data should correspond to the data specified on the type plated. Type plate can be reached by opening the front door of the oven.
- The unit should be installed and connected in accordance with national and local regulations.
- The cable for further replacements should correspond to the specifications listed in the user manual.
- Turn off the power source before installing the oven. The product should not be connected to the mains before the installation completed.
Connection to the main supply
i IMPORTANT: Electrical installation should comply with national and local codes.
i IMPORTANT: This appliance must be grounded!
⚠️ DANGER:
power supply!
The main power supply lead must not be clamped, bent or trapped or come into contact with hot parts of the appliance.
If the main power supply is damaged, it must be replaced by a qualified electrician.
Be sure your appliance is properly installed and grounded by a qualified technician. Ask your dealer to recommend a qualified technician or an authorized repair service.
This appliance is manufactured with a green GROUND wire connected to the oven chassis. After making sure that the power has been turned off, connect the flexible conduit from the oven to the junction box using a U.L. listed conduit connector. Figures A and B and the instructions provided below present the most common way of connecting the ovens. Your local codes and ordinances, of course, take precedence over these. Complete electrical connections according to local codes and ordinances "WARNING" Risk of Electric Shock, frame grounded to neutral of appliance through a link.
Grounding through the neutral conductor is prohibited for new branch-circuit installations (1996 NEC); mobile homes; and recreational vehicles, or in an area where local codes prohibit grounding through the neutral conductor. For installations where grounding through the neutral conductor is prohibited:
- Disconnect the ground from the neutral at free end of conduit;
• Use grounding terminal of lead to ground unit; and - Connect neutral terminal or lead to branch circuit neutral in usual manner.
Wire branch circuit (for US only)

Refer to Figure A, where local codes allow the connection of GROUND wire from the oven to the branch circuit NEUTRAL wire (gray or white colored wire):
- If local codes permit, connect the green GROUND wire from the oven and white wire form the oven to the branch circuit NEUTRAL wire (gray or white colored wire).
- Connect the red and black leads from the oven to the corresponding leads in the junction box.
Wire branch circuit (for US and Canada)
Figure B
Ungrounded Neutral
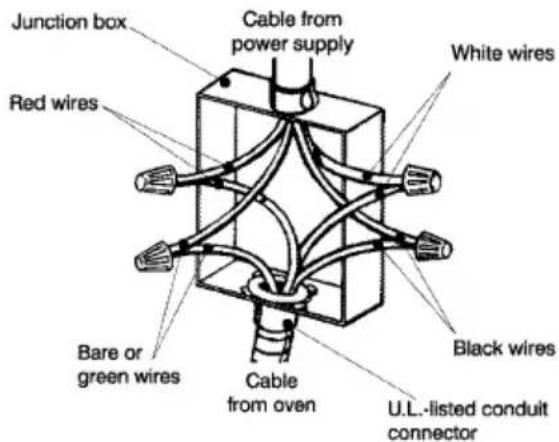
Refer to Figure B:
- Disconnect ground from neutral at free end of conduit.
- Connect the green GROUND wire from the oven to the GROUND wire in the junction box (bare or green colored wire).
- Connect the red and black leads from the oven to the corresponding leads in the junction box.
- Connect the white wire from the oven to the NEUTRAL (gray or white) wire in the junction box.
Electrical Requiremetns:
- This appliance must be supplied with the proper voltage and frequency, and connected to an individual, properly grounded branch circuit, protected by a circuit braker or fuse.
- See the rating plate located on the side trim to determine the rating of the product. Use the chart below to determine to minimum recommended dedicated circuit protection.
| kW Rating 240 V | Recommended circuit size (Dedicated) |
| < 4,8 kW | 20 Amp |
For installations where grounding through the neutral conductor is prohibited.
The main supply data must correspond to the data specified on the rating plate of the appliance. The rating plate is either seen when the door or the lower cover is opened or it is located at the rear wall of the appliance depending on the appliance type.
Installation
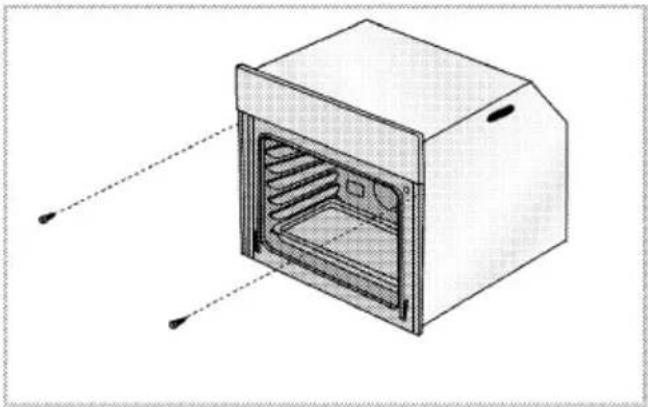
- Slide the oven through the cabinet aperture, align and secure.
natural_image
Diagram of an oven with internal grating and ventilation slots, shown in isometric view (no text or labels)• Fix your oven with the 2 screws and washers as indicated in the figure.
Final check
• 1. Connect the appliance to the mains supply and switch on the mains supply.
• 2. Check function.
For equipment with a cooling fan

1 Fan
2 Control panel
3 Door
- The Built-in cooling fan cools both the built-in cabinet and the front of the appliance.
NOTE
Cooling fan continues to run for up to 20-30 minutes (approx.) even after the oven is turned off.
3 PREPARATION
Tips for saving energy
The following tips will help you to use your appliance in an ecological way and to save energy:
- Use dark colored and enamel coated trays, since the heat transmission will be better.
- While cooking your meals, perform a preheating operation if it is advised in the user manual or cooking instructions.
- During cooking, do not open the oven door frequently.
- Try to cook more than one type of meal within the oven at the same time (You can cook two different meals at the same time by locating cooking bowls on the same shelf). It will be suitable to cook more than one meal after each other. The oven will already be hot.
- Defrost frozen meals before cooking them.
- You can save energy by switching off your oven a few minutes before the end of the cooking time (The oven door should not be opened).
Initial operation
Before first usage of your appliance, don't forget to remove the sticker on the digital timer screen.
Setting the time
i IMPORTANT: Before using the oven the clock time must be set. If the clock time is not set, the main oven will not work.

Keys for:
1 Alarm clock
2 Duration
3 End of cooking time
4 Manual mode & Time of the day
Keys for time adjustment:
5 Minus key
6 Plus key
- Press key 4.
- Set clock with key 5 or key 6. By pressing the key shortly, you advance or reset the clock by one minute. When you keep the individual key pressed, the minutes are advanced or reset quickly.
First cleaning of the appliance
i IMPORTANT: When removing appliance for cleaning and/or service;
Disconnect AC power supply.
Carefully remove the range by pulling outward.
i NOTICE: The surface might get damaged by some detergents or cleaning materials.
Do not use aggressive detergents, cleaning powder/cream or any sharp objects. Be careful to avoid steam burn. Some cleaners can produce noxious fumes if applied to a hot surface.
- Remove all packaging materials.
- Wipe the surfaces of the appliance with a damp cloth or sponge and dry with a cloth.
Initial heating

WARNING: Hot surfaces
may cause burns!
Do not touch the hot surfaces of the appliance. Use oven gloves. Keep children away from the appliance.

IMPORTANT: Smell and moke may emit during first heating. Ensure that the room is well ventilated.
Any production residues or conservation layers must be burnt off before the first use. Heat up the appliance for about 30 minutes and then switch it off.
Electric oven
- Take all baking trays and racks from the oven.
- Close oven door.
- Select top and bottom heat with the function knob.
- Select the highest temperature with the thermostat knob; see How to use the electric oven, page 23.
- Heat approximately 30 minutes.
- Switch off oven; see How to use the electric oven, page 23.
Broil oven
- Take all baking trays and wire shelf from the oven.
- Close oven door.
-
Select highest power of the broil; see How to operate the broil, page 26.
-
Heat approximately 30 minutes.
- Switch off broil; see How to operate the broil, page 26
General information on baking, roasting and broiling
⚠️ DANGER:
Risk of scalding by hot steam!
Stand away from the oven when opening oven door. Hot air or steam which escapes can cause burns to hands, face, and/or eyes.
Let hot air or steam escape before removing or replacing food.
Tips for baking
- Use non-stick coated appropriate metal plates or aluminum containers or heat-resistant silicone moulds.
• Make best use of the space on the rack. - It is recommended to place the baking mould in the middle of the rack.
- Select the correct shelf position before turning the oven or broil on do not move oven shelves when hot.
- Always place oven racks in desired location while oven is cool. If rack must be moved while oven is hot, do not let potholder contact hot heating element in oven.
- Keep the oven door closed.
Tips for roasting
- Seasoning with lemon juice and black pepper will improve the cooking performance when cooking a whole chicken, turkey or a large piece of meat.
-
Meat with bones takes about 15 to 30 minutes longer before it is cooked than a roast of the same size without bones.
-
You should calculate about 4 to 5 minutes cooking time per centimeter height of the meat.
- Let meat rest in the oven for about 10 minutes after the cooking time. The juice is better distributed all over the roast and does not run out when the meat is cut.
- Fish in a fire-resistant dish should be placed on the rack at the medium or lower level.
Tips for broiling
Broiling is ideal for cooking meat, fish and poultry and will achieve a nice brown surface without it drying out to much. Flat pieces, meat skewers and sausages are particularly suited for broiling as are vegetables with a high water content such as tomatoes and onions.
- Distribute the pieces to be broiled on the wire shelf.
- If the broiling is on the wire shelf, locate a dripping pan under it in order to collect the fat.
- Add some water in dripping pan for easy cleaning.
How to use the electric oven
i IMPORTANT:
Before using the oven, the clock time must be set. If the clock time is not set, the main oven will not work.
i IMPORTANT:
Food Poisoning Hazard
Do not let food sit in oven more than one hour before or after cooking.
Doing so can result in food poisoning or sickness.
Select temperature and operating mode
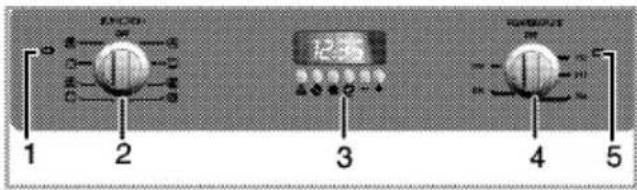
1 Warning lamp
2 Function knob
3 Digital timer
4 Thermostat knob
5 Thermostat lamp
The operating modes of the electric oven are selected with the function knob.
The temperature is adjusted with the thermostat knob.
All oven functions are turned off by turning the relevant knob to off (upper) position.
- Set thermostat knob to the desired temperature.
- Set function knob to the required operating mode.
» The oven heats up to the adjusted temperature and maintains it. During heating, temperature lamp stays on.
Switch off electric oven
Turn function knob and thermostat knob to off position (top).

natural_image
Cross-sectional diagram of a mechanical device showing internal components and housing (no text or labels)Shelf positions
It is important to position the wire shelf on side rack correctly. The wire shelf must be placed so that it will fit into the opening of the wire shelf as illustrated in the figure.
Operating modes
All functions for the ovens (also included main oven) are listed in this section.
The order of operating modes shown here might deviate from the arrangement on your appliance.
Static

Top and bottom heat are on. The foodstuffs are heated simultaneously from the upper and
lower part. Suitable for cakes, cookies or cakes and casseroles in baking moulds.
Cook with one tray only.
Bottom heat

Only bottom heat is on. Is particularly suitable for dishes, such as pizza, which are required
to be baked from bottom.
Top and bottom heat with convection air

Top and bottom heat plus fan (in the rear wall) are on. The hot air is distributed evenly and quickly all
over the oven by the fan. Cook with one tray only.
Operating with fan

The oven is not heated. Only the fan (in the rear wall) is in operation. Frozen granular food is thawed
slowly at room temperature and cooked food is cooled down.
Hot air

The heating ring with fan (in the rear wall) is in operation. The hot air is distributed evenly and quickly all over the oven by the fan. In most cases, preheating is not required. Suitable when several levels are used for the preparation
of food. Suitable for cooking with multi trays.
"3D" function
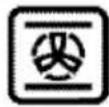
Top heat, bottom heat plus ring heat with fan (in the rear wall) are on. The food to be cooked is evenly and quickly cooked all around. Cook with one tray only.
Broil
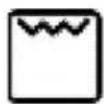
The large (under the oven roof) is in operation. Suitable for broiling larger quantities.
- Put big or medium-sized portions in correct shelf position under the broil heater for broiling.
- Set the temperature to maximum level.
- Turn the food after half of the broiling time.
Broil with convection air
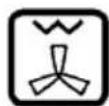
The broil effect is not as strong as with normal broiling.
- Put small or medium-sized portions in correct shelf position under the broil heater for broiling.
- Set the temperature to maximum level.
- Turn the food after half of the broiling time.
How to operate the oven timer

Keys for:
1 Alarm clock
2 Duration
3 End of cooking time
4 Manual mode & Time of the day
Keys for time adjustment:
5 Minus key
6 Plus key
i IMPORTANT:
The maximum time to be set for the end of the cooking process is 12 hours. In case of power cut, program will be canceled. Reprogram is needed.
Switch on fully automatic operation
In this mode of operation, after setting the finishing time, you can set time of cooking. Oven adjust and starts automatically.
- Press key 3.
- Set end of the cooking time with key 5 or key 6. By pressing the key shortly, you advance or reset the clock by one minute. When you keep the key pressed, the minutes are advanced or reset quickly.
» The indication "AUTO" lights up on the display. - Keep key 2 pressed.
- Set the cooking time with key 5 or key 6. By pressing the key shortly, you advance or reset the clock by one minute. When you keep the key pressed, the minutes are advanced or reset quickly.
- Put your dish into the oven.
- Select operating mode and temperature.
» The oven is heated up to the set temperature and keeps this
temperature until the end of the cooking time that has been selected. During the cooking process, the cooking symbol on the display is lit.
- Press key 3 as soon as the cooking process has been completed and an alarm sounds.
- Switch the oven off with the thermostat knob and/or the function knob.
- Press key 4.
» The indication "AUTO" on the display goes off.
Switch on semi-automatic operation
In this mode of operation, after set the time of cooking, oven start the cooking.
- Press key 2.
- Set the cooking time with key 5 or key 6. By pressing the key shortly, you advance or reset the clock by one minute. When you keep the key pressed, the minutes are advanced or reset quickly.
» The indication "AUTO" lights up on the display.
3. Put your dish into the oven.
4. Select operating mode and temperature.
» The oven is heated up to the set temperature and keeps this temperature until the end of the cooking time that has been selected. During the cooking process, the cooking symbol on the display is lit.
5. Press key 3 as soon as the cooking process has been completed and an alarm sounds.
6. Switch the oven off with the thermostat knob and/or the function knob.
7. Press key 4.
» The indication "AUTO" on the display goes off.
i IMPORTANT:
When you press key 2 during the cooking process, the display will show the remaining cooking time for a short moment.
Interrupting the cooking process
- Keep key 2 pressed.
- Keep key 5 pressed until "0.00" is shown as remaining cooking time on the display.
- Release key 2.
- Press key 4.
» The indication "AUTO" on the display goes off. - Switch the oven off with the thermostat knob and/or the function knob.
Cooking times table
i IMPORTANT:
The values indicated in the table below are data indicative. They may vary according to the type of food as well as your preferences of cooking.
| Food | Cooking level number | Rack position | Temperature (°F) | Cooking time (min.) (approx.) | |
| Cake in tray | One level | 3 | 350 | 25 ... 30 | |
| Cake in mould | One level | 2 | 355 | 40 ... 50 | |
| Cakes in paper | One level | 3 | 350 | 25 ... 30 | |
| 2 levels | 1 - 5 | 350 | 30 ... 40 | ||
| 3 levels | 1 - 3 - 5 | 355 | 45 ... 55 | ||
| Sponge cake | One level | 3 | 390 | 5 ... 10 | |
| 2 levels | 1 - 5 | 350 | 20 ... 30 | ||
| Cookies | One level | 3 | 350 | 25 ... 30 | |
| 2 levels | 1 - 5 | 340 ... 375 | 30 ... 40 | ||
| 3 levels | 1 - 3 - 5 | 350 | 35 ... 45 | ||
| Dough pastry | One level | 2 | 390 | 30 ... 40 | |
| 2 levels | 1 - 5 | 390 | 45 ... 55 | ||
| 3 levels | 1 - 3 - 5 | 390 | 55 ... 65 | ||
| Filled savory pastry | One level | 2 | 390 | 25 ... 35 | |
| 2 levels | 1 - 5 | 390 | 35 ... 45 | ||
| 3 levels | 1 - 3 - 5 | 375 | 45 ... 55 | ||
| Leaven | One level | 2 | 390 | 35 ... 45 | |
| 2 levels | 1 - 3 | 375 | 35 ... 45 | ||
| Lasagna | One level | 2-3 | 390 | 30 ... 40 | |
| Pizza | One level | 2 | 390 ... 430 | 15 ... 20 | |
| Lamb haunch (casserole)Roast chicken | One level | 3 | 25 min. max after 355...375 | 70 ... 90 | |
| One level | 3 | 15 min. max after 355... 375 | 55 ... 65 | ||
| One level | 2 | 15 min. max after 355...375 | 55 ... 65 | ||
| Turkey (5.5 kg) | One level | 2 | 25 min. max after 355...375 | 150 ... 210 | |
| One level | 2 | 25 min. max after 355...375 | 150 ... 210 | ||
| Fish | One level | 2 | 390 | 20 ... 30 | |
| One level | 3 | 390 | 20 ... 30 | ||
| While cooking with 2 trays at the same time, place the deep tray to the upper shelf and shallow tray to the lower shelf.It is suggested to perform preheating for all foods. | |||||
(**) For preheating, set the required temperature, the thermostat lamp will go out when the required temperature is reached.
Baking and roasting
i IMPORTANT: Level 1
is the bottom level in the oven.
Tips for baking cakes
- If pastry is too dry,
» Increase the temperature by 50°F and reduce the cooking time. - If pastry dropped,
» Use less liquid or lower the temperature by 50°F. - If pastry is too dark on top,
» Place it on a lower rack, lower temperature, and increase the cooking time. - If cooked well on the inside but sticky on the outside,
» Use less liquid, lower the temperature, and increase the cooking time.
Tips for baking pastry
- If the pastry is too dry,
» Increase the temperature some 50°F and decrease the cooking time.
» Dampen the layers of dough with a sauce composed of milk, oil, egg and yogurt. - If the pastry takes too long to bake,
» Make sure that the thickness of the pastry you have prepared does not exceed the depth of the tray and remain level with it. - If the upper side of the pastry gets browned, but the lower part is not cooked,
» Make sure that the amount of sauce you have used for the pastry is not too much at the bottom of the pastry. Try to
scatter the sauce equally between and on the dough layers for an even browning.
» Cook the pastry in accordance with the mode and temperature given in the cooking table. If the bottom part is still not browned enough, place it on one-layer-lower shelf next time.
Tips for cooking vegetables
- If the vegetable dish runs out of juice and gets to dry,
» Since using a lid during cooking will keep the juice of the dish in the pan, cook your vegetable dishes in a pan with a lid instead of a tray. - If a vegetable dish does not get cooked,
» Boil the vegetables beforehand or prepare them like canned food and put in the oven.
How to operate the broil i IMPORTANT:
Before using the oven the clock time must be set. If the clock time is not set, the main oven will not work.
WARNING: Hot surfaces may cause burns!
Close oven door during broiling.
Switch on broil
- Set the function knob onto the broil symbol.
- Set broil temperature.
- Preheat for approximately 5 minutes, if it is necessary.
» The thermostat lamp is switched on.
Switch off broil
- Turn broil control knob to off position (top).
Shelf positions
For optimum broil coverage, position the wire shelf towards the front of the oven just out of contact with the glass door. Placing the wire shelf fully to the rear of the oven will reduce the broil coverage.
Cooking times table for broiling
| Food | Insertion level | Grilling time (approx.) |
| Fish | 4...5 | 20...25 min.# |
| Sliced chicken | 4...5 | 25...35 min. |
| Lamb chops | 4...5 | 20...25 min. |
| Roast beef | 4...5 | 25...30 min.# |
| Veal chops | 4...5 | 25...30 min.# |
| Toast bread | 4 | 1...2 min. |
| # depending on thickness | ||
How to use the alarm clock
In addition to using the timer for cooking, it can be also used as a reminder or an alarm clock.
As soon as the defined period of time has expired, the alarm clock will emit a signal. The alarm clock has no influence on the functions of the oven.

Keys for:
1 Alarm clock
2 Duration
3 End of cooking time
4 Manual mode & Time of the day
Keys for time adjustment:
5 Minus key
6 Plus key
Setting the alarm clock
- Press key 1.
i IMPORTANT:
The maximum alarm time can be 23 hours and 59 minutes.
- With key 5 or key 6 you can set the period of time which is to elapse before the alarm signal sounds. By pressing the key shortly, you advance or reset the clock by one minute. When you keep the individual key pressed, the minutes are advanced or reset quickly.
» The alarm clock symbol on the display lights up.
i IMPORTANT:
When you press key 1 while the alarm clock is activated, the display will show the remaining cooking time for a short moment.
Switching off the alarm
- Press any key as soon as the alarm signal sounds.
» The alarm clock symbol on the display is extinguished.
In order to cancel set alarm time;
- To reset the alarm time, key 1 pressed.
- Keep key 5 pressed until "0.00" is shown as remaining time on the display.
» The alarm clock symbol on the display is extinguished.
5
MAINTENANCE AND CARE
General information

DANGER:
Risk of electric shock!
Switch off the electricity before cleaning appliance to avoid an electric shock.

DANGER: Hot surfaces
may cause burns!
Allow the appliance to cool down before you clean it.

NOTICE:
The surface might get damaged by some detergents or cleaning materials.
Do not use aggressive detergents, cleaning powder/cream or any sharp objects.
Clean the appliance thoroughly after each use; in this way it will be possible to remove cooking residues more easily, thus avoiding these from burning the next time the appliance is used.
No special cleaning agents are required for cleaning the appliance. It is recommended to use warm water with washing liquid, a soft cloth or sponge and use a dry cloth for drying.
Do not use any abrasive cleaning materials!

IMPORTANT:
Do not use steam cleaners for cleaning.
Cleaning the control panel

NOTICE:
Damage of the control panel!
Do not remove the control knobs for control panel cleaning.
Clean control panel and control knobs.
Cleaning the oven
No oven cleaner or any other special cleaning agent is required for cleaning the oven. It is recommended to wipe the oven with a damp cloth while it is still warm.
Do not allow fat or oils to build up in the oven base, or oven accessories.
To clean the side wall,
- Remove the front section of the side rack by pulling it in the opposite direction of the side wall.
- Remove the side rack completely by pulling it towards you.

Catalytic walls
Side walls or just back wall of oven interior may be covered with catalytic enamel.
The catalytic walls of the oven must not be cleaned. The porous surface of the walls is self-cleaning by absorbing and converting spitting fat (steam and carbon dioxide).
Clean oven door
Don't use any harsh abrasive cleaners or sharp metal scrapers for cleaning the oven door. They could scratch the surface and destroy the glass.
Removal of oven door
- Open the front door.
- Open the clips at the hinge housing on the right and left hand sides of the front door by pressing them down as
illustrated in the figure.

natural_image
Technical diagram of a mechanical joint or bracket with an arrow indicating rotation (no text or symbols present)
- Move the front door to half-way.
- Remove the front door by pulling it upwards to release it from the right and left hinges.
i NOTICE:
Steps carried out during removing process should be performed in reverse order (steps 4, 3, 2 and 1) to reattach the door. Do not forget to close the clips at the hinge housing when reinstalling the door.
Replacing the oven lamp
△ DANGER:
Hot surfaces may cause burns!
Make sure that the appliance is switched off and cooled down in order to avoid the risk of an electrical
shock.
The lenses must be in place when using the oven.
The lenses serve to protect the light bulb from breaking.
The lenses are made of glass. Handle carefully to avoid breakage. Broken glass could cause an injury.
i NOTICE:
Position of lamp might vary from diagram.
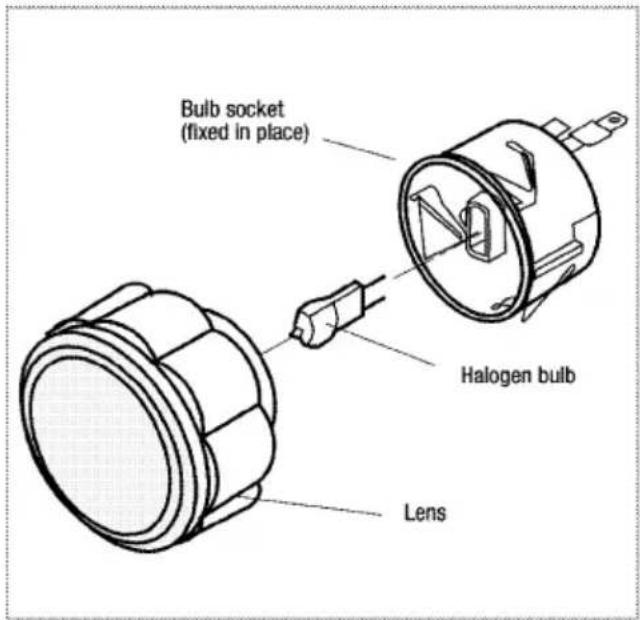
Each oven is equipped with two halogen lights located in the back wall of the oven. The lights are switched on when the door is opened or when the oven is in a cooking cycle. The oven lights are not illuminated during self clean. Each light assembly consists of a removable lens, a light bulb as well as a light socket housing that is fixed in place. Light bulb replacement is considered to be a routine maintenance item.
To replace a light bulb:
- Read warning on this page.
- Turn off power at the main power supply (your fuse or breaker box).
6 GENERAL INFORMATION
Overview
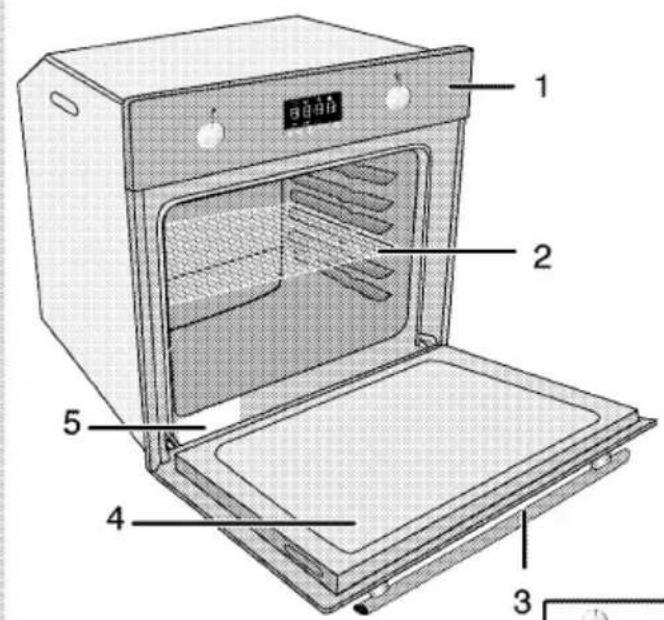


- Control panel
- Wire shelf
- Handle
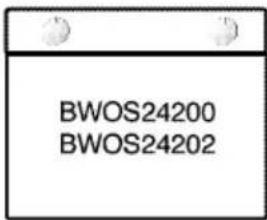
- BWOS 24100 has -U- shaped stainless steel door capping
BWOS 24200 -24202 glass door no capping
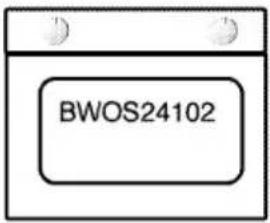
BWOS 24102 has -O- shaped stainless steel door capping
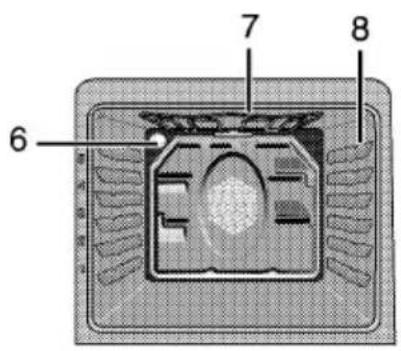
- Rating label
- Lamp
- Top heating element
- Shelf positions

1 Warning lamp
2 Function knob
3 Digital timer
4 Thermostat knob
5 Thermostat lamp
Technical Data
| GENERAL | |
| Outer dimensions (height/width/depth) | 595 mm(23” 27/64) /594 mm(23” 25/64) /567 mm (22” 21/64) inches |
| Installation dimensions (height/width/ depth) | 590 or 600 mm (23” 15/64 or (23” 5/8) /560 mm (22” 3/64) /min. 550 mm (21” 21/32) inches |
| Voltage/frequency | 120/240V ~ 60 Hz |
| Total electric power | 2,5 kW |
| Fuse protection | min. 20 A |
| Cable type / cross section | BC-SIL 4X15 AWG |
| Cable length | min. 3 max. 6 feet |
| Main oven | Multifunction oven |
| Inside illumination | 15–25 W |
| Broil power consumption | 2.2 kW |
Accessories supplied with the unit
i IMPORTANT: Accessories supplied can vary depending on the product model. All the accessories described in the user manual may not exist on your product.
Wire shelf

natural_image
Pure electrical circuit lines without any symbolsCan be used for roasting and as deposit for baking, roasting and casserole dishes.
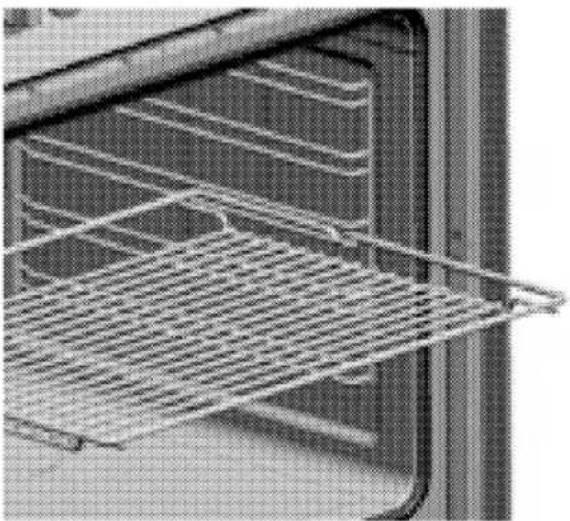
Proper positioning of the wire shelf on sliding shelves
It is important to position the broil and/or dripping pan on the wire shelves correctly. Slide the broil or the dripping pan completely between the 2 rails and make sure it is stable before putting a dish on it (Please see the following figure).
natural_image
Close-up of a stainless steel baking tray with mesh insulation inside an oven (no text or symbols visible)7 TROUBLESHOOTING
△ DANGER
Risk of electric shock, short circuit or fire by unprofessional repairs!
Repairs on the appliance must be carried out by an approved service centre.
Normal operating conditions
- Smoke and smell may emit for a couple of hours during the first operation.
- It is normal that steam escapes during operation.
- When the metal parts are heated, they may expand and cause noise.
Before you call the service, please check the following points
Electrical equipment
| Malfunction/problem | Possible cause | Advice/remedy |
| The appliance does not work. | The mains fuse is defective or has tripped. | Check fuses in the fuse box. If necessary, replace or reset them. |
| Appliance's plug can not be connected to the grounded socket. | Check the plug connection. | |
| Timer buttons do not work. | Keylock may be enabled. Please disable it(See; How to use the program lock, | |
| Oven light does not work | Oven lamp is defective. | Replace oven lamp. |
| No current. | Check fuses in the fuse box. If necessary, replace or reset them. | |
| Oven does not heat. | Function knob and/thermostat knob are not set. | Set function knob and thermostat knob. |
| If the appliance has a timer, the timer may not be set. | Set the time. | |
| No power. | Check main power supply and fuse box. |
Clock/ timer (If the appliance has a digital timer)
| Malfunction/problem | Possible cause | Advice/remedy |
| Clock display is blinking or clock symbol is on. | Power was interrupted previously. | Set timeThen switch the oven off with function knobs, set the oven function again. |
If the problem has not been solved:
- Separate unit from the mains supply (deactivate or unscrew fuse).
- Call the after-sales service of your store reseller.
i IMPORTANT
Do not attempt to repair the appliance yourself. There are no customer service items inside the appliance.
8 WARRANTY STATEMENT for
Blomberg Electric and gas ranges
Cooking Appliances(wall ovens / cooktops)
The warranties provided by Blomberg in these statements only apply to Blomberg cooking appliances(wall ovens / cooktops) sold to the original purchaser or homeowner
in the US and Canada. The warranty is not transferable. To obtain warranty service, please contact our nearest distributor as listed by state. You will need your cooking appliances(wall ovens / cooktops) model number, serial number, retailer name and address, where purchased and purchase date / installation date. This warranty gives you specific legal rights, and you may also have other rights which vary from state to state.
1 year * limited warranty from date of first installation Blomberg will repair or replace at no cost to the consumer any defective parts of the cooking appliances(wall ovens / cooktops) if used under normal household conditions (warranty is void if the product is used commercially). Service must also be performed by an authorized Blomberg service agency otherwise the warranty is void. (Cosmetic defects must be reported within 10 business days from installation)
2 year *++ limited warranty from date of first installation (Parts only) Blomberg will repair or replace any parts at no cost to the consumer if material defects or workmanship have caused the damage or failure of these components. Again the appliance must have been used under normal household conditions and not commercially as stated above (Labor charges are the responsibility of the consumer)
5 year * ++ limited warranty from date of first installation (parts only 2-5 years) Blomberg will repair or replace any circuit boards at no cost to the consumer if material defects or workmanship by an authorized service have caused the damage or failure of these components. The cooking appliances(wall ovens / cooktops) must have been used under normal household conditions and not commercially (Labor charges are the responsibility of the consumer).
Lifetime limited warranty from date of first installation *++ (parts only).
Disclaimers of warranties and exclusions: Warranty does not cover service costs by an authorized service agent to correct installation, electrical problems or educational instruction on the use of the cooking appliances(wall ovens / cooktops). The warranty also does not cover defects or damage caused by an act of god (such as storms, floods, fires, mudslides, etc.), damage cause by use of the cooking appliances(wall ovens / cooktops) for purposes other than those for which it was designed, misuse, abuse, accident, alteration, improper installation, maintenance, travel fees, service calls outside normal service hours, unauthorized service work or work.
This product is fully tested and went through official quality assurance inspections before leaving the original manufacturing site. Warranty terms for this Blomberg household appliance is not valid if the product is altered, tampered, modified, additional parts assembled, fixed and re-packed by an authorized distributor, servicer, a third party retailer, reseller or by any other unauthorized person(s).
TO THE EXTENT PERMITTED BY LAW, THIS WARRANTY IS IN LIEU OF ALL OTHER EXPRESSED AND IMPLIED WARRANTIES, INCLUDING THE IMPLIED WARRANTIES OF MERCHANTABILITY AND FITNESS FOR A PARTICULAR PURPOSE. BLOMBERG UNDERTAKES NO RESPONSIBILITY FOR THE QUALITY OF THIS PRODUCT EXCEPT AS OTHERWISE PROVIDED IN THIS WARRANTY STATEMENT. BLOMBERG ASSUMES NO RESPONSIBILITY THAT THE PRODUCT WILL BE FIT FOR ANY PARTICULAR PURPOSE FOR WHICH YOU MAY BE BUYING THIS PRODUCT, EXCEPT AS OTHERWISE PROVIDED IN THIS WARRANTY STATEMENT.
Blomberg does not assume any responsibility for incidental or consequential damages. Such damages include, but are not limited to, loss of profits, loss of savings or revenue, loss of use of the washer or any associated equipment, cost of capital, cost of any substitute equipment, facilities or services, downtime, the claims of third parties, and injury to property. Some states do not allow the exclusion or limitation of incidental or consequential damages, so the above limitations or exclusion may not apply to you.
* installation date shall refer to either purchase date or 5 business days after delivery of the product to the home, whichever is later. ++Parts replaced will assume the identity of the original parts + their original warranty.
No Other Warranties. This Warranty Statement is the complete and exclusive warranty from the manufacturer. No employee of Blomberg or any other party is authorized to make any warranty statements in addition to those made in this Warranty Statement. Please keep this warranty card, user manual and your sales slip for future reference.
HOW TO GET SERVICE
Please contact the Distributor for your State or Province as listed on the Distributor Contact List, or call our Toll Free Number at 1800 459 9848 for direction to an Authorized Blomberg Service Agent. 02 01.
natural_image
Diagram of a rectangular chamber with labeled dimensions D and Z, showing internal structure and two circular features (no text or symbols beyond labels)Installation et connection
i REMARQUE
Dommage matériel
natural_image
Diagram of a 3D oven with internal grating and ventilation duct (no text or labels)Clés pour:
natural_image
Cross-sectional diagram of a mechanical device showing internal components and housing (no text or symbols)Positions des grilles
natural_image
Technical diagram showing two views of a mechanical or electrical component with internal wiring and labeled parts (no readable text or symbols)Murs catalytiques
1 Porte frontale
2 Charnière
3 Four

natural_image
Pure mechanical assembly diagram showing a bracket and mounting holes without any text or symbols



natural_image
Simple line drawing of a rectangular grid pattern with no text or symbolsnatural_image
Close-up of a stainless steel baking tray inside an oven (no text or symbols visible)7 DÉPANNAGE
△ DANGER

natural_image
Diagram of a 3D box with labeled dimensions and internal structure, no readable text or symbols present.natural_image
Diagram of a microwave oven with internal grating and ventilation slots (no text or labels)Teclas para:
natural_image
Cross-sectional diagram of a mechanical device showing internal components and housing (no text or symbols)Teclas para:
natural_image
Pure electrical circuit lines without any symbolsParedes catalíticas
natural_image
Pure mechanical assembly diagram showing a bracket and mounting holes without any text or symbols


natural_image
Isometric line drawing of a rectangular grid pattern with no text or symbolsnatural_image
Close-up of an oven with a metal rack inside, showing internal structure and ventilation slots (no text or symbols visible)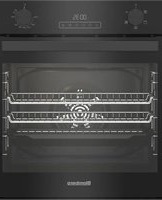
- ⚠️ Please read these instructions before installation or using your appliance!
- Dear Customer,
- The instructions will help you to operate the appliance quickly and safely.
- Explanation of symbols
- Table of Contents
- SAFETY INSTRUCTIONS 4
- INSTALLATION 8
- PREPARATION 16
- How to operate the broil 23
- MAINTENANCE AND CARE25
- GENERAL INFORMATION 27
- TROUBLESHOOTING 29
- WARRANTY STATEMENT for Blomberg
- SAFETY INSTRUCTIONS
- Basic safety instructions
- Safety for children
- Safety when working with electricity
- Intended use
- Disposal
- Packaging material
- ⚠️ DANGER: Risk of suffocation by the packaging materials!
- Future transportation
- If you do not have the original carton
- 2
- INSTALLATION
- i IMPORTANT:
- Before installation
- Important notes to the consumer
- Installation Conditions
- Final Check
- Installation and connection
- i NOTICE
- Material damage!
- DANGER:
- Electrical shock hazard!
- Property damage!
- Installation Instructions
- Rating Plate Location
- Electrical Connection
- i IMPORTANT: Any work
- Connection to the main supply
- ⚠️ DANGER:
- power supply!
- Be sure your appliance is properly installed and grounded by a qualified technician. Ask your dealer to recommend a qualified technician or an authorized repair service.
- Wire branch circuit (for US only)
- Wire branch circuit (for US and Canada)
- Electrical Requiremetns:
- NOTE
- PREPARATION
- Tips for saving energy
- Initial operation
- Setting the time
- Keys for:
- First cleaning of the appliance
- Initial heating
- WARNING: Hot surfaces
- Electric oven
- Broil oven
- General information on baking, roasting and broiling
- Risk of scalding by hot steam!
- Tips for baking
- Tips for roasting
- Tips for broiling
- How to use the electric oven
- Food Poisoning Hazard
- Select temperature and operating mode
- Switch off electric oven
- Shelf positions
- Operating modes
- Static
- Bottom heat
- Top and bottom heat with convection air
- Operating with fan
- Hot air
- "3D" function
- Broil
- Broil with convection air
- How to operate the oven timer
- Switch on fully automatic operation
- Switch on semi-automatic operation
- Interrupting the cooking process
- Cooking times table
- Baking and roasting
- i IMPORTANT: Level 1
- Tips for baking cakes
- Tips for baking pastry
- Tips for cooking vegetables
- How to operate the broil i IMPORTANT:
- WARNING: Hot surfaces may cause burns!
- Switch on broil
- Switch off broil
- How to use the alarm clock
- Setting the alarm clock
- Switching off the alarm
- In order to cancel set alarm time;
- 5
- MAINTENANCE AND CARE
- General information
- Risk of electric shock!
- DANGER: Hot surfaces
- NOTICE:
- Do not use any abrasive cleaning materials!
- IMPORTANT:
- Cleaning the control panel
- Cleaning the oven
- Catalytic walls
- Clean oven door
- Removal of oven door
- i NOTICE:
- Replacing the oven lamp
- △ DANGER:
- Hot surfaces may cause burns!
- GENERAL INFORMATION
- Overview
- Accessories supplied with the unit
- Proper positioning of the wire shelf on sliding shelves
- TROUBLESHOOTING
- △ DANGER
- i IMPORTANT
- WARRANTY STATEMENT for
- Blomberg Electric and gas ranges
- Cooking Appliances(wall ovens / cooktops)
- HOW TO GET SERVICE
- Installation et connection
- i REMARQUE
- Dommage matériel
- Clés pour:
- Positions des grilles
- Murs catalytiques
- DÉPANNAGE
- Teclas para:
- Paredes catalíticas
Brand : BLOMBERG
Model : BWOS 24200
Category : Oven