
475575 - Digital Camera THOMSON - Free user manual and instructions
Find the device manual for free 475575 THOMSON in PDF.
| Product type | Compact digital camera |
| Brand | THOMSON |
| Model | 475575 |
| Dimensions | 100 x 62 x 25 mm |
| Power supply | 2 AAA batteries (non-rechargeable) |
| Sensor | CMOS, 10 megapixels |
| Maximum photo resolution | 16 MP (4608 x 3456) |
| Video resolution | 640 x 480 (VGA) |
| Screens | Main LCD 2.7 inches + secondary screen 1.8 inches |
| Digital zoom | 4x |
| Lens focal length | f = 8.5 mm |
| Aperture | f/2.8 |
| ISO sensitivity | Auto, 100 to 800 ISO |
| Shutter speed | 1/4 to 1/4000 sec |
| Flash | Auto, forced, off |
| White balance | Auto, Daylight, Cloudy, Tungsten, Fluorescent |
| Storage medium | Micro SD card (not included) |
| Interface | USB 2.0 |
| File formats | JPEG (photos), AVI (M-JPEG) (videos) |
| Accessories included | Wrist strap, user manual, 2 AAA batteries, USB cable, pouch |
| Warranty | 2 years parts and labor |
| Water resistance | Up to 3 meters depth, 60 minutes max |
| Care and cleaning | Rinse with fresh water after use in saltwater or dusty environments; wipe with a soft dry cloth. Avoid greasy products. |
| Safety | Do not open underwater, avoid shocks and dust, do not obstruct the lens or flash. |
| Spare parts and repairability | Batteries and memory card removable. For any repair, contact THOMSON after-sales service. |
Frequently Asked Questions - 475575 THOMSON
User questions about 475575 THOMSON
0 question about this device. Answer the ones you know or ask your own.
Ask a new question about this device
Download the instructions for your Digital Camera in PDF format for free! Find your manual 475575 - THOMSON and take your electronic device back in hand. On this page are published all the documents necessary for the use of your device. 475575 by THOMSON.
USER MANUAL 475575 THOMSON
1.1 Description of the appliance 2
1.2 Description of the screen 3
1.3 To set up the appliance 4
1.4 To take a photo 4
1.5 To make a video 4
1.6 To view your pictures and videos 4
2.0 ADVANCED USE 6
2.1 Picture size 6
2.2 Quality 7
2.3 Light measurement 7
2.4 White balance 8
2.5 Sensitivity (ISO) 9
2.6 Exposure 9
2.7 Self-timer 9
2.8 Sharpness 9
2.9 Effect 10
2.10 Printing date 10
2.11 Quick view 10
2.12 Configuration 10
2.13 Zoom control 11
2.14 How to use the flash 12
3.0VIDEOCLIPS 12
3.1 Recording of video clips 12
3.2 Available functions in recording mode of video clips 13
4.0 READING MODE 13
5.0 PC CONNECTION 13
6.0 TECHNICAL CHARACTERISTICS 15
7.0 USE PRECAUTIONS 16
8.0 CUSTOMER SUPPORT AND HOTLINE 18
CERTIFICATE OF WARRANTY 19
1.0 STARTING-UP AND EASY USE
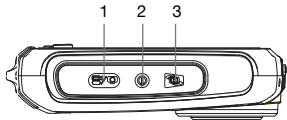
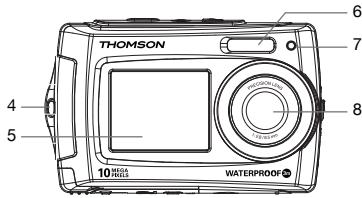
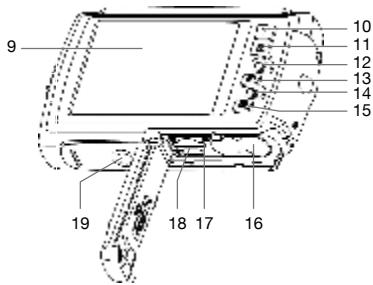
1.1 Description of the appliance
1 Shutter button
2 Key on/off
3 Screen selector
4 Wrist strap
5 Second screen
6 Flash
7 LED light
8 Lens
9 Main screen
10 Top /Zoom+
11 Bottom /Zoom-
12 On left / Flash
13 On right /Reading mode
14 Photo/Video mode selector
15 Menu/Eraser
16 Battery
17 Micro SD card
18 Micro USB connector
19 Tripod mounting
Sélecteur de mode
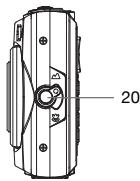
20 Normal / Macro
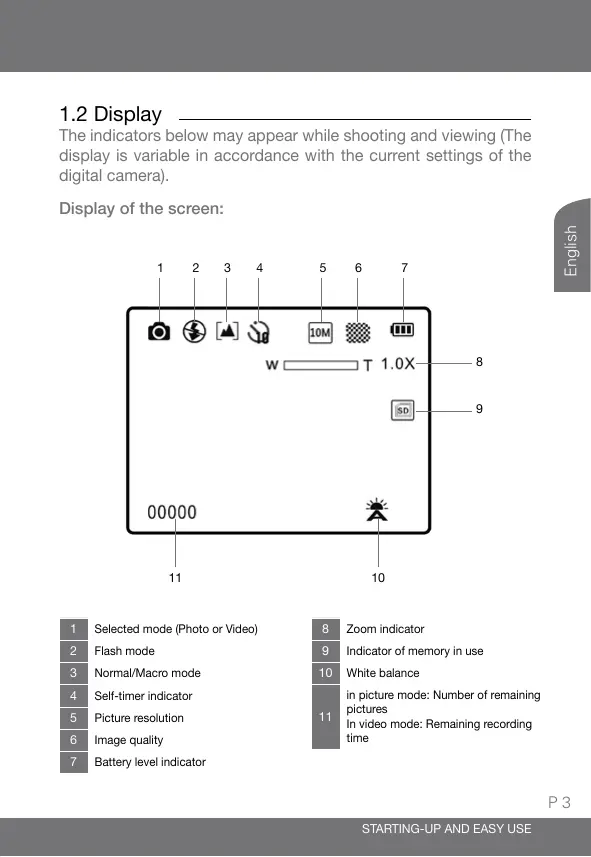
1.2 Display
The indicators below may appear while shooting and viewing (The display is variable in accordance with the current settings of the digital camera).
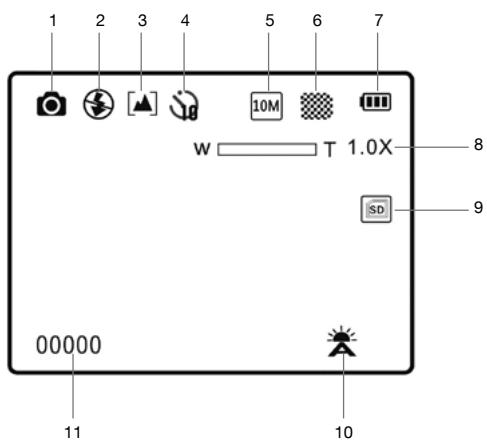
Display of the screen:
1 Selected mode (Photo or Video)
2 Flash mode
3 Normal/Macro mode
4 Self-timer indicator
5 Picture resolution
6 Image quality
7 Battery level indicator
8 Zoom indicator
9 Indicator of memory in use
10 White balance
in picture mode: Number of remaining pictures
In video mode: Remaining recording time
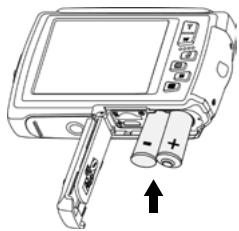
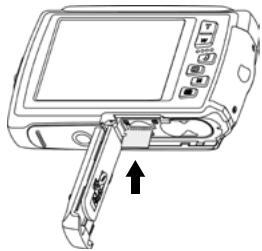
1.3 To set up the appliance
- Open up the lower flap.
- Insert 2 x AAA battery with the same polarity. Push a SD memory card down, the chip toward the screen without forcing as long as it does not sound « click ». (the card remains down)
- Close the lower flap.
1.4 To make a picture
- Turn on the appliance through the keys on/off.
- Aim at the subject and adjust the zoom with the zoom keys +/- if required.
- Press on the shutter button thoroughly.
1.5 To make a video
- Press on the key M to switch into the CAMCORDER mode.
- Aim at the subject and adjust the zoom with the zoom keys +/- if required.
- Press on the shutter button thoroughly. The recording is working.
- Press once again on the shutter button to stop recording.
1.6 To view your pictures and videos
- Press on the key to switch into the viewing mode.
- To come through the next/previous pictures, use the thumbnail arrows .
-
To zoom a piece of the picture, use the zoom keys.
-
Press on the zoom key + (▲) to view a video. Press once again to pause then press on the key M to stop reading.
- Press on the key M to leave the viewing mode.
Now you figure out the essential notions to use efficiently your digital camera. The next chapter is dedicated to learn efficiently the advanced use as example:
To transfer your photos into PC
- To use the portrait mode through the second screen
- To select picture resolutions or videos
- To use the self-timer for group photograph by example
- To update the timetable on the camera and make easy the archiving of your pictures on your PC
- To centre a picture
- To set up the flash
- To make any kind of hard settings for getting particular effects
The setting of the digital camera makes itself through menus. To make the reading of this notice easier, we note the access to the menu as written below:
MENU Submenu
By example, when you are going to read:
MENU Resolution
This is the shortcut of:
- Press on the key MENU (回) to access to the main menu.
- Press on the thumbnail arrows to select the Resolution menu.
-
Press on the shutter button to valid it.
-
Press on the thumbnail arrows to select the suitable setting.
- Press on the shutter button to valid it.
Any function in the digital camera which is being not described in the user manual, is not under warranty. Thus any insignificant functions have been voluntarily hidden in this document.
2.0 ADVANCED USE
Do make the settings necessarily in picture mode as below. A small camcorder appears in upper left of the screen. Press on the key M if it doesn't appear on the screen.
2.1 Picture size
MENU Resolution
Select the picture size and format from which the pictures are saved. The large pictures can be printed without spoiling the quality although they spend a lot of storage space. The low resolution pictures are ideally used to be displayed on PC screen or TV set therefore they spend less storage space. Basically, you can store 300 pictures with 10 MP resolution (default setting) and over 1000 pictures with 3MP resolution through 1GB of your SD card's capacity.
16MP (4608x3456) format 4:3
10MP (3648x2736) format 4:3 (default setting)
5MP (2592x1944) format 4:3
3MP (2048x1536) format 4:3
VGA (640x480) format 4:3
2.2 Quality
MENU Quality
You can select the compression level adapted to your application for the recorded pictures.
| Option | Description |
| Very fine-grained | Very low compression. Select this function to get the best image quality as ever. |
| Fine-grained (default setting) | Compromise between the best image quality and the least of congestion. |
| Standard | High compression. Select this function to store more pictures. |
2.3 Light measurement
MENU Light measurement
The brightness measurement procedure of the subject in order to evaluate the exposure is called « measure ». It allows you to pick the means up to measure the exposure from the camera.
Centre-weighted
The digital camera measures all view but it spoils the most part of weighting at the subject which is in the centre of view. This method is strongly recommended for doing portraits and restores any detail of the background by revealing the lighting conditions in the center of view.
Multi (default setting)
The exposure for any view is defined through the digital camera. This option is strongly recommended most of the time.
Spot
An upgrade of the exposure is automatically made according to photometric average released on the picture. However, the upgrade distorts the center of the picture field. This is adapted to the shooting of tiny objects such as the flowers and insects.
2.4 White balance
MENU White balance
Select a setting according to the lighting source for natural colours.
| Option | Description |
| AUTO (default setting) | The white balance is automatically adap- ted to the ambient lighting. |
| Daylight | The white balance is adapted to sunbeams. |
| Cloudy | Use it for photographing under a cloudy sky. |
| Fluorescent | Use it for a fluorescent lighting (neon lights). |
| Incandescent | Use it for an incandescent lighting (filament lamps). |
2.5 Sensitivity (ISO)
MENU ISO
It allows monitoring the light sensitivity of the digital camera. Greater is the ISO value, more sensitive is the light therefore the camera's ability is better for photographing in lighting low conditions; take a note that the noise of the image (grain) increases proportionally at the ISO value.
2.6 Exposure
MENU Exposure
As you adjust the exposure correction, the general brightness of the picture can be adjusted in such a way that the pictures are brighter or darker.
Select the positive values (+) to increase the exposure and select the negative values (-) to decrease the exposure.
2.7 Self-timer
MENU Self-timer
The digital camera is equipped with a self-timer running from 2, 5 to 10 seconds for the auto portraits or to avoid the blurring effect coming from the camera shake.
2.8 Sharpness
MENU Sharpness
It allows selecting the sharpness level of pictures.
2.9 Effect
MENU Effect
It allows superimposing special effects into your pictures.
2.10 Printing date
MENU Printing date
Select this option to let appear the date and time of shooting.
2.11 Quick view
MENU Quick view
You can view the picture you have made on the LCD screen for 2 seconds through this option (default setting). The quick overview is accessible with pictures only.
2.12 Configuration
MENUGe Thumbnail arrow (
The configuration menu releases the following options:
Sound
It allows activating or disabling the beep, modifies the start-up sound or shooting.
Auto-off
Set the timer in which the camera turns off for the battery savings.
Language
Select the displaying language of menus from the digital camera.
Date/Time
This function allows setting the date format and time.
NOTICE : Date and time are printed on the pictures if you have activated the printing of date (see § 2.10 on page 10). This option allows dating the pictures (.jpg files and EXIF data).
Please take a note that the adjustment for date is required after any opening of the battery flap or card if you want to date your pictures.
Formatting card
Format the memory card or internal memory. Warning! This action deletes all data coming from the card.
Re-initialization
To restore the default values of the digital camera.
2.13 Zoom control
Press on the zoom keys T/W to activate the zoom. Press on the key T to make a zoom in on the subject or the key W to make a zoom out so that you can see the whole subject.
- When you log on to the digital camera, the zoom is in a wide-angle lens position.
- The zoom indicator appears to the right of the screen.
2.14 How to use the flash
The flash can be set according to shooting conditions.
Be careful: The flash cannot be activated in Macro mode.
Press on the key ( ) and select either of the following flash modes :
3A Automatic flash
The flash fires automatically if the lighting is low.

Backlight flash
The flash fires in every shooting. Use this mode for subjects against the light.

Disabled flash (default setting)
The flash does not fire even if the lighting is very low
3.0VIDEOCLIPS
3.1 Recording of video clips
Do make the settings as below in the video mode.
You can record video clips in VGA (640x480) with sound on the memory card.
- Turn on the digital camera and monitor the shooting mode.
- Press once on the key M to select the video mode. A small cam-corder appears in upper left of the screen.
- Point the camera at the subject and centre the photo through the LCD screen.
- Press once on the shutter button to record video sequences.
- Press once again on the shutter button to stop recording.
3.2 Available functions in recording mode of video clips
Press on the key MENU (回) to change the menu settings of video clips before recording a video clip.
The following options can be modified from the menu of video clip:
Video resolution
The white balance
- The Flash cannot be activated in video mode.
4.0 READING MODE
To display the reading menu, press on the key on the thumbnail arrow.
Press on the thumbnail arrow to display the previous picture.
Press on the thumbnail arrow to display the next picture.
Press on the key M to come back to shooting mode.
Press on the key MENU ( ) to remove pictures and videos coming from the memory card.
5.0 PC CNECTION
Use the supplied cable for connecting the digital camera to your PC and transfer (copy/paste) pictures and videos from your camera to your PC.
Transfer of pictures and videos from the digital camera to your PC.
- Log on to your PC.
-
Connect the digital camera to your computer through the supplied USB cable.
-
Log on to the digital camera then the LCD screen shows "Connection..." for a short time.
- The digital camera is identified as storage medium (USB key or External Hard Disc) once your PC has recognized the digital camera as device. The digital camera is accessible from your PC workstation.
- Click on your [workstation] then double click on the [removable disk DCIM 100THOMS]. The pictures and videos appear then.
- Select the folder and click on the right key from your mouse.
- Afterwards the contextual menu appears.
- Click on [Copy].
- Click on the folder where the copy will be pasted.
- Click on the right key from your mouse and the contextual menu will appear.
- Click on [Paste].
- You are transferring a picture or video from your digital camera to your PC.
The recent applications supply standard management tools for your pictures. You can find numerous free softwares on internet to allow classifying or touch up your pictures.
6.0 TECHNICAL CHARACTERISTICS
- Sensor: CMOS
- Sensor resolution: 10 millions pixels
- Photo resolutions: 4:3: 16MP / 10MP / 5MP / 3MP / VGA
Video resolutions: 640 × 480 / 320 × 240 - Screen sizes: LCD 2.7" + LCD 1.8"
- Lens focal length: f = 8.5 ~mm
Aperture: f/2.8
Focus range (mini/macro): 50cm / 11cm
ISO Sensitivity: Auto / 100 up to 800 ISO
Digital zoom: 4x - Shutter speed: 1/4 to 1/4000 sec.
-
Exposure control: EV -2.0~+2.0
-
Functions: Waterproof 3M, Dual screen, self-timer (10 sec.), picture stabilizer, auto power-off (Off / 1 min. / 3 min.), Video mode, Special effects (white and black, sepia, negative, Lomo, drawing, bright green, bright blue and bright red)
- Flash: Auto / Fill flash / Declutching
- White balance: Auto / Daylight / Cloudy / Tungsten / Fluorescent
- Storage medium: micro-SD (not supplied)
- Interface: 2.0 USB
- Audio video format: JPEG / AVI (M-JPEG)
- System requirements: Compatible with any Applications
Dimensions: 100 × 62 × 25 ~mm
Supplied accessories:
Wrist strap, notice, 2 AAA batteries and USB cord
The micro-SD card is not supplied
7.0 USE PRECAUTIONS
This digital camera is made of electronic components. Do not use or store this camera in the following spots.
- The unpredictable temperatures.
- The dusty places and dirties.
- The sunny spots or inside a car in hot weather.
- The magnetic environments or excessive vibrations (Electric-fields, Static electricity, Line noise...)
- Room with explosive materials or inflammable, chemical substances (such as naphthalene or moth repellent).
Use this digital camera for photographing under water up to 3M of depth within 60 minutes.
- Do not open the battery flap under water.
- Do not use this digital camera in the thermal sources or warmed swimming pools.
- Do not dive into water with the digital camera or not to submit it to an excessive pressure whatever its nature.
- Do not leave the digital camera on sand. The temperature may damage the good working of the digital camera.
- The face creams and sun moisturizers or any kind of oily substances might discolour the digital camera.
- Pull out particles and substances on the seal or adjacent surfaces. These particles could damage the Do not use liquid soaps, detergents, alcohol and any cleaners which could compromise the waterproofing of the digital camera.
- Rinse the digital camera with the tap water or dip it into a basin of fresh water from 2 to 3 minutes after using it under water or places in which outdoor substances might stick to the digital camera. Mop the digital camera with a dry cloth after going it out the water.
Keep this digital camera through silica gel in an airtight box if you foresee not to use it for a while.
Do not introduce sand into the appliance when you are using it on the beach, coastal dunes or any else sandy places. It could bring about either a failure or the end of life of the digital camera.
Do not drop the digital camera, neither shocks nor sudden vibrations.
Protect the LCD screen against impacts. Stock the digital camera with a protective case when it is not used anymore.
Avoid obstructing either the lens or flash when you are taking a picture.
8.0 CUSTOMER SUPPORT AND HOTLINE
Although we have brought all care to design the products and instruction manuals, you have met some troubles to figure out:
Do not hesitate to contact us; our pundits are available for advising:
You can forward to us an email to the following address: customersupport@thomson-camera.eu
Please advise the following details before calling:
- Model N°: Digital camera (475575)
C E

This symbol indicates that the product must not be treated as household waste. The harmful substances possibly contained in the equipment may have negative consequences on the environment and / or the human health. At the end of its life, bring any electronic equipment back to your retailer or at the collection point that your city or town puts at your disposal.
THOMSON is a trademark of TECHNICOLOR S.A. used under license to METRONIC for sales in EUROPE.
All brand names and icons are trademarks or recorded from their respective owners.
Subject to alterations. In consequence of continuous research and development technical specifications, design and appearance of products may change.
Photo credits: © detailblick - Fotolia.com
CERTIFICATE OF WARRANTY
This digital camera has a warranty of 2 years including parts and labour. In case of fault, the collect of the defective product is payable by the customer and the reshipment is payable by us.
The warranty is valid if you have fulfilled the certificate properly with sending the print copy of the invoice or the receipt.
Item code: Digital camera (475575)
Purchase date:
Serial Number:
To send to SAV THOMSON (After sales service)
100 Rue Gilles de Gennes - Node PARK Touraine
37310 TAUXIGNY - France

Do not ship the digital camera without having the return order number.
INDICE
- ADVANCED USE 6
- 3.0VIDEOCLIPS 12
- READING MODE 13
- PC CONNECTION 13
- TECHNICAL CHARACTERISTICS 15
- USE PRECAUTIONS 16
- CUSTOMER SUPPORT AND HOTLINE 18
- CERTIFICATE OF WARRANTY 19
- Display
- To set up the appliance
- To make a picture
- To make a video
- To view your pictures and videos
- ADVANCED USE
- Picture size
- Quality
- Light measurement
- Centre-weighted
- Multi (default setting)
- Spot
- White balance
- Sensitivity (ISO)
- Exposure
- Self-timer
- Sharpness
- Effect
- Printing date
- Quick view
- Configuration
- Sound
- Auto-off
- Language
- Date/Time
- Formatting card
- Re-initialization
- Zoom control
- How to use the flash
- 3A Automatic flash
- Backlight flash
- Disabled flash (default setting)
- 3.0VIDEOCLIPS
- Recording of video clips
- Available functions in recording mode of video clips
- READING MODE
- PC CNECTION
- TECHNICAL CHARACTERISTICS
- Supplied accessories:
- USE PRECAUTIONS
- CUSTOMER SUPPORT AND HOTLINE
- C E
- CERTIFICATE OF WARRANTY
- INDICE
Brand : THOMSON
Model : 475575
Category : Digital Camera