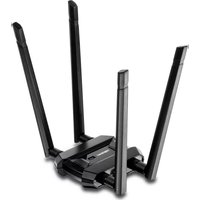
AC1900 - Network card / adapter TRENDNET - Free user manual and instructions
Find the device manual for free AC1900 TRENDNET in PDF.


| Product Type | Wireless AC1900 Network Adapter |
| Brand | TRENDnet |
| Model | AC1900 |
| Wireless Standard | IEEE 802.11ac |
| Frequency Bands | 2.4 GHz and 5 GHz |
| Maximum Speed | 600 Mbps (2.4 GHz) + 1300 Mbps (5 GHz) |
| Interface | USB 3.0 |
| Antenna | 2 external high-gain antennas |
| Security | WEP, WPA/WPA2, WPA3 |
| LED Indicators | Power, Link/Activity |
| Dimensions (L x W x H) | 4.5 x 1.2 x 0.6 inches |
| Weight | 0.5 oz |
| Power Source | USB powered |
| Operating Temperature | 0°C to 40°C |
| Certifications | FCC, CE |
| Compatible Systems | Windows 10/8/7, Mac OS X 10.6+, Linux |
| Package Contents | Adapter, Quick Installation Guide, CD with drivers |
| Warranty | 3 years limited |
| Maintenance & Cleaning | Unplug before cleaning; use a soft, dry cloth; avoid liquids. |
| Safety | Use in dry environment; do not expose to moisture or extreme heat. |
| Spare Parts & Repairability | No user-serviceable parts; contact TRENDnet support for repairs. |
| General Information | Refer to the user manual for detailed setup and troubleshooting. |
Frequently Asked Questions - AC1900 TRENDNET
User questions about AC1900 TRENDNET
0 question about this device. Answer the ones you know or ask your own.
Ask a new question about this device
Download the instructions for your Network card / adapter in PDF format for free! Find your manual AC1900 - TRENDNET and take your electronic device back in hand. On this page are published all the documents necessary for the use of your device. AC1900 by TRENDNET.
USER MANUAL AC1900 TRENDNET
natural_image
Black and white photo of a wireless router with four extended blades (no visible text or symbols)AC1900 High Power Dual Band Wireless USB Adapter
TEW-809UB
TRENDnet User's Guide
Table of Contents
Contents
Product Overview ......2
Package Contents 2
Features 2
Product Hardware Features.... 3
System Requirements....3
Applicaon Diagram 4
Installing your Wireless Adapter....5
Windows® OS Installaon....5
Mac® OS Installaon....2
Connect to your wireless network using WPS 7
Windows® OS....7
WPS conncon using the built in ulity (Virtual Push Buon)....7
WPS conncon using the hardware push buon 8
Mac® OS.... 10
WPS conncon using the built in ulity (Virtual Push Buon) 10
WPS conncon using the hardware push buon 11
Technical Specicaons 14
Troubleshoong 16
Appendix 17
Product Overview
natural_image
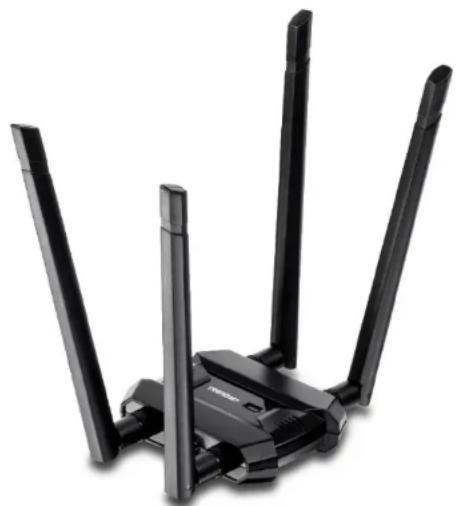
Black wireless router with four extended blades and a brand logo (no visible text or symbols)TEW-809UB
Package Contents
In addition to your wireless adapter, the package includes:
- Quick Installaon Guide
• CD-ROM (Drivers & User's Guide) - 4 x High Gain Detachable Dual Band Antennas
- USB 3.0 Micro-B to USB Type-A cable (0.91 m / 3)
If any package contents are missing or damaged, please contact the retail store, online retailer, or reseller/distributor from which the product was purchased.
Features
TRENDnet's AC1900 High Power Dual Band Wireless USB Adapter, model TEW-809UB, upgrades a computer to Wireless AC1900. Quickly connect to a high performance Wireless AC network at 1300 Mbps or to a Wireless N network at 600 Mbps. A high power radio with detachable high gain antennas increase wireless coverage.
Easy Setup
Get up and running in minutes with the intuitive guided setup
AC1900 Dual Band
Connect to an extreme performance 1300 Mbps Wireless AC or 600 Mbps Wireless N network*
Wireless Coverage
Extended wireless coverage with high power radio and detachable high gain antennas
LED Indicator
LED indicator conveys device status
Operang Systems
Comparable with Windows ^® and Mac ^® operang systems
*Maximum wireless signal rates are referenced from IEEE 802.11 theoretical speciacons. Actual data throughput and coverage will vary depending on interference, network trac, building materials and other conditions. For maximum performance of up to 1.3 Gbps use with a 1.3 Gbps 802.11ac wireless adapter. For maximum performance of up to 600 Mbps, use with a 600 Mbps 802.11n wireless adapter.
Product Hardware Features

USB 3.0 Micro-B port – Use the included USB 3.0 Micro-B to Type A cable to connect the wireless adapter to your computer.
- Acvity LED Indicator –The LED will blink rapidly to indicate WPS has been acvated. The LED will blink every 5 sec. when disconnected. When connected, the LED will blink rapidly during wireless data transmission.
- Detachable High Gain Antennas – Connect the detachable high gain antenna directly to the antenna connectors on the adapter. The antennas are adjustable for opmal connectivity.
- WPS Push Buon – Aer the adapter drivers have been install in the computer, you can use the WPS push buon to establish wireless conncon to your wireless router or access point via WPS protocol. Push and hold the WPS buon for 3 sec. and release to acvate WPS.
System Requirements
- Windows ^ 10, 8.1, 8, 7, Vista, or XP
- Mac OS ^ 10.6-10.11
• Available USB 3.0 port on your computer.
Note: Maximum wireless speeds will be reduced if using a USB 2.0 port.
• CD-ROM Drive (Driver Installaon with included CD)
Note: If you do not have the included CD-ROM, you can download the utility and drivers from hp://www.trendnet.com/support/.
Applicaon Diagram
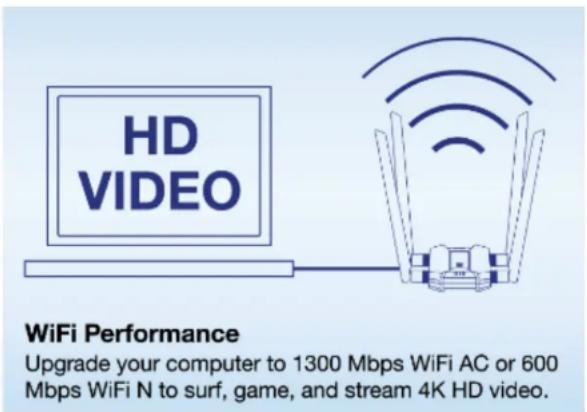
Upgrade your computer to 1300 Mbps WiFi AC or 600 Mbps WiFi N to surf, game, and stream 4K HD video.

Beamforming increases real-time performance by directing stronger wireless signals to each device's specific location.

The AC1900 High Power Wireless Dual Band PCIe Adapter can provide wireless AC or wireless N connectivity to a wireless AC/N network (router/access point) through the use of an available USB 3.0 port on your computer. The detachable high gain antenna allows for exible adjustment to achieve the best possible wireless coverage and connectivity
TRENDnet User's Guide
TEW-809UB
Installing your Wireless Adapter
This secon describes how to install the soware driver for the wireless adapter.
Windows® OS Installaon
Supported operang systems: Windows® 10, 8.1, 8, 7, Vista, XP
For any updates, please check the TRENDnet website www.trendnet.com.
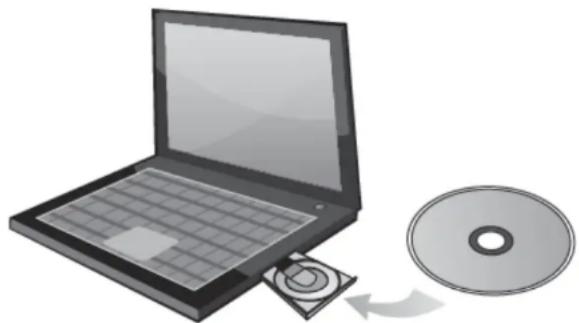
- Insert the included CD-ROM into your computer's CD-ROM drive.
Note: If you do not have the included CD-ROM, you can download the utility and drivers from hp://www.trendnet.com/support/.
natural_image
Illustration of a laptop next to a CD and an open disc, showing no text or symbols.- At the CD Autorun Prompt window, click Run Autorun.exe.
Note: If the Autorun prompt does not appear automatically, open the CD contents and double-click Autorun.exe.
At the CD-ROM main menu, click Install Drivers.

TRENDnet User's Guide
TEW-809UB
3. At the installaon window, click Next.

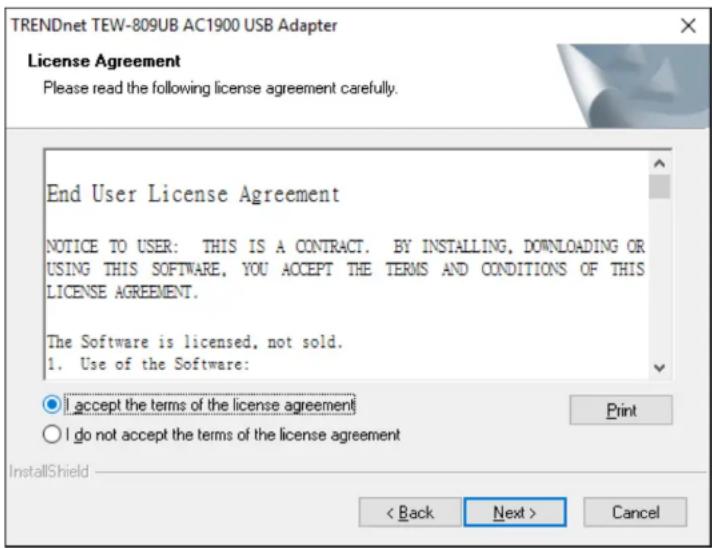
- You will be prompted to accept the end user license agreement. Select I accept the terms of the license agreement and click Next.
TRENDnet User's Guide
TEW-809UB
- Wait for the driver installaon to complete. This may take a few minutes.
Note: If you do not receive a security prompt, connue to the next step. If prompted, click Install this driver sware anyway.

Now installing TEW-809UB
- Aer the process is completed, click Finish.
TRENDnet TEW-809UB AC1900 USB Adapter

natural_image
Abstract graphic with three gray triangular shapes on a blue gradient background, no text or symbols present.InstallShield Wizard Complete
The InstallShield Wizard has successfully installed TRENDnet TEW-809UB AC1900 USB Adapter. Click Finish to exit the wizard.
Back
Finish
Cancel
- Using the included USB 3.0 cable, connect the USB 3.0 micro-B side to the adapter and the USB 3.0 type A side to the computer's USB 3.0 port.

TRENDnet User's Guide
TEW-809UB
- Aached to the adapter and posion the antennas at opposite angles and slightly away from each other on each as shown for opmal coverage.

natural_image
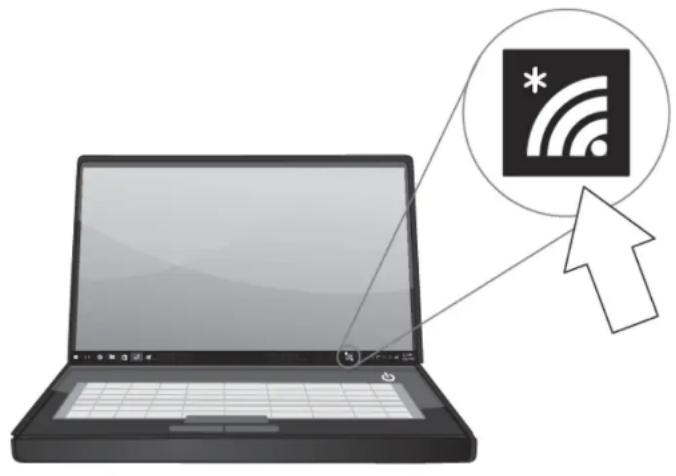
Diagram of a black 3D printer with four blades and directional arrows indicating rotation or signal flow (no text or symbols)- Click on the wireless icon in the taskbar located in the boom right corner.
natural_image
Illustration of a laptop with an icon showing wireless signal and a cursor pointing at it (no text or symbols present)TRENDnet User's Guide
TEW-809UB
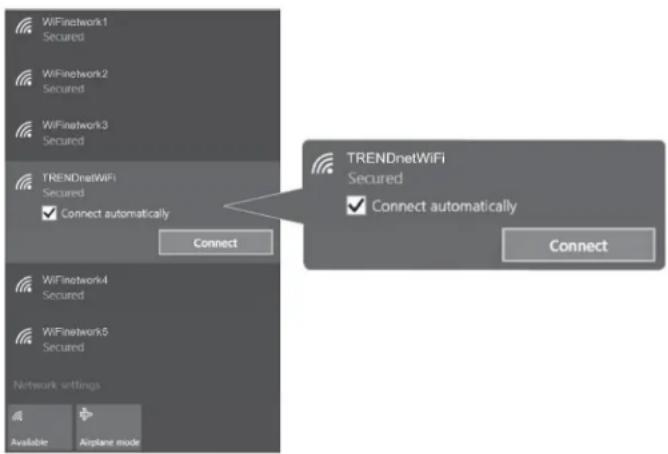
- Click on the wireless network you would like to connect and click Connect.
flowchart
graph TD
    A["WiFi Network 1 Secured"] --> B["TRENDnetWiFi Secured"]
    C["WiFi Network 2 Secured"] --> B
    D["WiFi Network 3 Secured"] --> B
    E["TRENDnetWiFi Secured"] --> F["Connect automatically"]
    G["WiFi Network 4 Secured"] --> H["Connect"]
    I["WiFi Network 5 Secured"] --> H
    J["Network settings"] --> K["Available"]
    L["Airplane mode"] --> M["Connect"]
    N["TRENDnetWiFi Secured"] --> O["Connect automatically"]
    P["Connect"] --> Q["Connect"]
- Enter the WiFi Key (password) and click Next.

- The status will display "Connected" to indicate a successful conncon.
Note: If the connected message does not display, double check your WiFi key (password) and re-enter it.

TRENDnet User's Guide
TEW-809UB
Mac® OS Installaon
Supported operang systems: Mac® OS 10.6-10.11
For any updates, please check the TRENDnet website www.trendnet.com.
- Insert the included CD-ROM into your computer's CD-ROM drive.
Note: If you do not have the included CD-ROM, you can download the utility and drivers from hp://www.trendnet.com/support/

natural_image
Illustration of a laptop next to a CD and an open disc, showing no text or symbols.- Open the folder named "Mac" on the included Utility and Driver CD ROM.

Mac
- Open the folder according to the Mac® OS version you are running. For Mac® OS 10.6-10.11, the folder will be named "Mac OS 10.6-10.11".

Mac OS 10.6-10.11
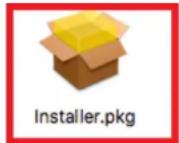
- Double click the Installer.pkg le to start the installaon.

TRENDnet User's Guide
TEW-809UB
5. At the Introducon window, click Connue.
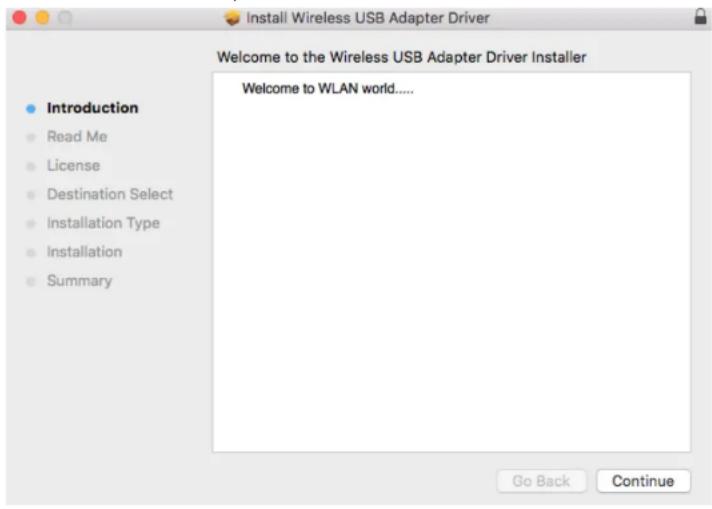
6. At the Read Me window, click Connue.

TRENDnet User's Guide
TEW-809UB
7. At the License Agreement window, click Connue.
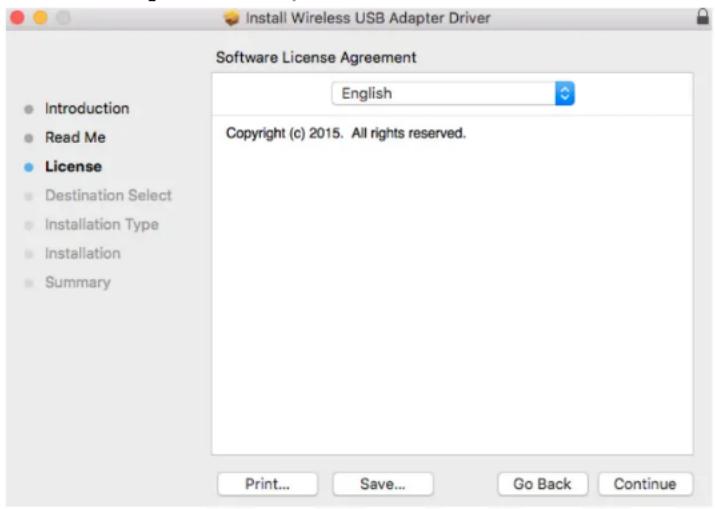
8. When prompted, click Agree.
To continue installing the software you must agree to the terms of the software license agreement.
Click Agree to continue or click Disagree to cancel the installation and quit the Installer.
Read License
Disagree
Agree
9. At the Install window, click Install.

TRENDnet User's Guide
TEW-809UB
- When prompted, enter your Mac® user account password to authorize the install, click Install Soware.
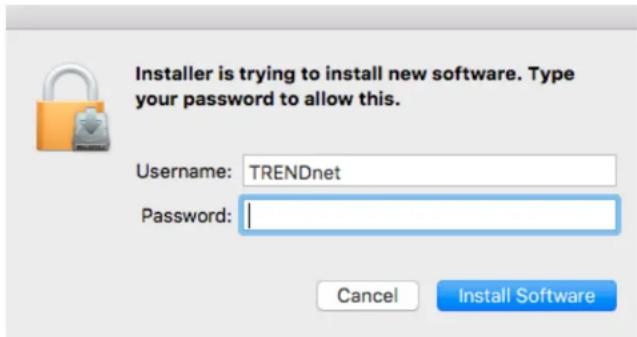
- When prompted, click Connue Installaon.
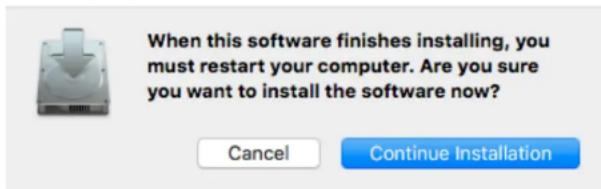
- Once the installaon is complete, you will be prompted to restart the computer. Click Restart to restart your computer.

TRENDnet User's Guide
TEW-809UB
- Using the included USB 3.0 cable, connect the USB 3.0 micro-B side to the adapter and the USB 3.0 type A side to the computer's USB 3.0 port.

- Aached to the adapter and posion the antennas at opposite angles and slightly away from each other on each as shown for opmal coverage.

natural_image
Diagram of a wireless router with multiple blades and directional arrows indicating rotation or signal flow (no text or symbols)TRENDnet User's Guide
TEW-809UB
- Aer the driver is successfully installed and wireless adapter is connected, a wireless adapter icon will appear in the top menu bar. Click on the icon in the top menu bar.

- A list of available wireless network will appear. Click on the wireless network you would like to connect.

- Enter the WiFi Key (password) and click Join.

- The wireless adapter icon will change to green WiFi bars to indicate a successful conncon.
Note: If the connected message does not display, double check your WiFi key (password) and re-enter it.

TRENDnet User's Guide
TEW-809UB
Connect to your wireless network using WPS
WPS (Wi-Fi Protected Setup) is a feature that makes it easy to connect devices to your wireless network. If your wireless router/access point supports WPS, you can use this feature to easily connect wireless devices to your network.
Note: You can typically nd out if you if your wireless router/access point supports WPS just by looking at the physical device. There should be a WPS push buon located on the exterior casing of the device, if not, your device may not support WPS or you may need to reference your device documentaon as to how WPS can be initiated on the device. If your device does not have an idenable WPS push buon on the exterior locaon, we would recommend using the standard conncon method on the previous page.
Windows® OS
WPS conncon using the built in ulity (Virtual Push Buon)
- Click the WiFi icon in the system tray to scan for available wireless networks.

natural_image
Illustration of a laptop with an icon showing wireless signal and an arrow pointing to it (no text or symbols present)- Click the network you would like to connect. Leave this window open.

- On your wireless router/access point, push the WPS buon.
Note: Typically, the WPS buon hold me is 3-5 sec., then release. For TRENDnet routers/access points, the WPS hardware push buon hold me is 3 seconds. If you are using another brand device, you may need to refer to your device documentaon for WPS operaon.
TRENDnet User's Guide
TEW-809UB
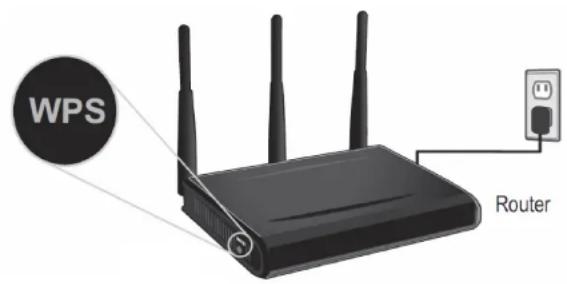
- The status will display "Connected" to indicate a successful conncon.
Note: If the connected message does not display, double check your WiFi key (password) and re-enter it.

TRENDnetWiFi Connected, secured

Note: If the WPS process fails, you will receive not receive a message "Connected". You may need to aempt the WPS process again. Please refer to your wireless router/access point documentaon regarding the operaon of WPS.
WPS conncon using the hardware push buon
1 On your wireless router/access point, push the WPS buon.
Note: Typically, the WPS buon hold me is 3-5 sec., then release. For TRENDnet routers/access points, the WPS hardware push buon hold me is 3 seconds. If you are using another brand device, you may need to refer to your device documentaon for WPS operaon.

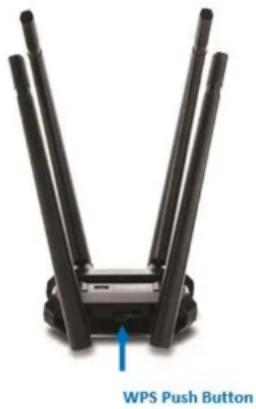
- On your wireless adapter, push and hold the WPS buon for 3 seconds and release.

natural_image
Black wireless router with four antenna units and a blue arrow pointing to the bottom right (no text or symbols visible)WPS Push Button
TRENDnet User's Guide
TEW-809UB
- A series of WPS status messages will appear. Wait for process to complete.

- The WiFi status will display "Connected" to indicate a successful conncon.

Note: If the WPS process fails, you will receive not receive a message "Connected". You will need to aempt the WPS process again. Please refer to your wireless router/access point documentaon regarding the operaon of WPS.
TRENDnet User's Guide
TEW-809UB
Mac® OS
WPS conncon using the built in ulity (Virtual Push Buon)
1 On your wireless router/access point, push the WPS buon.
Note: Typically, the WPS buon hold me is 3-5 sec., then release. For TRENDnet routers/access points, the WPS hardware push buon hold me is 3 seconds. If you are using another brand device, you may need to refer to your device documentaon for WPS operaon.
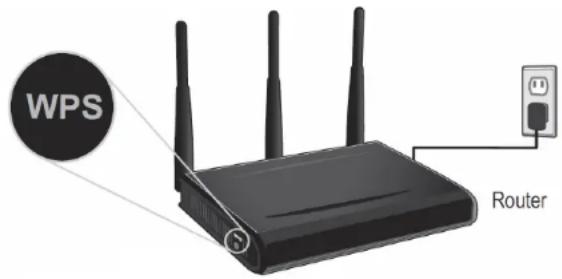
- Click on the wireless adapter icon in the top menu bar.

- Scroll to the boom of the available wireless networks list and click the arrow at the boom.

4, Aer the additional menu opens, click on WPS.

- In the WPS window, click PBC to acvate WPS.

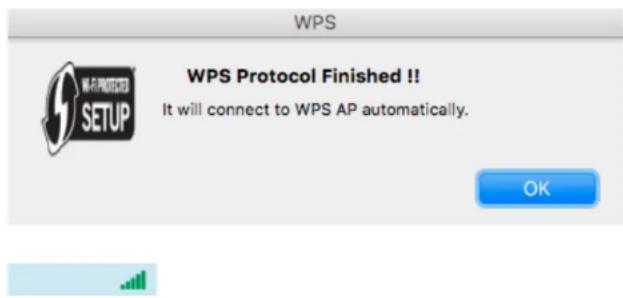
- A series of status messages will appear. Wait for the WPS process to complete.

- A status message will appear to indicate a successful conncon.
Note: If the WPS process fails, you will receive not receive a message "Connected". You may need to aempt the WPS process again. Please refer to your wireless router/access point document on regarding the operaon of WPS.

TRENDnet User's Guide
TEW-809UB

WPS conncon using the hardware push buon
1 On your wireless router/access point, push the WPS buon.
Note: Typically, the WPS buon hold me is 3-5 sec., then release. For TRENDnet routers/access points, the WPS hardware push buon hold me is 3 seconds. If you are using another brand device, you may need to refer to your device documentaon for WPS operaon.
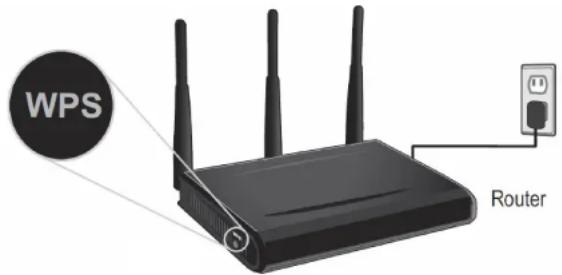
- On your wireless adapter, push and hold the WPS buon for 3 seconds and release.
natural_image
Black wireless router with four towers and a blue arrow pointing to the 'WPS Push Button' label (no other text or symbols)- The WPS window will appear and a series of status messages will appear. Wait for the WPS process to complete.

- A status message will appear to indicate a successful conncon.
Note: If the WPS process fails, you will receive not receive a message "Connected". You may need to aempt the WPS process again. Please refer to your wireless router/access point documentaon regarding the operaon of WPS.
WPS

WPS Protocol Finished !!
It will connect to WPS AP automatically.
OK

TRENDnet User's Guide
TEW-809UB
WPS conncon using a PIN
- Click on the wireless adapter icon in the top menu bar.

- Scroll to the boom of the available wireless networks list and click the arrow at the boom.

3, Aer the additional menu opens, click on WPS.

- In the WPS window, note the randomly generated WPS PIN.

- Log into your router or access point to enter in the wireless adapter PIN and acvate WPS.
Note: You may need to refer to your device documentaon for WPS operaon and where to enter the client PIN in your router's conguraon page. In TRENDnet routers, typically, the router conguraon secon to enter the PIN is under Advanced > Wireless 2.4GHz or 5GHz > WPS, example below.
| WPS Action | ||
| Station PIN | 39545060 | Note: Empty for PBC method. |
| Add Enrollee | ||
- Return back to the computer with the WPS window open and click PIN.

TRENDnet User's Guide
TEW-809UB
- The WPS window will appear and a series of status messages will appear. Wait for the WPS process to complete.

- A status message will appear to indicate a successful conncon.
Note: If the WPS process fails, you will receive not receive a message "Connected". You may need to aempt the WPS process again. Please refer to your wireless router/access point documentaon regarding the operaon of WPS.
TRENDnet User's Guide
Limited Warranty
Technical Specicaons
Standards
- IEEE 802.11a
- IEEE 802.11b
- IEEE 802.11g
• IEEE 802.11n (up to 600 Mbps)
• IEEE 802.11ac (up to 1300 Mbps)
Hardware Interface
- USB 3.0 Micro-B port
- LED indicator
- WPS Buon
- 4 x RP-SMA female antenna connectors
- 4 x High gain detachable dual band antennas
Encrypon
• Wireless encrypon: WEP, WPA/WPA2-PSK
Compatibility
- Windows ^® 10, 8.1, 8, 7, Vista, XP
• Mac OS® 10.6-10.11
Special Features
- 4 high gain dual band detachable antennas and integrated high powered amplifiers for long range connectivity
• High-speed 802.11ac connecvity - Explicit Beamforming
Quality of Service
• WMM
Frequency
• 2.4GHz: (FCC) 2.412 – 2.462GHz, (ETSI) 2.412 – 2.472GHz
- 5GHz: (FCC) 5.150 - 5.250GHz/5.745 - 5.825GHz, (ETSI) 5.150 - 5.250GHz/5.500 - 5.700GHz
Modulaon
• 802.11b: CCK, DQPSK, DBPSK
• 802.11a/g: OFDM with BPSK, QPSK and 16/64-QAM
• 802.11n: BPSK, QPSK, 16-QAM, 64-QAM with OFDM
• 802.11ac: OFDM with BPSK, QPSK and 16/64/256-QAM
Antenna Gain
• 2.4 GHz/5 GHz: 4 x 5 dBi (max.) dual band external/detachable
Wireless Output Power
• FCC: 802.11a: 21 dBm (max.) / ETSI: 18.5 dBm (max.) @ 54 Mbps
• FCC: 802.11b: 23 dBm (max.) / ETSI: 17.5 dBm (max.) @ 11 Mbps
• FCC: 802.11g: 20 dBm (max.) / ETSI: 17 dBm (max.) @ 54 Mbps
• FCC: 802.11n (2.4GHz): 23 dBm (max.) / ETSI: 17.5 dBm (max.) @ 600 Mbps
• FCC: 802.11n (5GHz): 19.5 dBm (max.) / ETSI: 18 dBm (max.) @ 600 Mbps
• FCC: 802.11ac: 20.5 dBm (max.) / ETSI: 17.5 dBm (max.) @ 1300 Mbps
Receiving Sensitivity
• 802.11a: -72 dBm (typical) @ 54 Mbps
• 802.11b: -84 dBm (typical) @ 11 Mbps
• 802.11g: -70 dBm (typical) @ 54 Mbps
• 802.11n (2.4GHz): -90 dBm (typical) @ 600 Mbps
• 802.11n (5GHz): -88 dBm (typical) @ 600 Mbps
• 802.11ac: -84 dBm (typical) @ 1300 Mbps
Wireless Channels
• 2.4GHz: (FCC) 1-11, (ETSI) 1-13
• 5GHz: (FCC) 36, 40, 44, 48, 149, 153, 157, 161, 165, (ETSI) 36, 40, 44, 48
TRENDnet User's Guide
Limited Warranty
Power
• Consumpon: Max. 6.6 W
Operang Temperature
0 - 40 °C (32 - 104 °F)
Operang Humidity
• Max. 80% non-condensing
Cercaons
• CE
• FCC
Dimensions
- 85 x 75 x 20 mm (3.35 x 2.95 x 0.79 in.)
Weight
• 48 g (1.7 oz.)
\*Disclaimers\*
* Maximum wireless signal rates are referenced from IEEE 802.11 theoretical specicaons. Actual data throughput and coverage will vary depending on interference, network trac, building materials and other conditions. For maximum performance of up to 1300Mbps, connect to a 1300 Mbps 802.11ac wireless router or access point. For maximum performance of up to 600Mbps, connect to a 600 Mbps 802.11n wireless router or access point.
Troubleshoong
Q: I inserted the Utility & Driver CD-ROM into my computer's CD-ROM Drive and the installaon menu does not appear automatically. What should I do? Answer:
- For Windows® 8.1/8/7, if the installaon menu does not appear automatically, click on the Windows Icon on the boom le hand corner of the screen,, click the "Search programs and les" box, and type D:\Autorun.exe, where "D" in "D:\Autorun.exe" is the leer assigned to your CD-ROM Drive, and then press the ENTER key on your keyboard
- For Windows® Vista, if the installaon menu does not appear automatically, click Start, click the Start Search box, and type D:\Autorun.exe where "D" in "D:\autorun.exe" is the leer assigned to your CD-ROM Drive, and then press the ENTER key on your keyboard.
- For Windows ^® XP, if the installaon menu does not appear automatically, click Start, click Run, and type D:\Autorun where "D" in "D:\Autorun.exe" is the leer assigned to your CD-ROM Drive, and then press the ENTER key on your keyboard.
Q: I completed all the steps in the quick installaon guide, but my Wireless USB Adapter is not connecng to my access point. What should I do? Answer:
- Verify that the SSID (Network Name) matches your wireless router or access point's SSID
- Please check with your network administrator for security key in order to access a secured wireless access point or router. Please refer to the User's Guide for more informaon regarding wireless network security.
- Check your TCP/IP properes to ensure that Obtain an IP address automacally is selected.
- Double-click the Wireless Conguraon Utility icon, click Available Networks and then click Refresh to check and see if there are any available wireless networks listed.
Q: Windows is unable to recognize my hardware. What should I do? Answer:
- Make sure your computer meets the minimum requirements as specified in Secon 1 of this quick installaon guide.
- You must complete the installaon of the Wireless Conguraon Utility (as described in Secon 2) before connecng the Wireless USB Adapter to your computer.
- Connect the Wireless USB Adapter to a dierent USB port on your computer.
Q: I cannot open the Wireless Conguraon Utility. What should I do? Answer:
Access your device manager to make sure the adapter is installed properly.
1. To access the device manager on Windows® 8.1/8/7, click on the Windows icon on the boom le-hand corner, click Computer, click System Properes and then click Device Manager.
2. To access the device manager on Windows® Vista, right-click Computer, click Properes and then click Device Manager.
3. To access the device manager on Windows® XP, right-click My Computer, click Properes, click the Hardware tab, and then click Device Manager.
If you see a networking device with a yellow queson mark or exclamaon point:
1. Uninstall the device from device manager
2. Remove the adapter from the computer
3. Click the Windows / Start icon, click All Programs, click TRENDnet Wireless Utility and then click Uninstall.
Appendix
How to choose the type of security for your wireless network
Seng up wireless security is very important. Leaving your wireless network open and unsecure could expose your enre network and personal les to outsiders. TRENDnet recommends reading through this enre secon and seng up wireless security on your new router.
There are a few dierent wireless security types supported in wireless networking each having its own characteriscs which may be more suitable for your wireless network taking into consideraon compatibility, performance, as well as the security strength along with using older wireless networking hardware (also called legacy hardware).
It is strongly recommended to enable wireless security to prevent unwanted users from accessing your network and network resources (personal documents, media, etc.).
In general, it is recommended that you choose the security type with the highest strength and performance supported by the wireless computers and devices in your network. Please review the security types to determine which one you should use for your network.
Wireless Encrypon Types
- WEP: Legacy encrypon method supported by older 802.11a/b/g hardware. This is the oldest and least secure type of wireless encrypon. It is generally not recommended to use this encrypon standard, however if you have old 802.11b, 802.11g or 802.11a wireless adapters or computers with old embedded wireless cards(wireless clients), you may have to set your router to WEP to allow the old adapters to connect to the router. Note: This encrypon standard will limit conncon speeds to 54Mbps.
- WPA: This encrypon is significantly more robust than the WEP technology. Much of the older 802.11a or 802.11g hardware has been upgraded (with rmware/driver upgrades) to support this encrypon standard. Total wireless speeds under this encrypon type however are limited to 54Mbps.
- WPA-Auto: This seng provides the router with the ability to detect wireless devices using either WPA or WPA2 encrypon. Your wireless network will automatically change the encrypon seng based on the rst wireless device connected. For example, if the rst wireless client that connects to your wireless network uses WPA encrypon your wireless network will use WPA encrypon. Only when all wireless clients disconnect to the network and a wireless client with WPA2 encrypon connects your wireless network will then change to WPA2 encrypon. NOTE: WPA2 encrypon supports 802.11n speeds and WPA encrypon will limit your connecon speeds to 54Mbps
- WPA2: This is the most secure wireless encrypon available today, similar to WPA encrypon but more robust. This encrypon standard also supports the highest conncon speeds. TRENDnet recommends seng your router to this encrypon standard. If you nd that one of your wireless network devices does not support WPA2 encrypon, then set your router to either WPA or WPA-Auto encrypon.
Note: Check the specifications of your wireless network adapters and wireless appliances to verify the highest level of encrypon supported.
TRENDnet User's Guide
Limited Warranty
Open or Shared \ WEP – Enter the WEP key for your wireless network. Wireless network has WEP security enabled, open or shared. Please note that the Key Index 1-4 must also match the same index congured on the wireless router/access point.
| WEP Key Format | HEX | ASCII |
| Character set | 0-9 & A-F, a-f only | Alphanumeric (a,b,C,?,*,/,1,2, etc.) |
| 64-bit key length | 10 characters | 5 characters |
| 128-bit key length | 26 characters | 13 characters |
WPA/WPA2-PSK/TKIP or AES – Wireless network has WPA/WPA2-PSK security enabled, TKIP or AES. Note: 8-63 alphanumeric characters (a,b,C,?,*,/,1,2, etc.)
Below is brief comparison chart of the wireless security types and the recommended conguraon depending on which type you choose for your wireless network.
| Security Standard | WEP | WPA | WPA2 |
| Compatible Wireless Standards | IEEE 802.11a/b/g (802.11n devices will operate at 802.11g to connect using this standard) | IEEE 802.11a/b/g (802.11n/ac devices will operate at 802.11g to connect using this standard) | IEEE 802.11a/b/g/n/ac |
| Highest Performance Under This Seng | Up to 54Mbps | Up to 54Mbps | Up to 1.3Gbps 11ac** Up to 300Mbps 11n* |
| Encrypon Strength | Low | Medium | High |
| Additional Opons | Open System or Shared Key, HEX or ASCII, Dierent key sizes | TKIP or AES, Preshared Key or RADIUS | TKIP or AES, Preshared Key or RADIUS |
| Recommended Conguraon | Open System ASCII 13 characters | TKIP Preshared Key 8-63 characters | AES Preshared Key 8-63 characters |
*Dependent on the maximum 802.11n data rate supported by the device (600Mbps)
**Dependent on the maximum 802.11ac data rate supported by the device (1.3Gbps)
How to nd your IP address?
Note: Please note that although the following procedures provided to follow for your operang system on conguring your network sengs can be used as general guidelines, however, it is strongly recommended that you consult your computer or operang system manufacturer directly for assistance on the proper procedure for conguring network sengs.
Command Prompt Method
Windows® XP/Vista/7/8/8.1/10
- On your keyboard, press Windows Logo+R keys simultaneously to bring up the Run dialog box.
- In the dialog box, type cmd to bring up the command prompt.
- In the command prompt, type ipcong /all to display your IP address sengs.
Note: If you are experiencing dicules, please contact your computer or operating system manufacturer for assistance.
How to congregate your network sengs to obtain an IP address automatically or use DHCP?
Note: Please note that although the following procedures provided to follow for your operang system on conguring your network sengs can be used as general guidelines, however, it is strongly recommended that you consult your computer or operang system manufacturer directly for assistance on the proper procedure for conguring network sengs.
Windows® 10/8.1/8/7
a. Go into the Control Panel, click Network and Sharing Center.
b. Click Change Adapter Sengs, right-click the Local Area Connecon icon.
c. Then click Properes and click Internet Protocol Version 4 (TCP/IPv4).
d. Then click Obtain an IP address automacally and click OK.
Windows® Vista
a. Go into the Control Panel, click Network and Internet.
b. Click Manage Network Connecons, right-click the Local Area Connecon icon and click Properes.
c. Click Internet Protocol Version (TCP/IPv4) and then click Properes.
TRENDnet User's Guide
Limited Warranty
d. Then click Obtain an IP address automacally and click OK.
Windows ^® XP
a. Go into the Control Panel, double-click the Network Connecons icon
b. Right-click the Local Area Connecon icon and the click Properes.
c. Click Internet Protocol (TCP/IP) and click Properes.
d. Then click Obtain an IP address automacally and click OK.
Note: If you are experiencing dicules, please contact your computer or operating system manufacturer for assistance.
How to connect to a wireless network using the built-in Windows utility?
Note: Please note that although the following procedures provided to follow for your operang system on conguring your network sengs can be used as general guidelines, however, it is strongly recommended that you consult your computer or operang system manufacturer directly for assistance on the proper procedure for connecng to a wireless network using the built-in utility.
Windows ^® 10/8.1/8/7
- Open Connect to a Network by clicking the network icon (eop) in the nocoon area.
- In the list of available wireless networks, click the wireless network you would like to connect to, then click Connect.
- You may be prompted to enter a security key in order to connect to the network.
- Enter in the security key corresponding to the wireless network, and click OK.
Windows® Vista
- Open Connect to a Network by clicking the Start Buon. and then click Connect To.
- In the Show list, click Wireless.
- In the list of available wireless networks, click the wireless network you would like to connect to, then click Connect.
- You may be prompted to enter a security key in order to connect to the network.
- Enter in the security key corresponding to the wireless network, and click OK.
Windows XP
- Right-click the network icon in the nocaon area, then click View Available Wireless Networks.
- In Connect to a Network, under Available Networks, click the wireless network you would like to connect to.
- You may be prompted to enter a security key in order to connect to the network.
- Enter in the security key corresponding to the wireless network, and click Connect.
Federal Communicaon Commission Interference Statement
15.21
You are cauoned that changes or modicaons not expressly approved by the part responsible for compliance could void the user's authority to operate the equipment.
15.105(b)
This equipment has been tested and found to comply with the limits for a Class B digital device, pursuant to part 15 of the FCC rules. These limits are designed to provide reasonable protecon against harmful interference in a residential installaon. This equipment generates, uses and can radiate radio frequency energy and, if not installed and used in accordance with the instrucons, may cause harmful interference to radio communicaons. However, there is no guarantee that interference will not occur in a parcular installaon. If this equipment does cause harmful interference to radio or television reception, which can be determined by turning the equipment and on, the user is encouraged to try to correct the interference by one or more of the following measures:
- Reorient or relocate the receiving antenna.
- Increase the separaon between the equipment and receiver.
- Connect the equipment into an outlet on a circuit dierent from that to which the receiver is connected.
- Consult the dealer or an experienced radio/TV technician for help.
This device complies with Part 15 of the FCC Rules. Operaon is subject to the following two conditions:
1) this device may not cause harmful interference and
2) this device must accept any interference received, including interference that may cause undesired operation of the device.

FCC RF Radiaon Exposure Statement:
- This Transmier must not be co-located or operang in conjuncon with any other antenna or transmier.(For only one antenna)
- This equipment complies with FCC RF radiaon exposure limits set forth for an uncontrolled environment. This equipment should be installed and operated with a minimum distance of 20 cenmeters between the radiator and your body.
RoHS
This product is RoHS compliant.

Europe – EU Declaraon of Conformity
TRENDnet hereby declare that the product is in compliance with the essenal requirements and other relevant provisions under our sole responsibility.

Safety
EN 60950-1: 2006 + A11: 2009: + A1: 2010 + A12: 2011 + A2: 2013
EMC
EN 301 489-1 V1.9.2: 09-2011
EN 301 489-17 V2.2.1: 09-2012
EN 55022: 2010 + AC: 2011
EN 55024: 2010
Radio Spectrum & Health
EN 300 328 V1.9.1: 02-2015
EN 301 893 V1.8.1: 03-2015
EN 62311: 2008
This product is herewith conrmed to comply with the Direcves.
Directves
Low Voltage Directive 2006/95/EC and 2014/35/EU
EMC Directive 2004/108/EC and 2014/30/EU
R&TTE Directive 2014/53/EU and RED Directive 2014/53/EU
RoHS Directive 2011/65/EU
REACH Regulaon (EC) No. 1907/2006
TRENDnet User's Guide
Limited Warranty
| cs Česky [Czech] | TRENDnet mto prohlašuje, že tento TEW-809UB je ve shodě se základními požađavky a dalšími příslušnými ustanoveními směrnice 2006/95/ES, 2014/35/EU, 2004/108/ES, 2014/30/EU, 2011/65/EU, a REACH (ES) 1907/2006. |
| da Dansk [Danish] | Undertegnede TRENDnet erklærer herved, at følgende udstyr TEW-809UB overholder de væsentlige krav og øvrige relevante krav i direkv 2006/95/EF, 2014/35/EU, 2004/108/EF, 2014/30/EU, 2011/65/EU, og REACH (EF) 1907/2006. |
| de Deutsch [German] | Hiermit erklärt TRENDnet, dass sich das Gerät TEW-809UB in Übereinsmmung mit den grundlegenden Anforderungen und den übrigen einschlägigen Besimmungen der Richtlinie 2006/95/EG, 2014/35/EU, 2004/108/EG, 2014/30/EU, 2011/65/EU, und REACH (EG) 1907/2006 bendet. |
| et Ees [Estonian] | Käesolevaga kinnitab TRENDnet seadme TEW-809UB vastavust direkivi 2006/95/EÜ, 2014/35/EU, 2004/108/EÜ, 2014/30/EU, 1999/5/EÜ, 2011/65/EU, ja REACH (EÜ) 1907/2006 põhinõuetele ja nimetatud direkivist tulenevatele teistele asjakohastele sätetele. |
| en English | Hereby, TRENDnet, declares that this TEW-809UB is in compliance with the essenal requirements and other relevant provisions of Direcve 2006/95/EC, 2014/35/EU, 2004/108/EC, 2014/30/EU, 2011/65/EU, and REACH (EC) 1907/2006. |
| es Español [Spanish] | Por medio de la presente TRENDnet declara que el TEW-809UB cumple con los requisitos esenciales y cualesquiera otras disposiciones aplicables o exigibles de la Direcva 2006/95/CE, 2014/35/EU, 2004/108/CE, 2014/30/EU, 2011/65/EU, y REACH (CE) 1907/2006. |
| el Eλληνική [Greek] | ME THN ΠΑΡΟΥΣΑΤRENDnet ΔΗΛΩΝΕΙ ΟΤΙΤΕW-809UBΣΥΜΜΟΡΦΩΝΕΤΑΙ ΠΡΟΣ ΤΙΣ ΟΥΣΙΩΔΕΙΣ ΑΠΑΙΤΗΣΕΙΣ ΚΑΙ ΤΙΣ ΛΟΙΠΕΣ ΣΧΕΤΙΚΕΣ ΔΙΑΤΑΞΕΙΣ ΤΗΣ ΟΔΗΓΙΑΣ 2006/95/EK, 2014/35/EU, 2004/108/EK, 2014/30/EU, 2011/65/EU, REACH (EK) 1907/2006 και. |
| fr Français [French] | Par la présente TRENDnet déclare que l'appareil TEW-809UB est conforme aux exigences essenelles et aux autres disposions permentes de la direcve 2006/95/CE, 2014/35/EU, 2004/108/CE, 2014/30/EU, 2011/65/EU, REACH (CE) 1907/2006 et. |
| It Italiano[Italian] | Con la presente TRENDnet dichiara che questo TEW-809UB è conforme ai requisi essenziali ed alle altre disposizioni pernen stabilite dalla direva 2006/95/CE, 2014/35/EU, 2004/108/CE, 2014/30/EU, 2011/65/EU, e REACH (CE) 1907/2006.. |
| Latviski [Latvian] | AršoTRENDnetdeklarė, ka TEW-809UB atbilst Direkvas 2006/95/EK, 2014/35/EU, 2004/108/EK, 2014/30/EU, 2011/65/EU, un REACH (EK) 1907/2006 būskajāmprasībām un ciemar to saistajlemnoteikumiem. |
| Lietuvių [Lithuanian] | Šiuo TRENDnet deklaruoja, kad šis TEW-809UB anka esminius reikalavimus ir kitas 2006/95/EB, 2014/35/EU, 2004/108/EB, 2014/30/EU, 2011/65/EU, ir REACH (EB) 1907/2006 Direktyvos nuostatas. |
| Nederlands [Dutch] | Hierbij verklaart TRENDnet dat het toestel TEW-809UB in overeenstemming is met de essenėle eisen en de andere relevante bepalingen van richtlijn 2006/95/EG, 2014/35/EU, 2004/108/EG, 2014/30/EU, 2011/65/EU, en REACH (EG) 1907/2006. |
| Mal [Maltese] | Hawnhekk, TRENDnet, jiddikjara li dan TEW-809UB jikkonforma mal-ħigijiet essenzjali u ma provvedimen oħrajn relevan li hemm d-Dirreva 2006/95/KE, 2014/35/EU, 2004/108/KE, 2014/30/EU, 2011/65/EU, u REACH (KE) 1907/2006. |
| Magyar [Hungarian] | Aluliro, TRENDnet nyilatkozom, hogy a TEW-809UBmegfelel a vonatkozó alapvető követelményeknek és az 2006/95/EK, 2014/35/EU, 2004/108/EK, 2014/30/EU, 2011/65/EU, irányelv, a REACH (EK) 1907/2006 irányelv egyéb előírásainak. |
| Polski [Polish] | Niniejszym TRENDnet oświadcza, że TEW-809UB jest zgodny z zasadniczymi wymogami oraz pozostałymi stosownymi postanowieniami Dyrektywy 2006/95/WE, 2014/35/EU, 2004/108/WE, 2014/30/EU, 2011/65/EU, i REACH (WE) 1907/2006. |
| Português [Portuguese] | TRENDnet declara que este TEW-809UB está conforme com os requisitos essenciais e outras disposições da Direcva 2006/95/CE, 2014/35/EU, 2004/108/CE, 2014/30/EU, 2011/65/EU, e REACH (CE) 1907/2006. |
| Slovensko [Slovenian] | TRENDnet izjavlja, da je ta TEW-809UB v skladu z bistvenimi zahtevami in ostalimi relevantnimi določili direkve 2006/95/ES, |
TRENDnet User's Guide
Limited Warranty
| 2014/35/EU, 2004/108/ES, 2014/30/EU, 2011/65/EU, in REACH (ES) 1907/2006. | |
| Slovensky [Slovak] | TRENDneýmtovyhlasuje, že TEW-809UBsplíñazákladnépožiadavky a všetkypríslušnéustanoveniaSmernice 2006/95/ES, 2004/108/ES, 2014/35/EU, 2014/30/EU, 2011/65/EU, a REACH (ES) 1907/2006. |
| Suomi [Finnish] | TRENDnet vakuuaa täten eä TEW-809UB tyyppinen laite on direkivin 2006/95/EY, 2014/35/EU, 2004/108/EY, 2014/30/EU, 2011/65/EU, ja REACH (EY) 1907/2006 oleellisten vaamusten ja sitä koskevien direkivin muiden ehtojen mukainen. |
| Svenska [Swedish] | Härmed intygar TRENDnet a denna TEW-809UB står I överensstämmelse med de väsentliga egenskapskrav och övriga relevanta bEYtämmelser som framgår av direkv 2006/95/EG, 2014/35/EU, 2004/108/EG, 2014/30/EU, 2011/65/EU, och REACH (EG) 1907/2006. |
TRENDnet User's Guide
Limited Warranty
Industry Canada Statement
This Class B digital apparatus complies with Canadian ICES-003
This device complies with Industry Canada licence-exempt RSS standard(s).
Operaon is subject to the following two conditions: (1) this device may not cause
interference, and (2) this device must accept any interference, including interference that may cause undesired operaon of the device.
To comply with RSS 102 RF exposure compliance requirements, a separaon distance of at least 20 cm must be maintained between the antenna of this device and all persons.
The device, for operaon in the band 5150\~5250Mhz is only for indoor use to reduce the potential for harmful interference to co-channel mobile satellite systems.
TRENDnet User's Guide
Limited Warranty
Limited Warranty
TRENDnet warrants only to the original purchaser of this product from a TRENDnet authorized reseller or distributor that this product will be free from defects in material and workmanship under normal use and service. This limited warranty is non-transferable and does not apply to any purchaser who bought the product from a reseller or distributor not authorized by TRENDnet, including but not limited to purchases from Internet aucon sites.
Limited Warranty
TRENDnet warrants its products against defects in material and workmanship, under normal use and service. Specific warranty periods are listed on each of the respective product pages on the TRENDnet website.
- AC/DC Power Adapter, Cooling Fan, and Power Supply carry a one-year warranty.
Limited Lifetime Warranty
TRENDnet oers a limited lifeme warranty for all of its metal-enclosed network switches that have been purchased in the United States/Canada on or aer 1/1/2015.
• Cooling fan and internal power supply carry a one-year warranty
To obtain an RMA, the ORIGINAL PURCHASER must show Proof of Purchase and return the unit to the address provided. The customer is responsible for any shipping-related costs that may occur. Replacement goods will be shipped back to the customer at TRENDnet's expense.
Upon receiving the RMA unit, TRENDnet may repair the unit using refurbished parts. In the event that the RMA unit needs to be replaced, TRENDnet may replace it with a refurbished product of the same or comparable model.
In the event that, aer evaluaon, TRENDnet cannot replace the defective product or there is no comparable model available, we will refund the depreciated value of the product.
If a product does not operate as warranted during the applicable warranty period, TRENDnet shall reserve the right, at its expense, to repair or replace the defective product or part and deliver an equivalent product or part to the customer. The repair/replacement unit's warranty connues from the original date of purchase. All products that are replaced become the property of TRENDnet. Replacement products may be new or reconditioned. TRENDnet does not issue refunds or credit. Please contact the point-of-purchase for their return policies.
TRENDnet shall not be responsible for any soware, rmware, informaon, or memory data of customer contained in, stored on, or integrated with any products returned to TRENDnet pursuant to any warranty.
There are no user serviceable parts inside the product. Do not remove or aempt to service the product by any unauthorized service center. This warranty is voided if (i) the product has been modified or repaired by any unauthorized service center, (ii) the product was subject to accident, abuse, or improper use, or (iii) the product was subject to conditions more severe than those specified in the manual.
Warranty service may be obtained by contacting TRENDnet within the applicable warranty period and providing a copy of the dated proof of the purchase. Upon proper submission of required documentaon, a Return Material Authorizaon (RMA) number will be issued. An RMA number is required in order to initiate warranty service support for all TRENDnet products. Products that are sent to TRENDnet for RMA service must have the RMA number marked on the outside of return packages and sent to TRENDnet prepaid, insured and packaged appropriately for safe shipment. Internaonal customers
TRENDnet User's Guide
Limited Warranty
shipping from outside of the USA and Canada are responsible for any return shipping and/or customs charges, including but not limited to, duty, tax, and other fees.
Refurbished product: Refurbished products carry a 90-day warranty aer date of purchase. Please retain the dated sales receipt with purchase price clearly visible as evidence of the original purchaser's date of purchase. Replacement products may be refurbished or contain refurbished materials. If TRENDnet, by its sole determinaon, is unable to replace the defective product, we will oer a refund for the depreciated value of the product.
WARRANTIES EXCLUSIVE: IF THE TRENDNET PRODUCT DOES NOT OPERATE AS WARRANTED ABOVE, THE CUSTOMER'S SOLE REMEDY SHALL BE, AT TRENDNET'S OPTION, REPAIR OR REPLACE. THE FOREGOING WARRANTIES AND REMEDIES ARE EXCLUSIVE AND ARE IN LIEU OF ALL OTHER WARRANTIES, EXPRESSED OR IMPLIED, EITHER IN FACT OR BY OPERATION OF LAW, STATUTORY OR OTHERWISE, INCLUDING WARRANTIES OF MERCHANTABILITY AND FITNESS FOR A PARTICULAR PURPOSE. TRENDNET NEITHER ASSUMES NOR AUTHORIZES ANY OTHER PERSON TO ASSUME FOR IT ANY OTHER LIABILITY IN CONNECTION WITH THE SALE, INSTALLATION, MAINTENANCE, OR USE OF TRENDNET'S PRODUCTS.
TRENDNET SHALL NOT BE LIABLE UNDER THIS WARRANTY IF ITS TESTING AND EXAMINATION DISCLOSE THAT THE ALLEGED DEFECT IN THE PRODUCT DOES NOT EXIST OR WAS CAUSED BY CUSTOMER'S OR ANY THIRD PERSON'S MISUSE, NEGLECT, IMPROPER INSTALLATION OR TESTING, UNAUTHORIZED ATTEMPTS TO REPAIR OR MODIFY, OR ANY OTHER CAUSE BEYOND THE RANGE OF THE INTENDED USE, OR BY ACCIDENT, FIRE, LIGHTNING, OR OTHER HAZARD.
LIMITATION OF LIABILITY: TO THE FULL EXTENT ALLOWED BY LAW, TRENDNET ALSO EXCLUDES FOR ITSELF AND ITS SUPPLIERS ANY LIABILITY, WHETHER BASED IN
CONTRACT OR TORT (INCLUDING NEGLIGENCE), FOR INCIDENTAL, CONSEQUENTIAL, INDIRECT, SPECIAL, OR PUNITIVE DAMAGES OF ANY KIND, OR FOR LOSS OF REVENUE OR PROFITS, LOSS OF BUSINESS, LOSS OF INFORMATION OR DATE, OR OTHER FINANCIAL LOSS ARISING OUT OF OR IN CONNECTION WITH THE SALE, INSTALLATION, MAINTENANCE, USE, PERFORMANCE, FAILURE, OR INTERRUPTION OF THE POSSIBILITY OF SUCH DAMAGES, AND LIMITS ITS LIABILITY TO REPAIR, REPLACEMENT, OR REFUND OF THE PURCHASE PRICE PAID, AT TRENDNET'S OPTION. THIS DISCLAIMER OF LIABILITY FOR DAMAGES WILL NOT BE AFFECTED IF ANY REMEDY PROVIDED HEREIN SHALL FAIL OF ITS ESSENTIAL PURPOSE.
Governing Law: This Limited Warranty shall be governed by the laws of the state of California.
Some TRENDnet products include soware code written by third party developers. These codes are subject to the GNU General Public License ("GPL") or GNU Lesser General Public License ("LGPL").
Visit hp://www.trendnet.com/gpl or the support secon on hp://www.trendnet.com and search for the desired TRENDnet product to access to the GPL Code or LGPL Code. These codes are distributed WITHOUT WARRANTY and are subject to the copyrights of the developers. TRENDnet does not provide technical support for these codes. Please visit hp://www.gnu.org/licenses/gpl.txt or hp://www.gnu.org/licenses/lgpl.txt for specific terms of each license. PWP07172015v3 2016/05/24
TRENDNET®
Product Warranty Registration
Please take a moment to register your product online. Go to TRENDnet's website at http://www.trendnet.com/register
TRENDnet
20675 Manhattan Place
Torrance, CA 90501. USA
Copyright ©2016. All Rights Reserved. TRENDnet.

- TRENDnet User's Guide
- Table of Contents
- Contents
- Product Overview ......2
- Installing your Wireless Adapter....5
- Connect to your wireless network using WPS 7
- Technical Specicaons 14
- Troubleshoong 16
- Appendix 17
- Package Contents
- Features
- Easy Setup
- AC1900 Dual Band
- Wireless Coverage
- LED Indicator
- Operang Systems
- System Requirements
- Applicaon Diagram
- Installing your Wireless Adapter
- Windows® OS Installaon
- TEW-809UB
- At the installaon window, click Next.
- Mac® OS Installaon
- At the Introducon window, click Connue.
- At the Read Me window, click Connue.
- At the License Agreement window, click Connue.
- When prompted, click Agree.
- At the Install window, click Install.
- Connect to your wireless network using WPS
- Windows® OS
- WPS conncon using the built in ulity (Virtual Push Buon)
- TRENDnetWiFi Connected, secured
- WPS conncon using the hardware push buon
- Mac® OS
- WPS
- WPS Protocol Finished !!
- WPS conncon using a PIN
- Limited Warranty
- Technical Specicaons
- Standards
- Hardware Interface
- Encrypon
- Compatibility
- Special Features
- Quality of Service
- Frequency
- Modulaon
- Antenna Gain
- Wireless Output Power
- Receiving Sensitivity
- Wireless Channels
- \*Disclaimers\*
- Troubleshoong
- Appendix
- How to choose the type of security for your wireless network
- Wireless Encrypon Types
- Windows® 10/8.1/8/7
- Windows® Vista
- Windows ® XP
- How to connect to a wireless network using the built-in Windows utility?
- Windows ® 10/8.1/8/7
- Windows XP
- Federal Communicaon Commission Interference Statement
- FCC RF Radiaon Exposure Statement:
- RoHS
- Europe – EU Declaraon of Conformity
- Safety
- EMC
- Directves
- Industry Canada Statement
- Limited Lifetime Warranty
- TRENDNET®
- Product Warranty Registration
Brand : TRENDNET
Model : AC1900
Category : Network card / adapter