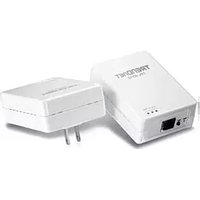
TPL-401E2K - Network card / adapter TRENDNET - Free user manual and instructions
Find the device manual for free TPL-401E2K TRENDNET in PDF.


| Product Type | Powerline Adapter Kit (2 units) |
| Model | TPL-401E2K |
| Brand | TRENDnet |
| Data Rate | Up to 400 Mbps |
| Ports | 1x 10/100 Fast Ethernet port per unit |
| Frequency Band | 2-30 MHz (Powerline) |
| Security | 128-bit AES encryption with pairing button |
| Dimensions (each unit) | Approximately 72 x 55 x 31 mm |
| Weight (each unit) | Approximately 60 g |
| Power Consumption | Less than 3W typical |
| Operating Temperature | 0°C to 40°C |
| Operating Humidity | 10% to 90% (non-condensing) |
| Certifications | CE, FCC, RoHS |
| LED Indicators | Power, Ethernet, Powerline Link |
| Pairing Method | Physical button press on each unit |
| Supported Protocols | IEEE 1901, HomePlug AV |
| Power Cord | Integrated plug, no external cord |
| Package Contents | 2× TPL-401E units, 2× Ethernet cables, quick installation guide, CD-ROM |
| Maintenance | Keep dry; unplug before cleaning; do not expose to liquids |
| Repairability | No user-serviceable parts; contact TRENDnet support for issues |
Frequently Asked Questions - TPL-401E2K TRENDNET
User questions about TPL-401E2K TRENDNET
0 question about this device. Answer the ones you know or ask your own.
Ask a new question about this device
Download the instructions for your Network card / adapter in PDF format for free! Find your manual TPL-401E2K - TRENDNET and take your electronic device back in hand. On this page are published all the documents necessary for the use of your device. TPL-401E2K by TRENDNET.
USER MANUAL TPL-401E2K TRENDNET
natural_image
Two white wireless network devices, one labeled 'TRENDNET YPL-4016' and the other 'TRENDNET', shown against a grid background (no text or symbols on the devices themselves)Quick Installation Guide


Table of Contents
English 1
- Before You Start 1
- How to Install 2
- LEDs and Buttons 5
Troubleshooting 6

natural_image
Two white wireless network devices with ports and connectors, one labeled 'TRENET' (no additional text or symbols visible)Package Contents
• TPL-401E/TPL-401E2K
• CD-ROM (Utility and User's Guide)
• Multi-Language Quick Installation Guide
• Cat.5 Ethernet Network Cable (1.5m/5ft)
System Requirements
- CD-ROM drive
• A Desktop or Laptop PC with Network Adapter Installed
• Existing 10/100Mbps wired network when TPL-401E is used as a bridge device
• Additional 200Mbps HomePlug AV or IEEE 1901 compliant powerline adapter
(e.g. TRENDnet TPL-303E, TPL-304E, TPL-305E, TPL-310AP, or another
TPL-401E) (Note: This requirement is for the TPL-401E only. The TPL-401E2K
already includes two TPL-401E adapters)
Software Utility Requirements
| Supported Operating Systems CPU | Memory | |
| Windows 7 (32/64-bit) | 1GHz or above | 1GB RAM or above |
| Windows Vista (32/64-bit) | 800MHz or above | 512MB RAM or above |
| Windows XP (32/64-bit) | 300MHz or above | 256MB RAM or above |
Note:
The configuration utility will allow you to add security to your powerline network by providing you with the ability to change the default network name and create your own personal network name for your powerline network. The utility can also help you troubleshoot connectivity between powerline adapters by verifying the network name. Please refer to the User's Guide on the TPL-401E/TPL-401E2K CD-ROM for instructions on installing and using the utility.
Powerline Networking Solution

The example diagram shows a typical powerline network configuration in a home environment with 3 powerline adapters installed in different rooms. The orange line represents the powerline connectivity established through your home's electrical system and the blue lines represent Cat. 5, 5e, 6 Ethernet connectivity to your network enabled appliances such as a computer, router, or IP set top box connected to your television.
Note:
- DO NOT install the TPL-401E until instructed to do so.
- DO NOT plug the TPL-401E into a surge protector or power strip.
- Avoid connecting the TPL-401E into an outlet that has appliances (e.g. refrigerators, washer and dryer) plugged in.
- In order for the TPL-401E adapters to link to each other, each unit must be on the same electrical system.
- A maximum of 16 TPL-401E adapters can be networked.
- Assuming that the TPL-401E adapters are configured with the default settings, to create a powerline network, simply connect all TPL-401E adapters to wall outlets that are on the same electrical system. No additional configuration in the utility is necessary.
- The network name must be the same on all powerline adapters in order to establish connectivity. If the network name is not the same on all powerline adapters, the adapters will NOT establish connectivity. The default network name for the TPL-401E is "HomePlugAV".
Below is an example showing how to create a Powerline network using the TPL-401E and your existing router to share Internet.
- Plug a TPL-401E into an available power outlet. This TPL-401E should be located within the reach of the router's network cable.
- Connect a network cable from the TPL-401E to an available LAN network port on your router (e.g. TEW-673GRU).
- Plug a second TPL-401E into an available power outlet where your remote computer or network appliances (e.g. Game Console, IP Set box, network enabled TV, etc.) are located.

natural_image
White electrical outlet with two socket outlets, no visible text or symbols on the device itself
natural_image
Black wireless router with two antennas and a red vertical line indicator (no visible text or symbols)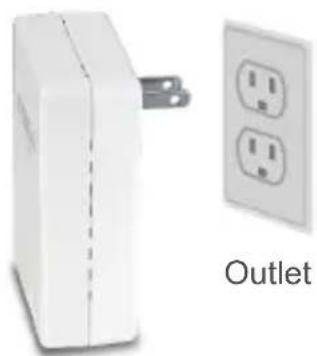
natural_image
White electrical outlet with two socket outlets, no text or symbols visible- Connect a network cable from the TPL-401E network port into the network port on your remote computer or network appliance (e.g. Game Console, Blu-ray player, IP Set box, network enabled TV, etc.).

natural_image
Diagram showing a white electronic device connected to a gray gaming console with a controller (no text or symbols present)
Outlet
- Verify that the PWR (Power), PL (Powerline) and ETH (Ethernet Link/ACT) LEDs are on for both TPL-401E adapters.
Your installation is now complete
For detailed information regarding the the TPL-401E/TPL-401E2K, configuration and advanced settings, please refer to the Troubleshooting section, User's Guide on the Utility CD-ROM, or TRENDnet's website at http://www.trendnet.com.
Register Your Product
To ensure the highest level of customer service and support, please take a moment to register your product Online at: www.trendnet.com/register
Thank you for choosing TRENDnet
3. LEDs and Buttons

The Gigabit Ethernet/Network Port and Reset button are located at the bottom of the device.

Note:
Please refer to the User's Guide on the TPL-401E/TPL-401E2K's User's Guide CD for detailed explanations of each LED and button.
1. I have verified that my Powerline device is connected to my workstation, but I cannot detect other Powerline devices. What should I do?
- Verify that you are using Cat. 5, Cat. 5e or Cat. 6 Ethernet network cables for each TPL-401E adapter.
- Verify that the power outlet of the TPL-401E adapter is plugged into is on the same electrical system and/or circuit breaker box.
-
If you are still not able to establish connectivity after performing the above steps, please reset both of the TPL-401E adapters to factory default. The default network name/key is "HomePlugAV". The Reset button is located on the bottom of the TPL-401E.
-
With a pin or paperclip, press and hold the reset button for 1 second and release it. The LEDs will turn off and turn back on.
-
To verify connectivity, the PL LED will become solid when the powerline adapters establish connectivity. The TPL-401E powerline adapters must have the same network name/key in order to connect to each other.
Note: If you have problems resetting the device, unplug the powerline adapter(s) from the power outlet, wait 15 seconds and plug the adapter(s) back into the outlet, then repeat the reset procedure.
2. I can detect my Powerline devices on my Powerline network, but I cannot connect to the Internet. What should I do?
Assuming that the Powerline network is connected to a router:
- Make sure you are not connecting the device into a surge protector or power strip.
- Make sure that your Router is connected to the Internet and one of the Router's LAN ports is connected to the TPL-401E's network port). Check both TPL-401E and the router's network port LED for positive connection status.
- Make sure your computer's TCP/IP settings are set to Obtain an IP address automatically (see the steps below).
Windows 7
- Go into the Control Panel, click Network and Internet, click Network and Sharing Center, click Change Adapter Settings and then right-click the Local Area Connection icon and then click Properties.

Local Area Connection
Identifying NVIDIA eB
Disable
Status
Diagnose
Bridge Connections
Create Shortcut
Delete
Rename
Properties
Obtain an IP address automatically
○ Use the following IP address:
IP address
Subnet mask:
Default gateway

- Click Internet Protocol Version 4(TCP/IPv4) and then click Properties. Then click on Obtain an IP address automatically.
Windows Vista
- Go into the Control Panel, click Network and Internet, click Network and Sharing Center, click Manage Network Connections and then right-click the Local Area Connection icon and then click Properties.

Local Area Connection
Identify me
NVIDIA nI
Disable
Status
Diagnose
Bridge Connections
Create Shortcut
Delete
Rename
Properties
Obtain an IP address automatically
Use the following IP address:
IP address
Subnet music
Default gateway

- Click Internet Protocol Version 4(TCP/IPv4) and then click Properties. Then click on Obtain an IP address automatically.
Windows XP/2000
- Go into the Control Panel, double-click the Network Connections icon and then right-click the Local Area Connection icon and then click Properties.

Local
Conne
Disable
Status
Repair
Bridge Connections
Create Shortcut
Delete
Rename
Properties
Obtain an IP address automatically
○ Use the following IP address:
P address
Sabinet mask
Default gateway

-
Click Internet Protocol (TCP/IP) and then click Properties. Then click on Obtain an IP address automatically.
-
I have a HomePlug 1.0 or HomePlug Turbo network. Can I use this with my network?
The TPL-401E is not backwards compatible with HomePlug 1.0 or HomePlug Turbo.
- Do I need to reconfigure my TPL-401E after I hit the reset button?
No, the TPL-401E adapter should automatically establish connection once both units are reset to default settings.
If you still encounter problems or have any questions regarding the TPL-401E, please refer to the User's Guide included on the Utility CD-ROM or contact TRENDnet's Technical Support Department.
Company Information:
Company Name:
TRENDnet, Inc.
Company Address:
20675 Manhattan Place
Torrance, CA 90501
USA
Product Information:
Product Description:
500Mbps Powerline AV Adapter
Model Number:
TPL-401E
Brand name:
TRENDnet

Technical Standards:
The product is herewith confirmed to comply with the requirements of Directive 1999/5/EC of the Council (European Parliament) on the radio and telecommunications terminal equipment and Energy-related products Directive 2009/125/EC.
I hereby declare that the products and devices mentioned above are consistent with the standards and provisions of the guidelines.
Sonny Su
Full Name
October 1, 2010
Date
Director of Technology
Position / Title

Signature
Certifications
This equipment has been tested and found to comply with FCC and CE Rules.
Operation is subject to the following two conditions:
(1) This device may not cause harmful interference.
(2) This device must accept any interference received. Including interference that may cause undesired operation.


Waste electrical and electronic products must not be disposed of with household waste. Please recycle where facilities exist. Check with you Local Authority or Retailer for recycling advice.

NOTE: THE MANUFACTURER IS NOT RESPONSIBLE FOR ANY RADIO OR TV INTERFERENCE CAUSED BY UNAUTHORIZED MODIFICATIONS TO THIS EQUIPMENT. SUCH MODIFICATIONS COULD VOID THE USER'S AUTHORITY TO OPERATE THE EQUIPMENT.
ADVERTENCIA
Description of Modes
Erp (EuP) Operation: Standby Mode
The EUT has no external mechanical switch and uses an internal program to control active and standby modes.
Disconnect the Ethernet cables from the device Ethernet ports, and after 3 minutes, the device will enter standby mode. The Power (PWR) LED will flash every 15 seconds to indicate that the device is currently in standby mode. To return to active mode, reconnect the Ethernet cables to the device Ethernet ports, and the device will re-enter active mode.

TRENDNET®
Product Warranty Registration
Please take a moment to register your product online. Go to TRENDnet's website at http://www.trendnet.com/register

- Table of Contents
- English 1
- Troubleshooting 6
- Package Contents
- System Requirements
- Software Utility Requirements
- Note:
- Your installation is now complete
- Register Your Product
- LEDs and Buttons
- I have verified that my Powerline device is connected to my workstation, but I cannot detect other Powerline devices. What should I do?
- I can detect my Powerline devices on my Powerline network, but I cannot connect to the Internet. What should I do?
- Windows 7
- Windows Vista
- Windows XP/2000
- Company Information:
- Product Information:
- Technical Standards:
- Certifications
- ADVERTENCIA
- TRENDNET®
- Product Warranty Registration
Brand : TRENDNET
Model : TPL-401E2K
Category : Network card / adapter