
HIR9BGTA - Monitor BOSS - Free user manual and instructions
Find the device manual for free HIR9BGTA BOSS in PDF.


| Product Type | Headrest Monitor with DVD Player |
| Brand | BOSS |
| Model | HIR9BGTA |
| Display | 9-inch TFT LCD, 16:9, LED backlit |
| Resolution | 800 x 480 pixels |
| Brightness | 400 cd/m² |
| Color System | PAL/NTSC (auto-select) |
| Disc Compatibility | DVD, VCD, CD, MP3, CD-R, CD-RW, DVD-R, DVD-RW, DIVX |
| Media Playback | USB, SD/MMC card, Mini USB, 3.5mm front jack |
| Audio Output | Built-in dual speakers, FM transmitter, dual IR transmitter (Ch A: 2.3/2.8MHz, Ch B: 3.2/3.8MHz) |
| Video Inputs | Front 3.5mm jack, wired RCA input |
| Video Output | 1 A/V RCA output |
| Remote Control | Wireless remote included |
| Interchangeable Covers | Yes (black, grey, tan included) |
| Pole Distance Adjustment | 4" to 7" |
| Tilt Mechanism | Free tilt for optimal viewing angle |
| Power Supply | DC 12V (10.6-15.8V) |
| Power Consumption | 12W |
| Operating Temperature | 14°F to 122°F (-10°C to 60°C) |
| Dimensions (Product) | 11" x 6" x 14.75" |
| Weight | 5.5 lbs |
| Cleaning | Use a clean, dry cloth; avoid water and chemical solvents |
| Safety | Designed for DC 12V grounded systems; do not disassemble |
| Installation | Requires correct steel tube size; ensure compatibility with vehicle |
| Warranty | Void if disassembled; consult authorized dealer for repairs |
Frequently Asked Questions - HIR9BGTA BOSS
User questions about HIR9BGTA BOSS
0 question about this device. Answer the ones you know or ask your own.
Ask a new question about this device
Download the instructions for your Monitor in PDF format for free! Find your manual HIR9BGTA - BOSS and take your electronic device back in hand. On this page are published all the documents necessary for the use of your device. HIR9BGTA by BOSS.
USER MANUAL HIR9BGTA BOSS
DVD CONTENTS
- DVD Features 2
- Front Panel Controls ---- 3
- Installation 4
- Remote Control Operation ---- 6
- OSD Operation 7
- DVD Operation 8
- Disc Compatibility - - - - - - - - - - - - - - - - - - 9
- Handling Discs----9
- Safety Precautions 10
- Troubleshooting 11
11.Technical Specifications - - - - - - - - - - - - - 12 - leather change instruction - - - - - - - - - - - 13
leather change instruction

natural_image
Close-up of a mechanical device with a cylindrical component and wiring, no visible text or symbolsSTEP 7: Slide on the edges of the leather cover from left to right.

natural_image
Interior view of a black rectangular device with four circular annotations highlighting areas of interest (no text or symbols present)STEP 8: Make sure the leather covers all headrest cushion areas after the cover is set in place.

natural_image
Interior view of a car seat frame with visible wiring and components (no text or symbols)STEP 9: Secure all the edges of leather cover by pressing firmly on the Velcro areas.

natural_image
Interior view of a car showing a black rectangular device with ventilation slots and mounting brackets (no visible text or symbols)STEP 10: Connect the two cables and reassemble.
leather change instruction
natural_image
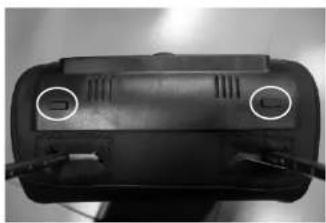
Close-up of a black electronic device with two circular annotations pointing to internal components (no visible text or symbols)STEP 1: Press the two buttons on the bottom of the headrest firmly.
natural_image
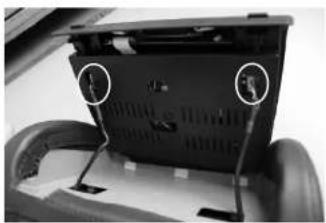
Interior view of a car chassis showing a rear panel with two circular annotations pointing to the front panel (no text or symbols visible)STEP 2: Disconnect the connecting cables.

natural_image
Top-down view of a car chassis frame with visible wiring and components (no text or symbols)STEP 3: Pull out the 4 edges of the leather cover held by Velcro.

natural_image
Close-up of a white VR headset with black buttons and cable, no visible text or symbolsSTEP 4: Once the edges are loosen, remove the leather cover beginning on one end and moving on to the other.

natural_image
Simple sketch of a rectangular box with a flat top and side connectors (no text or symbols)STEP 5: Flip the new desired leather cover inside out.

natural_image
Interior view of an electronic device with exposed wiring and components (no visible text or symbols)STEP 6: Slide the 2 metal poles through the two openings on the reversed leather cover.
DVD Features:
• Built-in DVD Player compatible with DVD/VCD/MP3/MP4/CD-R/CD-RW/DIVX
- LED backlit panels for exceptional picture quality, high efficiency and long life
- Cover colors easily interchangeable between black, grey and tan to match vehicle interior (all 3 colors included)
- Pole distance adjustable from 4"-7" apart for universal fit
• Free tilt mechanism allows for adjustment to optimal viewing angle
- Mini USB port and SD/MMC card slot for music, image and video files
• Automatically selects PAL/NTSC system
- Front 3.5 mm jack for headphones
- 2 A/V inputs
One 3.5 mm front input jack
One wired RCA input
- 1 A/V RCA output
• Wireless remote control
• Built-in dual-channel speaker
• Built-in FM transmitter
• Built-in dual channel IR transmitter
Ch A: 2.3MHz(left)-2.8MHz(right)
Ch B: 3.2MHz(left)-3.8MHz(right)
• 9"(16:9) TFT LCD display
• Resolution:800(H) X 3(RGB) X 480(W)
• Number of Pixels: 1,152,000
- Brightness: 400 cd / m2
• Power supply: DC +12V (10.6V-15.8V).
• Power consumption: 12W
- Operating temperature: -10ircC to +60ircC .
• Dimensions: 11" x 6" x 14 34 "
- Weight: 5.5 lbs.
Front Panel Controls
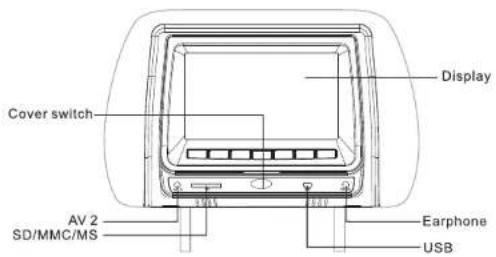

flowchart
graph TD
    A["Power"] --> B["Source select"]
    B --> C["SourceUSB/SD"]
    C --> D["Menu"]
    D --> E["Previous/Next -Adjustment +"]
    E --> F["Play/Pause"]
    F --> G["Stop"]

Technical Specifications
| panel | TFT LCD |
| Screen size | 9 Inches (16:9) |
| Pixel | 800 X 3 (RGB) X 480 |
| Temperature | Operation:14 °F ~ 122 °F; Storage:-22 °F ~167 °F |
| Back light | LED |
| Brightness | 400 cd /m2 |
| Color system | PAL/NTSC |
| Playable discs | DVD、VCD、CD、MP3、CR-R、CD-RW、DVD-R、DVD-RW、 |
| Resolution | ≥500 |
| S/N | ≥90 dB |
| Isolation | ≥65 dB |
| Audio Input/Output | 1.6V±20% |
| Video Input/Output | 1V p-p ±20% |
| Power supply | DC 12V |
| Power | ≤ 12W |
| Product Dimensions | 11" x 6" x 14 3⁄4 |
| Net weight | 5.5lbs |
Note:
The design and specifications are subject to change without notice.
Troubleshooting
| Fault | Reason | Resolution |
| No power | Yellow wire should be connected to 12v + source; red wire should be connected to the ACC; black wire should be connected to the ground | Connect power correctly |
| Fuse burned out | Change fuse | |
| Power cable is disconnected | Connect power correctly | |
| No picture | No AV input | Input video |
| Video lines disconnected | Reconnect video lines | |
| Remote does not work | Battery is blocked by protective paper | Remove paper |
| Pointed in wrong direction | Point remote to remote sensor | |
| No power | Change batteries | |
| Can't play Disc | Bad disc | Replace disc |
| Distortion | Disc loaded incorrectly | Re-insert disc |
| Disc is dirty | Clean disc | |
| Fast forward/backward | This is normal |
Installation
First check to make sure the appearance and installation specifications match with the subject vehicle. Before you begin, choose the right accessories and right tools.
Installation steps:
Step 1. Remove original pillow
Step 2. Choose the correct installation steel tube size, to ensure proper fit.
Step 3. Connect the power cord and the Video cable.
Step 4. Properly position the pillow.
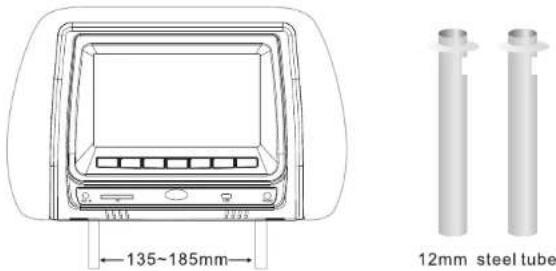
Note:
The appearance and installation specifications are not suited for all vehicles. Please choose the correct appearance and installation specifications.
| Connecting Power Line | 1 |
| 12mm diameter steel tube | 2 |
| Remote controller | 1 |
| User's manual | 1 |
The headrest DVD player has an AV input port and an output. The input port can connect with other sources such as GPS, TV Box, Game TV-Box etc. The AV output port can connect to other displays.

Safety Precautions
- This device is designed to be operated with a DC 12V grounded system.
- Do not allow any foreign substance to get into the disc slot.
- The device may not work in high or low temperatures. Stop using the device until the temperature returns to a normal level. Operating temperature range: 14°F\~122°F)
Cleaning
- When cleaning the device, do not make contact with water. The device may get damaged.
- Since chemical solvents may damage the surface of the unit, do not use them for cleaning.
- Use a clean and dry cloth to clean.
Condensation
- When turning the heater on in the car during a rainy or humid day, moisture may condense on the optical lens. If this occurs, the device may not read the disc and will not function properly. In such a case, it is advised to remove the disc from the device until the unit is dried.
Installation and Repairs
- Please install and operate the device as specified by this manual. If you cannot install the device correctly yourself, take it to an authorized dealer.
- Do not open the device by yourself for repairs. If the device does not work properly, take it to an authorized dealer. (If you disassemble the unit, you will void the warranty).
Video/Audio Trouble
- When driving on a rough road the unit is prone to severe shaking and may experience video/audio problems. This is inevitable.
Disc Compatibility
| Disc type | DVD video | Video CD | Audio CD |
| Contents | Audio+ Video | Audio+ Video | Audio |
| Disc type | Disc size | Maximum playing time |
| Disc type | 5 inches (12cm) | Approx.133 minutes(SS/SL) Approx.242 minutes(SS/DL) Approx.266 minutes(DS/SL) Approx .484 minutes(DS/DL) *SS:Single Sided ,DS:Double Sided, SL:Single Layer ,DL :Dual Layer |
| Video CD | 5 inches (12cm) | Approx.74 minutes |
| Audio CD | 5 inches (12cm) | Approx.74 minutes |
| CD-ROM | 5 inches (12cm) | Mp3 : music file WAV: music file MPG: motion picture file VOB: DVD file JPG: picture file |
Handling Discs
Dust particles, scratches or twisting may cause sound disruption, poor sound quality or poor screen image during play.
- Use a soft cloth to gently clean fingerprints and dust on the data surface (polished side) of the disc
- Never use anti-static spray or liquid, benzene, thinner or other chemical solvents to clean discs. Such chemical solvents may damage the plastic surface of the disc.
- After playing discs, you are advised to place them inside their original cases to prevent any damage to them.
- Do not expose discs to direct sunlight, high humidity or high temperatures for long periods of time. Discs may deform.
- Do not write on the disc's signal surface. A sharp pen or ink may cause damage to the surface of the disc.
- The sound quality may vary among discs depending on their recording methods.
Remote Control Operation
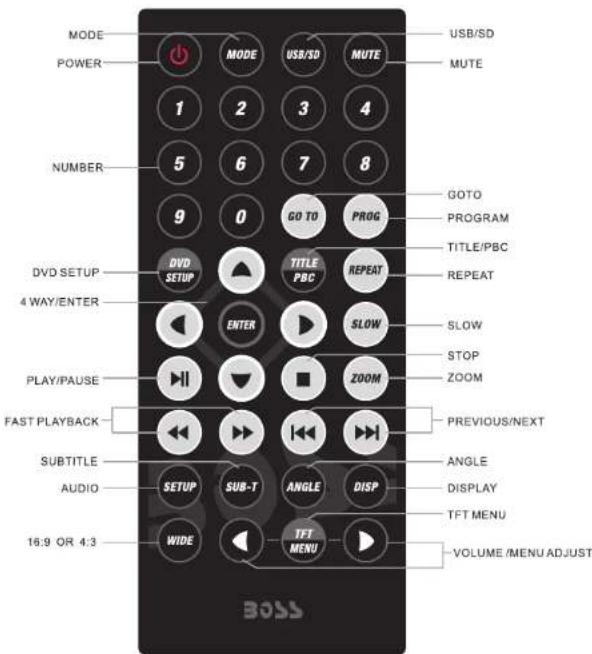
OSD Operation
1) Pressing "TFT MENU" key to enter menu below.
2) Press [ < ] [ > ] to adjust.








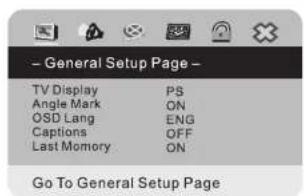
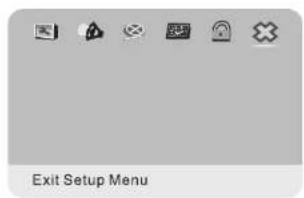
DVD Operation
1)1)Pressing "DVD SETUP" key to enter menu below.
2) Press [▲] [▼] to select an item.
3) Press [◀] [▶] to adjust.


PASSWORD:136900


Brand : BOSS
Model : HIR9BGTA
Category : Monitor