
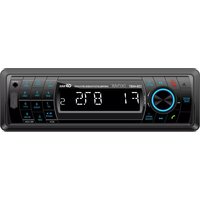
CAD-438BT - Car radio DENVER - Free user manual and instructions
Find the device manual for free CAD-438BT DENVER in PDF.


| Product Type | Car Stereo with CD/MP3/WMA Player, USB, SD, Bluetooth, RDS/EON |
| Model | CAD-438BT |
| Brand | Denver |
| Dimensions (W x D x H) | 178 mm x 178 mm x 51 mm |
| Weight | 2.0 kg |
| Operating Power | 12 Volts DC, Negative Ground |
| Fuse | 10 A |
| Speaker Output | 4 speakers, 4-8 ohms impedance, minimum 45W each |
| RCA Line Out | Low-level outputs, 1V |
| CD Player Signal/Noise Ratio | >80 dB |
| CD Player Frequency Response | 20 Hz - 20 kHz |
| CD Player Channel Separation | >50 dB |
| FM Tuning Range | 87.5 - 107.9 MHz (USA) / 87.5 - 108 MHz (Europe) |
| AM Tuning Range | 530 - 1710 kHz (USA) / 522 - 1620 kHz (Europe) |
| Bluetooth | Hands-free calling, A2DP audio streaming, auto-connect |
| USB/SD Support | Up to 8 GB, FAT32, MP3/WMA playback |
| Electronic Skip Protection (ESP) | 10 seconds for CD, 60 seconds for MP3/WMA on rough roads |
| Detachable Face | Yes, for theft prevention |
| RDS Functions | AF, TA, PTY, Mask DPI/ALL, Retune S/L, TA VOL |
| Remote Control | Included, CR-2025 lithium battery, range up to 6 m |
| Maintenance | Clean with dry cloth; replace fuse with same amperage |
| Safety Precautions | Disconnect battery before installation; do not modify unit; avoid extreme temperatures (-20°C to 60°C) |
| Spare Parts / Repairability | No spare parts listed; warranty void if modified or improperly installed |
| General Information | CE compliant, RoHS, WEEE directive; import by Denver Electronics A/S, Denmark |
Frequently Asked Questions - CAD-438BT DENVER
User questions about CAD-438BT DENVER
0 question about this device. Answer the ones you know or ask your own.
Ask a new question about this device
Download the instructions for your Car radio in PDF format for free! Find your manual CAD-438BT - DENVER and take your electronic device back in hand. On this page are published all the documents necessary for the use of your device. CAD-438BT by DENVER.
USER MANUAL CAD-438BT DENVER
AM/FM Receiver, CD/MP3/WMA Player with Electronic Anti-Shock (ESP) & Detachable Face RDS/EON Control, USB and SD card Control
Contents
Precautions....3
Warnings Before Installation....4-6
Before You Install....7
Installation (DIN Front Mount)......8
Installation (Vehicle's Brackets)......9
Wiring Connections....10-11
Bluetooth Operation....12
Basic Operation....13
Radio Operation....14
RDS Operation....15
CD/MP3/WMA/USB Operation....16-17
Maintenance....17
Remote Control....18
Simple Troubleshooting Guide....19
Specifications....19
Welcome!
Thank you for purchasing this high-technology car stereo with CD/MP3 and USB, SD/MMC control. This unit will support CD-R and CD-RW Playback. Also it supports up to 8GB storage size of USB flashdisk and SD/MMC media storage. If there is any compatibility problems, we recommend you to format your flashdisk/storage card in FAT32 mode before using it. If the problem persists, kindly consult your dealer for assistance.
Precautions
• This unit will only play the following discs.
| Type of disc | Label on the disc Recorded material | Size of disc | ||
| CD, MP3, WMA |  | Audio only | 12 cm | |
DO NOT ATTEMP TO MODIFY THE UNIT, MODIFYING THE UNIT MAY CAUSE AN ACCIDENT. STOP THE VEHICLE BEFORE CARRYING OUT ANY OPERATION THAT COULD INTERFERE WITH YOUR DRIVING.
DO NOT TURN ON THE UNIT IF THE TEMPERATURE INSIDE THE VEHICLE IS OUT OF -20°C TO 60°C.
This unit only reads 12 cm discs.
Don't attempt to modify the unit; it could result in an accident.
Stop the vehicle before any manipulation which could interfere with your driving.
Do not use the unit if the temperatures are extremely cold or extremely high (lower than -20irc or higher than +60irc ).
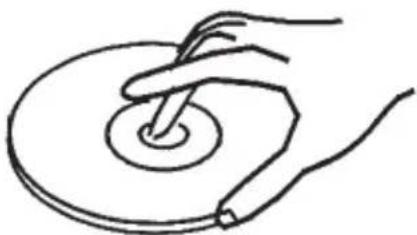
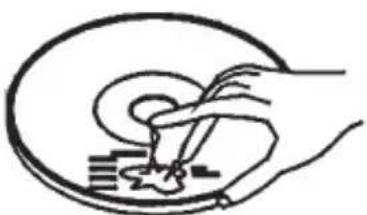
To enjoy a sound of best quality, handle discs as indicated below:
Clean the discs with a cleaning cloth.
Clean each sisc from the center to the outside edge.
Don't use CDs with blobs of glue or ink on its surface.
natural_image
Simple line drawing of a hand holding a circular object with a pointer, no text or symbols present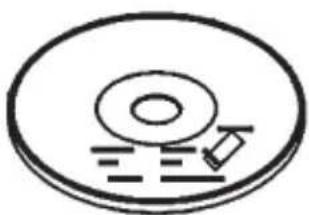
natural_image
Simple line drawing of a CD or DVD disc with a handle and internal structure (no text or symbols)Don't use Cds with label or stickers on its surface.
There coule be some remainder of glue which would interfere with the good performance of the unit if labels were starting to be rubbed away.
Hold and handle discs by the edges to keep the disc clean and don't touch its surface.
natural_image
Simple line drawing of a hand holding a pen, with no text or symbols present.
natural_image
Hand holding a CD or DVD disc with arrows indicating rotation (no text or symbols)Warnings Before Installation
Important Warnings to Take Note of BEFORE Commencing Installation
Damage Caused By Incorrect Installation or Usage is NOT Covered By Warranty. PLEASE Take The Time To Read The Installation Notes Carefully.
- To avoid shorts in your vehicles electrical system, be sure to disconnect the battery cable before beginning installation.
- This unit is intended for vehicles with a 12-volt battery and negative grounding. Before installing the unit in a recreational vehicle, truck, or bus, check that the battery voltage is 12 volts.
- Remove the two transport screws from the top of the unit before installation.
- The black lead is ground. A good chassis ground requires a tight connection to ground. The area should be free from rust, paint or any form of dirt. Please ground this lead separately from the ground of high-current products such as power amps. If you ground the products together and the ground becomes detached, there is a risk of damage to the products or fire.
- Be sure to connect the colour coded leads according to the diagram. Incorrect connections may cause the unit to malfunction or damage the vehicle's electrical system. Cords for this product and those for other products may be different colours even if they have the same function. When connecting this product to another product, refer to the supplied installation manuals of both products and connect cords that have the same function.
- Be sure to connect the negative (-) speaker leads to the negative (-) speaker terminal. Never connect the negative (-) speaker leads to chassis ground.
- The unit is only designed for use with 4 speakers. Do not combine outputs for use with 2 speakers. Do not ground negative speaker leads to the chassis ground.
- Speakers connected to this unit must be high-power units with a minimum rating of 45W and impedance of 4 to 8 ohms. Connecting speakers with output and/or impedance values other than those noted here will result in damage to the head unit and the speakers. Check the condition of your speakers carefully-connecting this unit to old or degraded speakers may result in a fault which will damage the audio IC and invalidate the warranty.
Warnings Before Installation
- If this unit is installed in a vehicle that does not have an ACC (accessory) position on the ignition switch, the red lead of the unit should be connected to a terminal coupled with ignition switch ON/Off operations. If this is not done, the vehicle battery may be drained when you are away from the vehicle for several hours.
- Secure the wiring with cable clamps or adhesive tape. To protect the wiring, wrap adhesive tape around them where they lie against metal parts. To avoid short-circuiting, cover all disconnected lead with insulating tape. There is a possibility of short-circuiting if the leads are not insulated.
- Route and secure all wiring so it cannot touch any moving parts, such as the gear lever and handbrake. Do not route wiring in places that get hot, such as near the heater outlet. If the insulation of the wiring melts or gets torn, there is a danger of the wiring short-circuiting to the vehicle's body.
- Don’t pass the yellow lead through a hole into the engine compartment to connect to the battery. This will damage the lead’s insulation and cause a very dangerous short.
- Do not shorten any leads. If you do, the protection circuit may fail to work when it should.
- Never feed power to other equipment by cutting the insulation of the power supply lead of the unit and tapping into the lead. The current capacity of the lead will be exceeded, causing overheating.
- When this product's source is switched ON, a control signal is outputted through the orange lead. Connect to an external power amp's system remote control or the car's Auto-antenna relay control terminal (max. 300mA 12 V DC). If the car features a glass antenna, connect to the antenna booster power supply terminal.
- When an external power amp is being used with this system, do not connect the orange lead to the amp's power terminal. Likewise, do not connect the orange lead to the power terminal of the auto-antenna. Such connection could cause excessive current drain and a major malfunction. Refer to the relevant owner's manual for details on connecting the power amp and other units, then make the connections correctly.
- Do not block any vents or heater panels. Blocking them will cause heat to build up and may result in fire.
- Make sure that the unit has a good chassis ground. A good ground connection will eliminate most electrical noise. A good chassis ground requires a tight connection to the vehicles metal chassis.
Warnings Before Installation
The area around the ground connection should be clean, bare metal without rust, paint, plastic or dirt for a good electrical connection.
- If noise is still experienced when the motor of the vehicle accelerates, a choke should be placed in line with the power to the unit. The installation company will know what is required.
- When replacing the fuse(s) the replacement must be of the same amperage as shown on the fuse holder. Never replace a fuse with another of a different value. If the fuse blows again please contact your installation company.
- Do not block vents or heater panels. Blocking them will cause heat to build up inside and may result in fire.
- Double check that all wiring and connections are correct before reconnecting the battery and turning on the unit.
- After completing the installation and before operating the unit, reconnect the battery, Then press the (RES) button with a pointed object, such as a ball-point pen to set the unit to its initial status. After pushing the button, wait a few seconds for the red light to flash.
Tools for Installation
- 2 removal wrenches are supplied for taking out the old unit and place with this brand name car radio. The following tools and supplies may also be needed for the installation:
Tools for Installation:
- Philips Screw-drivers
- Wire Stripper
- Wire Cutter
- Hammer
- Pencil
- Electrical Tape
- Electric Drill
Supplies for Installation:
- Machine Screws
- Crimp Connectors
- 14 Gauge Wire for Power Connections
- 14-16 Gauge Speaker Wires
* The above are not supplied.
Automotive audio equipment installations can be troublesome at times, even to the most experienced of installation technicians. If you are not confident working with electrical wiring, removing and reinstalling interior panels, carpeting, dashboards or other components of your vehicle, please call your dealer in order to have the unit professionally installed.
IMPORTANT: Remove the two transport screws from the top of the unit before installing.
1. Remove the Old Unit from the Dashboard
- Remove the outer trim frame.

natural_image
Diagram showing two rectangular blocks with an arrow pointing from one to the other (no text or symbols)DIN Front Mount
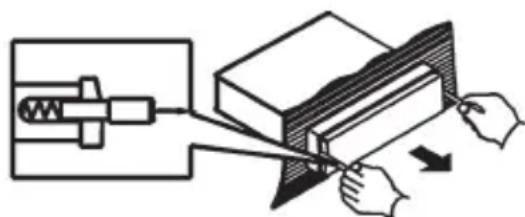
- Insert the keys supplied with the old unit into both sides of the unit as shown in figure below until they click. Pull to remove the old unit from the dashboard.
natural_image
Diagram of a mechanical device with hands operating a block and cutting through it (no text or symbols present)DO NOT DISCONNECT WIRES AT THIS TIME!
2. Mark Polarity of the Speaker Wires
Marking the polarity of the speaker wires will make it easier to connect the existing speakers to your car radio. Consult wiring diagram of existing head unit before disconnecting any wires. If you are not positive of the polarity of the existing wires from the speakers to the head unit, install new wires.
- While the old unit is playing, disconnect the wires from one speaker
- Take a length of masking tape and fold it around the wire so it forms a flag.
-
On the masking tape mark the polarity of the speaker wires (+ & - ), as well as left or right, and front or rear.
-
Double check that you marked the first speaker correctly by checking that the speaker wires are the same at the head unit.
- Repeat this procedure for all of the speakers.
- Mark the power, ground, and any other wires also.
WARNING!
Disconnect negative battery terminal from battery before starting installation. Consult the vehicle's owner's manual for proper instructions.
NOTE: Mark the polarity of the existing speaker wires before disconnecting battery.
NOTE: Remove the two transport screws from the top of the unit before installing.
DIN Front Mount

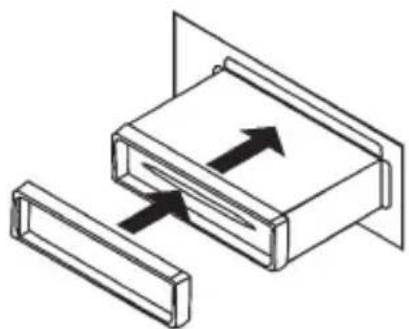
- After removing the old radio and mounting sleeve, insert supplied mounting sleeve into opening.
natural_image
Isometric line drawing of a mechanical component with two arrows indicating direction (no text or symbols)- Attach wires from the unit to existing wires. See wiring connections diagram. Insert radio into dashboard. Then apply the trim frame to outside of radio.

natural_image
Diagram showing a mechanical component with a close-up inset of a tool interacting with a bracket (no text or symbols)- Bend the tabs on the mounting sleeve to keep the mounting sleeve firmly in place.

- Support radio using supplied rear mounting bolt and steel bar. See parts list.
NOTE: Outer trim frame, hook, and mounting sleeve are not used for this installation.
This is only intended as a general guide; contact the vehicle's manufacturer for specific instructions.
This method of installation uses the screw holes at the sides of the unit and the holes of the existing vehicle mounting bracket.
- Remove the hooks on both sides.
- Align the screw holes of the mounting bracket supplied with the car and the screw holes of the main unit. Tighten the 2 screws on each side of the unit. Then fasten the brackets to the car.
- Attach wires of the unit to existing speaker wires. See wiring diagram.
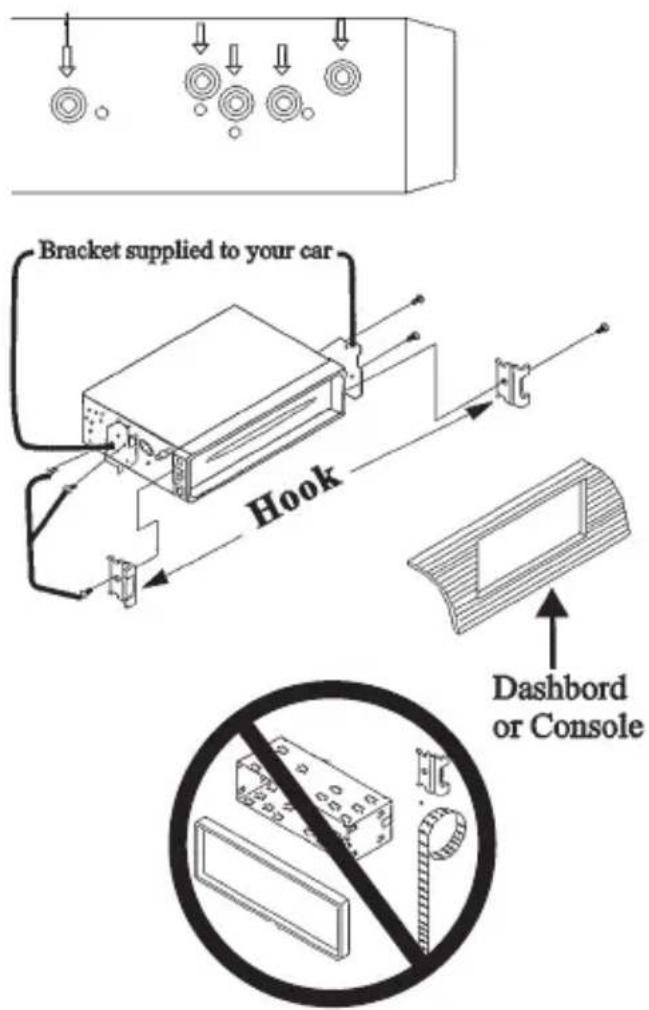
Make sure that you have a good chassis ground. Good ground connections will eliminate most electrical noise problems. A good chassis ground requires a tight connection to the vehicle's metal chassis. The area around the ground connection should be clean, bare metal without rust, paint, plastic, dust, or dirt for a good electrical connection.
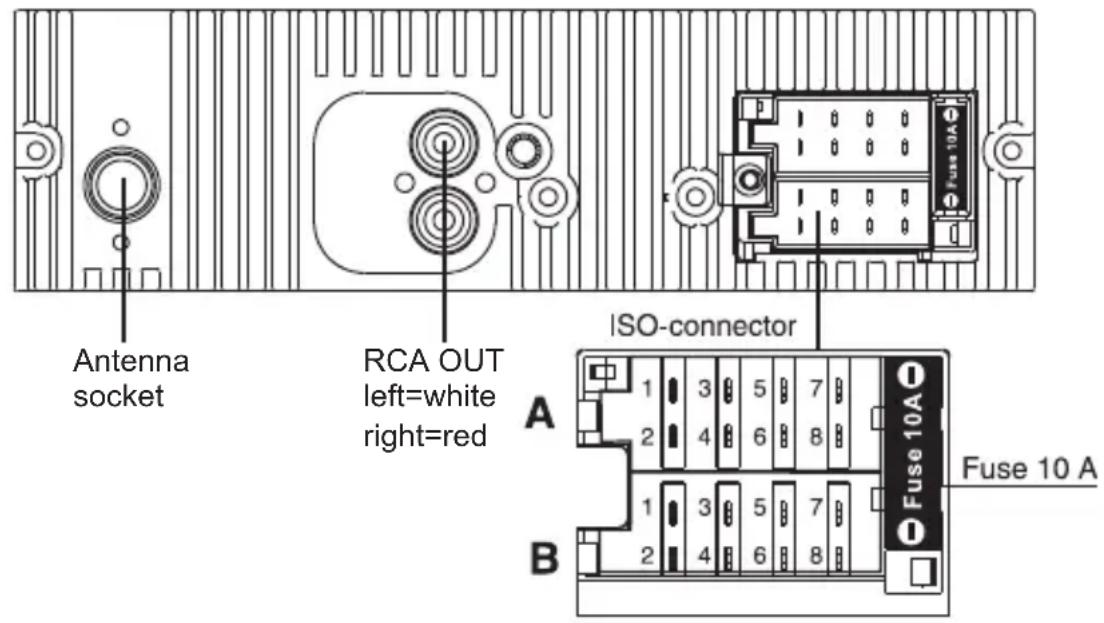
ConnectorA
- Rear right speaker(+)/Purple
- Rear right speaker(-)/Purple-Black
- Front right speaker(+)/Grey
- Front right speaker(-)/Grey-Black
- Front left speaker(+) / White
- Front left speaker(-)/White-Black
- Rear left speaker(+)/Green
- Rear left speaker(-)/Green-Black
ConnectorB
-
- 2.-
-
- Battery 12V (+)/Yellow
- Antenna power/Blue-White
- Panel light/Orange-White
- ACC+/Red
- Ground/Black
Black Ground
Connect to vehicle body/chassis. Make sure that you have a good chassis ground. This will eliminate most electrical noise from the motor and alternator. A good chassis ground requires a tight connection to ground. The area should be free from rust, paint or any form of dirt.
Yellow Memory backup
Connect to electrical terminal always supplied with power regardless of ignition switch position.
Orange Remote
Connect to Auto-antenna or power amp control wire/remote connection. Maximum current 300Ma 12 V DC.(Low Current)
Wiring Connections
White Panel Light
Connect to lighting circuit of vehicle. This will illuminate the buttons on the display for night time operation. This wire can also be connected to the Orange Remote wire to activate the buttons when the unit is powered on. DO NOT JOIN THE WHITE WIRE TO THE LIGHTING CIRCUIT OF THE VEHICLE IF CONNECTED TO THE ORANGE REMOTE WIRE.
Speaker Wiring Notes
Follow the above wiring diagram to install the head unit with new or existing speakers.
- This unit is designed for use with four (4) speakers with impedance between 4 Ohms to 8 Ohms.
- An impedance load of less than 4 Ohms could damage the unit
- Never bridge or combine the speaker wire outputs. When not using four speakers, use electrical tape to tape the ends of the unused speaker outputs to prevent a short circuit.
- Never ground the negative speaker terminals to chassis ground.
Bluetooth Operation
1. Pairing
Press and hold BND/TEL button until the word "PAIRING" appears on the display waiting for the bluetooth device to connect.
The pairing will be available in any mode.
Please run the bluetooth search and connect function in your cell phone.
The car radio model no "BT Car Stereo" will be shown on the cellphone
. Select this car radio and connect. When you are asked for a connection password, please input "0000" in your cellphone to finish the pairing, there is "PAIR OK" to show on the LCD. Then the bluetooth icon will be shown on the car radio LCD indicating that the bluetooth function is ready to use.
2. Dial
Press PHONE button enter PHONE mode, you could dial telephone number “0-9, *,#” button on the remote control.
You could turn VOL+/- to setup the speaker volume during you are on the phone.
3. Disconnection
Press and hold "Answer" button, it will disconnect the phone.
When you press and hold "Answer" button again, it will connect the phone.
4. Answering/Rejecting call
When there is phone calling in, press the "Answer" button anytime to receive a call in your car radio. If you want to reject the call, press "REJECT" button.
5. BT Audio (A2DP)
Press MOD button, you could enter mode: Radio/CD/AUX/BT Audio. BT Audio will automatically play when you play the song in the cellphone. You could pause by "PAUSE" button, to choose up and next song by pressing |<< and >>| button.
6. Auto Connect
This unit support the “Auto Connect function”. In case the connected cell-phone is out of range (e.g. the user leaves the car for lunch), when the cellphone is in the range again, the unit will automatically connect with the cellphone so that you do not have to set connection in the cellphone. If the auto connect does not work, press and hold the “Answer” button so that the unit will connect to the last device(cellphone). "Auto Connect" requires the function is enabled in your cell phone as well.
7. BT VOL
Press the SEL Button repeatedly until the display shows "BT VOL". Use the volume knob to adjust the Bluetooth mode volume level.
1. Tuning the unit On / Off
Press any Button to turn the unit on, the display will show a message WELCOME TO CAR AUDIO to indicate it is ready for use. Press and hold the PWR button to turn the unit off. The display will show a message "GOODBYE".
2. Mode Selection
Press the MOD Button to select Radio Mode. Press the MODE Button to cycle the Play Mode among AUX, RADIO and CD PLAY.
Note: USB & SD mode will only show on the display when a USB flash memory or SD card is inserted into the USB port or SD port.
3. Loudness Control
Press the SEL button until "LOUD OFF" is shown on the display indicates that the loudness function is OFF. Turn the volume knob to select between ON or OFF.
4. Mute Control
Press the POW/MUT button active or cancel Mute function.
5. Volume
Use the VOL +/- Button to adjust the volume level. The larger the number, the higher the volume level.
6. Bass
Press the SEL Button repeatedly until the display shows "BAS 00". Use the VOL +/- Button to adjust. When EQ is ON, bass control is not available.
7. Treble
Press SEL Button repeatedly until the display shows "TRE 00". Use the VOL +/- Button to adjust. When EQ is ON, treble control is not available.
8. Balance
Press SEL Button repeatedly until the display shows "BAL L-R", then use the VOL +/- Button to adjust the balance between the left & right speakers.
9. Fader
Press SEL Button repeatedly until the display shows "FAD F-R", then use the VOL +/- Button to adjust the balance between the front & rear speakers.
10. Clock
The time clock can be set anytime when the power is on. Press the PTY/CLK Button on the faceplate or remote control once, the time will show on the display.
Then press and hold the button until the hour blinks on the display. Rotate the VOL knob to set hours, then press the VOL knob for the minutes to blink and rotate the VOL knob to set.
Press the PTY/CLK button again or leave the unit idle for new setting to effect. Press the PTY/CLK button anytime to view the time clock display.
11. Preset Beep Sound Off
Press the SEL button repeatedly until "BEEP ON" is displayed. Turn the VOL +/- Button to select "BEEP OFF" or "BEEP ON", then leave the unit idle for setting to take effect.
12. Preset Equalizer Function
Press the SEL Button repeatedly until “EQ” indication is displayed then rotate the Volume knob to choose between the EQ sound effects. The Sequence of equalizer setting will be as follows:

Radio Operation
1. Choose Radio Band
Press the MOD Button to access the radio function.
The unit comes with five bands- three FM Bands (FM1, FM2, and FM3) and two MW Bands (MW1, and MW2) selects. Each of the five bands can store up to six preset stations, for a total of 30 preset memory stations.
2. Radio Tune / Seek Function
In Radio Mode, press and hold the SEEK |<< or >>| Button for 2 seconds, and the display will show"MANUAL". Then Press the SEEK |<< or >>| Button once to manually adjust the radio frequency.
3. Tuning
Press the SEEK |<< or >>| Button once the radio will seek the next strong and clear frequency station. Repeat to seek more stations in your listening area with a strong signal.
4. Mono/Stereo Reception Control
In FM radio mode, Press the SEL Button until "STEREO" is shown on the display. Roate the VOL +/- to select STEREO or MONO. Improvement of reception of distant stations can be done by selecting "MONO" operation which may cut down some reception noise.
5. Local / Distant Control
In FM radio mode, Press the SEL Button until "DX" is shown on the display. Roate the VOL +/- to select "LOCAL" or "--DX--".
Local and distance reception setting can facilitate the radio reception, depending on the location in which the radio is being used.
6. Save Your Preset Stations
There are six numbered preset buttons which can store and recall stations for each band. While listening to a radio station you would like to save as a pre-set, press and hold one of the buttons numbered 1-6 until you hear a beep. The button you pressed is now the pre-set button for that station.
7. Automatic Store/Preset Scan
There are six numbered preset buttons which can store and recall stations for each band. While listening to a radio station you would like to save as a pre-set, press and hold one of the buttons numbered 1-6 until you hear a beep. The button you pressed is now the pre-set button for that station.
A. Automatic Scan & Store
While listening to the FM Radio, press and hold the F/PS Button. The receiver will automatically scan and save stations of the 3 FM Bands. While listening to the MW Radio, press and hold the F/PS Button. The receiver will automatically scan and save stations of the 2 MW Bands.
B. Scan & Preview Saved Stations
Press the F/PS button once and the receiver will scan the radio stations in the current band.
RDS Function
RDS (Radio Data System) service availability varies with areas. Please understand if RDS service is not available in you area, the following service is not available, either.
1. AF-ALTERNATIVE FREQUENCY
a. In RDS mode, press the AF button on the panel to turn the AF function on or off. When the Radio signal strength is poor, enabling the AF function will allow the unit to same PI (Program Identification) as the current station but with stronger signal strength, so that you do not have to retune the stations when driving between different transmitter coverage areas. When AF symbol is on, it means RDS information is received; when AF symbol is flashing, it means RDS information is not yet received. PS (Program Service name): the name of statin will be display instead of frequency.
If RDS service is not available in your area, turn off the AF mode. Dufault setting is ON.
b. In RBDS mode, no AF function.
2. TA - TRAFFIC ANOUNCEMENT
Press and hold the TA button so that the unit will be activated for reception of traffic announcement from local radio stations.
To choose the TA mode, press the sound select button for 2 seconds, the display will show TA SEEK. Rotate the encoder volume to choose between the TA SEEK and TA ALARM, after chooising, please leave the unit idle for the mode to activate. In TA SEEK mode, the unit will seek for traffic announcement programme when TA is pressed; in TA ALARM mode, no TA/TP is displayed and the alarm is set off.
3. PTY - PROGRAMME TYPE
This radio will allow you to select the type of programme required, and will search for a station broadcasting that type of programme. Press and hold the PTY button once to show the music type. Then press 1-6 button to choose the different music types available.
Press the PTY button twice to show the speech type programme. Then press 1-6 button to choose the different speech type programme. Each number keye will show 3 different speech programme for you to choose.
4. MASK DPI - MASK ALL
Press the sound select button for 2 seconds, the display will show TA SEEK. Press the sound select button again so that the unit will show MASK DPI. Rotate the encoder volume to toggle between MASK DPI and MASK ALL mode. Then leave the unit idle for the mode to take effect. During MASK DPI mode, the unit will mask only the AF which has different PI, this is the default mode; during MASK ALL mode, the unit will mask the AF which has different PI and no RDS signal with high field strength.
5. RETUNE S/L - SHORT/LONG
This function is to set the initial duration of automatic TA Search -- Press and hold the sound select button until "TA SEEK" is shown on the LCD, then press the SEL button to cycle through the menu selections until "RETUNE_S" is shown, use the VOL +/- button to choose "RETUNE_S" or "RETUNE_L". The default is "RETUNE_S".
6. TA VOL
This function is to set the TA volume, the default level is 25.
CD/MP3/WMA/USB/SD Operation
1. Insert / Eject CD
Insert a disc into CD slot with label side up. The disc will be automatically loaded into the unit, even when it is off or at radio mode. The word "LOAD" will blink on the display and the CD will play automatically. Press the EJECT Button to eject the disc from the slot. If the disc is not removed from the slot within 5 seconds, it will automatically be loaded into the slot again. When the disc is ejected and removed, the unit will automatically switch to radio mode.
While you are playing a disc with MP3 or WMA, The first file in the root folder will be played. if there is any ID3 information that will be displayed as the file is playing.
To play MP3/WMA files from a USB flash memory or SD card, insert a USB flash memory or SD card into the USB port or SD port of the unit. The unit will start playing MP3/WMA files on the USB flash memory automatically.
If the MP3/WMA files are stored in folders on the USB drive, the unit will start by playing the first song in the first folder. After playing all the files sequentially in the first folder, the unit will play sequentially all of the files in the next folder. The unit will continue playing through all of the folders on the USB drive in this manner.
If the USB drive has loose files and folders containing files, it will play the loose files sequentially, then it will play the files in the folders sequentially.
2. Multi-Session CD Reading
This unit can read multi-session CDs. The multi-session reading will be activated automatically if the player detects a file that is written in multi-session format.
3. Selecting Tracks
Press the SEEK >>| Button to advance CD to the next track. Track numbers will be shown on the display. Press and hold SEEK >>| to fast forward. Press the SEEK |<< Button to go to a previous track. Track numbers will be shown on the display. Press and hold the SEEK |<< Button to fast reverse. Disc will play normally when the No. 1( play/pause) Button is pressed.
4. Play / Pause CD
Press the No.1/PAU Button to pause the CD. Press this button again to resume playback.
5. Scanning Tracks
Press the No.2/INT Button to play the first 10 seconds of each track, "INT" will be displayed on the display. Press this button again to resume playback.
6. Repeat
Press the No.3/RPT Button to repeat the current track. Press it again to cancel.
7. Random
Press the No.4/RDM Button to play all the tracks in random order. "RDM" will appear on the display. Press this button again to stop random play.
8. Folder Down
Press the "5 ➕" button once to go back one folder.
9. Folder UP
Press the "6 ➕+ " button once to advance one folder.
10. Search Modes
There are 3 search modes to help find your favorite MP3 & WMA tracks. The search modes only works with MP3/WMA CDs, and USB flash memory with MP3/WMA files.
A. Simple Track Search
Press the SEEK |<< or >>| Button to go to the next track or previous track.
B. Track Search
Press the F/PS Button, TRK-SCH will appear on the display. Use the VOL +/- Button to select the track number. press the SEL button so that the cho
CD/MP3/WMA/USB/SD Operation
sen track will start to play.
C. Folder Search
Press the F/PS Button twice and NAVIGATE will be shown on the display. Use the VOL +/- Button to select the folder name. Then press the SEL Button to play the chosen folder.
11. Electronic Skip Protection
Electronic Skip Protection is for driving on rough roads. The CD will play for 10 seconds on rough roads without skipping. If driving on a rough road for more than 10 seconds the CD may skip. For MP3 or WMA files will play for 60 seconds. If the road is rough for more than 60 seconds the CD with MP3 or WMA files may skip.
ID3 Tag
While you are playing an MP3 file which has ID3 Tag information, Press BND/ID3 button repeatedly to show the ID3 Tag information on the LCD. The ID3 Tag information will be as follow: Fold - File - Title - Artist - Album
If there is no ID3 Tag information, nothing will shown on LCD.
MAINTENANCE
Cleaning the Unit
Do not use any liquids to clean this unit.
Do not use petroleum distillates to clean this unit.
Use a clean, dry cloth to clean this unit.
Replacing the Fuse
Make sure the amperage matches the specified value when replacing the fuse(s). If the fuse is bad, check the power connection and replace the fuse with a new one. If the same problem occurs, this might indicate a malfunction within the unit.
Warning
When replacing a fuse, do not use a fuse with a higher amperage rating than the fuse originally supplied to your unit, otherwise damage will result to your unit.

- Power on / off / Mute Sound Button
- Volume +
- Sound Select Key / Menu
- Volume -
- Number 2 / Intro Scan
- Number 1 / Play / Pause
- Number 5 / Folder Down
- Number 4 / Random Play
- Number 8 / TA Control
- Number 7 / AF Control
- Number 0
- Number *
- Number 3 / Repeat Play
- Stations Tune/Seek/Track Up
- Number 6 / Folder Up
- Stations Tune/Seek/Track Down
- Number 9 / PTY Control
- Mode
- Number #
- Band / ID3
- Answer Button
- Phone Button
- Reject Button / Clock Display
- F/PS
This unit comes with a full remote control system. The CR-2025 Lithium battery is an included item with the remote control.
In case you have to replace the batteries
(1) remove the cover from the back of the remote control.
(2) insert a CR-2025 Lithium battery.
(3) Fix the cover to the back of the remote control.
Operating the remote control
Aim at the face panel of the CD Receiver, the maximum distance at which signals can be received is about 6M. Make sure that the signal path is not obstructed. Do not drop or throw the remote control. Do not place the remote control in a location that is exposed to direct sunlight or next to a heating unit or other heat source.
Simple Troubleshooting Guide
| PROBLEM | CAUSE/SOLUTION |
| No Power | Check and make sure that the fuses did not blow. |
| Errors are displayed on the screen or no function is active | Unplug your car radio then plug it again |
| No radio reception | Check the connection of the antenna.Make sure the antenna is completely extended and that it is not broken |
| CDs cannot be loaded | A CD is already inside the appliance.Make sure that the fixing screws of the CD mechanism have been removed. |
| The stereo indicator is blinking | Set the frequency more accurately.The reception signal is too low. |
Specifications
GENERAL
Operating Power....12 Volts DC, Negative Ground
Speaker output....4 speakers
RCA line out....low-level outputs - 1V
Output Impedance.... 4 to 8 Ohms
Fuses....10 A
Dimensions....178mm(W) x 178mm(D) x 51mm (H)
Weight....2.0 Kg
CD PLAYER
Signal / Noise Ratio.....>80dB
Frequency Response....20 Hz\~20KHz
Channel Separation....>50dB
D / A Converter....16 Bit
FM TUNER
Tuning Range......(USA) - 87.5 - 107.9MHz, (Europe) - 87.5 - 108 MHz
FM Sensitivity....12dBu
Stereo Separation @ 1 Khz....35dB
AM TUNER
Tuning Range......(USA) -- 530-1710 KHz, (Europe) -- 522-1620 KHz
AM Sensitivity....30dBu
Hereby, Inter Sales A/S, declares that this product CAD-438BT is in compliance with the essential requirements and other relevant provisions of Directive 1999/5/EC. A copy of the Declaration of conformity may be obtained at:
Inter Sales A/S
Stavneagervej 22,
DK-8250 Egaa
Denmark
ALL RIGHTS RESERVED, COPYRIGHT DENVER ELECTRONICS A/S
DENVER®
www.denver-electronics.com
Electric and electronic equipment and included batteries contains materials, components and substances that can be hazardous to your health and the environment, if the waste material (discarded electric and electronic equipment and batteries) is not handled correctly.
Electric and electronic equipment and batteries is marked with the crossed out trash can symbol, seen below. This symbol signifies that electric and electronic equipment and batteries should not be disposed of with other household waste, but should be disposed of separately.
As the end user it is important that you submit your used batteries to the appropriate and designated facility. In this manner you make sure that the batteries are recycled in accordance with legislature and will not harm the environment.
All cities have established collection points, where electric and electronic equipment and batteries can either be submitted free of charge at recycling stations and other collection sites, or be collected from the households. Additional information is available at the technical department of your city.
Imported by:
DENVER ELECTRONICS A/S
Stavneagervej 22
DK-8250 Egaa
Denmark
www.facebook.com/denverelectronics
- Contents
- Welcome!
- Precautions
- Warnings Before Installation
- Tools for Installation
- Remove the Old Unit from the Dashboard
- Mark Polarity of the Speaker Wires
- WARNING!
- Disconnect negative battery terminal from battery before starting installation. Consult the vehicle's owner's manual for proper instructions.
- DIN Front Mount
- ConnectorA
- ConnectorB
- Black Ground
- Yellow Memory backup
- Orange Remote
- Wiring Connections
- White Panel Light
- Speaker Wiring Notes
- Bluetooth Operation
- Pairing
- Dial
- Disconnection
- Answering/Rejecting call
- BT Audio (A2DP)
- Auto Connect
- BT VOL
- Tuning the unit On / Off
- Mode Selection
- Loudness Control
- Mute Control
- Volume
- Bass
- Treble
- Balance
- Fader
- Clock
- Preset Beep Sound Off
- Preset Equalizer Function
- Radio Operation
- Choose Radio Band
- Radio Tune / Seek Function
- Tuning
- Mono/Stereo Reception Control
- Local / Distant Control
- Save Your Preset Stations
- Automatic Store/Preset Scan
- Automatic Scan & Store
- Scan & Preview Saved Stations
- RDS Function
- AF-ALTERNATIVE FREQUENCY
- TA - TRAFFIC ANOUNCEMENT
- PTY - PROGRAMME TYPE
- MASK DPI - MASK ALL
- RETUNE S/L - SHORT/LONG
- TA VOL
- CD/MP3/WMA/USB/SD Operation
- Insert / Eject CD
- Multi-Session CD Reading
- Selecting Tracks
- Play / Pause CD
- Scanning Tracks
- Repeat
- Random
- Folder Down
- Folder UP
- Search Modes
- Simple Track Search
- Track Search
- Folder Search
- Electronic Skip Protection
- ID3 Tag
- MAINTENANCE
- Cleaning the Unit
- Replacing the Fuse
- Warning
- Simple Troubleshooting Guide
- Specifications
- GENERAL
- CD PLAYER
- FM TUNER
- AM TUNER
- ALL RIGHTS RESERVED, COPYRIGHT DENVER ELECTRONICS A/S
- DENVER®
Brand : DENVER
Model : CAD-438BT
Category : Car radio