ESMB-B4235 - Hand blender Elba - Free user manual and instructions
Find the device manual for free ESMB-B4235 Elba in PDF.


| Product Type | Hand Blender |
| Brand | Elba |
| Model | ESMB-B4235 |
| Power | 600 W |
| Voltage | 220-240 V, 50/60 Hz |
| Speed Settings | 2 variable speeds + Turbo |
| Shaft Material | Stainless Steel |
| Blade Material | Stainless Steel |
| Housing Material | Plastic (ABS) |
| Accessories Included | Beaker (500 ml), Whisk, Chopper Attachment (500 ml) |
| Cord Length | 1.2 m |
| Weight | 0.8 kg |
| Dimensions (H x W x D) | 38 x 7 x 7 cm |
| Functions | Blending, Mixing, Puréeing, Whisking, Chopping |
| Dishwasher Safe Parts | Shaft, whisk, chopper bowl and lid |
| Cleaning Instructions | Wipe motor unit with damp cloth; attachments dishwasher safe |
| Safety Features | Overheat protection, non-slip handle, cool-touch housing |
| Replaceable Parts | Shaft assembly, whisk, chopper bowl available separately |
| Warranty | 2 years (EU) |
Frequently Asked Questions - ESMB-B4235 Elba
User questions about ESMB-B4235 Elba
0 question about this device. Answer the ones you know or ask your own.
Ask a new question about this device
Download the instructions for your Hand blender in PDF format for free! Find your manual ESMB-B4235 - Elba and take your electronic device back in hand. On this page are published all the documents necessary for the use of your device. ESMB-B4235 by Elba.
USER MANUAL ESMB-B4235 Elba
natural_image
Line drawing of a kitchen mixer with handle and side panel (no text or symbols)ELBA
STAND MIXER
Please read this manual carefully before operating your set.
Retain it for future reference.
Record model number and serial number of the set.
See the label attached on the set and quote this information to your dealer when you require service.
For The Warranty Terms & Conditions, Please Refer To Warranty Certificate.
IMPORTANT SAFEGUARDS
Before using the appliance, basic precautions should always be followed including the following:
- Read all instructions before using.
- Do not operate the appliance with damaged power cord or plug, after the appliance malfunction, or if it is dropped or damaged in any manner. Return the appliance to the nearest authorized dealer or after-sales service center for examination, repair, electrical or mechanical adjustment.
- Do not leave the mixer unattended while operating.
- Do not let the power cord hang over edge of table or counter or hot surface.
- To protect against risk of electrical shock, do not immerse mixer in water or any other liquids. This may cause personal injury or damage to the product!
- Avoid contacting with moving parts. Keep hands, clothing, as well as spatulas and other utensils away from beaters and dough hooks during operation to reduce the risk of injury to persons, and/or damage to the appliance.
- Close supervision is necessary when your appliance is being used near children or infirm persons.
- Do not place the appliance on or near gas stove or on a heated oven.
- Never eject beaters or dough hooks while operating the appliance.
- Unplug the plug from wall outlet when not in use, before putting on or taking off parts, and before cleaning.
- Do not operate the appliance for other than its intended use.
- Do not use this mixer outdoors.
- This appliance is not intended for used by persons (including children) with reduced physical, sensory or mental capabilities, or lack of experience and knowledge, unless they have been given supervision or instruction concerning use of the appliances by a person responsible for their safety.
- Children should be supervised to ensure that they do not play with the appliance.
- Save these instructions for future reference.
PRODUCT ILLUSTRATION
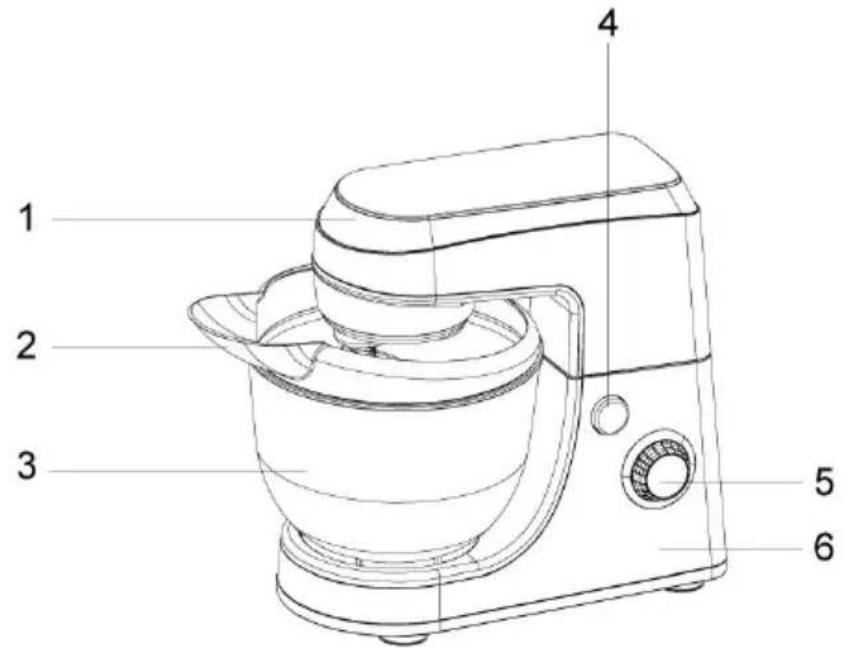
(1) Head of the mixer (7) Dough hook
(2) Splash guards (8) Beater
(3) Stainless steel bowl (9) Whisk
(4) Head-lift button (10) Spatula
(5) Speed selector
(6) Base unit
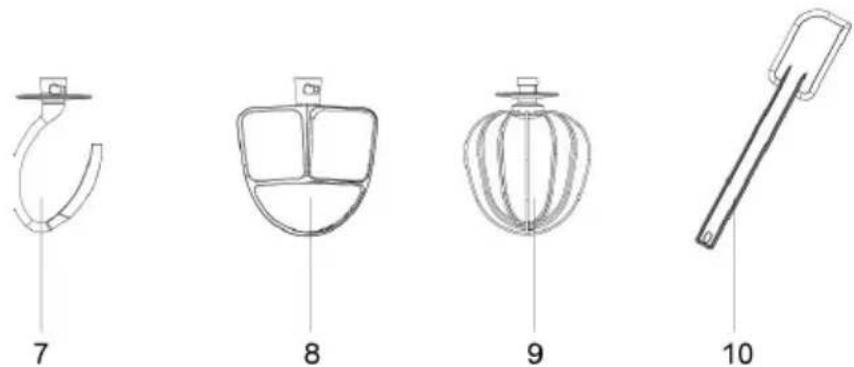
Accessories:
Dough hook - For kneading the dough.
Beater - For making cakes, biscuits, pastry, mashed potatoes, butter, cheesecake, etc.
Whisk – For eggs, cream, mousses, etc. Butter or cheese can be beaded by whisk provided they are thaw to room temperature.
Note: Do not use the whisk for heavy mixtures (example like creaming sugar) as it will damage the mixer.
Spatula—Removing the food which attached on bowl.
| Product picture | Descriptions |
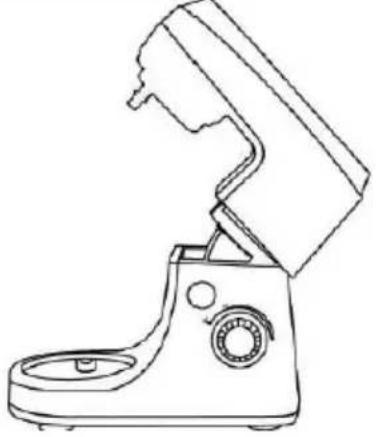 | Note: Using the mixer for the first time, please clean the beater, dough hook, whisk, spatula and bowl. Before assembling the mixer, be sure the plug is unplugged from the wall outlet and the speed selector is on the “off” position.Press the head-lift button and raise the mixer head till it locks. |
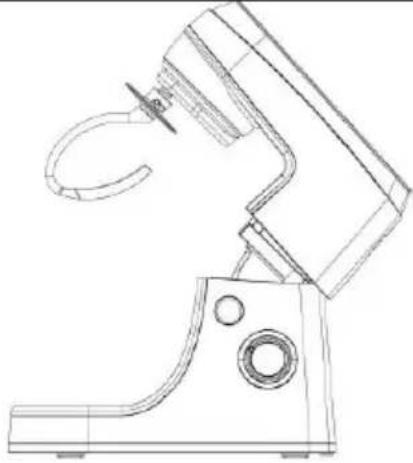 | To install the beater, dough hooks or whisk, push up the accessories and turn anti-clockwise until it is securely tightened.Note: The accessories cannot be inserted in reverse directions. |
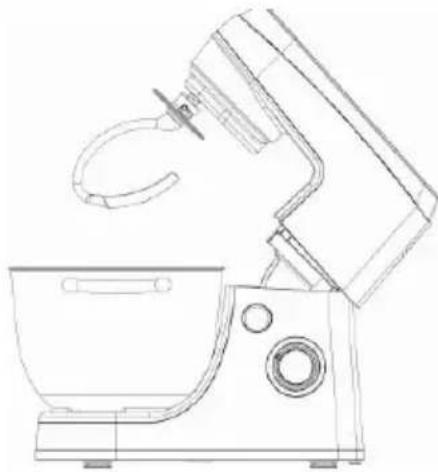 | Fit the stainless steel bowl onto the stand mixer base and turn anti-clockwise.After that, press the head-lift button and slowly push down the mixer head back to its position.Note: The mixer will only operate when the mixer head is fully secured back to its position.Connect the mixer to the power supply. Always turn on the lower power level first then slowly turn to desired level settings.To stop the mixer, turn the speed selector to “off” position.Warning: Do not place knife, metal spoon, fork and so on into the bowl during the process of mixing.The max operation time shall not exceed 5 minutes. Let the appliance rest for approximate 20 minutes until the mixer has cooled down. When kneading yeast dough, it is recommended to set the speed at the lowest first and then adjust to higher speed to achieve the best results. |
TO USE THE SPLASH GUARD
| Product picture | Descriptions |
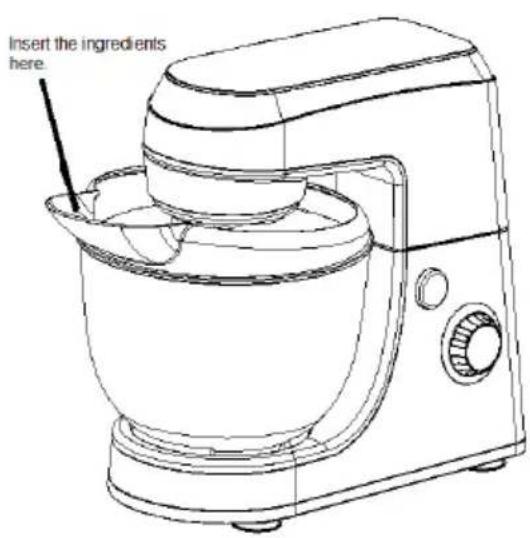 | To insert the splash guard, turn the head-lift button and raise the mixer head till it locks.Place the splash guard on the stainless steel bowl.Install the accessories such as beater, whisk, and dough hook and turn anti-clockwise until it securely tightened.To tilt the mixer head back to its position, press the head-lift button and slowly push down the mixer head back to its position.During the mixing, ingredients can be added directly to the bowl via the spout section of the splash guard. |
INGREDIENTS LIST
| Ingredients | Method | |
| Bread dough for buns | 250ml milk4 egg yolks3 tablespoons salted butter3 tablespoons sugar2 tablespoons yeast500g bread flour | 1. Install the dough hook.2. Pour ingredients into the mixing bowl according to sequence. Select the lowest speed and gradually increased the speed.3. Mix the ingredients well.4. When cycle finished, take out the dough immediately.5. Mould the dough into desired shape and size and place on a baking tray.6. Preheat oven at 170°C for 10 minutes and switch off the oven. Place the tray of buns into oven to allow the dough to rise for 20 minutes.7. When the buns are significantly bigger after 20 minutes, take out the tray from oven and switch on the oven again.8. Use egg to glaze the top of buns and put back into oven to bake for 15-20 minutes until golden brown. |
| Mini egg tarts (about 26 pieces) | Pastry ingredients170g plain flourPinch of salt100g butter30g caster sugar1 egg yolk 12 teaspoon vanilla essenceTopping ingredients3 eggs80g caster sugar70ml milk230ml water | Method for crust1. Place the plain flour, salt and caster sugar in the mixing bowl.2. Use the beater and mix. Adjust to low speed.3. Add butter, egg yolk and vanilla essence and knead until it becomes soft dough.4. Take about 11g of dough and presson the tart mould.5. Prick with fork.Method for egg crustard filling1. Use the whisk to whisk eggs and sugar until it become thick and creamy.2. Add milk to mixture and continue to whisk until combined.3. Add water gradually and continue to whisk.4. Pour into molded tart dough.5. Preheat oven at 170-180°C and bake for about 25 minutes per tray.6. Remove and serve warm. |
| Chocolate nutty brownie (about 42 pieces of 1 1⁄2 size brownie) | 250g butter100g cocoa powder400g caster sugar100g self raising flour4 eggs100g walnut pieces (lightly toasted)100g almond pieces (lightly toasted) | 1. Place butter, sugar and cocoa butter into a saucepan over slow fire and stir melt the butter. Leave mixture to cool.2. Use the whisk to whisk eggs until lightly thick.3. Sift flour into egg mixture and mix evenly.4. Pour cocoa mixture into egg mixture and whisk until it is well blended. Fold in the 2 types of nuts.5. Preheat oven at 180°C.6. Line the base of shallow tray with grease proof paper allowing the 2 sides to drape outwards.7. Grease the other 2 sides of tray with butter.8. Pour combined mixture onto tray and bake for about 25-30 minutes. Do not over bake. |
| Vanilla cup cakes (about 30 cupcakes) | 250g butter180g caster sugar5 eggs 12 teaspoon of vanilla essence200g self raising flour | 1. Place soft caster sugar into the mixing bowl, use beater and start with the lowest speed and gradually cream until light and fluffy.2. Add eggs one at a time by using higher speed to mix evenly.3. Scrape sides of the mixing bowl with spatula and add in the vanilla essence.4. Sift flour into the mixture and mix evenly until everything in the mixing bowl is well mixed.5. Preheat oven at 170°C.6. Line cupcake tray with cupcake paper cups.7. Scoop or pipe in mixture to 2/3 full.8. Bake for about 20 minutes or until light golden brown and allow cooling on rack. |
| Mini quiche Dough ingredients185g plain flourPinch of salt150g butter, chilled and cubed1 egg, lightly whisked2-3 tablespoons ice waterFilling ingredients200g of chopped ham300ml milk3 eggs1 small onion120g mixed vegetables | 185g plain flourPinch of salt150g butter, chilled and cubed1 egg, lightly whisked2-3 tablespoons ice watersalt and black pepper to taste | 1. Place salt, flour and butter into mixing bowl. Use beater to mix until crumbly.2. Add egg and ice water to mix until it forms dough.3. Mould dough into pastry cases, prick the base and bake blind.4. Preheat oven to 180°C at bake function.5. Bake for about 20 minutes or until light golden. Leave a side.6. Lightly fry onion, ham and mixed vegetables with a little oil in a frying pan.7. Divide the ingredients into the ready pastry.8. Whisk eggs, milk, salt and pepper into a bowl.9. Pour the egg mixture into the ready pastry with ingredients.10. Bake for 25 minutes until golden at 180°C. |
| Sugee cookies | 125g butter70g ghee100g icing sugar 12 tablespoons baking powder 12 tablespoons vanilla essence250g top flour50g chopped almonds (lightly roasted) | 1. Mix butter, ghee and icing sugar using the beater until creamy.2. Add in vanilla essence and mix evenly.3. Shift the top flour and baking power into mixture.4. Add in the chopped almonds and mix into a soft dough. Leave in the refrigerator for 30 minutes.5. Roll dough into 10g size balls. Place on greaseproof paper.6. Preheat oven at 170°C and bake for about 15-20 minutes or until light golden brown.7. Cool before serving. |
| Butter cream icing | 250g shortening or butter1 tablespoons vanilla essence1 tablespoons water220g icing sugar 12 tablespoons meringue powder | 1. Use the beater, cream shortening or butter with water until creamy and light.2. Add sugar and meringue powder and continue to cream until well mixed.3. Add coloring as desired.4. Pipe out icing onto cupcakes. |
CLEANING AND MAINTENANCE
- Unplug the appliance and wait until it completely cool down before cleaning. Caution: the mixer cannot be immersed in water or any other liquids.
- Clean the product body and the base with a wet cloth and then wipe it with a soft dry cloth.
- Wipe any excessive food particles at the power cord (if any) with dry cloth.
- Immerse the bowl, beaters and dough hooks in warm soapy water for complete cleaning. Then rinse under running water and wipe dry. The beaters and dough hooks may be placed in the dishwasher.
COOKING TIPS
- Ingredients such as butter and eggs should always stored in refrigerator before mixing begins.
- To eliminate the possibility of shells or deteriorated eggs in your mixture, break eggs into separate container first and then add it to the mixture.
- Always start the process of mixing at lowest speed. Gradually increase to the recommended speed as stated in the recipe.
ENVIRONMENT- FRIENDLY DISPOSAL
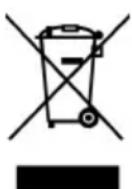
You can help to protect the environment!
Please remember to respect the local regulations: hand in the non-working electrical equipments to an appropriate waste disposal center.
ELBA
Brand : Elba
Model : ESMB-B4235
Category : Hand blender