
CDC936 - CD Player PHILIPS - Free user manual and instructions
Find the device manual for free CDC936 PHILIPS in PDF.


| Product Type | CD Player |
| Model | CDC936 |
| Brand | Philips |
| Disc Capacity | Single disc |
| Playback Formats | Audio CD |
| Remote Control | Yes, with numeric keys |
| Display | Fluorescent display |
| Dimensions (W x H x D) | Approximately 430 x 100 x 300 mm |
| Weight | Approximately 4.0 kg |
| Power Supply | AC 220-240 V, 50 Hz |
| Power Consumption | 15 W (typical) |
| Headphone Jack | 3.5 mm stereo |
| Audio Outputs | RCA (L/R) |
| Functions | Play, Pause, Stop, Skip, Scan, Repeat, Shuffle, Programmable Track Order |
| Fader Function | Yes |
| Safety | Double insulated |
| Cleaning | Soft dry cloth; lens cleaning recommended |
| Fuse (UK plug) | 5A, BS1362 |
| Accessories | Remote control, power cord |
Frequently Asked Questions - CDC936 PHILIPS
User questions about CDC936 PHILIPS
0 question about this device. Answer the ones you know or ask your own.
Ask a new question about this device
Download the instructions for your CD Player in PDF format for free! Find your manual CDC936 - PHILIPS and take your electronic device back in hand. On this page are published all the documents necessary for the use of your device. CDC936 by PHILIPS.
USER MANUAL CDC936 PHILIPS
FITTING A MAINS PLUG (U.K. only)
This apparatus is fitted with an approved moulded 13 Amp plug. To change a fuse in this type of plug proceed as follows:
- Remove fuse cover and fuse.
- Fix new fuse which should be a BS1362 5A, A.S.T.A. or BSI approved type.
- Refit the fuse cover.

natural_image
Technical line drawing of a mechanical clamp or connector (no text or symbols)If the fitted plug is not suitable for your socket outlets, it should be cut off and an appropriate plug fitted in its place.
If the mains plug contains a fuse, this should have a value of 5A. If a plug without a fuse is used, the fuse at the distribution board should not be greater than 5A.
NOTE
The severed plug must be disposed to avoid a possible shock hazard should it be inserted into a 13A socket elsewhere.
HOW TO CONNECT A PLUG
The wires in the mains lead are coloured in accordance with the following code:
BLUE – "NEUTRAL" ("N") and BROWN – "LIVE" ("L"). As these colours may not correspond with the colour markings identifying the terminals in your plug, proceed as follows:
- The BLUE wire must be connected to the terminal which is marked with the letter "N" or coloured BLACK.
- The BROWN wire must be connected to the terminal which is marked with the letter "L" or coloured RED.
- Do not connect either wires to the earth terminal in the plug which is marked by the letter "E" or by the safety earth symbol or coloured green or green-and-yellow.
Before replacing the plug cover, make certain that the cordgrip is clamped over the sheath of the lead – not simply over the two wires
GB English ......page 4 English
⑤ Français ......page 20
natural_image
Pure electrical circuit lines without any symbolsnatural_image
Pure electrical circuit lines without any symbolsnatural_image
Black-and-white photo of a server rack with a label '2728' on the side (no other text or symbols visible)AFSTANDSBEDIENING
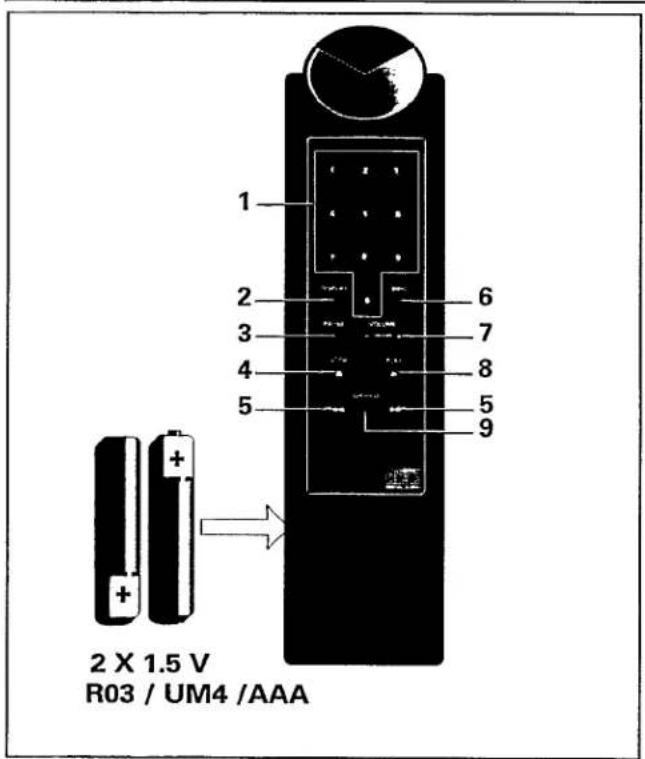
1 Cijfertoetsen 1-0
natural_image
Illustration of hands using a tool to adjust or install a component (no text or symbols visible)

KENNISMAKEN MET DE CD's (SCAN)
Alle CD's:
ACTIVEREN VAN DE FADER-FUNCTIE (FADER)
LET OP!
(STOP/CP, CLR of OPEN/CLOSE)
natural_image
Line drawing of a hand holding a device with a circular head (no text or symbols)De speler


Brand : PHILIPS
Model : CDC936
Category : CD Player