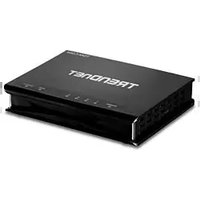
TDM-C504 - Router TRENDNET - Free user manual and instructions
Find the device manual for free TDM-C504 TRENDNET in PDF.


| Product Type | ADSL2/2+ Modem Router |
| Model | TDM-C504 |
| Brand | TRENDnet |
| WAN Port | 1 x RJ-11 (ADSL) |
| LAN Ports | 4 x 10/100Mbps Auto-MDIX RJ-45 |
| ADSL Standards | ANSI T1.413 Issue2, ITU G.992.1 (G.dmt), G.992.2 (G.lite), G.992.3 (ADSL2), G.992.5 (ADSL2+), Annex L, Annex M |
| Protocols | TCP/IP, NAT, HTTP, DHCP Server/Relay/Client, DDNS, DNS Proxy, UPnP, RIP v1/v2 |
| Firewall | NAT, SPI, IP/Port Filtering, MAC Filtering, URL Blocking, DMZ |
| VPN Pass-Through | Yes |
| QoS | IP QoS with priority levels |
| Management | Web-based (HTTP), Telnet, SNMP v2c |
| Dimensions | 145 x 113 x 27 mm (5.7 x 4.4 x 1.1 in) |
| Weight | 280 g (9.9 oz) |
| Power Adapter | 9V DC, 1A (A type) / 0.5A (EU type) |
| Power Consumption | 5W |
| LEDs | Power, LAN 1-4 (Link/Act), ADSL, Internet |
| Reset Button | Yes (press 2-5 sec to reboot, >5 sec to factory reset) |
| On/Off Power Button | Yes |
| Operating Temperature | 5° to 45°C (41° to 113°F) |
| Certifications | CE, FCC |
| Warranty | 3 years limited |
Frequently Asked Questions - TDM-C504 TRENDNET
User questions about TDM-C504 TRENDNET
0 question about this device. Answer the ones you know or ask your own.
Ask a new question about this device
Download the instructions for your Router in PDF format for free! Find your manual TDM-C504 - TRENDNET and take your electronic device back in hand. On this page are published all the documents necessary for the use of your device. TDM-C504 by TRENDNET.
USER MANUAL TDM-C504 TRENDNET
CONNECTION MECHANISM....10
Connection through Ethernet Cable....10
Setting up the TCP/IP in Windows....12
ADVANCE CONFIGURATION....2
Login....2
Setup Wizard 3
LAN....7
WAN 8
Channel Config....8
ATM Settings....18
ADSL Settings....19
SERVICE....21
DHCP Settings....21
DNS 23
DDNS Server 23
FIREWALL....25
IP/Port Filtering 25
MAC Filtering....26
Port Forwarding 27
URL Blocking....28
DMZ....29
IGMP PROXY 30
UPNP....31
RIP 32
ADVANCE....34
ARP table....34
Bridging....35
Routing....35
SNMP 37
Port Mapping....37
IP QoS....39
Remote Access....40
Others 41
DIAGNOSTIC....43
Ping....43
ATM Loopback....43
ADSL....44
Diagnostic Test....44
ADMIN 46
Commit/Reboot 46
Backup/Restore 46
System log 47
Password....47
Upgrade Firmware 47
ACL....48
Time Zone....48
STATISTICS ....50
Interface....50
ADSL....50
APPENDIX A....51
ROUTER TERMS 51
FREQUENTLY ASKED QUESTIONS....52
TROUBLESHOOTING GUIDE....54
UPNP SETTING ON WINDOWS XP (OPTIONAL) 56
GLOSSARY 58
ENERGY-RELATED PRODUCTS INFORMATION....62
SPECIFICATION....63
LIMITED WARRANTY....64
Compliance
FCC Radiation Norm
This equipment has been tested and found to comply with limits for a Class B digital device pursuant to 47 CFR, Part 2 and Part 15 of the Federal Communication Commission (FCC) rules. Operation is subject to the following two conditions:
- This device may not cause harmful interference
- This device must accept any interference received including interferences that may cause undesired operations.
CE Radiation Norm
This equipment has been tested and found to comply with the limits of the European Council Directive 99/5/EC on the approximation of the law of the member states relating to EN 55022:2006(Class B), EN55024:1998 +A1:2001+A2:2003 and EN 60950-1:2006 +A11:2009.
FCC & CE Compliance Statement
These limits are designed to provide reasonable protection against radio interference in a residential environment. This equipment can generate, uses and radiate radio frequency energy and, if not installed and used in accordance with the instructions, may cause harmful interference to radio communications.
However, there is no guarantee that interference will not occur in a particular installation. If this equipment does cause harmful interference to radio or television reception, which is found by turning the equipment ON and OFF, the user is encouraged to try to reduce the interference by one or more of the following measures:
- Reorient or relocate the receiving antenna
- Increase the separation between the equipment and the receiver
- Connect the equipment into an outlet on a circuit different from that to which the receiver is connect to
- Consult a dealer or an experienced technician for assistance

CAUTION!
The Federal Communication Commission warns the user that changes or modifications to the unit not expressly approved by the party responsible for compliance could void the user's authority to operate the equipment.
Introduction
The 4-PORT ADSL 2/2+ Modem Router, model TDM-C504, provides a modem for Internet access and a high speed router to allow multiple connections to the internet.
It supports all Internet service providers with ADSL 2, ADSL 2+, Annex A, Annex L, or Annex M networks.
Installation is a breeze with a step-by-step setup wizard; status LEDs conveys devices status; and a convenient on/off power button protects hardware when powering down.
Protect your data with a dual NAT and SPI firewall. Manage access to the Internet with IP port and MAC address filtering and URL and domain name blocking controls. Additional features include a browser-based management interface, SNMP v1 and v2 support, QoS data prioritization, DMZ controls, Port Forwarding, and Dynamic DNS support.
Features
■ ADSL Standards Compliance
• Full rate ANSI T1.413 Issue2, ITU-T G.992.1 and ITU-T G.992.2 standards compliant.
- ITU G.992.3, ITU G.992.5 ADSL2/2+ standards compliant.
• Support Annex M and Annex L specification.
- Downstream and Upstream data rates up to 24Mbps and 1Mbps.
■ ATM and PPP Protocols
• Support ATM AAL0, AAL2 & AAL5.
• Support ITU-T I.610 OAM F4/F5.
• Support up to 8 PVCs.
- Multiple Protocols over AAL5 (RFC 2684 / RFC 1483).
- Support Bridged and Routed Ethernet Encapsulation.
• Support VC and LLC based Multiplexing.
• Support PPPoA (RFC 2364) standard.
• Support PPPoE (RFC 2516) standard.
- Traffic classes: UBR, CBR and VBR-rt, VBR-nrt.
■ Network Protocols & Features
- IP Routing – RIPv1 and RIPv2.
- Support Static Routing.
• DHCP Server, Relay and Client. - Support DNS Relay.
• Support DDNS features.
• Support SNMP functionality.
• Support IP QoS features.
• Support IGMP functionality - Support IP Filter and MAC Filter functionality.
- URL Blocking feature supported.
• Support Port Forwarding features.
• Support DMZ functionality. - Support NAT and NAPT (PAT) functionality with extensive ALG supported.
• Support VPN Pass-Through.
• Built-in Firewall features.
■ Bridging
• Support IEEE 802.1d Transparent Bridging.
• Support IGMP Snooping.
• Support MAC Learning Address features.
■ Management
- Web-based Configuration / Management.
- Support FTP/TFTP/Telnet Management / Configuration.
- Support Remote Access Management / Configuration.
-
Firmware upgrade and Reset to default via Web management.
-
Restore factory default setting via Web or hardware reset button.
• WAN and LAN connection statistics. - Support Password Authentication.
- Device System Log.
• Built-in Diagnostic Test.
■ UPnP
• Support UPnP functionality.
■ Ethernet Standards
• Built-in 4 Ports 10/100Mbps Ethernet Switch which compliant with IEEE 802.3x standards
• Automatic MDI/MDI-X crossover for 100BASE-TX and 10BASE-T ports.
• Auto-negotiation and speed-auto-sensing support.
- Port based VLAN supported in any combination.
System Requirement
Check and confirm that your system confirms the following minimum requirements:
■ Personal computer (PC/Notebook).
■ Pentium III compatible processor and above.
■ Ethernet LAN card installed with TCP/IP protocol.
■ 64 MB RAM or more.
■ 50 MB of free disk space (Minimum).
■ Internet Browser.
■ CD-ROM Drive.
Package Contents
The TDM-C504 ADSL2/2+ Modem Router package contains the following items:
TDM-C504
■ Multi-Language Quick Installation Guide
■ CD-ROM (User's Guide & Drivers)
■ Power Adapter
■ Cat. 5 Ethernet Cable (1.5m / 5ft.)
■ RJ-11 telephone cable (1.8m / 6ft.)
If any of the above items are damaged or missing, please contact your dealer immediately.
Hardware
Front Panel
The TDM-C504 ADSL2/2+ Modem Router's LEDs indicators display information about the device's status.
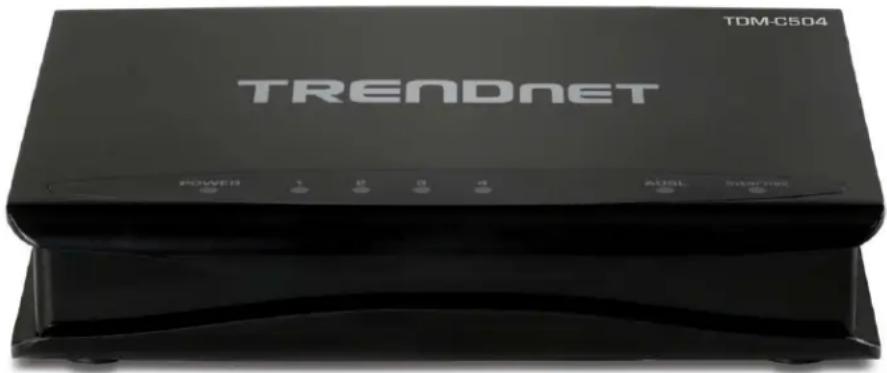
| Power Lights up when TDM-C504 4-Port ADSL2/2+ Modem Router is powered on. | |
| LAN 1-4 | Blinking when LAN port(s) of this TDM-C504 4-Port ADSL2/2+ Modem Router is sending or receiving data. |
| ADSL | Lights up when a successful 4-Port ADSL2/2+ connection is established.Blinking when it is attempting to make an ADSL connection with ISP. |
| INTERNET | Lights up when connection is established to Internet. |
Back Panel
The back panel of the TDM-C504 4-Port ADSL2/2+ Modem Router contains ADSL, Ethernet Switches, Reset, Power Adapter connection.

natural_image
Black TPMD-0504 wireless device with yellow ports and network ports (no visible text or symbols beyond branding)| ADSL Port for connecting to the ADSL2/2+ Service Provider. | |
| LAN 1-4 10/1 | 100Mbps Ethernet Port for connecting to the network devices |
| Power Power adapter connector. | |
| On/Off Power ON/OFF button. | |

RESET Button:
Reboot & Restore the TDM-C504 4-Port ADSL2/2+ Modem Router to factory defaults.
To "Reset" the TDM-C504 4-Port ADSL2/2+ Modem Router to factory defaults:
■ Ensure that the device is powered on.
■ Press the Reset button for more than 5 seconds and release. Wait for 30 seconds after release the Reset button. Do not power off the device during the reset process.
■ The default settings are now restored after 30 seconds.
To "Reboot" the TDM-C504 4-Port ADSL2/2+ Modem Router:
■ Ensure that the device is powered on.
- Press the Reset button for 2\~5 seconds and release. Wait for 30 seconds after release the Reset button.
Connection Mechanism
This section describes the hardware connection mechanism of TDM-C504 4-Port ADSL2/2+ Modem Router on your Local Area Network (LAN) connected to the Internet, how to configure your TDM-C504 4-Port ADSL2/2+ Modem Router for Internet access or how to manually configure your Internet connection.
You need to prepare the following items before you can establish an Internet connection through your TDM-C504 ADSL2/2+ Modem Router:
- A computer/notebook which must have an installed Ethernet Adaptor and an Ethernet Cable.
- ADSL/ADSL2/ADSL2+ service account and configuration information provided by your Internet Service Provider (ISP). You will need one or more of the following configuration parameters to connect your TDM-C504 ADSL2/2+ Modem Router to the Internet:
a. VPI/VCI parameters
b. Multiplexing Method or Protocol Type or Encapsulation Type
c. Host and Domain Names
d. ISP Login Name and Password
e. ISP Domain Name Server (DNS) Address
f. Fixed or Static IP Address.
Figure below shows the overall hardware connection mechanism of your TDM-C504 4-Port ADSL2/2+ Modem Router.

flowchart
graph TD
    A["TRENDYFT"] --> B["150Mbps Wireless N Access Point (TEW-650AP)"]
    B --> C["Workstations with Gigabit PCI Adapter (TEG-PCITXR)"]
    B --> D["Phone Jack"]
    D --> E["RJ-11 Telephone Line"]
    B --> F["Workstation with Wireless PCI Adapter"]
Connection through Ethernet Cable
Following are the steps to properly connect your TDM-C504 4-PORT ADSL 2/2+ Modem Router by Ethernet Cable (RJ-45):
- Turn off your computer/notebook.
- Connect the ADSL port of your TDM-C504 4-Port ADSL2/2+ Modem Router to the wall jack of the ADSL/ADSL2/ADSL2+ Line with a RJ-11 cable.
- Connect the Ethernet cable (RJ-45) from your TDM-C504 ADSL2/2+ Modem Router to the Ethernet Adaptor on your computer.
- Connect the Power adaptor to the TDM-C504 ADSL2/2+ Modem Router and plug it into a Power outlet.

The Power light will be on after turning on the TDM-C504.

Use the Power Adaptor exclusively in combination with the equipment supplied and do not use any other kind of power adaptor for the equipment.
- Turn on your computer.
- Refer to the next section to setup or configure your system's Network Adaptor.
Setting up the TCP/IP in Windows
The instruction in this chapter will help you configure your computers to be able to communicate with this TDM-C504 4-PORT ADSL2/2+ Modem Router.
Computers access the Internet using a protocol called TCP/IP (Transmission Control Protocol/ Internet Protocol). Each computer/notebook on your network must have TCP/IP installed and selected as its networking protocol. If a Network Interface Card (NIC) is already installed in your PC, then TCP/IP is probably already installed as well.
The following description assumes TDM-C504 4-PORT ADSL2/2+ Modem Router been set to factory default. (If not, please hold the reset button down for 5\~10 seconds). The default of the TDM-C504 4-PORT ADSL2/2+ Modem Router's LAN IP is 192.168.10.1.
Follow the procedures below to set your computer/notebook function as a DHCP Client.

Restart and Reboot your Windows system might be necessary after setting your computer function as a DHCP Client. In order to properly activate your choice, click "OK" to restart your Windows system.
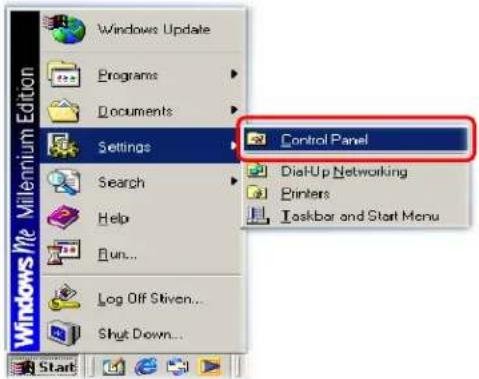
Windows ME / 98
Step 1: Click Start→Settings→Control Panel.
Step 2: Double-click the Network icon.
![Control Panel File Edit View Favorites Tools Help Address Control Panel Control Panel Network Configures network hardware and software. Windows Update Technical Support Fonts Gaming Internet Keyboard Modems Mouse ODBC Data Sources [2bit] Passwords Power Options Printers Regional Settings](/content/2026/05/1070529/images/1c0f1da656720d93ccbf474ccba86f67d1c6045aa97c94d21ddfdbc20b357fae.jpg)
Step 3: Go to Configuration icon, select network adapter installed and click Properties.

Step 4: Go to IP Address icon and select
Obtain an IP address.

Step 5: Go to Gateway icon and erase all previous setting.

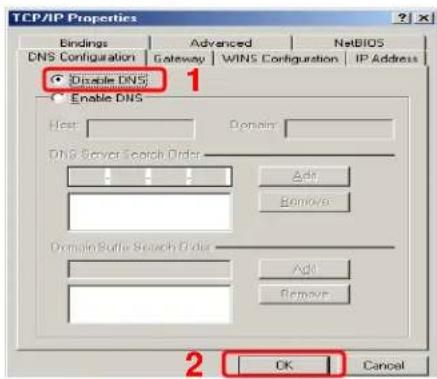
Step 6: Go to DNS Configuration icon, select Disable DNS and click OK.
Windows 2000
Step 1: Click Start→Settings→Control Panel.
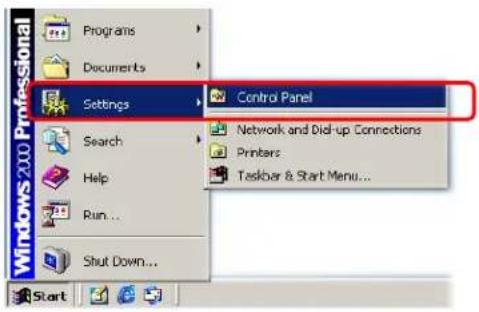
Step 2: Double-click the Network and Dial-up Connections.

Step 3: Right Click the Local Area Connection and select Properties.

Step 4: Select Internet Protocol (TCP/IP) and click Properties.
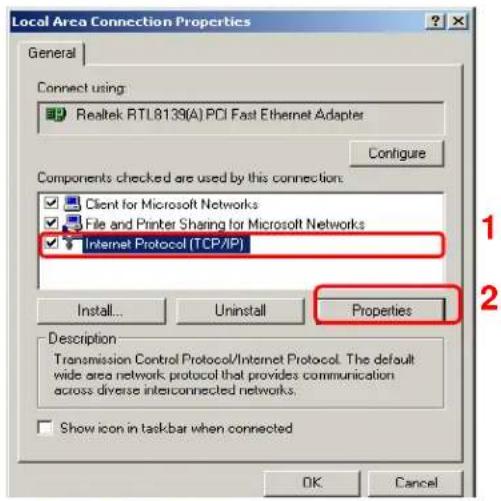
Step 5: Select Obtain an IP address automatically and DNS server address automatically. Then, click OK.

Windows XP
Step 1: Click Start→Control Panel→Classic View.

Step 2: Double-click the Network Connections.
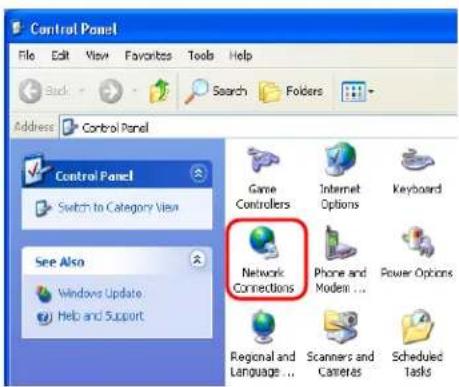
Step 3: Right Click on the Local Area Connection and select Properties.

Step 4: Go to General icon, select Internet Protocol (TCP/IP) and click Properties.

Step 5: Go to General icon, select Obtain an IP address automatically and DNS server address automatically. Then, click OK.

Windows Vista
Step 1: Click Start→Control Panel.
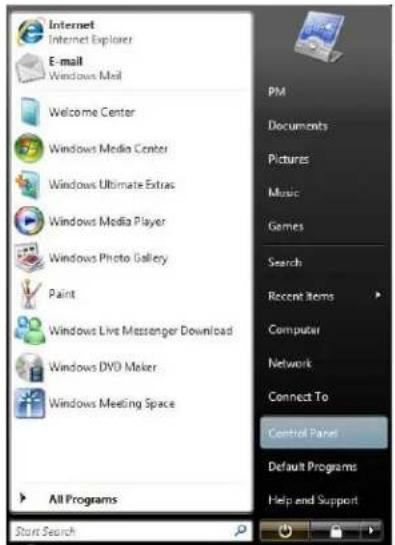
Step 2: Double-click the Network and Sharing Center.

Step 3: Click on the Manage network connections.

Step 4: Right Click on the Local Area Connection and select Properties.

Step 5: Go to General icon, select Internet Protocol Version 4 (TCP/lpv4) and click Properties.

Step 6: Go to General icon, select Obtain an IP address automatically and DNS server address automatically.
Then, click OK.

Windows 7
Step 1: Click Start→Control Panel.

Step 2: Click the View network status and tasks.

Step 3: Click on the Change adapter settings.

Step 4: Right click on the Local Area Connection and select Properties.

Step 5: Select Internet Protocol Version 4 (TCP/IPv4) and click Properties.

Step 6: Go to General icon, select Obtain an IP address automatically and DNS server address automatically.

Advance Configuration
For your convenience, an Administrative Utility has been programmed into TDM-C504 4-PORT ADSL2/2+ Modem Router. This chapter will explain all the functions in this utility. All the TDM-C504 4-PORT ADSL2/2+ Modem Router based administrative tasks are performed through this web utility.
Login
To access the TDM-C504 4-PORT ADSL2/2+ Modem Router Configuration screens, follow the following steps will enable you to log into the TDM-C504 ADSL2/2+ Modem Router:
- Launch your web browser, and enter the TDM-C504 4-PORT ADSL2/2+ Modem Router's default IP Address: "192.168.10.1" in the address field then press the "Enter" key to login.

- Enter your user name and password in the login window. The default username and password is "admin".

- Upon entering the address into the web browser, the system HOME page with all the device information will appear as shown below.

This page displays the ADSL modem/router's current status and settings. This information is read-only except for the PPPoE/PPPoA channel for which user can connect/disconnect the channel on demand.
Refresh
Updates the status of your WAN Configurations
Connect / Disconnect
The two buttons take effect only when PVC is configured as PPPoE/PPPoA mode. Click Connect/Disconnect button to connect/disconnect the PPP dial up link.
Setup Wizard
The Setup Wizard is a presetting wizard which is meant to help you install the TDM-C504 ADSL2/2+ Modem Router quickly and easily.
Click on "Setup Wizard" and the following screen will pop-up:
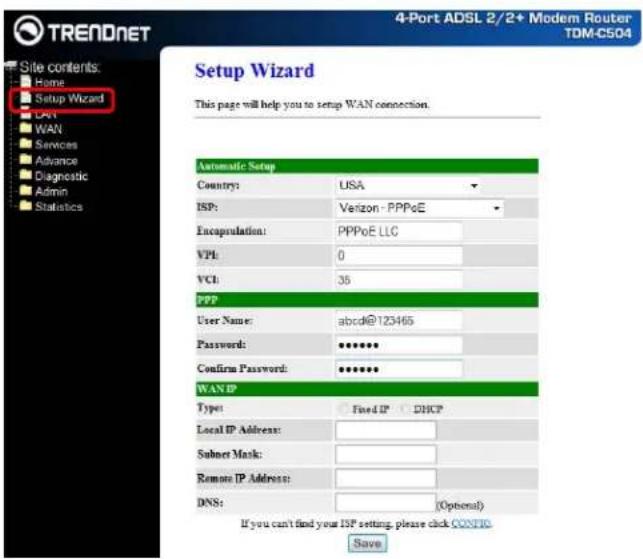
Follow the "Steps" describe below to complete your installation.
Step 1: Select your country from the Country list and the ADSL service provider from the ISP List (If there are more than two ISP in your country) and note the "Encapsulation" type and "VPI & VCI" setting.

Note: Click "CONFIG" if you cannot find your parameters available in the pull down menu. Contact your ISP for configuration settings.
A. For countries with the following "Encapsulation" type, you will enter into set Username and Password window as shown below:
√ PPPoA VC-Mux
√ PPPoA LLC
√ PPPoE VC-Mux
√ PPPoE LLC

Manually enter your "User Name" and "Password" which will be provided by your Service Provider (ISP). Click "Save" after setup.
Click Commit and Reboot button to commit changes to system memory and reboot router.
B. For countries with the following "Encapsulation", the following window will pop-up:
☑ 1483 Routed IP VC-Mux
1483 Routed IP LLC
1483 Bridged IP VC-Mux
1483 Bridged IP LLC
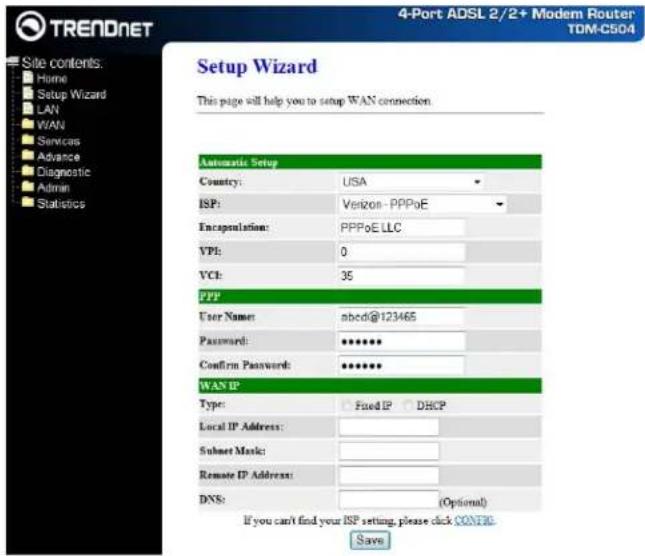
In this current window, you will find TWO different Connection Type:
■ Fixed IP (Fixed IP by ISP)
■ DHCP (Get IP dynamically from ISP)
Note: Click "CONFIG" if you cannot find your parameters available in the pull down menu. Contact your ISP for configuration settings.
■ Fixed IP: Fixed IP Settings are for users who have a Static IP Address (WAN side) from their ISP.
Click the radio button to enable Fixed IP option. Manually enter the "Local IP Address", "Subnet Mask", "Remote IP Address" (Default Gateway) and "DNS" which will be provided by your ISP. Click "Save" after your setting. Click Commit and Reboot button to commit changes to system memory and reboot router.

☑ Local IP Address: This is the Static IP Address given by your ISP.
☑ Subnet Mask: This is the Subnet Mask provided by your ISP.
☑ Remote IP Address: This is your gateway IP address.
☑ DNS: This is the DNS address specified by your ISP.
■ DHCP (Get IP dynamically from ISP): Click the radio button to enable DHCP (Get IP dynamically from ISP) option.
Nothing to be filled under this mode. Just click the "Save" button to confirm your setting.
Click Commit and Reboot button to commit changes to system memory and reboot router.
The following page with the device setup information will be displayed.

Note: If the final settings are different from what you'd selected in STEP 1, click Setup Wizard and redo the setup procedures or else check your dealer immediately for technical support.
Step 2: Launch your web browser, and verify you can browse the Internet.
![TRENDnet | Networks People Trust - Windows Internet Explorer http://www.trendnet.com?Trendnet.com File Edit View Favorites Tools Help Favorites TRENDENET TEW-652BRLU ... Suggested Sites Get More Add-ons TRENDENET Networks People Trust TRENDENET® Networks People Trust™ Company Products Where to Buy Press Support Downloads Partners Store TRENDENETV United States [change] Search 450Mbps Wireless GREEN Wireless Internet Cameras Mobile Wireless TEW-691GR World's First 450Mbps Router! 450 Mbps Wireless 450 Mbps 450 Mbps 450 Mbps](/content/2026/05/1070529/images/c56d090a5d97bb908bb80fdcecc127a1c7cf7166772acfeb93f233edb403e195.jpg)
LAN
This page shows the current settings of the LAN interface.
Fields in this page:
| Field Description | |
| IP Address The IP address your LAN hosts use to identify the device's LAN port. | |
| Subnet Mask LAN subnet mask. | |
| IGMP Snooping Enable/Disable the IGMP snooping function for the multiple bridged LAN ports. |

Apply Changes
Click to save the setting to the configuration. New parameters will take effect after save into flash memory and reboot the system. See section "Admin" for save details.
WAN
There are three sub-menu for WAN configuration: [Channel Config], [ATM Settings], and [ADSL
Settings].
Channel Config
ADSL router comes with 8 ATM Permanent Virtual Channels (PVCs) at the most. There are mainly three operations for each of the PVC channels: add, delete and modify. And there are several channel modes to be selected for each PVC channel. For each of the channel modes, the setting is quite different accordingly. Please reference following section for details.

Add
Click Add to complete the channel setup and add this PVC channel into configuration.
Modify
Select an existing PVC channel by clicking the radio button at the Select column of the Current ATM VC Table before we can modify the PVC channel. After selecting an PVC channel, we can modify the channel configuration at this page. Click Modify to complete the channel modification and apply to the configuration.
Delete
Select an existing PVC channel to be deleted by clicking the radio button at the Select column of the Current ATM VC Table. Click Delete to delete this PVC channel from configuration.
MAC Address Clone
Select this option if your ISP requires a MAC address to be entered. Enable this option by selecting Enable in the pull down menu. You can either manually enter the MAC address of click Clone MAC Address to automatically enter your PC's MAC address.
Before the TDM-C504 ADSL2/2+ Modem Router will pass any data between the LAN interface(s) and the WAN interface, the WAN side of the modem must be configured. Depending upon your ADSL service provider or your ISP, you will need some (or all) of the information outlined below before you can properly configure the WAN:
■ Your ADSL account Username and Password
■ Your ADSL line VPI and VCI setting
■ Your ADSL encapsulation type or multiplexing (Either LLC or VC. Check your ISP for detail)
■ Your ADSL Training Mode or Handshaking Mode (default is MMODE)
For PPPoA or PPPoE users, you also need these values from your ISP:
■ Your account Username
■ Your account Password
For RFC 1483 users, you may need these values from your ISP:
■ Your ADSL fixed Internet IP address
■ Your Subnet Mask
■ Your Default Gateway address
■ Your primary DNS IP address
Since multiple users can use the TDM-C504 ADSL2/2+ Modem Router, the TDM-C504 ADSL2/2+ Modem Router can simultaneously support multiple connection types; hence, you must set up different profiles for each connection. The TDM-C504 ADSL2/2+ Modem Router supports the following protocols:
■ PPPoE
■ PPPoA
■ 1483 Bridged
■ 1483 MER
■ 1483 Routed
The WAN setup configuration page enable the user to create, save, delete and select connection profiles as required. (In many cases, only one connection profile will be required and only one connection profile will be used at one time).
Bridge Mode
ADSL router is bridge mode enabled by factory default. There is a 1483-bridged mode PVC 5/35 in system.
1483 Bridged: When 1483 Bridged mode is selected, the following screen will pop-up. A Bridged connection basically disables the routing, firewall and NAT features of the 4 Ports ADSL2/2+ Router. In a 1483 Bridged connection, the 4 Ports ADSL2/2+ Router acts as a modem or hub, and just transmits packets between the WAN interface and the LAN interface. A 1483 Bridged connection assumes that another device is providing the routing functionality that is now disabled in the 4 Ports ADSL2/2+ Router.
LLC and VC-Mux are two different methods of encapsulating the PPP packet. Contact your ISP to make sure which encapsulation is being supported.
■ Channel:
☑ VPI: Virtual Path Identifier is a virtual path used for cell routing that is identified by an 8-bit field in the ATM cell header. The VPI field specifies this 8-bit identifier for routing.
☑ VCI: A Virtual Channel Identifier is a virtual channel that is identified by a unique numerical tag that is defined by a 16-bit field in the ATM cell header. The purpose of the virtual channel is to identify where the cell should travel. The VCI field specifies this 16-bit numerical tag that determines the destination.
☑ Encapsulation: There are 2 Encapsulation type:
◆ LLC
◆ VC-Mux
Note: LLC and VC-Mux are two different methods of encapsulating the PPP packet.
Contact your ISP to make sure which encapsulation is being supported.
☑ Channel Mode: Select "1483 Bridged" from the drop down manual.
Configuration Procedure :
- From the WAN – Channel Config page, click and select 1483 Bridged connection mode from the Channel Mode drop down manual. The default 1483 Bridged connection setup is displayed.
- Under the Channel mode, enter the values of VPI and VCI settings.
- Click the radio button and elect the Encapsulation type (LLC or VC-Mux).
Note: Your ADSL service provider or your ISP will supply these. In this case the ADSL service provider is using LLC.
- Click "Add" button after setup.
- You can "Edit" or "Delete" (☐) the existing connection profile under the Actions column.
- Click "Admin/ Commit/Reboot". Press "Commit" to save the settings into flash memory.
- The new settings will take effect after reboot the system.
- The following window display indicates the system restarting process. The System Home page will shows all the connection status and system information.

MER(Mac Encapsulation Routing) Mode
1483 MER: 1483 MER also commonly known as 1483 Bridged Router mode. When 1483 MER mode is selected, the following screen will pop-up. Most Internet users are provided with a dynamic IP address by their ISP for each session, however certain situations call for a Fixed (Or Static) IP address. Fixed (Or Static) is used whenever a known Fixed (Or Static) IP is assigned. The accompanying information such as the Subnet mask and the gateway should also be specified. Up to three Domain Name Server (DNS) addresses can also be specified. These servers would enable you to have access to other web servers. Valid IP addresses range is from 0.0.0.0 to 255.255.255.255.

■ Channel:
☑ VPI: Virtual Path Identifier is a virtual path used for cell routing that is identified by an 8-bit field in the ATM cell header. The VPI field specifies this 8-bit identifier for routing.
☑ VCI: A Virtual Channel Identifier is a virtual channel that is identified by a unique numerical tag that is defined by a 16-bit field in the ATM cell header. The purpose of the virtual channel is to identify where the cell should travel. The VCI field specifies this 16-bit numerical tag that determines the destination.
☑ Encapsulation: There are 2 Encapsulation type:
LLC
◆ VC-Mux
Note: LLC and VC-Mux are two different methods of encapsulating the PPP packet. Contact your ISP to make sure which encapsulation is being supported.
☑ Channel Mode: Select "1483 MER" from the drop down manual.
☑ Enable NAPT: Select "Disable" or "Enable" the NAPT functionality. Default setting is "Enable".
■ WAN IP:
☑ Type: Click the radio button to select "Fixed IP" or "DHCP" mode.
Fixed IP: You need to fill in the "Local IP Address", "Subnet Mask", "Remote IP Address" which will be provided by your ADSL Service provider or ISP.
DHCP: Dynamic Host Configuration Protocol (DHCP) allows the 4 Ports ADSL2/2+ Router to automatically obtain the IP address from the server. This option is commonly used in situations where the IP address is dynamically assigned and is not known prior to assignment.
☑ Default Route: Click the radio button to "Enable" or "Disable" the Default Route functionality.
Configuration Procedure:
- From the WAN – Channel Config page, click and select 1483 MER connection mode from the Channel Mode drop down manual. The default 1483 MER connection setup is displayed.
- Under the Channel mode, enter the values of VPI and VCI settings.
- Click the radio button and elect the Encapsulation type (LLC or VC-Mux).
Note: Your ADSL service provider or your ISP will supply these. In this case the ADSL service provider is using LLC.
- Check the radio button to "Enable" or "Disable" the NAPT setting. Leave as its default setting if your ADSL provider or ISP didn't provide any setting information.
Note: NAPT: Network Address and Port Translation: An extension of NAT, NAPT maps many private internal addresses into one IP address. The outside network (WAN) can see this one IP address but it cannot see the individual device IP addresses translated by the NAPT.
-
Under the WAN IP mode, enter the "Local IP Address", "Subnet Mask" and "Remote IP Address" if you are using the Fixed IP (Or Static IP) mode. These information/data will be provided by your ADSL Service provider or ISP.
-
Under the WAN IP mode, if you select DHCP as your connection type, nothing needed to fill. In this case the ADSL service provider is using Dynamic IP (Or DHCP) mode.
-
Check the radio button to "Enable" or "Disable" the Default Route setting. Leave as its default setting if your ADSL provider or ISP didn't provide any setting information.
-
Click "Add" button after setup.
-
You can "Edit" or "Delete" (☐) the existing connection profile under the Actions column.
-
Click "Admin/ Commit/Reboot". Press "Commit" to save the settings into flash memory.
-
The new settings will take effect after reboot the system.
-
The following window display indicates the system restarting process.
-
The following screen display after the system rebooting process. The System Home page will show all the connection status and system information.
PPPoE Mode
PPPoE: When PPPoE Mode is selected from the Channel Mode drop down manual, the following screen display. Point-to-Point Protocol (PPP) is a method of establishing a network connection between network hosts. PPPoE, also known as RFC 2516, adapts PPP to work over Ethernet for ADSL connections. PPPoE provides a mechanism for authenticating users by providing User Name and Password fields and it is a connection type provided by many ISP or Telecom.
LLC and VC-Mux are two different methods of encapsulating the PPP packet. Contact your ISP to make sure which encapsulation is being supported.
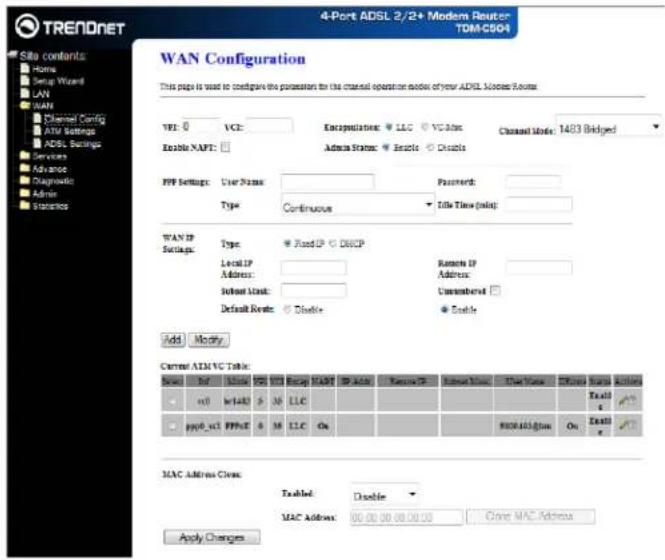
■ Channel:
☑ VPI: Virtual Path Identifier is a virtual path used for cell routing that is identified by an 8-bit field in the ATM cell header. The VPI field specifies this 8-bit identifier for routing.
☑ VCI: A Virtual Channel Identifier is a virtual channel that is identified by a unique numerical tag that is defined by a 16-bit field in the ATM cell header. The purpose of the virtual channel is to identify where the cell should travel. The VCI field specifies this 16-bit numerical tag that determines the destination.
☑ Encapsulation: There are 2 Encapsulation type:
◆ LLC
◆ VC-Mux
Note: LLC and VC-Mux are two different methods of encapsulating the PPP packet.
Contact your ISP to make sure which encapsulation is being supported.
☑ Channel Mode: Select "PPPoE" from the drop down manual.
☑ Enable NAPT: Select "Disable" or "Enable" the NAPT functionality. Default setting is "Enable".
■ PPP:
User Name: Manually enter your PPPoE User Name which will be provided by your ADSL service provider or ISP.
☑ Password: Manually enter your PPPoE Password which will be provided by your ADSL service provider or ISP.
☑ Type: Select your connection type from the drop down manual. This 4 Ports ADSL2/2+ Router provides 3 connection type:
◆ Continues (Default Setting)
◆ Connect on Demand
◆ Manual
■ WAN IP:
☑ Default Route: Click the radio button to "Enable" or "Disable" the default Route functionality. Default setting is Enable.
Configuration Procedure:
- From the WAN – Channel Config page, click and select PPPoE connection mode from the Channel Mode drop down manual. The default PPPoE connection setup is displayed.
- Select the Channel Mode to "PPPoE". Set the parameters VPI/VCI and Encapsulation mode according to the ISP setting.
- Click the radio button and select the Encapsulation type (LLC or VC-Mux).
Note: Your ADSL service provider or your ISP will supply these. In this case the ADSL service provider is using LLC.
- Check the radio button to "Enable" or "Disable" the NAPT setting. Leave as it's default setting if your ADSL provider or ISP didn't provide any setting information.
Note: NAPT: Network Address and Port Translation: An extension of NAT, NAPT maps many private internal addresses into one IP address. The outside network (WAN) can see this one IP address but it cannot see the individual device IP addresses translated by the NAPT.
-
Enter your Username and Password which will be provided by your ADSL provider or ISP.
-
Select the Connection Type form the drop down manual or leave as it's default setting (Continuous).
-
Click the radio button to "Enable" or "Disable" the Default Route functionality or leave as its default (Enable).
-
Click "Add" button after setup.
-
You can "Edit"() or "Delete" (☐) the existing connection profile under the Actions column.
-
Click "Admin/ Commit/Reboot". Press "Commit" to save the settings into flash memory.
-
The new settings will take effect after reboot the system.
-
The following window display indicates the system restarting process.
-
The following screen display after the system rebooting process. The System Home page will shows all the connection status and system information.
PPPoE Mode
PPPoA: When PPPoA mode is selected, the following screen will pop-up. PPPoA is also known as RFC 2364. It is a method of encapsulating PPP packets over ATM cells which are carried over the ADSL line. PPP or Point-to-Point protocol is a method of establishing a network connection/session between network hosts. It usually provides a mechanism of authenticating users.
LLC and VC-Mux are two different methods of encapsulating the PPP packet. Contact your ISP to make sure which encapsulation is being supported.
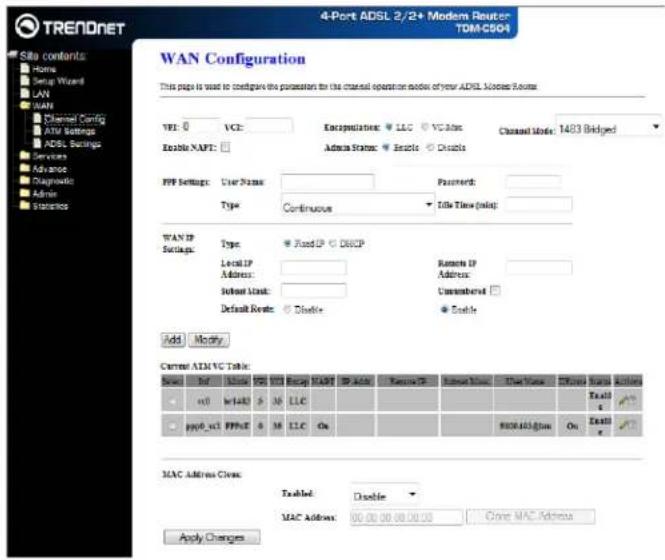
■ Channel:
☑ VPI: Virtual Path Identifier is a virtual path used for cell routing that is identified by an 8-bit field in the ATM cell header. The VPI field specifies this 8-bit identifier for routing.
☑ VCI: A Virtual Channel Identifier is a virtual channel that is identified by a unique numerical tag that is defined by a 16-bit field in the ATM cell header. The purpose of the virtual channel is to identify where the cell should travel. The VCI field specifies this 16-bit numerical tag that determines the destination.
☑ Encapsulation: There are 2 Encapsulation type:
◆ LLC
◆ VC-Mux
Note: LLC and VC-Mux are two different methods of encapsulating the PPP packet.
Contact your ISP to make sure which encapsulation is being supported.
☑ Channel Mode: Select "PPPoA" from the drop down manual.
☑ Enable NAPT: Select "Disable" or "Enable" the NAPT functionality. Default setting is "Enable".
■ PPP:
User Name: Manually enter your PPPoA User Name which will be provided by your ADSL service provider or ISP.
☑ Password: Manually enter your PPPoA Password which will be provided by your ADSL service provider or ISP.
☑ Connection Type: Select your connection type from the drop down manual. This 4 Ports ADSL2/2+ Router provides 3 connection type:
◆ Continues (Default Setting)
◆ Connect on Demand
◆ Manual
■ WAN IP:
☑ Default Route: Click the radio button to "Enable" or "Disable" the default Route functionality.
Configuration Procedure:
- From the WAN – Channel Config page, click and select PPPoA connection mode from the Channel Mode drop down manual. The default PPPoA connection setup is displayed.
- Select the Channel Mode to "PPPoA". Set the parameters VPI/VCI and Encapsulation mode according to the ISP setting.
- Click the radio button and select the Encapsulation type (LLC or VC-Mux).
Note: Your ADSL service provider or your ISP will supply these. In this case the ADSL service provider is using LLC.
- Check the radio button to "Enable" or "Disable" the NAPT setting. Leave as it's default setting if your ADSL provider or ISP didn't provide any setting information.
Note: NAPT: Network Address and Port Translation: An extension of NAT, NAPT maps many private internal addresses into one IP address. The outside network (WAN) can see this one IP address but it cannot see the individual device IP addresses translated by the NAPT.
- Enter your Username and Password which will be provided by your ADSL provider or ISP.
- Select the Connection Type form the drop down manual or leave as it's default setting (Continuous).
- Click the radio button to "Enable" or "Disable" the Default Route functionality or leave as its default (Enable).
- Click "Add" button after setup.
- You can "Edit"() or "Delete" (☐) the existing connection profile under the Actions column.
- Click "Admin/ Commit/Reboot". Press "Commit" to save the settings into flash memory.
- The new settings will take effect after reboot the system.
- The following window display indicates the system restarting process.
- The following screen display after the system rebooting process. The System Home page will shows all the connection status and system information.
1483 Routed Mode
1483 Routed: When 1483 Routed mode is selected, the following screen will pop-up. Fixed (Or Static) is used whenever a known Fixed (Or Static) IP is assigned. The accompanying information such as the Subnet mask, Local IP Address and the Remote IP Address should also be specified. Up to three Domain Name Server (DNS) addresses can also be specified (Click Services – DNS – DNS Server configuration page and fill in the DNS server IP address provided by your ISP). These servers would enable you to have access to other web servers. Valid IP addresses range is from 0.0.0.0 to 255.255.255.255.

■ Channel:
☑ VPI: Virtual Path Identifier is a virtual path used for cell routing that is identified by an 8-bit field in the ATM cell header. The VPI field specifies this 8-bit identifier for routing.
☑ VCI: A Virtual Channel Identifier is a virtual channel that is identified by a unique numerical tag that is defined by a 16-bit field in the ATM cell header. The purpose of the virtual channel is to identify where the cell should travel. The VCI field specifies this 16-bit numerical tag that determines the destination.
☑ Encapsulation: There are 2 Encapsulation type:
LLC
◆ VC-Mux
Note: LLC and VC-Mux are two different methods of encapsulating the PPP packet.
Contact your ISP to make sure which encapsulation is being supported.
☑ Channel Mode: Select "1483 Routed" from the drop down manual.
☑ Enable NAPT: Select "Disable" or "Enable" the NAPT functionality. Default setting is "Enable".
■ WAN IP:
☑ Type: Click the radio button to select "Fixed IP" mode.
Fixed IP: You need to fill in the "Local IP Address", "Subnet Mask" and "Remote IP Address" which will be provided by your ADSL Service provider or ISP. You need to go to Services – DNS – DNS Server configuration page to fill in your DNS setting.
☑ Default Route: Click the radio button to "Enable" or "Disable" the Default Route functionality.
Configuration Procedure:
- From the WAN – Channel Config page, click and select 1483 Routed connection mode from the Channel Mode drop down manual. The default 1483 Routed connection setup is displayed.
- Under the Channel mode, enter the values of VPI and VCI settings.
- Click the radio button and elect the Encapsulation type (LLC or VC-Mux).
Note: Your ADSL service provider or your ISP will supply these. In this case the ADSL service provider is using LLC.
- Check the radio button to "Enable" or "Disable" the NAPT setting. Leave as its default setting if your ADSL provider or ISP didn't provide any setting information.
Note: NAPT: Network Address and Port Translation: An extension of NAT, NAPT maps many private internal addresses into one IP address. The outside network (WAN) can see this one IP address but it cannot see the individual device IP addresses translated by the NAPT.
- Under the WAN IP mode, enter the "Local IP Address", "Subnet Mask", "Remote IP Address" and "DNS" setting if you are using the Fixed IP (Or Static IP) mode. These information/data will be provided by your ADSL Service provider or ISP.
- Check the radio button to "Enable" or "Disable" the Default Route setting. Leave as its default setting if your ADSL provider or ISP didn't provide any setting information.
- Click "Add" button after setup.
- You can "Edit" or "Delete" (☐) the existing connection profile under the Actions column.
- Click "Admin/ Commit/Reboot". Press "Commit" to save the settings into flash memory.
- The new settings will take effect after reboot the system.
- The following window display indicates the system restarting process.
- The following screen display after the system rebooting process. The System Home page will show all the connection status and system information.
ATM Settings
The page is for ATM PVC QoS parameters setting.

Fields in this page:
| Field Description | |
| VPI | Virtual Path Identifier. This is read-only field and is selected on the Select column in the Current ATM VC Table. |
| VCI | Virtual Channel Identifier. This is read-only field and is selected on the Select column in the Current ATM VC Table. The VCI, together with VPI, is used to identify the next destination of a cell as it passes through to the ATM switch. |
| QoS Quality of Server, a characteristic of data transmission that measures how accurately and how quickly a message or data is transferred from a source host to a destination host over a network. The four QoS options are: - UBR (Unspecified Bit Rate): When UBR is selected, the SCR and MBS fields are disabled. - CBR (Constant Bit Rate): When CBR is selected, the SCR and MBS fields are disabled. - nrt-VBR (non-real-time Variable Bit Rate): When nrt-VBR is selected, the SCR and MBS fields are enabled. - rt-VBR (real-time Variable Bit Rate): When rt-VBR is selected, the SCR and MBS fields are enabled. | |
| PCR Peak Cell Rate, measured in cells/sec., is the cell rate which the source may never exceed. | |
| CDVT Cell Delay Variation Time. The Cell Delay Variation is a term used in ATM (Asynchronous Transfer Mode) to describe the time difference that is acceptable between cells being presented at the receiving host. Available only when VBR QoS is chosen. | |
| SCR Sustained Cell Rate, measured in cells/sec., is the average cell rate over the duration of the connection. | |
| MBS | Maximum Burst Size, a traffic parameter that specifies the maximum number of cells that can be transmitted at the peak cell rate. |
Apply Changes
Set new PVC OoS mode for the selected PVC. New parameters will take effect after save into flash memory and reboot the system. See section "Admin" for save details.
Undo
Discard your settings.
ADSL Settings
The ADSL setting page allows you to select any combination of DSL training modes.
Fields in this page:
| Field Description | |
| ADSL modulation Choose preferred xdsl standard protocols. | |
| G.lite : G.992.2 Annex A | |
| G.dmt : G.992.1 Annex A | |
| T1.413 : T1.413 issue #2 | |
| ADSL2 : G.992.3 Annex A | |
| ADSL2+ : G.992.5 Annex A | |
| AnnexL Option | Enable/Disable ADSL2/ADSL2+ Annex L capability. |
| AnnexM Option | Enable/Disable ADSL2/ADSL2+ Annex M capability. |
| ADSL Capability | “Bitswap Enable” : Enable/Disable bitswap capability.“SRA Enable” : Enable/Disable SRA (seamless rate adaptation) capability. |

Tone Mask
Choose tones to be masked. Mased tones will not carry any data.
Apply Changes
Click to save the setting to the configuration and the modem will be retrained.
Service
You can view Service link in the left navigation bar. Following are the options available under Service:
DHCP Settings
DNS
Firewall
IGMP Proxy
UPnP
RIP
DHCP Settings
You can configure your network and DSL device to use the Dynamic Host Configuration Protocol (DHCP). This page provides DHCP instructions for implementing it on your network by selecting the role of DHCP protocol that this device wants to play. There are two different DHCP roles that this device can act as: DHCP Server and DHCP Relay. When acting as DHCP server, you can setup the server parameters at the DHCP Server page; while acting as DHCP Relay, you can setup the relay at the DHCP Relay page.

DHCP Server configuration
By default, the device is configured as a DHCP server, with a predefined IP address pool of 192.168.10.64 through 192.168.10.253 (subnet mask 255.255.255.0).
| Field Description | |
| IP Pool Range Specify the lowest and highest addresses in the pool. | |
| Max Lease Time The Lease Time is the amount of time that a network user is allowed to maintain a network connection to the device using the current dynamic IP address. At the end of the Lease Time, the lease is either renewed or a new IP is issued by the DHCP server. The amount of time is in units of seconds. The default value is 86400 | |
| seconds (1 day). The value -1 stands for the infinite lease. | |
| Domain Name A user-friendly name that refers to the group of hosts (subnet) that will be assigned addresses from this pool. | |
Apply Changes
Set new DHCP server configuration. New parameters will take effect after save into flash memory and reboot the system. See section "Admin" for save details.
Undo
Discard your changes.
DHCP Relay configuration
Some ISPs perform the DHCP server function for their customers' home/small office network. In this case, you can configure this device to act as a DHCP relay agent. When a host on your network requests Internet access, the device contacts your ISP to obtain the IP configuration, and then forward that information to the host. You should set the DHCP mode after you configure the DHCP relay.
DNS
There are two submenus for the DNS Configuration: [DNS Server] and [Dynamic DNS]. This page is used to select the way to obtain the IP addresses of the DNS servers.
| Field Description | |
| Attain DNS Automatically | Select this item if you want to use the DNS servers obtained by the WAN interface via the auto-configuration mechanism. |
| Set DNS Manually Select this item to configure up to three DNS IP addresses. | |

Apply Changes
Set new DNS relay configuration. New parameters will take effect after save into flash memory and reboot the system. See section "Admin" for save details.
Reset Selected
Discard your changes.
DDNS Server
Each time your device connects to the Internet, your ISP assigns a different IP address to your device. In order for you or other users to access your device from the WAN-side, you need to manually track the IP that is currently used. The Dynamic DNS feature allows you to register your device with a DNS server and access your device each time using the same host name. The Dynamic DNS page allows you to enable/disable the Dynamic DNS feature.
On the Dynamic DNS page, configure the following fields:
| Field Description | |
| Enable Check this item | to enable this registration account for the DNS server. |
| DDNS provider There | are two DDNS providers to be selected in order to register your device with: DynDNS and TZO. A charge may occur depends on the service you select. |
| Hostname Domain name | to be registered with the DDNS server. |
| Username User-name | assigned by the DDNS service provider. |
| Password Password assigned by the DDNS service provider. | |
| Email Email assigned by the DDNS service provider. | |
| Key Key assigned by the DDNS service provider. | |

Add
Click Add to add this registration into the configuration.
Modify
Click Modify to modify this registration into the configuration.
Remove
Select an existing DDNS registration by clicking the radio button at the Select column of the Dynamic DNS Table. Click Remove button to remove the selected registration from the configuration.
Firewall
Firewall contains several features that are used to deny or allow traffic from passing through the device.
IP/Port Filtering
The IP/Port filtering feature allows you to deny/allow specific services or applications in the forwarding path.
| Field Description | |
| Outgoing Default Action | Specify the default action on the LAN to WAN forwarding path. |
| Incoming Default Action | Specify the default action on the WAN to LAN forwarding path. |

Apply Changes
Click to save the setting of default actions to the configuration.
Fields on the second setting block:
| Field Description | |
| Rule Action Deny or allow traffic when matching this rule. | |
| Direction | Traffic forwarding direction. |
| Protocol There are 3 options available: TCP, UDP and ICMP. | |
| Source IP Address | The source IP address assigned to the traffic on which filtering is applied. |
| Subnet Mask Subnet-mask of the source IP. | |
| Port Starting and ending source port numbers. | |
| Destination IP Address | The destination IP address assigned to the traffic on which filtering is applied. |
| Subnet Mask Subnet-mask of the destination IP. | |
| Port Starting and ending destination port numbers. | |
Add
Click to add the rule entry to the configuration.
Function buttons for the Current Filter Table:
Delete Selected
Delete selected filtering rules from the filter table. You can click the checkbox at the Select column to select the filtering rule.
Delete All
Delete all filtering rules from the filter table.
MAC Filtering
The MAC filtering feature allows you to define rules to allow or deny frames through the device based on source MAC address, destination MAC address, and traffic direction.
| Field Description | |
| Outgoing Default Action | Specify the default action on the LAN to WAN bridging/forwarding path. |
| Incoming Default Action | Specify the default action on the WAN to LAN bridging/forwarding path. |
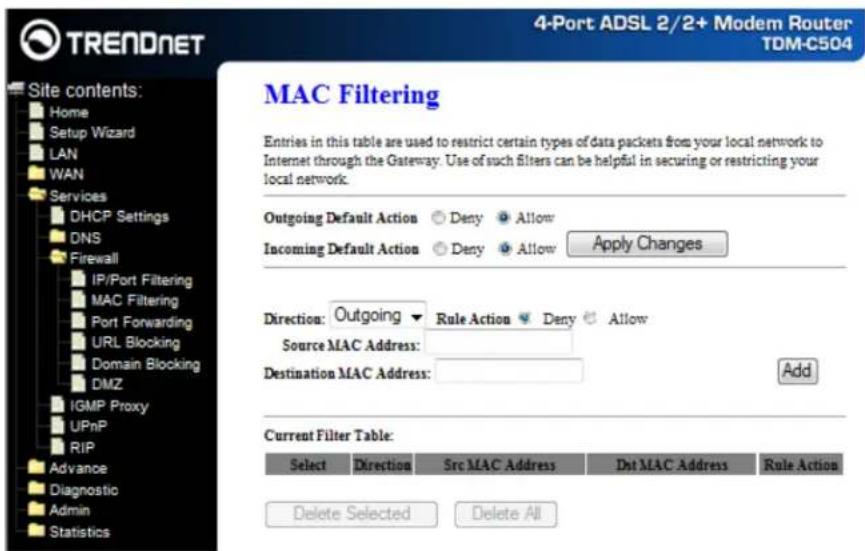
Apply Changes
Click to save the setting of default actions to the configuration.
Fields on the second setting block:
| Field Description | |
| Rule Action Deny or allow traffic when matching this rule. | |
| Direction Traffic bridging/forwarding direction. | |
| Source MAC Address The source MAC address. It must be xxxxxxxxxxxx format. Blanks can be used in the MAC address space and are considered as don't care. | |
| Destination MAC Address | The destination MAC address. It must be xxxxxxxxxxxx format. Blanks can be used in the MAC address space and are considered as don't care. |
Add
Click to add the rule entry to the configuration.
Function buttons for the Current Filter Table:
Delete Selected
Delete selected filtering rules from the filter table. You can click the checkbox at the Select column to select the filtering rule.
Delete All
Delete all filtering rules from the filter table.
Port Forwarding
Firewall keeps unwanted traffic from the Internet away from your LAN computers. Add a Port Forwarding entry will create a tunnel through your firewall so that the computers on the Internet can communicate to one of the computers on your LAN on a single port.

Fields in this page:
| Field Description | |
| Port Forwarding Enable | /Disable the port-forwarding feature. |
| Protocol There are 3 options available: TCP, UDP and Both. | |
| Comment Fill in the port forwarding name. | |
| Enable Check this item to enable this entry. | |
| Local IP Address IP address of your local server that will be accessed by Internet. | |
| Local Port | The destination port number that is made open for this application on the LAN-side. |
| Remote IP Address The source IP address from which the incoming traffic is allowed. Leave blank for all. | |
| Public Port The destination port number that is made open for this application on the WAN-side | |
| Interface Select the WAN interface on which the port-forwarding rule is to be applied. | |
Apply Changes
Click to save the enable/disable the port forwarding to the configuration.
Add
Click to add the rule entry to the configuration.
Function buttons for the Current Port Forwarding Table:
Delete Selected
Delete the selected port forwarding rules from the forwarding table. You can click the checkbox at the Select
column to select the forwarding rule.
Delete All
Delete all forwarding rules from the forwarding table.
URL Blocking
A URL is a web address that is normally typed into a web browser. For instance www.yahoo.com, www.msn.com are all URLs. URL Blocking allows you to block URLs based upon keywords that you enter into a box. Blocking URLs prevents people on your network from accessing these websites. These keywords may be full URL's or they may just be words.
FQDN (Fully Qualified Domain Name) means the complete domain name for a specific computer (host) on the Internet. It provides enough information so that it can be converted into a physical IP address. The FQDN consists of host name and domain name. For example, www.google.com is the FQDN on the Web for the publisher of this database. The WWW is the host. On the Web, there are millions of hosts named WWW in order to maintain uniformity. GOOGLE.COM is the domain name, with .COM being the top level domain (TLD) name.

| Field Description | |
| URL Blocking Enable/Disable the URL Blocking feature. | |
| FQDN The complete domain name for a specific computer (host) on the Internet. | |
| Keyword Enter the filtered keyword. | |
Apply Changes
Click to save the enable/disable the URL Blocking to the configuration.
Function buttons for the URL Blocking Table:
Add
Click to add the FQDN to the configuration.
Delete Selected
Delete the selected FQDN from the URL Blocking table. You can click the checkbox at the Select column to select the FQDN entry.
Delete All
Delete all FQDN entry from the URL Blocking table.
Function buttons for the Keyword Filtering Table:
Add
Click to add the keyword to the configuration.
Delete Selected
Delete the selected keyword from the Keyword Filtering table. You can click the checkbox at the Select column to select the keyword entry.
Delete All
Delete all keyword entry from the keyword filtering table.
DMZ
A DMZ (Demilitarized Zone) allows a single computer on your LAN to expose all of its ports to the Internet. Enter the IP address of that computer as a DMZ (Demilitarized Zone) host with unrestricted Internet access. When doing this, the DMZ host is no longer behind the firewall.

| Field Description | |
| DMZ Host Enable/Disable the DMZ feature. | |
| DMZ Host IP Address IP address of the local host. This feature sets a local host to be exposed to the Internet. | |
Apply Changes
Click to save the setting to the configuration.
IGMP Proxy
Multicasting is useful when the same data needs to be sent to more than one hosts. Using multicasting as opposed to sending the same data to the individual hosts uses less network bandwidth. The multicast feature also enables you to receive multicast video stream from multicast servers.
IP hosts use Internet Group Management Protocol (IGMP) to report their multicast group memberships to neighboring routers. Similarly, multicast routers use IGMP to discover which of their hosts belong to multicast groups. This device supports IGMP proxy that handles IGMP messages. When enabled, this device acts as a proxy for a LAN host making requests to join and leave multicast groups, or a multicast router sending multicast packets to multicast group on the WAN side.
When a host wishes to join a multicast group, it sends IGMP REPORT message to the device's IGMP downstream interface. The proxy sets up a multicast route for the interface and host requesting the video content. It then forwards the Join to the upstream multicast router. The multicast IP traffic will then be forwarded to the requesting host. On a leave, the proxy removes the route and then forwards the leave to the upstream multicast router.
The IGMP Proxy page allows you to enable multicast on WAN and LAN interfaces. The LAN interface is always served as downstream IGMP proxy, and you can configure one of the available WAN interfaces as the upstream IGMP proxy.
■ Upstream: The interface that IGMP requests from hosts is sent to the multicast router.
■ Downstream: The interface data from the multicast router are sent to hosts in the multicast group database.

| Field Description | |
| IGMP Proxy Enable/disable IGMP proxy feature | |
| Proxy Interface The upstream WAN interface is selected here. | |
Apply Changes
Click to save the setting to the configuration.
UPnP
The DSL router supports a control point for Universal Plug and Play (UPnP) version 1.0, and supports two key features: NAT Traversal and Device Identification. This feature requires one active WAN interface. In addition, the host should support this feature. In the presence of multiple WAN interfaces, select an interface on which the incoming traffic is present.
With NAT Traversal, when an UPnP command is received to open ports in NAT, the application translates the request into system commands to open the ports in NAT and the firewall. The interface to open the ports on is given to UPnP when it starts up and is part of the configuration of the application.
For Device Identification, the application will send a description of the DSL device as a control point back to the host making the request.

| Field Description | |
| UPnP Enable/disable | UPnP feature. |
| WAN Interface Select W | WAN interface that will use UPnP from the drop-down lists. |
Apply Changes
Click to save the setting to the system configuration.
RIP
RIP is an Internet protocol you can set up to share routing table information with other routing devices on your LAN, at your ISP's location, or on remote networks connected to your network via the ADSL line.
Most small home or office networks do not need to use RIP; they have only one router, such as the ADSL Router, and one path to an ISP. In these cases, there is no need to share routes, because all Internet data from the network is sent to the same ISP gateway.
You may want to configure RIP if any of the following circumstances apply to your network:
- Your home network setup includes an additional router or RIP-enabled PC (other than the ADSL Router). The ADSL Router and the router will need to communicate via RIP to share their routing tables.
- Your network connects via the ADSL line to a remote network, such as a corporate network. In order for your LAN to learn the routes used within your corporate network, they should both be configured with RIP.
- Your ISP requests that you run RIP for communication with devices on their network..

| Field Description | |||
| RIP | Enable/disable | RIP | feature. |
Apply Changes
Click to save the setting of this setting block to the system configuration
Fields on the second setting block:
| Field Description | |
| Interface The name of the interface on which you want to enable RIP. | |
| Receive Mode | Indicate the RIP version in which information must be passed to the DSL device in order for it to be accepted into its routing table. |
| Send Mode | Indicate the RIP version this interface will use when it sends its route information to other devices. |
Add
Add a RIP entry and the new RIP entry will be display in the table
Delete Selected
Delete the selected RIP entry. You can click the checkbox at the Select column to select the RIP entry.
Delete All
Delete all RIP entry from the RIP Config table.
Advance
You can view Advance link in the left navigation bar. Following are the options available under Advance:
■ ARP table
Bridging
Routing
SNMP
■ Port Mapping
IP QoS
■ Remote Access
Others
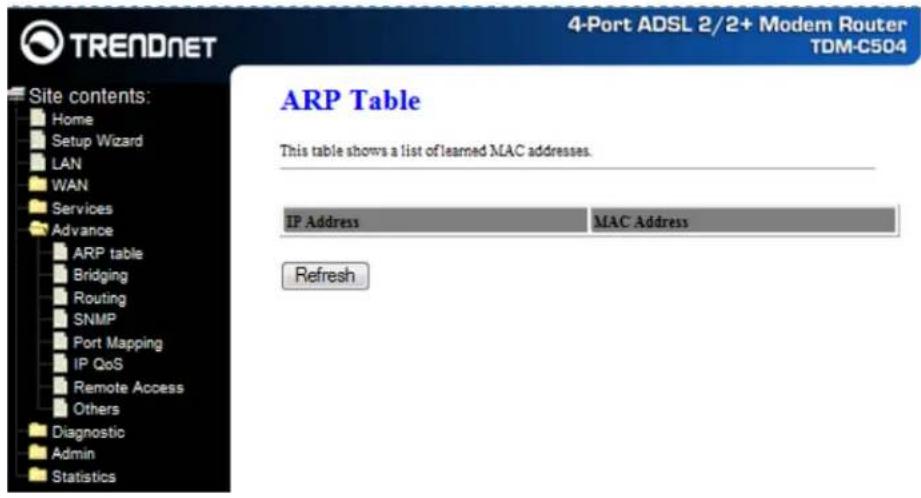
ARP table
ARP table shows a list of learned MAC address.
Bridging
You can enable/disable Spanning Tree Protocol and set MAC address aging time in this page.

| Field Description | |
| Ageing Time Set the Ethernet address ageing time, in seconds. After [Ageing Time] seconds of not having seen a frame coming from a certain address, the bridge will time out (delete) that address from Forwarding DataBase (fdb). | |
| 802.1d Spanning Tree Enable/disable the spanning tree protocol | |
Apply Changes
Save this bridge configuration. New configuration will take effect after saving into flash memory and rebooting the system. See section "Admin" for details.
Show MACs
List MAC address in forwarding table.
Routing
The Routing page enables you to define specific route for your Internet and network data.
Most users do not need to define routes. On a typical small home or office LAN, the existing routes that set up the default gateways for your LAN hosts and for the DSL device provide the most appropriate path for all your Internet traffic.
- On your LAN hosts, a default gateway directs all Internet traffic to the LAN port(s) on the DSL device. Your LAN hosts know their default gateway either because you assigned it to them when you modified your TCP/IP properties, or because you configured them to receive the information dynamically from a server whenever they access the Internet.
- On the DSL device itself, a default gateway is defined to direct all outbound Internet traffic to a route at your ISP. The default gateway is assigned either automatically by your ISP whenever the device negotiates an Internet access, or manually by user to setup through the configuration.
You may need to define routes if your home setup includes two or more networks or subnets, if you connect to two or more ISP services, or if you connect to a remote corporate LAN.

| Field Description | |
| Enable Check to enable | the selected route or route to be added. |
| Destination | The network IP address of the subnet. The destination can be specified as the IP address of a subnet or a specific host in the subnet. It can also be specified as all zeros to indicate that this route should be used for all destinations for which no other route is defined (this is the route that creates the default gateway). |
| Subnet Mask The network mask of the destination subnet. The default gateway uses a mask of 0.0.0.0. | |
| Next Hop | The IP address of the next hop through which traffic will flow towards the destination subnet. |
| Metric Defines the number of hops between network nodes that data packets travel. The default value is 0, which means that the subnet is directly one hop away on the local LAN network. | |
| Interface The WAN interface to which a static routing subnet is to be applied. | |
Add Route
Add a user-defined destination route.
Update
Update the selected destination route on the Static Route Table.
Delete Selected
Delete a selected destination route on the Static Route Table.
Show Routes
Click this button to view the DSL device's routing table.
SNMP Simple Network Management Protocol (SNMP) is a troubleshooting and management protocol that uses the UDP protocol on port 161 to communicate between clients and servers. The DSL device can be managed locally or remotely by SNMP protocol.

| Field Description | |||
| SNMP | Enable/disable | SNMP | Feature. |
| System Description System description of the DSL device. | |||
| System Contact Contact person and/or contact information for the DSL device. | |||
| System Name An administratively assigned name for the DSL device. | |||
| System Location The physical location of the DSL device. | |||
| System Object ID | Vendor object identifier. The vendor's authoritative identification of the network management subsystem contained in the entity. | ||
| Trap IP Address Destination IP address of the SNMP trap. | |||
| Community name (read-only) | Name of the read-only community. This read-only community allows read operation to all objects in the MIB. | ||
| Community name (write-only) | Name of the write-only community. This write-only community allows write operation to the objects defines as read-writable in the MIB. | ||
Apply Changes
Save SNMP configuration. New configuration will take effect after saving into flash memory and rebooting the system. See section "Admin" for details.
Port Mapping
The DSL device provides multiple interface groups. Up to five interface groups are supported including one default group. The LAN and WAN interfaces could be included. Traffic coming from one interface of a group can only be flowed to the interfaces in the same interface group. Thus, the DSL device can isolate traffic from group to group for some application. By default, all the interfaces (LAN and WAN) belong to the default group, and the other four groups are all empty. It is possible to assign any interface to any group but only one group.

| Field Description | |
| Enabled/Disabled Radio | buttons to enable/disable the interface group feature. If disabled, all interfaces belong to the default group. |
| “Interface groups To manipulate a mapping group:1. Select a group from the table.2. Select interfaces from the available/grouped interface list and add it to the grouped/available interface list using the arrow buttons to manipulate the required mapping of the ports.3. Click “Apply Changes” button to save the changes. | |
Apply Changes
Save configuration to system. New configuration will take effect after saving into flash memory and rebooting the system. See section "Admin" for details.
IP QoS
The DSL device provides a control mechanism that can provide different priority to different users or data flows. The QoS is enforced by the QoS rules in the QoS table. QoS rule contains two configuration blocks: Traffic Classification and Action. The Traffic Classification enables you to classify packets on the basis of various fields in the packet and perhaps the physical ingress port. The Action enables you to assign the strictly priority level for and mark some fields in the packet that matches the Traffic Classification rule. You can configure any or all field as needed in these two QoS blocks for a QoS rule.
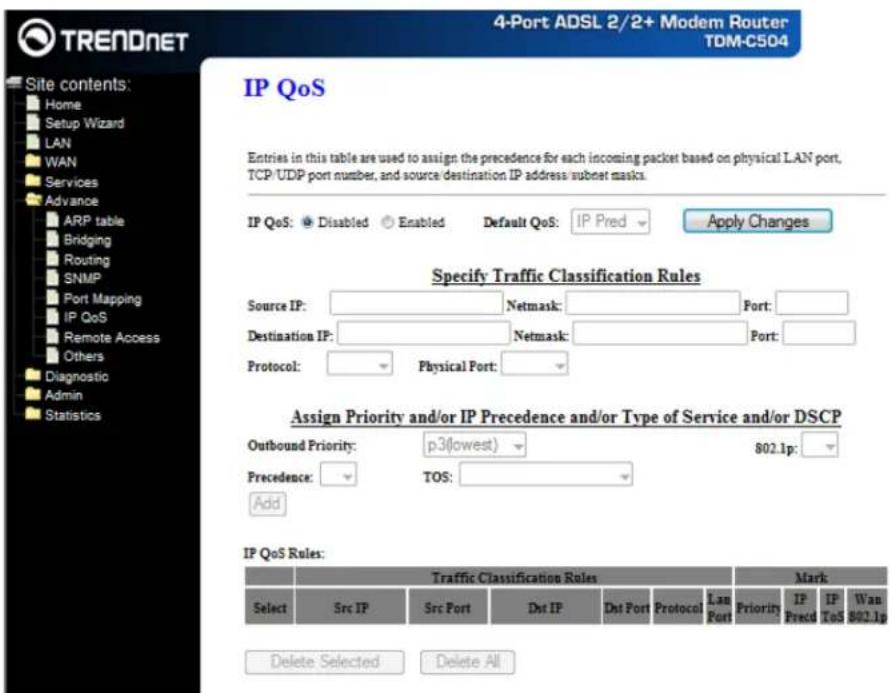
| Field Description | |
| IP QoS Enable/disable | the IP QoS function. |
| Source IP The IP address | ss of the traffic source. |
| Source Netmask The source | source IP netmask. This field is required if the source IP has been entered. |
| Source Port | The source port of the selected protocol. You cannot configure this field without entering the protocol first. |
| Destination IP The IP address | address of the traffic destination. |
| Destination Netmask The destination | destination IP netmask. This field is required if the destination IP has been entered. |
| Destination Port | The destination port of the selected protocol. You cannot configure this field without entering the protocol first. |
| Protocol | The selections are TCP, UDP, ICMP and the blank for none. This field is required if the source port or destination port has been entered. |
| Physical Port The incoming ports. The selections include LAN ports and the blank for not applicable. | |
Apply Changes
Click to save the setting of default actions to the configuration.
Function buttons for this second setting block:
Fields on the second setting block of this page:
| Field Description | |
| Outbound Priority The priority level for the traffic that matches this classification rule. The possible selections are (in the descending priority): p0, p1, p2, p3. | |
| Precedence Select this field to mark the IP precedence bits in the packet that match this classification rule. | |
| TOS Select this field to mark the IP TOS bits in the packet that match this classification rule. | |
| 802.1p Select this field to mark the 3-bit user-priority field in the 802.1p header of the packet that match this classification rule. Note that this 802.1p marking is workable on a given PVC channel only if the VLAN tag is enabled in this PVC channel. |
Add
Click to add the rule entry to the configuration.
Function buttons for the IP QoS Rules Table:
Delete Selected
Delete selected IP QoS rules from the table. You can click the checkbox at the Select column to select the IP QoS rule.
Delete All
Delete all IP QoS rules from the IP QoS Rules table.
Remote Access
The Remote Access function can secure remote host access to your DSL device from LAN and WLAN interfaces for some services provided by the DSL device.

Fields in this page:
| Field Description | |
| LAN | Check/un-check the services on the LAN column to allow/un-allow the services access from LAN side; and “WAN”: |
| WAN | Check/un-check the services on the WAN column to allow/un-allow the services access from WAN side. |
| WAN Port This field allows the user to specify the port of the corresponding service. Take the HTTP service for example; when it is changed to 8080, the HTTP server address for the WAN side is http://dsl_addr:8080, where the DSL_addr is the WAN side IP address of the DSL device. | |
Function buttons in this page:
Apply Changes
Save configuration to system.
Others
IP Pass Through: Although the Router mode is capable of terminating the PPP in the modem and hence does not require PPPoE client software on the host PC, there are some disadvantages to Router mode when only single-user support is required. For instance, Router mode uses NAT which requires ALG support. IP Pass Through also terminates the PPP in the modem and does not require a PPPoE client on the PC. However, IP Pass Through does not use NAT and is not limited by ALGs. IP Pass Through will work with Ethernet interface to the PC.
When IP Pass Through is enabled, only one PC is able to access the Internet, and the DHCP server will duplicate the WAN IP address from the ISP to the local client PC. Only the PC with the WAN IP address can access the Internet.

Fields in this page:
| Field Description | |
| IP PassThrough | Select the WAN connection profile from the drop down manual on which the rule will take effect. |
| Lease Time | The Lease time is the amount of time a network user will be allowed to connect with DHCP server. |
| Allow LAN Access | Click to enable LAN Access. |
Function buttons in this page:
Apply Changes
Save configuration to system.
Diagnostic
The Diagnostics page allows you to run a series of diagnostic tests of your system software and hardware connections.
You can view Diagnostic link in the left navigation bar. Following are the options available under Diagnostic:
Ping
■ ATM Loopback
ADSL
■ Diagnostic Test
Ping
Once you have your DSL device configured, it is a good idea to make sure you can ping the network. A ping command sends a message to the host you specify. If the host receives the message, it sends messages in reply. To use it, you must know the IP address of the host you are trying to communicate with and enter the IP address in the Host Address field. Click Go! To start the ping command, the ping result will then be shown in this page.

Fields in this page:
| Field Description | |
| Host Address The IP address you want to ping. | |
ATM Loopback
In order to isolate the ATM interface problems, you can use ATM OAM loopback cells to verify connectivity between VP/VC endpoints, as well as segment endpoints within the VP/VC. ATM uses F4 and F5 cell flows as follows:
- F4: used in VPs
- F5: used in VCs
An ATM connection consists of a group of points. This OAM implementation provides management for the following points:
- Connection endpoint: the end of a VP/VC connection where the ATM cell are terminated
– Segment endpoint: the end of a connection segment
This page allows you to use ATM ping, which generates F5 segment and end-to-end loop-back cells to test the reach ability of a segment endpoint or a connection endpoint.

Fields in this page:
| Field Description | |
| Select PVC Select the PVC channel you want to do the loop-back diagnostic. | |
| Flow Type The ATM OAM flow type. The selection can be F5 Segment or F5 End-to-End. | |
| Loopback Location ID T | The loop-back location ID field of the loop-back cell. The default value is all 1s (ones) to indicate the endpoint of the segment or connection. |
ADSL
This page shows the ADSL diagnostic result. Click Start button to start the ADSL diagnostic.

Diagnostic Test
The Diagnostic Test page shows the test results for the connectivity of the physical layer and protocol layer for both LAN and WAN sides.

Fields in this page:
| Field Description | |
| Select the Internet Connection | The available WAN side interfaces are listed. You have to select one for the WAN side diagnostic. |
Admin
Commit/Reboot
Whenever you use the Web configuration to change system settings, the changes are initially placed in temporary storage. These changes will be lost if the device is reset or turn off. To save your change for future use, you can use the commit function.
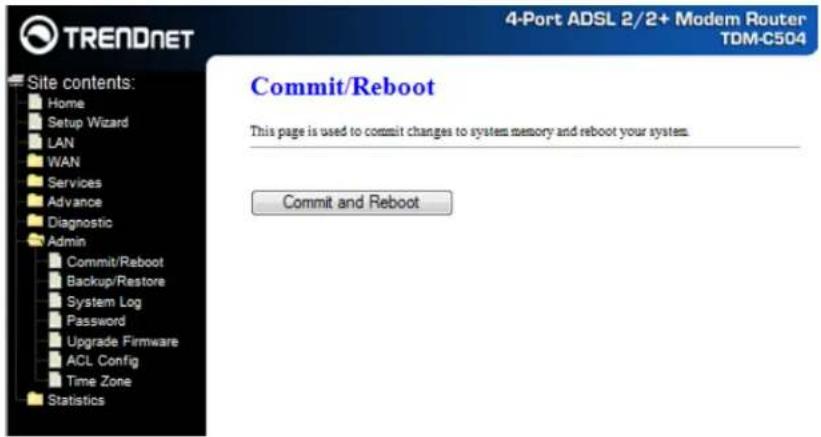
Function buttons in this page:
Commit and Reboot
Whenever you use the web console to change system settings, the changes are initially placed in temporary storage. To save your changes for future use, you can use the Commit/Reboot function. This function saves your changes from RAM to flash memory and reboot the system.
IMPORTANT! Do not turn off your modem or press the Reset button while this procedure is in progress.
Backup/Restore
This page allows you to backup and restore your configuration into and from file in your host.

System log
This page shows the system log.
![TRENDNET 4-Port ADSL 2/2+ Modem Router TDM-C504 Site contents: Home Setup Wizard LAN WAN Services Advance Diagnostic Admin Commit/Robot Backup/Restore System Log Password Upgrade Firmware ACL Config Time Zone Statistics System Log System Log Disable Enable Apply Changes Save Log to File: Save... Clear Log: Reset <14> Jan 1 00:00:31 1970 syslog: spppd: pppD: Secondary INNS 64.105.192.2? <14> Jan 1 00:00:31 1970 dmssarg[47]: swimming /wax/wxsvv.comf <8> Jan 1 00:00:32 1970 *wying: ddmC: pppD Start updateadd - provider is dyndns <10> Jan 1 00:00:32 1970 syslog: updated: update to DDWS server dyndns <8> Jan 1 00:00:33 1970 boa[121]: DSI Link up <80> Jan 1 00:01:04 1970 boa[123]: Authentication successful for admin from 192.168.10.2 <80> Jan 1 00:24:38 1970 boa[123]: Authentication successful for admin from 85.44.129.2 <14> Jan 1 01:58:04 1970 udscpd: 192.168.10.2 belongs to someone, reserving it for 3600 seconds <14> Jan 1 01:58:05 1970 udscpd: sending OTTER of 192.168.10.2 <14> Jan 1 01:58:05 1970 udscpd: sending ACK to 192.168.10.2 Refresh](/content/2026/05/1070529/images/998f8ffe36f2a9a7ffdad7bacc2a505270f47078da60bf4c29fd1fc83ffac058.jpg)
Password
The first time you log into the system, you use the default password. There are two-level logins: admin and user. The admin and user password configuration allows you to change the password for administrator and user.

Fields in this page:
| Field Description | |
| User Name Selection of old Password Enter the new password here. | user levels are: admin and user. |
| Old Password Enter the old password for this selected login. | |
| New Password Enter the new password here. | |
| Confirmed Password Enter the new password here again to confirm. |
Function buttons in this page:
Apply Changes
Save configuration to system
Upgrade Firmware
To upgrade the firmware for the DSL device:
- Click the Browse button to select the firmware file.
- Confirm your selection.
- Click the Upload button to start upgrading.
IMPORTANT! Do not turn off your DSL device or press the Reset button while this procedure is in progress.

ACL
The Access Control List (ACL) is a list of permissions attached to the DSL device. The list specifies who is allowed to access this device. If ACL is enabled, all hosts cannot access this device except for the hosts with IP address in the ACL table.
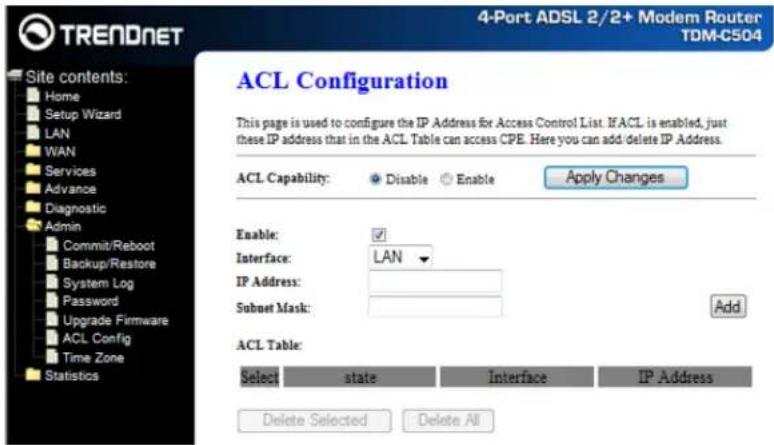
Fields in this page:
| Field Description | |
| ACL Capability Enable/disable the ACL function | |
| Enable Check to enable this ACL entry | |
| Interface Select the interface domain: LAN or WAN | |
| IP Address Enter the IP address that allows access to this device. | |
Time Zone
Simple Network Timing Protocol (SNTP) is a protocol used to synchronize the system time to the public SNTP servers. The DSL device supports SNTP client functionality in compliance with IETF RFC2030. SNTP client functioning in daemon mode which issues sending client requests to the configured SNTP server addresses periodically can configure the system clock in the DSL device

Fields in this page:
| Field Description | |
| Current Time The current time of the specified time zone. You can set the current time by yourself or configured by SNTP. | |
| Time Zone Select The time zone in which the DSL device resides. | |
| Enable SNTP client update | Enable the SNTP client to update the system clock. |
| SNTP server | The IP address or the host name of the SNTP server. You can select from the list or set it manually. |
Function buttons in this page:
Apply Changes
Click to save the setting to the configuration.
Statistics
The DSL device shows the different layer of network statistics information.
You can view statistics on the processing of IP packets on the networking interfaces. You will not typically need to view this data, but you may find it helpful when working with your ISP to diagnose network and Internet data transmission problems.
Interface
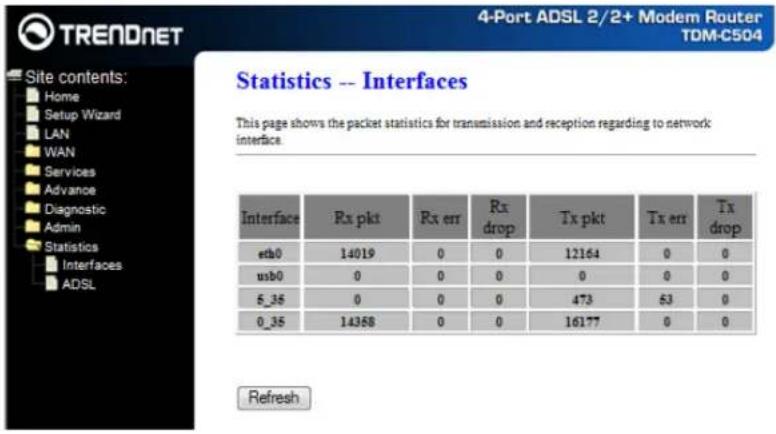
To display updated statistics showing any new data since you opened this page, click Refresh.
ADSL
This page shows the ADSL line statistic information.

Appendix A
Router Terms
What is a firewall?
A firewall is a device that protects one network from another, while allowing communication between the two. A firewall incorporates the functions of the NAT router, while adding features for dealing with a hacker intrusion or attack. Several known types of intrusion or attack can be recognized when they occur. When an incident is detected, the firewall can log details of the attempt, and can optionally send email to an administrator notifying them of the incident. Using information from the log, the administrator can take action with the ISP of the hacker. In some types of intrusions, the firewall can fend off the hacker by discarding all further packets from the hacker's IP address for a period of time.
What is NAT?
NAT stands for Network Address Translation. Another name for it is Connection Sharing. What does this mean? Your ISP provides you with a single network address for you to access the Internet through. However, you may have several machines on your local network that want to access the Internet at the same time. The router provides NAT functionality that converts your local network addresses to the single network address provided by your ISP. It keeps track of all these connections and makes sure that the correct information gets to the correct local machine.
Occasionally, there are certain programs that don't work well through NAT. Some games, and some specialty applications have a bit of trouble. The router contains special functionality to handle the vast majority of these troublesome programs and games. NAT does cause problems when you want to run a SERVER though. When running a server, please see the DMZ section below.
What is a DMZ?
DMZ really stands for Demilitarized Zone. It is a way of separating out part of your local network so that is more open to the Internet. Suppose that you want to run a web-server, or a game server. Normal servers like these are blocked from working by the NAT functionality. The solution is to "isolate" the single local computer into a DMZ. This makes the single computer look like it is directly on the Internet, and others can access this machine.
Your machine isn't really directly connected to the Internet, and it really has an internal local network address. When you provide the servers network address to others, you must provide the address of the router. The router "fakes" the connection to your machine.
You should use the DMZ when you want to run a server that others will access from the Internet. Internal programs and servers (like print servers, etc) should NOT be connected to the DMZ
What is a Gateway?
The Internet is so large that a single network cannot handle all of the traffic and still deliver a reasonable level of service. To overcome this limitation, the network is broken down into smaller segments or subnets that can deliver good performance for the stations attached to that segment. This segmentation solves the problem of supporting a large number of stations, but introduces the problem of getting traffic from one subnet to another.
To accomplish this, devices called routers or gateways are placed between segments. If a machine wishes to
contact another device on the same segment, it transmits to that station directly using a simple discovery technique. If the target station does not exist on the same segment as the source station, then the source actually has no idea how to get to the target.
One of the configuration parameters transmitted to each network device is its default gateway. This address is configured by the network administrators and it informs each personal computer or other network device where to send data if the target station does not reside on the same subnet as the source. If your machine can reach all stations on the same subnet (usually a building or a sector within a building), but cannot communicate outside of this area, it is usually because of an incorrectly configured default gateway.
Frequently Asked Questions
The Frequently Asked Questions addresses common questions regarding TDM-C504 ADSL2/2+ Modem Router settings.
Some of these questions are also found throughout the guide, in the sections to which they reference.
1. How do I determine if a link between the Ethernet card (NIC) and the TDM-C504 ADSL2/2+ Modem Router has been established?
Ans. A ping test would determine if a connection is established between your TDM-C504 ADSL2/2+ Modem Router and computer. Using, the ping command, ping the IP address of the TDM-C504 ADSL2/2+ Modem Router, in this case, 192.168.1.1 (default). For more information on Ping Testing, refer to Appendix C: Troubleshooting Guide. Alternatively, if the Ethernet LINK LED is solidly on, then the Ethernet link is established.
2. How do I determine if a link between the TDM-C504 ADSL2/2+ Modem Router and the Internet has been established?
Ans. Similar to the previous question, a ping test would determine whether or not a connection is established. However, this time use a URL instead of and IP Address, such as www.google.com. Alternatively, if the ADSL LED is solidly on, then the ADSL link is established.
3. I can't get the Internet game, server, or application to work properly.
Ans. If you are having difficulties getting any Internet game, server, or application to function properly, consider exposing one computer to the Internet using DeMilitarized Zone (DMZ) setting. Refer to Service–Firewall–DMZ section for the setting detail.
4. I need to upgrade the firmware.
Ans. In order to upgrade the firmware with the latest features, check with your local dealer or ISP for technical support.
5. I forgot my password.
Ans. Reset the TDM-C504 ADSL2/2+ Modem Router to factory default by pressing the Reset button for more than 5 seconds and then releasing it.
6. What is MAC Address?
Ans. Short for Media Access Control Address. It is a hardware address that uniquely identifies each node of a Ethernet networking device. This address is usually permanent.
7. What is NAT (Network Address Translation) and what is it used for?
Ans. NAT translates multiple IP Address on the private LAN to one public IP Address (in WAN) that is sent out to the Internet. NAT adds a level security since the IP address of a PC connected to the private LAN is never transmitted on the Internet.
- What can I do when I am not able to get the web configuration screen for this TDM-C504 ADSL2/2+ Modem Router?
Ans. Remove the proxy settings on your Internet Browsers or remove the dial-up settings on your browser.
- What is DMZ (DeMilitarized zone)?
Ans.DMZ allows one IP Address (computer) to be exposed to the Internet. Some applications require multiple TCP/IP ports to be open. It is recommended that you set your computer with a static IP if you want to use DMZ features.
- What is the maximum IP addresses supported by this TDM-C504 ADSL2/2+ Modem Router?
Ans. The TDM-C504 ADSL2/2+ Modem Router can support up to 253 IP addresses.
Troubleshooting Guide
The Troubleshooting Guide provides answers to common problems regarding the TDM-C504 ADSL2/2+ Modem Router settings, connections, and computer settings.
1. The TDM-C504 ADSL2/2+ Modem Router does not work (None of the LEDs light up)
Ans. Check the following:
- Make sure that the TDM-C504 ADSL2/2+ Modem Router is plugged into a power socket.
- Make sure that you are using the correct power supply for your TDM-C504 ADSL2/2+ Modem Router device.
- Make sure the power switch on the TDM-C504 ADSL2/2+ Modem Router is turned on.
2. I changed the LAN IP Address in the LAN configuration page and my PC is no longer able to detect the TDM-C504 ADSL2/2+ Modem Router.
Ans. After changing the LAN IP Address of the TDM-C504 ADSL2/2+ Modem Router, proceed to the following step before a PC is able to recognize the TDM-C504 ADSL2/2+ Modem Router:
- Click "Start" → "Run".
- In the open field, enter "cmd" then click "OK".
- In the command prompt, type "ipconfig/release" then press "Enter".
- Type "ipconfig/renew" then press "Enter".
3. LAN (Link/Act) LED does not light up.
Ans. Check the following:
- Make sure that the LAN cables are securely connected to the 10/100Base-T port.
- Make sure that you are using the correct cable type for your Ethernet equipment.
- Make sure the computer's Ethernet port is configured for auto-negotiation.
4. Failed to configure the TDM-C504 ADSL2/2+ Modem Router through web browser (By a client PC in LAN)
Ans. Check the following:
- Check the hardware connection of the TDM-C504 ADSL2/2+ Modem Router's LAN port. The LED will lit when a proper connection is made.
-
Check your Windows TCP/IP setting (Refer to Chapter 3 for setting details).
-
Open the Windows System Command Prompt:
■ For Windows 9x/ME: Manually enter winipcfg, then press Enter.
■ For Windows 2000/XP/Vista/Windows 7: Manually enter ipconfig/all, then press Enter.
- You should have the following information listed on your Window System:
■ IP Address: 192.168.1.x
■ Subnet mask: 255.255.255.0
■ Default Gateway IP: 192.168.1.1
5. I forgot or lost my Administrator Password.
Ans. Reset the TDM-C504 ADSL2/2+ Modem Router to factory default by pressing the "Reset" button for more than 5 seconds.
6. I need to upgrade the Firmware.
Ans. In order to upgrade the Firmware with the latest features, check your local dealer or ISP for technical support. Before proceed the upgrading process, check the following details: 1. Download the latest Firmware and save at your pointed location.
- Read the firmware release note carefully before proceed the upgrading process.
- Refer to Admin – Upgrade Firmware section for the upgrading process.
7. Testing LAN path to your TDM-C504 ADSL2/2+ Modem Router.
Ans. To verify whether the LAN path from your PC to your TDM-C504 ADSL2/2+ Modem Router is properly connected, you can “Ping” the TDM-C504 ADSL2/2+ Modem Router with the following procedures:
- From the Windows toolbar, click "Start" and select "Run".
- In the open field, type "Ping 192.168.1.1" and click "OK"
- If the path is working, you should see the message in the following format:
Reply from 192.168.1.1 bytes = 32 time < 10ms TTL = 60
- If the path is not working, you should see the following message:
Request timed out
If the path is not functioning correctly:
- Make sure the LAN port LED indicator is on.
- Check whether you are using the correct LAN cable.
-
Check your Ethernet Adaptor installation and configurations.
-
Verify that the IP address for your TDM-C504 ADSL2/2+ Modem Router and your workstation are correct and that the addresses are on the same subnet.
UPnP Setting on Windows XP (Optional)
Adding UPnP:
If you are running Microsoft Windows XP, it is recommended to add the UPnP component to your system.
Proceed as follows:
- Click "Start" → "Settings" then "Control Panel". The "Control Panel" window appears. Click "Add or Remove Programs".

- The "Add or Remove Programs" window appears. Click "Add/Remove Windows Components".

- The "Windows Components Wizard" appears. Select "Networking Services" in the Components list and click "Details".
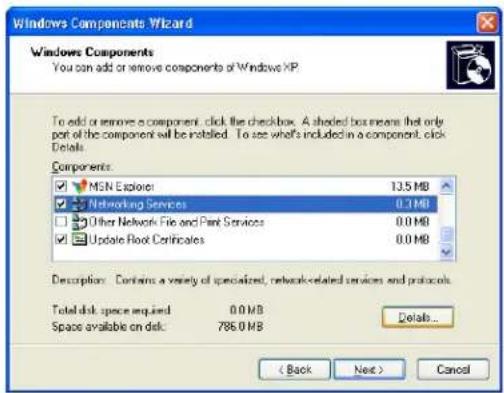
- The "Networking Services" window appears. Select "Universal Plug and Play" and click "OK".
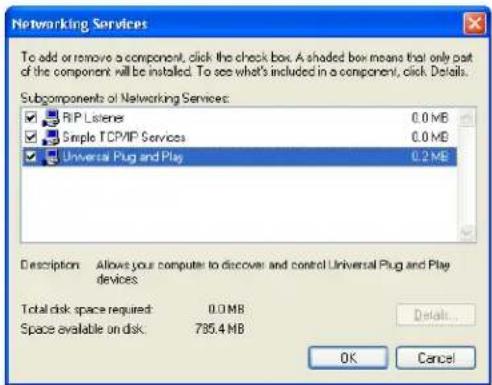
- Click "Next" to start the installation and follow the instructions in the Windows Components Wizard.
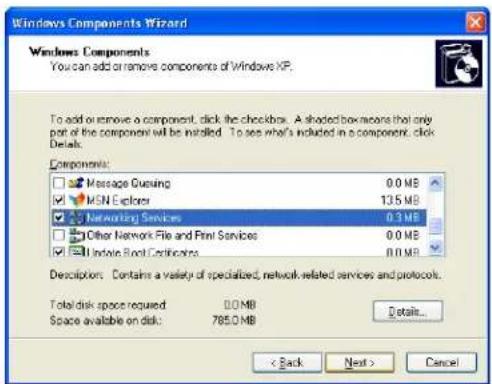
Note :System may ask for original Windows XP CD-ROM. Insert the CD-ROM and direct Windows to the proper location of the CD-ROM.
Restart your Windows system to activate your setting might be necessary. Click "OK" to restart your Windows system.
- A "Completing the Windows Components Wizard" will appear indicating the installation was successful. Click "Finish" to quit.

Glossary
The Glossary provides an explanation of terms and acronyms discussed in this user guide.
10BASE-T: IEEE 802.3 specification for 10 Mbps Ethernet over twisted pair wiring.
100BASE-Tx: IEEE 802.3 specification for 100 Mbps Ethernet over twisted pair wiring.
ATM: Asynchronous Transfer Mode: A method of transfer in which data is organized into 53-byte cell units. ATM cells are processed asynchronously in relation to other cells.
BC: Broadcast: Communication in which a sender transmits to everyone in the network.
BER: Bit Error Rate: Percentage of Bits that contain errors relative to the total number of bits transmitted.
Bridge: A device that connects two networks and decides which network the data should go to.
Bridge Mode: Bridge Mode is used when there is one PC connected to the LAN-side Ethernet or USB port.
IEEE 802.1D method of transport bridging is used to bridge between the WAN (ADSL) side and the LAN (Ethernet or USB) side, i.e., to store and forward.
CBR: Constant Bit Rate: A constant transfer rate that is ideal for streaming (executing while still downloading) data, such as audio or video files.
Cell: A unit of transmission in ATM, consisting of a fixed-size frame containing a 5-octet header and a 48-octet payload.
CHAP: Challenge Handshake Authentication Protocol: Typically more secure than PAP, CHAP uses username and password in combination with a randomly generated challenge string which has to be authenticated using a one-way hashing function.
CLP: Cell Loss Priority: ATM cells have two levels of priority, CLP0 and CLP1. CLP0 is of higher priority, and in times of high traffic congestion, CLP1 error cells may be discarded to preserve the Cell Loss Ratio of the CLP0 cells.
CO: Central Office: In a local loop, a Central Office is where home and office phone lines come together and go through switching equipment to connect them to other Central Offices. The distance from the Central Office determines whether or not an ADSL signal can be supported in a given line.
CPE: Customer Premises Equipment. This specifies equipment on the customer, or LAN, side.
CRC: Cyclic Redundancy Checking: A method for checking errors in a data transmission between two computers. CRC applies a polynomial function (16 or 32-bit) to a block of data. The result of that polynomial is appended to the data transmission. Upon receipt, the destination computer applies the same polynomial to the block of data. If the host and destination computer share the same result, the transmission was successful. Otherwise, the sender is notified to re-send the data block.
DHCP: Dynamic Host Configuration Protocol: A communications protocol that allows network administrators to manage and assign IP addresses to computers within the network. DHCP provides a unique address to a computer in the network which enables it to connect to the Internet through Internet Protocol (IP). DHCP can lease and IP address or provide a permanent static address to those computers who need it (servers, etc.).
DMZ: Demilitarized Zone: A computer Host or network that acts as a neutral zone between a private network and a public network. A DMZ prevents users outside of the private network from getting direct access to a server or any computer within the private network. The outside user sends requests to the DMZ, and the DMZ initiates sessions in the public network based on these requests. A DMZ cannot initiate a session in the
private network, it can only forward packets to the private network as they are requested.
DNS: Domain Name System: A method to locate and translate Domain Names into Internet Protocol (IP) addresses, where a Domain Name is a simple and meaningful name for an Internet address.
DSL: Digital Subscriber Line: A technology that provides broadband connections over standard phone lines.
DSLAM: Digital Subscriber Line Access Multiplexer: Using multiplexing techniques, a DSLAM receives signals from customer DSL lines and places the signals on a high-speed backbone line. DSLAMs are typically located at a telephone company's CO (Central Office).
Encapsulation: The inclusion of one data structure within another. For example, packets can be encapsulated in an ATM frame during transfer.
FEC: Forward Error Correction: An error correction technique in which a data packet is processed through an algorithm that adds extra error correcting bits to the packet. If the transmitted message is received in error, these bits are used to correct the errored bits without retransmission.
Firewall: A firewall is a method of implementing common as well as user defined security policies in an effort to keep intruders out. Firewalls work by analyzing and filtering out IP packets that violate a set of rules defined by the firewall administrator. The firewall is located at the point of entry for the network. All data inbound and outbound must pass through the firewall for inspection.
Fragmentation: Breaking a packet up into smaller packets that is caused either by the transmission medium being unable to support the original size of the packet or the receiving computer not being able to receive a packet of that size. Fragmentation occurs when the sender's MTU is larger than the receiver's MRU.
FTP: File Transfer Protocol. A standardized internet protocol which is the simplest way to transfer files from one computer to another over the internet. FTP uses the Internet's TCP/IP protocols to function.
Full Duplex: Data transmission can be transmitted and received on the same signal medium and at the same time. Full Duplex lines are bidirectional.
G.dmt: Formally G.992.1, G.dmt is a form of ADSL that uses Discrete MultiTone (DMT) technology. G.dmt incorporates a splitter in its design.
G.lite: Formally G.992.2, G.lite is a standard way to install ADSL service. G.lite enables connections speeds up to 1.5 Mbps downstream and 128 kbps upstream. G.lite does not need a splitter at the user end because splitting is preformed at the remote end (telephone company).
Gateway: A point on the network which is an entrance to another network. For example, a router is a gateway that connects a LAN to a WAN.
Half Duplex: Data transmission can be transmitted and received on the same signal medium, but not simultaneously. Half Duplex lines are bidirectional.
HEC: Headed Error Control: ATM error checking by using a CRC algorithm on the fifth octet in the ATM cell header to generate a check character. Using HEC, either a single bit error in the header can be corrected or multiple bit errors in the header can be detected.
HNP: Home Network Processor
Host: In context of Internet Protocol, a host computer is one that has full two way access to other computers on the Internet.
IAD: Integrated Access Device: A device that multiplexes and demultiplexes communications in the CPE onto and out of a single telephone line for transmission to the CO.
IP: Internet Protocol: The method by which information is sent from one computer to another through the Internet. Each of these host computers have a unique IP address which distinguishes it from all the other computers on the internet. Each packet of data sent includes the sender's IP address and the receiver's IP address.
LAN: Local Area Network: A group of computers, typically covering a small geographic area, that share devices such as printers, hard disk drives, scanners, and optical drives. Computers in a LAN typically share an internet connection through some sort of router that connects the computers to a WAN.
LLC: Logical Link Control: Provides an interface point to the MAC sublayer. LLC Encapsulation is needed when several protocols are carried over the same Virtual Circuit.
MAC Address: Media Access Control Address: A unique hardware number on a computer or device that identifies it and relates it to the IP address of that device.
MC: Multicast: Communication involving a single sender and multiple specific receivers in a network.
MRU: Maximum Receive Unit: MRU: Maximum Receive Unit (MRU) is the largest size packet that can be received by the modem. During the PPP negotiation, the peer of the PPP connection will indicate its MRU and will accept any value up to that size. The actual MTU of the PPP connection will be set to the smaller of the two (MTU and the peer's MRU). In the normal negotiation, the peer will accept this MRU and will not send packet with information field larger than this value.
MSS: Maximum Segment Size: The largest size of data that TCP will send in a single, unfragmented IP packet. When a connection is established between a LAN client and a host in the WAN side, the LAN client and the WAN host will indicate their Maximum Segment Size during the TCP connection handshake.
MTU: Maximum Transmission Unit: The largest size packet that can be sent by the modem. If the network stack of any packet is larger than the MTU value, then the packet will be fragmented before the transmission. During the PPP negotiation, the peer of the PPP connection will indicate its MRU and will accept any value up to that size. The actual MTU of the PPP connection will be set to the smaller of the two (MTU and the peer's MRU).
NAPT: Network Address and Port Translation: An extension of NAT, NAPT maps many private internal addresses into one IP address. The outside network (WAN) can see this one IP address but it cannot see the individual device IP addresses translated by the NAPT.
NAT: Network Address Translation: The translation of an IP address of one network to a different IP address known by another network. This gives an outside (WAN) network the ability to distinguish a device on the inside (LAN) network, as the inside network has a private set of IP address assigned by the DHCP server not known to the outside network.
PAP: Password Authentication Protocol: An authentication protocol in which authorization is done through a user name and password.
PDU: Protocol Data Unit: A frame of data transmitted through the data link layer 2.
Ping: Packet Internet Groper: A utility used to determine whether a particular device is online or connected to a network by sending test packets and waiting for a response.
PPP: Point-to-Point Protocol: A method of transporting and encapsulating IP packets between the user PC and the ISP. PPP is full duplex protocol that is transmitted through a serial interface.
Proxy: A device that closes a straight connection from an outside network (WAN) to an inside network (LAN). All transmissions must go through the proxy to get into or out of the LAN. This makes the internal addresses of the devices in the LAN private.
PVC: Permanent Virtual Circuit: A software defined logical connection in a network; A Virtual Circuit that is permanently available to the user.
RIP: Routing Information Protocol: A management protocol that ensures that all hosts in a particular network share the same information about routing paths. In a RIP, a host computer will send its entire routing table to another host computer every X seconds, where X is the supply interval. The receiving host computer will in turn repeat the same process by sending the same information to another host computer. The process is repeated until all host computers in a given network share the same routing knowledge.
RIPv1: RIP Version 1: One of the first dynamic routing protocols introduced used in the internet, RIPv1 was developed to distribute network reach ability information for what is now considered simple topologies.
RIPv2: RIP Version 2: Shares the same basic concepts and algorithms as RIPv1 with added features such as subnet masks, authentication, external route tags, next hop addresses, and multicasting in addition to broadcasting.
Router Mode: Router Mode is used when there is more than one PC connected to the LAN-side Ethernet and/or USB port. This enables the ADSL WAN access to be shared with multiple nodes on the LAN. Network Address Translation (NAT) is supported so that one WAN-side IP address can be shared among multiple LAN-side devices. DHCP is used to serve each LAN-side device and IP address.
SNAP: SubNetwork Attachment Point.
SNMP: Simple Network Management Protocol: Used to govern network management and monitor devices on the network. SNMP is formally described in RFC 1157.
SNR: Signal-to-Noise Ratio: Measured in decibels, SNR is a calculated ratio of signal strength to background noise. The higher this ratio, the better the signal quality.
Subnet Mask: Short for SubNetwork Mask, subnet mask is a technique used by the IP protocol to filter messages into a particular network segment, called a subnet. The subnet mask consists of a binary pattern that is stored in the client computer, server, or router. This pattern is compared with the incoming IP address to determine whether to accept or reject the packet.
TCP: Transfer Control Protocol: Works together with Internet Protocol for sending data between computers over the Internet. TCP keeps track of the packets, making sure that they are routed efficiently.
TFTP: Trivial File Transfer Protocol: A simple version of FTP protocol that has no password authentication or directory structure capability.
Trellis Code: An advanced method of FEC (Forward Error Correction). When enabled, it makes for better error checking at the cost of slower packet transmission. Setting Trellis Code to Disabled will cause increased packet transmission with decreased error correction.
TTL: Time To Live: A value in an IP packet that indicates whether or not the packet has been propagating through the network too long and should be discarded.
UBR: Unspecified Bit Rate: A transfer mode that is usually used in file transfers, email, etc. UBR can vary depending on the data type.
USB: Universal Serial Bus: A standard interface between a computer and a peripheral (printer, external drives, digital cameras, scanners, network interface devices, modems, etc.) that allows a transfer rate of 12Mbps.
UDP: User Datagram Protocol: A protocol that is used instead of TCP when reliable delivery is not required. Unlike TCP, UDP does not require an acknowledgement (handshake) from the receiving end. UDP sends packets in one-way transmissions.
VBR-nrt: Variable Bit Rate – non real time: With VBR-nrt, cell transfer is variable upon certain criteria.
VC: Virtual Circuit: A virtual circuit is a circuit in a network that appears to be a physically discrete path, but is actually a managed collection of circuit resources that allocates specific circuits as needed to satisfy traffic requirements.
VCI: Virtual Channel Identifier: A virtual channel identified by a unique numerical tag that is defined by a 16-bit field in the ATM cell header. The purpose of the virtual channel is to identify where the cell should travel.
VC-Mux: Virtual Circuit based Multiplexing: In VC Based Multiplexing, the interconnect protocol of the carried network is identified implicitly by the VC (Virtual Circuit) connecting the two ATM stations (each protocol must be carried over a separate VC).
VPI: Virtual Path Identifier: Virtual path for cell routing indicated by an eight bit field in the ATM cell header.
WAN: Wide Area Network: A WAN covers a large geographical area. A WAN is consisted of LANs and the Internet is consisted of WANs.
Energy-Related Products information
In order to conform to the CE Energy–Related Products Directive 2009/125/EC, please ask the local distributor, supplier or importer below information:
● the related information of Recycle or disposal
● the related information of spare parts issue --- The product doesn't have the function of upgrading.
- the related information of Energy–Related Products Directive 2009/125/EC Implementing Measure is added to the Energy–Related Products testing report
Specification
| Hardware | |
| Standards | Compliant with ADSL standards- ANSI T1.413 Issue2- G.992.1 (G.dmt, Annex A)- G.992.2 (G.lite)Compliant with ADSL2 standard- G.992.3 (G.dmt.bis, Annex L)Compliant with ADSL2+ standard- G.992.5 Annex A and MIEEE 802.3u 10/100Base TX Fast Ethernet |
| Protocol | TCP/IP,NAT, HTTP, DHCP Server/Relay/Client, DDNS, DNS Proxy, UPNP, RIP (v1 and v2) |
| Firewall | Network Address Translation (NAT)Stateful Packet Inspection (SPI)Packet Filtering - IP, MAC, DomainManagement Access Control for LAN |
| ATM | VC and LLC MultiplexingBridged/Routed Ethernet over ATM (RFC1483/2684)OAM F4/F5 loop-backATM AAL5 adaptationPPP over ATM (RFC2364)PPP over Ethernet (RFC2516)ATM Traffic Shaping QoS(UBR, CBR, rt-VBR, nrt-VBR) |
| Management | Web based Configuration (HTTP)Command Line Interface (CLI) via TelnetSNMP v2cIGMP v1 and v2SW upgradeATM PVC Remote Management |
| WAN Port (ADSL line Interface) | 1 x RJ-11 port |
| LAN Port | 4 x 10/100Mbps Auto-MDIX RJ-45 port |
| Reset Button | Reset to factory default |
| On/Off Power Button | Power on/off button |
| LED | Power, LAN: Link/ACT, ADSL, Internet |
| Power | A: 9V, 1A external power adapterEU: 9V, 0.5A external power adapter |
| Power Consumption | 5 watts |
| Dimensions | 145 x 113 x 27 mm (5.7 x 4.4 x 1.1 in) |
| Weight | 280 g (9.9 oz) |
| Temperature | Operating: 5° ~ 45° C (41° ~ 113° F),Storage: -20° ~ 60° C (-4° ~ 140° F) |
| Humidity | Max. 90% (non-condensation) |
| Certifications | CE, FCC |
Limited Warranty
TRENDnet warrants its products against defects in material and workmanship, under normal use and service, for the following lengths of time from the date of purchase.
TDM-C504-3 Years Warranty
AC/DC Power Adapter, Cooling Fan, and Power Supply carry 1 year warranty.
If a product does not operate as warranted during the applicable warranty period, TRENDnet shall reserve the right, at its expense, to repair or replace the defective product or part and deliver an equivalent product or part to the customer. The repair/replacement unit's warranty continues from the original date of purchase. All products that are replaced become the property of TRENDnet. Replacement products may be new or reconditioned. TRENDnet does not issue refunds or credit. Please contact the point-of-purchase for their return policies.
TRENDnet shall not be responsible for any software, firmware, information, or memory data of customer contained in, stored on, or integrated with any products returned to TRENDnet pursuant to any warranty.
There are no user serviceable parts inside the product. Do not remove or attempt to service the product by any unauthorized service center. This warranty is voided if (i) the product has been modified or repaired by any unauthorized service center, (ii) the product was subject to accident, abuse, or improper use (iii) the product was subject to conditions more severe than those specified in the manual.
Warranty service may be obtained by contacting TRENDnet within the applicable warranty period and providing a copy of the dated proof of the purchase. Upon proper submission of required documentation a Return Material Authorization (RMA) number will be issued. An RMA number is required in order to initiate warranty service support for all TRENDnet products. Products that are sent to TRENDnet for RMA service must have the RMA number marked on the outside of return packages and sent to TRENDnet prepaid, insured and packaged appropriately for safe shipment. Customers shipping from outside of the USA and Canada are responsible for return shipping fees. Customers shipping from outside of the USA are responsible for custom charges, including but not limited to, duty, tax, and other fees.
WARRANTIES EXCLUSIVE: IF THE TRENDNET PRODUCT DOES NOT OPERATE AS WARRANTED ABOVE, THE CUSTOMER'S SOLE REMEDY SHALL BE, AT TRENDNET'S OPTION, REPAIR OR REPLACE. THE FOREGOING WARRANTIES AND REMEDIES ARE EXCLUSIVE AND ARE IN LIEU OF ALL OTHER WARRANTIES, EXPRESSED OR IMPLIED, EITHER IN FACT OR BY OPERATION OF LAW, STATUTORY OR OTHERWISE, INCLUDING WARRANTIES OF MERCHANTABILITY AND FITNESS FOR A PARTICULAR PURPOSE. TRENDNET NEITHER ASSUMES NOR AUTHORIZES ANY OTHER PERSON TO ASSUME FOR IT ANY OTHER LIABILITY IN CONNECTION WITH THE SALE, INSTALLATION MAINTENANCE OR USE OF TRENDNET'S PRODUCTS.
TRENDNET SHALL NOT BE LIABLE UNDER THIS WARRANTY IF ITS TESTING AND EXAMINATION
DISCLOSE THAT THE ALLEGED DEFECT IN THE PRODUCT DOES NOT EXIST OR WAS CAUSED BY CUSTOMER'S OR ANY THIRD PERSON'S MISUSE, NEGLECT, IMPROPER INSTALLATION OR TESTING, UNAUTHORIZED ATTEMPTS TO REPAIR OR MODIFY, OR ANY OTHER CAUSE BEYOND THE RANGE OF THE INTENDED USE, OR BY ACCIDENT, FIRE, LIGHTNING, OR OTHER HAZARD.
LIMITATION OF LIABILITY: TO THE FULL EXTENT ALLOWED BY LAW TRENDNET ALSO EXCLUDES FOR ITSELF AND ITS SUPPLIERS ANY LIABILITY, WHETHER BASED IN CONTRACT OR TORT (INCLUDING NEGLIGENCE), FOR INCIDENTAL, CONSEQUENTIAL, INDIRECT, SPECIAL, OR PUNITIVE DAMAGES OF ANY KIND, OR FOR LOSS OF REVENUE OR PROFITS, LOSS OF BUSINESS, LOSS OF INFORMATION OR DATE, OR OTHER FINANCIAL LOSS ARISING OUT OF OR IN CONNECTION WITH THE SALE, INSTALLATION, MAINTENANCE, USE, PERFORMANCE, FAILURE, OR INTERRUPTION OF THE POSSIBILITY OF SUCH DAMAGES, AND LIMITS ITS LIABILITY TO REPAIR, REPLACEMENT, OR REFUND OF THE PURCHASE PRICE PAID, AT TRENDNET'S OPTION. THIS DISCLAIMER OF LIABILITY FOR DAMAGES WILL NOT BE AFFECTED IF ANY REMEDY PROVIDED HEREIN SHALL FAIL OF ITS ESSENTIAL PURPOSE.
Governing Law: This Limited Warranty shall be governed by the laws of the state of California.
Some TRENDnet products include software code written by third party developers. These codes are subject to the GNU General Public License ("GPL") or GNU Lesser General Public License ("LGPL").
Go to http://www.trendnet.com/gpl or http://www.trendnet.com Download section and look for the desired TRENDnet product to access to the GPL Code or LGPL Code. These codes are distributed WITHOUT WARRANTY and are subject to the copyrights of the developers. TRENDnet does not provide technical support for these codes. Please go to http://www.gnu.org/licenses/gpl.txt or http://www.gnu.org/licenses/lgpl.txt for specific terms of each license.

TRENDNET®
Product Warranty Registration
Please take a moment to register your product online. Go to TRENDnet's website at http://www.trendnet.com/register
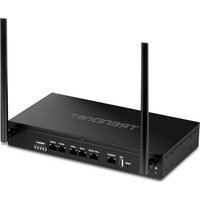
- CONNECTION MECHANISM....10
- ADVANCE CONFIGURATION....2
- LAN....7
- WAN 8
- SERVICE....21
- DNS 23
- FIREWALL....25
- IGMP PROXY 30
- UPNP....31
- RIP 32
- ADVANCE....34
- DIAGNOSTIC....43
- ADMIN 46
- STATISTICS ....50
- APPENDIX A....51
- SPECIFICATION....63
- LIMITED WARRANTY....64
- Compliance
- FCC Radiation Norm
- CE Radiation Norm
- FCC & CE Compliance Statement
- CAUTION!
- Introduction
- Features
- ■ ADSL Standards Compliance
- ■ ATM and PPP Protocols
- ■ Network Protocols & Features
- ■ Bridging
- ■ Management
- ■ UPnP
- ■ Ethernet Standards
- System Requirement
- Package Contents
- Hardware
- Front Panel
- Back Panel
- RESET Button:
- Connection Mechanism
- Connection through Ethernet Cable
- Setting up the TCP/IP in Windows
- Windows ME / 98
- Windows 2000
- Windows XP
- Windows Vista
- Windows 7
- Advance Configuration
- Login
- LAN
- Apply Changes
- WAN
- Channel Config
- Add
- Modify
- Delete
- MAC Address Clone
- Bridge Mode
- ■ Channel:
- Configuration Procedure :
- MER(Mac Encapsulation Routing) Mode
- ■ WAN IP:
- Configuration Procedure:
- PPPoE Mode
- ■ PPP:
- Routed Mode
- ATM Settings
- ADSL Settings
- Tone Mask
- Service
- DHCP Settings
- DHCP Server configuration
- Undo
- DHCP Relay configuration
- DNS
- Reset Selected
- DDNS Server
- Remove
- Firewall
- IP/Port Filtering
- Delete Selected
- Delete All
- MAC Filtering
- Port Forwarding
- URL Blocking
- Function buttons for the Keyword Filtering Table:
- DMZ
- IGMP Proxy
- UPnP
- RIP
- Advance
- ARP table
- Bridging
- Show MACs
- Routing
- Add Route
- Update
- Show Routes
- Port Mapping
- IP QoS
- Remote Access
- Others
- Diagnostic
- Ping
- ATM Loopback
- ADSL
- Diagnostic Test
- Admin
- Commit/Reboot
- Commit and Reboot
- Backup/Restore
- System log
- Password
- Upgrade Firmware
- ACL
- Time Zone
- Statistics
- Interface
- Appendix A
- Router Terms
- What is a firewall?
- What is NAT?
- What is a DMZ?
- What is a Gateway?
- Frequently Asked Questions
- How do I determine if a link between the Ethernet card (NIC) and the TDM-C504 ADSL2/2+ Modem Router has been established?
- How do I determine if a link between the TDM-C504 ADSL2/2+ Modem Router and the Internet has been established?
- I can't get the Internet game, server, or application to work properly.
- I need to upgrade the firmware.
- I forgot my password.
- What is MAC Address?
- What is NAT (Network Address Translation) and what is it used for?
- Troubleshooting Guide
- The TDM-C504 ADSL2/2+ Modem Router does not work (None of the LEDs light up)
- I changed the LAN IP Address in the LAN configuration page and my PC is no longer able to detect the TDM-C504 ADSL2/2+ Modem Router.
- LAN (Link/Act) LED does not light up.
- Failed to configure the TDM-C504 ADSL2/2+ Modem Router through web browser (By a client PC in LAN)
- I forgot or lost my Administrator Password.
- I need to upgrade the Firmware.
- Testing LAN path to your TDM-C504 ADSL2/2+ Modem Router.
- Request timed out
- UPnP Setting on Windows XP (Optional)
- Adding UPnP:
- Glossary
- Energy-Related Products information
- Limited Warranty
- TRENDNET®
- Product Warranty Registration
Brand : TRENDNET
Model : TDM-C504
Category : Router