
Percept S - Video recorder TOSHIBA - Free user manual and instructions
Find the device manual for free Percept S TOSHIBA in PDF.


| Product Type | Cloud Managed Network Video Recorder (NVR) |
| Model | Toshiba Percept S |
| Video Input | Up to 16 IP cameras via PoE switch (built-in) |
| Video Output | HDMI |
| Audio | Not specified |
| Network Interfaces | Client NIC (RJ45) for remote connection; Camera NIC (RJ45) for dedicated camera network |
| USB Ports | USB for keyboard/mouse |
| Power Supply | 100-240V AC, 50/60Hz |
| Dimensions (approx.) | 300 x 200 x 40 mm |
| Weight (approx.) | 2 kg |
| Default Login | Username: admin, Password: 1234 |
| Supported Protocols | ONVIF Profile S, RTSP |
| Recording Modes | Continuous, Motion Detection, Scheduled |
| Remote Access | Via Web Services portal (cloud) |
| User Management | Multiple user groups with permissions (User, Super User, Admin) |
| Maintenance | Keep device clean and dust-free; ensure proper ventilation |
| Safety | Use only supplied power cord; avoid liquid exposure; disconnect power before handling |
| Spare Parts | Contact Toshiba support for replacement parts |
| Repairability | Refer to manual for troubleshooting; contact professional service for repairs |
| General Information | Cloud-managed appliance designed for IP camera surveillance systems |
Frequently Asked Questions - Percept S TOSHIBA
User questions about Percept S TOSHIBA
0 question about this device. Answer the ones you know or ask your own.
Ask a new question about this device
Download the instructions for your Video recorder in PDF format for free! Find your manual Percept S - TOSHIBA and take your electronic device back in hand. On this page are published all the documents necessary for the use of your device. Percept S by TOSHIBA.
USER MANUAL Percept S TOSHIBA
Creating a Company Account
Company accounts are created to segregate different customer accounts, permissions, and recorders from one another. Company accounts can only be created by a channel partner. Once created, the channel partner can assign recorders to companies or create accounts for end users.
1. Log in to your WS account from a web browser.
2. Enter your registered Username and Password.
-
Click Add Company
-
Enter a Company Name, and then click Add Company Account.
Adding Users to WS
-
Log in to your WS account from a web browser.
-
Click Connect in the row of the Company Account you wish to
add users to.
-
Click User Management, and then click User Account.
-
Click Add New Users, and then enter the appropriate user information
5. Click Add New User.
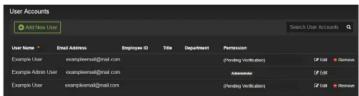
Managing User Permissions
To make User Management more efficient, permissions are managed through User Groups rather than through individual users. User Management can be performed locally on individual recorders or performed centrally in the cloud through WS.

NOTE It is recommended that you perform all user management using
e Cloud.
Three default permission levels are available:
- User - basic Live view and Search functionality
- Super User - basic Live view and Search functionality, ability to support and view daily sales
export and view video clips.
- Admin - all Live view, Search, and Export functionality, access to recorder setup and group management.
Adding a User to a Group
- Log in to your WS account using a web browser.
- Click the Company Account appropriate for your desired user.
- Click User Management, and then click User Groups.
- In the row of your desired User Group, click Edit.
- Click Users, and then click Add User.
- Select the user you want to add to the User Group, and then click Save.
Removing a User from a Group
- In the appropriate Company Account, click User Management,
and then click User Groups. - In the row of your desired User Group, click Edit.
- Click Users, and then click Remove in the row of the desired
User Group.
Adding a New User Group
- Log in to your WS account using a web browser.
- Click the Company Account appropriate to your desired User.
- Click User Management, and then click User Groups.
- Click Add New User Group.
- Type a Name and Description for the User Group, and then
click Save.
Modifying Group Level Permissions
- Click the Company Account appropriate to your desired User.
- Click User Management, and then click User Groups.
- Click Edit in the row of the desired User Group.
- Click one of the following and edit the desired permission:
- Web Services Permissions - These permissions pertain to Video Archive, User Management, and Recorder permissions from the WS website.
- Recorder Permissions - All Live view, Search, and Setup functions available through the Thin Client, Mobile, and Command Station applications.
- Remote Client Permissions - These permissions pertain to shared Command Station permission.

Modifying Recorder Access
- Click the Company Account appropriate to your desired User.
- Click User Management, and then click User Groups.
- Click Edit in the row of the desired User Group.
- Click the Recorders tab.
- To add recorder access, click Add Recorder, select the appropriate recorders, and then click Save.
- Click Remove in the row of the recorder you want to remove.

NOTE Users who are also assigned to another group with permission to access the recorder removed from this group will still be able to access the recorder.
Copyright ©2016. All Rights Reserved. Information contained in this document is subject to change without prior notice. This company does its best to provide accurate information but cannot be held responsible for typos or mistakes.
type of 100%
35137AB
Quick Installation Guide
Cloud Managed Appliance
This guide will assist you with the initial setup of your cloud managed appliance and recording software. This guide includes hardware setup, software setup, network configuration, and connecting your appliance to the Web Services Portal.
- Plug the supplied power cord into the recorder. Do NOT connect the plug to a power source at this time.
- Connect the network cable intended for remote connections to the Client NIC.

NOTE The Camera NIC is intended for use with a dedicated camera network.
- Connect the supplied keyboard and mouse using the USB ports.
- Connect a monitor using the HDMI port.
-
Connect the cameras to PoE ports, or the external camera network.
-
Connect the power cord to a power source, and then turn the recorder ON.
-
Log in to the Server recorder using the default credentials:
Username: admin
Password: 1234
- Follow the Setup Wizard to complete basic setup of your system.

Default Login Credentials and Network Settings
| Username admin Password 1234 |
| Client NIC IP Address | Set to DHCP | Remote Communication Port | 80 (8888 used if 80 is blocked) |
| Camera NIC IP Address 192.1 | 168.51.1 IP Address | Reserved for PoE | 192.168.50.1 (Internal PoE)192.168.50.2 (Internal NIC)192.168.50.11-192.168.50.26 (PoE Ports) |
CAMERA MANAGEMENT
Server software makes it easy to add and configure IP cameras. Recorders will automatically detect and add ONVIF IP cameras connected to the on-board PoE switch.

NOTE Third party cameras may need to be configured using a third party program before being added to Server. Cameras that don't support ONVIF can be configured to record via RTSP streaming.
Adding Auto-Detected Cameras
Server software automatically detects ONVIF Profile S compliant cameras set to DHCP. Cameras not meeting these requirements must be configured manually.
-
Click Return
-
Click Setup , and then click Cameras.
-
Click Add Cameras.
-
For automatically detected cameras, select the camera(s) using the check boxes, and then type the appropriate Username and Password.
-
Click Add.

NOTE The recorder will automatically detect and add most cameras connected to the on-board PoE switch as long as the cameras are set to DHCP.
Adding Cameras Manually
-
Click Setup and then click Cameras
-
Click Setup ,
-
Click Add Cameras.
- For cameras not automatically detected, click Add Cameras Manually.

- Select the ONVIF or the RTSP protocol, and then type the appropriate Title, IP Address, Username, and Password.

NOTE When using RTSP, specify the individual URL streams for your cameras. For instructions regarding these streams, consult the camera manual.
- Click Add Cameras.
Configuring Recording Settings
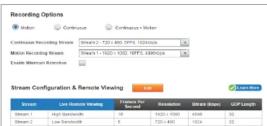
For optimal motion detection, cameras should be configured with a secondary stream of 720x576 or lower. Server software will still detect motion using a higher resolution stream if a 720x576 or lower stream is not available, but this will consume more system resources.
-
Click Setup and then click Cameras.
-
Select the desired camera, and then click the Live / Recording tab.
-
Configure the settings as desired.

NOTE Continuous + Motion recording is the default setting for all cameras upon connection to your recorder.
ADVANCED CAMERA MANAGEMENT
Cameras set to static IP addresses, third party cameras, and cameras not supported by ONVIF may not be detected automatically. To configure cameras not automatically detected by Server software, follow the steps below.
Configuring Cameras with a Static IP Address (Linux models only)

-
Click Setup, and then click Support Tools.
-
Click Launch Support Tools.
-
Click Network Camera Manager
-
Note the discovered IP address for the desired camera.
-
Click Exit to return to Server software
-
Follow the steps in the Adding Cameras Manually section, typing the Static IP Address.
Configuring Cameras with DHCP (Linux models only)
-
Click Setup and then click Support Tools
-
Click Launch Support Tools
-
Click Network Camera Manager.
-
Select your desired cameras, and DHCP, and then click Apply.
-
Click Exit to return to Server software
-
Follow the steps in the Adding Auto-Detected Cameras section to add the camera.
Adding Third Party Cameras
Third party cameras may require installing a manufacturer camera discovery tool on a separate PC. Once the camera discovery tool is installed, follow the steps for adding a camera with a static IP address or using DHCP as outlined above.
Adding Cameras Not Supported by ONVIF You must add cameras that are not ONVIF-compliant using the RTSP stream of the camera. Consult the manufacturer's camera manual for more detailed information regarding RTSP streams. When you know the URL for the RTSP stream of your camera, follow the steps in the Adding Cameras Manually section, selecting RTSP protocol.
ADVANCED NETWORK SETUP
In some cases, advanced network settings may be applied to set up an optimal local or remote connection. The following steps are optional. Please contact a support technician if you are unsure of your video network.
Direct Connection
With direct connection, network traffic bypasses the WS cloud relay service, allowing for optimal connection speeds. This configuration requires additional steps, including router configuration, in order to forward traffic to the appropriate appliance.

NOTE Visit http://portforward.com/English/routers/port_forwarding/ for instructions regarding router configuration for direct connection.
- Access the router used for Internet communication and forward TCP port 80 to the internal address of the appliance.
- Use a web browser to log in to your WS account. Click My Re-
corders, and then click Edit in the row of your desired appliance. -
Click Remote Network Settings, and then type the static IP or DDNS entry for the router in the IP Address or Domain field, and 80 in the Port field.
-
Click Save
LAN Smart Forwarding
To optimize local connections, WS uses a feature called LAN Smart Forward (LSF). This feature allows WS to detect if the machine using the remote client software is on the same local network. WS then automatically switches from a cloud relay connection to a direct connection. This ensures the fastest connection between client and appliance.
The following conditions are required for LAN Smart Forwarding:
- You must already have an WS account, and the appliance must be connected to WS with LAN Smart Forwarding configured (see the Web Services section for more information).
- Both client and appliance use the same external IP address, or IP addresses within an acceptable range.
• The Client NIC port must be used for the Internet connection.
To enable LAN Smart Forwarding:
- Use a web browser to log in to your WS account, and then click on
your desired Company Account.
- Click My Recorders, and then click Edit in the row of the desired
appliance
-
Click the Remote Network Settings tab.
-
Set LAN Smart Forwarding to On.

NOTE If your appliance and client machines have different external IP addresses, enter the IP range in which the client and appliance reside.

WEB SERVICES
This is a cloud based management solution which allows you to administer all your users, recorders, and VMS installations from one central location. To get the most out of your new web-managed recorder, we strongly recommend connecting it to the Web Services portal.
Creating a Web Services Account
To begin using WS, you will need to add individual companies to associate with customers.

NOTE If you do not already have an WS account, contact a technical support agent.
Connecting a Recorder to WS
In the previous Web Services Connection section, you enabled Web Services on your Server recorder.
Now, you will need to add the recorder to the appropriate Company Account.
-
Log in to your WS account
-
Select the appropriate Company Account, and then click Add.

NOTE Once you have enabled an recorder to connect with WS, it will appear on your WS account as an unassigned recorder. Assign the recorder to the appropriate Company Account.
Users associated with this Company Account will now be able to remotely access the Server recorder.
WEB SERVICES CONNECTION
-
Click Setup , and then click Cameras.
-
Select the desired camera, and then click the Live / Recording tab.
-
Configure the settings as desired.
-
On your Server recorder, click Setup, and then click the Glob-
HEALTH MONITORING CONNECTION
-
Click Setup , and then click Health Monitoring
-
Select Use Health Monitoring.
-
Configure the settings as desired

NOTE If you do not already have a Health Monitoring account, contact a technical support agent.


- Creating a Company Account
- Adding Users to WS
- Click Add New User.
- Managing User Permissions
- Three default permission levels are available:
- Adding a User to a Group
- Removing a User from a Group
- Adding a New User Group
- Modifying Group Level Permissions
- Modifying Recorder Access
- Quick Installation Guide
- CAMERA MANAGEMENT
- ADVANCED CAMERA MANAGEMENT
- ADVANCED NETWORK SETUP
- WEB SERVICES
- WEB SERVICES CONNECTION
- HEALTH MONITORING CONNECTION
Brand : TOSHIBA
Model : Percept S
Category : Video recorder