MP3 Boombox ME-909 - Hi-Fi System Visual Land - Free user manual and instructions
Find the device manual for free MP3 Boombox ME-909 Visual Land in PDF.

| Product Type | Portable MP3 Boombox / Hi-Fi System |
| Brand | Visual Land |
| Model | MP3 Boombox ME-909 |
| Dimensions | Approx. 12 x 6 x 4 inches (30 x 15 x 10 cm) |
| Weight | Approx. 2.2 lbs (1 kg) |
| Power Source | AC adapter (120V, 60Hz) or 6x C batteries (not included) |
| Playback Media | CD, CD-R/RW, MP3 CD |
| Radio | FM stereo with telescopic antenna |
| Additional Inputs | USB port, SD card slot, 3.5 mm auxiliary input |
| Audio Output | Stereo speakers (2 x 3W) |
| Headphone Jack | 3.5 mm stereo |
| Controls | Play/Pause, skip, volume, source select, equalizer presets |
| Display | LCD screen with track info |
| Care Instructions | Wipe with a soft dry cloth; avoid moisture and direct sunlight |
| Safety Warnings | Do not expose to rain or moisture; use only supplied adapter |
| Spare Parts Availability | Contact Visual Land customer service for replacement parts |
| Repairability | Not user-serviceable; refer to qualified technician |
| General Information | Portable boombox for indoor and outdoor use; handle with care |
Frequently Asked Questions - MP3 Boombox ME-909 Visual Land
User questions about MP3 Boombox ME-909 Visual Land
0 question about this device. Answer the ones you know or ask your own.
Ask a new question about this device
Download the instructions for your Hi-Fi System in PDF format for free! Find your manual MP3 Boombox ME-909 - Visual Land and take your electronic device back in hand. On this page are published all the documents necessary for the use of your device. MP3 Boombox ME-909 by Visual Land.
USER MANUAL MP3 Boombox ME-909 Visual Land
BASIC FEATURES:
- Dual enclosed 3W speaker
construction
• USB and AUX
- 356 and AUX inputs
- SU and micro SD card slots
• Headphone Port output
• FM radio tuner with external
antenna
• MP3 and WMA playback
• Built-in Mic for Voice Reparction
- Clock
• Click • Color
• Calendar
- Up to 16 Hours Battery Life
SPECIFICATIONS
Total Output
EW RMS (3W x2)
Frequency Response: 105-4800/Hz (2dB)
Signal and Noise Ratio of Amplifier, BCD3
Magnetic Resilience
4 China
Speaker Means, comments
1.77 x2, (45min) x2
Charge time: 2-4 hours
SYSTEM REQUIREMENTS>
Windows XP, Vista, 7 or higher
UGI 1.1/2.0 port for charging/transferring
SD Cart, MicSD Cart, USI Last Drive, USD
Wall Charger are not included with this device.
Button/Port Functions
H/I. Begins playback. Pressed once, it will pause playback. If pressed and held down for 2-3 seconds, it will do a soft power off saving your current location and settings.
VOL-; Lowers the volume by one level each time it is pressed.
VOL+: Raises the volume by one level each time it is pressed.
◀: Skips back to the previous song. If pressed and held down it will scan back within the current song.
▶: Skips to the next song. If pressed and held down it will skip forward within the current song.
MENU : Accesses any submenus available and will also serve as the button to select options. If pressed and held down this will exit any feature and will take you to the clock screen. Then press any button to bring up the Main Menu.
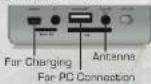
Charging Your Boombox
Your boombox can be charged by plugging the provided USB cable into the 5-pin USB CHARGE port on the boombox and then connecting it to either a USB wall charger or a computer's USB port. NOTE: To charge, have the power switch in the ON position. Additionally you cannot transfer fire using the port. You will need to use the USB/HOS' port.
Saving Settings Changes
To save your settings press and hold the ||■ button, this will turn off the boombox as well as save any settings recently changed. Then slide the power switch to the OFF position. This will allow you to resume what you were last doing. However, powering the unit down this way will require you to slide the power switch to the ON position and hold the ||■ button for 2-3 seconds again to power it back on.
PC Connection
You may connect your boombox to your computer using the supplied USB cable. The end with the two split cables goes to the boombox side and the single USB A Male side is for the computer side. To both charge and connect to your computer to load files to an inserted Micro SD or SD CARD, or USB Flash drive it must be connected in a specific order. Please note the boxbox must in the OFF position when connecting it to a computer. The order is at follows: also, USB A Male is connected to the computer, then the side with the two connections is connected, it must go USB A Male to boxbox, than once it shows connection to PC the USB charge cable can be connected to charge the device while you move around your Hot. Note: The boxbox has been used for the USB and USB card or USB Flash Drive mounted into the boxbox, it will show us on an empty drive. Additionally you cannot use this USB port to change the USB from the USB CHA-SE port to charge the battery.
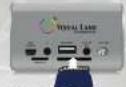
SD and MicroSD Card Insertion:
SD and MicroSD Card is inserted label side down, with the contact points facing up. Inserting it the incorrect way may cause damage to the SD or MicroSD Card. NOTE: To get back to the Main Menu from MUSIC when a SD or MicroSD card is inserted and begins to play, press and hold down the MENU button. This will stop the playback and take you back to the clock screen, then press any button to have the Main Menu, reappear. The transcript supports up to 1608 SD and MicroSD Cards
Aux In
If using the boombox as a speaker for an external device, use the included 3.5mm cable to connect your device to the boombox. When connected you will be unable to use the other functions of the boombox.
Calendar
In the Calendar menu option you can view both the current time and current date. To set the time and date, you will have to do so from the System Time submenu option in the System Settings option from the main menu. The highlighted section will be the one you adjust by pressing the 🎥 and 🎥 buttons. To move over to the next you will press the MENU button once. Only move on once you have set it correctly. Once MENU set the last one and press
again it will take you back into the System Settings submenu
Music
If no card or USB flash drive is present when you enter the music section, you will see a message "NOCARD" "NO UISK". When a Media Card or USB flash drive is inserted with MP3 or WMA files, the MP3 Eboxbox will automatically recognize and begin playback of the files. To skip between files you can press the H and H to skip back or skip to the next song. Volume can be adjusted by pressing either the VOL or VOL- buttons when in this menu. While music is playing and you press the MENU button the following list will come up:
Cycle Mode: From here you can select the different playback modes which are Normal, Repeat One, Folder (plays through current folder), Repeat Folder, Repeat All, Random [shuffle]. Intro (plays first few seconds of a song then moves on to next and does the same)
EQ Settings: Natural Rock, Pop, Classic, Soft Jazz, DBE, SRS WOW Repeat Mode: This will bring you back to the current playing song
screen, but you will now be able to set up a loop in the current file. To select the starting point press the H button and once you reach the point in the file that you choose to be the end of the loop press the H once more. The loop you have now created will play through 4 times. Pressing the MENU button will exit the loop.
Back: This will take you back to the clock screen, and will stop playback as well.
Exit: This will take you back to the previous screen.
Music Submenu
When music is not being played, you can access this sub-menu by pressing the MENU button.
Card Folder/U-disk Dir: Highlight and press MENU on the folder you wish to select a file from then highlight a file using the 🔊 and 🔍 buttons to navigate the files within the folder, then press MENU to select it.
Delete File: Will delete the current file you are on if you select this option. Delete All: Will delete all files from within current folder when you select this option.
Back: This will take you back to the clock screen, and will stop playback as well.
Recorder
[Note: Recorder will only open when either an SD or MicroSD card or USB Flash Drive is inserted as they are required to save the recordings. If no card or flash drive is present you will get a "OSKERROR" message.] Once you have entered the Recorder menu option you will see a time elapsed for the current recording you are making above the time left in memory from your memory card. HH/MM/SS is the format the time will be in. To begin, recording press the
■H■ button which will begin a new recording if the upper elapsed time shows 00:00:00. To pause the recording press the H■ button, and once more when you are ready to begin recording. To save a recording press and hold down the H■ button until the screen shows SAVE in the center. This means the recording has successfully saved. To playback a file you have recorded you will need to go back into the "MUSIC" section from the main page, then to select the "MUSIC SUMMER" for selecting a folder, select the "VOICE" folder then select the file you wish to playbook that you have recorded with the boombox.
Recorder Submenu
To access the submenu in Recorder, press the MENU button once before you begin a new recording. Please note you will not have access to this submenu while you are recording or paused during a recording session. The options from here are as follows:
REC Type: Which allows you to charge the quality of the recording. Record Gain Set: This is where you can adjust the microphones sensitivity level from 0 to 7.
FM Radio
To listen to the radio with the built in smokers, you will need to open "FM RADIO" first and then insert either standard 3.5mm headphones or a 3.5mm AUX cable into the AUX port. Either can act as the antenna when you are not listening to the FM RADIO through your headphones. Extending the headphones or cable will improve reception. The frequency band is defaulted to 87.5MHz-108MHz, using the and keys you can move from left or right on the FM band. To store frequencies into memory, press the
MENU button once and select SAVE. After you have saved a few pre-sets, to move between them, press the H1/■ button. Volume can be adjusted by pressing either the VOL+ or VOL- buttons when in this menu.
FM Radio Submenu
Save Channel: The current frequency that is tuned in will be saved. 20 Stacions can be saved.
FM Record: (Note: You will sell an email to 3D or MicroSD card or USB Flash Drive) insert into a list this video, so they are not all to make the text. The image is also available to you. You can do it will automatically bring you to the RECORD feature and begin recording the current radio station while you listen. You can also pause the recording at any time by pressing the HIB button. To begin recording again press the same button again. Once you have finished recording, you can call your phone to the radio button, then to the recording and take you back to the FM Radio. To playbox a file you have recorded you will need to go back into the "MUSIC" section from the menu here, then following the record. You can call the "Flicker" select the "VOICE" folder until enter the
file you wish to playback that you have recorded
FM Record Submenu
Similar to the Recorder Submenu, the FM Record has a submenu. Please follow the instructions mentioned in the Recorder Submenu section
Delete Channel: Will delete the current station you are on when it is a saved station.
Delete All: This will delete all the stations you have saved
Auto Search: This will auto tune and save all the stations on the current band that have an audible frequency.
Common Band: When you select this you will now have the standard band for FM frequencies, 87.5mhz to 100mhz
Japan Band: When you select this option the band will switch from the standard 87.5mhz to 108mhz, to 76mhz to 90mhz
Exit: This will exit the FM RADIO submenu and bring you back to the Band Frequency Screen
System Settings
To get to the system settings, from
the main menu, select system settings. Within system setting you will find most of the options related to the everyday use of your boombox:
System Time: Set the time and date, refer to calendar for adjusting time and date.
Backlight: Set LCD usage mode to save power. You can set the backlight to stay on from 0-30 seconds in increments of 3 seconds. Setting it to 0 will leave it on all the time.
Language: Select the language to be displayed: Simplified Chinese, English, French, German, Italian, Spanish.
Tool:
Power Off Set: Allows you to set how long before the boombox turns off when inactive, from 0-120 minutes.
Alarm: Alarm can be tagged ON or OFF by pressing the MENU button on the first option in ALARM. In TIME, you can set when the alarm will go off. In CYCLE you can choose from having the alarm to go off Every Day, or One Time, or Cycle if you select this mode you can pick specific days of the week to have it sound by checking the box next to the day(s) you want it to). Alarm Signal allows you to select between
the bolt in alarm sound or a song you have on your memory card to play when the alarm goes off. With VOLUME you can set how loud you want the sound to ring when the alarm goes off. MENU button will shut the alarm off and the ▶■ button will snooze it for 10 minutes.
Contrast: Here you can adjust the contrast level of the screen. Levels adjust by one, from 1-15.
Firmware Version: This is where you can view the version of the firmware you have installed currently.
Exit: This will exit the System Settings Menu.
If you have a problem with your zoombox please visit our website and view our support pages. http://www.visual-land.com
FCC Par 13. Directors on which Part 10 of the ECG Rates, Operation of the production subject to the following three components: (1) DSC devices may include: layout of interference, and SP1 that does not contain any interference medium, including interference that may be underloaded operator. FCC Warning: Changes of interference and information approved by the process of the construction of the ECG. The company will also provide a responsibility for law and the requirement.
Copyright ©2017 Vision Labs