
TB600MG2F - Media player MAGNAVOX - Free user manual and instructions
Find the device manual for free TB600MG2F MAGNAVOX in PDF.


| Product Type | Media Player |
| Brand | Magnavox |
| Model | TB600MG2F |
| Dimensions (W x D x H) | 4.5 x 4.5 x 1.2 inches |
| Weight | 0.5 lbs |
| Power Supply | 5V DC via USB cable (adapter not included) |
| Power Consumption | 2.5W (max) |
| Video Output | HDMI 1.4 |
| Audio Output | HDMI, 3.5mm headphone jack |
| Supported Video Formats | MP4, AVI, MKV, MOV, WMV, FLV |
| Supported Audio Formats | MP3, WMA, WAV, AAC, FLAC |
| Supported Image Formats | JPEG, BMP, PNG, GIF |
| Storage Media | SD/SDHC/MMC card up to 32GB, USB flash drive |
| Media Playback | Play, pause, stop, forward, rewind, shuffle, repeat |
| Remote Control | Infrared remote included (batteries not included) |
| Language Support | English, French, Spanish, German, Italian, Dutch |
| Maintenance | Wipe with a soft, dry cloth. Do not use liquids or solvents. |
| Safety Precautions | Keep away from moisture, heat sources, and flammable items. Do not disassemble. |
| Spare Parts Availability | Remote control and power adapter available separately from Magnavox support. |
| Repairability | Not user-serviceable. Contact authorized service center for repairs. |
| Operating Temperature | 41°F to 95°F (5°C to 35°C) |
Frequently Asked Questions - TB600MG2F MAGNAVOX
User questions about TB600MG2F MAGNAVOX
0 question about this device. Answer the ones you know or ask your own.
Ask a new question about this device
Download the instructions for your Media player in PDF format for free! Find your manual TB600MG2F - MAGNAVOX and take your electronic device back in hand. On this page are published all the documents necessary for the use of your device. TB600MG2F by MAGNAVOX.
USER MANUAL TB600MG2F MAGNAVOX
HD Streaming Player with Built-in WiFi

natural_image
Black rectangular device labeled 'MAGNAVOX' on a white background (no additional text or symbols visible)1. CONTENTS
-
CONTENTS 2
-
FEATURES....3
2.1 Features 3
2.2 Product Info 4
- FUNCTIONAL OVERVIEW
3.1 Top / Front Panel 5
3.2 Rear Panel 5
3.3 Remote Control 6
3.4 Guide to On-Screen Display 8
- CONNECTIONS 9
4.1 HDMI Video / Audio Connection....9
4.2 Standard Video + Standard Audio Connection .....9
4.3 Connection to an Audio System....10
4.4 Connection to the Network....11
- BEFORE YOU START
5.1 Finding the Viewing Video Source Input on Your TV....13
5.2 Initial Setup....13
- USING NETWORK FEATURES....14
6.1 Preparation for Network Features....14
6.2 Information on Network Services 14
-
LIST OF SETTINGS....15
-
SETTINGS....17
8.1 Network Connection....17
8.2 fun-Link (HDMI CEC)....22
8.3 HDMI Video Resolution....22
8.4 Software Update....23
8.5 Initialize 24
-
TROUBLESHOOTING....25
-
SPECIFICATIONS....28
-
NETWORK SERVICE DISCLAIMER .....29
-
SAFETY INSTRUCTIONS....30
-
MAINTENANCE 31
-
SUPPLIED ACCESSORIES....31
-
INSTALLING ON A WALL OR SHELF......32
-
TRADEMARK INFORMATION ....33
-
GLOSSARY 34
-
ESPAÑOL....36
18.1 Mando a Distancia....36
This unit supports VUDU which is the leading HD on-demand video service. With VUDU, you can also enjoy various kinds of Internet applications. In order to use this feature, you must connect this unit to the Internet. (This feature is only available in the United States.)
Netflix
With this unit, you can enjoy movies and TV episodes streamed instantly from Netflix via the Internet. In order to use this feature, you must visit netflix.com/Magnavox on your PC and become a Netflix member. (This feature is only available in the United States.)
Film Fresh / Blockbuster
With this unit, you can enjoy movies and TV episodes streamed instantly from Film Fresh / Blockbuster via the Internet. In order to use this feature, you must visit the below websites on your PC and become a Film Fresh / Blockbuster member. (This feature is only available in the United States.)
- Film Fresh : filmfresh.roxionow.com/Login
- Blockbuster : www.blockbuster.com/auth/login
Pandora® internet radio
This unit supports Pandora internet radio service. You can instantly listen to free personalized radio stations streamed over the Internet from Pandora. In order to use this feature, you must visit the below website on your PC and become a Pandora member. (This feature is only available in the United States.)
- www.pandora.com/magnavox
Picasa
With Picasa application, you can browse your web albums on your TV screen. Picasa helps you organize a number of photographs of yours, so you can easily find particular photographs with an easy operation.
Easy and simple connection to your HDTV with an HDMI (High-Definition Multimedia Interface) cable
Connect this unit to your HDTV with one single HDMI cable. It is recommended to use a High Speed HDMI cable for better compatibility. The high-definition video output signal will be transferred to your HDTV without conversion to analog signals, so you will get excellent picture and sound quality, completely free from noise. Thanks to other multiple outputs, you can also easily connect to your home theater system or amplifier.
fun-Link (HDMI CEC) (Consumer Electronics Control)
This unit supports fun-Link (HDMI CEC), which allows integrated system control over an HDMI cable and is part of the HDMI standard. This function may not work properly on some devices.
HDMI Deep Color
Deep Color reduces posterization (color banding) effect of the playback image.
2.2 Product Info
"Product Info" screen provides information about this unit's software version. When a newer version of software is available, you can update the software via the Internet.
To access "Product Info", follow the procedure below.
- Press [HOME].
- Use [◀/▶] to select "Settings", then press [OK].
- Use [▲/▼] to select "Product Info".
Netflix ESN
You can view the ESN (Electronic Serial Number, which Netflix uses to identify your device) on the “Product Info” screen.
3. FUNCTIONAL OVERVIEW
3.1 Top / Front Panel

- Infrared sensor window
- Standby/on indicator

Note
- Due to new ENERGY STAR® requirements, this unit will automatically turn On the screen saver after 5 minutes of inactivity and enter Standby mode after 25 minutes of inactivity.
3.2 Rear Panel
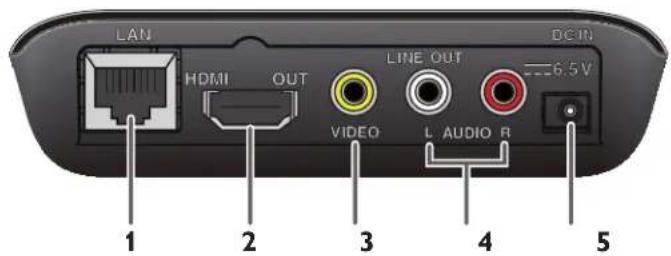
-
LAN terminal
-
AUDIO output jacks (L/R)
-
HDMI OUT jack
-
DC IN jack
-
VIDEO output jack

Caution
- Do not touch the inner pins of the jacks on the rear panel. Electrostatic discharge may cause permanent damage to the unit.
• This unit does not have a TV RF modulator.
3.3 Remote Control
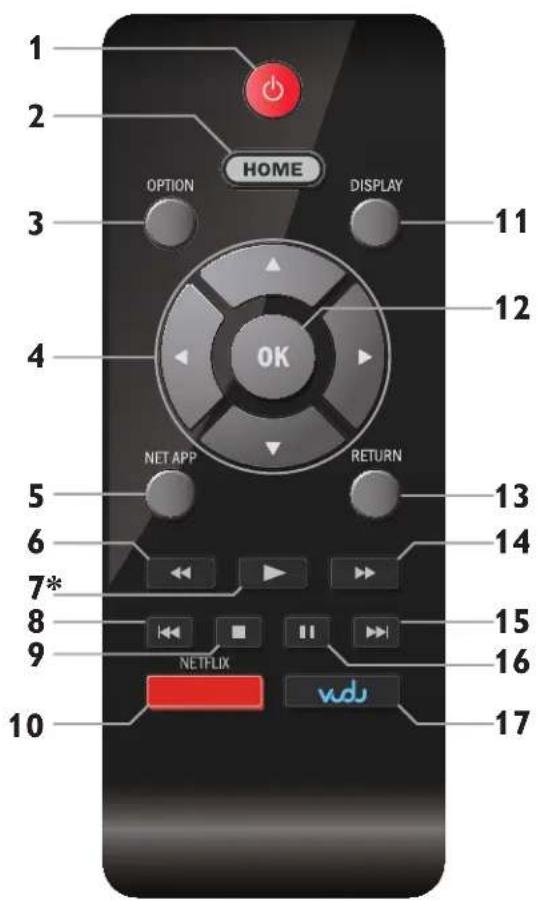
* The unit can also be turned On by pressing this button.
- ⏻ (Standby/on) button
Press to turn On the unit, or to switch the unit into Standby mode. (To completely turn Off the unit, you must unplug the AC adapter.)
- HOME button
Press to display the home menu.
- OPTION button
If a newer software is found when "Auto Update Check" is set to "On", the update notification appears in the home menu screen. Press this button to start update.
- ▲/▼/◄/► buttons
Press to select items or settings.
- NET APP button
Press to display the network application menu.
- ◀◀ (reverse) button
During playback, press to fast reverse the playback.
- ▶ (play) button*
Press to start playback or resume playback.
- (skip) button
During playback, press once to return to the beginning of the current title.
- ■ (stop) button
Press to stop playback.
- NETFLIX button
Press to launch Netflix.
- DISPLAY button
Press to display the on-screen display menu.
- OK button
Press to confirm or select menu items.
- RETURN button
Press to return to the previous menu screen or screen function.
- ▶▶ (forward) button
During playback, press to fast forward the playback. When playback is in pause, press to slow forward the playback.
- ▶▶▶ (skip) button
During playback, press to skip to the next title.
- II (pause) button
Press to pause playback.
- VUDU button
Press to launch VUDU.
Note
- When the unit receives a signal from the remote control, the Standby/on indicator on the top panel turns Off.
■ Installing the Batteries in the Remote Control
Install 2 AAA (1.5V) batteries matching the polarity indicated inside the battery compartment of the remote control.

natural_image
Diagram of a battery pack with an arrow indicating a component, showing no text or symbols.Caution
Incorrect use of batteries can result in hazards, such as leakage and bursting. Please observe the following:
- Do not mix alkaline, standard (carbon-zinc), or rechargeable (ni-cad, ni-mh, etc) batteries.
- Do not mix new and old batteries together.
- Do not use different kinds of batteries together. Although they may look similar, different batteries may have different voltages.
• Make sure that the + and - ends of each battery match the indications in the battery compartment. - Remove batteries from the battery compartment when the remote is not going to be used for a month or more.
- When disposing of used batteries, please comply with governmental regulations or environmental public rules that apply in your country or area.
- Do not recharge non-rechargeable batteries.
- Do not short-circuit, heat or burn any batteries.
■ Using the Remote Control
Remote Control Usage Guidelines:
- To check remote operation, aim the remote at the unit then press any arrow button. The Standby/on Indicator on the unit will turn Off when the button is pressed and turn On again when the button is released. This confirms that the unit is receiving the IR remote signal.
- Make sure that there are no obstacles between the remote control and the infrared sensor window on the unit.
- Do not mount the device on the wall behind the TV as this would block the infrared sensor window from the remote infrared signal.
- Remote operation may become unreliable if strong sunlight or fluorescent light is shining on the infrared sensor window of the unit.
- Remote controls of different devices can interfere with each other. Avoid using a remote control of another device which is located close to the unit.
- Replace the batteries when you notice a fall-off in the operating range of the remote control.
- The maximum operable ranges from the unit are as follows.
Line of sight : approx. 23 feet (7 m)
Either side of the center : approx. 16 feet (5 m) within 30°
Above: approx. 16 feet (5 m) within 15°
Below: approx. 10 feet (3 m) within 30^

natural_image
Black rectangular device with three metallic pins, labeled 30° and 20° (no visible text or symbols on the device itself)
natural_image
Exterior view of a black rectangular device with two side connectors and a central display (no visible text or symbols)3.4 Guide to On-Screen Display
Home Menu
When you turn On the unit, the home menu will automatically appear. Otherwise, press [HOME].

- "NET APP": To access the menu of network services
- “Settings” : To access the setup menu
- "Network Setup": To configure network settings
■ Setup Menu

- Categories
- Menus / Options : Displays options for the highlighted item on the left whenever available.
4. CONNECTIONS
4.1 HDMI Video / Audio Connection
(Supports up to 1080p (outputs video data with a frame rate of 60 frames per second.)
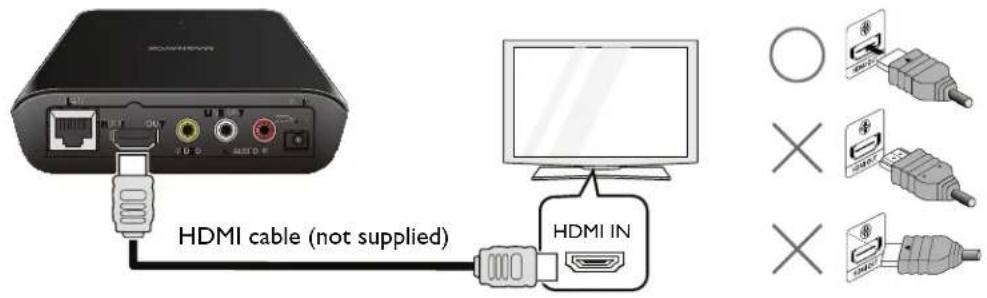
No audio connection required.
- Make sure the shapes of the jack and the connector are matched and do not tilt the HDMI connector when inserting it into the HDMI jack.
- When connected to an HDCP incompatible display device, the picture will not be displayed properly.
- Use an HDMI cable with the HDMI logo (a certified HDMI cable) for this connection.
High Speed HDMI cable (also known as HDMI category 2 cable) is recommended for better compatibility.
4.2 Standard Video + Standard Audio Connection
(Supports only 480i resolution.)

- Connect this unit directly to the TV. If the audio / video cables are connected to a VCR, then the pictures may be distorted due to the copyright protection system.
4.3 Connection to an Audio System
- When you change the connections, you should turn Off all the devices.
- When making connections with external devices, please refer to their user manuals for additional setup help.
■ 2-Channel Analog Audio Connection
Stereo system with analog audio input jacks
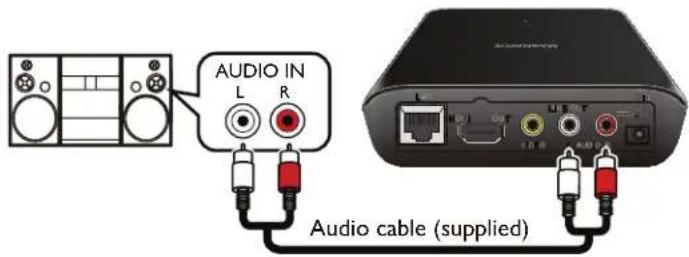
■ HDMI Audio Connection
AV receiver/amplifier with an HDMI input jack

■ HDMI Audio Out
| Audio Source PCM Stereo Bitstream PCM 5.1ch | ||||
| VUDU | Dolby Digital Plus 2cn LPCM | Dolby Digital Plus Multi LPCM | * | |
| MP3 2cn LPCM 2cn LPCM | 2cn LPCM | |||
| Netflix | WMA | 2cn LPCM 2cn LPCM 2cn LPCM | ||
| Film Fresh | AAC | 2cn LPCM | 2ch AAC | 2cn LPCM |
| Blockbuster | AAC | 2cn LPCM | 2ch AAC | 2cn LPCM |
| Pandora® | MP3 2cn LPCM 2cn LPCM | 2cn LPCM | ||
* Fully decoded.
Note
- If the connected device is not compatible with the HDMI BITSTREAM then audio will be output as multi LPCM or 2-channel down-mixed LPCM based on the capability of the connected device even if you select "Bitstream" in "Audio Out" setting.
- If the connected device is not compatible with AAC, audio will be output as LPCM based on the capability of the connected device.
4.4 Connection to the Network
By connecting this unit to the Internet you can update the software via the Internet or play contents of the network services. For more information about a software update, refer to "Network Update" on page 24.

Note
- Wired connection is recommended when using the following features. (Using the following features with a wireless connection can be affected by other devices using radio frequencies.)
- Video streaming services (VUDU / Netflix / Film Fresh / Blockbuster)
- Listening to Internet radio (Pandora®)
- Network update
■ Wired Connection

flowchart
graph TD
    A["Networking equipment (modem, etc.)"] --> B["LAN"]
    B --> C["LAN cable (not supplied)"]
    C --> D["WAN LAN"]
    D --> E["Broadband router or hub"]
    D --> F["LAN cable (not supplied)"]
    F --> G["Internet"]
    style A fill:#f9f,stroke:#333
    style B fill:#ccf,stroke:#333
    style D fill:#cfc,stroke:#333
    style E fill:#fcc,stroke:#333
    style F fill:#cff,stroke:#333
    style G fill:#ffc,stroke:#333

Caution
- Do not insert any cable other than a LAN cable to the LAN terminal to avoid damaging the unit.
- Do not connect your PC directly to the LAN terminal of this unit.

Note
- After you make a wired connection, perform the necessary network setup. (For network settings of a wired connection, refer to "Wired" on page 17.)
- If your cable modem does not have router functions, use a wired router.
- If your cable modem has router functions but there is no vacant port, add a hub.
- For a wired router, use a router which supports 10BASE-T / 100BASE-TX ETHERNET standard.
- Please purchase shielded LAN cables at your local store and use them to connect the unit to network equipment.
■ Wireless Connection
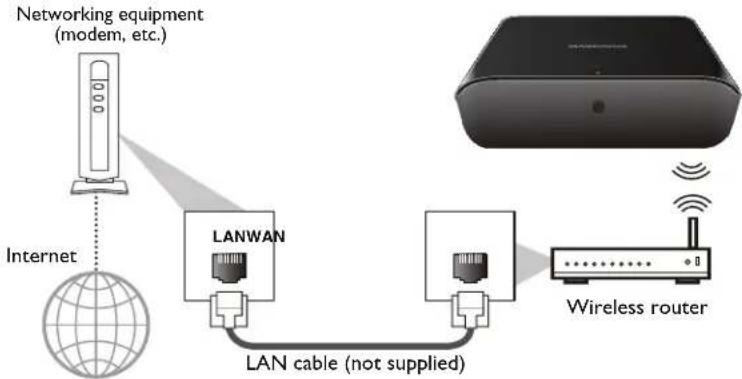
flowchart
graph TD
    A["Internet"] --> B["Networking equipment (modem, etc.)"]
    B --> C["LANWAN"]
    C --> D["LAN cable (not supplied)"]
    D --> E["Wireless router"]
    E --> F["RF/CC/DAV/DC"]

Note
- After you made a wireless connection, perform the necessary network setup. (For the network settings of a wireless connection, refer to "Wireless" on page 19.)
- For a wireless router, use a router which supports IEEE 802.11 b/g/n. ("n" type is recommended for stable operations of the wireless network.)
- Set the wireless router to Infrastructure mode. This unit does not support Ad-hoc mode.
- Other radio devices or obstacles may cause interference to a wireless network connection.
5. BEFORE YOU START
5.1 Finding the Viewing Video Source Input on Your TV
After you have connected this unit to your TV with either an HDMI cable or video and audio cables, find the viewing source (external input source) on your TV.
- Turn On your TV.
- Press the button on the TV's remote control that accesses the external input source. It may be labeled "SOURCE", "AV", "AUX" or "INPUT" (refer to your TV's user manual).
- Plug the AC adapter for this unit into the unit (DC IN jack) and then into an AC outlet.

This is the correct viewing source (external input source).
- If the TV is connected with an HDMI cable, it may take a while for the opening picture to come up.
- "Please Wait..." screen is output only when the unit is connected to a TV with an HDMI cable.
5.2 Initial Setup
Please follow the instructions below to complete the initial setup.
- While the welcome screen is displayed, use [◀/▶] to select "Next", then press [OK].
- Language setup screen will appear. Use [▲/▼] to select your language, then press [OK]. After this, use [▲/▼/◄/►] to select "Next", then press [OK].
![[Language] Please select your language for on-screen display. English Français Español ReturnNo](/content/2026/05/1070247/images/bdd8c40ab002be669d10ec917a4a22587f2a1211267dd65b3ce5836346413679.jpg)
-
"Auto Update Check" screen will appear. Use [▲/▼] to select the desired mode, then press [OK]. After this, use [▲/▼/◄/►] to select "Next", then press [OK].
-
Network setup screen will appear. In order to proceed with the network setup, see "Network Connection" on page 17.
-
This unit automatically detects whether or not a LAN cable is connected to it.
-
If a LAN cable is connected to this unit, "Wired IP Settings" screen will appear.
- If a LAN cable is not connected to this unit, "Wireless" screen will appear.
6. USING NETWORK FEATURES
6.1 Preparation for Network Features
Please follow the instructions below before using the network features.
- Connect this unit to the Internet.
- Refer to "Connection to the Network" on page 11.
- Perform the necessary network connection setup.
- Refer to "Network Connection" on page 17.
- Press [NET APP].

flowchart
graph TD
    A["NET APP 1"] --> B["NET APP"]
    C["NET APP 2"] --> D["NET APP"]
    E["NET APP 3"] --> F["NET APP"]
    G["NET APP 4"] --> H["NET APP"]
    I["NET APP 5"] --> J["NET APP"]
    K["NET APP 6"] --> L["NET APP"]
    M["NET APP 7"] --> N["NET APP"]
- Select the desired application, then press [OK].
- For the first time only, the "Network Service Disclaimer" screen will appear. After confirming the content, use [◀/▶] to select "Agree", then press [OK].
- Press [HOME] to exit.

Note
- The Network Service Disclaimer is displayed when first using a network service and its acceptance is applied to all network services.
6.2 Information on Network Services
For detailed information on the third-party Internet services, please visit each service provider's website:
Netflix : http://www.netflix.com/HowltWorks
Film Fresh : http://filmfresh.roxionow.com/
Blockbuster : http://www.blockbuster.com
VUDU : http://www.vudu.com/product_overview.html
Pandora : http://www.pandora.com
7. LIST OF SETTINGS
In the setup menu, you can customize various kinds of settings as you prefer. Refer to the following instructions to navigate through the setup menu.
- Press [HOME] to access the home menu.
- Use [◀/▶] to select "Settings", then press [OK].
- Use [/] to select the desired setting, then press [OK].
- Use [/] to move the highlight up and down in the list.
- To make a selection or to access options of an item, select the desired item, then press [OK].
- To go back to the previous screen, press [RETURN].
- Press [HOME] to exit.
Refer to the following table for the types of settings you can customize.
The item highlighted in gray is the default setting.
| Categories Menus / Options | |||
| Settings Video Out Video Resolution HDMI Auto | |||
| 1080p | |||
| 1080i | |||
| 720p | |||
| 480p | |||
| 480i | |||
| TV Aspect 16:9 Wide | |||
| 16:9 Pillarbox | |||
| 4:3 Pan & Scan | |||
| 4:3 Letterbox | |||
| Deep Color Auto | |||
| Off | |||
| Audio Out DRC | On | ||
| Off | |||
| Digital Output | PCM Stereo | ||
| Bitstream | |||
| PCM 5.1 | |||
| Categories Menus / Options | ||
| Settings System Language | English | |
| Français | ||
| Español | ||
| fun-Link (HDMI CEC) On | ||
| Off | ||
| Auto Update Check On | ||
| Off | ||
| Network Update | ||
| Initialize Restore factory settings and deactivate all connected applications | ||
| Disclaimer | ||
| OSS | ||
| Network Setup Network List | ||
| Easy Connect (WPS) | ||
| Manual | ||
| IP Settings | ||
| Network Test | ||
| Product Info | ||
8. SETUPS
8.1 Network Connection
[HOME] → “Network Setup”
Perform the network connection setup in order to use the network features, such as Netflix / BLOCKBUSTER / FILM FRESH / Picasa / Pandora / VUDU and the network update function.

Note
- Once a network connection is established, you are ready to use the network features, such as Netflix / BLOCKBUSTER / FILM FRESH / Picasa / Pandora / VUDU and the network update function, using the Internet without making any additional settings.
- If a network connection could not be established, you may need to check your router settings and make sure the physical connection is secure. If you need the MAC address of this unit to complete your router settings, you can view it on "Network Setup" screen under "Settings" in the home menu.
- When connecting this unit directly to a modem for the first time or connecting it to a modem which was previously connected to any other network device (e.g. a router, PC, etc.), you may have to power cycle the modem (unplug the modem's and/or router's AC plug from its AC outlet for 30 seconds and then plug it back in), this may reset the settings in the modem.
If you have a telephone/Internet modem with your cable service then you may have to use its reset button or remove the backup battery to reset this type of modem.
■ Wired
Connect this unit to a modem / router with a LAN cable before setting up. This unit will then automatically detect the LAN connection and leads you to the appropriate setup screen.
Auto (Wired)
Select "Auto" to set the network setting automatically.
-
Use [◀/▶] to select "Network Setup" in the home menu, then press [OK].
-
At "IP Mode", press [OK], and set it to "Auto", then press [OK].
-
Use [///] to select “Apply”, then press [OK].
- The unit will start a network test, and the test result will appear right after the test finishes.
- If the network test passes, press [OK].
Manual (Wired)
In the following cases, select "Manual"(wired) to set each setting as necessary.
- If a network connection could not be established when the setting was "Auto"(wired).
-
When instructed by your Internet service provider to make specific settings in accordance with your network environment.
-
Use [◀/▶] to select "Network Setup" in the home menu, then press [OK].
-
At "IP Mode", press [OK], and set it to "Manual", then press [OK].
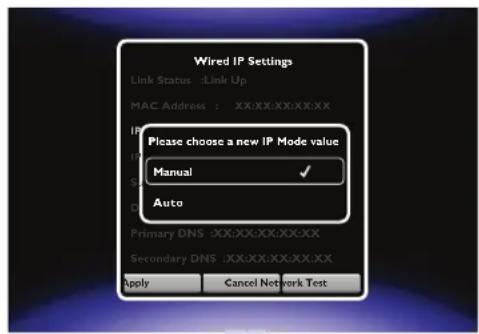
- Use [▲/▼] to select "IP Address", then press [OK].
- The IP address setting screen will appear. Enter an IP address using [▲/▼/◄/►] on the software keyboard, then select "Done", then press [OK]
![Wired IP Settings Link Status :Link Up MAC Address : XX-XX-XX-XXXX Please enter a new IP Address. Valid range of each segment is 0 to 225. Current Value xxx.xxx.x.xxx New Value Done 1 2 3 4 5 6 7 8 9 0 q w e r y u o p a s d f g h j k l ; z x c v b n m , . Space - - = \ [ ]'](/content/2026/05/1070247/images/5e5eff06cfaae67a65491d0ae96d96fdae14847b40bb7ca4968bc0c3df83282f.jpg)
- The software keyboard shows up by pressing [OK] on the remote while in a number cell.
- When inputting a single character using the software keyboard as soon as you press [OK] on the remote to input that character, then the character is displayed for a very short time to allow you to confirm that this was the correct character.
- Enter an IP address after checking the specifications of your router.
-
If an IP address is unknown, check the IP address of other devices (e.g. PC connected with a LAN cable). Then, in the furthest cell to the right, assign a different number from those other devices.
-
Use [▲/▼] to select "OK", then press [OK].
-
Repeat the same procedure as steps 4 to 5 for "Subnet Mask", "Default Gateway", "Primary DNS" and "Secondary DNS".
-
Enter the DNS addresses provided by your Internet provider.
-
If the DNS address is unknown, check the DNS address of other devices (e.g. PC connected with a LAN cable) and assign the same DNS address.
-
Use [▲/▼/◄/►] to select "Apply", then press [OK].
- The unit will start a network test, and the test result will appear right after the test finishes.
- If the network test passes, press [OK] to exit.
Continued on next page.

Note for "IP Address", "Subnet Mask", "Default Gateway", "Primary DNS" and "Secondary DNS"
- The range of input numbers is between 0 and 255.
- When you enter a wrong number, click on ✗ on the software keyboard to clear the incorrect number.
- To correct the wrong number in the previous cell, press [RETURN] to start over.
- If you want to enter a 1 or 2-digit number in one cell, type in on the software keyboard "001" for a 1-digit number, and "011" for a 2-digit number.
Wireless
This unit automatically detects nearby wireless networks when a LAN cable is not connected to the unit. Please make sure a LAN cable is not connected to the LAN terminal of this unit when making a wireless connection. Before proceeding with the setup, make a note of the SSID (your network name) and its password (WEP / WPA key).
Network List (Wireless)
- Use [◀/▶] to select "Network Setup" in the home menu, then press [OK].
- Use [/] to select "Network List", then press [OK].
- This unit will automatically start searching for wireless networks.
- The result of wireless network searching will be displayed. Use [/] to select the appropriate SSID, then press [OK].
- If you select an SSID with “ 🔍 ”, please go to step 4.

- "Password" entry screen will appear. Enter the WEP /WPA key of the selected wireless network using [▲/▼/◄/►] on the software keyboard, then select "Done", then press[OK].
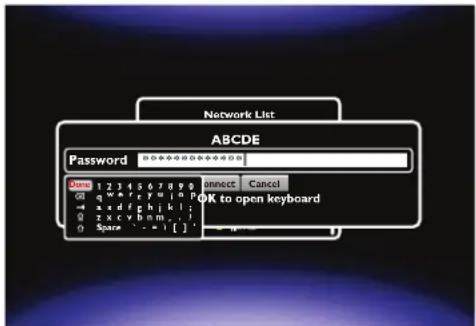
- The software keyboard shows up by pressing [OK] on the remote in the password input field.
- When inputting a single character using the software keyboard as soon as you press [OK] on the remote to input that character, then the character is displayed for a very short time to allow you to confirm that this was the correct character.
- If you do not know the WEP / WPA key for your wireless network, ask your ISP or the person who set up your wireless network.
- Use [▲/▼/◄/►] to select "Connect", then press [OK].
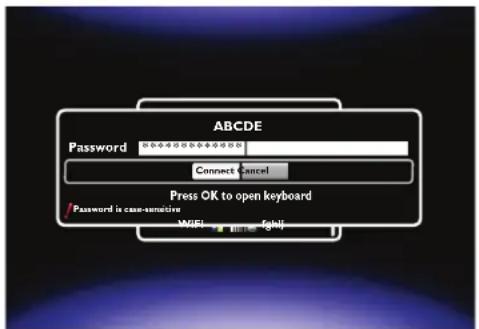
- If a connection succeeded, press [OK] to finish the setting, then press [RETURN] to exit.

Note
- When entering characters from the screen keyboard, look at the screen immediately after pressing the key to select the character. For a very short time the character you selected is displayed before the dot replaces the character for security reasons.
-
The internal wireless LAN supports following specifications.
-
Wireless standards : IEEE 802.11 b/g/n
- Frequency spectrum : 2.4 GHz
- Security protocol : WEP / WPA / WPA2
Manual (Wireless)
Set up the connection to the wireless router manually by entering the wireless network name (SSID).
In the following cases, select “Manual”(wireless) to perform each setting as necessary.
- When a connection test failed with the setting of "Network List" (wireless)
- Use [◀/▶] to select "Network Setup" in the home menu, then press [OK].
- Use [▲/▼] to select "Manual", then press[OK].
-
SSID (wireless network name) entry screen will appear. Enter the SSID using [▲/▼/◄/►] on the software keyboard, then select "Done", then press [OK].
-
The software keyboard shows up by pressing [OK] on the remote in the SSID input field.
-
When inputting a single character using the software keyboard as soon as you press [OK] on the remote to input that character, then the character is displayed for a very short time to allow you to confirm that this was the correct character.
-
"Password" entry screen will appear. Enter the WEP / WPA key of the selected wireless network using [▲/▼/◄/►] on the software keyboard, then select "Done", then press [OK].
![Manual Name ABCDE Password Done @234567890 connect Cancel @ qwert?uiioP → asdfgh[ikl ; scvhm ; 0 Space := ![] ; OK to open keyboard](/content/2026/05/1070247/images/434a06f86ee82fa9c2bbeb19548f63f861cf107ded309d63cc8866951c9708e2.jpg)
Continued on next page.
- Use [▲/▼/◄/►] to select "Connect", then press [OK].
- If a connection succeeded, press [OK] to finish the setting, then press [RETURN] to exit.
- If you do not know the password (WEP / WPA / WPA2 key) for your wireless network, ask your ISP or the person who set up your wireless network.
Easy Connect
You can set up the wireless connection quickly.
- “Easy Connect (WPS)” (Wi-Fi Protected Setup) is only available when your router supports it. For details, please refer to the user manual of your wireless router.
Push Button Method
Please confirm your wireless router has a PBC (Push Button Configuration) button. If the router does not have it, please perform the "Network List" setup.
- Use [◀/▶] to select "Network Setup" in the home menu, then press [OK].
- Use [/] to select “Easy Connect (WPS)”, then press [OK].
- Push the PBC button on your wireless router before the progress bar reaches the end.

- In case the procedure failed, press [OK] to return to the previous screen, then try again.
- If a connection succeeded, press [OK] to finish the setting, then press [RETURN] to exit.
PIN Code Method (Netbox PIN)
- Follow steps 1 to 3 in "Network List (Wireless)" on page 19.
- Use [▲/▼/◄/►] to select "WPS PIN", then press [OK].
- Use [◀/▶] to select "Netbox PIN", then press [OK].
- Set up your wireless router with the PIN code shown on your TV screen before the progress bar reaches the end.
- For details about how to set up your wireless router, please refer to your router manual.
-
"OK" will appear, then press [OK].
-
Press [RETURN] to exit.
- In case the procedure failed, press [OK] to return to the previous screen, then try again.
PIN Code Method (Router PIN)
- Follow steps 1 to 3 in "Network List (Wireless)" on page 19.
- Use [▲/▼/◄/►] to select "WPS PIN", then press [OK].
-
Use [◀/▶] to select "Router PIN", then press [OK].
-
Enter the router PIN that you obtained from your router into the router PIN field using [▲/▼/◄/►] on the software keyboard.
- Please refer to your router's user manual to learn where to find the router PIN.
-
Use [▲/▼/◄/►] to select "OK", then press [OK].
-
Press [RETURN] to exit.
- In case the procedure failed, press [OK] to return to the previous screen, then try again.
8.2 fun-Link (HDMI CEC)
[HOME] → “Settings” → “System” → “fun-Link (HDMI CEC)”
fun-Link (HDMI CEC) allows integrated system control over HDMI and is part of the HDMI standard. This function may not work properly depending on the device connected to the unit. When “fun-Link (HDMI CEC)” setting is set to “On”, the following functions will be available.
■ One Touch Play
fun-Link (HDMI CEC) operations are performed using remote control buttons. The TV will automatically be turned On and switched to the appropriate input source signal.
Buttons for one touch play:
• [▶ (play)]
■ One Touch Standby
When the connected fun-Link (HDMI CEC) compatible display device is turned Off first and then this unit will be turned Off.
■ System Information
Get & Set Menu Language
The unit recognizes the OSD language set on the TV and automatically sets the same language as the player menu language (OSD menu language) for this unit. Refer to the "Language" on page 16 for available languages.
8.3 HDMI Video Resolution
[HOME] → “Settings” → “Video Out” → “Video Resolution”
Set the resolution of the video signal being output from the HDMI OUT jack. You can select the desired “Video Resolution” among the settings listed below.
Actual Output Resolution:
| Setting in the "Video Resolution" | HDMI Video Output Resolution |
| HDMI Auto | The highest resolution that your display device supports will automatically be in effect. |
| 1080p | 1080p/60 |
| 1080i | 1080i |
| 720p | 720p |
| 480p | 480p |
| 480i | 480i |
Continued on next page.

Note
- Composite video output (VIDEO) jack can only output 480i/60.
- If you wish to have HDMI output and composite video output simultaneously, set the “Video Resolution” to “480i”.
- When connected to a TV which supports up to 1080i, this unit does not output 1080p contents. ("1080p" will not appear if the TV does not support it.)
- When connected to a TV which supports up to 720p, this unit does not output 1080p or 1080i contents. ("1080p" or "1080i" will not appear if the TV does not support it.)
- The selected resolution must also be supported by your display device.
• Refer also to your TV's manual. - When connected to an HDCP incompatible display device, the picture will not be displayed properly.
- The audio signals from the HDMI OUT jack (including the sampling frequency, the number of channels and bit length) may be limited by the connected device.
- Among the display devices that support HDMI, some do not support audio output (for example, projectors).
- When this unit's HDMI OUT jack is connected to a DVI-D compatible display device(s) (HDCP compatible) with an HDMI-DVI converter cable, the signals are output in digital RGB.
Copyright protection system
To play back digital video images via an HDMI connection, it is necessary that both the player and the display device (or an AV receiver / amplifier) support a copyright protection system called HDCP (high-bandwidth digital content protection system). HDCP is copy protection technology that comprises data encryption and authentication of the connected AV device. This unit supports HDCP. Please read the operating instructions of your display device (or an AV receiver / amplifier) for more information.
Important copyright information
Unauthorized copying, broadcasting, public performance and lending of discs are prohibited. This item incorporates copy protection technology that is protected by U.S. patents and other intellectual property rights of Rovi Corporation. Reverse engineering and disassembly are prohibited.
8.4 Software Update
[HOME] → “Settings” → “System” → “Network Update”

Note
- Software update will not change any of the current settings.
- The version of Netflix will also be updated if a newer version of Netflix is available when updating the software.
■ Network Update
- Use [◀/▶] to select "Settings" in the home menu, then press [OK].
- Use [/] to select "System", then press [OK].
- Use [▲/▼] to select "Network Update", then press [OK]. If a newer software is available, the software update screen will appear. Press [OK].
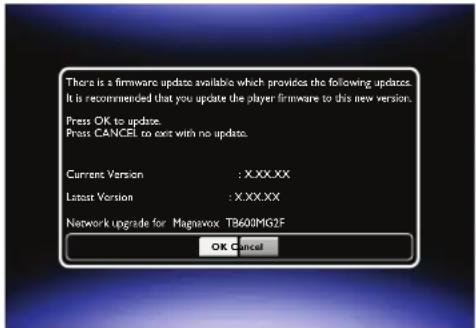
- After a software update is completed, this unit automatically restarts. Please confirm the update result, then press [OK].
Caution
- Please do not unplug the AC adapter, LAN cable or press [⏻ (Standby/on)] to set the unit into Standby mode while executing "Network Update".
Note
- In order to update the software via the Internet, you must connect the unit to the Internet and perform the necessary setup.
- For the network connection, refer to "Connection to the Network" on page 11.
- For the network setup, refer to “Network Connection” on page 17.
- Software update will not change any of the current settings.
- The software version of the network services will also be updated if a newer version is available when updating the software.
8.5 Initialize
[HOME] → "Settings" → "System" → "Initialize"
Menus to reset player settings and deactivate network services.
- Use [◀/▶] to select "Settings" in the home menu, then press [OK].
- Use [/] to select "System", then press [OK].
- Use [/] to select "Initialize", then press [OK].
- Use [/] to select the desired item, then press [OK].
- Use [◀/▶] to select "OK", then press [OK].
- Press [HOME] to exit.
9. TROUBLESHOOTING
| Problem Tip | |
| No power. Check if the AC adapter | is properly connected. |
| Unplug the AC adapter once, and wait for 5-10 seconds and then plug it in again. | |
| No sound or picture. Check if the con | connected TV is turned On. |
| Check if the connections are made securely and correctly. | |
| Check whether the connected TV or other device supports HDCP. (This unit will not output a video signal unless the other device supports HDCP.) | |
| Check whether the output format of this unit (HDMI FORMAT) matches the supported input format of the other connected device. | |
| No audio / video signal on the display device via HDMI cable. | If the unit is connected to an unauthorized display device with an HDMI cable, the audio / video signal may not be output. |
| Perform an HDMI cable hotplug, by disconnecting the HDMI cable from the TV and this unit. Then reconnect the HDMI cable to both devices while they are powered On. | |
| Ensure that your HDMI cable is certified. | |
| No audio signal from the loudspeakers of the TV screen. | Assign the audio input to the TV to the corresponding video input. |
| Make sure the HDMI cable is not plugged into the HDMI-DVI jack on the TV when using an HDMI signal that has both digital HD video and digital audio signal sources. | |
| Ensure that the TV's speakers are turned On in the TV menu. | |
| No audio signal from the loudspeakers of the audio system. | Turn On the audio system. |
| Set the audio system to the correct external audio input. | |
| Increase the volume level of the audio system. | |
| Distorted picture. Sometimes a small | amount of picture distortion may appear. This is not a malfunction. |
| Connect this unit directly to the TV. If the audio / video cables are connected to a VCR, pictures may be distorted due to the VCR copyright protection system. | |
| No sound or distorted sound. Adjust | the volume. |
| Check if speakers are connected correctly. | |
| Check the HDMI connections. | |
| Make sure the HDMI cable is not plugged into the HDMI-DVI jack on the TV when using an HDMI signal that has both digital HD video and digital audio signal sources. | |
| Check the settings in "Audio Out" menu. | |
| The unit does not respond to the remote control. | Aim the remote control directly at infrared sensor window on the front or the top panel. (Refer to page 7) |
| Reduce the distance to infrared sensor window. | |
| Check the +/- polarity of the batteries and replace both batteries in the remote control if required. | |
| Go to “IR Signal Check” on page 31. | |
| To check remote operation, aim the remote at the unit then press any arrow button. The Standby/on Indicator on the unit will turn Off when the button is pressed and turn On again when the button is released. This confirms that the unit is receiving the IR remote signal. | |
| ⊗ in the upper right hand corner of the TV screen. | The current operation is not possible. |
| The unit stops responding. To completely reset the unit, unplug the AC adapter for 30 seconds. | |
| Cannot connect to the network. Check to see if there is power on the modem / router. | |
| Streaming movies often stop or start buffering during playback. | Contact your Internet service provider.(You may need to improve the broadband speed.) |
| Cannot use the Film Fresh / Blockbuster feature. | Film Fresh / Blockbuster is only available in the United States. |
| Check if the network connection is made properly. | |
| Visit filmfresh.roxionow.com/Login (Film Fresh) or www.blockbuster.com/auth/login (Blockbuster) on your PC and create an account. | |
| Cannot use the VUDU service. VUDU | U is only available in the United States. |
| Check if the network connection is made properly. | |
| Visit www.vudu.com/product_overview.html on your PC and create an account. | |
| Cannot rent or buy movies / TV shows on VUDU. | You need to activate the VUDU account. |
| Log into your account at https://my.vudu.com and check your payment information. | |
| The picture quality of VUDU movie is poor. | Check the speed of your Internet connection. You need speeds of at least 9 Mbps to this player for high quality uninterrupted playback. |
| VUDU movie often stops or starts buffering during playback. | Contact your Internet service provider to troubleshoot your Internet connection for speed and line quality. Consistent line quality and speed are very important for Internet video playback. |
| Cannot use the Pandora® feature. Pa | Dora is only available in the United States. |
| Check if the network connection is made properly. | |
| You must create a Pandora account and activate this unit. (See page 14) | |
| Cannot use the Picasa feature. Check | if the network connection is made properly. |
| You must have a Picasa account. If not, create an account on your computer.(See page 14) | |

Note
- Do not attempt to repair this unit yourself. This may cause severe injury, irreparable damage to your HD Streaming Player and void your warranty.
- Please have available your HD Streaming Player's model and serial number before contacting us. These numbers are available on the cabinet as well as on the packaging.
10. SPECIFICATIONS
| General |
| Signal system NTSC Color |
| AC adapter power source AC 100 - 240V, 50 / 60 Hz |
| Power requirements 6.5V DC |
| Power consumption 6.5 W (Standby: 1.0 W) |
| Dimensions (width x depth x height) 4.5 × 4.7 × 1.2 inches (114.1 × 118.0 × 29.5 mm) |
| Weight 0.42 lb. (0.19 kg) |
| Operating temperature 41°F (5°C) to 104°F (40°C) |
| Operating humidity Less than 80 % (no condensation) |
| Terminals | |
| DC input 6.5 V, 1000 mA | |
| Audio output (Analog) (RCA jack x 2) | L/R: 2 Vrms (output impedance: more than 1kΩ) |
| Video output (RCA jack x 1) | 1 Vp-p (75Ω) |
| HDMI output (HDMI OUT jack x 1) | Digital Video: 480i, 480p, 720p, 1080i, 1080pDigital Audio |
| LAN terminal | 10BASE-T / 100BASE-TX |
| Wireless LAN (Internal) | IEEE 802.11 b/g/n |

Note
- The specifications and design of this product are subject to change without notice.
11. NETWORK SERVICE DISCLAIMER
Content and services made available through this product are transmitted by third parties by means of networks and transmission facilities over which Company has no control and third party services may be terminated or interrupted at any time, and Company makes no representation or warranty that any content or service will remain available for any period of time. Without limiting the generality of this disclaimer, Company expressly disclaims any responsibility for any interruption or suspension of any content or service made available through this product. Company is not responsible for customer service related to the content and services. Any question or request for service relating to the content or services should be made directly to the respective content and service providers.
THIRD PARTY CONTENT AND SERVICES MADE AVAILABLE THROUGH THIS PRODUCT ARE PROVIDED "AS IS." COMPANY DOES NOT WARRANT CONTENT OR SERVICES SO PROVIDED, FOR ANY PURPOSE WHATSOEVER. COMPANY EXPRESSLY DISCLAIMS ANY WARRANTIES, EXPRESS OR IMPLIED INCLUDING WITHOUT LIMITATION, WARRANTIES OF MERCHANTABILITY OR FITNESS FOR A PARTICULAR PURPOSE, ACCURACY, VALIDITY, TIMELINESS, LEGALITY, SUITABILITY, OR QUALITY OF ANY CONTENT OR SERVICE MADE AVAILABLE THROUGH THIS PRODUCT.
IN NO EVENT SHALL COMPANY BE LIABLE FOR, ANY DAMAGES, WHETHER ARISING IN CONTRACT OR TORT, INCLUDING WITHOUT LIMITATION, ANY DIRECT, INDIRECT, INCIDENTAL, SPECIAL OR CONSEQUENTIAL DAMAGES, LOST PROFITS, ATTORNEY FEES, EXPENSES, OR ANY OTHER DAMAGES ARISING OUT OF, OR IN CONNECTION WITH, ANY CONTENT (OR ANY INFORMATION CONTAINED THEREIN) OR SERVICE PROVIDED TO THE USER OR ANY THIRD PARTY, EVEN IF ADVISED OF THE POSSIBILITY OF SUCH DAMAGES.
All content and services accessible through this product belong to third parties and are protected by copyright, patent, trademark and/or other intellectual property rights. Such content and services are provided solely for the User's personal noncommercial use. User may not use any content or services in a manner that has not been authorized by the content owner or service provider. Without limiting the foregoing, unless expressly authorized by the applicable content owner or service provider, you may not modify, copy, republish, upload, post, transmit, translate, sell, create derivative works, exploit, or distribute in any manner or medium any content or services made available through this product.
12. SAFETY INSTRUCTIONS
■ To Avoid the Hazards of Electrical Shock and Fire
- Do not handle the AC adapter with wet hands.
- Do not pull on the AC adapter when disconnecting it from an AC outlet. Grasp it by the AC adapter case to unplug it.
- Do not put your fingers or objects into the unit.
■ Location and Handling
- Do not install the unit in direct sunlight, near strong magnetic fields, in a place subject to dust or strong vibration or on the wall behind the TV.
• To prevent injury, this unit must be securely attached to a wall in accordance with the installation instructions. - Avoid a place with drastic temperature changes.
- Install the unit in a vertical (w/ mounting bracket included) or horizontal and stable position. Do not place anything directly on top or bottom of the unit.
- Depending on the environment, the temperature of this unit may increase slightly. This is not a malfunction.
- Be sure to unplug the AC adapter from the outlet before carrying the unit.
■ Note about Recycling
- This unit's packaging materials are recyclable and can be reused. Please dispose of any materials in accordance with your local recycling regulations.
- Batteries should never be thrown away or incinerated but disposed of in accordance with your local regulations concerning chemical wastes.
- For product recycling information, please visit www.magnavox.com, click on Protect Our Environment on the home page.

■ Notice for Progressive Scan Output
- Consumers should note that not all high definition television sets are fully compatible with this product and may cause artifacts to be displayed in the picture. In case of picture problems with 480 progressive scan output, it is recommended that the user switch the connection to the ‘standard definition’ output.
13. MAINTENANCE
Servicing
- Please refer to relevant topics on "TROUBLESHOOTING" on page 25 before returning the product.
- If this unit becomes inoperative, do not try to correct the problem by yourself. There are no user-serviceable parts inside. Place the unit into the Standby mode, unplug the AC adapter, and please visit www.magnavox.com/support for Online Support or contact Customer Service 1-800-605-8610.
■ Cleaning the Cabinet
- Wipe exterior surfaces of the unit with a soft cloth.
- Never use a solvent, thinner, benzene or alcohol to clean the unit. Do not spray insecticide liquid near the unit. Such chemicals may discolor the surface or damage the unit.
■ IR Signal Check
- If the remote control is not working properly, you can use a digital camera (including a cellular phone with built-in camera) to see if it is sending out an infrared signal. See next.
With a digital camera (including built-in cell phone cameras):
Point a digital camera towards the remote control. Push any button on the remote control and look through the digital camera. If the infrared light appears through the camera, the remote control is working.

Or
To check remote operation, aim the remote at the unit then press any arrow button. The Standby/on Indicator on the unit will turn Off when the button is pressed and turn On again when the button is released. This confirms that the unit is receiving the IR remote signal.
14. SUPPLIED ACCESSORIES
- AC adapter
• Remote Control (NB930UD) - Batteries (AAA, 1.5 V × 2)
• Audio / video cables - SETUP MANUAL
- Wall mount bracket
- Wall mount screws
- VUDU sheet
Caution
- Do not use adapters other than the supplied AC adapter for this unit.
- Do not use the supplied AC adapter with any other device.
We are not responsible for any damages or injury caused by your misuse described above.
15. INSTALLING ON A WALL OR SHELF
Screw clockwise to fasten.

natural_image
Mechanical component diagram showing two positively charged pins with a rotation arrow (no text or symbols)■ Installing on a wall
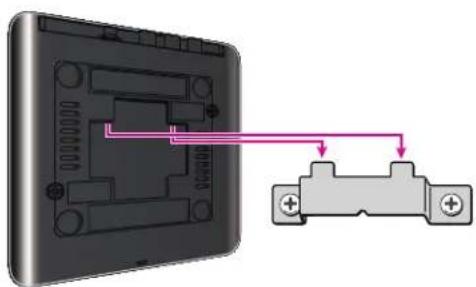
Be sure to attach the wall-mount bracket securely to a wall. You may find it helpful to drill pilot holes into the mounting surface. Pilot holes should be slightly smaller than the body of the screws for a good hold.
natural_image
Diagram showing a device with internal components connected to a terminal block, no text or symbols presentPosition the unit so the wall-mount slots in the back of the unit line up with the two projecting tabs of the wall-mount bracket. Place the wall-mount slots over the two projecting tabs on the wall-mount bracket, then slide the unit down until the projecting tabs fit firmly into the wall-mount slots on the unit.
* Do not place this unit behind the TV as this will block the unit's IR receiver.

■ Installing on a shelf
This unit should not be placed in a book case, cabinet or a closed off space unless it has proper ventilation. Make sure to leave space of 3.9 inches (10 cm) or more as displayed.
* 3.9 in (10 cm) or more
MAGNAVOX is a registered trademark of Philips Electronics North America Corporation and is used by Funai Electric Co. Ltd. and Funai Corporation, Inc. under license from Philips Electronics North America.
© 2011 Funai Electric Co., Ltd.
All rights reserved. No part of this manual may be reproduced, copied, transmitted, disseminated, transcribed, downloaded or stored in any storage medium, in any form or for any purpose without the express prior written consent of Funai.
Furthermore, any unauthorized commercial distribution of this manual or any revision hereto is strictly prohibited.
Information in this document is subject to change without notice. Funai reserves the right to change the content herein without the obligation to notify any person or organization of such changes.
All other trademarks used herein remain the exclusive property of their respective owners. Nothing contained in this manual should be construed as granting, by implication or otherwise, any license or right to use any of the trademarks displayed herein. Misuse of any trademarks or any other content in this manual is strictly prohibited. Funai shall aggressively enforce its intellectual property rights to the fullest extent of the law.
16. TRADEMARK INFORMATION

Netflix and the Netflix logo are trademarks or registered trademarks of Netflix, Inc.
http://www.netflix.com/HowItWorks
FILM FRESH
Film Fresh and the Film Fresh logo are registered trademarks of Film Fresh Inc.
http://filmfresh.roxionow.com/
BLOCKBUSTER®
BLOCKBUSTER name, design and related marks are trademarks of Blockbuster Inc.
http://www.blockbuster.com

VUDU ^TM is a trademark of VUDU, Inc.
http://www.vudu.com/product_overview.html
PANDORA®
internet radio
PANDORA, the PANDORA logo, and the Pandora trade dress are trademarks or registered trademarks of Pandora Media, Inc. Used with permission.
http://www.pandora.com
DOLBY.
DIGITAL PLUS
Manufactured under license from Dolby Laboratories. "Dolby" and the double-D symbol are trademarks of Dolby Laboratories.
HDMI®
HIGH-DEFINITION MULTIMEDIA INTERFACE
HDMI, the HDMI Logo, and High-Definition Multimedia Interface are trademarks or registered trademarks of HDMI Licensing LLC in the United States and other countries.

CERTIFIED®
The Wi-Fi CERTIFIED Logo is a certification mark of the Wi-Fi Alliance.
Adobe, Flash, and the Flash logo are either registered trademarks or trademarks of Adobe Systems Incorporated in the United States and/or other countries.
Powered by Adobe ^® Flash ^®
Contains Adobe® Flash® Lite® technology by Adobe Systems Incorporated. This HD Streaming Player (TB600MG2F) contains Adobe® Flash® Lite® software under license from Adobe Systems Incorporated, Copyright © 1995-2011 Adobe Macromedia Software LLC. All rights reserved. Adobe, Flash and Lite are trademarks of Adobe Systems Incorporated.
17. GLOSSARY
AAC
Advanced Audio Coding (AAC) is a lossy compression and encoding scheme for digital audio. Audio files that have been encoded with AAC generally achieves better sound quality than MP3 at similar bit rates.
Analog Audio
An electrical signal that directly represents sound. Compare this to digital audio which can be an electrical signal, but is an indirect representation of sound. See also “Digital Audio”.
Aspect Ratio
The width of a TV screen relative to its height. Conventional TVs are 4:3 (in other words, the TV screen is almost square); widescreen models are 16:9 (the TV screen is almost twice as wide as its height).
Blockbuster
Blockbuster is online service which you can rent or purchase movies and TV episodes streamed over the Internet. Blockbuster is only available in the United States.
Digital Audio
An indirect representation of sound by numbers. During recording, the sound is measured at discrete intervals (44,100 times a second for CD audio) by an analog-to-digital converter, generating a stream of numbers. On playback, a digital-to-analog converter generates an analog signal based on these numbers. See also “Sampling Frequency” and “Analog Audio”.
DNS Server
A server which translates Internet domain names into IP addresses.
Dolby Digital Plus
Dolby Digital Plus is the next generation digital audio compression technology developed as an extension to Dolby Digital.
Film Fresh
Film Fresh is online service which you can rent or purchase movies and TV episodes streamed over the Internet. Film Fresh is only available in the United States.
Gateway
IP address of the electronic devices (such as router) which provide Internet access.
HDMI (High-Definition Multimedia Interface)
A digital interface between audio and video source. It can transmit component video, audio, and control signal with one cable connection.
Hub
A device used for connecting multiple devices to the network.
IP Address
A set of numbers which are assigned to devices participating in a computer network.
LAN (Local Area Network)
A group of computer networks covering a small area like a company, school or home.
Netflix
Netflix is online movie rental service, offering online streaming to customers in the United States.
Pandora®
Pandora is a popular personalized Internet radio service. You can instantly listen to free personalized radio stations streamed over the Internet from Pandora. Pandora is only available in the United States.
PCM (Pulse Code Modulation)
The most common system of encoding digital audio, found on CD and DAT. Excellent quality, but requires a lot of data compared to formats such as Dolby Digital and MPEG audio.
Picasa
Picasa allows you to create your original web-based albums and organize your digital photographs and images in chronological order.
Router
A networking device which distinguishes the IP address assigned to each device and routing and forwarding information in the computer network.
Sampling Frequency
The rate which sound is measured by a specified interval to turn into digital audio data. The numbers of sampling in one second defines as the sampling frequency. The higher the rate, the better the sound quality.
Subnet Mask
A mask which is used to determine what subnet an IP address belongs to.
VUDU
VUDU is a leading HD on-demand video service which utilizes the Internet connection to deliver the highest quality on-demand video and Internet applications.
16:9 Pillarbox
When a 4:3 formatted picture is shown on a 16:9 screen, the complete 4:3 picture is displayed while adding black bars on each side of the screen to hide the blank screen area.
18. ESPAÑOL
18.1 Mando a Distancia

FUNAI CORP. will repair this product, free of charge in the USA in the event of defect in materials or workmanship as follows:
DURATION:
PARTS: FUNAI CORP. will provide parts to replace defective parts without charge for one (1) year from the date of original retail purchase. Certain parts are excluded from this warranty.
LABOR: FUNAI CORP. will provide the labor without charge for a period of ninety (90) days from the date of original retail purchase.
Note: Any product sold and identified as refurbished or renewed carries a ninety (90) days labor and parts limited warranty.
LIMITS AND EXCLUSIONS:
THIS WARRANTY IS EXTENDED ONLY TO THE ORIGINAL RETAIL PURCHASER. A PURCHASE RECEIPT OR OTHER PROOF OF ORIGINAL RETAIL PURCHASE WILL BE REQUIRED TOGETHER WITH THE PRODUCT TO OBTAIN SERVICE UNDER THIS WARRANTY.
This warranty shall not be extended to any other person or transferee.
This warranty is void and of no effect if any serial numbers on the product are altered, replaced, defaced, missing or if service was attempted by an unauthorized service center. This limited warranty does not apply to any product not purchased and used in the United States.
This warranty only covers failures due to defects in material or workmanship which occur during normal use. It does not cover damage which occurs in shipment, or failures which are caused by repairs, alterations or products not supplied by FUNAI CORP., or damage, which results from accident, misuse, abuse, mishandling, misapplication, alteration, faulty installation, improper maintenance, commercial use such as hotel, rental or office use of this product, or damage which results from fire, flood, lightning or other acts of God.
THIS WARRANTY DOES NOT COVER PACKING MATERIALS, ANY ACCESSORIES (EXCEPT REMOTE CONTROL), ANY COSMETIC PARTS, COMPLETE ASSEMBLY PARTS, DEMO OR FLOOR MODELS.
FUNAI CORP. AND ITS REPRESENTATIVES OR AGENTS SHALL IN NO EVENT BE LIABLE FOR ANY GENERAL, INDIRECT OR CONSEQUENTIAL DAMAGES ARISING OUT OF OR OCCASIONED BY THE USE OF OR THE INABILITY TO USE THIS PRODUCT. THIS WARRANTY IS MADE IN LIEU OF ALL OTHER WARRANTIES, EXPRESS OR IMPLIED, AND OF ALL OTHER LIABILITIES ON THE PART OF FUNAI, ALL OTHER WARRANTIES INCLUDING THE WARRANTY OF MERCHANTABILITY AND FITNESS FOR A PARTICULAR PURPOSE, ARE HEREBY DISCLAIMED BY FUNAI AND ITS REPRESENTATIVES IN THE UNITED STATES. ALL WARRANTY INSPECTIONS AND REPAIRS MUST BE PERFORMED BY AN AUTHORIZED SERVICE CENTER. THIS WARRANTY IS ONLY VALID WHEN THE UNIT IS CARRIED-IN TO AN AUTHORIZED SERVICE CENTER. THE PRODUCT MUST BE ACCOMPANIED BY A COPY OF THE ORIGINAL RETAIL PURCHASE RECEIPT. IF NO PROOF OF PURCHASE IS ATTACHED, THE WARRANTY WILL NOT BE HONORED AND REPAIR COSTS WILL BE CHARGED.
IMPORTANT:
THIS LIMITED WARRANTY GIVES YOU SPECIFIC LEGAL RIGHTS. YOU MAY HAVE OTHER RIGHTS THAT VARY FROM STATE TO STATE. IF, AT ANY TIME DURING THE WARRANTY PERIOD, YOU ARE UNABLE TO OBTAIN SATISFACTION WITH THE REPAIR OF THIS PRODUCT, PLEASE CONTACT FUNAI CORP.
ATTENTION:
FUNAI CORP. RESERVES THE RIGHT TO MODIFY ANY DESIGN OF THIS PRODUCT WITHOUT PRIOR NOTICE.
WARRANTY STATEMENT REGARDING NON AUTHORIZED REPAIRS:
To obtain warranty service, you must take the product, or deliver the product freight prepaid, in either its original packaging or packaging affording an equal degree of protection, to any AUTHORIZED SERVICE CENTER. FUNAI CORP. will not reimburse you for any service done by unauthorized service providers without prior written approval.
To locate your nearest AUTHORIZED SERVICE CENTER or for general service inquiries, please contact us at:
FUNAI SERVICE CORPORATION
Tel: 1-800-605-8610
www.magnavox.com/support
2200 Spiegel Drive, Groveport, OH 43125
- CONTENTS
- Netflix
- Film Fresh / Blockbuster
- Pandora® internet radio
- Picasa
- Easy and simple connection to your HDTV with an HDMI (High-Definition Multimedia Interface) cable
- fun-Link (HDMI CEC) (Consumer Electronics Control)
- HDMI Deep Color
- Product Info
- Netflix ESN
- FUNCTIONAL OVERVIEW
- Top / Front Panel
- Note
- Rear Panel
- Caution
- Remote Control
- ■ Installing the Batteries in the Remote Control
- ■ Using the Remote Control
- Guide to On-Screen Display
- Home Menu
- ■ Setup Menu
- CONNECTIONS
- HDMI Video / Audio Connection
- Standard Video + Standard Audio Connection
- Connection to an Audio System
- ■ 2-Channel Analog Audio Connection
- ■ HDMI Audio Connection
- ■ HDMI Audio Out
- Connection to the Network
- ■ Wired Connection
- ■ Wireless Connection
- BEFORE YOU START
- Finding the Viewing Video Source Input on Your TV
- Initial Setup
- USING NETWORK FEATURES
- Preparation for Network Features
- Information on Network Services
- LIST OF SETTINGS
- SETUPS
- Network Connection
- ■ Wired
- Auto (Wired)
- Manual (Wired)
- Note for "IP Address", "Subnet Mask", "Default Gateway", "Primary DNS" and "Secondary DNS"
- Wireless
- Network List (Wireless)
- Manual (Wireless)
- scvhm ;
- Easy Connect
- Push Button Method
- PIN Code Method (Netbox PIN)
- PIN Code Method (Router PIN)
- fun-Link (HDMI CEC)
- ■ One Touch Play
- Buttons for one touch play:
- ■ One Touch Standby
- ■ System Information
- Get & Set Menu Language
- HDMI Video Resolution
- Copyright protection system
- Important copyright information
- Software Update
- ■ Network Update
- Initialize
- TROUBLESHOOTING
- SPECIFICATIONS
- NETWORK SERVICE DISCLAIMER
- SAFETY INSTRUCTIONS
- ■ To Avoid the Hazards of Electrical Shock and Fire
- ■ Location and Handling
- ■ Note about Recycling
- ■ Notice for Progressive Scan Output
- MAINTENANCE
- Servicing
- ■ Cleaning the Cabinet
- ■ IR Signal Check
- With a digital camera (including built-in cell phone cameras):
- Or
- SUPPLIED ACCESSORIES
- INSTALLING ON A WALL OR SHELF
- ■ Installing on a wall
- ■ Installing on a shelf
- TRADEMARK INFORMATION
- FILM FRESH
- BLOCKBUSTER®
- PANDORA®
- DOLBY.
- HDMI®
- GLOSSARY
- AAC
- Analog Audio
- Aspect Ratio
- Blockbuster
- Digital Audio
- DNS Server
- Dolby Digital Plus
- Gateway
- HDMI (High-Definition Multimedia Interface)
- Hub
- IP Address
- LAN (Local Area Network)
- PCM (Pulse Code Modulation)
- Router
- Sampling Frequency
- Subnet Mask
- VUDU
- 16:9 Pillarbox
- ESPAÑOL
- Mando a Distancia
- DURATION:
- LIMITS AND EXCLUSIONS:
- IMPORTANT:
- ATTENTION:
- WARRANTY STATEMENT REGARDING NON AUTHORIZED REPAIRS:
Brand : MAGNAVOX
Model : TB600MG2F
Category : Media player