TFD-1506DVBT - Portable DVD Player DENVER - Free user manual and instructions
Find the device manual for free TFD-1506DVBT DENVER in PDF.

User questions about TFD-1506DVBT DENVER
0 question about this device. Answer the ones you know or ask your own.
Ask a new question about this device
Download the instructions for your Portable DVD Player in PDF format for free! Find your manual TFD-1506DVBT - DENVER and take your electronic device back in hand. On this page are published all the documents necessary for the use of your device. TFD-1506DVBT by DENVER.
USER MANUAL TFD-1506DVBT DENVER
Instructions on environment protection

natural_image
Symbol of a trash bin crossed with no text or numbers, representing waste sorting or restriction (no text present)Do not dispose of this product in the usual household garbage at the end of its lifecycle; hand it over at a collection point for the recycling of electrical and electronic appliances. The symbol on the product, the instructions for use or the packing will inform about the methods for disposal.
The materials are recyclable as mentioned in this marking. By recycling, material recycling or other forms of re-utilization of old appliances, you are making an important contribution to protect our environment. Please inquire at the community administration for the authorized disposal location.
Table of Contents
Table of Contents 1
Specifications 2
Installation 3
Important Safety Instruction 4
Warnings and Cautions 5-7
Functional Parts(TV) 8
Functional Parts(DVD) 9
Rear view of TV set 10
Setup 11
Remote Control Operation 12-15
MENU Screens 16-17
Initial Settings(DVD) 18-19
Getting started 20-22
Basic operation 23-27
DVD Setting menu 28
Media manage 29
DVB menu 30-33
DVB Convenient functions 34-35
System setting 36
Game 37
SPECIFICATIONS
| Receiving System: | ECK, |
| Colour System: | PSECAM |
| LCD Panel: | 391mm(15.4inch) diagonal |
| Ext.Antenna: | 75 Ohm Coaxial Cable |
| Ext. In/Out: | PC Input, SCART IN |
| Speaker: | 8 Ohm x 2 |
| Audio Output: | 2W |
| Power Consumption: | AC 110-240V 50/60Hz,60W |
| Dimension: | W385 xD180 xH371(mm) |
| Net Weight: | 4KG |
Note: Design and specifications are subject to change without prior notice.
REMOTE CONTROL
Transmitting System : Infrared
Power Supply :DC 3V
INSTALLATION
Thank you very much for your purchase of this product, the most natural Colour Television Receiver. To enjoy your set to the full from the very beginning, read this manual carefully and keep it handy for ready reference.
INSTALLATION
- Locate the receiver in the room where direct light does not strike the screen.
Total darkness or a reflection on the picture screen can cause eyestrain. Soft and indirect lighting is recommended for comfortable viewing.
- Allow enough space between the receiver and the wall to permit ventilation.
- Avoid excessively warm locations to prevent possible damage to the cabinet or premature component failure.
- This TV operates on a DC supply provided by the AC-DC adaptor. The voltage is as indicated on the label on the back cover. Only use the AC-DC adaptor supplied with the TV and never apply an AC mains to the TV directly. The AC-DC adaptor operates on and AC mains supply, the voltage is as indicated on the label of the AC-DC adaptor. Connect the DC plug of the AC-DC adaptor to the DC 12V socket at the back of the TV. Connect the AC-DC adaptor and its mains cord. Insert the mains plug in the wall socket having a mains voltage of 110-240V.
- Do not install the receiver in a location near heat sources such as radiator, air ducts, direct sunlight, or in a place somewhere like close compartment and close area.
- Do not cover the ventilation openings when using the set.
CAUTION
Never tamper with any components inside your set, or any other adjustment controls not mentioned in this manual. The LCD panel used in this product is made of glass. Therefore, it can break When the product is dropped or applied with impact. Be careful not to be injured by broken glass pieces in case the LCD panel breaks. When you clean up dust or stick of a water drop on the LCD panel. The power cord should be pulled out from the plug receptacle, then wipe the receiver with dried soft cloth. During thunder and lighting, unplug the power cord and antenna cord to prevent your TV set from damage. All television receivers are high voltage instruments. All "inside work" on your receivers should be performed only by the TV service personnel.
If some abnormal phenomena happens, may be you have some mis-operation, please take off power and restart your TV set.
IMPORTANT SAFETY INSTRUCTION

WARNING
RISK OF ELECTRIC SHOCK DO NOT OPEN

WARNING: TO REDUCE THE RISK OF ELECTRIC SHOCK DO NOT REMOVE COVER OR BACK. NO USER-SERVICEABLE PARTS INSIDE. REFER SERVICING TO QUALIFIED SERVICE PERSONNEL.

The lighting flash with arrow head within a triangle is intended to tell the user that parts inside the product are a risk of electric shock to persons.

The exclamation point within a triangle is intended to tell the user that important operating and servicing instructions are in the papers with the appliance.
WARNING: TO REDUCE THE RISK OF ELECTRIC SHOCK DO NOT EXPOSE THIS APPARATUS TO RAIN OR MOISTURE AND OBJECTS FILLED WITH LIQUIDS, SUCH AS VASES, SHOULD NOT BE PLACED ON THIS APPARATUS.
The power cable/disconnect device shall remain easy to operate/disconnect.
WARNINGS AND CAUTIONS

text_image
Illustration showing a computer monitor with a crossed-out black X symbol and stars, indicating a warning or prohibition.
Caution
Do not drop or push objects into the television cabinet slots or openings. Never spill any kind of liquid on the television receiver.
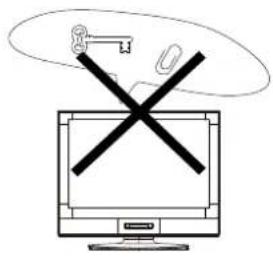
text_image
Diagram showing a computer monitor with a crossed-out X symbol and a key, possibly indicating a prohibition or rejection mechanism.
Caution
Do not insert anything in the ventilation holes. If metal or something flammable enters, it may result in fire or electric shock.

natural_image
Line drawing of a computer monitor with a decorative floral icon above it (no text or symbols)
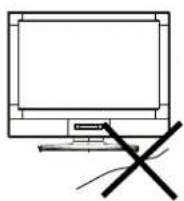
Caution
Do not place objects on this unit, it may damage the screen surface.

Caution
Do not squash power supply cord under the television receiver.


Caution
Do not throw anything at the set. The screen glass may explode by impact and cause serious injury.
WARNINGS AND CAUTIONS
text_image
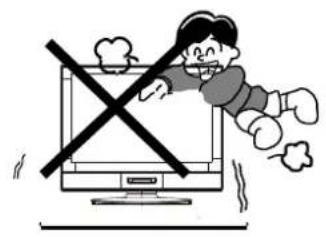
Cartoon illustration showing a child on a computer screen with a crossed-out 'X' symbol, indicating no change or prohibition.
Caution
Never stand on, lean on, or suddenly push the television or its stand. You should pay special attention to children. Serious injury may result if it should fall.
natural_image
Simple line drawing of a cross over a geometric shape (no text or symbols)
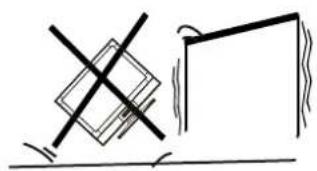
Caution
Do not place your television on an unstable cart, stand, shelf or table. Serious injury to an individual, and damage to the television, may result if it should fall.
text_image
Illustration showing a person running away from a TV screen with a crossed-out magnifying glass, symbolizing online shopping or online shopping.
Caution
When the television receiver is not used for an extended period of time, it is advisable to disconnect the AC power cord from the AC outlet.

natural_image
Simple line drawing of a heating element with steam rising (no text or symbols)
Caution
Do not block the ventilation holes in the back cover. Adequate ventilation is essential to prevent failure of electrical component.

text_image
Safety warning symbol showing a computer monitor crossed out with a 'X' and a warning light, accompanied by a warning light icon.
Warning
Avoid exposing the television receiver to direct sunlight and other source of the heat. Do not stand the television receiver directly on other produces which give off heat .E.g.video cassette players. Audio amplifiers. Do not place naked flame sources, such as lighted candle on the television. Do not expose the LCD screen surface to the sun, it may damage the screen surface.
WARNINGS AND CAUTIONS


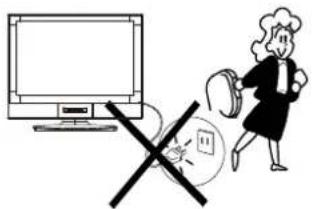
Warning
Take care not to connect many appliances to the same mains socket as this could result in fire or electric shock.

text_image
Diagram showing a computer monitor connected to a power line with lightning and a crossed-out electrical component, indicating electrical hazard or resistance.
Warning
High voltages are used in the operation of this television receiver. Do not remove the cabinet back from your set. Refer servicing to qualified service personnel.

text_image
Diagram showing a crossed-out monitor with a diagonal line and a spray bottle, likely illustrating a safety or cleaning concept.
Warning
To prevent fire or electrical shock hazard, Do not expose the television receiver to rain or moisture.

natural_image
Illustration of a computer monitor with lightning bolts and a bag, no text or symbols present
Warning
For you own safety, Do not touch any part of the set, main lead or aerial lead during lighting storms.
Minimum distances

text_image
10cm 20cm 10cm 10cm 10cm
Caution
If the television is to be built into a Compartment or similarly enclosed, the minimum distances must be maintained.
Heat build-up can reduce the service life of your television, and can also be dangerous.
FUNCTIONAL PARTS(TV)
Front View of LCD Set

text_image
⑨8 76 5④3 OFF TOTAO STADI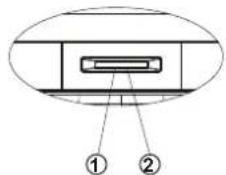
text_image
Diagram of a device with labeled components, showing two numbered parts (① and ②) pointing to a rectangular component.- LED indicator lamp
- Remote Sensor
- Standby Button
- TV/DVD Button
- MENU Button
- P+ Button
- P- Button
- V+Button
- V-Button
To turn the TV power ON
Put the TV set on the correct place, then connect the DC plug of the AC-DC adaptor to the DC 12V socket at the back of the TV set. Connect the adaptor main cord to the wall outlet, then the LED indicator lamp turns red/blue and the TV set is at Standby/work Mode. At Standby Mode, if Standby Button is pressed the power indicator will change to blue. It takes a few seconds before the picture appears.
To turn the TV power OFF
Press the Standby Button to make the TV set in Standby Mode, then disconnect the power plug from the wall outlet.
NOTE
If TV is the selected input without signal received and NO operation is performed for about 5 minutes continuously, the TV set will enter standby mode. For any inputs other than TV, the TV set will not enter standby mode automatically without users instruction. If you are not going to use this TV set for a long time, switch off the set and disconnect the power plug from the wall outlet.
FUNCTIONAL PARTS(DVD)
text_image
Technical diagram of a device with numbered components for identification- DVD Slot
- Repeat
- Forward Skip
- Reverse Skip
- Play/Pause
- Stop
- Open/Close
Switch this LCD-TV Set to DVD status, insert the disk to DVD slot, and the player will suck it in.
Notes:
- Do not attach any seal or label to either side (the labeled side or the recorded side) of a disc.
-
Do not use irregularly shaped CDs (e.g., Heartshaped or octagonal) since they may result in malfunctions.
-
Some playback operations of DVDs and Video CDs may be intentionally programmed by software manufacturers. This unit plays DVDS and Video CDs according to disc content designed by the software manufacturer, therefore some playback features may not be available or other functions may be added.
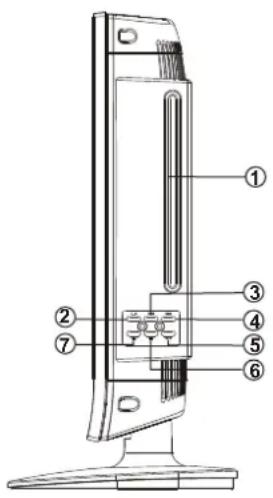
REAR VIEW OF TV SET
DC IN 12V
HEADPHONE
PC IN
FULL-SCART
RF INPUT(ANT.)
TO DC IN 12V

text_image
TO POWER SOURCE
text_image
DC IN 12V G VGA PC IN AUDIO Full-SCART ANT.NOTE
Precautions when connecting to other equipment
When using external equipment with this TV set, please read the instruction manual of the external equipment.
Switch off all power supplies to the equipment and TV set before connection.
Always ensure that the input and output terminals are correctly connected.
Remote Control Battery Installation
Requires two AAA batteries(supplied).

natural_image
Diagram of a vertical cylindrical device with internal components and an attached rectangular component (no text or symbols)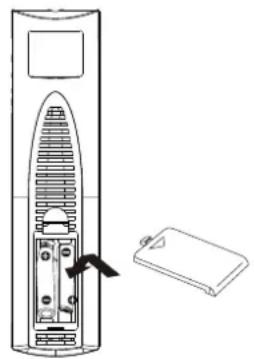
natural_image
Diagram of a vertical cylindrical device with internal components and an attached rectangular device (no text or symbols)TO USE AC POWER SOURCE
Use the AC polarized line cord provided for operation on AC. Insert the AC cord plug into a standard 110-240V 50/60Hz polarized AC outlet.
NOTE:
- This TV can be connected to the specified voltage (AC 110-240V, 50/60Hz).
- If the polarized AC cord does not fit into a non-polarized AC outlet, do not attempt to file or cut the blade. It is the user's responsibility to have an electrician replace the obsolete outlet.
Procedure
- Turn the remote control face down. Remove battery cover by pressing down on the marking on the cover and sliding it off in the direction indicated.
- Install batteries matching(+) and(-) polarity signs.
- Replace the battery cover by sliding in reverse until the lock snaps.
Note: Incorrect installation can cause battery leakage and corrosion that will damage the Remote control.
Precautions
- Replace batteries in pair.
- Do not mix battery types(zinc carbon with alkaline).
-
Do not recharge, heat, short-circuit, disassemble, or burn batteries.
-
If you cause a static discharge when touching the unit, and the unit fails to function, simply unplug the unit from the AC outlet, wait a few minutes, and plug it back in. The unit should return to normal operation.
Remote Control Operation

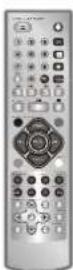
text_image
OPEN/CLOSE POWER 1 2 3 PPT 4 5 6 + 7 8 9 10+ 0 VIEW SWAP SCAN TTX FAW PTRV REPEAT MUTE TV/AV/DVD PROG+ VOL- MENU VOLI PROG- DVR/AVE REVEALSIZE STOP MIX INDEX TEXT SUBPACE ANGLE FEC IT+ ZOOM MINXPROGRAM/BTITLE CPG AUDIO SET UP A-B DISPLAY EXIT RAD-DTV MODE:
POWER BUTTON( ⏻ )
Press this button to turn the TV on/off. Press any Number Button or Program Up/Down Button, picture and sound will come on within a few seconds.
PROGRAM SELECTION BUTTONS(0-9)
Push the number for your desired program and the program indicator will be displayed on the screen.
Press number key 0-249 for program selection.
Press the number keys to select teletext pages in teletext mode.
DIGIT BUTTON(-/-)
Press this button to select program between 0-249 program.
For example, If you want to access program 8, press i °8 i ± key only, If you want to access program 88, you should press this "-/-" button twice the screen display "--", then press "8" "8" key, the TV set will switch to program 88; If you want to access program 188, you should press this i°-/-± button three times the screen display i°---i ± £ then press i°1i ± "8" "8" key, the TV set will switch to program 188.
PICTURE MODE BUTTON(P.P)
Press this button to select the desired picture mode, DYNAMIC, USER MILD and STANDARD can be selected cyclically.
DISPLAY BUTTON( + )
Press this button sequential to recall for the program number, system, logo etc on the screen.
SLEEP BUTTON(①)
Press it on display and set the sleep timer in 10 minutes step up to three hours. When the preset time runs to 0, the TV set will go into stand by mode.
*If no program received, the TV set will switch to stand by auto after 5 minutes.
Q.VIEW BUTTON
Press this button to return to the previously viewed program.
SWAP Button
You can adjust your TV program list order, press this button, the program swap menu will be displayed, as shown below. E.g. to swap channel 0 and 7, press i°SWAPi±button, pressi°PROG+/-i±to choose .FROM and press i°VOL+/-i±to set the channel number as i°0i±, and as the same way to set the TO asi°7i±, last to do choose thei°SAVEi± and press i°VOL+/-i±to implement this fuction.
MUTE BUTTON
Press once to mute the sound, press again to return to previously set sound level.
AV MODE BUTTON (TV/AV/DVD)
Press this button to switches for TV/AV/SCART/DVD/DVBT.
Remote Control Operation

text_image
OPEN/CLOSEPOWER 1 2 3 PPT 4 5 6 + 7 8 9 10+ 0 VIEW SWAP SCAN TTX FAW PCTV REPEAT MUTE TV/AV/DVD PROG+ VOL- MENU VOL1 PROG- DVR/WE REVEALSIZE STOP MIX INDEX TEXT SURFACE ANGLE FEC ZOOM MENU PROCPM SUBTITLE CPG AUDIO SET UP A-B DISPLAY EXIT RAD-DPROG +/- BUTTON ( )
Press the Program Up Button to select the program forwards. Press the Program Down Button to select the program backwards. (Use this button for Page Up/Down to increase/decrease page number in TELETEXT mode).
VOL +/- BUTTONS ( )
Press Volume Up/Down Buttons to adjust sound level.
MENU BUTTON( 📂 )
Press this button to display the On-Screen menu function.
SOUND SYSTEM BUTTON (SYS.) (OPTION)
When the sound system is incorrect, Press this button to select the correct sound system.
ZOOM BUTTON(OPTION)
- Press ZOOM during playback or still playback to activate the Zoom function. The square frame appears briefly in the right bottom of the picture.
- Each press of the ZOOM button changes the TV screen in the following sequence: 16°9'ZOOM'→NORMAL'4°3) Note: Zoom not work on DVD mode
TELETEXT MODE
REVEAL BUTTON
Sometimes the answers of quizzes, jokes etc are hidden. Press REVEAL button to reveal the hidden information.
SIZE BUTTON
Press this button to change the Teletext screen display mode among the following:(1) Upper half screen enlarged ; (2) Lower half screen enlarged ; (3) Normal screen state.
STOP BUTTON
Press this button to stop teletext.
MIX BUTTON
Press this button to turn on or off the teletext background.
INDEX BUTTON
Press this button to obtain the index page.
TEXT BUTTON
Press this button to turn on or off the teletext.
SUB.PAGE BUTTON
Press this button to display sub pages.
Remote Control Operation

text_image
OPEN/CLOSE POWER 1 2 3 PPT 4 5 6 + 7 8 9 10+ 0 VIEW SWAP SCAN TTX FAW POSTV REPEAT MUTE TV/AV/DVD PROG+ VOL- MENU VOL I PROG- DVR/DVD REVEALSIZE STOP MIX INDEX TEXT SURFACE ANGLE FEC II - ZOOM MIN/PROGRAM/BTITLE A-8 AUDIO SETUP A-B DISPLAY EXIT RADIODVD/DVB MODE:
PLAY/PAUSE (▶)
Starts playback or pause playback(DVD only).
STOP ( ■ )
Stops playback(DVD only).
Reverse Skip (◄◄ )/SCAN
Go to previous chapter / track DVB channel or to the beginning(DVD only).
Scan key in DVB mode.
Forward Skip(▶) / TTX
Go to the next chapter / track DVB channel.
Teletext key in DVB mode.
ZOOM
Enlarges video image.
REPEAT
Repeat chapter, track, title all in DVD mode.
A-B/RADIO
Repeat A-B in DVD mode.
Switch TV and Radio channels.
PROGRAM/EPG
Place a track on the program list in DVD mode.
EPG(Electronic program guide) in DVB mode.
DVB/DVD
DVB and DVD switch.
TITLE
Return to DVD title menu.
POWER
Switches Player ON and OFF.
0-9 NUMBER BUTTON
Selects numbered items in a menu.
ENTER
Confirms menu selection.
MENU
Accesses menu on a DVD disc.
Enter DVB menu on DVB mode.
DISPLAY
Accesses On-Screen display.
Remote Control Operation
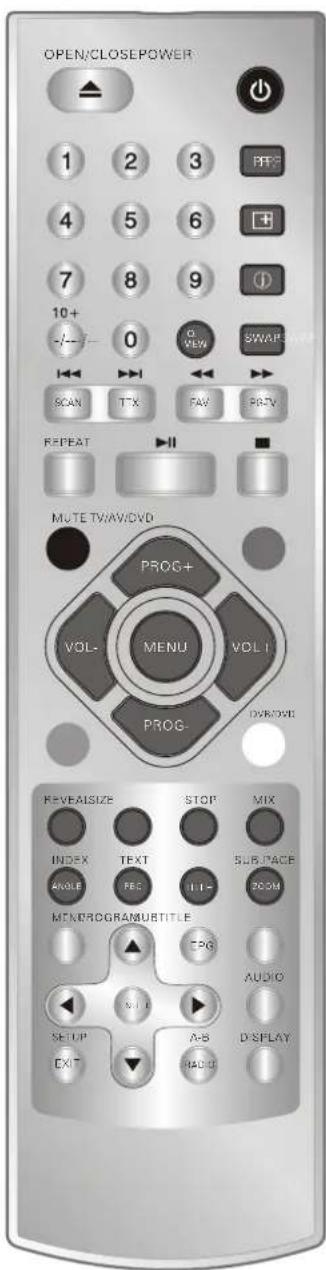
text_image
OPEN/CLOSEPOWER 1 2 3 PPT 4 5 6 + 7 8 9 10+ 0 VIEW SWAP SCAN TTX FAW PROV REPEAT MUTE TV/AV/DVD PROG+ VOL- MENU VOLI PROG- DVR/AVE REVEAISIZE STOP MIX INDEX TEXT SURFACE ANGLE FEC IT - SUBPACER ZOOM MINXPROGRAMUBTITLE CPG AUDIO SET UP A-B D-SPLAY EXIT RAD GDVD/DVB MODE:
AUDIO
Selects an audio language.
SUBTITLE
Selects a subtitle language.
ANGLE
Selects a DVD camera angle if available in DVD mode.
SETUP/EXIT
Accesses or removes setup menu.
Exit Key in DVB mode.
10+ BUTTON
Add 10+ while your selection is more than 10.
MUTE
Disable Audio output.
◀/FAV
Fast backward in DVD .Set favourite
channel in DVB mode.
/PG-TV
Program favourite TV, fast forward in DVD
PBC
PBC on/off switch in DVD mode.
MENU SCREENS
This TV allows you to adjust any setting from the menu screens using i^_i±,i· VOL+/-i± and i^+/-i± buttons.
Press i°MENU±button to display the menu, pressi°PROG+/-i±to change menu from one to another, i°VOL+/-i±to enter the chosen menu, pressi°PROG+/-i±to select the item, and then press i°VOL+/-i±to adjust each item.
Press i°MENUi± again to exit the menu mode.

text_image
PICTURE CONTRAST BRIGHTNESS TINT COLOUR SHARPNESS COLOUR TEMP COOL PICTURE MODE NORMAL ADJUST SELECT EXITPICTURE MENU
You can adjust the contrast, brightness, tint(NTSC only) colour, sharpness.
COLOUR TEMP: NORMAL / WARM / COOL
PICTURE MODE: NORMAL / SOFT / RICH / CUSTOM
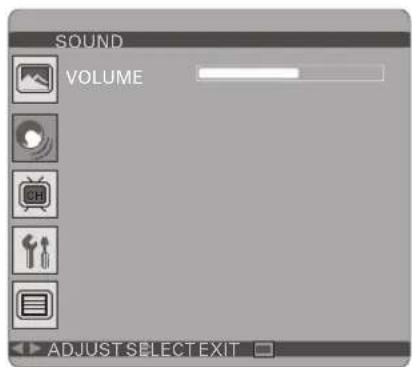
text_image
SOUND VOLUME ADJUST SELECT EXITSOUND MENU
Enter sound menu, you can adjust VOLUME.
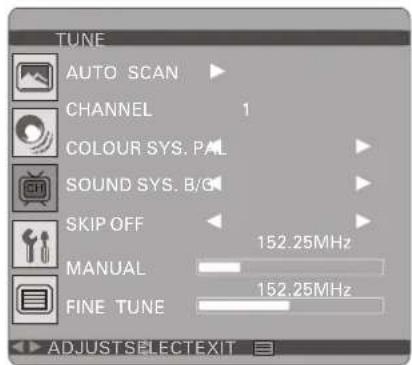
text_image
TUNE AUTO SCAN CHANNEL 1 COLOUR SYS. PAL SOUND SYS. B/G SKIP OFF 152.25MHz MANUAL 152.25MHz FINE TUNE ADJUSTSELECTEXITTUNE MENU
AUTO SCAN: Press;°VOL+/-±to begin auto search program, and press menu to exit auto search. CHANNEL: The number is the current channel, and you can also change channel from one to another.
COLOUR SYS. PAL/SECAM (optional)
SOUND SYS. B/G,D/K,I,L,L; (optional)
SKIP: Set this item on to skip the channel which you are watching.
MANUAL: To start searching until a program is searched, or press;°MUNE;± to exit.
Fine Tune: Frequency data can be fine-tuned in upward or downward by the VOL+/- buttons.
MENU SCREENS
text_image
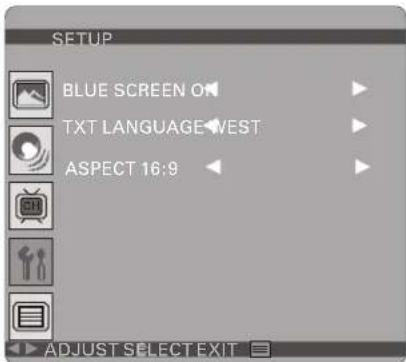
SETUP BLUE SCREEN ON TXT LANGUAGE WEST ASPECT 16:9 ADJUST SELECT EXITSETUP MENU
BULE SCREEN: You can set background ON or OFF. TXT LANGUAGE.
ASPECT: You can set the picture to 16:9, 4:3, ZOMM, 16:9 FS, PANORAMA.
text_image
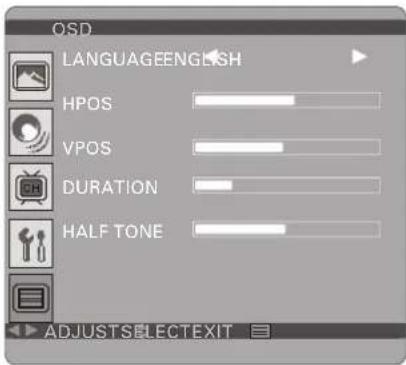
OSD LANGUAGEENGLISH HPOS VPOS DURATION HALF TONE ADJUSTSELECTEXITOSD MENU
You can choose the language, adjust the H-position, V-position, duration and halftone.
text_image
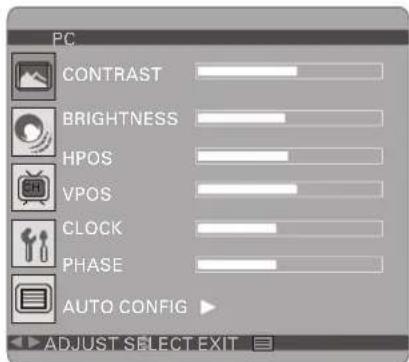
PC CONTRAST BRIGHTNESS HPOS VPOS CLOCK PHASE AUTO CONFIG ADJUST SELECT EXITPC MENU(under PC mode only)
You can adjust the CONTRAST, BRIGHTNESS
HPOS/VPOS Press the VOL+/- buttons to adjust the picture Horizontal and Vertical position.
CLOCK Press the VOL+/- to minimize any vertical bars or stripes visible on the screen background.
PHASE When necessary, adjust the pixel phase of the picture to avoid picture interference.
AUTO CONFIG To adjust the screen position automatically. It will take a few seconds and during this process the screen will be black.
NOTE:
If the set is cold, there may be a small i^ flicker i ± when the set is switched on. It is normal, There is nothing wrong with the set.
If possible, use the VESA 1024X768@60HZ video mode to obtain the best image quality for your LCD monitor. Under other resolutions some scaled or processed pictures may appear on the screen.
Some dot defects may appear on the screen, like red, green or blue Spots, However, this will have no impact or effect on the monitor performance.
Do not press the LCD screen with your finger for a long time as it may incur some damage to the screen.
INITAL SETTINGS(DVD)
COMMON PROCEDURES OF INITIAL SETTINGS
Press SETUP button to get the setup menu. Use direction buttons "◀◀◀" to select the preferred item. After finishing settings, press SETUP again to TV display.
The following menu items can be changed:
GENERAL: selects the GENERAL PAGE menu.
AUDIO : selects the Audio menu.
DOLBY : selects the DOLBY DIGITAL SETUP menu.
PREFERENCE: selects the PREFERENCE PAGE menu.
GENERAL SETUP PAGE

text_image
General Audio Dolby Video Preference -- General Setup Page TV display Ps Angle OMark Osd Lang Eng English On Normal/Ps Screen Saver On Off Japanese Off Normal/Lb Wide 16:9 Go To General Setup PageThe following menu items can be changed:
TV DISPLAY: selects the aspect ratio of the playback picture.
NORMAL/PS: pan &scan display.
NORMAL/LB: letterbox display.
WIDE: widescreen display.
ANGLE MARK: viewing angles change option (if available). See changing the angles on page 10.
SCREEN SAVER: this is to turn on/off screen saver.
AUDIO SETUP PAGE

text_image
General Audio Dolby Video Preference -- 8Speaker Setup Page Downmix Stereo LT/RT Stereo Speaker Setup PageThis page is for setup speaker output.
DOWNMIX Stereo
LT/RT: 2ch output, main channel with surround. STEREO: 2ch output, main right channel with right surround; main left channel with left surround.
DOLBY DIGITALSETUP PAGE
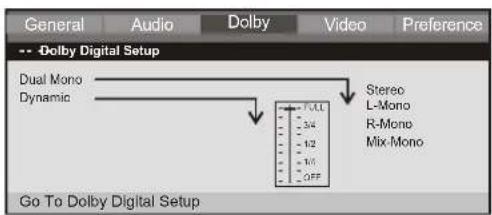
text_image
General Audio Dolby Video Preference -- Dolby Digital Setup Dual Mono Dynamic Stereo L-Mono R-Mono Mix-Mono Go To Dolby Digital SetupThe following menu items can be changed:
DUAL MONO: Reproduction mode, used only when the input consists of two independent audio channels(1/1 mode). Possible selections are: STEREO: Reproduce both channels as is. L-MONO: Reproduce the left channel only. R-MONO: Reproduce the right channel only. The default is STEREO.
DYNAMIC: Dynamic range compression.
VIDEO DIGITALSETUP PAGE
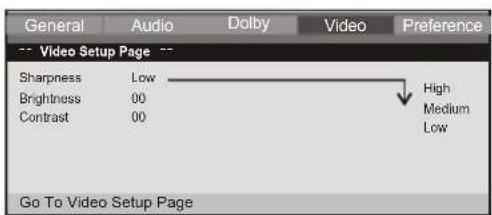
text_image
General Audio Dolby Video Preference -- Video Setup Page -- Sharpness Low High Brightness 00 Medium Contrast 00 Low Go To Video Setup PageThe following menu items can be changed:
Sharpness: sharpness value.
Brightness: brightness value.
Contrast: contrast value.
INITAL SETTINGS(DVD)
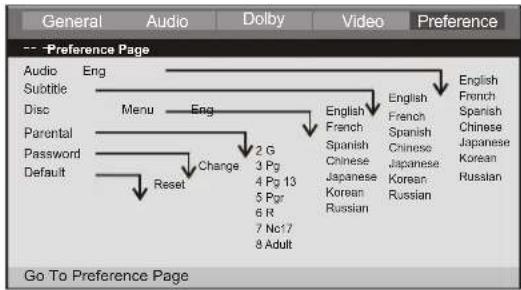
PREFERENCE SETUP PAGE
flowchart
graph TD
    A["Audio Subtitle"] --> B["Disc"]
    B --> C["Parental Password Default"]
    C --> D["Reset"]
    D --> E["Change 2 G 3 Pg 4 Pg 13 5 Pg 6 R 7 No17 8 Adult"]
    E --> F["Menu"]
    F --> G["Eng"]
    G --> H["English French Spanish Chinese Japanese Korean Russian"]
    H --> I["English French Spanish Chinese Japanese Korean Russian"]
    I --> J["English French Spanish Chinese Japanese Korean Russian"]
The following menu items can be changed:
AUDIO: Selects a language for audio(if available).
SUBTITLE: Selects a language for subtitles(if available).
DISC MENU: Selects a language for DISC menus (if available).
PARENTAL[DVD only]: This is to disable the playing of specified DVDs which are unsuitable for children. Some DVDs are encoded with specific rating level. If the rating level of the disc is higher than that preset in the setup operation, playback of the disc will be prohibited. After selecting one of the PARENTAL items the screen will change to the PASSWORD page, and password is required, The factory initial setting is 1369.
PASSWORD: Selects the menu setup PASSWORD CHANGE PAGE.
PASSWORD CHANGE PAGE
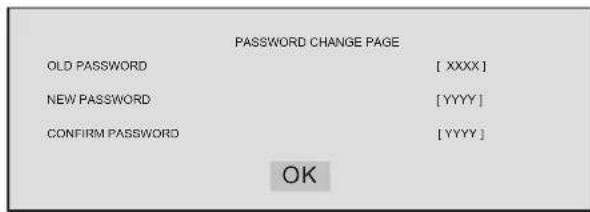
text_image
PASSWORD CHANGE PAGE OLD PASSWORD [ XXXX] NEW PASSWORD [YYYY] CONFIRM PASSWORD [YYYY] OKOLD PASSWORD: Enter the OLD password, (Factory setting is 1369), and the cursor will jump automatically to NEW PASSWORD.
NEW PASSWORD: Enter the NEW password. Enter 4 digits from the remote control unit numeric buttons, and the cursor will automatically jump to CONFIRM PASSWORD.
CONFIRM PASSWORD: Confirm the NEW password by entering it again. If the confirmation is incorrect, the cursor will stay in this column. After entering, the correct new password again, the cursor will jump automatically to OK.
OK: When cursor is on this button, press ENTER key to confirm setting.
DEFAULT: Back to the factory setting.
Getting Started
Introduction
• Title (DVD video discs only)
A title is generally a distinct section of a DVD disc. For example the main feature could be title 1, a documentary describing how the film was made could be title 2, and cast interviews could be title 3. Each title is assigned a reference number enabling you to locate it easily.
Chapter (DVD video discs only)
A chapter is a segment of a title such as a scene in a film or one interview in a series. Each chapter is assigned a chapter number, enabling you to locate the chapter you want. Depending on the disc, chapters may not be recorded.
PBC: Playback Control (Video CD only)
Playback control is available for Video CD (VCD) version 2.0 disc formats. PBC allows you to interact with the system via menus, search functions, or other typical computer-like operations. Moreover, still pictures of high resolution can be played if they are included in the disc. Video CDs not equipped with PBC (Version 1.1) operate in the same way as audio CDs.
Track
A distinct element of audiovisual information, such as the picture or sound track for a specific language (DVD), or a musical piece on a video or audio CD. Each track is assigned a track number, enabling you to locate the track you want. DVD discs allow one track of video (with multiple angles) and several tracks of Audio.
Getting Started
Playing a DVD or Video CD(Operation)
- Playback Setup
- turn on the power switch at the left side of the product.
- Please insert your chosen disc, with the playback side down.
- Playback will start automatically.
DVD
Use the ▲▼◀▶ buttons to select the title/chapter you want to view, then press ENTER to start. Press MENU to return to the menu screen.
VCD
Use the number buttons to select the track you want to view and press MENU to return to the menu screen. Menu settings and operating procedures may differ. Follow the instructions on the each menu screen.
Notes:
- If parental control is set and the disc isn't fit for the rating setting you must input the password. (Which page).
- DVDs may have a region code. Your player does not play discs that have a region code different from your player.
- Unless stated otherwise, all operations described use the remote control. Some features may also be available on the setup menu.
Moving to another CHAPTER/TRACK DVD VCD
When a title on a disc has more than one chapter or a disc has more than one track, you can move to another chapter/track as follows:
-
Press SKIP ▶ on▶ briefly during playback to select the next (or previous)chapter/track or to return to the beginning of the current chapter/track.
-
Press SKIP twice briefly to step back to the previous chapter/track.
-
To go directly to any chapter during DVD playback, input the chapter/track number.
Changing the Audio Channel VCD
Press AUDIO repeatedly during playback to hear a different audio channel (Stereo, Left, or Right).
Repeat A-B DVD VCD
To repeat a sequence.
- Press A-Bat your chosen starting point "A". Appears briefly on the TV screen.
- Press A-Bagain at your chosen end point." ☐ AB" appears briefly on the TV screen and the repeat sequence begins.
- Press A-B again to cancel.
Repeat DVD VCD
You can play a title/chapter/all/track on a disc repeatedly.
Press REPEAT during playback to select a desired repeat mode.
Getting Started
Playing a DVD or Video CD(Operation)
DVD Video Discs - " Repeat Chapter / Title/Off"
Chapter: repeats the current chapter. Chapter
Title: repeats the current title.
All : repeats all the tracks on a disc.
Off : does not play repeatedly.
Video CDs, discs - " Repeat Track /All/Off"
Track : repeats the current track
All : repeats all the tracks on a disc.
Off : does not play repeatedly.
Notes:
-
On a Video CD with PBC, you must set PBC to Off to use therepeat function.
-
If you press SKIP (◀◀ or ▶◀) once during Repeat Chapter(Track) playback, the repeat playback cancels
Zoom DVD VCD
Use zoom to enlarge the video image:
-
Press ZOOM during playback or still playback to activate the Zoom function. The square frame appears briefly in the right bottom of the picture.
-
Each press of the ZOOM button changes the TV screen in the following sequence:
2X size → 3X size → 4X size → 1/2 size → 1/3 size → 1/4size→normal size
-
Use the ▲▼◀▶ buttons to move through the zoomed picture.
-
To resume normal playback, press ZOOM button until screen becomes 1X.
N Note: Zoom may not work on some DVDs.
Special DVD Features Checking the contents of DVD discs:
Menus DVDs may offer menus that allow you to access special features. To use the disc menu, press MENU. Input the corresponding number or use the ▲▼◀▶ buttons to highlight your selection. Then press ENTER.
MENU
-
Press MENU.If the current title has a menu, the menu appears on the screen. Otherwise, the disc menu may not appear.
-
The MENU offers features such as camera angles, spoken language and subtitle options, and chapters for the title.
-
Press MENU to exit.
Camera Angle DVD
If the disc contains scenes recorded at different camera angles, you can change to a different camera angle during playback. Press ANGLE repeatedly during playback to select a desired angle. Note that the number of the current angle appears on screen.
Note:
The angle indicator will blink on the TV screen during scenes recorded at different angles as an indication that angle switching is possible.
Changing the Audio Language DVD
Press AUDIO repeatedly during playback to hear a different audio language or audio track. With DVD-RW discs recorded in VR mode that have both a main and a Bilingual audio channel, you can switch between Main (L), Bilingual (R), or a mix of both (Main + Bilingual) by pressing AUDIO.
Subtitles DVD
Press SUBTITLE repeatedly during playback to see the different subtitle languages.
TITLE button DVD
DVD disc:
Press TITLE button, then the DVD menu or titles available on the disc will be displayed. Then you can use " ◆" and ENTER button to select programs.
22
Basic operation
Audio CD and MP3/WMA Disc Features
Disc
The DVD player can play CD and MP3/WMA formatted recordings on CD-R, CD-RW, DVD+R and DVD±RW discs.
Audio CD
Once an Audio CD is inserted it will be played automatically. Its playblack information will be show on screen, such as chapter elapse time.
MP3 / WMA
-
Press ◀ to ▶ select a folder, and press ENTER to see the folder contents.
-
Press ▲ to▼ select a track then press PLAY or ENTER. Playback starts.
MP3 / WMA disc compatibility with this player is limited as follows:
-
Sampling frequency: within 8 - 48 kHz(MP3), within 32 - 48kHz (WMA).
-
Bit rate: within 8 - 320kbps( MP3 ), 32 - 192kbps ( WMA ).
The player cannot read an MP3 /WMA file that has a file extension other than MP3/WMA.
CD-R physical format should be ISO 9660.
- If you record MP3/ WMA files using software that cannot create a file system (eg. Direct-CD) it is impossible to playback MP3/WMA files. We recommend that you use Easy-CD Creator, which creates an ISO 9660 file system.
- File names should have a maximum of 8 letters and must incorporate an".mp3" or ".wma" extension.
- They should not contain special letters such as "/? * : < > I "etc.
- The total number of files on one disc should be less than 650.
This DVD player requires discs and recordings to meet certain technical standards in order to achieve optimal playback quality. Pre-recorded DVDs are automatically set to these standards. There are many different types of recordable disc formats (including CD-R containing MP3 or WMA files) and these require certain pre-existing conditions (see above) to ensure compatible playback. - Customers should note that permission is required in order to download MP3 / WMA files and music from the Internet. Our company has no right to grant such permission. Permission should always be sought from the copyright owner.
Basic operation
Playing an Audio CD or MP3/WMA
Pause CD MP3 WMA
- Press PLAY/PAUSE during playback.
- To return to playback, press PLAY/PAUSE again.
- Moving to another Track CD MP3 WMA
- Press SKIP (◀◀ or ▶◀) briefly during playback to go to the next(or previous) track or to return to the beginning of the current track..
- Press SKIP twice briefly to go back to the previous track.
- You can play any track by inputting its number.
MP3 WMA
- Press " ▲▼" to focus on the file then press enter.
- You can play any track by inputting its number. Then press enter.
Repeat Track/Folder/All/Off CD MP3 WMA
You can play a track/folder/all on a disc.
-
Press REPEAT when playing a disc. The repeat icon appears.
-
Press REPEAT to select a desired repeat mode.
Track: repeats the current track.
Folder: repeats the current folder.
All: repeats all the tracks on a disc.
Off(No display): normal playback.
N Note:
If you press SKIP (▶) once during Repeat Track playback, the repeat playback cancels.
Repeat A-B CD MP3 WMA
- To repeat a sequence during disc playback press A-B at your chosen starting point. The Repeat icon "A" appear on the menu screen.
- Press A-B again at your chosen end point. The Repeaticon"AB" appear on the menu screen, and the sequence begins to play repeatedly.
- To exit the sequence and return to normal play, press A-Bagain. The Repeat icon disappears from the menu screen.
Playing a JPEG Disc
Slide Show JPEG
There are 16 types for slide show. You can press Program repeatedly to select the slide show Mode.
Still Picture JPEG
- Press PLAY/PAUSE during slide show. The player will now go into PAUSE mode.
- To return to the slide show, press PLAY/ PAUSE again.
Using this DVD Player you can view Kodak PICTURE CDs and discs with JPEG files. - Insert a disc. The file menu appears on the TV screen.
- Press to select a folder, and press ENTER. A list of files in the folder Appears. If you are in a file list and want to return to the previous Folder list, use the buttons on the remote to highlight and press ENTER.
- If you want to view a particular file, press to highlight a file and press ENTER or PLAY. Viewing the file proceeding starts.
- If the DISC you insert is a Kodak Picture CD it will be played automatically.
Viewing a JPEG Disc
NOTE:
Press" >> " to move to the next page," << " to return to previous folder, and " MENU" return to menu.
Zoom JPEG
- Press 'ZOOM'.
2,Used "▶" to enlarge,or "◀" to shorten the picture.
24
Basic operation
Playing a JPEG Disc
To rotate picture ▲▼◀◀
Press during showing a picture to rotate the picture clockwise or counter clockwise.
JPEG disc compatibility with this player is limited as follows:
-
Depending upon the size and number of JPEG files, it could take a long time for the DVD player to read the disc's contents. If you don't see an on screen display after several minutes, some of the files may be too large reduce the resolution of the JPEG files to less than 2M pixels as 2760 x 2048 pixels and burn another disc.
-
The total number of files and folders on the disc should be less than 650. Some discs may be incompatible due to a different recording format or the condition of disc. Ensure that all the selected files have the."jpg" extensions when copying into the CD layout. If the files have."jpg" or. "jpeg" extensions, please rename them as."jpg" file. File names without."jpg" extension will not be able to be read by this DVD player. Even though the files are shown as JPEG image files in Windows Explorer.
Playing a DVD VR format Disc
This unit will play DVD-R/RW discs recorded using the DVD-Video format that have been finalized using a DVD-recorder.
This unit will play DVD-RW discs recorded using the Video recording (VR) format.
-
Insert a disc .The DVD-VR menu appears on the TV screen.
-
Press ▲ /▼ to select a track then press PLAY or ENTER and playback starts.
N Note:
Unfinalized DVD-R/RW discs cannot be played in this player. Some DVD-VR disc are made with CPRM data by DVD RECORDER.
Player does not support these kinds of discs and display "unknown disc".
What is "CPRM"
CPRM is a copy protection system (with scramble system) only allowing there cording of 'Copy once' broadcast programs. CPRM stands for content Protection for Recordable Media.
This player is CPRM compatible, which means that you can record copy-once broadcast programs, but you cannot then make a copy of those recordings. CPRM recordings can only be made on DVD-RW discs formatted in VR mode, and CPRM recordings can only be played on players that are specifically compatible with CPRM.
Basic operation
Playing a MPEG4 Movie Disc
- Using this DVD Player you can play MPEG4 disc. 1. Insert a disc .The folder menu appears on the TV screen.
-
Press ▲ to ▼ select a folder, and press ENTER. A list of files in the folder appears. If you are in a file list and want to return to the Folder list, use the ▲ or ▼ button on the remote to highlight_ and press ENTER button.
-
If you want to view a particular file, press ▲ ↗ to highlight a file and press ENTER or PLAY.
-
Press STOP to exit.
-
Press NEXT ▶ to move to the next page.
MPEG4 disc compatibility with this player is limited as follows:
-
Available resolution size of the MPEG4 file is under 720x576 (W xH) pixel.
-
The file name of the MPEG4 subtitle is available by 56 characters.
-
If there is impossible code to express in the MPEG4 file, it may be displayed as " _ " mark on the display.
- If the number of the screen frame is over 30 per second, this unit may not operate normally.
- If the video and audio structure of recorded file is not interleaved, either video or audio is outputted.
- Playable MPEG4 file
".avi", ".mpg", ".mpeg".
- Playable Codec format
"MPEG4 3.xx", "MPEG4 4.xx", "MPEG4 5.xx"
- Playable Audio format
"AC3", "PCM", "MP3", "WMA". Sampling frequency: within 8 - 48 kHz (MP3), within 32 - 48kHz (WMA) Bit rate: within 8 - 320kbps (MP3), 32 - 192kbps (WMA)
Basic operation
Program playback(for DVD VCD/SVCD CD)
This function can set playing order, when playing DVD, press PROGRAM, if it is in the mode of (Navigation ON), system will Show "Invalid", if (Navigation Off) then show program screen below:

text_image
PROGRAM 1. _ 2. _ 3. _ 4. _ 5. _ 6. _ 7. _ Tidemap 08 04 05 06 07 08 01 02 03 04 05 Select Play ClearThe max track of this function is 20. When playing Picture CD/MP3/JPG/AV/CDI/VOB/MPG/WMA and JPEG, and when press PROGRAM, it will show [File Manager] screen: it will show [Program] mode in right corner.
In[Program]Mode, the selected file will show yellow background and reverse color. User can select the song or picture he wants for example, user selects test_5_01 test_5_03, and test_5_06 three files, it can select over than one folder, even in sub-folder, or sub-sub-folder.

text_image
Program Mode IOSDI AVI DAT JPG VPS test_5.01 Test_5.02 Test_5.03 Test_5.04 Test_5.06 Test_5.07 Test_5.08 test_5.09 List ( List ) ( Play )In the file of cursor indicated, if the file is not yet to be selected, then user can press to add it to the program list, system will show red rectangle. If we want to cancel the file we selected, then move the cursor to the place again, press again, this file we select will be cancelled. In[Program]mode, there are[list]and[play]buttons to provide users to select.
When user wants to play the selected files in[Program]mode, it needs to move the cursor to the buttons, then press ▶ key to play.
Use First time
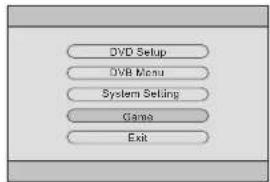
- When the system power on first, it shows following picture which the user can select one function to enter, Ct219 provide dvd and dvb-t two functions.

text_image
DV -ROM Drive DV B BroadcastingDVD menu DVD Setup Fellowing an initialed picture of DVD setting, it is include Language Setup, AudioSetup, Custom setup.
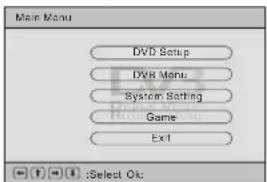
text_image
Main Menu DVD Setup DVD Menu System Setting Game Exit (1) (2) :Select Ok:DVD Setting menu
Language Setup
It is include Menu, Audio, Subtitle, External Subtitle four items, and even item is include the same options, English language, French language, ect..., see following picture.

text_image
DVD Setup -Language Setup Menu Audio Subtile External Subtile English Chinese Japanese French German Select OkAudio Setup.
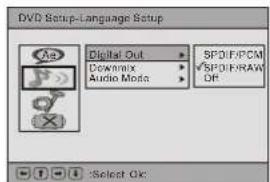
Digital out It is include spdif/pcm, spdif/raw, off three items
text_image
DVD Setup-Language Setup Digital Out Downlink Audio Mode SPDIF/PCM SPDIF/RAM OP Select OkDownmix
[DownMix]has 2 options, one is Lo /Ro ,another is Lt /Rt.

text_image
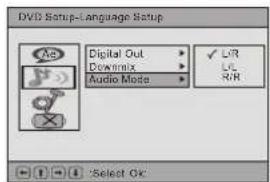
DVD Setup-Language Setup Digital Out Drawnia Audio Mode Lo/Ro LRI Select Ok:Audio Mode
Custom Setup Parental Ctrl
It needs password to enter this function (system default password is 8888), after verifying the password and screen will change as follow figure, there are 8 levels. Number 8 can play all restricted videos, The smaller number, the more restrictions, or to select [Off] to disable this function
text_image
DVD Setup-Language Setup Digital Out Downmix Audio Mode ✓ L/R ✓ L/C R/R Select OK
text_image
DVD Setup-Language Setup Parental Girl Angle Mark 4 5 6 7 ✓ 8 Select Ok.(when the user want to modify the division, the system needs password to enter this function)
Angle Mark
The item has two options, one is One the other is Off.

text_image
DVD Setup-Language Setup Parental Ctrl Angle Mark On Off Select: Ok.Media Manage
Special Functions
Media Manager
Once the CD ROM disc, DVD ROM disc or USB device are detected, the DVD player will analysis all the media files format on the discs or device, then user can use the [Media Manager] to proceed the playback. [Media Manager] can detect the following file format to play, they are [MP3; MP2; JPEG; DAT; MPG; VOB; AVI and WMA].
Sort File
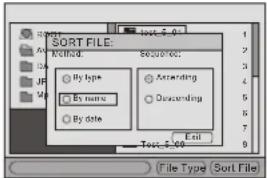
In the right-down corner of [Media Manager], there is a [File Sort] function, that can let user to choose his/her favorite files display sequence. User can use the direction keys↑↓→ to the desire item, and use the PLAY key to choose. The file display sequence can have the following three methods 1. File Type : The file sorting is based on the file type, the same files types will display in a group. 2. File Name: The file sorting is based on the first character of the file name, like 0\~9, A\~Z. 3. File time: The file sorting is based on the file creation time.
text_image
SORT FILE: R本周 By type By name By date Sort: 5.00 By date By type Sort: 5.00 By type By name By date By type Sort: 5.00 By type Sort: 5.00 By type Sort: 5.00 By type Sort: 5.00 By type Sort: 5.00 By type Sort: 5.00 By type Sort: 5.00 By type Sort: 5.00 By type Sort: 5.00 By type Sort: 5.00File Type
[File Type] function provide user to set the media file types that he/she wants to playback. As the following diagram, when use just can to show the MP3, MP2 and JPEG three kinds of file types from of source on the TV screen. User can move the cursor to the File Type] place, then move to the item by the direction keys and use the PLAY key to turn on or turn off the displayfile types. The selected file types will show a yellow mark on the screen to response.

text_image
ROOT AV1 DA1 JPG MPS FILE TYPE: MP3 MP2 VOB JP53 AV1 EA1 VBA Exit Tout 5.00 File Type (Sort File)DVB Menu
DVB-T
Initial First time
When the user first time use the system, it will disappear following picture, it will help to finish the installation Wizard.
- first, select Yes and press PLAY key, see following picture.

text_image
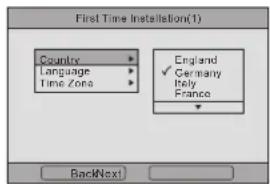
First Time Installation Do you want to start first time Installation Wizard?- enter into user's local materiel, localzone, osd language and time zone, The system will auto search local channels depend on those materiel, select next and press PLAY key.
text_image
First Time Installation(1) Country Language Time Zone England ✓ Germany Italy France BackNext- select Yes and press PLAY key, see following picture.
text_image
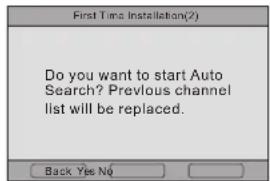
First Time Installation(2) Do you want to start Auto Search? Previous channel list will be replaced. Back Yes No-
now the system is scanning channels, after scanning, the system will enter into DVB-T mode, it will playback last channel it scanned.
-
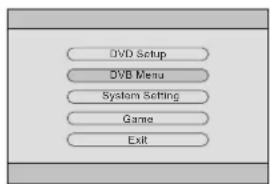
in DVB-T mode, press MENU key enter into DVB-T setting(DVB MENU), of course DVD SETUP can not active. Select DVB MENU enter into DVB setting. See following picture.
text_image
DVD Setup DVB Menu System Setting Game ExitDVB Menu
DVB Menu
Program List
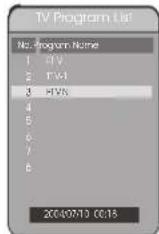
TV program
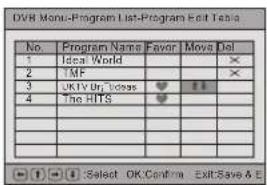
The item can edit channel list, including favor channel, move channel and del channel, use 11←→ and PLAY keys to operate, see following picture.
text_image
DVB Menu-Program List-Program Edit Table No. Program Name Favor Moves Del 1 Ideal World 2 TMF 3 UKIV Utr. Ideas ♥ 11 4 The HITS ♥ Novs X X X X X X X X X X X X X X X X X X X X X X X X X X X X X X X X X XMusic Program
The same operator as TV program.
Sort
The user can sort channel list depend on channel name, service ID or channel number.

text_image
Menu-Program List TV Program Music Program Sort ✓ By Name By Service By Channel - Select OKProgram Search
Automatic Search
It scan channels depend on country and time zone setting. It will auto scan channels. When before scanning, it will ask u if not to clear previous exiting channel, if select Yes, clear, if select No, add channels after previous exiting channels. See following picture.

text_image
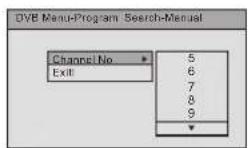
DVD Setup-Language Setup Automatic Search Message Do you want to start Auto Search? OK Cancel Select Ok.Manual Search
If the user want to scan special channel, the system provide Manual Search function, it will add scanning channel after previous exiting channels.
- Parental control
Channel Lock
This function provides to lock Parental setting's channel or not, when select Yes, it must enter password when playback the locked channels of Parental setting. When select No, it does not need enter password, but when select from Yes to No, it must enter password.

text_image
DVB Menu-ParentalControl Channel Lock Parental Setting Yes No :Select OKDVB Menu
DVB Menu
Parental Setting
This function provides which channel the user want to lock or not, the user can select more than one channel to lock in Parental Setting List Via using ↑ and PLAY key.
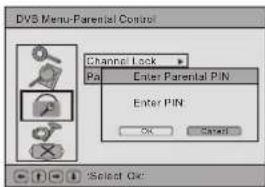
text_image
DVS Menu-Parental Control Channel Lock > Pai Enter Parental PIN Enter PIN OK Cancel Select On: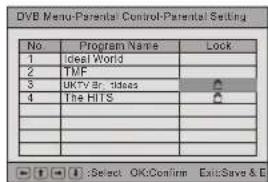
text_image
DVB Menu-Parental Control-Parental Setting No. Program Name Lock 1 Ideal World 2 TMF 3 UKTV Br. Ideas # 4 The HITS # . . . . . . . . . . . . . . . Select OK:Confirm ExitSave & EWhen the user select parental setting's channel, the system ask the user enter password.
System Setting
Country
Setup which country signal the user want to receive, for example English, German, Italian, French...

text_image
DVB Menu-System Setting-Language 1st Audio 2nd Audio Subtrife Ext English German France Portuguese Spanish Select Ok.Language
When enter this item, it has three options: 1 ^nd Audio, 2 Audio and Subtitle.
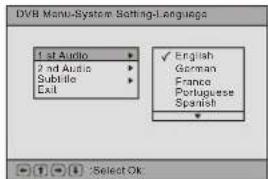
text_image
DVB Menu-System: Setting-Language 1st Audio 2nd Audio Subtile Last ✓ English German France Portuguese Spanish Select OkGMT Usage
This function provides the user to use GMT time or not, if select Off, The system cancel this function, the user can setup time zone himself, if select On, the system uses GMT time zone depend on local material of DVB-T system.

text_image
DVD Menu-System Setting Country Time Setting Set Date: 20/4/11/19 Set Time: 18.08 OK Cancel Select OKTime Zone
This function setup the time zone of DVB-T system.
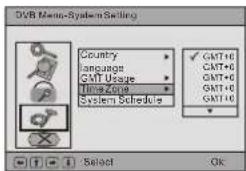
text_image
DVB Menu-System Setting Country Language GMT Usage Time Zone System Schedule GMT+6 GMT+6 GMT+6 GMT+6 GMT+6 Select Ok32
DVB Menu
DVB Menu DVB Menu
System Schedule
This function provides the user to playback when and which channel he want to via pre-arranging in system schedule, there are total 10 tasks the user can use.
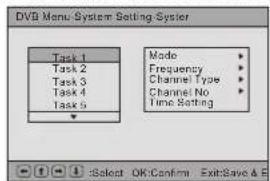
text_image
DVB Menu-System Setting-System Task 1 Task 2 Task 3 Task 4 Task 5 Mode Frequency Channel Type Channel No Time Setting Select OK Confirm ExitSave & FMode
It setup the task is activated or not, if active the task, select Active, otherwise select Inactive.

text_image
DVB Monosystem Setting-System-Schedule Task 1 Task 2 Task 3 Task 4 Task 5 Mode Frequency Channel Type Channel No Time Setting Active Inactive Select OK/Confirm ExitSave & EFrequency
The item provide the user how frequency to take active the task: Once(one time), Daily(every time every day), Weekly (every time every week).
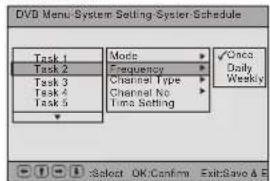
text_image
DVD Menu-System: Setting-Sysler Schedule Task 1 Task 2 Task 3 Task 4 Task 5 Mode: Frequency: Channel Type: Channel No. Time Setting ✓Once Daily Weekly Select OK/Confirm Exit/SaveChannel Type
The item has two option, TV or Radio
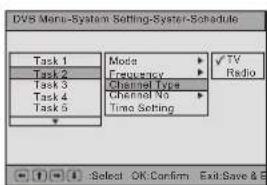
text_image
DVB Menu-System Setting-System-Schedule Task 1 Task 2 Task 3 Task 4 Task 5 Mode Frequency Channel Type Channel No Time Setting TV Radio Select OK Confirm Exit Save & EChannel No
It provide which channel number the user want to schedule.

text_image
DVB Menu-System Setting-System-Schedule Task 1 Task 2 Task 3 Task 4 Task 5 Mode Frequency Channel Type Channel No Time Setting ✓ 2 3 4 Select OK Confirm Exit Save &Time Setting
It setup when will execute the task, there is Start time and End time. See following picture.

text_image
DVB Menu-System Setting-System-Schedule Task 1 Task 2 Task 3 Task 4 Task 5 Mode Time Setting Start Date:2005/00/00 Start Time:00:00 End Time:00:00 OK Cancel Select OK Confirm Exit Save & EExit
Back to Main Menu.
DVB Convenient Functions
Audio Channel
You can select the preferred audio channel and sound mode.
1 Press AUDIO
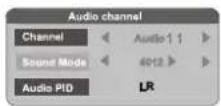
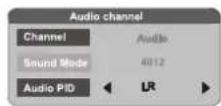
3 Pressi° i±button / j° i±button to select the preferred audio channel or sound mode. When the "Channel" option is changed, the value of "Audion PID" will also change to the correct value.
*To exit from Audio channel
---Press AUDIO
EPG (Electronic Program Guide)
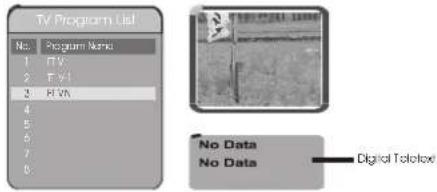
The DVB-T player provides you an Electronic Program Guide to take a fast preview of live broadcasts from each TV channel in advance of watching it in full screen.
1 Press EPG
An Electronic Program Guide Menu appears on the screen, with a TV channel menu to the left and corresponding live broadcast of the selected program to the right.
text_image
TV Program List No: Program Name 1 RTV 2 F V1 3 F V2 4 5 6 7 8 No Data No Data Digital Tofetox2 Press; ^ button to more digital teletext provided by the selected channel.
Press i ° i ±button and i °EXIT i ±button to return to program list
In Advance:
The content of digital teletext varies according to the program provider. It could be pictures and sound for the program, pages of information on the programs, the weather, the news or other options. Some channels provide only digital teletext that carry no normal TV program; if so, you can't see the preview of the channels with EPG function.
3 Press; button / i ± button to toggle through each TV channel and to see its live broadcast.
4 Press; ^o OK to watch your preferred program in full screen.
*To exit from this page
---Press i °EXIT i ±button
DVB Convenient Functions
Displaying Information of the Program
Press INFO
*To exit from this page
---Press INFO
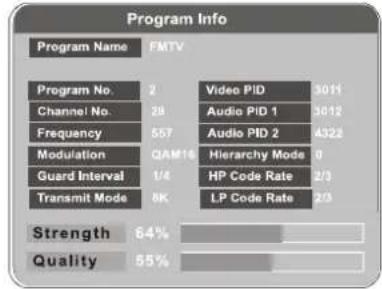
text_image
Program Info Program Name FMTV Program No. 2 Video PID 3011 Channel No. 28 Audio PID 1 3012 Frequency 557 Audio PID 2 4322 Modulation GAM16 Hierarchy Mode 0 Guard Interval 1/4 HP Code Rate 2/3 Transmit Mode 8K LP Code Rate 2/3 Strength 64% Quality 55%~Digital Teletext
If the program you are watching broadcasts digital teletext, the DVB-T player can display teletext. The content of digital teletext varies according to the program provider. It could be pictures and sound for the program, pages of information on the programs, the weather, the news or other options.
Press TEXT
Press 11 button, turn over the teletext information.
*To exit from teletext
---Press EXIT
Favorite
There are some channels that you tend to watch more often and some only occasionally. Favorite PR allows the most-watched channels to access more easily, leaving less watched channels acces-sible but out of way.
Press FAV
i°Fav oni±appears on thescreen, and thefavorite program isactivated; by pressing i° 📄 i±button / i° 📄 +button, you can only step through the favorite programs. Other programs can still be accessed by entering the program number.
*To exit from Favorite Program
---Press (FAV) button until; °Fav off ± appears on thescreen.
Music mode
The DVB-T player provides you the convenient function to listen to the digital radio.

1 Press
Wait a few seconds, it will switch from TV mode to Music mode.
*To exit from Music mode
---Press TV/Radio
System Setting
System Setting
System Setting
It can setup item related to DVD and DVB.
Language Setup
It provide the user to select osd language, English, French, German...
- Display Setup
TV Standard
It has two types of TV Standard, NTSC, PAL.
- Display Type
Preference UI style
- Change PIN
It can permit the user to modify password.
Default Type
It provide the user select which mode in power up.
Default
It can pre-set the system into factory default.
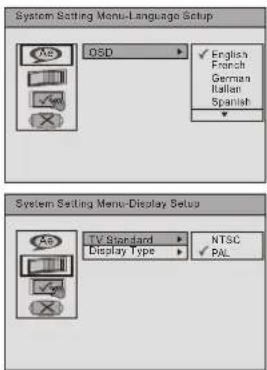
text_image
System Setting Menu-Language Setup OSD English French German Italian Spanish TV Standard Display Type NTSC PAL
text_image
System Setting Menu-Display Setup TV Standard Display Type 4.3 4.3 ✓ 16:9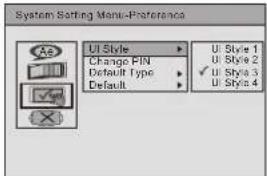
text_image
System Setting Menu-Preference UI Style Change PIN Default Type Default U Style 1 U Style 2 ✓ U Style 3 U Style 4
text_image
System Setting Menu Preference UI Style Change PIN Old PIN: New PIN: Confirm New PIN: OK Cancel System Setting Menu Preference UI Style Change PIN Default Type Default DVD DVD User Select Last Operating
text_image
System Setting Menu-Preference UI Style Change PIN Default Type Default ReadGAME
GAME
Game
This section provides you bonus games for extra fun and enjoyment.
text_image
DVD Setup DVD Menu System Setup Game ExitGame selecting

text_image
Menu-Game Mise Telris System Setting Rush Hour Exit Select Ok:1 Under Main Menu, press +← button and OK button to select Game: Mine, Tetris, Rush Hour, Calendar
2 Press ↑↓ button OK button to select one game to play.
To return to the MAIN MENU
---Press EXIT button.
ALL RIGHTS RESERVED, COPYRIGHT DENVER ELECTRONICS A/S
DENVER®
www.denver-electronics.com