BB 3500 - Bike computer TRELOCK - Free user manual and instructions
Find the device manual for free BB 3500 TRELOCK in PDF.

| Product Type | Bike Computer |
| Brand | Trelock |
| Model | BB 3500 |
| Dimensions | Approx. 5 x 4 x 2 cm |
| Weight | Approx. 30 g |
| Power Supply | 1 x CR2032 3V battery |
| Display Type | LCD |
| Functions | Current speed, average speed, maximum speed, trip distance, total distance, ride time, clock, stopwatch |
| Water Resistance | IPX4 (splash-proof) |
| Mounting | Handlebar mount with zip ties |
| Sensor Type | Wired speed sensor |
| Wheel Size Setting | User-programmable (wheel circumference in mm) |
| Units | km/h or mph selectable |
| Backlight | No |
| Operating Temperature | -10°C to 50°C |
| Battery Life | Approx. 1 year (normal use) |
| Spare Parts | Battery (CR2032), mounting brackets, sensor, magnet |
| Repair Service | Contact Trelock customer support |
| Maintenance | Clean with a soft, dry cloth; avoid liquids |
| Safety Warning | Do not immerse in water; keep away from heat sources |
Frequently Asked Questions - BB 3500 TRELOCK
User questions about BB 3500 TRELOCK
0 question about this device. Answer the ones you know or ask your own.
Ask a new question about this device
Download the instructions for your Bike computer in PDF format for free! Find your manual BB 3500 - TRELOCK and take your electronic device back in hand. On this page are published all the documents necessary for the use of your device. BB 3500 by TRELOCK.
USER MANUAL BB 3500 TRELOCK
- Every product is delivered with the PIN 0000
- You can protect your cycle computer against theft by entering your chosen personal PIN code (page 13). Likewise, you can change the PIN and PIN time (energy-saving function) at any time.
You can enter your PIN and PIN time here:
PIN
PIN time
Mandatory entries:
Code number of the speed sensor (BB 2000, BB 3000, BB 3500, BB 4000)
Speed measurement only works if the code number which is located on a sticker directly on the sensor is entered (wheel 1 and wheel 2) (refer to page 10).
Code number of the pedal frequency sensor (BB 2000, BB 3000, BB 4000)
Pedal stroke measurement works only if the code number which is located on a sticker directly on the sensor is entered (refer to page 10).
Code number of the heart rate sensor
(BB 3000, BB 3500, BB 4000)
Heart rate measurement works only if the code number which is located on a sticker directly on the sensor is entered (refer to page 10).
The stickers with the code number of your sensors can be affixed here
Code no. of the speed sensor.
Wheel 1
Wheel 2
Code no. of the pedal frequency sensor
Code no. of the heart rate sensor
You can alternatively or additionally have your PIN code and code numbers of the sensors registered with TRELOCK:
www.trelock.de/Trelock Service
Center/PinCode.
If you change address, please inform us of your new address.
BIKE & BODY BB 2000/3000/3500/4000
GB MANUAL
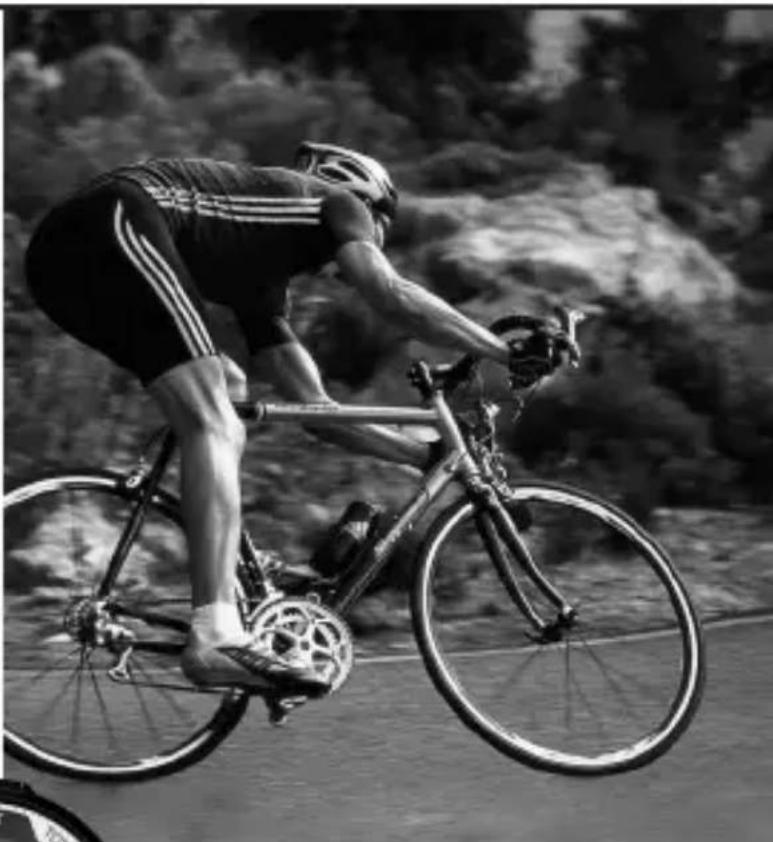
natural_image
Black-and-white photo of a cyclist riding a bicycle on a road, with blurred natural background (no text or symbols visible)Check: www.trelock.de for our international consumer service.
→ download of product manuals
TRELOCK®
INSPIRED GERMAN INNOVATION
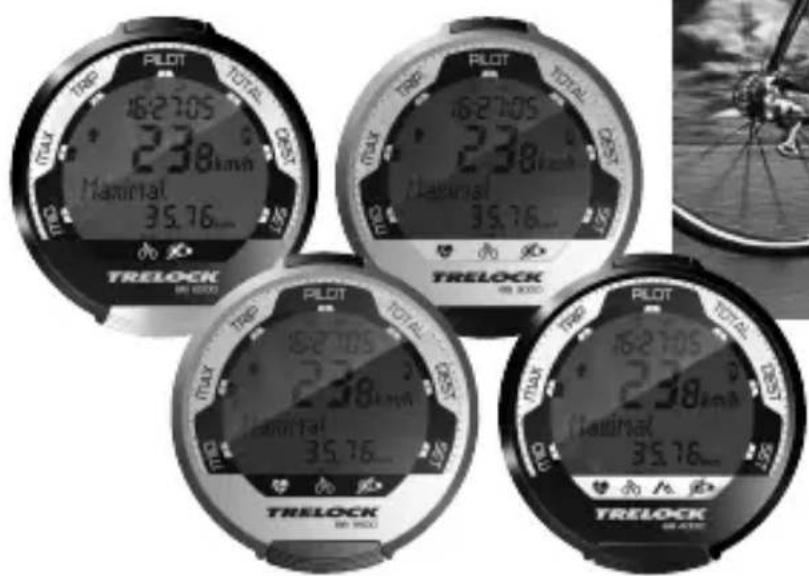
The TRELOCK data systems of the Bike & Body computer line were developed to specifically cater for your needs. This line offers you a multitude of bike, altimeter, pedal stroke and pulse measurement functions, depending on the product features. The hardware, software and ergonomics of the products thoroughly meet the highest demands in terms of quality, convenience and performance.
An outstanding feature is the fully digitized data transfer between the various transmitter modules and the cycle computer developed by TRELOCK – RADIO SELECT®. The receiver of the cycle computer exclusively selects coded system data – data transfer without any cross talking effect. Interference due to mobile phones or training partners' cycle computers is not received.
Theft is pointless owing to the PIN coding.
The wireless wake-up function is a special function – ride off without switching on.
Data transfer to a PC via a USB interface is possible with the accessory set ZF 450.
The visual control system, large mono keys and the neatly arranged display with full text displays in eight languages allow very simple operation.


RADIO SELECT
Contents
Scope of delivery
Inserting the batteries
Installation
- Display structure and operating principle 44
- General preliminary settings 46
- "Bike" menu 54
- "Altimeter" menu 58
- "Pedal frequency" menu 64
- "Heart rate" menu 68
- Training
- Additional information and instructions 76
- Notes on safety 77
10 . Guarantee and service 77
11 . Frequently asked questions 77 - Accessories 78
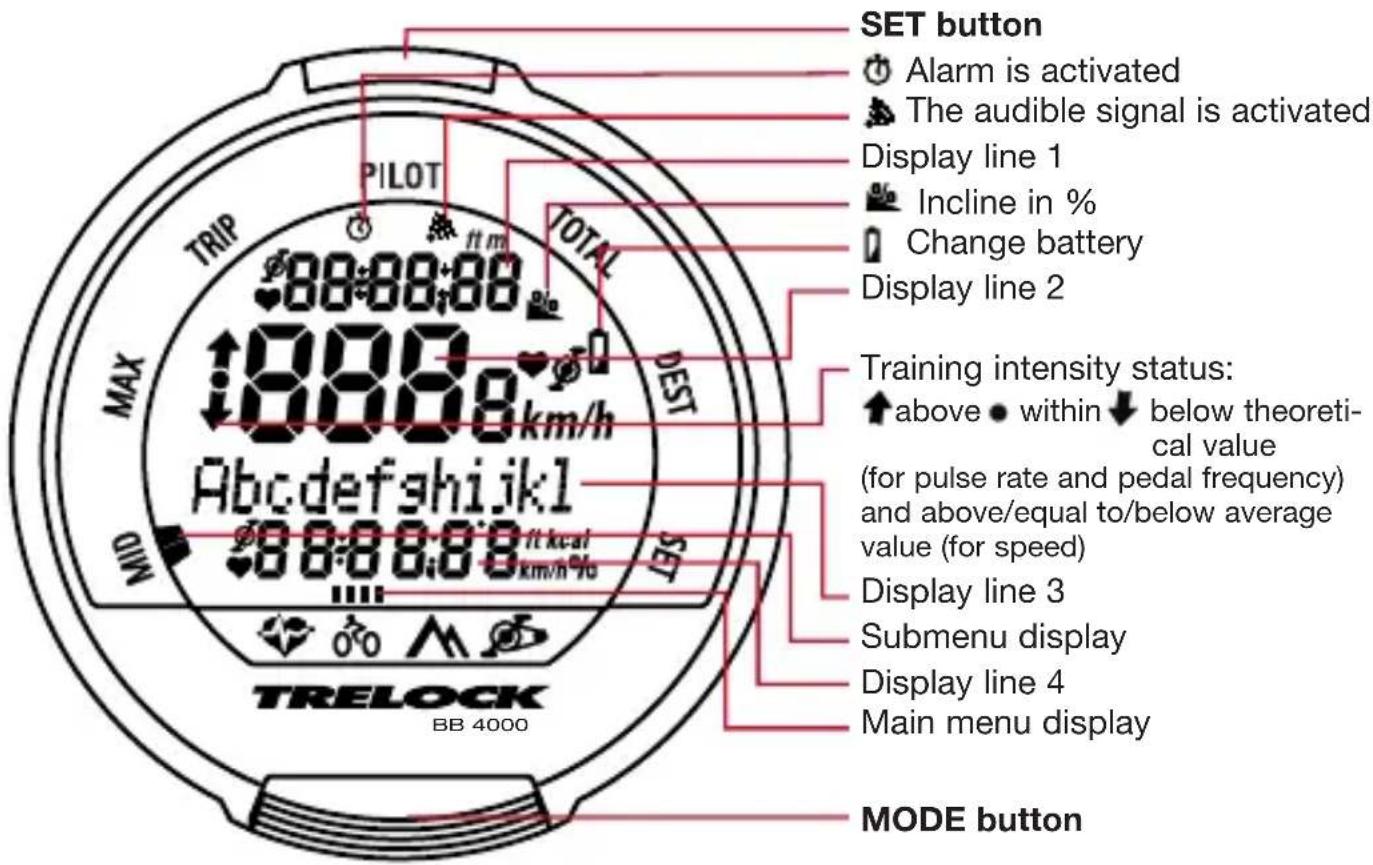
1. Display structure and operating principle
By pressing the MODE button for 3 seconds, you can toggle between the main menus "Bike", "Altimeter", "Pedal frequency" and "Heart rate". (The "Pedal frequency" and "Heart rate" menus can only be selected if the corresponding sensor is logged in.)
Pressing the MODE button once takes the suer to the submenus MID, MAX, TRIP, PILOT, TOTAL, DEST and SET.
In order to enter digits (time, meter readings etc.), press the MODE button several times until the desired digit appears. Pressing the SET button confirms the selection and switches to the next position. After entering the last position, confirm again by pressing the SET button.
If you do not wish to make any entry/modification, you can skip the menu item by pressing the MODE button. A selected entry function can be aborted by pressing the MODE button for 3 seconds. Any changes made will not be adopted in this case.
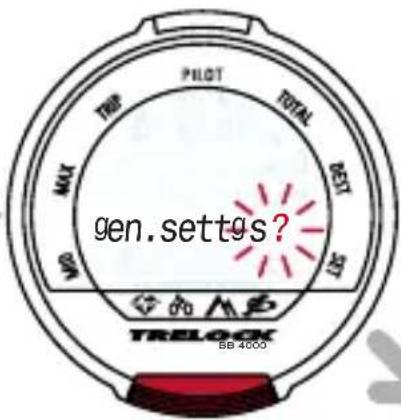
2. General preliminary settings
After activating the cycle computer, the user is transferred to the general preliminary settings automatically. If you wish to make changes here at a later stage, press the SET and MODE button in the submenu SET for approx. 3 sec.
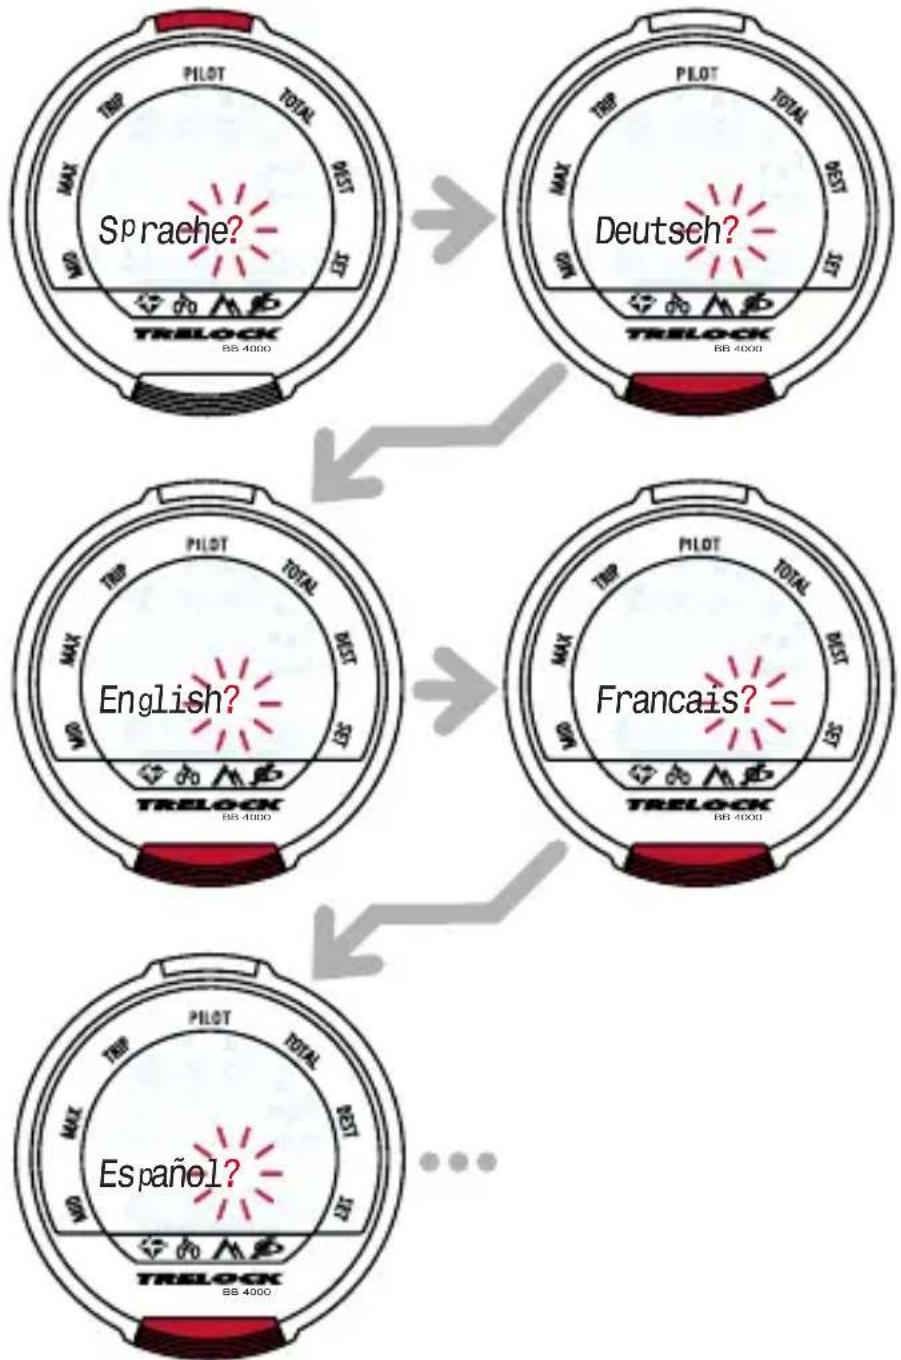
2.1 Language selection
- Confirm by pressing the SET button
- Select the language (D, GB, F, NL, E, I, RUS, PL) by pressing the MODE button
- Confirm by pressing the SET button
2.2 Selection between km/h and m/h and between C and F
- Confirm by pressing the MODE button to adopt the standard values "km/h" and "°C"
- To make changes, press the SET button and select between "km/h" and "m/h" by pressing the MODE button
- Confirm by pressing the SET button
- Choose between "°F" and "°C" by pressing the MODE button
- Confirm by pressing the SET button
IMPORTANT: if you subsequently change from "km/h" to "m/h" or vice versa, the data recorded in the "Bike" and "Altimeter" menus will be reset to "0"!


TRELOCK
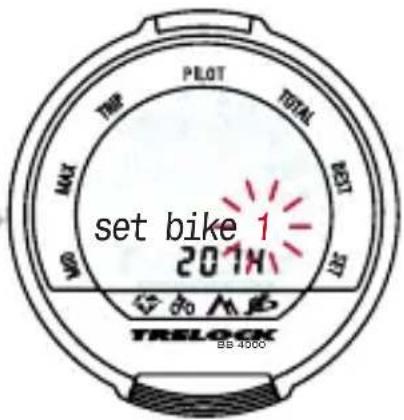
2.4 Settings for wheel 1 and wheel 2
You can use your cycle computer on two cycles, even if they have different wheel radii. An own sensor for each cycle is required for this purpose. The switch-over from wheel 1 to wheel 2 is performed automatically.
- Switch to "cycle 1" by pressing the SET button
- Choose between "cycle 1" and "cycle 2" by pressing the MODE button
- Confirm by pressing the SET button

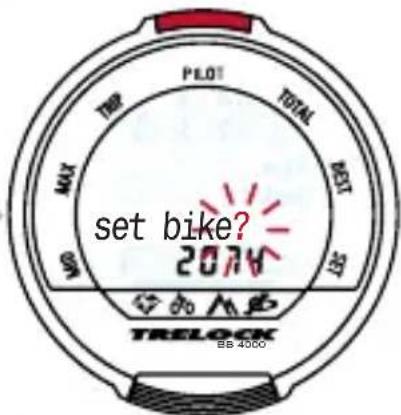
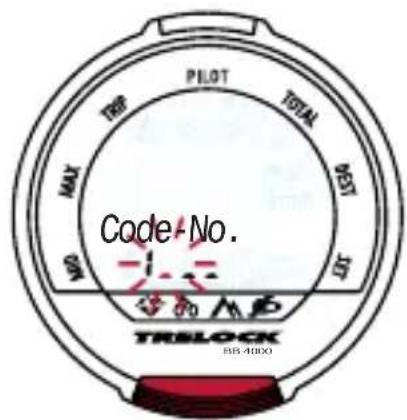
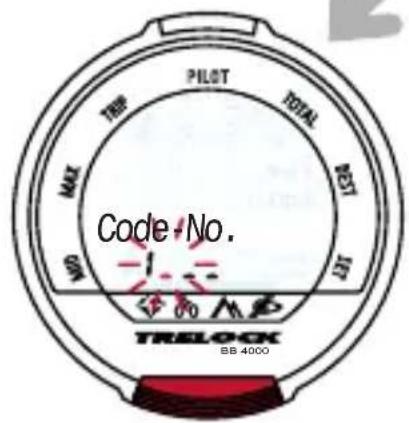
2.4.1 Entry of the code no.
- Entry of the code for "cycle 1" and/or "cycle 2" by pressing the MODE button (repeatedly)
- Validate the individual digits with the SET button
- Repeat the process for the other digits
Please enter the code no. on page 2 of this operating manual. The sticker should subsequently be pulled off the sensor.
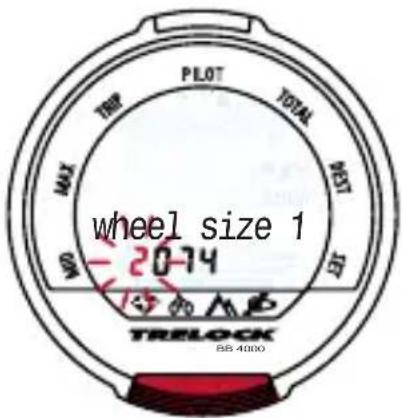
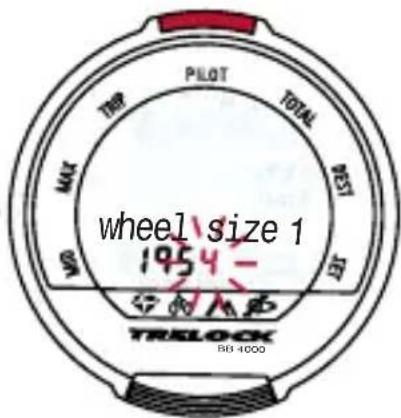
2.4.2 Adjusting the wheel size(s)
- Determine the wheel size on the basis of the table below or calculation of the wheel circumference
- Enter the value for "cycle 1" and/or "cycle 2" as under point 2.4.1 and confirm by pressing the SET button
- Press the MODE button to continue
Wheel size/wheel circumference (mm)
ETRTO mm
| 47-305 | 16x1.75x2 | 1272 |
| 47-406 | 20x1.75x2 | 1590 |
| 50-406 | 20/2.00 | 1593 |
| 60-406 | 20/2.35 | 1665 |
| 37-540 | 24x1 | 3/8 A 1948 |
| 47-507 | 24x1.75x2 | 1907 |
| 50-507 | 24/2.00 | 1910 |
| 40-559 | 26x1.5 | 2026 |
| 44-559 | 26x1.6 | 2051 |
| 47-559 | 26x1.75x2 | 2074 |
| 50-559 | 26x1.9 | 2089 |
| 54-559 | 26x2.00 | 2114 |
| 57-559 | 26x2.125 | 2133 |
| 37-590 | 26x1 | 3/8 2105 |
| 20-571 | 26x3/4 | 1954 |
ETRTO mm
| 60-559 26/2.35 2146 | |
| 32-630 27x1 1/4 2199 | |
| 40-622 28x1.5 2224 | |
| 47-622 28x1.75 | 2268 |
| 40-635 28x1 1/2 2265 | |
| 37-622 28x1 3/8x1 5/8 | 2205 |
| 18-622 700x18C 2102 | |
| 23-622 700x23C 2133 | |
| 25-622 700x25C 2146 | |
| 28-622 700x28C 2149 | |
| 32-622 700x32C 2174 | |
| 37-622 700x35C 2205 | |
| 40-622 700x40C 2224 | |
| 50-622 28/2.00 2284 | |
| 60-622 28/2.35 2340 |
TRELOCK
Wheel circumference (mm) = 2 x r (mm) x 3.14

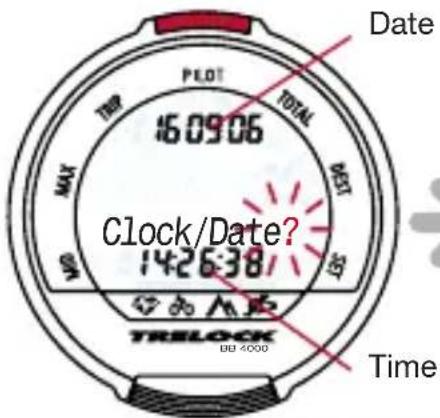
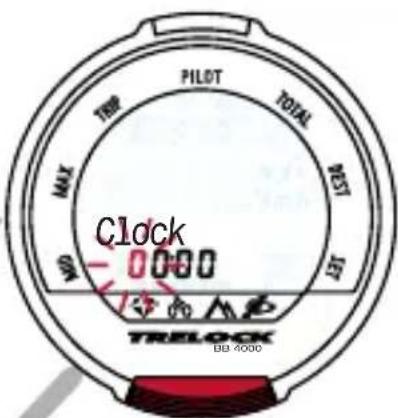
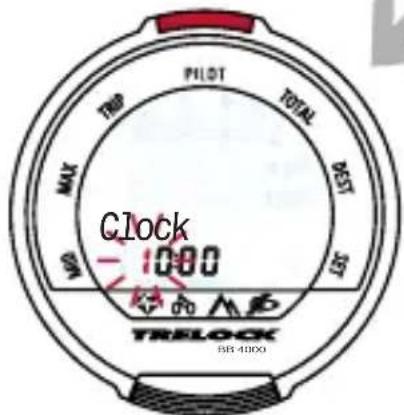
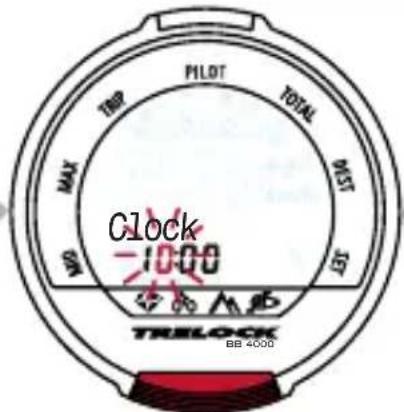
2.5 Setting the current time
- Press the SET button
- Change the digits by pressing the MODE button several times
- Confirm the individual digits by pressing the SET button

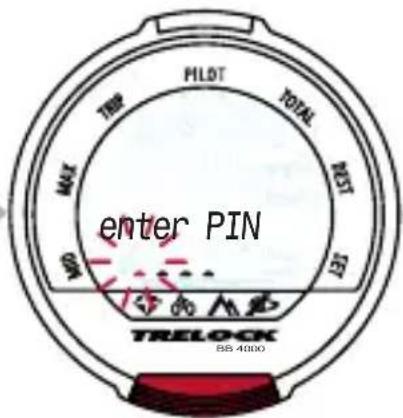
2.6 Entering and modifying the PIN – anti-theft protection
You can protect your cycle computer against foreign access with a PIN. Activation of the cycle computer is only possible in this case if the PIN is entered correctly. After adjusting the time and date, the user is transferred to the "Change PIN?" window. You can enter your own PIN here and subsequently modify it if necessary. If you do not wish to use any PIN, press the MODE button. Otherwise, after pressing the SET button, you will be asked to enter the former PIN (the factory setting is "0000"). In order to do this, press the MODE button until the appropriate digit appears and subsequently jump to the next position by pressing the SET button. The PIN is controlled. If the PIN has been incorrectly entered, "Wrong PIN" appears for approx. 3 seconds and you will be requested to make a new entry. If the PIN is correct, enter a new PIN of your choice as described above. After confirming the last position by pressing the SET button, the PIN must be re-entered. If repetition of the PIN is incorrect, you will be returned to the "Change PIN?" window. If you wish to dispense with safeguarding your cycle computer with a PIN, reset the PIN to "0000".
Please note your personal PIN on page 2, so that you can have it available if appropriate.

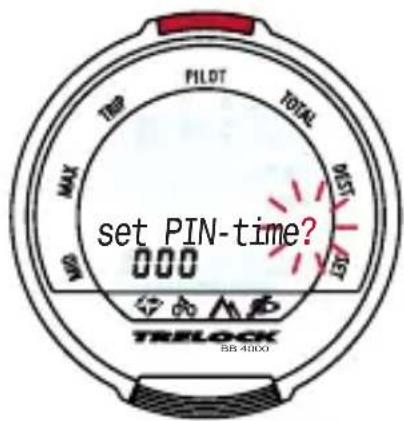
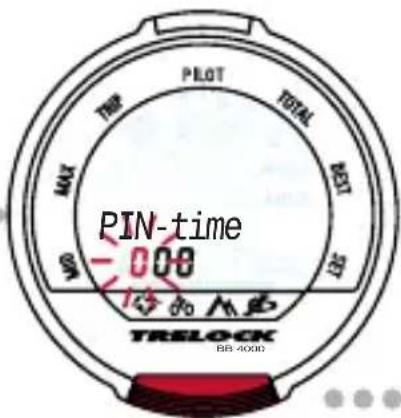
2.7 Entering and modifying the PIN time - energy-saving function
If the cycle computer, which is in sleep mode with the PIN function active (PIN not equal to 0000), is not awakened over a certain period of time, it can only be reactivated by entering your PIN. This period of time (PIN time) can be entered or modified in the "New PIN time?" window: After you have pressed the SET button, you will be requested to enter your PIN. After making a correct entry, you
will be transferred to "PIN TIME", where you can enter up to 240 min. The factory setting is 60 min. In sleep mode, only the time will be displayed until the PIN time elapses. After the PIN time elapses, the time display will also be faded out. If the PIN time is set to "0", this energy-saving function is deactivated and the time will be permanently displayed.
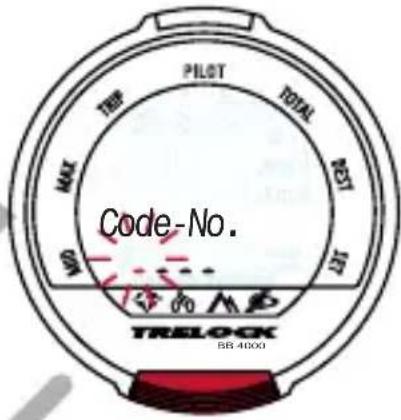
2.8 Logging in the pedal frequency

sensor(BB 2000, BB 3000, BB 4000)
- Log the pedal frequency sensor in by pressing the SET button
- Enter the code no. by pressing the MODE button (repeatedly)
- Confirm the individual digits by pressing the SET button
- Repeat the process for the other digits
Please enter the code no. on page 2 of this operating manual. The sticker should subsequently be pulled off the sensor.
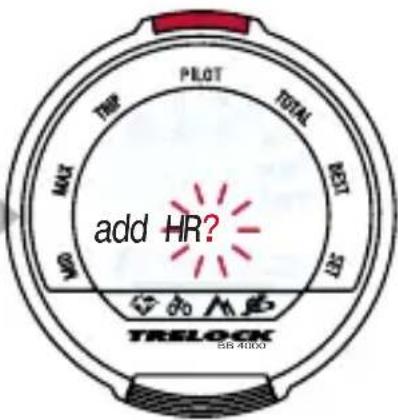
2.9 Logging in the heart rate sensor

(BB 3000, BB 3500, BB 4000)
- The pulse sensor is logged in as for logging in the pedal frequency sensor
Please enter the code no. on page 2 of this operating manual. The sticker should subsequently be pulled off the sensor.


3. "Bike" menu

The "Bike" menu has 15 functions incl. a temperature display
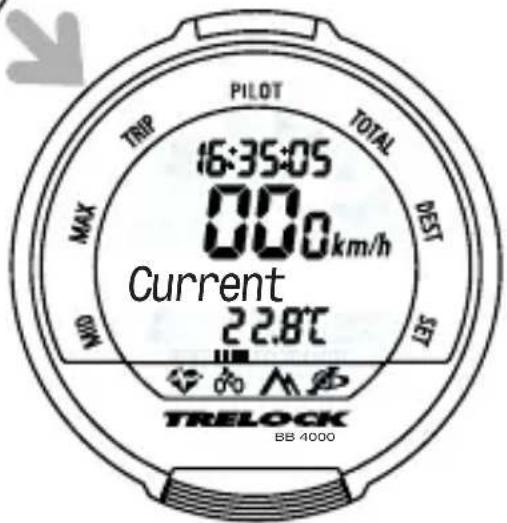
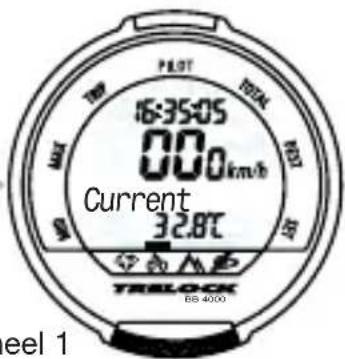
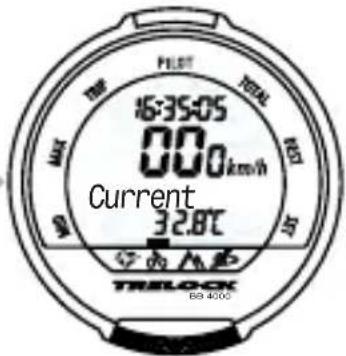
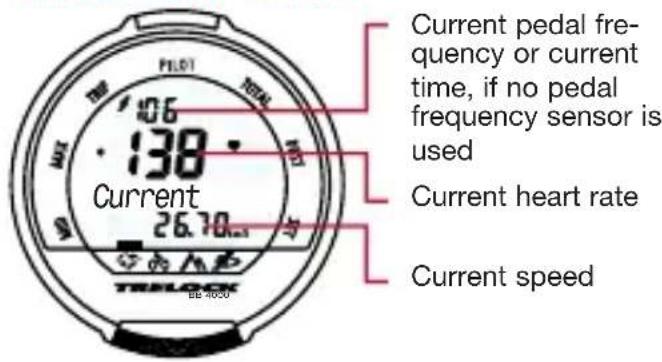
3.1 Submenu "Current"

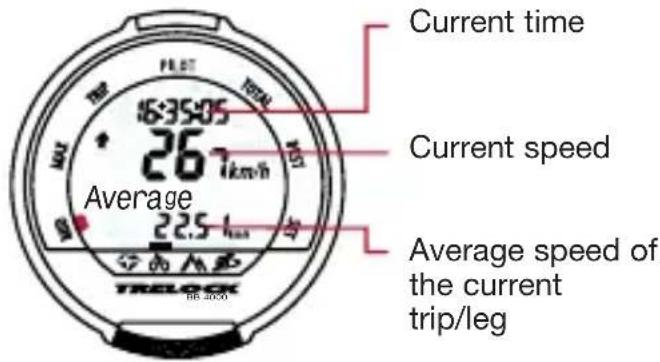
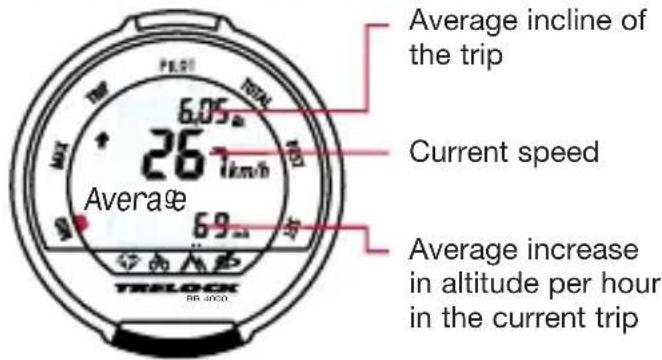
3.2 Submenu "Average" MID
Start a new trip/leg
Measurement of the current trip/leg is halted by pressing the SET button. The values will be saved, the display will be reset to "0" and a new trip/leg will be started.
3.3 Submenu "Maximum" MAX
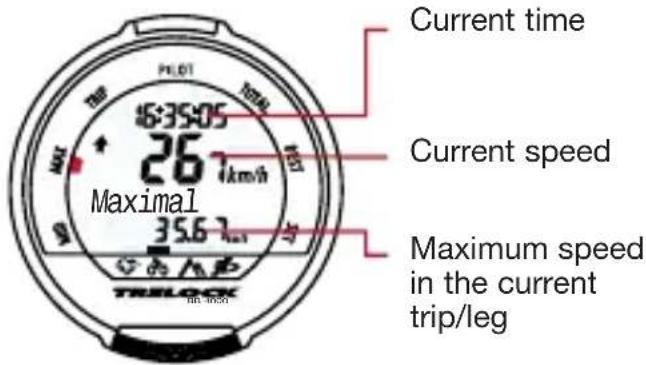
Start a new trip/leg
Measurement of the current trip/leg is halted by pressing the SET button. The values will be saved, the display will be reset to "0" and a new trip/leg will be started.
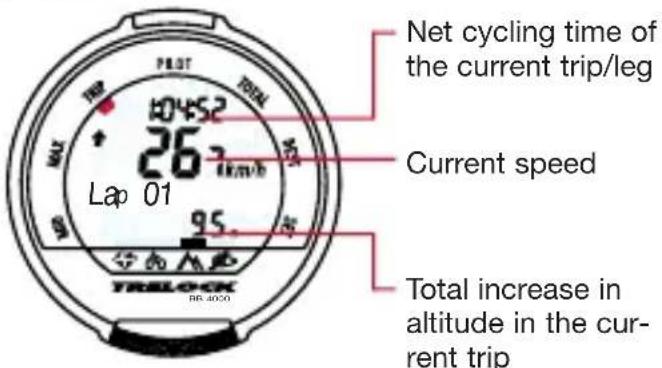
3.4 Submenu "Trip" TRIP
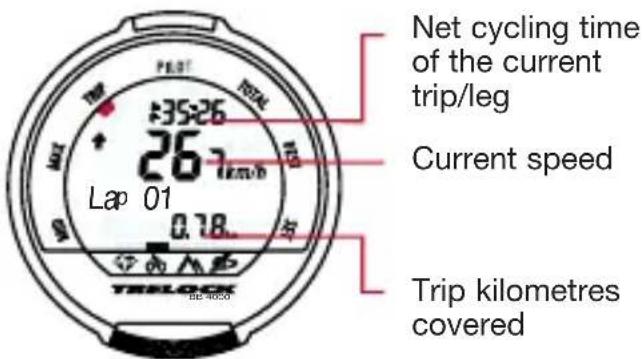
Start a new trip/leg
Measurement of the current trip/leg is halted by pressing the SET button. All data are saved and a new trip/leg is begun in the
background. The data of the last trip continue to be displayed and the trip no.flashes. After pressing the SET button again, the data of the current trip/leg are displayed.
Displaying and deleting trip/leg data
- Press the SET button for 3 sec.
• The display "Show trips" appears - Selection of "Show trips" and "Delete trips" by pressing the MODE button
• After pressing the SET button in "Show trips", the net cycling times
and trip kilometres of the trips/legs appear
By pressing the SET button for 3 seconds, all values of the trip/leg which has just been displayed will be deleted.
If the SET button is pressed for 3 seconds in the "Delete trips" window, the data recorded for all trips/legs will be deleted and a new trip/leg will be started.
Pressing the MODE button takes you back to the submenu "Trip".
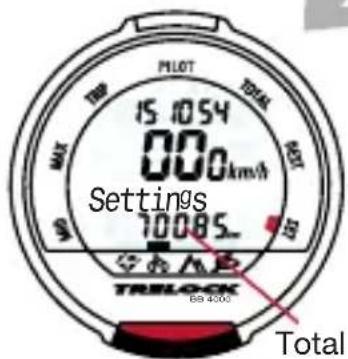
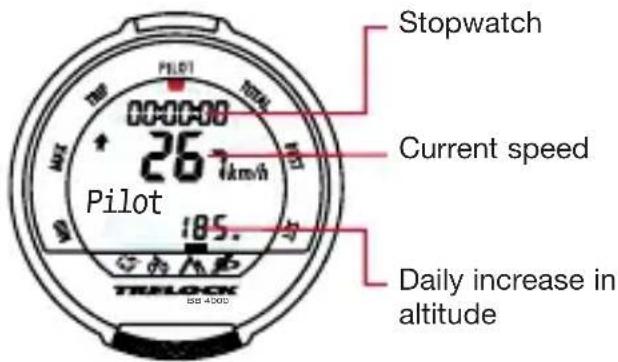
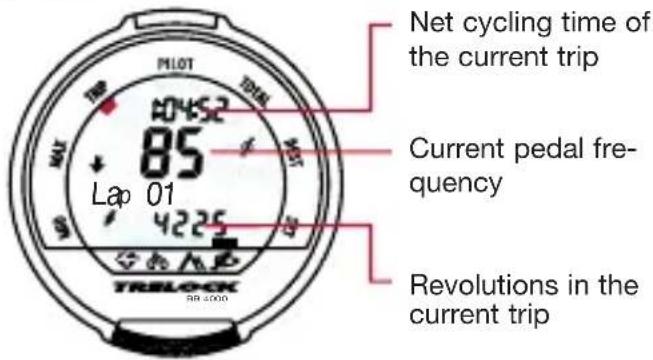
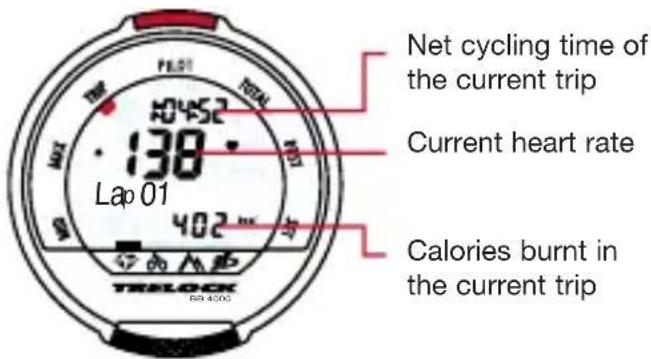
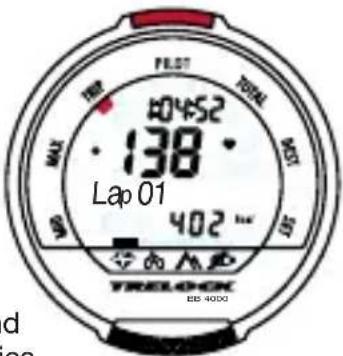
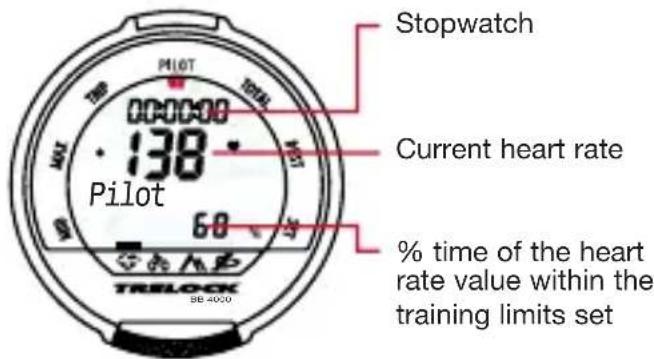
3.5 Submenu "Pilot" PILOT
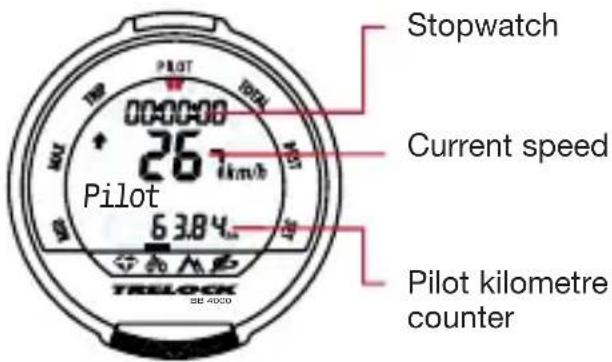
Starting, stopping and resetting the stop-watch
- Start or stop the stopwatch by pressing the SET button
- Zeroing of the stopwatch by pressing the SET button for 3 seconds
Adjusting the pilot kilometre counter
- Press the SET button for 3 seconds
- The display "Set km" appears and the first digit for entry flashes
- The display of the kilometre counter can be modified (only possible with the stopwatch off)
This function is helpful when you cycle according to a roadbook. You can start in the middle of a trip or correct the kilometre reading after riding a detour for example.
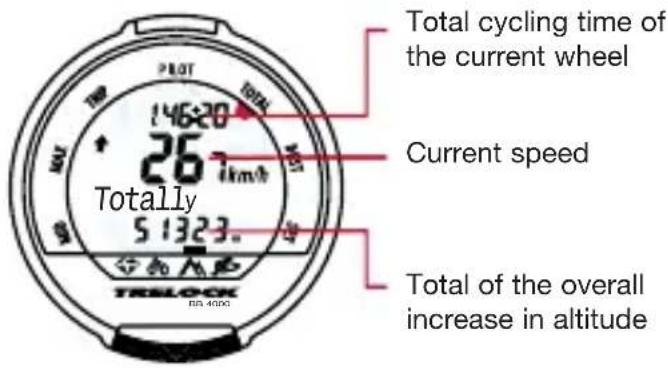
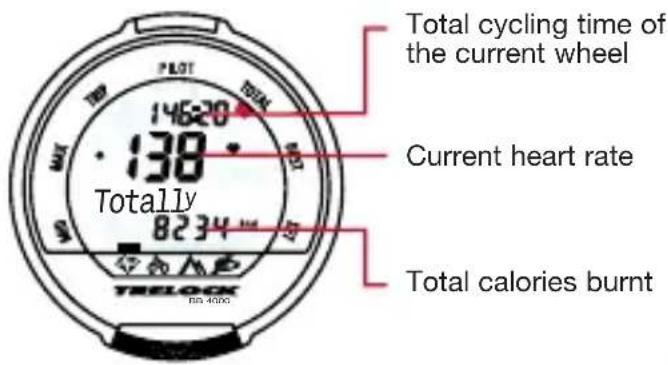
3.6 Submenu "Total" TOTAL 3.8 Submenu "Set" SET
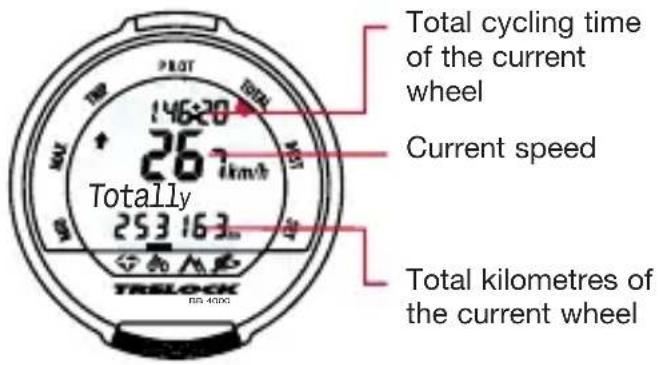
3.7 Submenu "Destination" DEST
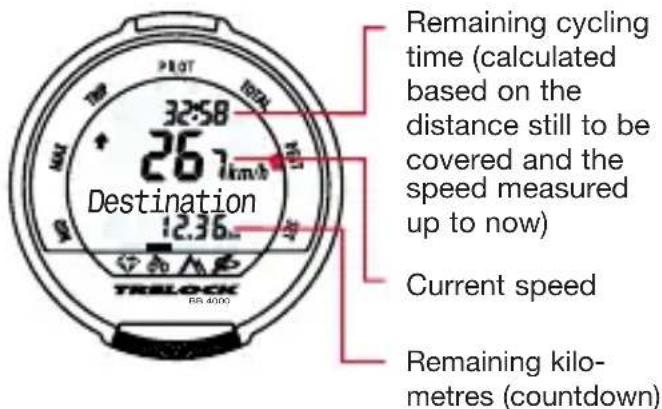
Adjusting the remaining kilometre counter
- Press the SET button for 3 seconds
- The display "Set km" appears and the first digit for entry flashes
- Adjust the remaining kilometre counter by pressing the MODE button repeatedly and confirming the individual digits by pressing the SET button
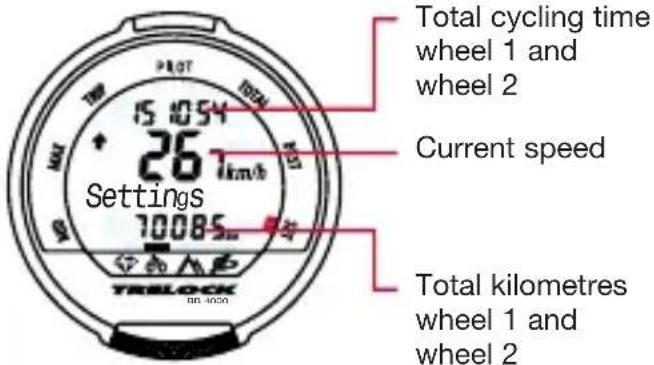
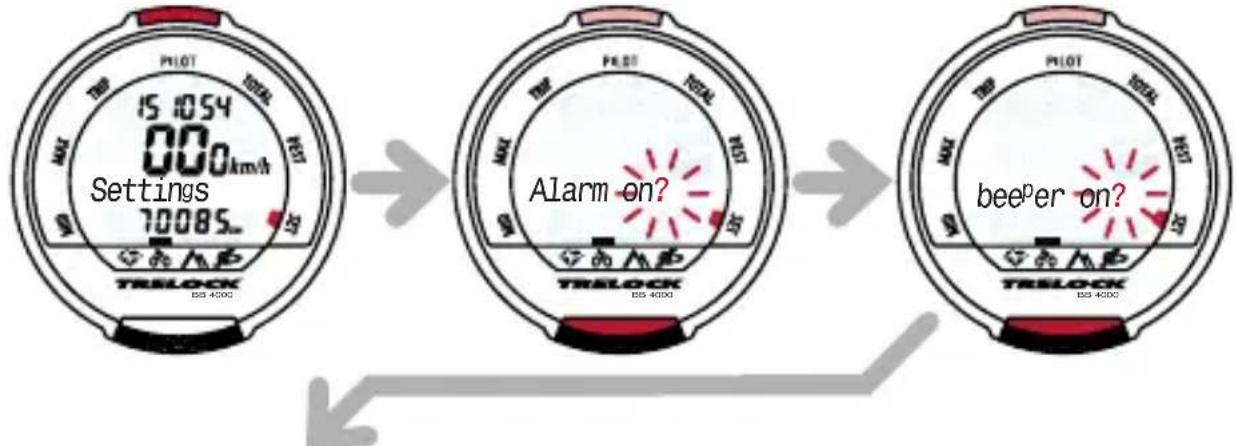
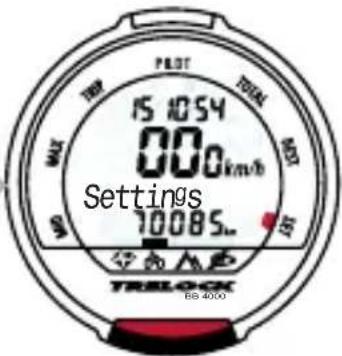
Correcting preliminary settings and/or adjusting further settings
- The following appears after pressing the SET button for 3 seconds:
- "Alarm on?" – Entry of a wake-up time possible
- "Signal on?" – Activation of the audible alarm
- "Time/date?"
- "Wheel size?"(wheel 1 and wheel 2)
- "Total km?" (wheel 1 and wheel 2)
If you wish to make changes, press the SET button in the appropriate window and make your entries as usual by pressing the MODE and SET buttons.
3 seconds SET button for modification SET button for modification
SET button for modification SET button for modification SET button for modification

Pressing the SET and MODE buttons simultaneously for 3 seconds returns you to the general preliminary settings (p. 8, point 2).
Total km wheel 1 and wheel 2
TRELOCK
4. Menu "Altimeter"

BB 3500, BB 4000 The "Altimeter" menu provides you highly accurate data and has 10 functions. The measurement values are however influenced by fluctuations in air pressure. In order to calculate precise measurement values, we recommend an altitude adjustment being performed, e.g. based on maps with altitude indications.
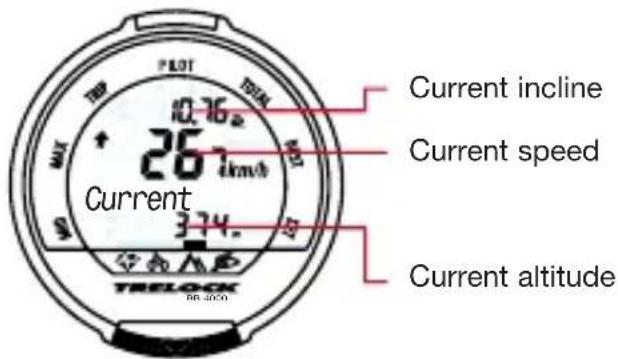
4.1 Submenu "Current"
Start a new trip/leg in the submenus "Average" and "Maximum"
Measurement of the current trip/leg is halted by pressing the SET button. The values will be saved, the display will be reset to "0" and a new trip/leg will be started.
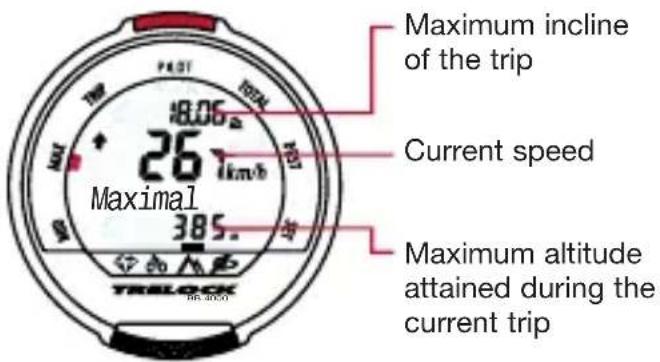
4.3 Submenu "Maximum" MAX
4.2 Submenu "Average" MID 4.4 Submenu "Trip" TRIP
Measurement of the current trip/leg is halted by pressing the SET button. All entered data are saved and a new trip/leg is begun in the background. The data of the last trip continue to be displayed and the trip no.flashes. After pressing the SET button again, the data of the current trip/leg are displayed.
Displaying and deleting trip/leg data
- Press the SET button for 3 sec.
• The display "Show trips" 3 seconds appears - Selection of "Show trips" and "Delete trips" by pressing the MODE button
• After pressing the SET button in "Show trips", the net cycling times and the saved increase in altitude of the trips/legs appear
By pressing the SET button for 3 seconds, all values of the trip/leg which has just been displayed will be deleted.
If the SET button is pressed for 3 seconds in the "Delete trips" window, the data recorded for all trips/legs will be deleted and a new trip/leg will be started.
Pressing the MODE button takes you back to the submenu "Trip".
4.5 Submenu "Pilot" PILOTStart a new trip/leg
Starting, stopping and resetting the stop-watch
- Start or stop the stopwatch by pressing the SET button
- Zeroing of the stopwatch by pressing the SET button for 3 seconds
Adjusting the adding counter of the increase in altitude
- Press the SET button for 3 seconds
- The display "Set altitude" appears and the first digit for entry flashes
- The display of the adding counter of the positive change in altitude can be modified (only possible with the stopwatch off)
4.6 Submenu "Total" TOTAL 4.8 Submenu "Set" SET
4.7 Submenu "Destination" DEST
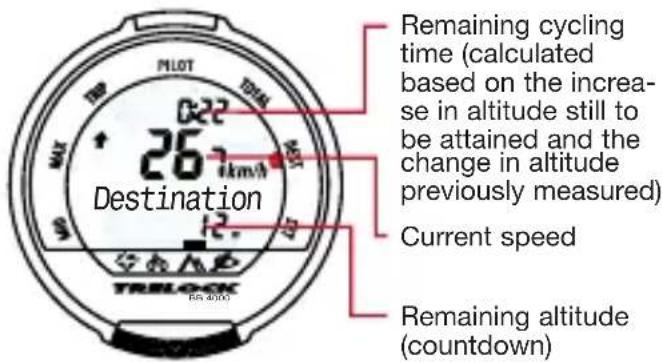
Adjusting the remaining altitude
- Press the SET button for 3 seconds
- The display "Set altitude" appears and the first digit for entry flashes
- Adjusting the remaining altitude by pressing the MODE button repeatedly and confirming the individual digits by pressing the SET button
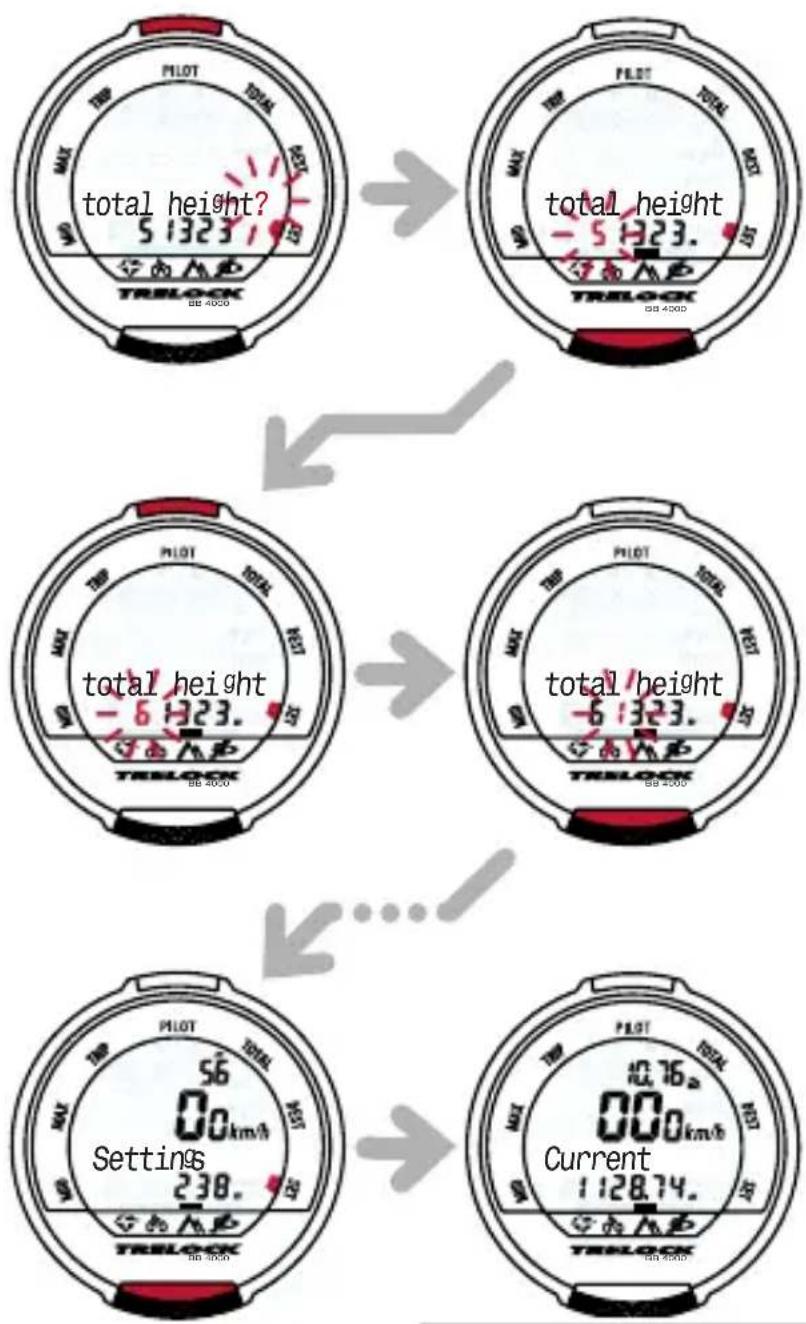
When using the device for the first time and after a battery change, an altitude adjustment must be performed in order to activate the altitude measurement function.
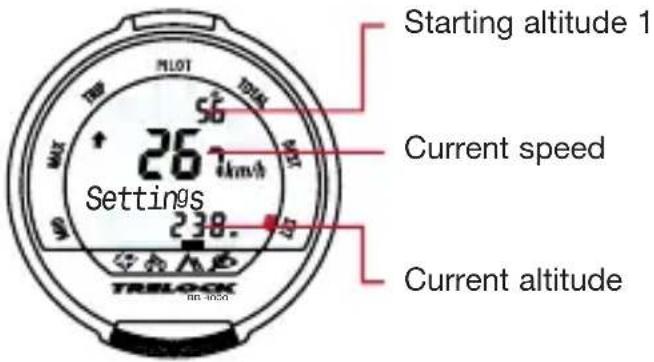
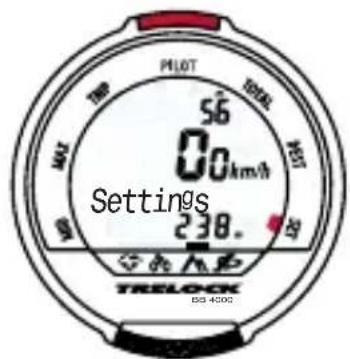
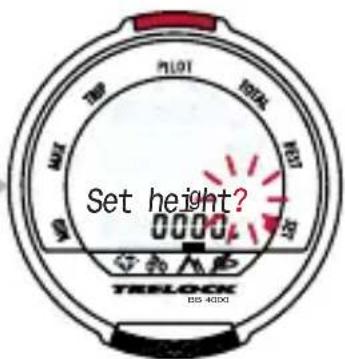
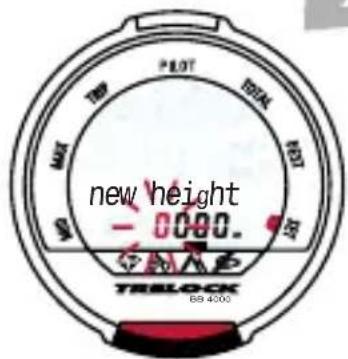
Adjusting and setting the current altitude
- Press the SET button for 3 seconds
- The display "adj. altitude?" appears
- Press the SET button to change
- Adjustment of the altitude displayed can be performed (necessary owing to changes in atmospheric pressure)
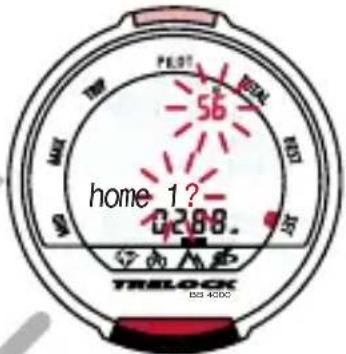
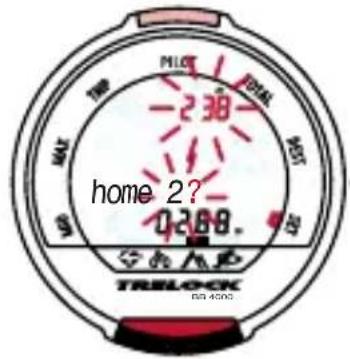
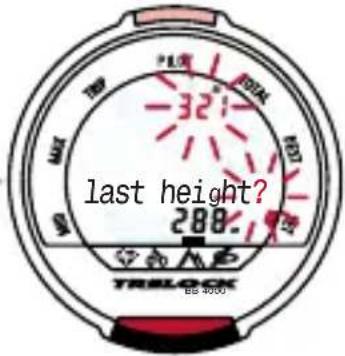
An altitude adjustment can be performed in four ways:
- "Starting altitude 1?": Rapid adjustment with starting altitude 1 (e.g. absolute altitude of your preferred starting point)
- "Starting altitude 2?": Rapid adjustment with starting altitude 2 (e.g. absolute altitude of a second starting point)
- "Last altitude?": Rapid adjustment with the altitude attained in the last saved trip
- "New altitude?": Entry of the actual altitude according to a topographical map or another reliable reference
3 seconds
SET button for modification
SET button for modification Accept by pressing the SET button

TRELOCK
Adjusting the starting altitudes
- Press the SET button for 3 seconds
- The display "adj. altitude?" appears, continue with MODE button – "set start alt.1?" appears
- Entry of the desired values for "Start alt.1" and "Start alt.2" as usual
- Confirm by pressing the SET button
- If no change is made, "Total altitude?" appears by pressing the MODE button

SET BUTTON for modification SET BUTTON for modification
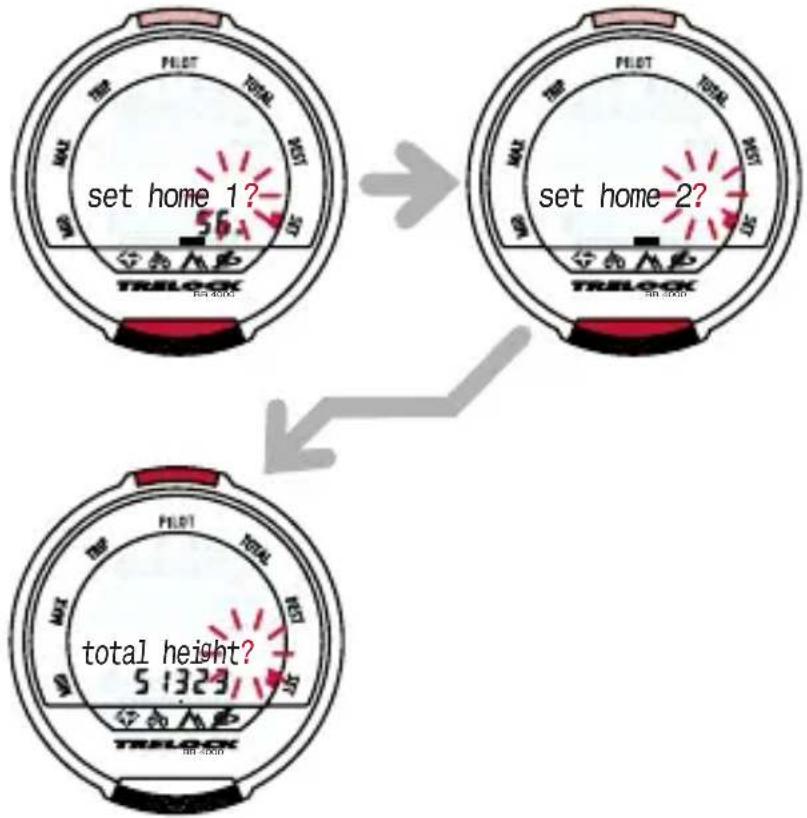
Adjusting the increase in altitude total counter
- by confirming with the SET button, the display of the total altitude gain managed with the cycle can be modified (e.g. for adopting the counter reading of your old cycle computer)
- Entry of the digits as usual
- Confirm by pressing the SET button
Pressing the SET and MODE buttons simultaneously for 3 seconds returns you to the general preliminary settings (p. 8, point 2).
TRELOCK
5. Menu "Pedal frequency"

BB 2000, BB 3000, BB 4000 The "Pedal frequency" menu has 10 functions. The digital data transfer functions precisely subject to the condition that the pedal frequency sensor is correctly installed on the cycle. Please remember to enter the code number after installation (refer to page 14).
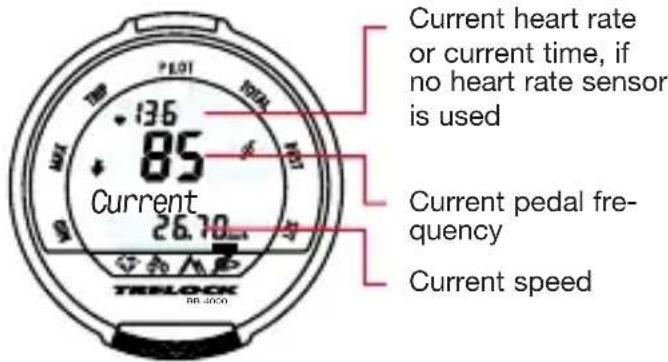
5.1 Submenu "Current"
Start a new trip/leg in the submenus "Average" and "Maximum"
Measurement of the current trip/leg is halted by pressing the SET button. The values will be saved, the display will be reset to "0" and a new trip/leg will be started.
5.3 Submenu "Maximum" MAX
5.2 Submenu "Average" MID 5.4 Submenu "Trip" TRIP
Start a new trip/leg
Measurement of the current trip/leg is halted by pressing the SET button. All data are saved and a new trip/leg is begun in the background. The data of the last trip continue to be displayed and the trip no.flashes. After pressing the SET button again, the data of the current trip/leg are displayed.
Displaying and deleting trip/leg data
- Press the SET button for 3 sec.
• The display "Show trips" 3 seconds appears - Selection of "Show trips" and "Delete trips" by pressing the MODE button
• After pressing the SET button in "Show trips", the net cycling times and the number of revolutions in all trips/legs appear
By pressing the SET button for 3 seconds, all values of the trip/leg which has just been displayed will be deleted.
If the SET button is pressed for 3 seconds in the "Delete trips" window, the data recorded for all trips/legs will be deleted and a new trip/leg will be started.
Pressing the MODE button takes you back to the submenu "Trip".
5.5 Submenu "Pilot" PILOT
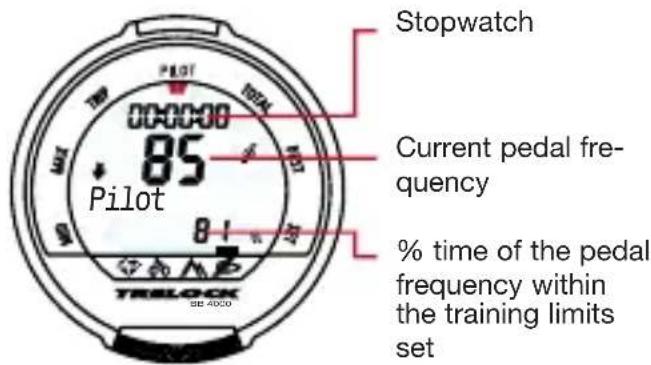
Starting, stopping and resetting the stop-watch
- Start or stop the stopwatch by pressing the SET button
- Zeroing of the stopwatch by pressing the SET button for 3 seconds
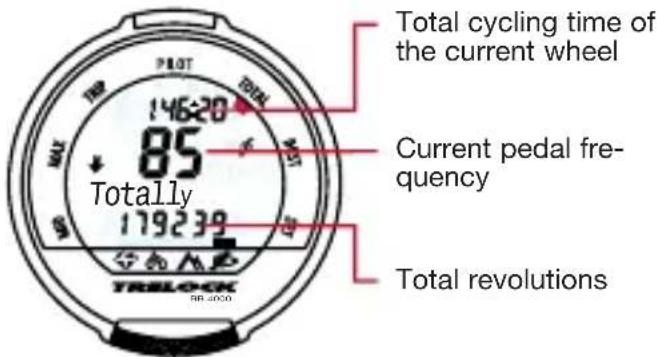
5.6 Submenu "Total" TOTAL
TRELOCK
5.7 Submenu "Destination" DEST
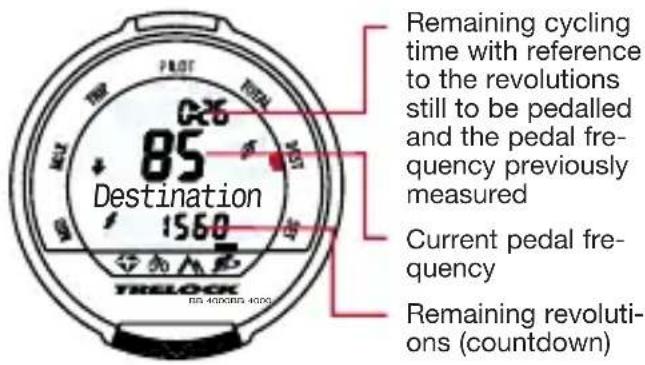
Adjusting the remaining revolution counter
- Press the SET button for 3 seconds
- The display "Set revs." appears and the first digit for entry flashes
- Adjust the remaining revolution counter by pressing the MODE button repeatedly and confirming the individual digits by pressing the SET button
5.8 Submenu "Set" SET
(De)activating the signal
- Press the SET button for 3 seconds
- The display "Signal on?" or "Signal off?" appears
- By pressing the SET button, the audible signal (on exceeding or falling below the set training limits) can be activated or deactivated
= Signal is activated

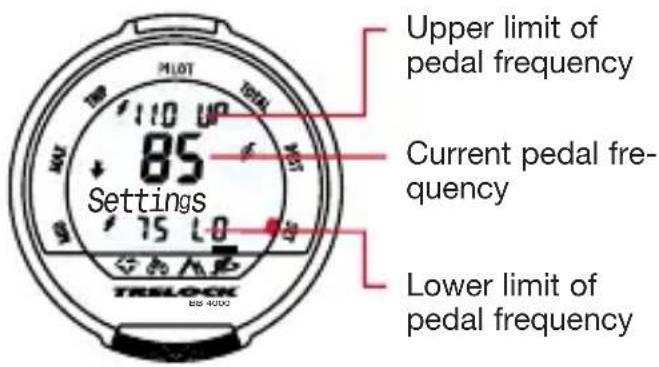
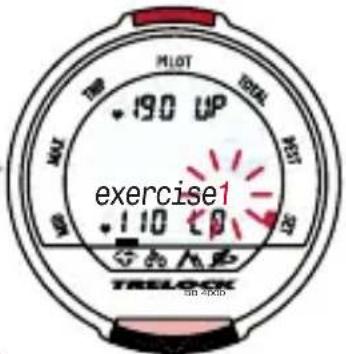
Entry of the upper and lower training limits of the pedal frequency
- Press the SET button for 3 seconds
- The display "Signal on?" or "Signal off?" appears
- By pressing the MODE button, "Set min/max?" appears
- By pressing the SET button, select entry of the values for "Maximum" and "Minimum"
• Entry of the digits as usual - Confirm by pressing the SET button
3 seconds SET button for modification
irs
(on
;)
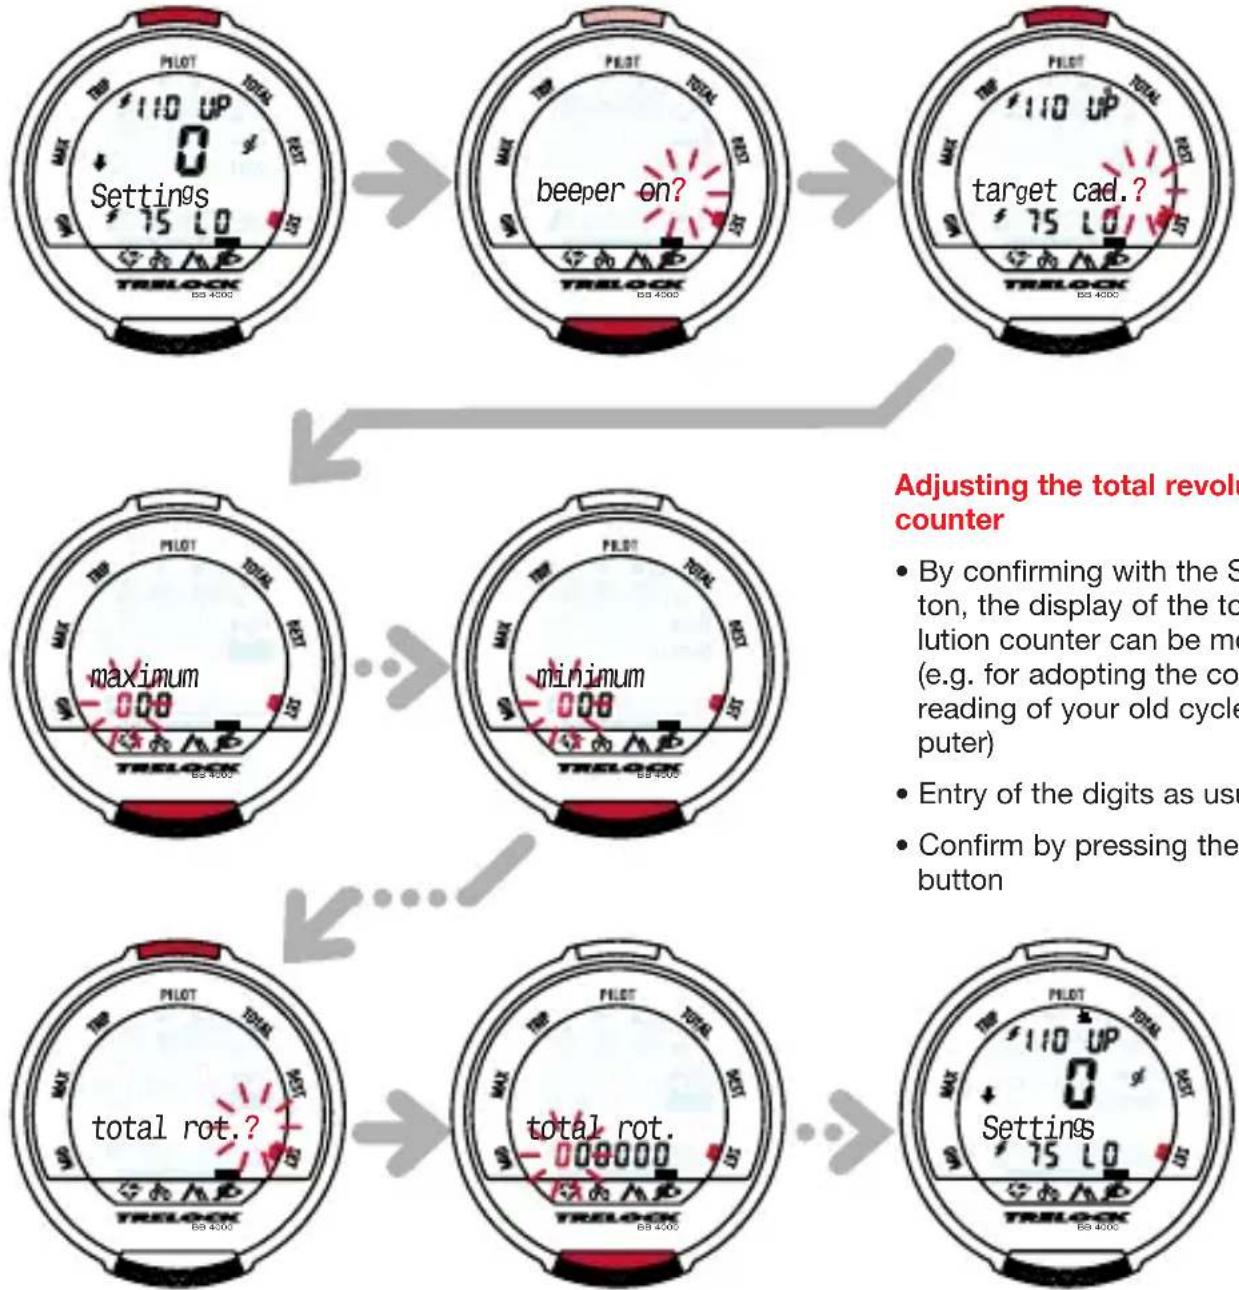
Adjusting the total revolution counter
- By confirming with the SET button, the display of the total revolution counter can be modified (e.g. for adopting the counter reading of your old cycle computer)
• Entry of the digits as usual - Confirm by pressing the SET button
TRELOCK
6. Menu "Heart rate"

BB 3000, BB 3500, BB 4000
The "Heart rate" menu also contains your personal training manager which helps you to increase your fitness with a specific training programme without overtaxing your body. Before training however, you should nevertheless consult your physician who tests your athletic health.
If you wear a pacemaker, you should not use the heart rate mode without consulting your general practitioner. Please remember to enter the code number (refer to page 14).
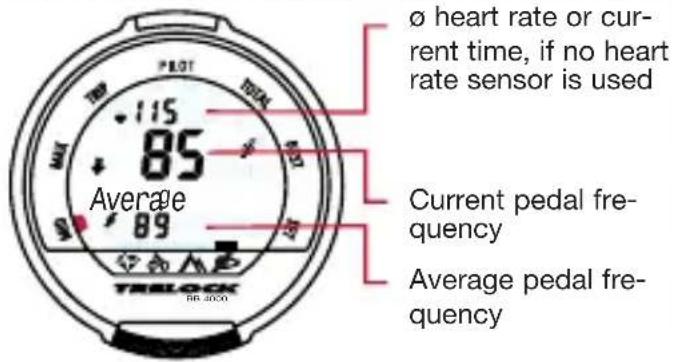
6.2 Submenu "Average" MID
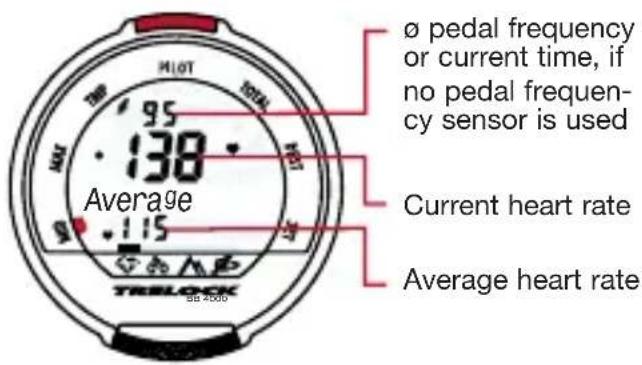
Start a new trip/leg in the submenus "Average" and "Maximum"
Measurement of the current trip/leg is halted by pressing the SET button. The values will be saved, the display will be reset to "0" and a new trip/leg will be started.
5.1 Submenu "Current"
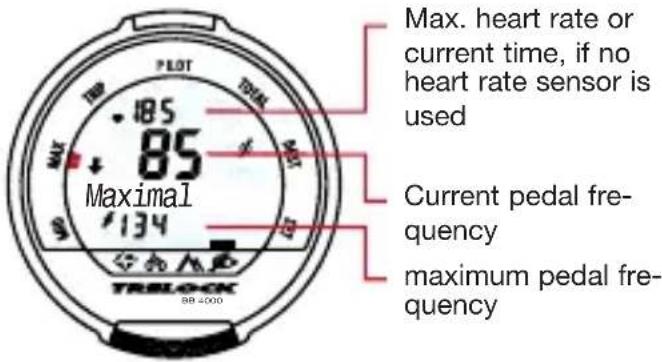
6.3 Submenu "Maximum" MAX

6.4 Submenu "Trip" TRIP
Start a new trip/leg
Measurement of the current trip/leg is halted by pressing the SET button.
All entered data are saved and a new trip/leg is begun in the background. The data of the last trip continue to be displayed and the trip no.flashes. After pressing the SET button again, the data of the current trip/leg are displayed.
Displaying and deleting trip/leg data
- Press the SET button for 3 sec.
• The display "Show trips" appears - Selection of "Show trips" and "Delete trips" by pressing the MODE button
• After pressing the SET button in "Show trips", the net cycling times and the number of calories burnt in all trips/legs appear
3 seconds
By pressing the SET button for 3 seconds, all values of the trip/leg which has just been displayed will be deleted.
If the SET button is pressed for 3 seconds in the "Delete trips" window, the data recorded for all trips/legs will be deleted and a new trip/leg will be started.
Pressing the MODE button takes you back to the submenu "Trip".
5.5 Submenu "Pilot" PILOT
Starting, stopping and resetting the stop-watch
- Start or stop the stopwatch by pressing the SET button
- Zeroing of the stopwatch by pressing the SET button for 3 seconds
6.6 Submenu "Total" TOTAL
6.7 Submenu "Destination" DEST
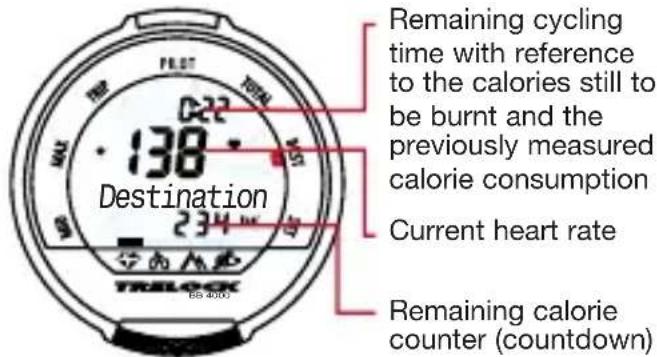
Adjusting the remaining calorie counter
- Press the SET button for 3 seconds
- The display "Set kcal" appears and the first digit for entry flashes
- Adjust the remaining calorie counter by pressing the MODE button repeatedly and confirming the individual digits by pressing the SET button
Basis: approx. 250 kcal are burnt in 30 minutes of training.
(De)activating the signal
- Press the SET button for 3 seconds
- The display "Signal on?" or "Signal off?" appears
- By pressing the SET button, the audible signal (on exceeding or falling below the set training limits) can be activated or deactivated
= Signal is activated

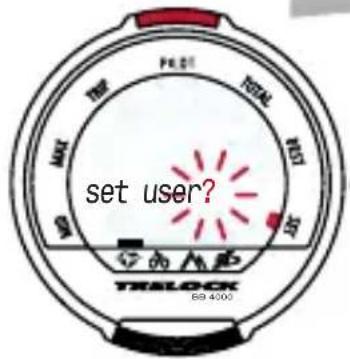
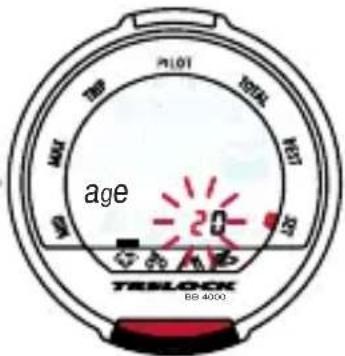
Entry of the personal user data
- Press the SET button for 3 seconds
- The display "Signal on?" or "Signal off?" appears
- By pressing the MODE button, "Set cyclist?" appears - confirm by pressing the SET button
-
The following personal data can now be entered as usual:
-
Age
- Weight ("kg" or "lbs")
- Sex ("male" or "female")
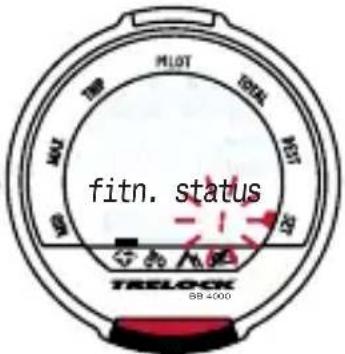
- Fitness level ("Set fitness")
Fitness level
1 = you are untrained
2 = you practice approx.
1 hour of sport 2 to
3 times a week.
3 = you regularly prac-
tice sport with a
high training effect.
3 seconds
SET button for modification


MODE button for modification
SET button for modification


SET button for modification
TRELOCK
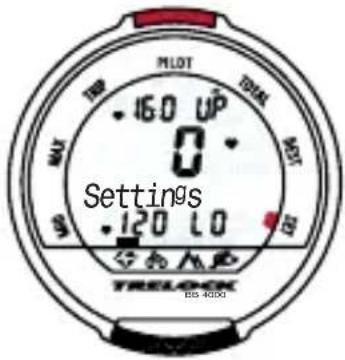
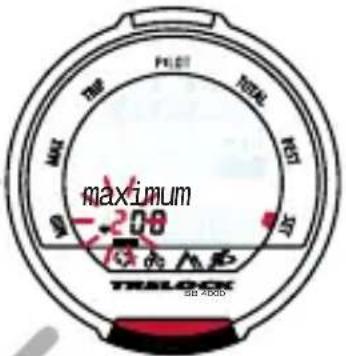
After confirming with the SET button, the user is transferred to the "Pulse limits?" window. Before you now modify the upper heart rate limit, you should be aware that "Maximum" displays the upper heart rate limit with total exhaustion of your physical performance ability. This value is already calculated on the basis of the personal data that you have entered. You should not increase this value, or have your personal upper heart rate limit determined by your physician by means of a stress test. Calculation formula: 220 - age = maximum value
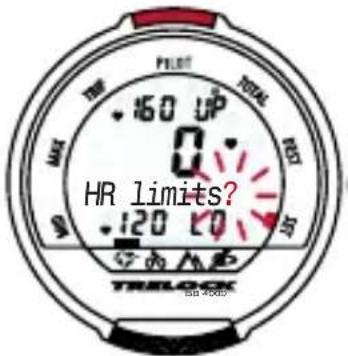
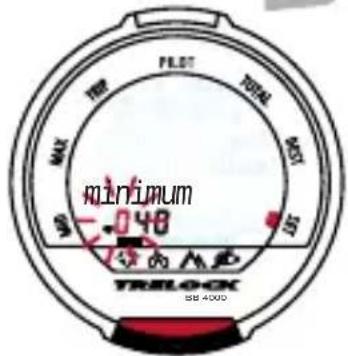
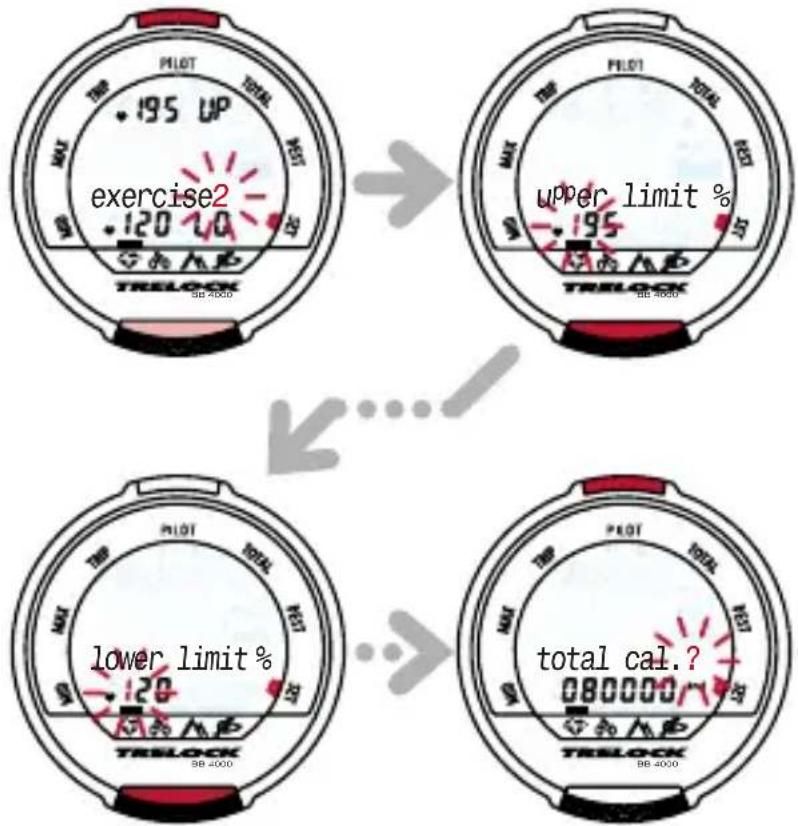
Adjusting the heart rate, training intensity and the total calorie counter
- In order to view the upper heart rate limit, press the SET button and accept or correct values
- Confirm by pressing the SET button and accept or correct the resting pulse in the "Minimum" window and confirm by pressing the SET button
- The desired training intensity can be selected by pressing the MODE button:
1 = low (easy training for beginners) The heart rate lies in the range of 60–70% of the highest value.
2 = moderate (for advanced athletes) The heart rate lies in the range of 70–80% of the highest value.
3 = high (intensive training only for trained athletes) The heart rate lies in the range of 80–90% of the highest value.

- Confirm training intensity by pressing the SET button
- In the "Total kcal?" window the display of the total calorie• counter can now be modified (e.g. in order to adopt the counter reading of your old cycle computer or your old pulse watch)
- Entry of the digits as usual and confirmation with the SET button
• Alternatively, by pressing the SET button for 3 seconds, the automatically calculated training limits can be viewed or modified by pressing the MODE button (in %).
3 seconds SET button for modification
Pressing the SET and MODE buttons simultaneously for 3 seconds returns you to the general preliminary settings (p. 8, point 2).
7. Training
7.1 Training manager
Depending on the product features, your TRELOCK cycle computer offers a wide range of specific training options. You can, for example, determine
• how long you wish to train
- the minimum number of kilometres you wish to cycle
- the gain in altitude you wish to achieve (BB 3500, BB 4000)
• how many calories you wish to burn in a training session (BB 3000, BB 3500, BB 4000) or
• how many revolutions per minute you wish to accomplish (BB 2000, BB 3000, BB 4000).
You can view your training status at any time during training or a pause.
Using the symbols "↑", "•" and "↓" on the display, you can constantly check your training intensity.
In the menu "Bike":
= your current speed is higher than the average speed in the current trip/leg.
- = the current speed corresponds to the average speed in the current trip/leg.
= your current speed is lower than the average speed in the current trip/leg.
In the "Pedal frequency" menu (BB 2000, BB 3000, BB 4000):
= the current pedal frequency is above the training limit entered.
- = the current pedal frequency is optimal for your training.
= the current pedal frequency is below the training limit entered.
In the "Heart rate" menu (BB 3000, BB 3500, BB 4000):
= the current heart rate is above the training limit entered.
- = the heart rate is optimal for your training.
= the heart rate is below the training limit entered.
natural_image
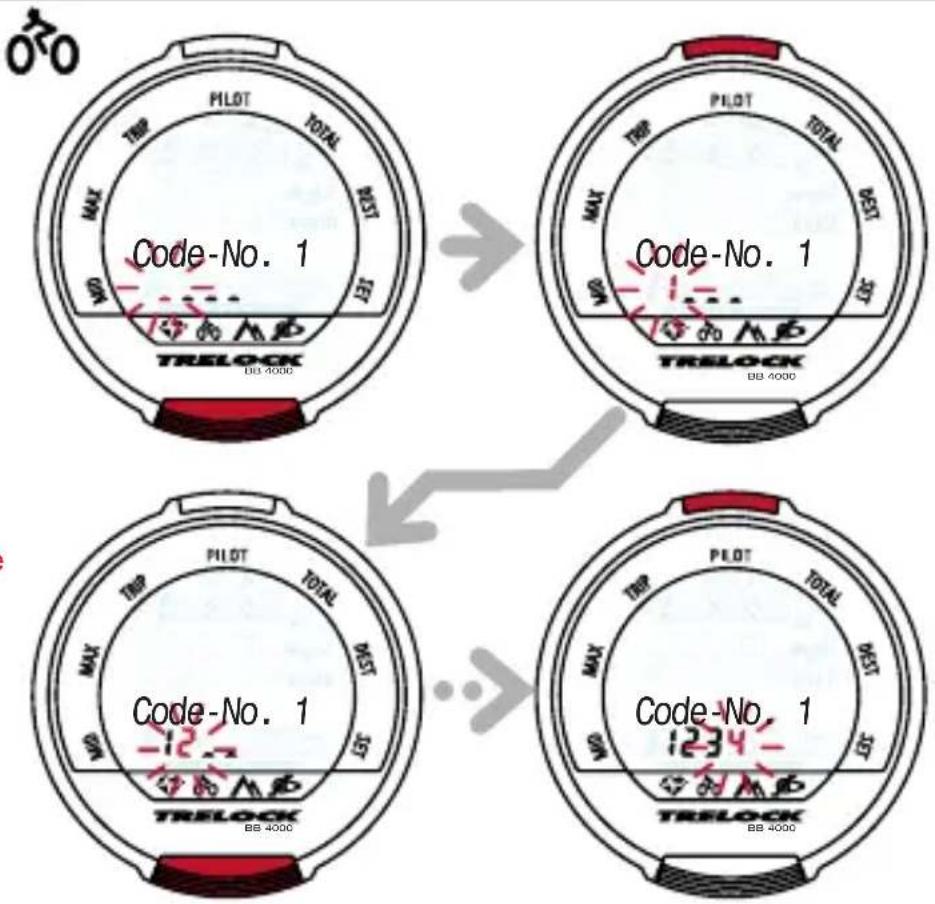
Pure geometric lines forming a V-shape and two parallel diagonal segments (no text or symbols)7.2 Putting the ZF 460 chest band on (BB 3000, BB 3500, BB 4000)
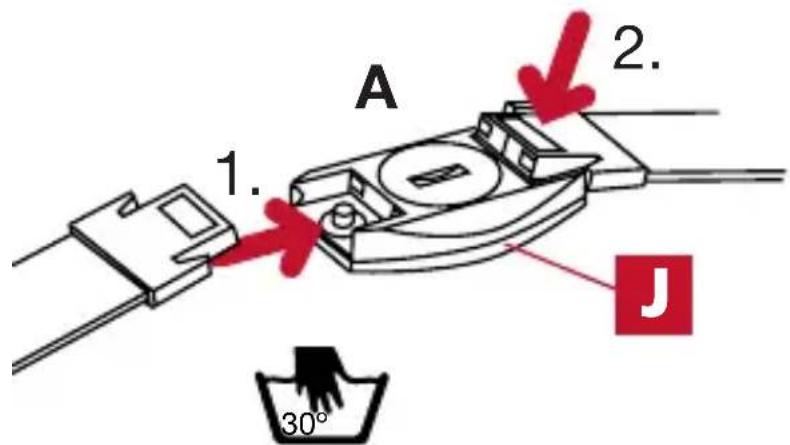
A Attach the elastic band to the sensor. The chest band can be adjusted to fit sizes M to XXL.
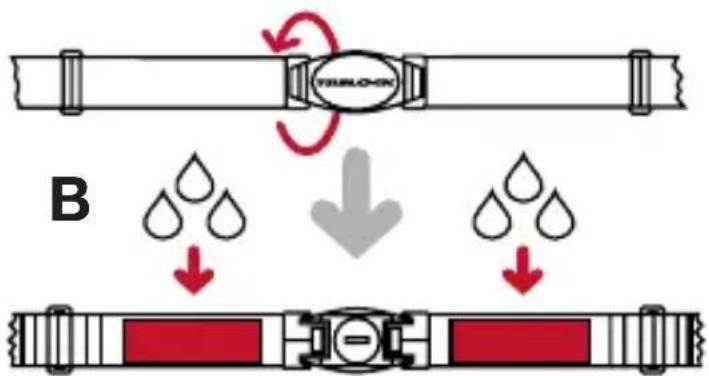
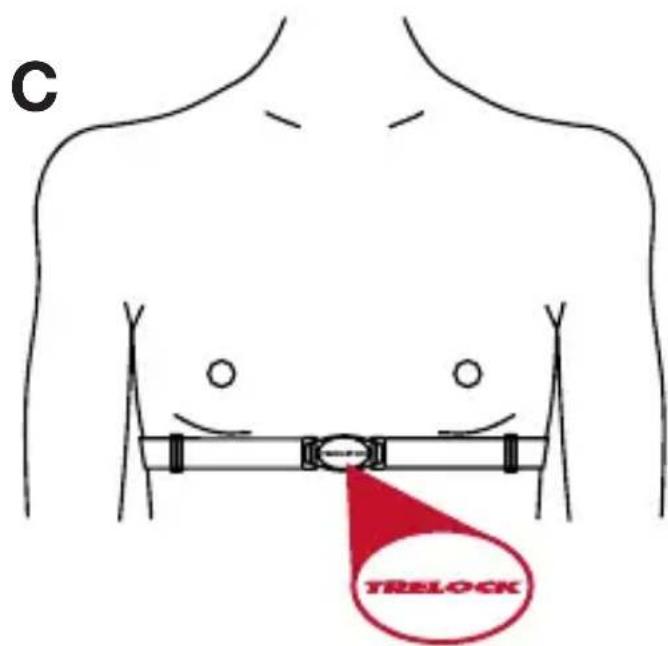
B Moisten the inside of both contact points on the right and left next to the sensor.
C Put the chest band on as illustrated. The TRELOCK logo on the transmitter must be legible and must not be upside down! Adjust the length of the elastic so that the chest band fits comfortably, but cannot slip during training.
Press the MODE button for 2 sec. and repeat the procedure if necessary until the main menu "Heart rate" appears on the display. If the chest band has been put on correctly, the heart symbol will now flash and the current heart rate will be displayed – you can now start to train.
flowchart
graph TD
    A["TURLOCK"] --> B["Downward flow"]
    B --> C["Sensor with red particles"]
    style A fill:#f9f,stroke:#333
    style C fill:#bbf,stroke:#333
7.3 Transferring the training data to your PC
Your can optionally transfer the saved training data to your PC and analyse, log and manage it using the TRELOCK software. You need the PC interface set ZF 450, which also contains the TRELOCK software in order to be able to perform the data transfer. ZF 450 is not included in the scope of delivery, but is available as an accessory from your specialist dealer.
8. Additional information and instructions
8.1 Changing the battery
The night light base and computer power supplies are independent of one another. Failure of the battery in the night light base does not impair the function of the computer.
Important: discharged batteries are special waste and should not be put into the domestic waste!
Your personal data are still memorized even if when there are no batteries in your cycle computer.
The user can change the batteries him/herself.
8.2 Reset
If a malfunction occurs, remove the battery from the cycle computer, wait a short while and reinsert.
8.3 Maintenance and care
Your TRELOCK cycle computer is maintenance-free and does not require any special care.
Simply use a moist cloth for cleaning. The elastic of the chest band (BB 3000, BB 3500, BB 4000) is washable. Please observe the washing instructions on the label.
Protect the sensors and receivers against extreme temperatures. Temperatures under -20 ^ ( -4 ^ ) and above 80 ^ ( 176 ^ ) will damage the cycle computer.
The operating temperature should be between 5 ^ C -50^ C (40 ^ F -120^ F).
8.4 Technical data
Speed 0–199.9 km/h
or m/h
Trip/leg 0-999.99
k
Trip/leg time 0–23:59:59
Total kilometres 0–99999 km
Total cycling time 0–9999:59
Heart rate 0–255 beats/min.
Calories/trip 0–9999 kcal
Total calories 0–999999 kcal
Pedal frequency 0–255 revs.
Revolutions/trip 0-999999 revs.
Remaining revolutions 0–39999 revs.
Altitude measurement 0–5999 m / 19999 ft
Daily increase in altitude 0–9999 m / 29999 ft
Total increase in altitude 0–999999 m or ft
Trips/legs 0–40
Wheel circumference 300–2999 mm
Stopwatch 0-23:59:59
9. Notes on safety
TRELOCK cycle computers are designed for personal athletic training and are not suitable for commercial or medical purposes. Persons wearing pacemakers should not use the heart rate mode (BB 3000, BB 3500, BB 4000) without consulting their physician.
10. Guarantee and service
The current legal regulations apply to the guarantee. We accept liability towards our contractual partners. Please consult your dealer if you have any cause for complaint. The TRELOCK Service Centre remains at your disposal in case of any enquiries:
TRELOCK GmbH, Postfach 7880, 48042 Münster, Germany, Tel. 02 51/9 19 99-14, www.trelock.de. In case of any justified claims under the guarantee, the product will be repaired, or you will receive a replacement device – the claim is only applicable to the current model at the time of the claim. The guarantee shall only apply if the product has not been forcibly opened or damaged after purchase. Batteries, storage batteries and expendable parts are excluded from the guarantee. TRELOCK cannot accept any liability for defect and consequential damage on the basis of this guarantee. This guarantee is valid for a period of 2 years as and from the date of purchase on presentation of the original purchase slip. The manufacturer reserves all rights for technical modifications.
TRELOCK Fast Set Service: You can also have your dealer configure your cycle computer. Your dealer will be able to configure your cycle computer with the TRELOCK Fast Set Box based on the data indicated by you.
11. Frequently asked questions
Why can't the cycle computer be activated?
The battery is flat and needs replacing.
Why are no current data other than the time displayed?
The cycle computer is in sleep mode – press any key or simply ride off (wireless wake-up).
Why is the speed incorrectly displayed?
A wrong wheel size has been entered.
Why is the altitude incorrect?
(BB 3500, BB 4000)
Barometric pressure has changed – altitude compensation is required.
Why is no speed or pedal frequency (BB 2000, BB 3000, BB 4000) displayed?
The distance between the sensor and the respective magnet is too great or the battery in the respective sensor is flat.
Why isn't the heart rate displayed? (BB 3000, BB 3500, BB 4000)
a) The chest belt is not correctly positioned.
b) The contact points on the sensor are not moistened or are dirty.
c) The sensor battery is flat.
Why does the display go dark or react sluggishly?
The operating temperature (5 °C – 50 °C; 40 °F – 120 °F) is too low or too high.
Why is the display pale?
The battery is flat and needs replacing.
Can my training partner's cycle computer interfere with my device?
No. Digital data transfer and the individual coding of the sensors protect your cycle computer against interference to the greatest possible extent.
Foreign data are not received.
12. Accessories (optional) /Spares
ZF 410 Art no. 8001094 Night light base
ZF 420 Art no. 8001179 Dual bike set
ZF 50 Art no. 8000831 Universal spoke magnet
ZF 430 Art no. 8001095 Pedal frequency set
ZF 435 Art no. 8001310 Cycle transmitter
ZF 440 Art no. 8001126 Chest band
ZF 450 Art no. 8001096 PC Interface set