CIT300 - Phone LINKSYS - Free user manual and instructions
Find the device manual for free CIT300 LINKSYS in PDF.

| Product Type | Dual-Mode Internet Telephony Kit (Cordless Phone) |
| Handset Dimensions | 1.86 x 5.20 x 1.36 in (47.37 x 132 x 34.62 mm) |
| Handset Weight | 4.59 oz (0.13 kg) |
| Base Station Dimensions | 4.65 x 4.92 x 2.48 in (118 x 125 x 63 mm) |
| Base Station Weight | 9.2 oz (0.26 kg) |
| Charger Dimensions | 2.99 x 2.99 x 2.48 in (76.04 x 75.88 x 62.92 mm) |
| Charger Weight | 6.35 oz (0.18 kg) |
| Frequency Bands | 1880-1900 MHz (Europe), 1920-1930 MHz (North America), 1910-1930 MHz (South America), 1880-1895 MHz (Taiwan) |
| Standards | DECT, GAP |
| Speech Coding | 32 Kbps ADPCM |
| Range | 300 m outdoor, 50 m indoor |
| Channels | 120 duplex (Europe SA), 60 duplex (NA), 96 duplex (Taiwan) |
| Talk Time | Up to 10 hours |
| Standby Time | Up to 120 hours |
| Battery Type | 2 x NiMH AAA 1.2V 750mAh rechargeable |
| Display | Backlit LCD with icons, contrast adjustable |
| Phonebook Capacity | Private 100 entries, Shared 10 entries |
| Call Records | 15 missed, 10 dialed, 5 received |
| Speakerphone | Yes (handsfree) |
| Headset Jack | 2.5 mm |
| Intercom | Yes (between multiple handsets) |
| USB Interface | Built-in cable for PC connection |
| Power Adapter | 9V DC 300mA for base station |
| LED Indicators | Skype (blue), Phone Line (amber), Handset (red) |
| Page Button | On base station to locate handset |
Frequently Asked Questions - CIT300 LINKSYS
User questions about CIT300 LINKSYS
0 question about this device. Answer the ones you know or ask your own.
Ask a new question about this device
Download the instructions for your Phone in PDF format for free! Find your manual CIT300 - LINKSYS and take your electronic device back in hand. On this page are published all the documents necessary for the use of your device. CIT300 by LINKSYS.
USER MANUAL CIT300 LINKSYS
A Division of Cisco Systems, Inc.
Dual-Mode
Internet Telephony Kit
natural_image
Two electronic devices: a gray L acquisition phone and a silver Li Auto phone, both shown with no visible text or symbols on the devices themselves.VoIP
User Guide
Cisco SYSTEMS

Model No. CIT300
Copyright and Trademarks
Specifications are subject to change without notice. Linksys is a registered trademark or trademark of Cisco Systems, Inc. and/or its affiliates in the U.S. and certain other countries. Copyright © 2006 Cisco Systems, Inc. All rights reserved. Other brands and product names are trademarks or registered trademarks of their respective holders.
WARNING: This product contains chemicals, including lead, known to the State of California to cause cancer, and birth defects or other reproductive harm. Wash hands after handling.
How to Use the User Guide
This User Guide has been designed to make understanding how to use the Dual-Mode Internet Telephony Kit easier than ever. Look for the following items when reading this User Guide:

This exclamation point means there is a caution or warning and is something that could damage your property or Dual-Mode Internet Telephony Kit.

This question mark provides you with a reminder about something you might need to do while using the Dual-Mode Internet Telephony Kit.

This checkmark means there is a note of interest and is something you should pay special attention to while using the Dual-Mode Internet Telephony Kit.
In addition to these symbols, there are definitions for technical terms that are presented like this: word: definition.
Also, each figure (diagram, screenshot, or other image) is provided with a figure number and description, like this: Figure 0-1: Sample Figure Description
Figure 0-1: Sample Figure Description
Figure numbers and descriptions can also be found in the "List of Figures" section.
Dual-Mode Internet Telephony Kit
IMPORTANT SAFETY INSTRUCTIONS
Cordless Internet Telephony Kit
BEFORE USING YOUR TELEPHONE EQUIPMENT, BASIC SAFETY PRECAUTIONS SHOULD ALWAYS BE FOLLOWED TO REDUCE THE RISK OF FIRE, ELECTRIC SHOCK AND INJURY, INCLUDING THE FOLLOWING.
- Read and follow all warnings and instructions marked on the product.
- Do not use this product near water, laundry tub, in a wet basement, or near a swimming pool.
- Do not place this product on an unstable table. The product may fall and be damaged.
- This product should never be placed near or over a radiator or heat register.
- This product should be operated only from the type of power source indicated on the label.
- Do not allow anything to rest on the power cord. Do not locate this product where the cord will be abused by persons walking on it.
- Do not overload wall outlets and extension cords as this can result in the risk of fire or electric shock.
- Avoid using a telephone during an electrical storm. There may be a remote risk of electric shock from lightning.
- Do not use this product to report a gas leak in the vicinity of the leak.
- Do not use this product near intensive care medical equipment or by persons with pacemakers.
- Due to the radio signals between base station and handset, wearers of hearing aids may experience interference in the form of a humming noise.
SAVE THESE INSTRUCTIONS
BATTERIES
- Use only the battery type listed in the instruction manual. Do not use lithium batteries or non-rechargeable batteries that may damage the handset and charger.
- Do not dispose of the battery in a fire, as they can explode.
- Do not open or mutilate the battery. Released electrolyte is corrosive and can cause damage to the eyes or skin. It can be toxic if swallowed.
- Avoid contact with metal objects when handling the battery. These objects could short out the batteries or cause the conductor to overheat resulting in burns.
- Do not attempt to recharge the battery cell by heating it. Sudden release of battery electrolyte can cause burns or irritation to the eyes or skin.
- Observe the proper polarity, or direction, of any battery. Reverse insertion of the battery cell can result in leakage or explosion.
- Remove the battery cells if you do not plan to use the product for several months at a time.
- Discard any "dead" batteries because they are likely to leak into the product.
- Do not store this product or the battery in a high temperature area. Battery stored in a freezer or refrigerator should be protected from condensation during storage and defrosting. Battery should be stabilized at room temperature before using.
- Your battery is rechargeable and can be recycled once it outlives its usefulness. Depending upon your local and state law, it might be illegal to dispose of this battery into a municipal waste system. Check with your local solid waste company for more information on your recycling options for the battery cells.
SAVE THESE INSTRUCTIONS
Table of Contents
Dual-Mode Internet Telephony Kit
Chapter 1: Introduction 1
Welcome 1
What's in This User Guide? 2
Chapter 2: Getting to Know the Dual-Mode Internet
Telephony Kit
Overview 3
The Charger 3
The USB Base Station 4
The Handset's Front Panel 5
The Handset's Side Panel 6
The Handset's Back Panel 7
The Handset's Display Screen 8
Chapter 3: Getting Started 13
Overview 13
Before You Begin 13
Getting Started with the Handset 14
Getting Started with the USB Base Station 15
Powering On the Handset
Setting Up Your PC
Using the Telephony Kit
Setting the Handset's Clock
3
Chapter 4: Using the Dual-Mode Internet Telephony Kit
Overview 21
15
16
18
19
21
Dual-Mode Internet Telephony Kit
Using the Handset 21
Making Skype Calls 24
Making Landline Calls 27
Making Skype or Landline Calls 29
Using the Phonebook 31
Using Voicemail 41
Using the Call Records 44
Using Additional Features 49
Customizing the Handset 52
Using Advanced Features 59
Managing the Handsets 67
Using Multiple Handsets 72
Appendix A: Troubleshooting 75
Common Problems and Solutions 75
Frequently Asked Questions 78
Default Settings 79
Appendix B: Specifications 81
Environmental 82
Appendix C: Regulatory Information 83
IMPORTANT SAFETY INSTRUCTIONS. READ CAREFULLY AND KEEP FOR FUTURE REFERENCE. 83
Environment and Safety 83
Compliance Information 85
European Union 90
Appendix D: Warranty Information 99
Appendix E: Contact Information 101
List of Figures
Dual-Mode Internet Telephony Kit
Figure 2-1: Handset on Charger 3
Figure 2-2: Front Panel of USB Base Station 4
Figure 2-3: Back Panel of USB Base Station 4
Figure 2-4: Front of Handset 5
Figure 2-5: Headset Port 6
Figure 2-6: Back Panel of Handset 7
Figure 2-7: Handset with Clip 7
Figure 3-1: Handset's Batteries 14
Figure 3-2: Handset on Charger 14
Figure 3-3: Connect to the LINE Port 15
Figure 3-4: Audio for Windows 2000 17
Figure 3-5: Volume Control for Windows 2000 17
Figure 3-6: Skype Access Screen 18
Figure 3-7: Front of Handset 19
Figure 4-1: Front of Handset 21
Figure 4-2: Page the Handset 22
Figure 4-3: Headset
Dual-Mode Internet Telephony Kit
Chapter 1: Introduction
Dual-Mode Internet Telephony Kit
Welcome
Thank you for choosing the Linksys Dual-Mode Internet Telephony Kit. It will allow you to make phone calls using your broadband connection (through Skype™) and traditional phone service.
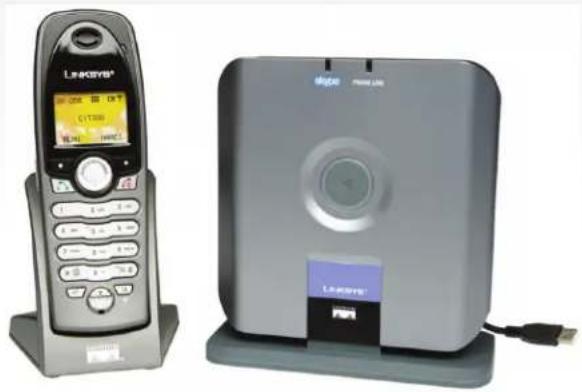
The Telephony Kit gives you cordless convenience, so you don't have to sit in front of your computer when you want to talk to your friends. The Telephony Kit comes with a handset, its charger, and a USB base station. You plug the USB base station into your computer using USB, and then connect its LINE port to a telephone wall jack.
With the Skype application running on your computer, the handset can display your contact list on its display. Find your contact, press the Skype button, and start talking.
The Telephony Kit also supports SkypeOut™ dialing and works as a regular phone. It rings when you have a Skype, SkypeIn™, or landline call coming in, and it provides caller ID. You can hit the mute button for privacy, or use the speakerphone function to let everyone join in.
The Linksys Dual-Mode Internet Telephony Kit gives you all the functionality of a regular phone plus the capability to handle Skype calls.
Chapter 1: Introduction Welcome
What's in This User Guide?
This guide covers the steps for installing the Dual-Mode Internet Telephony Kit.
• Chapter 1: Introduction
This chapter describes the Telephony Kit's applications and this User Guide.
• Chapter 2: Getting to Know the Dual-Mode Internet Telephony Kit
This chapter describes the physical features of the Telephony Kit.
• Chapter 3: Getting Started
This chapter explains how to connect and set up the Telephony Kit.
• Chapter 4: Using the Dual-Mode Internet Telephony Kit
This chapter discusses how to make calls and configure different features of the Telephony Kit.
- Appendix A: Troubleshooting
This appendix describes some potential problems and solutions, as well as frequently asked questions, regarding use of the Telephony Kit.
- Appendix B: Specifications
This appendix provides the technical specifications for the Telephony Kit.
- Appendix C: Warranty Information
This appendix supplies the warranty information for the Telephony Kit.
- Appendix D: Regulatory Information
This appendix supplies the regulatory information regarding the Telephony Kit.
- Appendix E: Contact Information
This appendix provides contact information for a variety of Linksys resources, including Technical Support.
Chapter 2: Getting to Know the Dual-Mode Internet Telephony Kit
Overview
The Telephony Kit includes six items:
- A handset
• A charger with built-in power adapter
• A USB base station with built-in USB cable
• A power adapter for the USB base station - A belt clip for the handset
• An RJ-11 telephone cable
The Charger
The Telephony Kit comes with a charger, which plugs into an electrical outlet. When the handset's power runs low, slide it into the charger, and the handset will begin recharging automatically.
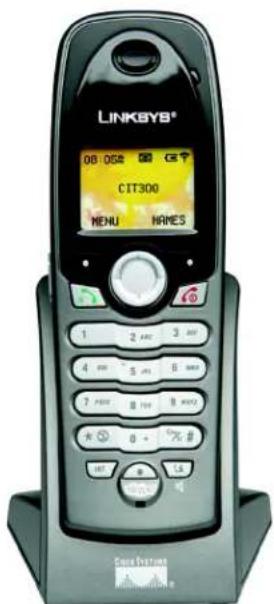
Figure 2-1: Handset on Charger
Chapter 2: Getting to Know the Dual-Mode Internet Telephony Kit Overview
Dual-Mode Internet Telephony Kit
The USB Base Station
For Skype calls, the USB base station transmits voice calls between the handset and your Skype-enabled PC. For landline calls, it transmits voice calls between the handset and your landline.
Front Panel
skype LED Blue. The skype LED lights up and is solidly lit during a Skype call.
PHONE LINE LED Amber. The PHONE LINE LED lights up and is solidly lit during a landline call.
Page Button Press this button to page your handset. To stop the page, press the right soft key on your handset. You will also use this button if you need to register additional handsets (refer to "Chapter 4: Using the Dual-Mode Internet Telephony Kit" for more information).
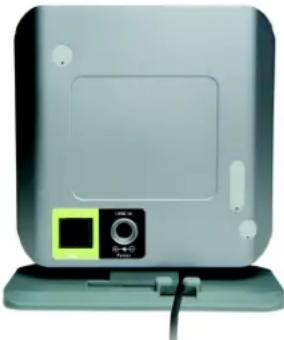
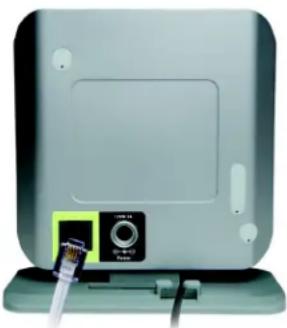
Back Panel
LINE Port Use the LINE port to connect the USB base station to your telephone wall jack with an RJ-11 telephone cable.
Power Port Use the power port to connect the power adapter of the USB base station.
Built-in USB Cable Use this cable to connect the USB base station to a USB port of your Skype-enabled PC.
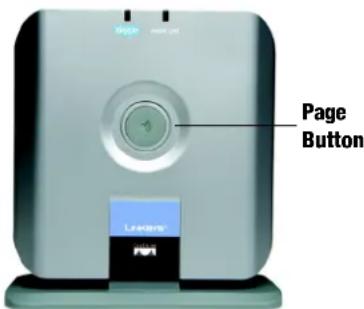
Figure 2-2: Front Panel of USB Base Station
natural_image
Front view of a silver electronic device with a control panel and indicator lights (no visible text or symbols)Figure 2-3: Back Panel of USB Base Station
The Handset's Front Panel
Dual-Mode Internet Telephony Kit
The LED and keys of the handset are described here. You can have up to four cordless handsets for a single USB base station (refer to "Chapter 4: Using the Dual-Mode Internet Telephony Kit" for more information).
LED Red. The LED lights up when the handset is in use. It flashes when there is an incoming call or a message waiting.
The context-sensitive keys are described in this table.#
| Icon Name Function | ||
 | Soft Key Press this key to select the appropriate action shown on the left- or right-hand side of the screen. | |
 | Navigation Pad This lets you navigate menus in up and down directions, as well as left to right.During standby mode, press up or down to see the Skype contact list. Press left to view the SKYPE menu, or press right to view the DIALED list. | |
 | Call Press this key to make or answer calls. | |
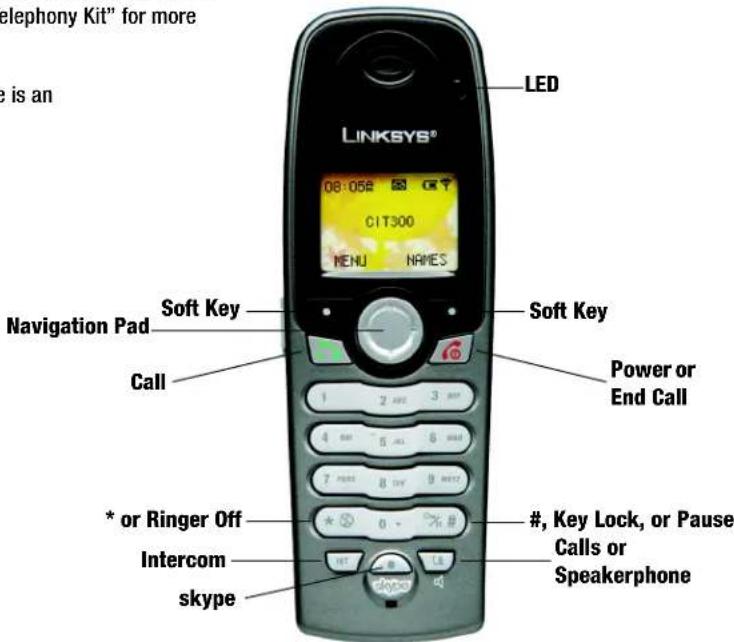
Figure 2-4: Front of Handset
Chapter 2: Getting to Know the Dual-Mode Internet Telephony Kit The Handset's Front Panel
Dual-Mode Internet Telephony Kit
| Icon Name Function | ||
 | Power or End Call | Press this key to power the handset on or off.Press this key to end a call or exit the current menu without saving changes. |
 | * or Ringer Off This button performs all the functions of a * (star) key or turns the handset's ringer on or off. | |
 | #, Key Lock, or Pause | This button performs all the functions of a # (pound) key, locks the keys, or enters a pause. |
 | Intercom Press this button to access the intercom feature. | |
 | skype Press this button to access your Skype contact list. | |
 | Calls or Speakerphone | Press this button to access call records or use the speakerphone. |
The Handset's Side Panel
If you have a headset (optional), open the headset flap. Then plug your headset into the headset port.

NOTE: If the battery charge is low, the handset may not power on for up to 15 minutes.

Figure 2-5: Headset Port
The Handset's Back Panel
The handset's speakerphone and battery compartment are located on the back panel. For directions on how to insert the batteries, refer to "Chapter 3: Getting Started."
The included belt clip snaps onto the back of the handset.
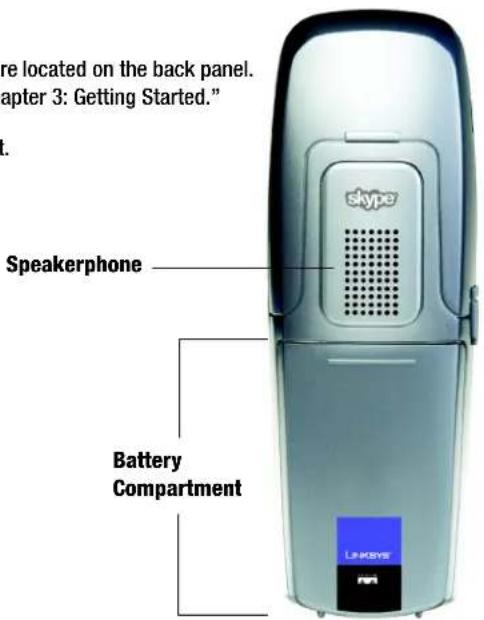
Figure 2-6: Back Panel of Handset
Dual-Mode Internet Telephony Kit

Figure 2-7: Handset with Clip
Chapter 2: Getting to Know the Dual-Mode Internet Telephony Kit The Handset's Back Panel
The Handset's Display Screen
The display screen shows descriptive icons, a call timer (displayed during a call), and menus for settings.
Display Screen Icons
Various icons can appear on the handset's display screen. They are described in this table:
| Icon Description Icon Description | |||
 | Base/Handset Link Name |  | |
 | Landline or Intercom Call in Progress Number |  — — | |
 | Battery Full(This bar shortens as the battery charge runs low.) |  | Battery Empty(Recharge the handset.) |
 | Speaker Volume Level |  | 1 block = lowest volume5 blocks = highest volume |
 | Alarm Clock Internal Melody |  | (for intercom calls) |
 — — — — | Ringer Off External Melody |  | (for landline calls) |
 — — | Key Lock Mode |  | |
Dual-Mode Internet Telephony Kit
| Icon Description Icon Description | |||
| Home Phone/Landline Volume | |||
| Mobile Phone Display Contrast | |||
| Gender Office Phone | |||
| Address (Country, State/Province, City) Birthday | |||
| USB Base Station/Skype Melody Language | |||
| Landline Voicemail Online Status | |||
| Skype Voicemail/Retrieved Skype Voicemail Skype Cell in Progress | |||
| New Skype Voicemail Skype ID | |||
| Time | |||
Call Timer
When you are on a call, the call timer shows the duration of your current call.
Chapter 2: Getting to Know the Dual-Mode Internet Telephony Kit
The Handset's Display Screen
Dual-Mode Internet Telephony Kit
Menus
The handset offers multiple menus for settings and features.
Main Menu
From the standby screen, press the left soft key to select MENU. Use the navigation pad to scroll through the menus and sub-menus.
| SKYPE DISPLAY SOUNDS ADVANCED SYSTEM | ||||
| CONTACTS CLOCK HANDSET (HS) TOUCH & DIAL REGISTER | ||||
| USER STATUS TIME FORMAT HS KEY TONES AUTO ANSWER BASE SELECT | ||||
| VOICEMAIL HANDSET NAME HS TONES ALARM CLOCK DELETE HS | ||||
| CREDITS | CONTRAST | TIMER | CHANGE PIN | |
| CHAT ALERT | LANGUAGE | STOPWATCH | RESET | |
| WALLPAPER | DIAL MODE | |||
| COLOR | RECALL | |||
| PAUSE | ||||
| PABX | ||||
During menu mode, select OK or SAVE (press the left soft key) to save your changes. Select CANCEL to cancel your changes. Press the Power or End Call key to cancel changes and return to the standby screen.
Phonebook (PHBK) Menu
Dual-Mode Internet Telephony Kit
From the standby screen, press the right soft key to select NAMES. Use the navigation pad to scroll through the menus and sub-menus.
| PRIVATE SHARED | |
| VIEW VIEW | |
| USE NUMBER USE | NUMBER |
| DETAILS EDIT | |
| EDIT TO PRIVATE | |
| TO SHARED DELETE | |
| DELETE ADD ENTRY | |
| ADD ENTRY STATUS | |
| QUICK DIAL DELETE ALL | |
| STATUS | |
| DELETE ALL | |
During menu mode, select OK or SAVE (press the left soft key) to save your changes. Select CANCEL to cancel your changes. Press the Power or End Call key to cancel changes and return to the standby screen.
Dual-Mode Internet Telephony Kit
Call Records Menu
Press the Calls or Speakerphone button to access the call records. Use the navigation pad to scroll through the menus and sub-menus.
| MISSED DIALED RECEIVED CALL TIMERS DELETE CALLS | ||||
| USE NUMBER USE NUMBER USE NUMBER LAST CALL MISSED | ||||
| DETAILS DETAILS DETAILS DIALED DIALED | ||||
| USE NUMBER USE NUMBER RECEIVED | RECEIVED | |||
| LIST | LIST | LIST | ALL CALLS | VMWI(VoiceMail Waiting Indication) |
| TO PRIVATE | TO PRIVATE | TO PRIVATE | CLEAR ALL | ALL CALLS |
| TO SHARED | TO SHARED | TO SHARED | ||
| DELETE | DELETE | DELETE | ||
| TO PRIVATE TO PRIVATE TO PRIVATE | ||||
| TO SHARED | TO SHARED | TO SHARED | ||
| DELETE DELETE | DELETE | |||
During menu mode, select OK or SAVE (press the left soft key) to save your changes. Select CANCEL to cancel your changes. Press the Power or End Call key to cancel changes and return to the standby screen.
Proceed to "Chapter 3: Getting Started."
Chapter 3: Getting Started
Dual-Mode Internet Telephony Kit
Overview
Run the Setup Wizard on the Setup CD-ROM for installation of the Telephony Kit. If you wish, you can follow the instructions in this chapter and run the Setup Wizard when instructed to do so.
Before You Begin
Make sure you have an active Skype account (www.skype.com) and a PC with the following:
- Windows 2000 or XP
- Skype software (www.skype.com)
• High-speed Internet connection
• Available USB port
If you have traditional phone service (a landline), make sure you have an available telephone wall jack.
Chapter 3: Getting Started
Overview
Dual-Mode Internet Telephony Kit
Getting Started with the Handset
To insert the batteries and charge them, follow these instructions:
- Remove the cover of the battery compartment.
- Insert the two NiMH rechargeable, AAA batteries (included). Make sure the polarities are correct. (The + and - ends of the batteries should be in the + and - slots of the compartment.)
- Slide the cover upward until it snaps into place.
- Plug the charger's power adapter into an electrical outlet.
- Place the handset on the charger. For the initial charge, let the batteries charge for 14 hours before using the handset. This maximizes battery performance and life.

NOTE: The handset may become warm during the initial charge.

NOTE: If the batteries are low, the handset may not power on for up to 15 minutes and will emit a warning tone. Place the handset on the charger to recharge.
Proceed to the next section, "Getting Started with the USB Base Station."

natural_image
Interior view of a Skype mobile phone showing two battery compartments with green and red labels (no readable text or symbols)Figure 3-1: Handset's Batteries
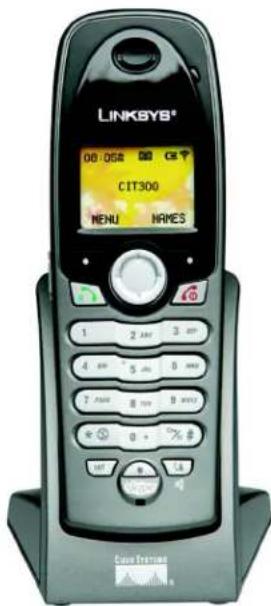
Figure 3-2: Handset on Charger
Chapter 3: Getting Started Getting Started with the Handset
Getting Started with the USB Base Station
To connect the USB base station, follow these instructions:
- If you have a landline, connect a RJ-11 telephone cable (included) to the LINE port of the USB base station. Then connect the other end to your telephone wall jack.
- Connect the USB cable of the USB base station to a USB port on your Skype-enabled PC.
- Connect the included power adapter to the power port of the USB base station. Then plug the power adapter into an electrical outlet.
Proceed to the next section, "Powering On the Handset."
Powering On the Handset
When the handset is fully charged, press and hold down the Power or End Call key for two seconds; this will power on the handset. To power off the handset, press and hold down the Power or End Call key for two seconds.
Proceed to the next section, "Setting Up Your PC."
Dual-Mode Internet Telephony Kit
natural_image
Front view of a silver electronic device with a black connector and cable, no visible text or symbolsFigure 3-3: Connect to the LINE Port
Setting Up Your PC
Make sure you have an active Skype account and Skype software installed on your PC. The Telephony Kit depends on Skype software to place Internet phone calls. For more information about Skype, visit www.skype.com.
Running the Setup Wizard
- Insert the Setup CD-ROM in your Skype-enabled PC's CD-ROM drive.
- The Setup Wizard will automatically run. Follow the on-screen instructions.
If the Setup Wizard does not automatically run, click Start. Click Run. In the field provided, enter D:\SetupWizard.exe (if "D" is the letter of your CD-ROM drive).
- When the installation is complete, a shortcut icon will appear on your desktop. If your PC runs Windows 2000, you may need to restart the PC.
Adjusting the Speaker Volume
To manually adjust the speaker volume on your PC, follow the instructions for your operating system.
Windows XP
- Click Start and select Control Panel.
- Click Sounds, Speech, and Audio Devices, and then click Sound and Audio Devices.
- Click the Audio tab.

NOTE: After the USB driver is installed, the Telephony Kit should start automatically whenever you power on the PC.
Chapter 3: Getting Started Setting Up Your PC
- From the Sound Playback drop-down menu, select Linksys CIT300.
- Click the Apply button.
- Click the Volume button.
- To obtain the best sound quality, adjust the volume using the slider. Close the window when finished.
- Return to the Sound Playback drop-down menu, and select your original sound device.
- Click the OK button.
Windows 2000
- Click Start and select Settings. Click Control Panel.
- Double-click Sound and Multimedia.
- Click the Audio tab.
- From the Sound Playback drop-down menu, select USB Audio Device.
- Click the Apply button.
- Click the Volume button.
- Adjust the volume using the slider to obtain the best sound quality.
- Close the window when finished.
Dual-Mode Internet Telephony Kit
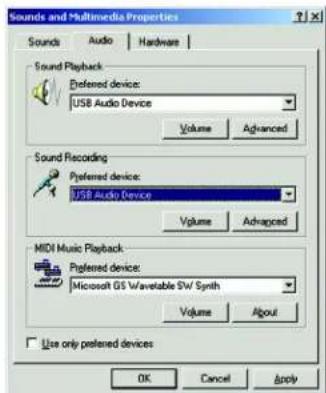
Figure 3-4: Audio for Windows 2000
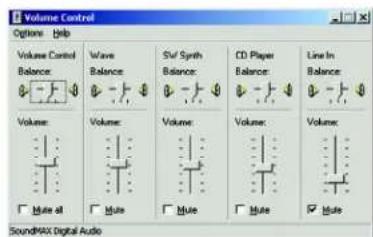
Figure 3-5: Volume Control for Windows 2000
Dual-Mode Internet Telephony Kit
-
Return to the Sound Playback drop-down menu, and select your original sound device.
-
Click the OK button.
Proceed to the next section, "Using the Telephony Kit."
Using the Telephony Kit
- Make sure that the USB base station is connected to your PC's USB port.
- Start the Skype software and log in to your Skype account.
- If the USB driver is not active, double-click the Linksys Dual-Mode Internet Telephony Kit icon on your desktop.
- If this is the first time you use the USB driver, you will be asked to allow the USB driver to access Skype. Click Allow this program to use Skype, and then click the OK button.
- When both Skype and the USB base station are active, the Telephony Kit is ready for use. Your current Skype online status should be shown on the handset's display screen.
- For Skype calls, press the skype key on the handset to view your Skype contact list. Select a contact, and then press the Call key.
For landline calls, use the handset as a regular phone. Press the Call key to make a landline call. Congratulations! The installation of the Dual-Mode Internet Telephony Kit is complete.
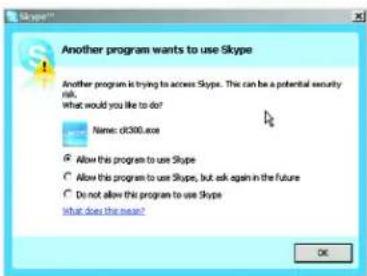
Figure 3-6: Skype Access Screen
Setting the Handset's Clock
After the Telephony Kit has been installed, the handset will obtain the current time from your PC, which will be shown on the display screen. You can manually change the time or time format.
To adjust the time setting, follow these instructions:
- Press the left soft key to select MENU.
- Use the navigation pad to scroll up or down and select DISPLAY.
- Press the left soft key to select OK.
- Select CLOCK.
- Select OK.
- Use the navigation pad to scroll left or right, and change the hour.
- Scroll down and change the minute.
If you are using a 12-hour time format, proceed to step 8. If you are using a 24-hour time format, proceed to step 9.
-
Scroll down and select AM or PM.
-
Select OK to save your changes.
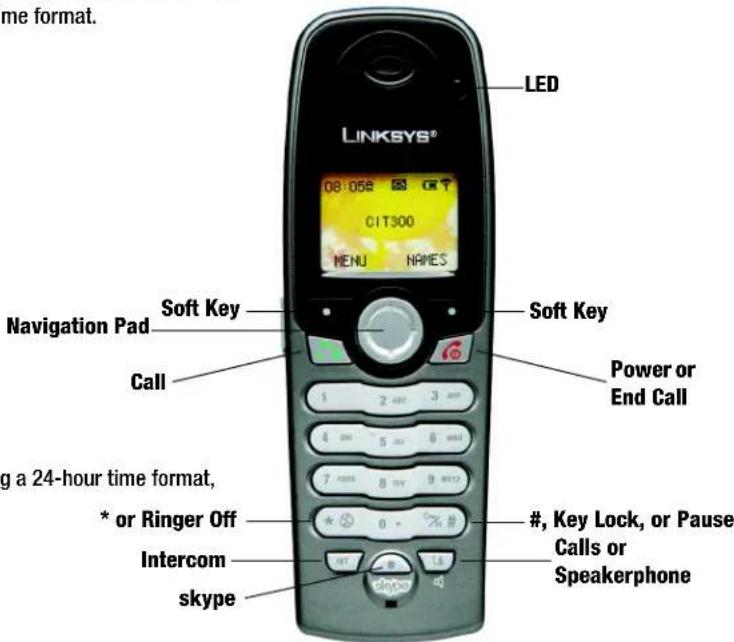
Figure 3-7: Front of Handset
Dual-Mode Internet Telephony Kit
To adjust the time format, follow these instructions:
- Press the left soft key to select MENU.
- Use the navigation pad to scroll up or down and select DISPLAY.
- Press the left soft key to select OK.
- Select TIME FORMAT.
- Select OK.
- Use the navigation pad to scroll up or down, and select 12 HOURS or 24 HOURS.
- Select OK to save your changes.
For more information on how to use the Telephony Kit, refer to “Chapter 4: Using the Dual-Mode Internet Telephony Kit.”
Chapter 4: Using the Dual-Mode Internet Telephony Kit
Overview
This chapter explains how to do the following:
- Make calls
- Use the phonebook
- Use voicemail
- Use the call records
- Customize the handset settings
- Use advanced features
- Manage multiple handsets
Using the Handset
Here are some guidelines for using the handset and making calls.

IMPORTANT: When you want to make an emergency call, make a landline call with the Telephony Kit (if you have a landline). If you attempt to make an emergency call through the Skype line, it will be automatically routed to the landline.
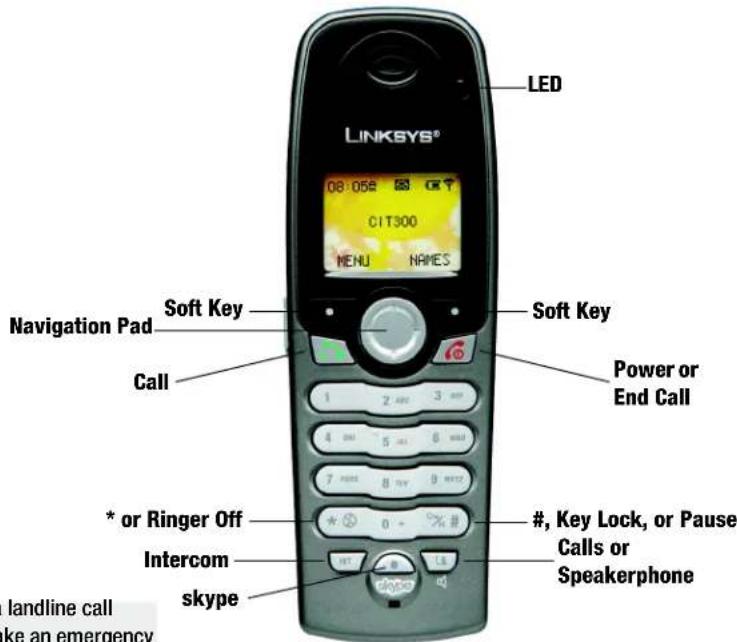
Figure 4-1: Front of Handset
Chapter 4: Using the Dual-Mode Internet Telephony Kit
Overview
Dual-Mode Internet Telephony Kit
Entering or Deleting Letters, Numbers, and Special Characters
- To enter a letter or number, press the appropriate key repeatedly until the letter or number appears.
- To enter a + sign, press and hold down the 0 key for one second while the handset is in standby mode.
- To enter a pause, press and hold down the # key.
- For certain entries, such as the handset name or phonebook name, press the 1 key once to enter a space. Press the 0 or * key repeatedly to enter the special character/symbol you want.
To change the case of a letter, press the # key. The next letter you enter will be in the opposite case (lower-or uppercase).
• To erase a character, select Clear; it works as a backspace.
- To move the cursor, use the navigation pad.
Call Timer
When you are on a call, the call timer shows the duration of your current call.
Paging the Handset
If you have misplaced the handset, press the page button on the USB base station. After you have located the handset, press the right soft key on your handset to stop the page. You will also use this button if you need to register additional handsets (described later in this chapter).
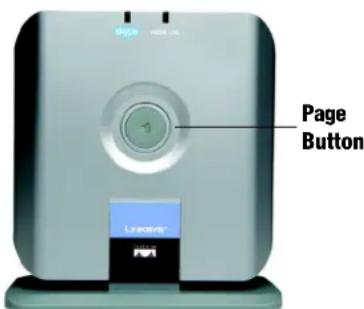
Figure 4-2: Page the Handset
Chapter 4: Using the Dual-Mode Internet Telephony Kit
Using the Handset
Handset Ringer
Dual-Mode Internet Telephony Kit
When the handset is ringing, select SILENT to turn off the ringer for the call. To turn off the ringer for all calls, press and hold down the * key when the handset is in standby mode. The Ringer Off icon will be shown. Press and hold down the * key to turn on the ringer.
Staying within Range
If you move outside of the USB base station's range during a call, an alarm tone will sound and the Base/Handset Link icon will flash on the handset's display screen. Your call will be disconnected if you do not move back within range. If a disconnected handset is outside of the USB base station's range for more than 30 minutes, it will automatically turn off.
Recharging the Handset's Batteries
If the handset's battery charge runs low, a warning tone will emit from the handset. Place it on the charger to recharge.
Chapter 4: Using the Dual-Mode Internet Telephony Kit Using the Handset
Making Skype Calls
Calling a Landline Number with SkypeOut
SkypeOut calls require SkypeOut credits. To purchase these credits, go to www.skype.com.
- Dial the landline number you want to call.

NOTE: For SkypeOut calls, dial 00, 011 or + as a prefix followed by the country code, area code and phone number.
Example:
To call the number 905-555-6622 in North America, where the country code is "1", you can dial 0019055556622 or, 01119055556622 or, +19055556622.
- Press the skype key.
Calling a Skype Contact
- During standby mode, press the skype key, or press up or down on the navigation pad.
- The Skype contact list will appear. An icon next to each contact indicates its online status. Use the navigation pad to select the contact you want. If you want to search by letter, use the handset's keypad to enter the first letter of the name you want.
When a contact is highlighted, select PROFILE to view the contact's information, such as name, online status, language, birthday, gender, home number, office number, mobile number, address, and time.
- After you have selected the appropriate contact, press the Call key.

NOTE: This is the contact list of the user who is currently logged into Skype on the PC.
Making a Second Skype Call
You can put your Skype call on hold and make a second Skype call, through your contact list or SkypeOut.
- While on a Skype/SkypeOut call, press the Call key to access the other line.
- You will hear a dial tone. To call another Skype contact, proceed to step 3.
To call a landline number through SkypeOut, go to step 7. - Press the skype key, or press up or down on the navigation pad.
- The Skype contact list will appear. Use the navigation pad to select the contact you want.
- Select PROFILE.
- Press the Dial key. Proceed to step 8.
- Dial the landline number you want to call.
- To toggle between the two calls, press the Call key.
Ending a Skype Call
Press the Power or End Call key, or place the handset on the charger.
Rejecting an Incoming Skype Call
Press the Power or End Call key, or place the handset on the charger.
Chapter 4: Using the Dual-Mode Internet Telephony Kit
Making Skype Calls
Dual-Mode Internet Telephony Kit
Answering an Incoming Skype Call
When you receive a Skype call, the handset will ring the selected Skype melody (refer to the "Customizing the Handset" section), and the Skype Call in Progress icon will flash. The display screen will show the display name and Skype ID of the caller or the number of the call (if it is a Skypeln call). To answer, press the Call key.
Answering a Second Incoming Skype Call
When there is a second incoming Skype call while you are on the first Skype call, you will hear a call waiting tone. To pick up the second incoming call, press the Call key. Your current Skype call will be put on hold. To toggle between the two calls, press the Call key.
Starting a Three-Way Skype Conference Call
You can have a conference call with two other Skype contacts or landline users through SkypeOut.
- Call the first Skype contact or landline user through SkypeOut.
- Press the Call key to seize the line.
- Call the second Skype contact or landline user through SkypeOut.
- When both calls are connected, select OPTIONS.
- Select SKYPE CONF.
- When both Skype parties are connected, the conference call will begin.
Making Landline Calls
Dual-Mode Internet Telephony Kit
Calling a Number with Your Landline
- Press the Call key.
- Dial the landline number you want to call.
Pre-Dialing a Number
- During standby mode, dial the landline number you want to call.
- Press the Call key.
Saving a Pre-Dialed Number
- Enter the number during standby mode.
- Select SAVE.
- Enter a unique name for the entry. (If the phonebook is full, the display screen will say, "FULL", and the handset will return to standby mode.)
- Press down and edit the number if necessary.
- Press down and select a melody (optional). Use this feature if you want a specific melody to ring when an incoming call matches the number of this entry.
- Select SAVE.
Chapter 4: Using the Dual-Mode Internet Telephony Kit Making Landline Calls
Dual-Mode Internet Telephony Kit
Using Quick Dialing
During standby mode, press and hold down the appropriate digit key. Your call will be automatically made. For more information about quick dialing, refer to the “Using the Phonebook” section.
Ending a Landline Call
Press the Power or End Call key, or place the handset on the charger.
Answering an Incoming Landline Call
When you receive a call, the handset will ring, and the Home Phone/Landline icon will flash. If you have caller ID, then the caller ID of the incoming call will be displayed. If the incoming call number matches a number in your phonebook, then the name in the phonebook will be displayed.
To answer, press the Call key.
Answering an Incoming Call from the Other Line
When there is an incoming call from the other line while you are on the first call, you will hear a call waiting tone. To end your current call and pick up the incoming call, select ANSWER. If you select ANSWER, then you will not be able to return to the first call.
Making Skype or Landline Calls
Dual-Mode Internet Telephony Kit
Redialing a Number
The handset records the last 10 contacts or numbers dialed. The most recent call is at the top of the list. Only the Skype ID is stored for Skype contact calls. If you have more than one handset, each handset records its own set of dialed number(s).
To redial the last landline number dialed, follow these instructions:
-
Press the Call key.
-
Select REDIAL.
To redial one of the last 10 landline numbers dialed, follow these instructions:
-
During standby mode, press right on the navigation pad. The Dialed list will appear.
-
Use the navigation pad to select the number or contact you want.
-
Press the Call key.
Each number or contact on the Dialed list indicates which line was used for the previous call. When you press the Call key, the number or contact will be dialed out through its respective line.
Making Handsfree Calls
You can use a headset with a 2.5 mm plug or speakerphone for handsfree calls.
Chapter 4: Using the Dual-Mode Internet Telephony Kit
Making Skype or Landline Calls
Dual-Mode Internet Telephony Kit
To use a headset, follow these instructions:
- Open the headset flap.
- Plug your headset into the headset port.
Unplug the headset to end the handsfree feature.
To use the speakerphone feature, follow these instructions:
Press the Calls or Speakerphone key. The Speaker icon will appear on the display screen.
Press the Calls or Speakerphone key again to turn off the speakerphone.
Adjusting the Call Volume
During a call, press up or down on the navigation pad to change the volume level.
You can also adjust the volume on your PC. Refer to "Chapter 3: Getting Started" for more information.
Muting a Call
To mute a call, select MUTE. The caller cannot hear you, but you can hear the caller.
To turn off the mute feature, select UNMUTE.
Quick Dialing
During standby, press and hold the appropriate digit key (configured through the phonebook) for your call.

Figure 4-3: Headset
Using the Phonebook
Dual-Mode Internet Telephony Kit
Your handset has a private phonebook and a shared phonebook. Each handset has its own private phonebook. The shared phonebook is stored in the USB base station, so its information can be shared by all handsets. A handset must be connected to the USB base station in order to use the shared phonebook.
Your private phonebook can store up to 100 entries, and your shared phonebook can store up to 10 entries. A name can have up to 10 characters, and a number can have up to 20 digits.
Accessing the Phonebook
- Select NAMES.
- Use the navigation pad to select the phonebook you want, PRIVATE or SHARED.
- Select OK.
Adding a Phonebook Entry
- Select NAMES.
- Use the navigation pad to select the phonebook you want, PRIVATE or SHARED.
- Select OK.
- Select ADD ENTRY and then select OK.
- Enter a unique name for the entry. (If the phonebook is full, the handset will return to standby mode.)
Chapter 4: Using the Dual-Mode Internet Telephony Kit
Using the Phonebook

NOTE: Contacts on the Skype contact list cannot be saved to the private or shared phonebook.

NOTE: If you enter the same name for two different entries, then the message, "DUPLICATE NAME REPLACE?" will be displayed. Select OK to replace the existing entry with the new entry, or select CANCEL to change the name.
Dual-Mode Internet Telephony Kit
- Press down and enter the number.
If you are adding to the private phonebook, you can press down and change the melody. Use this feature if you want a specific melody to ring when an incoming call matches the number of this entry.
- Select SAVE.
Viewing a Phonebook Entry
- Select NAMES.
- Use the navigation pad to select the phonebook you want, PRIVATE or SHARED.
- Select OK.
- Select VIEW.
- Select OK.
- Select DETAILS.
- Select OK to view the contact's information, such as name, number, and melody (if available).
-
Press up or down to view the details of the other phonebook entries.
-
Use the navigation pad to select the contact you want. If you want to search by letter, use the handset's keypad to enter the first letter of the name you want to find.
-
If you are using the shared phonebook, proceed to step 10. If you using the private one, select OPTIONS.
Editing a Phonebook Entry
Dual-Mode Internet Telephony Kit
- Select NAMES.
- Use the navigation pad to select the phonebook you want, PRIVATE or SHARED.
- Select OK.
- Select VIEW.
- Select OK.
- Use the navigation pad to select the contact you want. If you want to search by letter, use the handset's keypad to enter the first letter of the name you want to find.
- Select OPTIONS.
- Select EDIT.
- Select OK.
- If you wish, edit the name and number.
If you are using to the private phonebook, you can press down and change the melody. Use this feature if you want a specific melody to ring when an incoming call matches the number of this entry.
- Select SAVE.
Chapter 4: Using the Dual-Mode Internet Telephony Kit Using the Phonebook
Dual-Mode Internet Telephony Kit
Copying a Phonebook Entry
Entries can be shared by copying the entries from one phonebook to another.
- Select NAMES.
- Use the navigation pad to select the phonebook you want, PRIVATE or SHARED.
- Select OK.
- Select VIEW.
- Select OK.
- Use the navigation pad to select the contact you want. If you want to search by letter, use the handset's keypad to enter the first letter of the name you want to find.
- Select OPTIONS.
- To copy to the shared phonebook, select TO SHARED. To copy to the private phonebook, select TO PRIVATE.
- Select OK.
- If you wish, edit the name and number.
If you are copying to the private phonebook, you can press down and change the melody. Use this feature if you want a specific melody to ring when an incoming call matches the number of this entry.
- Select SAVE.
Using Quick Dialing
This feature allows you to dial an entry in your private phonebook by pressing and holding a quick dial key that you have assigned. You can assign nine quick dial keys (keys 1-9).
Assigning a Quick Dial Key
- Select NAMES.
- Select PRIVATE.
- Select OK.
- Select QUICK DIAL.
- Select OK.
- The first quick dial key is displayed. Press down on the navigation pad to select the quick dial key you wish to use.
If no number is assigned, the display will say, "EMPTY". Press the left soft key and go to step 8.
If a number has been assigned to the quick dial key, the display will show the name and number of the entry. Go to step 7.
- Select OPTIONS. Select CHANGE, and then select OK.

NOTE: Contacts on the Skype contact list cannot be assigned to quick dial keys.
Dual-Mode Internet Telephony Kit
- The display will show the entries in your private phonebook.
Use the navigation pad to select the contact you want.
-
Select DETAILS.
-
Select OK.
Deleting a Quick Dial Key
- Select NAMES.
- Select PRIVATE.
- Select OK.
- Select QUICK DIAL.
- Select OK.
-
The first quick dial key is displayed. Press down on the navigation pad to select the quick dial key you want to delete.
-
Select OPTIONS.
-
Select DELETE, and then select OK.
-
Select OK to confirm.
Deleting a Phonebook Entry
Dual-Mode Internet Telephony Kit
- Select NAMES.
- Use the navigation pad to select the phonebook you want, PRIVATE or SHARED.
- Select OK.
- Select VIEW, and then select OK.
- Use the navigation pad to select the contact you want. If you want to search by letter, use the handset's keypad to enter the first letter of the name you want to find.
- Select OPTIONS.
- Select DELETE, and then select OK.
- Select OK to confirm.
Deleting All Entries
- Select NAMES.
- Use the navigation pad to select the phonebook you want, PRIVATE or SHARED.
- Select OK.
- Select DELETE ALL, and then select OK.
- Select OK to confirm.
Chapter 4: Using the Dual-Mode Internet Telephony Kit Using the Phonebook
Dual-Mode Internet Telephony Kit
Viewing Memory Usage of the Phonebook
The handset keeps track of how many entries the phonebook has and how many are still available.
- Select NAMES.
- Use the navigation pad to select the phonebook you want, PRIVATE or SHARED.
- Select OK.
- Select STATUS, and then select OK.
- The display shows how many entries you have left and how many are used. Select OK when finished.
Calling a Number from the Phonebook
While you are viewing your phonebook, you can call a contact. You can also open your phonebook during a call.
Calling Directly from the Phonebook
- Select NAMES.
- Use the navigation pad to select the phonebook you want, PRIVATE or SHARED.
- Select OK.
- Select VIEW.
-
Select OK.
-
Use the navigation pad to select the contact you want. If you want to search by letter, use the handset's keypad to enter the first letter of the name you want to find.
- Press the Call key.
Pre-Dialing a Number from the Phonebook
- Select NAMES.
- Use the navigation pad to select the phonebook you want, PRIVATE or SHARED.
- Select OK.
- Select VIEW, and then select OK.
- Use the navigation pad to select the contact you want. If you want to search by letter, use the handset's keypad to enter the first letter of the name you want to find.
- To make the call, press the Call key.
To edit the number, go to step 7.
- Select OPTIONS.
- Select USE NUMBER, and then select OK.
- Select CLEAR to delete a digit, or use the navigation pad and keypad to edit the phone number.
- To make the call, press the Call key.
Chapter 4: Using the Dual-Mode Internet Telephony Kit
Using the Phonebook
Dual-Mode Internet Telephony Kit
Dual-Mode Internet Telephony Kit
Viewing the Phonebook During a Call
- Select OPTIONS.
- Select PHONEBOOK.
- Use the navigation pad to select the contact you want. If you want to search by letter, use the handset's keypad to enter the first letter of the name you want to find.
- Select DETAILS.
- The entry will be displayed. Select CANCEL three times to return to the call.
Making a Call from the Phonebook During a Call
- Select OPTIONS.
- Select PHONEBOOK.
- Use the navigation pad to select the contact you want. If you want to search by letter, use the handset's keypad to enter the first letter of the name you want to find.
- Select DETAILS.
- The entry will be displayed. Select DIAL.
Using Voicemail
Dual-Mode Internet Telephony Kit
The Telephony Kit offers convenient access to your Skype voicemail. To get a voicemail account, go to www.skype.com.
When you have new voicemail, the LED on the handset will flash, and the Skype Voicemail icon will appear on the display screen.
Retrieving a Voicemail Message
- Select MENU.
- Select SKYPE.
- Select OK.
- Select VOICEMAIL.
- Select OK.
- Select VIEW.
- Select OK.
- Select the message you want to retrieve.
- Select PLAY to listen to the message.

NOTE: The voicemail list will display an icon next to each voicemail. The Skype Voicemail icon with a red star indicates that a message is new, while the same icon without the star indicates that you have already heard this message.
Chapter 4: Using the Dual-Mode Internet Telephony Kit Using Voicemail
Dual-Mode Internet Telephony Kit
Deleting a Voicemail Message
- Select MENU.
- Select SKYPE.
- Select OK.
- Select VOICEMAIL.
- Select OK.
- Select VIEW.
- Select OK.
- Select the message you want to delete.
- Select DELETE.
- Select OK to confirm.
Deleting All Voicemail Messages
- Select MENU.
- Select SKYPE.
- Select OK.
Chapter 4: Using the Dual-Mode Internet Telephony Kit
Using Voicemail
- Select VOICEMAIL.
- Select OK.
- Select DELETE ALL.
- Select OK.
- Select OK to confirm.
Dual-Mode Internet Telephony Kit
Chapter 4: Using the Dual-Mode Internet Telephony Kit Using Voicemail
Using the Call Records
The handset keeps track of the calls you make, receive, or miss. You can access a list of the last 15 calls missed, the last 10 calls dialed, or the last 5 calls received. You can also keep track of the duration of your calls.
Checking the Call Records
- Press the Calls or Speakerphone key.
- Select MISSED, DIALED, or RECEIVED.
- Select OK.
- A list of call records is displayed. Press up or down on the navigation pad.
- To view the details of an entry, select OPTIONS.
- Select DETAILS.
- Select OK.
Transferring the Call Record to the Phonebook
- Press the Calls or Speakerphone key.
- Select MISSED, DIALED, or RECEIVED.
- Select OK.
- A list of call records is displayed. Press up or down on the navigation pad.
Dual-Mode Internet Telephony Kit
- To view the details of an entry, select OPTIONS.
-
To copy to the shared phonebook, select TO SHARED. To copy to the private phonebook, select TO PRIVATE.
-
Select OK.
-
If you wish, edit the name and number.
If you are copying to the private phonebook, press down and change the melody, if you wish. Use this feature if you want a specific melody to ring when an incoming call matches the number of this entry.
- Select SAVE.
Deleting a Call Records Entry
- Press the Calls or Speakerphone key.
- Select MISSED, DIALED, or RECEIVED.
- Select OK.
- A list of call records is displayed. Press up or down on the navigation pad.
- To view the details of an entry, select OPTIONS.
- Select DELETE.
- Select OK.
- Select OK to confirm.
Chapter 4: Using the Dual-Mode Internet Telephony Kit Using the Call Records
Dual-Mode Internet Telephony Kit
Deleting All Call Records
You can delete a single call records list, or you can delete all call records lists at the same time.
- Press the Calls or Speakerphone key.
- Select DELETE CALLS.
- Select OK.
- Select MISSED, DIALED, RECEIVED, or ALL CALLS.
- Select OK.
- Select OK to confirm.
Using the Call Timer
The handset has a call timer that records how long you have spent on various calls.
Viewing the Call Timer
- Press the Calls or Speakerphone key.
- Select CALL TIMERS.
- Select OK.
- Select LAST CALL, DIALED, RECEIVED, or ALL CALLS.
Chapter 4: Using the Dual-Mode Internet Telephony Kit
Using the Call Records
- Select OK.
- The duration of the call(s) is displayed. Select OK when finished.
Resetting the Call Timer
- Press the Calls or Speakerphone key.
- Select CALL TIMERS.
- Select OK.
- Select CLEAR ALL.
- Select OK.
- Select OK to confirm. You have reset the call timer to zero.
Calling a Number from the Call Records
While you are viewing the call records, you can make or return a call.
Calling Directly from the Call Records
- Press the Calls or Speakerphone key.
- Select MISSED, DIALED, or RECEIVED.
- Select OK.
Chapter 4: Using the Dual-Mode Internet Telephony Kit Using the Call Records
Dual-Mode Internet Telephony Kit
Dual-Mode Internet Telephony Kit
- A list of call records is displayed. Press up or down on the navigation pad.
- Press the Call key.
Pre-Dialing a Number from the Call Records
- Press the Calls or Speakerphone key.
- Select MISSED, DIALED, or RECEIVED.
- Select OK.
- A list of call records is displayed. Press up or down on the navigation pad.
- To make the call, press the Call key. To edit the number, go to step 6.
- Select OPTIONS.
- Select DETAILS.
- Select OK.
- Select OPTIONS.
- Select USE NUMBER, and then select OK.
- Select CLEAR to delete a digit, or use the navigation pad and keypad to edit the phone number.
- To make the call, press the Call key.
Using Additional Features
Dual-Mode Internet Telephony Kit
Changing the Skype Online Status Using the Handset
You can change your online status anytime without going back to your computer.
- Select MENU.
- Select SKYPE.
- Select OK.
- Select USER STATUS.
- Select OK.
- Select the online status you want others to see.
- Select OK.
Checking Your SkypeOut Credits Using the Handset
You can check how many SkypeOut credits you have left.
- Select MENU.
- Select SKYPE.
- Select OK.
Chapter 4: Using the Dual-Mode Internet Telephony Kit Using Additional Features
Dual-Mode Internet Telephony Kit
-
Select CREDITS.
-
The number of credits you have remaining will be displayed.
-
Select OK when finished.
Using the Key Lock Feature
During standby mode, press and hold the # key to lock the keypad. The Key Lock icon will be displayed. Then you can only answer an incoming call or unlock the keypad. When a call comes in, the keypad will become active. When you end the call, the keypad will be locked again.
To unlock the keypad, select UNLOCK. Then select OK. The keypad will be unlocked.
Paging a Handset
If you have misplaced a handset, press and release the page button on the USB base station. All handsets that are in standby mode and connected to that USB base station will play a paging melody.
If an outside call comes in, the handsets will stop paging and play the external call melody.

NOTE: A handset will not play the paging melody if it is powered off or on an outside call; however, all the other handsets will still ring.
There are two ways to stop the paging melody. If you have multiple handsets, press and release the page button on the USB base station. To stop the paging melody for an individual handset, select STOP on that handset, and it will stop paging. The other handsets will keep playing the paging melody.
If nothing is pressed, then the paging melody will automatically stop after 30 seconds.
Using the Chat Alert
Dual-Mode Internet Telephony Kit
You can have the handset alert you when someone sends you a Skype chat message.
- Select MENU.
- Select SKYPE.
- Select OK.
- Select CHAT ALERT.
- Select OK.
- Select ON.
- Select OK when finished.
Chapter 4: Using the Dual-Mode Internet Telephony Kit Using Additional Features
Dual-Mode Internet Telephony Kit
Customizing the Handset
You can customize the look and sound of the handset.
Customizing the Display
Setting the Handset's Clock
After the Telephony Kit has been installed, the handset will obtain the current time from your PC, which will be shown on the display screen. You can manually change the time or time format.
To adjust the time setting, follow these instructions:
- Select MENU.
- Select DISPLAY.
- Select OK.
- Select CLOCK.
- Select OK.
- Press left or right on the navigation pad, and change the hour.
- Press down and change the minute.
If you are using a 12-hour time format, proceed to step 8. If you are using a 24-hour time format, proceed to step 9.
- Press down and select AM or PM.
- Select OK.
To adjust the time format, follow these instructions:
- Select MENU.
- Select DISPLAY.
- Select OK.
- Select TIME FORMAT.
- Select OK.
- Press up or down on the navigation pad, and select 12 HOURS or 24 HOURS.
- Select OK.
Giving the Handset a Name
The handset comes with a factory default name. You can give the handset a different name.
- Select MENU.
- Select DISPLAY.
- Select OK.
Chapter 4: Using the Dual-Mode Internet Telephony Kit
Customizing the Handset
Dual-Mode Internet Telephony Kit
Dual-Mode Internet Telephony Kit
- Select HANDSET NAME.
- Select OK.
- Edit the name.
- Select OK when finished.
Adjusting the Contrast of the Display Screen
- Select MENU.
- Select DISPLAY.
- Select OK.
- Select CONTRAST.
- Select OK.
- Press left or right on the navigation pad to select the proper contrast.
- Select OK when finished.
Setting the Language on the Handset
-
Select MENU.
-
Select DISPLAY.
-
Select OK.
- Select LANGUAGE.
- Select OK.
- Use the navigation pad to select the language you want.
- Select OK when finished.
Changing the Wallpaper of the Display Screen
- Select MENU.
- Select DISPLAY.
- Select OK.
- Select WALLPAPER.
- Select OK.
- Use the navigation pad to select the wallpaper you want.
- Select OK when finished.
Dual-Mode Internet Telephony Kit
Dual-Mode Internet Telephony Kit
Changing the Color of the Handset
You can change the color of the menus, background, and highlighting of the handset.
- Select MENU.
- Select DISPLAY.
- Select OK.
- Select COLOR.
- Select OK.
- Use the navigation pad to select the color you want.
- Select OK when finished.
Customizing the Sounds of the Handset
Setting the Ringing Melodies and Volume
You can assign different ringing melodies for each handset at different volume levels. You can also assign different ringing melodies for outside and inside calls.
- Select MENU.
- Select SOUNDS.
- Select OK.
Chapter 4: Using the Dual-Mode Internet Telephony Kit
Customizing the Handset
- Select HANDSET.
- Select OK.
- To change the volume level, press left or right on the navigation pad. Press down when finished.
- To change the melody used for Skype calls, press left or right on the navigation pad.
Press down when finished.
- To change the melody used for landline calls, press left or right on the navigation pad.
Press down when finished. - To change the melody used for inside calls, press left or right on the navigation pad.
- Select OK when finished.
Setting the Key Tones
The handset emits key tones each time you press a key on the keypad. You can turn these key tones on or off.
- Select MENU.
- Select SOUNDS.
- Select OK.
- Select HS KEY TONES.
Dual-Mode Internet Telephony Kit
Dual-Mode Internet Telephony Kit
- Select OK.
- Select ON or OFF.
- Select OK when finished.
Setting the Confirmation and Parking Tones
The handset emits confirmation tones each time an operation is successful. It emits parking tones when you place the handset on the charger. You can turn these tones on or off.
- Select MENU.
- Select SOUNDS.
- Select OK.
- Select HS TONES.
- Select OK.
- Select ON or OFF.
- Select OK when finished.
Using Advanced Features
Using the Alarm Clock
Setting the Alarm Clock
- Select MENU.
- Select ADVANCED.
- Select OK.
- Select ALARM CLOCK.
-
Select OK.
-
Select ON or OFF.
-
If you selected ON, select OK and proceed to step 8.
If you selected OFF, select OK.
- To set the hour, press left or right on the navigation pad.
Press down when finished.
- To set the minute, press left or right on the navigation pad.
Press down when finished.
Chapter 4: Using the Dual-Mode Internet Telephony Kit Using Advanced Features
Dual-Mode Internet Telephony Kit
Dual-Mode Internet Telephony Kit
- If the handset's time format is 12-hour, select AM or PM. Then select OK.
If the handset's time format is 24-hour, select OK.
Turning Off the Alarm Clock
When the alarm clock rings, select STOP to turn it off.
Using the Snooze Feature of the Alarm Clock
When it rings, select SNOOZE to temporarily turn off the alarm clock. It will ring again in 10 minutes.
Using the Countdown Timer
Setting the Countdown Timer
- Select MENU.
- Select ADVANCED.
- Select OK.
- Select TIMER.
- Select OK.
- To set the hour, press left or right on the navigation pad.
Press down when finished.

NOTE: If the alarm clock is ringing and you do not press any key within one minute, it will snooze for 10 minutes and ring again.
- To set the minute, press left or right on the navigation pad.
Press down when finished.
- To set the second, press left or right on the navigation pad. Then select OK.
- The timer will start counting down and be displayed on the standby screen.
Turning Off the Countdown Timer
The countdown timer will ring when it finishes counting down the time you have set. When the timer rings, select STOP to turn it off.
Using the Stopwatch
- Select MENU.
- Select ADVANCED.
- Select OK.
- Select STOPWATCH.
- Select OK.
Dual-Mode Internet Telephony Kit

NOTE: If the timer is ringing and you do not press any key, it will automatically stop ringing after one minute.
Dual-Mode Internet Telephony Kit
- To start the stopwatch, select START.
To stop the stopwatch, select STOP. You can reset the stopwatch, or you can stop the stopwatch and return to the previous menu.
To pause the stopwatch, select PAUSE. The stopwatch will stop counting. To start the stopwatch again without a reset, select RESUME.
To return to the previous menu, select CANCEL.
Using the Touch & Dial Feature
This feature allows you to call a number by pressing any key on your handset, except when you press the Power or End Call key or select CANCEL.

NOTE: To use this feature, the handset must be registered. By default, the handset is registered to its USB base station. If the handset indicates that it is not registered, proceed to the "Managing the Handsets" section for instructions.
Activating Touch & Dial
- Select MENU.
- Select ADVANCED.
- Select OK.
- Select TOUCH & DIAL.
- Select OK.
Dual-Mode Internet Telephony Kit
- Select ON.
- Press down and enter the number.
- Select OK.
- The display screen will say, "TOUCH & DIAL".
Deactivating Touch & Dial
- Select CANCEL to return to its normal standby mode.
- Select OK to confirm.
- The handset will return to its normal standby mode.
Using the Auto Answer Feature
This feature offers you the convenience of answering a call by picking up the handset from the charger. You do not need to press any key to answer the call.
- Select MENU.
- Select ADVANCED.
- Select OK.
- Select AUTO ANSWER.
- Select OK.
Chapter 4: Using the Dual-Mode Internet Telephony Kit Using Advanced Features
Dual-Mode Internet Telephony Kit
- Select ON or OFF.
- Select OK.
Setting the Dialing Mode (Landline Only)
The dialing mode is used only when you are making a call. By default, the handset is set to tone dialing. You can switch to pulse dialing if necessary.
- Select MENU.
- Select ADVANCED.
- Select OK.
- Select DIAL MODE.
- Select OK.
-
Select TONE or PULSE.
-
Select OK.

NOTE: You can temporarily use tone dialing while the handset is in pulse dial mode. Press and hold the # key to set temporary tone dialing. The letter "d" will be displayed on the screen. All of the digits will be dialed as tones until you hang up. Then the handset will revert back to pulse dial mode.
Setting the Recall Duration
Dual-Mode Internet Telephony Kit
You can set the recall duration on the handset. In most cases, you do not need to change this setting. If you do need to change or add recall durations, contact your traditional phone service provider for more information.
- Select MENU.
- Select ADVANCED.
- Select OK.
- Select RECALL.
- Select OK.
- The current setting is displayed. Use the navigation pad to select a different recall duration.
- Select OK.
Setting the Pause Duration
You can set the pause duration on the handset. In most cases, you do not need to change this setting.
- Select MENU.
- Select ADVANCED.
- Select OK.
- Select PAUSE.
Chapter 4: Using the Dual-Mode Internet Telephony Kit Using Advanced Features

NOTE: If you are not sure how to use this feature, keep the default setting, and do NOT change the recall duration.

NOTE: If you are not sure how to use this feature, keep the default setting, and do NOT change the pause duration.
Dual-Mode Internet Telephony Kit
- Select OK.
- The current setting is displayed. Use the navigation pad to select a different pause duration.
- Select OK.
Setting the PABX (Landline Only)
You can set the Private Automatic Branch Exchange (PABX) number on the handset so that it will be used as the prefix every time you make an outgoing call. For example, if you have to dial "9" first for an outgoing call, you can set it here so you do not have to manually dial "9" first anymore.
- Select MENU.
- Select ADVANCED.
- Select OK.
- Select PABX.
- Select OK.
- The current setting is displayed. Enter the number to use as a prefix of any outgoing number.
- Select OK.
Managing the Handsets
Dual-Mode Internet Telephony Kit
This section describes a variety of system features. A handset must be linked to the USB base station in order to use any of the system features mentioned in this section, except for the registration feature.
Registering a Handset
By default, the handset is registered to its USB base station and ready for use. You only have to register the handset if it indicates that it is not registered. You can register the handset with up to four USB base stations, and each USB base station can register up to four handsets.
- When the handset says, "UNREGISTERED", select REG.
- Select OK.
- Press and hold down the page button on the USB base station until the LEDs of the USB base station flash.
- On the handset, enter the Personal Identification Number (PIN) code. The default is 0000.
- Select OK.
After the handset has been registered, you will see a confirmation screen. The handset will be in standby mode and display its name, its number, and the Base/Handset Link icon.
If the registration fails, then you will see a warning screen. The Base/Handset Link icon will flash, and the handset will not display its number. Repeat the registration procedure.
Chapter 4: Using the Dual-Mode Internet Telephony Kit
Managing the Handsets
Dual-Mode Internet Telephony Kit
Registering a Handset with an Additional USB Base Station
When the handset is registered with more than one USB base station, you can select which USB base station you want the handset to use.
- Select MENU.
- Select SYSTEM.
- Select OK.
- Select REGISTER.
- Select OK.
- Press and hold down the page button on the additional USB base station for four seconds.
- On the handset, enter the PIN code. The default is 0000.
- Select OK.
Selecting a USB Base Station
When you want to select a USB base station to use, you have two methods available. Follow one of the following:
- Press and hold down MENU for one second.
- You will see the BASE SELECT screen.
- Use the navigation pad to select the USB base station you want to use. Then select OK.
Chapter 4: Using the Dual-Mode Internet Telephony Kit
Managing the Handsets
Dual-Mode Internet Telephony Kit
OR
- Select MENU.
- Select SYSTEM.
- Select OK.
- Select BASE SELECT.
- Select OK.
- Use the navigation pad to select the USB base station you want to use. Then select OK.
Deleting a Handset
You can delete a handset from any USB base station. After you have deleted a handset, it will no longer be linked to that USB base station. The information in the handset's private phonebook and call records will still be available to you. However, you will no longer have access to the shared phonebook or any system features related to that USB base station.
- Select MENU.
- Select SYSTEM.
- Select OK.
- Select DELETE HS.
- Select OK.
Chapter 4: Using the Dual-Mode Internet Telephony Kit
Managing the Handsets
Dual-Mode Internet Telephony Kit
- Use the navigation pad to select the handset you want to delete. Then select OK.
- Enter your PIN code. Then select OK.
Changing the PIN Code
The PIN code secures access to some of the handset's menus. The factory default is 0000. You can change it to a unique PIN code that only you remember.
- Select MENU.
- Select SYSTEM.
- Select OK.
- Select CHANGE PIN.
- Select OK.
- Enter your current PIN Code.
- Select OK.
- Enter the new PIN code.
- Select OK.
- Enter the new PIN code again.
- Select OK.
Resetting the Handset to Its Factory Defaults
Dual-Mode Internet Telephony Kit
You can reset the display, sounds, and other settings of the handset. Refer to "Appendix A: Troubleshooting" for a list of default settings.
- Select MENU.
- Select SYSTEM.
- Select OK.
- Select RESET.
- Select OK.
- Enter your PIN code.
- Select OK.
- Select OK to confirm. The handset will return to standby mode.
Dual-Mode Internet Telephony Kit
Using Multiple Handsets
Calling Another Handset
You can use the intercom function to call someone on another handset.
Making an Intercom Call
- Press the Intercom key.
- Use the navigation pad to select the handset you want to call.
- Select OK.
- Wait for the other handset to answer your call.
Exiting an Intercom Call
To exit an intercom call, press the Power or End Call key.
Answering an Outside Call
If an outside call comes in while you are on an intercom call, you will hear a call waiting tone, and the caller ID will be displayed on the handset.
To answer the outside call, you must end the intercom call first. Press the Power or End Call key and the intercom call will disconnect. Then press the Call key to answer the outside call.

NOTE: You should have at least two handsets to use the functions in this section.
Calling Another Handset During an Outside Call
When you are on an outside call, you can put it on hold and call someone on another handset (this is called an inquiry call).
Making an Inquiry Call During an Outside Call
- Press the Intercom key.
- Use the navigation pad to select the handset you want to call.
- Select OK.
- Wait for the other handset to answer your call.
To return to the outside call, follow these instructions:
- Select OPTIONS.
- Select OUTSIDE CALL.
- Select OK. Your inquiry call has ended.
Transferring Your Call to Another Handset During an Outside Call
- Press the Intercom key.
- Use the navigation pad to select the handset you want.
- Select OK.
Chapter 4: Using the Dual-Mode Internet Telephony Kit Using Multiple Handsets
Dual-Mode Internet Telephony Kit
- Wait for the other handset to answer your call.
- When the other handset has answered your call, press the Power or End Call key. The outside call will be transferred to the other handset.
Starting a Three-Way Conference Call During an Outside Call
You can connect an outside call and an inside call to create a three-way call.
- Press the Intercom key.
- Use the navigation pad to select the handset you want to call.
- Select OK.
- Wait for the other handset to answer your call.
-
When the other handset has answered your call, select OPTIONS.
-
Select CONFERENCE.
-
Select OK.
-
When both parties are connected, the conference call will begin.
To exit the conference call, press the Power or End Call key.
Appendix A: Troubleshooting
Dual-Mode Internet Telephony Kit
This appendix provides solutions to problems that may occur during the installation and operation of the Dual-Mode Internet Telephony Kit. Also included is a list of its default settings. Read the descriptions below to solve your problems. If you can't find an answer here, check the Linksys website at www.linksys.com.
Common Problems and Solutions
- There is no dial tone when I press the Call key.
Do the following until you get a dial tone:
A. Make sure the RJ-11 telephone cable is properly connected to the LINE port of the USB base station and the telephone wall jack.
B. Move the handset closer to the USB base station.
C. Place the handset on the charger and recharge the batteries.
- The Base/Handset Link icon is flashing on the handset's display screen.
Do the following until the icon is not flashing:
A. If the handset says it is not registered, then refer to "Chapter 4: Using the Dual-Mode Internet Telephony Kit" for instructions on how to register the handset.
B. Move the handset closer to the USB base station.
C. Check to see if the USB base station is powered on. Make sure the power adapter is properly connected to the power port of the USB base station and an electrical outlet.
- When the handset is placed on the charger, I do not hear a beep.
If you have turned off the handset tone (refer to "Chapter 4: Using the Dual-Mode Internet Telephony Kit) or if the handset was previously powered off, then this is normal, and you were not supposed to hear a beep.
Appendix A: Troubleshooting
Common Problems and Solutions
Dual-Mode Internet Telephony Kit
If you were supposed to hear a beep, then do the following:
A. Remove the handset from the charger, and then place it on the charger again.
B. Clean the charging contacts with a clean and dry cloth.
- The Battery Empty icon is displayed even though the handset has charged for more than 14 hours.
Do the following:
A. Make sure the Battery icon indicates recharging when the handset is on the charger.
B. Use new rechargeable batteries.
- The handset's display screen is blank.
Do the following:
A. Check to see if the batteries are positioned properly in the battery compartment.
B. Make sure that you have properly connected the handset, charger, and USB base station. (Refer to "Chapter 3: Getting Started.")
C. Put the handset on the charger to recharge the batteries.
- The audio quality is poor.
Do the following:
A. Move the handset closer to the USB base station.
B. There may be interference from nearby electrical devices. Move the USB base station and Skype-enabled PC as needed.
C. If the USB base station and Skype-enabled PC is in a room with thick walls, move the USB base station and Skype-enabled PC as needed.
- The audio volume is too low or too loud.
The speaker volume on your PC or the handset may be set incorrectly. Adjust the volume on your PC and handset (refer to “Chapter 3: Getting Started”).
8. The handset does not ring when a call comes in.
Press and hold down the * key to turn on the ringer.
9. I get the message, "UNAVAILABLE" when I check the Skype contact list or USER STATUS.
Do the following until the contact list and user status are available:
A. Make sure the Skype-enabled PC is active, not in standby or hibernate mode.
B. Make sure the Skype software is active and you are logged into your Skype account.
C. Check the cable connections of the USB base station.
D. Right-click the Linksys Dual-Mode Internet Telephony Kit icon on the taskbar. Click Exit. To restart the driver, double-click the Linksys Dual-Mode Internet Telephony Kit icon on the desktop.
E. Another user may be using the contact list or Skype menu. Try again later.
10. I cannot call a landline number using SkypeOut.
Do the following until you can make your call:
A. Make sure you enter 00, +, or 011 before you dial the number.
B. Check your SkypeOut credit amount to make sure you have enough credits.
C. Move the handset closer to the USB base station.
11. I get a busy tone when I make a Skype call.
Do the following until you can make your call:
A. Make sure the Skype-enabled PC is active, not in standby or hibernate mode.
B. Make sure the Skype software is active and you are logged into your Skype account.
C. If the contact you are calling is offline, then wait until your contact is online before attempting your call.
D. The Skype call may be affected by the Internet connection and the number of active Skype users. Try again later.
E. Make sure the handset is properly set up. (Refer to "Chapter 3: Getting Started.")
Dual-Mode Internet Telephony Kit
12. My Skype call did not go through.
Do the following until you can make your call:
A. Make sure the handset indicates that your Skype status is ONLINE.
B. Double-click on the Skype icon in your system tray. Make sure the status is CONNECTED.
C. Make a call to the Skype test service, which lets users check their Skype service.
- On the Skype-enabled PC, add the contact echo123 to your contact list.
- Use the handset to call this Skype contact.
- After you heard the introductory message, talk for 10 seconds.
- If you can hear your own voice after 10 seconds, then your Skype connection is working properly.
Frequently Asked Questions
Can I receive Skypeln calls?
Yes, if you have purchased a SkypeIn number from Skype (go to www.skype.com for details). When you receive a SkypeIn call, it will ring the Skype melody, and you can answer it the same way you answer a Skype call.
Can I put a Skype call on hold and make a landline call on the same handset?
No. In order to make a call using the other line (the landline), you have to end the current Skype call. However, if you want to put the current call on hold and make another outgoing call on the same line, press the Call key and follow the instructions in “Chapter 4: Using the Dual-Mode Internet Telephony Kit.”
How can I add a contact or SkypeOut number to the contact list?
Use the Skype software on your Skype-enabled PC. Click Add a Contact, and follow the instructions to add the contact or SkypeOut number.
Can I make an outgoing call using the landline when someone else is on a Skype call, or vice versa?
To make a landline call while someone else is on a Skype call (or vice versa), pick up the handset and make the call. If the landline is already in use, you will hear a busy tone.
Appendix A: Troubleshooting
Frequently Asked Questions
Default Settings
| Setting Default Setting Default | |||
| Handset Name* | CIT300 | Touch & Dial | Off |
| Time Format | 12 Hours | Touch & Dial Number | Blank |
| Language English Quick Dial Off | |||
| Wallpaper | Wallpaper 1 | Quick Dial Numbers | Blank |
| Color | Color 1 | PIN Code | 0000 |
| Handset Ring Volume | Maximum | Base Selection | Auto |
| Handset Skype Ring Melody | Melody 1 | LCD Contrast Level* | 2 |
| Handset Landline Ring Melody | Melody 2 | Receiver Volume | Medium |
| Handset Intercom Ring Melody | Melody 3 | Message Waiting Indicator | Off |
| Handset Key Tones | On | Last Call Timer | Reset |
| Confirmation/Parking Tone | On | Dialed Call Timer | Reset |
| Alarm Clock | Off | Received Call Timer | Reset |
| Countdown Timer | Off | All Calls Timer | Reset |
| Stopwatch | Off | Recall Duration | Recall 1 |
| Auto Answer | On | Dial Mode | Tone |
| Pause Duration | Pause 1 | Chat Alert | Off |
| PABX | Off |
*If you reset the handset to its factory defaults, this setting will not be reset.
Dual-Mode Internet Telephony Kit
Dual-Mode Internet Telephony Kit
Appendix A: Troubleshooting Default Settings
Appendix B: Specifications
Model Number CIT300
Handset
Frequency Bands Europe:1880-1900MHz, North America:1920-1930MHz, South America:1910-1930MHz, Taiwan:1880-1895 MHz
Standards DECT (Digital Enhanced Cordless Telecommunication Standard), GAP (General Access Profile)
Speech Coding 32Kbps ADPCM
Distance Range 300 meters outdoor, 50 meters indoor
Number of Channels 120 duplex channels (Europe and South America), 60 duplex channels (North America), 96 duplex channels (Taiwan)
Standby/Talk Time 120 hours/10 hours
USB Base Station
Power 9V DC 300mA
Interface USB
Button Handset Locator Button
LEDs Skype, PHONE LINE
Dual-Mode Internet Telephony Kit
Environmental
USB Base Station
Dimensions 4.65" x 4.92" x 2.48" (118 mm x 125 mm x 63 mm)
Weight 9.2 oz. (0.26 kg)
Handset
Dimensions 1.86" x 5.20" x 1.36" (47.37 mm x 132 mm x 34.62 mm)
Weight 4.59 oz. (0.13 kg)
Charger
Dimensions 2.99" x 2.99" x 2.48" (76.04 mm x 75.88 mm x 62.92 mm)
Weight 6.35 oz. (0.18 kg)
Certification FCC, cUL, CE
Operating Temp. 0°C to 46°C (32°F to 110°F)
Storage Temp. -20°C to 76°C (-4°F to 164°F)
Operating Humidity 10% to 50% Relative Humidity, Non-Condensing
Storage Humidity 10% to 60% Non-Condensing
Appendix C: Regulatory Information
IMPORTANT SAFETY INSTRUCTIONS. READ CAREFULLY AND KEEP FOR FUTURE REFERENCE.
Environment and Safety
Safety information: This telephone is not designed for making emergency telephone calls when the power fails. If a power outage occurs, this phone will not function. An alternative should be made available for the making of emergency calls.
Battery requirements: The handset is powered through two rechargeable NiMH batteries, size AAA 1.2V 750mAh (HR11/45). Please do not use non-rechargeable batteries.

WARNING: RISK OF EXPLOSION IF BATTERY IS REPLACED BY AN INCORRECT TYPE. Never use non-rechargeable batteries; use only the recommended type supplied with this telephone. NiMH batteries must be disposed of in accordance with the applicable waste disposal regulations.

WARNING: Do not operate this phone in an explosive environment. The phone could ignite gases and vapors.

WARNING: The phone's handset produces a magnetic field that can attract small metallic objects such as pins and staples. In order to avoid the possibility of injury, do not place the handset near small metallic objects.

WARNING: You may suffer an injury from using this product or other electrical equipment during a thunderstorm. In extreme cases this may be fatal. You should not use this product during a thunderstorm.

IMPORTANT: The electrical network is classified as dangerous according to criteria in the standard IEC 60950. One way to power down this product is by unplugging the power supply from the electrical outlet. Ensure the electrical outlet is located close to the apparatus and is always easily accessible. You can also power down this product by unplugging the USB base station from the host PC.

CAUTION: The Telephony Kit will not operate during a power outage.
Appendix C: Regulatory Information
IMPORTANT SAFETY INSTRUCTIONS. READ CAREFULLY AND KEEP FOR FUTURE REFERENCE.
Dual-Mode Internet Telephony Kit
Safety precautions:
- Do not allow the handset to come into contact with liquids or moisture.
- Opening any part of the Telephony Kit, the handset, charger, or USB base station, could result in dangerous electrical shock.
- Do not allow the charging contacts of the charger or the handset's battery to come into contact with extraneous conductive materials.
- As there is a slight chance that the Telephony Kit could be damaged by an electrical storm, you should always unplug the phone from your PC's USB port during such a storm.
- Do not use the handset in an explosive hazard area, such as gas stations where there is gas leaking.
- Young children should be supervised to ensure that they do not play with the Telephony Kit.
Environmental care: Please remember to observe your local regulations regarding the disposal of your packaging materials, exhausted batteries and old phone and, where possible, always recycle.
Because the phone works by sending radio signals between the USB base station and the handset, wearers of hearing aids may experience interference in the form of a humming noise.
The Telephony Kit should not be used near intensive care medical equipment or by persons with pacemakers.
As the Telephony Kit can interfere with nearby electrical equipment, such as answering machines, televisions and radios, you should position the USB base station at least one meter from such appliances.
Privacy of communications may not be ensured when using this telephone.
Compliance Information
US and Canada Compliance Information
This equipment has been tested and found to comply with the limits for a Class B device, pursuant to Part 15 of the FCC rules and ICES-003 of Industry Canada. Operation is subject to the following conditions: (1) This device may not cause interference, and (2) This device must accept any interference, including interference that may cause undesired operation.
This product has been certified in accordance with 47 Code of Federal Regulations per the requirements as set forth in Part 15D for Unlicensed PCS devices.
This device has been certified in accordance with Industry Canada RSP-100 per the technical requirements as referenced in RSS-213.
FCC Part 68 Statement
This equipment complies with Part 68 of the FCC Rules. A label is attached to the equipment that contains, among other information, its FCC registration number and ringer equivalence number. If requested, this information must be provided to the telephone company.
This equipment uses the following USOC Jack: RJ-11.
An FCC compliant telephone cord and modular plug is provided with this equipment. This equipment is designed to be connected to the telephone network or premises wiring using a compatible modular jack, which is FCC Part 68 compliant. Connection to the telephone network should be made by using the standard modular telephone jack.
The REN is useful to determine the quantity of devices that may be connected to the telephone line and still have all of those devices ring when your telephone number is called. In most, but not all areas, the sum of RENs should not exceed 5. To be certain of the number of devices that may be connected to the line, as determined by the total RENs, contact the telephone company to determine the maximum REN for the calling area.
Dual-Mode Internet Telephony Kit
If this equipment causes harm to the telephone network, the telephone company may discontinue your service temporarily. If advance notice is not practical, the telephone company will notify the customer as soon as possible. Also, you will be advised of your right to file a complaint with the FCC if you believe it is necessary.
The telephone company may make changes in its facilities, equipment, operations, or procedures that could affect the operation of the equipment. If this happens, the telephone company will provide advance notice in order for you to make the necessary modifications in order to maintain uninterrupted service.
In the event this equipment should fail to operate properly, disconnect the unit from the telephone line. Try using another FCC approved device in the same telephone jack. If the trouble persists, call the telephone company repair service bureau. If the trouble does not persist and appears to be with this unit, disconnect the unit from the telephone line and discontinue use of the unit until it is repaired. Please note that the telephone company may ask that you disconnect the equipment from the telephone network until the problem has been corrected or until you are sure that the equipment is not malfunctioning. The user must use the accessories and cables supplied by the manufacturer to get optimum performance from the product.
No repairs may be done by the customer. If trouble is experienced with this equipment, please contact your authorized support provider for repair and warranty information. If the trouble is causing harm to the telephone network, the telephone company may request you remove the equipment from the network until the problem is resolved. This equipment cannot be used on telephone company provided coin service. Connection to Party Line Service is subject to state tariffs.
Interference
This equipment generates, uses and can radiate radio frequency energy and, if not installed and used in accordance with the instructions, may cause harmful interference to radio communications.
However, there is no guarantee that interference will not occur in a particular installation. If this equipment does cause harmful interference to radio or television reception, which can be determined by turning the equipment off and on, the user is encouraged to try to correct the interference by one or more of the following measures:
-
Re-orient or relocate the receiving antenna.
-
Increase the distance between the equipment and USB base station.
- Connect the equipment into an outlet on a circuit different from that to which the USB base station is connected.
- Consult the dealer or an experienced radio/TV technician for help.
Caution
Users should ensure for their own protection that the electrical ground connections of the power utility, telephone lines and internal metallic water pipe system, if present, are connected together. This precaution may be particularly important in rural areas.
Do not attempt to repair or modify this equipment.

NOTE: All electrical work should be performed by a licensed electrician or licensed cabler.
Repairs to the Telephony Kit, including the handset, the charger, and the base station, should be made by an authorized maintenance facility designated by the supplier. Any repairs or alterations made by the user to the equipment may render the equipment void in product warranty and compliance. This could also void the user's authority to operate the equipment.
RF Radiation Exposure
To maintain compliance with the FCC's RF exposure guidelines, the internal antennas used for this mobile transmitter (USB base station) must provide a separation distance of at least 20 cm from all persons.
Base and handset must not be co-located or operating in conjunction with any other antenna or transmitter.
The handset has been evaluated and found to comply with the applicable RF exposure regulations in accordance with FCC Part 2.1093 for portable devices. This compliance is based on Specific Absorption Rate testing.
Appendix C: Regulatory Information
Compliance Information
Dual-Mode Internet Telephony Kit
The base station and handset have been evaluated and found compliant in accordance with Industry Canada RSS-102 with respect to Canada's Health Code 6 for Exposure of Humans to RF Fields.
The highest SAR level measured for this phone is as follows:
Max. Head SAR - 0.153 W/kg
Max. Body SAR - 0.172 W/kg
The recommended limits are based on recommendations from the World Health Organizations (WHO) International Committee on Non Ionizing Radiation Protection (ICNIRP).
The Maximum allowable SAR as recommended by the ICNIRP limits is 2.0 W/kg based on 10 grams of tissue. However in the US, the recommended FCC limit is 1.6 W/kg based on 1 gram of tissue.
This phone has been tested and found compliant with the belt clip provided with the product. The use of other type accessories not provided with the product may not ensure compliance to the recommended RF exposure standards.
Additional information on SAR and RF Exposure can be obtained off the FCC website at www.fcc.gov/oet/rfsafety
There is no conclusive proof that these mobile phones are a health risk. The FDA and numerous researchers are continuing studies of RF radiation and health issues. Additional information on this subject can be obtained from the FDA web site at www.fda.gov.
There are several suggested methods to reduce exposure for the user. Among those include the following:
- Using a hands-free handset to increase the distance between the antenna and the head of the user,
- Orienting the antenna away from the user.
Additional information can be obtained from the following documentation:
• Cisco white paper on RF exposure
• FCC Bulletin 56: Questions and Answers about Biological Effects and Potential Hazards of Radio Frequency Electromagnetic Fields
Additional information can also be obtained from the following organizations as well as from the Cisco white paper on the subject:
• World Health Organization Internal Commission on Non-Ionizing Radiation Protection. www.who.int/emf
• Cellular Telecommunications Association: www.wow-com.com
Noise
Electrical pulse noise is present at one time or another. This is most intense during electrical storms. Certain kinds of electrical equipment, such as light dimmers, fluorescent bulbs, motors, fans, etc., also generate pulse noise. Because radio frequencies are susceptible to this, you may on occasion hear pulse noise through the USB base station. This is usually only a minor annoyance and should not be interpreted as a defect of the unit.
This telephone is not designed for making emergency telephone calls when the power fails. Make alternative arrangements for access to emergency services.
Dual-Mode Internet Telephony Kit
European Union
Declaration of Conformity with Regard to the EU Directive 1999/5/EC (R&TTE Directive)
| Česky [Czech]: | Toto zařizení je v souladu se základními požadavky a ostatními odpovídajícími ustanoveními Směrnice 1999/5/EC. |
| Dansk [Danish]: | Dette udstyr er i overensstemmelse med de væsentlige krav og andre relevante bestemmelser i Direktiv 1999/5/EF. |
| Deutsch [German]: | Dieses Gerät entspricht den grundlegenden Anforderungen und den weiteren entsprechenden Vorgaben der Richtlinie 1999/5/EU. |
| Eesti [Estonian]: | See seade vastab direktiivi 1999/5/EÜ olulistele nõuetele ja teistele asjakohastele sätetele. |
| English: | This equipment is in compliance with the essential requirements and other relevant provisions of Directive 1999/5/EC. |
| Español [Spanish]: | Este equipo cumple con los requisitos esenciales asi como con otras disposiciones de la Directiva 1999/5/CE. |
| Ελληνική [Greek]: | Αυτός ο εξοπλισμός είναι σε συμμόρφωση με τις ουσιώδεις απαιτήσεις και άλλες σχετικές διατάξεις της Οδηγίας 1999/5/EC. |
| Français [French]: | Cet appareil est conforme aux exigences essentielles et aux autres dispositions pertinentes de la Directive 1999/5/EC. |
| Íslenska [Icelandic]: | Petta tæki er samkvæmt grunnkröfum og öðrum viðeigandi ákvæðum Tilskipunar 1999/5/EC. |
| Italiano [Italian]: | Questo apparato é conforme ai requisiti essenziali ed agli altri principi sanciti dalla Direttiva 1999/5/CE. |
Appendix C: Regulatory Information European Union
Dual-Mode Internet Telephony Kit
| Latviski[Latvian]: | Šī iekārta atbilst Direktīvas 1999/5/EK būtiskajām prasībām un citiem ar to saistitajiem noteikumiem. |
| Lietuvių[Lithuanian]: | Šis įrenginys tenkina 1999/5/EB Direktyvos esminius reikalavimus ir kitas šios direktyvos nuostatas. |
| Nederlands[Dutch]: | Dit apparaat voldoet aan de essentiele eisen en andere van toepassing zijnde bepalingen van de Richtlijn 1999/5/EC. |
| Malti[Maltese]: | Dan l-apparat huwa konformi mal-ħtigiet essenzjali u l-provedimenti l-ohra rilevanti tad-Direttiva 1999/5/EC. |
| Margyar[Hungarian]: | Ez a készülék teljesíti az alapvető követelményeket és más 1999/5/EK irányelvben meghatározott vonatkozó rendelkezéseket. |
| Norsk[Norwegian]: | Dette utstyret er i samsvar med de grunnleggende krav og andre relevante bestemmelser i EU-direktiv 1999/5/EF. |
| Polski[Polish]: | Urządzenie jest zgodne z ogólnymi wymaganiami oraz szczególnymi warunkami określonymi Dyrektywą UE: 1999/5/EC. |
| Português[Portuguese]: | Este equipamento está em conformidade com os requisitos essenciais e outras provisões relevantes da Directiva 1999/5/EC. |
| Slovensko[Slovenian]: | Ta naprava je skladna z bistvenimi zahtevami in ostalimi relevantnimi pogoji Direktive 1999/5/EC. |
| Slovensky[Slovak]: | Toto zariadenie je v zhode so základnymi požiadavkami a inými príslušnými nariadeniami direktiv: 1999/5/EC. |
| Suomi[Finnish]: | Tāmā laite täyttää direktiivin 1999/5/EY olennaiset vaatimukset ja on siinā asetettujen muiden laitetta koskevien määräysten mukainen. |
| Svenska[Swedish]: | Denna utrustning ār i överensstämmelse med de väsentliga kraven och andra relevanta bestämmelser i Direktiv 1999/5/EC. |
Appendix C: Regulatory Information European Union
Dual-Mode Internet Telephony Kit
Note: The full Declaration of Conformity can be found either on the CD or a separate document included with this product.
If you need to see this statement in another language or have access to any other technical documentation, see the “Technical Documents” on www.linksys.com/international.
The following standards were applied during the assessment of the product against the requirements of the Directive 1999/5/EC:
- Radio: EN 301 406
• EMC: EN 301 489-1 and EN 301 489-6 - Safety: EN 60950-1, EN 50360 (handset) and EN 50385 (base station)
CE Marking
The following CE mark is added to the equipment:

User Information for Consumer Products Covered by EU Directive 2002/96/EC on Waste Electric and Electronic Equipment (WEEE)
This document contains important information for users with regards to the proper disposal and recycling of Linksys products. Consumers are required to comply with this notice for all electronic products bearing the following symbol:
English
Environmental Information for Customers in the European Union
European Directive 2002/96/EC requires that the equipment bearing this symbol on the product and/or its packaging must not be disposed of with unsorted municipal waste. The symbol indicates that this product should be disposed of separately from regular household waste streams. It is your responsibility to dispose of this and other electric and electronic equipment via designated collection facilities appointed by the government or local authorities. Correct disposal and recycling will help prevent potential negative consequences to the environment and human health. For more detailed information about the disposal of your old equipment, please contact your local authorities, waste disposal service, or the shop where you purchased the product.
Ceština/Czech
Appendix C: Regulatory Information European Union
Dual-Mode Internet Telephony Kit
Dansk/Danish
Miljøinformation for kunder i EU
Appendix C: Regulatory Information European Union
Français/French
Appendix C: Regulatory Information European Union
Lietuvškai/Lithuanian
Aplinkosaugos informacija, skirta Europos Sajungos vartotojams
Appendix C: Regulatory Information European Union
Dual-Mode Internet Telephony Kit
Suomi/Finnish
Appendix C: Regulatory Information European Union
Dual-Mode Internet Telephony Kit
Technical Documents on www.linksys.com/international
Follow these steps to access technical documents:
- Browse to http://www.linksys.com/international.
- Click the region in which you reside.
-
Click the name of the country in which you reside.
-
Click Products.
-
Click the appropriate product category.
-
Select a product.
-
Click the type of documentation you want. The document will automatically open in PDF format.
NOTE: If you have questions regarding the compliance of these products or you cannot find the information you are looking for, please contact your local sales office. Visit http://www.linksys.com/international for more details.
Appendix D: Warranty Information
Linksys warrants to You that, for a period of two years (the "Warranty Period"), your Linksys Product will be substantially free of defects in materials and workmanship under normal use. Your exclusive remedy and Linksys' entire liability under this warranty will be for Linksys at its option to repair or replace the Product or refund Your purchase price less any rebates. This limited warranty extends only to the original purchaser.
If the Product proves defective during the Warranty Period call Linksys Technical Support in order to obtain a Return Authorization Number, if applicable. BE SURE TO HAVE YOUR PROOF OF PURCHASE ON HAND WHEN CALLING. If You are requested to return the Product, mark the Return Authorization Number clearly on the outside of the package and include a copy of your original proof of purchase. RETURN REQUESTS CANNOT BE PROCESSED WITHOUT PROOF OF PURCHASE. You are responsible for shipping defective Products to Linksys. Linksys pays for UPS Ground shipping from Linksys back to You only. Customers located outside of the United States of America and Canada are responsible for all shipping and handling charges.
ALL IMPLIED WARRANTIES AND CONDITIONS OF MERCHANTABILITY OR FITNESS FOR A PARTICULAR PURPOSE ARE LIMITED TO THE DURATION OF THE WARRANTY PERIOD. ALL OTHER EXPRESS OR IMPLIED CONDITIONS, REPRESENTATIONS AND WARRANTIES, INCLUDING ANY IMPLIED WARRANTY OF NON-INFRINGEMENT, ARE DISCLAIMED. Some jurisdictions do not allow limitations on how long an implied warranty lasts, so the above limitation may not apply to You. This warranty gives You specific legal rights, and You may also have other rights which vary by jurisdiction.
This warranty does not apply if the Product (a) has been altered, except by Linksys, (b) has not been installed, operated, repaired, or maintained in accordance with instructions supplied by Linksys, or (c) has been subjected to abnormal physical or electrical stress, misuse, negligence, or accident. In addition, due to the continual development of new techniques for intruding upon and attacking networks, Linksys does not warrant that the Product will be free of vulnerability to intrusion or attack.
TO THE EXTENT NOT PROHIBITED BY LAW, IN NO EVENT WILL LINKSYS BE LIABLE FOR ANY LOST DATA, REVENUE OR PROFIT, OR FOR SPECIAL, INDIRECT, CONSEQUENTIAL, INCIDENTAL OR PUNITIVE DAMAGES, REGARDLESS OF THE THEORY OF LIABILITY (INCLUDING NEGLIGENCE), ARISING OUT OF OR RELATED TO THE USE OF OR INABILITY TO USE THE PRODUCT (INCLUDING ANY SOFTWARE), EVEN IF LINKSYS HAS BEEN ADVISED OF THE POSSIBILITY OF SUCH DAMAGES. IN NO EVENT WILL LINKSYS' LIABILITY EXCEED THE AMOUNT PAID BY YOU FOR THE PRODUCT. The foregoing limitations will apply even if any warranty or remedy provided under this Agreement fails of its essential purpose. Some jurisdictions do not allow the exclusion or limitation of incidental or consequential damages, so the above limitation or exclusion may not apply to You.
This Warranty is valid and may be processed only in the country of purchase.
Please direct all inquiries to: Linksys, P.O. Box 18558, Irvine, CA 92623.
Dual-Mode Internet Telephony Kit
Appendix D: Warranty Information
Appendix E: Contact Information
Dual-Mode Internet Telephony Kit
Need to contact Linksys?
Visit us online for information on the latest products and updates
to your existing products at: http://www.linksys.com or ftp.linksys.com
Can't find information about a product you want to buy
on the web? Do you want to know more about networking
with Linksys products? Give our advice line a call at: 800-546-5797 (LINKSYS)
Or fax your request in to: 949-823-3002
If you experience problems with any Linksys product, you can call us at: 800-326-7114
Don't wish to call? You can e-mail us at: support@linksys.com
Need to contact Linksys outside the United States?
Visit us online for information on the latest products and updates
to your existing products at: http://www.linksys.com/international
If you experience problems with any Linksys product, you can e-mail us at:
| In Europe E-mail Address | |
| Austria support.at@linksys.com | |
| Belgium support.be@linksys.com | |
| Denmark support.dk@linksys.com |
Appendix E: Contact Information
Dual-Mode Internet Telephony Kit
| In Europe | E-mail Address |
| France support.fr@linksys.com | |
| Germany support.de@linksys.com | |
| Italy support.it@linksys.com | |
| Netherlands support.nl@linksys.com | |
| Norway support.no@linksys.com | |
| Portugal support.pt@linksys.com | |
| Spain support.es@linksys.com | |
| Sweden support.se@linksys.com | |
| Switzerland support.ch@linksys.com | |
| United Kingdom & Ireland support.uk@linksys.com |
| Outside of Europe E-mail Address | |
| Latin America support.la@linksys.com | |
| U.S. and Canada support@linksys.com | |
| Asia Pacific asiasupport@linksys.com (English only) |
www.linksys.com