
AQ4130 - Cassette player PHILIPS - Free user manual and instructions
Find the device manual for free AQ4130 PHILIPS in PDF.


| Product Type | Portable Radio Cassette Recorder |
| Model | AQ4130 |
| Brand | Philips |
| Power Supply | 4× R20/D-cells (not included) or AC 107-220V via AC IN |
| Radio Bands | MW (AM), SW (Shortwave), FM |
| Cassette Playback | Standard audio cassette playback with auto stop |
| Recording | From radio or external microphone (MIC), automatic level |
| Playback Controls | PLAY, STOP-EJECT, PAUSE, FFWD, REW |
| Audio Controls | Volume rotary, Tone control (bass/treble) |
| Antenna | Telescopic antenna for FM/SW |
| Headphone Output | 3.5mm jack (inserting headphones disconnects internal speaker) |
| Cassette Type Compatibility | Normal (Type I) tapes; not suitable for Chrome (Type II) or Metal (Type IV) |
| Tape Mechanism Maintenance | Clean capstan and pinch roller monthly with isopropyl alcohol |
| Safety Warnings | Do not open; risk of electric shock. Place on stable surface. Keep away from moisture. |
| Disposal | Dispose of batteries and device per local regulations. Packaging recyclable. |
| Dimensions (Approx.) | 250 × 150 × 60 mm (estimated) |
| Weight (Approx.) | 0.8 kg (estimated with batteries) |
| Countries of Use | Multi-voltage (107-220V) with selector inside battery compartment |
Frequently Asked Questions - AQ4130 PHILIPS
User questions about AQ4130 PHILIPS
0 question about this device. Answer the ones you know or ask your own.
Ask a new question about this device
Download the instructions for your Cassette player in PDF format for free! Find your manual AQ4130 - PHILIPS and take your electronic device back in hand. On this page are published all the documents necessary for the use of your device. AQ4130 by PHILIPS.
USER MANUAL AQ4130 PHILIPS
Radio Cassette Recorder
AQ4130
User Manual
User Manual

PHILIPS
Meet Philips at the Internet
http://www.philips.com
AQ4130
Printed in China
1
Cassette Recorder
Cassette playback
1 Push the Source selector slider to TAPE
2 Press STOP•EJECT to open the
cassette holder and insert a cassette and close the deck.
3 Press PLAY ◀ to start playback.
4 To pause playback press PAUSE II
To resume, press the key again
5 By pressing F.FWD/REWIND ↔ or ▶ fast forwarding/ rewinding of the tape is possible in both directions. To stop fast winding, press ■/▲.
6 To stop the tape, press ■'▲.
Helpful hints:
During playback, the keys are automatically released at the end of a tape and the set is switched off (unless PAUSE II mode has been activated.)
During fast forwarding/rewinding, the keys will not be released at the end of a tape. To switch off the set, make sure the cassette keys are also released.
General information on recording
- Recording is permissible insofar as copyright or, other rights of third parties are not infringed.
- For recording, use only NORMAL type cassettes (IEC type I) on which the tabs have not yet been broken. This deck is not suited for recording on CHROME (IEC II) or METAL (IEC IV) type cassettes.
- The best recording level is set automatically. Altering the VOLUME will not affect the recording.
- To protect a tape from accidental erasure, break out the tabs. If you wish to record again, cover the tabs with a piece of adhesive tape.
Recording from the Radio
1 Select RADIO source.
2 Tune to the desired radio station (see Radio reception).
3 Press ■▲ to open the cassette holder. Insert a blank tape and close the deck.
4 Press REC ● to start recording.
5 For brief interruptions press II. To resume recording, press again.
6 To stop recording press ■/▲.
Making your recording
1 Select TAPE source. 2 Follow steps 3-4 under Recording from the Radio.
3 Speak towards the built-in microphone MIC (see 1).
4 Follow steps 6-7 under Recording from the Radio.
English Controls/Power Supply
Supplied accessories
- AC power cord
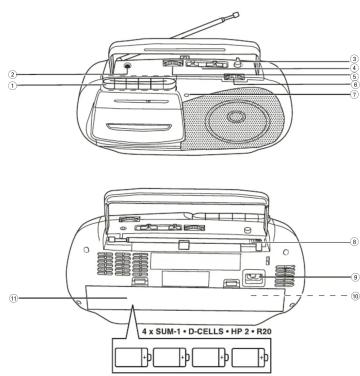
Top and front panels (See 1)
① Cassette recorder keys: PAUSE II – pauses playback or recording
STOP-EJECT stops playback as recording
- Opens the cassette holder.
F.FWD/REWIND ◀ or ▶
- Fast winds/rewinds the tape.
PLAY - Starts playback.
RECORD ● - Starts recording.
② Ω - 3.5mm stereo headphone jack.
Helpful hints.
The sneakers.
③ TONE
- RADIO (SW) only: for fine tuning.
④ Source selector: TAPE (OFF), RADIO
- Selects tape or radio source of sound.
- Switches off the set.
Band selector: MW, SW, FM
- Selects wavebands, MW, SW or FM.
⑤ VOLUME rotary – adjusts volume level
⑥ TUNING rotary – tunes to radio stations
MIC (built-in microphone)
- for voice recording
Back panel (See 1)
⑧ Telescopic antenna
- improves FM/SW reception.
② AC IN ~ - inlet for power cord
⑩ Voltage selector – (inside the battery compartment, not for all versions) adjust to match the local voltage 110/220V before plugging in the set.
⑪ Battery door - open to insert 4 X 1.5
batteries, type R20 or D-cells
Power supply
Whenever convenient, use the power cord if you want to conserve battery life. Make sure you remove the plug from the set and wall outlet before inserting batteries.
Batteries (not included)
Insert 4 batteries, type R20 or D-cells (preferably all lines) with the
(preferably the same) with correct polarity. (See 1)
Batteries contain chemical substances, so
they should be disposed of properly.
Incorrect use of batteries can cause electrolyte leakage and will corrode the compartment or cause the batteries to burst. Do not mix battery types: e.g. alkaline with carbon zinc. Only use batteries of the same type for the set.
When inserting new batteries, do not try to
mix old batteries with the new ones. Remove the batteries if the set is not to be used for a long time.
Power Supply General Operation/Radio
Using AC power
1 Check if the power voltage, as shown on
the type plate located on the bottom of the set, corresponds to your
local power supply. If it does not, consult your
dealer or service center.
■ If your set is equipped with a voltage selector, adjust the selector so that it
matches with the local mains
3 Connect the power cord to the AC IN\~
inlet and the wall socket. The power cord is
now connected and ready for use. To switch the set off completely, withdraw the
power cord from the wall socket.
• Disconnect the power cord from the wall socket to protect your set during heavy thunderstorms.
General operation
Switching on and selecting functions
1 To switch on, push the Source selector
slider to TAPE or RADIO as desired.
to TAPE (OFF) and check the cassette
keys are released.
Helpful hints:
- To change from TAPE to RADIO, or when you
are switching off the set first, make sure you press the STOP·EJECT ▪▲ key to end.
playback and all the cassette keys are released.
Adjusting volume
Adjust the volume with the VOLUME control.
Radio reception
1. Set the source selector to RADIO.
2. Set the band selector to choose your
desired waveband: MW, SW, or FM.
3. Turn the TUNING knob to tune to a station.
4. To switch on the radio, set the three selectors to the TAPE (OFF) position.
To improve radio reception:
- For FM and SW, extend and rotate the telescopic antenna for best reception. Reduce its length if the signal is too strong.
- For MW, the set uses a built-in antenna. Direct this antenna for best reception by turning the entire set.
Maintenance & safety
Tape deck maintenance
To ensure quality recording and playback of
the tape deck, clean parts A, B, and C as
slightly moistened
head cleaning fluid to clean the deck.
1. Open the cassette holder by pressing ■▲
2. Press ◀ and clean the roller Ⓒ.
3. Press Ⅱ and clean the heads Ⓐ, and the
capstan ⑥.
After cleaning, press ■▲
→ Cleaning of the heads can also be done
by playing a OPCO

Safety information
- Place the set on a flat, hard and stable surface so that the system does not tilt.
- Do not expose the set, batteries to humidity, rain, sand or excessive heat caused by heat.
- Do not expose the device or batteries to humidity, rain, sand, or excessive heat.
• The apparatus shall not be exposed to
dripping or splashing.
dripping or splashing.
Adequate ventilation with a minimum gap of
15 cm (6 inches) between the ventilation openings and surrounding surfaces is necessary
to prevent heat build-up.
Do not cover the ventilation openings with
items such as newspapers, tablecloths, curtains, etc.
No objects filled with liquids, such as vases, shall be placed on the apparatus.
No naked flame sources, such as lighted
candles, should be placed on the apparatus.
The mechanical parts of the set contain
self-lubricating bearings and must not be
oiled or lubricated.
To clean the set, use a dry cloth. Do not use
any cleaning agents containing alcohol,
as they may harm the housing.


Troubleshooting
If a fault occurs, first check the points listed below before taking the set for repair.
If you are unable to remedy a problem by following these hints, consult your dealer or service centre.
WARNING: Do not open the set as there is a risk of electric shock. Under no
circumstances should you try to repair the set yourself, as this will
invalidate the guarantee.
Problem
Poor radio reception
- Possible cause
- Remedy
No sound /power
- volume not adjusted 1. Adjust the (QUIM)
– Power cord not securely connected Poor cassette sound quality
- Connect the AC power cord pro
• Insert (fresh) batteries correctly. • Clean deck parts, see Maintenance
– Headphones connected to the s
- Disconnect headphones. - Only use NORMAL (IEC I) for recording
Display does not function properly/ No
Reaction to operation of any of the controls
- Electrostatic discharge
- Switch off and unplug the set. Reconnect after a
few seconds
Severe radio hum or noise
– Electrical interference: set too close to TV, VCR or
computer
- Increase the distance.
- Weak radio signal
• FM/SW: Adjust the FM telescopic antenna
- MW. Direct this antenna for best reception by turning the whole set
Poor cassette sound quality
– Dust and dirt on the heads, etc.
- Clean deck parts, see Maintenance
Use of incorrect tape types (RHE14E or CHROME)
- Only use NORMAL (IEC I) for recording
Recording does not work
Cassette tab(s) may be broken
- Apply adhesive tape over the missing tab space
Environmental information
All unnecessary packaging material has been omitted. The packaging can be easily separat-
ed into three materials: cardboard, polystyrene and plastic.
Your set consists of materials which can be recycled if disassembled by a
specialized company. Please observe the local regulations regarding the
disposal of packaging, dead batteries and old equipment.
Printed in China
The Ground Truth image displays a single, solid horizontal line, which is a stylistic or background element (like a rule line on paper). According to Rule 2, such lines must be ignored by the OCR result. The OCR content provided is "", which consists of no characters. Since the OCR output correctly ignores the stylistic line, it complies with Rule 2. Therefore, the OCR result is consistent with the Ground Truth.



Brand : PHILIPS
Model : AQ4130
Category : Cassette player