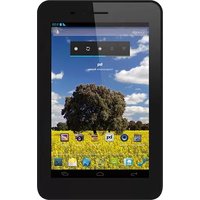
Elcano 2 - Tablet bq - Free user manual and instructions
Find the device manual for free Elcano 2 bq in PDF.


| Product Type | Tablet |
| Brand | bq |
| Model | Elcano 2 |
| Operating System | Android 5.1.1 Lollipop (pre-installed) |
| Display | 10.1 inches IPS LCD, 1920 x 1200 pixels |
| Processor | Quad-core ARM Cortex-A7 @ 1.3 GHz |
| RAM | 1 GB |
| Storage | 8 GB internal, expandable via microSD up to 32 GB |
| Cameras | Front 2 MP, Rear 5 MP |
| Connectivity | WiFi 802.11 b/g/n, Bluetooth 4.0, GPS |
| Battery | 6000 mAh non-removable Li-Po |
| Charging | Micro USB, 5V/2A adapter |
| Dimensions | 240 x 170 x 8.5 mm |
| Weight | 480 g |
| Audio | 3.5 mm headphone jack, built-in speaker |
| Sensors | Accelerometer, ambient light sensor |
| Maintenance | Clean with soft dry cloth; avoid moisture and harsh chemicals |
| Safety | Do not expose to high temperatures; use only certified charger |
Frequently Asked Questions - Elcano 2 bq
User questions about Elcano 2 bq
0 question about this device. Answer the ones you know or ask your own.
Ask a new question about this device
Download the instructions for your Tablet in PDF format for free! Find your manual Elcano 2 - bq and take your electronic device back in hand. On this page are published all the documents necessary for the use of your device. Elcano 2 by bq.
USER MANUAL Elcano 2 bq
flowchart
graph TD
    A["GPS"] --> B["3G"]
    B --> C["Micro-USB OTG"]
    D["Bluetooth"] --> E["7" IPS"]
    F["Internet"] --> G["178.0 Vision"]

Elcano 2 Quad Core
Guía rápida
Dolly and the Double-D symbol are registered in accordance of Dolly Laboratories.
bq Elcano 2 Quad Core
Thank you for choosing the bq Elcano 2 Quad Core. Before using your bq, please read this Quick Start Guide carefully.
Package contents
Before using your bq for the first time, please check the contents of the package. If any of the items below are missing, contact the vendor of the device.
■ bq Elcano 2 Quad Core
■ Micro-USB to USB cable
■ AC/DC adapter
■ Documentation
IMPORTANT
■ To ensure you use your device correctly, read this Quick Start Guide carefully beforehand.
■ The instructions are based on the factory settings for the device.
■ The images and screenshots featured in this guide may not be exactly the same as those of the final product.
■ Some of the content of this guide may not correspond exactly to the operation of the device, as a result of subsequent firmware updates. To obtain the most up-to-date version of the User Manual or Quick Start Guide, visit www.bqreaders.com.
■ bq shall not be held liable for any performance-related problems or incompatibility issues caused as a result of modification of the registration parameters by the user.
■ Some of the content and services you may access through this device are the property of third parties and are protected by copyright, patents, trademarks and/or other intellectual property law. bq does not provide any guarantees in relation to the content or services provided by third parties.
Instructional icons

Alert: Important notifications and recommendations regarding use of your device.
Next: The order in which you select options or menus to perform an operation.
Trademarks
The bq logo is a registered trademark of Mundo Reader, S.L.
The Android and Google Search™ logos are registered trademarks of Google, Inc.
Wi-Fi® and the Wi-Fi CERTIFIED and Wi-Fi logos are registered trademarks of the Wi-Fi Alliance.
HDMI® (High-Definition Multimedia Interface) is a registered trademark of HDMI Licensing, LLC, which is a subsidiary of Silicon Image, Inc.
Bluetooth ^® is a registered trademark of Bluetooth SIG, Inc.
MicroSD ^TM is a registered brand and logo registered of SD-3D, LLC.
Dolby and the double-D symbol are registered trademarks of Dolby Laboratories. All other trademarks remain the property of their respective owners. Copyright 2013 Dolby Laboratories. All rights reserved.
View of the device
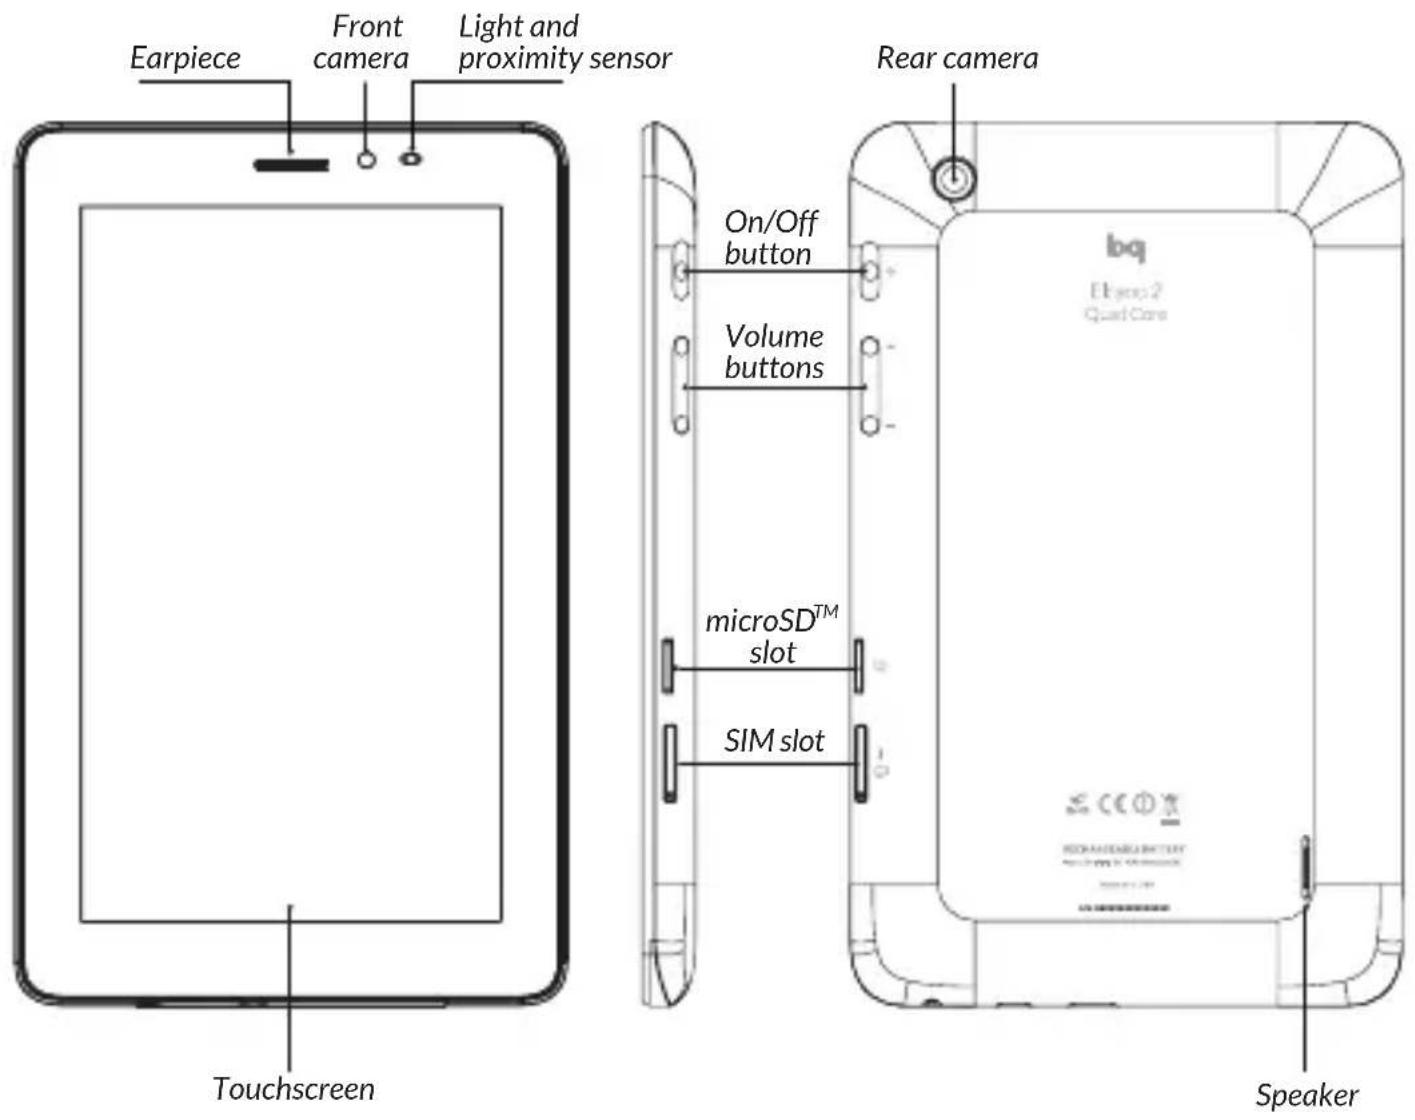

Buttons and connections
On/Off Press and hold down this button to turn on the device. To force it to turn off, press and hold down this button for 15 seconds.
Volume Press to adjust the multimedia buttons volume on your device.
SIM slot Insert your micro-nano SIM into this slot in order to make calls and access the Internet using your 3G connection.
Headphone Jack Plug in your headphones here.
Micro-USB Connects your bq device to port a computer via a USB cable, enabling you to transfer files between the two. Also allows you to charge the battery.
Mini-HDMI Digital video outlet that lets port you connect your device to an external screen.
microSD ^TM You can increase the storage slot capacity of your device by adding a microSD ^TM cards.
Front 2 Mpx camera. camera
Rear 5 Mpx camera. camera
Touch screen Touch the capacitive screen in order to operate the bq Elcano 2 Quad Core.
Speaker Emits audio output when the headphones are not connected.
GETTING STARTED
Battery
Your bq Elcano 2 Quad Core contains a rechargeable, non-removable Li-ion battery. To charge it, connect the AC/DC adapter to any standard plug socket, insert the USB connector into the corresponding port on the adapter and the micro-USB connector into the corresponding port on the device. The device can also be charged when it is connected to a computer. When the battery is fully charged, disconnect the cable from the device and unplug the adapter from the socket.

We recommend that you charge the very fully before using your bq device the first time.
Switching On/Off
To switch the device on, press and hold down the ⏻ button for a few seconds. To switch it off, press and hold down the same button ⏻ until a pop-up menu appears with the option Power Off, then select this option.
If you press and hold down this button for 15 seconds while the device is switched on, you will force it to switch off.
Inserting / removing the microSD™ card
To insert the microSD ^TM card, place it in the corresponding slot and push it in until you hear a “click”.
Operating system
The operating system your bq device uses is Android 4.2.2 (Jelly Bean).
Transferring files
To transfer files from your device's internal memory (or the microSD™ card) onto a computer (and vice versa), do the following:
-
Connect the micro-USB cable to the corresponding ports on the device and computer. The device (and the microSD™ card, if one is inserted) will be detected as a multimedia device (MTP). Alternatively, depending on the factory settings it may also be detected as a camera (PTP).
-
Select the files to be transferred and copy them onto your device or computer.
-
Once you have transferred the files, safely remove the device from your computer. Do not disconnect the cable while files are being transferred.
To transfer files from your bq device (and/or microSD™ card) onto a computer running Mac OS (and vice versa), you will need to download the free application Android File Transfer and install it onto your computer (http://www.android.com/filetransfer/).

Back up the content on your bq device regularly, to prevent file loss in the event your device is damaged, lost or stolen.

To change the storage mode, go to Settings > Storage > Menu button >> USB computer connection.
By default, your bq Elcano 2 Quad Core's screen locks automatically after you switch it on, or if you have not used the device for an extended period of time.
To adjust the time interval for the screen lock, press the icon and go to Settings > Display > Screen timeout.
To turn the screen off manually, press the On/Off button.
Adjusting screen orientation
The screen rotates automatically from portrait (vertical) to landscape (horizontal) format and vice versa, depending on the position of the device (and for those applications that support this function).
If you wish to stop the screen from changing orientation, press the 📁 icon and go to Settings > Display and disable the Auto-rotate screen option.
Home screen
The Home screen is your main access route to the tools and apps installed on your bq Elcano 2 Quad Core. From here you can monitor the status of your device, visit websites, open apps by pressing on the corresponding icons, access menus, and more.
At the bottom of your screen is the Navigation bar, and at the top is the Notifications and Alerts bar.

This icon gives you access to the apps drawer. It is located in the lower part of the screen (or on the right-hand side of the screen when the display is in landscape format). It provides access to Applications, Widgets and the Store.
Start Menu. The Navigation bar contains the following buttons:

Back. Press to go back to the previous page within an app.

Home. Press to go back to the Home screen.

Open apps. Press to go back to or close down an app. To close an app, simply press on it and drag it over to the right, removing it from the list
■ Menu. Press to show the menu of available options for the app you are using..
Notifications and Alerts bar (top of screen)
The bar at the top of the screen displays notifications and alerts, such as missed calls, new e-mails, etc.
- Pull down the bar using one finger in order to display the following options:
On the right is the icon, which closes the options window and deletes your notifications. Next is the icon, which allows you to create your social profile and configure your device using the direct access settings. If you have already created your profile, this icon will appear first in the list. If you still haven't created a profile, you can do so by going to Contacts > Set up my profile.
- If you pull down the bar with two fingers, you will see different options:
On the right is the quick access icon for Settings , along with the Notifications and Alerts icon
You will also find the following configuration icons: Flight Mode, Battery Level, Settings, Wi-Fi, Bluetooth, GPS, Data Connection, Data Usage, Sound Profiles, Brightness, Screen Timeout and Auto-rotation.
Status bar
The upper bar, which remains pinned to the display, shows the time, notifications, network status, Wi-Fi® and data connections, etc.

Wi-Fi®. This symbol appears when your device is connected to a Wi-Fi® network. It also indicates the strength of the wireless signal.

Battery level. Indicates the amount of charge left in the battery.
Bluetooth®. This symbol appears when your device's Bluetooth® connection is activated.

3G connection. Indicates the strength of the phone signal received by your micro-nano SIM. If your data connection is activated, the following text will appear alongside the icon:
G: GPRS data traffic
3G: 3G connection
H: HSDPA connection
Extended Home screens
The Home screen has an additional four screens, which you can customize by adding shortcuts, apps and other tools. To scroll through the
Home screen and extended screens, use your finger to slide the screen to the left or right.
Customising the Home screen
You can customise the Home screen and extended screens by using your own images as wallpaper, adding icons and shortcuts to your favourite apps, etc.
Changing the wallpaper
To change the wallpaper, long-press (press and hold down) the screen to produce a pop-up menu. Select the Wallpaper option, find the image you wish to use and press Set as wallpaper to confirm your choice.
Adding and deleting icons
To add an icon to the Home screen, press the button to open the list of apps, long-press the icon you wish to add and drag it to the desired position on the Home screen or extended screens.
To delete an icon from the Home screen, long-press it and drag it to the X symbol that will appear on the screen. Alternatively, select the Remove option from the pop-up menu.
APPS
The apps drawer gives you access to all the applications installed on your bq Elcano 2 Quad Core. To access the drawer, press the icon. To open an app, press the corresponding icon. To return to the Home screen, press the Home icon.
DOLBY
To improve the sound quality on your bq Elcano 2 Quad Core, press the 📄:icon to open the Dolby app.
After you open the app you can choose from any of the four pre-set modes that will appear: Video, Music, Game and Voice.
Each mode has a graphic equaliser that allows you to directly adjust the audio settings by swiping the screen with your fingers. You can also improve sound quality by selecting one of the intelligent equalisers: Open, Centred, Resonant and Custom.
If you adjust any of the modes manually, the G icon will appear next to the name of the mode and the words Graphic Equaliser: Custom will be shown. Pressing this icon will restore the initial values and delete any manual ones you have selected.
The Dolby app will be activated (and the icon shown) in order to improve sound quality for apps such as Music and Video Player. You can deactivate it by pressing the icon.
WI-FI® CONNECTION
To connect to the Internet or use an app that requires an Internet connection, you first need to connect the bq Elcano 2 Quad Core to a Wi-Fi® network, as follows:
- Press the Notifications menu located in the bar at the bottom of the screen, or press the icon and go to Settings > Wi-Fi. Once Wi-Fi® has been turned on, the device will automatically begin searching for available networks.
- The names of the available Wi-Fi® (SSID) networks found will be displayed in a list. Scroll through the list and press the name of the desired network to check its security level and system strength.
- If the network is secure, enter the password and press Connect. The Wi-Fi® icon will appear in the Notifications menu to indicate signal strength.
MICRO-NANO SIM CARD
To install your micro-nano SIM card, switch off the device and insert the card into the corresponding slot, as shown below.
When you switch the device on it will ask you to enter the PIN. Enter it and wait for the device to connect.
3G CONNECTION
In order to connect to the Internet via 3G, please insert your micro-nano SIM card in the relevant slot of your tablet:
- Before you insert your micro-nano SIM card, please switch off your device.
- Turn on the device. Once the card is inserted you will be automatically asked for your PIN (if the card has been protected with this code). Please, accept.
- Access Settings > Wireless & Networks > More... > Mobile networks. Tap on Data connection and turn it on, you have to select the Internet provider's name. Data roaming should be enabled if you want to connect to mobile networks abroad.

The APN configuration must be provided by your Internet provider.
TELEPHONE MODE
Making a call:
- Look for the desired phone number in your Contacts list (if the number is stored there). If you don't have the number stored, press the icon and enter the number manually.
- To end the call, press the icon.
Sending a text message (SMS):

- To send a text message, press the and write your message.
- Select the recipient from your Contacts list, or enter their phone number manually.
- Press Send.
You can access the advanced settings for both options by pressing the App Menu button.
BLUETOOTH®
This function allows you to transfer files between your bq Elcano 2 Quad Core and other devices.
- Access this function by going to Settings > Bluetooth. Activate Bluetooth® and the system will automatically detect any nearby Bluetooth®-enabled devices.
- Press the name of your device to make it visible to other nearby Bluetooth® devices. If the device you are looking for does not appear, press the Search for devices option in the upper bar.
- Press the name of the device you wish to connect to, in order to initialise the synchronisation process.
- After the devices have been synchronised, you can share files between them.
You can also search for your bq from another device by pressing the App Menu button ■ and adjusting the visibility timeout.
The App Menu button also provides access to advanced settings.
SAFETY PRECAUTIONS
When using your device, please make sure you observe the following safety precautions:
■ Do not use power cables or connectors that are damaged, or plugs that have loose fittings. Do not bend or damage the power cable. Do not touch the power cable with wet hands, or pull on it in order to disconnect the charger.
■ Do not use the device while it is charging, or touch it with wet hands.
■ Do not knock the charger or battery or allow them to fall. Do not charge the battery with chargers that have not been approved by the device manufacturer.
■ Do not use the device during electrical storms.
■ Take care when handling batteries and chargers. Do not touch Li-ion batteries that are damaged or leaking.
- Do not use the device in proximity to a pacemaker. If possible, avoid using it within 15 cm of a pacemaker, as it may interfere with the latter’s operation.
■ Do not use the device in a hospital or near any medical equipment that may be susceptible to radio interference.
■ If you are using medical equipment, make sure the equipment is protected from radio frequencies. If you wear a hearing aid, ask the manufacturer for information on radio interference.
■ In potentially explosive environments, switch the device off instead of removing the battery. Always observe the rules, instructions and safety signs.
■ Do not use the device at fuelling areas (petrol stations) or in the vicinity of other flammable and/or explosive chemical products.
■ Do not store or transport flammable liquids or gases or explosive materials in the same compartment in which the device (or any of its parts or accessories) is kept.
■ Switch the device off when you board an aeroplane.
■ Electronic devices pertaining to motorised vehicles may function incorrectly as a result of radio interference from this device.
■ Prolonged exposure to high volumes of sound may cause permanent damage to hearing. We recommend that you do not use headphones while cycling, running or travelling through areas with a high level of traffic and/or noise.
Warning!
This product must be used with a power source that conforms to the following specifications:
INPUT: 100-240V \~ 50/60 Hz 0.4A max
OUTPUT: 5.0V = 2.1A
Polarity must be as shown in the illustration
below:

Micro USB
Pin 1" + "
Pin 5 "-"
The use of power sources that do not conform to these specifications may damage your device and present a risk to personal and material safety.
Cleaning
Before cleaning the device, switch it off and remove all cables (including the power cable).
■ After cleaning the device, make sure the screen is completely dry before connecting the cables and switching it on again.
■ Do not apply any cleaning liquids or sprays directly onto the screen or casing.
■ Remove dust and dirt from the screen with a clean, soft cloth that does not leave any fibres behind. For fingerprints and marks,
use a cloth impregnated with a mild cleaning product.
■ To clean the casing, use a soft cloth lightly wetted with a mild cleaning product. Then rinse the cloth in clean water, wring it out thoroughly and wipe the casing to remove any traces of the cleaning product.
CORRECT DISPOSAL OF THE PRODUCT

(Waste electrical and electronic equipment) (Applies within the European Union and in European countries with selective sorting processes for waste materials).
The inclusion of this symbol on the product, or on its accessories or the literature that come with it, means that at the end of its useful life this product (and its electronic accessories such as the charger, cables, etc.) must not be disposed of along with other household waste.
To prevent possible damage to the environment or human health, separate these products from other types of waste and recycle them correctly. This will help promote the sustainable reuse of material resources.
Household users should contact the retailer where they purchased the product or the relevant local authorities in order to find out how and where they can recycle this product safely and without harming the environment.
Business users should contact their supplier and consult the terms and conditions of the purchase contract. This product and its electronic accessories should not be disposed of along with other commercial waste.
DECLARATION OF CONFORMITY
Mundo Reader, S.L.
Pol. Ind. Európolis
Calle Sofía, 10
28232 Las Rozas - Madrid. SPAIN
CIF: B85991941
Made in China
Declares that the:
bq Elcano 2 Quad Core
Complies with the provisions of Directive 1999/5/EC on Radio and Telecommunications Terminal Equipment (R&TTE), Directive 95/2006/EC on Electrical Safety for Low Voltage Equipment, and Directive 2004/108/EEC on Electromagnetic Compatibility, in addition to the following harmonised standards: EN 60950-1:2006 + A11:2009, EN 62311:2008, EN 301 489-1 V 1.8.1, EN 301 489-17 V2.1.1, EN 300 328 V1.7.1, EN 55022: 2006 + A1: 2007, EN 55013: 2001 + A1: 2003 + A2: 2006, EN 61000-3-2: 2006 + A1: 2009 + A2: 2009, EN 61000-3-3: 2008, EN 55024: 1998 + A1:2001 + A2: 2003, EN 55020: 2007.
Madrid, December 2013.

Alberto Méndez Peydró CEO
CE0168!
- Elcano 2 Quad Core
- bq Elcano 2 Quad Core
- Package contents
- IMPORTANT
- Instructional icons
- Trademarks
- View of the device
- Buttons and connections
- GETTING STARTED
- Battery
- Switching On/Off
- Inserting / removing the microSD™ card
- Operating system
- Transferring files
- Adjusting screen orientation
- Home screen
- Notifications and Alerts bar (top of screen)
- Status bar
- Extended Home screens
- Customising the Home screen
- Changing the wallpaper
- Adding and deleting icons
- APPS
- DOLBY
- WI-FI® CONNECTION
- MICRO-NANO SIM CARD
- 3G CONNECTION
- TELEPHONE MODE
- Making a call:
- Sending a text message (SMS):
- BLUETOOTH®
- SAFETY PRECAUTIONS
- Warning!
- Cleaning
- CORRECT DISPOSAL OF THE PRODUCT
- DECLARATION OF CONFORMITY
Brand : bq
Model : Elcano 2
Category : Tablet