
7144 044 - Oven Foster - Free user manual and instructions
Find the device manual for free 7144 044 Foster in PDF.


| Product Type | Built-in Electric Oven |
| Brand | Foster |
| Model | 7144 044 |
| Dimensions (H x W x D) | 595 x 595 x 575 mm (approx.) |
| Weight | 35 kg (approx.) |
| Power Supply | 230 V, 50 Hz |
| Energy Class | A |
| Capacity | 70 L (approx.) |
| Functions | Convection, Fan-assisted, Grill, Top and Bottom Heat, Defrost |
| Temperature Range | 50°C – 250°C |
| Control Type | Electronic with digital display |
| Installation | Built-in, flush or under counter |
| Cleaning | Catalytic enamel interior liners (auto-clean) |
| Safety Features | Child lock, cool-touch door, automatic shut-off |
| Accessories Included | 1 shelf set, 1 drip tray |
| Spare Parts Availability | Authorized Foster service centers |
| Reparability | Repairable by qualified technicians; parts available for 10 years |
| Manual Language | English (12 pages PDF) |
Frequently Asked Questions - 7144 044 Foster
User questions about 7144 044 Foster
0 question about this device. Answer the ones you know or ask your own.
Ask a new question about this device
Download the instructions for your Oven in PDF format for free! Find your manual 7144 044 - Foster and take your electronic device back in hand. On this page are published all the documents necessary for the use of your device. 7144 044 by Foster.
USER MANUAL 7144 044 Foster
natural_image
Front view of a modern oven with control panel and digital display (no visible text or symbols)Foster

KE60 MTL PIRO INOX

1 Control Panel
2 Oven Seal
3 Grill Element
4 Grid tray
5 Telescopic guides
6 Cake tray
7 Deep tray
8 Hinge
9 Door
10 Air outlet
11 Door switch-lock
12 Cabinet Mounting
13 Grill Screen
14 Smoke Outlet
15 Back Wall Panel
16 Side lights
17 Fan
18 Full size interior glass
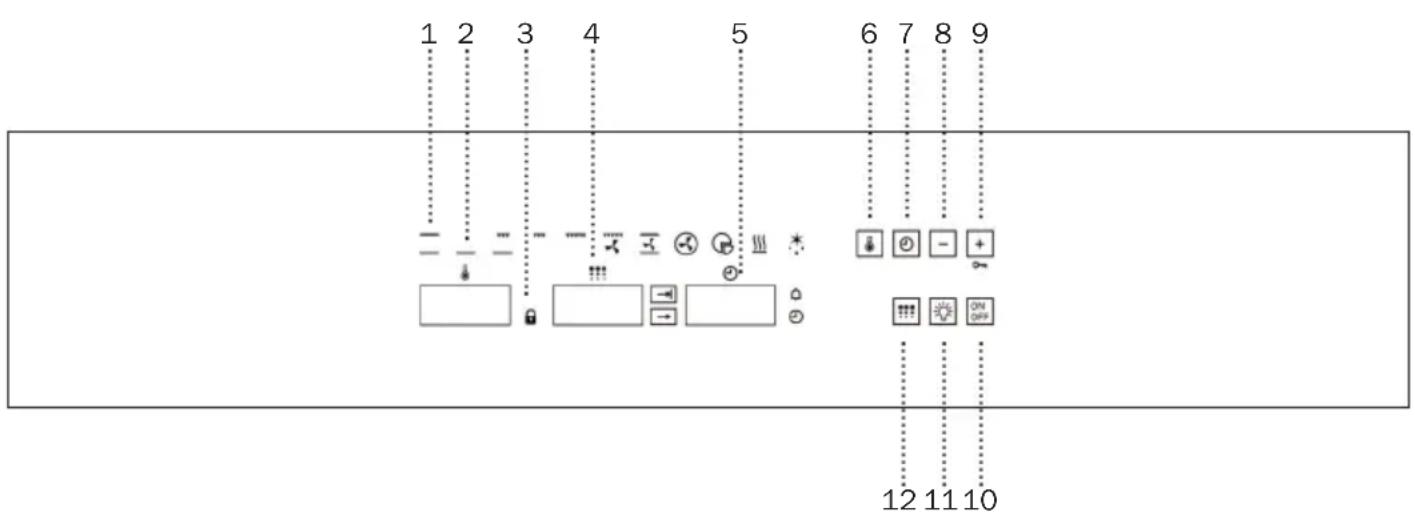
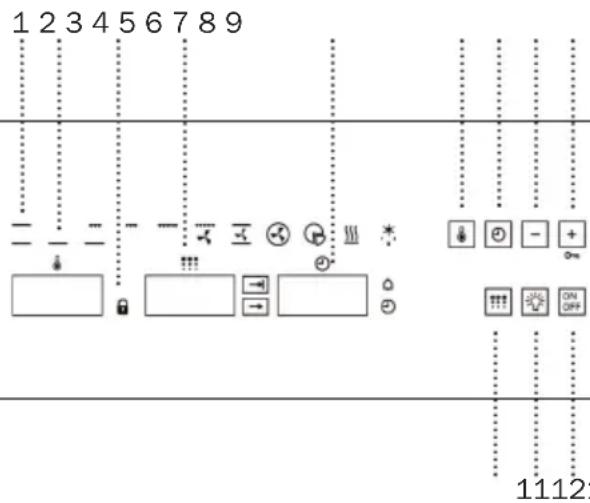
Control Panel

1 Cooking functions
2 Temperature display
3 Door lock indicator light
4 Pyrolytic function indicator display
5 Electronic timer
6 Temperature sensor
7 Electronic timer sensor
8 - Sensor
9 + Sensor / Child safety function
10 On / Off
11 Inside light
12 Pyrolytic function sensor
Oven Functions
— Convencional
Conventional with Fan
This function is for use when baking suitable for pasts and cakes. The fan spreads where the heat should be even the heat evenly throughout the ins spongy texture. oven to reduce cooking time and temperature
— Lower Element
Turbo
Heat only comes from beneath. Suitable for spreads the heat co warming plates or letting dough rise. element located at the back of the oven. As
— Grill and Lower Element
Ideal for roasts. This function can be used with any size joints of meat.
It able for spreads the heat co element located at the back of the oven. As result of the evenly distributed food can be cooked on two levels at the same time.
" Grill
Pizza
Ideal for baking pizzas, pies, and fruit tarts sponges.
Toasting and browning. This function allows the surface to be cooked without affecting the inside of the food. Suitable for flat pieces such as steaks, ribs, fish and toasts. Slow cooker Designed to c
Maxigrill
Slow cooker
Designed to cook casseroles, ste the traditional way, a specifying long cooking times and low heat.
For toasting larger sur faces than possible with the Grill function, in add toasting power for faster food browning.
For the best results, we recovered casserole pans with lids, first make sure that they can be used in the oven.
MaxiGrill with Fan
Defrosting
For even roasting and simultaneous surface browning. Ideal for mixed grills. Perfect for bulky pieces such as poultry and game. The meat should be placed on the oven grid with the tray below to collect meat juices.
Caution
The door must be closed during use with Grill, MaxiGrill or MaxiGrill with Fan.
Recommendations for Defrosting Food
The defrost function works by m Meatsandffish do not need to be complete 2-level system of hot air. HI is for me a t saw before cooking. Condiments general and LO is for fish, cakes, pastries and added once the surface is soft.
bread. When selecting the defrost select HI or LO on the temperature display by pressing on the temperature sensor then the + or - sensors.
function, Food's should always defrosting. and
- Do not refreeze defrosted food.
- Unpackaged food should be placed on the oven tray or on a dish.
- Defrost large pieces of meat or fish by placing them over the grid with a tray underneath to collect any liquid.
See the following chart for defrosting times and temperature levels:
| FOOD | LO LEVEL | HI LEVEL | ||
| Weight Time | Weight Time | |||
| Bread | 12 Kg | 35 mins | ||
| Cake | 12 Kg | 25 mins | ||
| Fish | 12 Kg | 30 mins | ||
| Fish | 1 Kg | 40 mins | ||
| Chicken | 1 Kg | 75 mins | ||
| Chicken | 1,5 Kg | 90 mins | ||
| Rib steak | 12 Kg | 40 mins | ||
| Minced meat | 12 Kg | 60 mins | ||
| Minced meat | 1 Kg | 120 mins | ||
The times shown in the chart are a guide. The time needed for defrosting temperature of the room, weight of the food and how frozen it is.
Oven Use

Use of the electronic timer
Caution
The electronic clock features technology. To operate, simply touch the glass control symbols with your fingertip.
The touch control sensiti adapts to changing conditions. the glass front of the control panel is and free of any obstacles when turning on the oven.
If the clock does not respond correctly with you touch the glass, you will need to turn on the oven for a few seconds and then turn back on. By doing this, the sensors adjust automatically and will react to fingertip control.
Setting the Electronic Clock
When turning your oven on, you will s clock flashing 12:00 Ⓥ. Set the clock by touching the + or - symbols on the glass. You will hear 2 beeps confirming the time has been set.
If you want to change the time, touch the clock sensor Ⓞ until the indicator flashes Ⓔ. Change the time by touching the + or - sensors. The two beeps you hear will confirm the new time has been set.
Manual Operation
After setting the clock, the oven is reuse:
1 Press the On sensor ON vity continuously 2 Press on the desired c Ensure that symbol. s clean
3 The temperature display ⚡ will show the preset temperature function. Press on the temperature when ⚡ to change it. Select the desired temperature by pressong sensors.
- The top oven cavity will start to function ☑_ — ⚙️ and _ will start the fast preheating fur minutes. The oven will beep when it reaches the selected temperature.
Caution: this preheating function turns on the turbo motor at the back of the top oven cavity.
5 During oven heating, the ° display will flas to show that the food is being heated.
6 Press on the Off sensor ON OFF to stop cooking.
Caution
When cooking has finished, you will notice that oven cooling feature will work until the temp ture inside the oven has been suitably lowered
Oven Lighting
The inside light will go on:
- When the oven door is open. If the door is not closed after a certain time, the light will turn of f to reduce power consumption.
- When any cooking function is set light will turn off after a certain time.
If you want to turn the light on during cooking, just touch the Oven Light sensor. If you keep your finger on this sensor for a few seconds, the light will stay on throughout cooking.
IMPORTANT
During the pyrolitic cleaning function, the in de light will not turn on.
3 You will then hear two beeps, the display w show the time left before the alarm sou and the symbol wi indicating that the timer has been set.
4 Once the programmed time has passed, alarm will sound and the symbol 🔒 will begin selected. The to flash more quickly.
5 Press on any sensor on the control panel to stop the alarm.
You can change the programmed time whenever you want by to sensor ⏻ until the symbol 🔍 flashes, and then touching the + or - sensors. The two beeps you hear after that will confirm the next time has been set.
Electronic Clock Functions
Cooking Time: This function programme cooking time length, after which the oven will turn off automatically.
Cooking Stop Time: This function allows you to programme the time for cooking to stop which the oven will turn off automatically.
Cooking Time and Cooking Stop function allows both cooking time length and the stop time to be programmed. With this function, the oven switches on automatically at the set 4 time and operates for the cooking time it has been programmed for. It sw automatically at the entered stop time.
Timer Alarm: A beep will go sound when the set time has finished, whether the oven is on or off.
Child safety: This function locks the oven, preventing small children from playing with it.
Programming the Timer Alarm
1 Press on the clock sensc several times until the symbol lights up.
2 Select the length of time after which you want the alarm to sound by pressing on the + or - sensors.
Programming Cooking Time
1 Press on the clock sensor ☑. The symbol on a l l o w s y o u t o → will light up.
2 Select the cooking time by pressing the + or to - sensors.
3 Two consecutive beeps will then sound the display will show the remaining co time. The symbol will flash slowly to p Time: This indicate that the oven automatically.
4 Select a cooking function and temperature
5 Once the cooking time is complete, the oven i will turn off, tan alfam wiflsound and the symbol will flash more quickly.
6 Press on any sensor on the control panel to stop the alarm.
You can change the programmed time whenever you want by to use a sensor and then on the + or - sensors. The two beeps you hear after that will confirm the new time has been set.
Programming the Cooking Stop Time
1 Press on the clock sensor ☐ several times until the symbol → lights up.
2 Select the cooking stop time by the + or - sensors.
3 Two consecutive beeps will then sound and the display will show the remaining cooking time. The ➕ symbol will flash slow indicate that the oven will automatically.
4 Select a cooking function and temperature.
5 Once it is the set time, the oven wil off, an alarm will sound and the → symbol will flash more quickly.
6 Press on any sensor on the control panel to stop the alarm.
You can change the programmed cooking stop time at any moment by pressing on the clock sensor ⏻ until the ➡ symbol flashes and then by pressing on the + or - sensors. The two beeps you hear after that will confirm the new time has been set.
You can use this function ever already cooking with the oven. If this case, follow all of the abo except No. 4.
5 Select the cooking stop time by pressing the + or - sensors.
6 This will be confirmed by two beeps. The current time will show on the display and the symbol will remain lit.
7 Select a cooking function and temperature.
8 The oven will remain off, with the symbol lit and the symbol f slowly. The clock will show the current time and the inside light will rema oven is now programmed.
9 When it is time to start cooking, the oven will switch on and will operate for the programmed cooking display will show the remai time.
10 Once the set time is reached, the oven will turn off, an alarm will sound and symbols will flash.
11 Press on any sensor on the control panel to stop the alarm.
If you wish to change the cooking st while cooking is in progress, n if you are clock sensor 📄 until the → symbol flashes. s, is the
You can then change the cooking stop time by ve instructions pressing on the + or - sensors. The two beeps you hear after that will confirm the new time has been set.
Programming Cooking Time and Cooking
Stop Time
1 Press on the clock sensor Ⓔ. The symbol → will light up.
2 Select the cooking time by pressing the + or - sensors.
3 Two consecutive beeps will then sound, and the display will show the cooking time. The symbol will flash slowly.
4 Press on the clock sensor ⏻ several times until the symbol ⏱ lights up.
Child Safety Function
This function locks the oven, preventing small children from playing with it. To try function, press on the symbol until you hear a long beep and see several flashing dots between the digits of the t displaying. The oven is now locked.
To turn off the child lock, symbol pressed until a long beep sounds.
kCaution the
In the event of power failure, your el clock timer settings will be erased and 12:0 will flash on the clock display. Reset the clock and programme again.
PROGRAMMING AND OPERATING THE PYROLYTIC FUNCTION
Follow the instructions below to carry out the pyrolytic programme is a pyrolytic cleaning cycle: touch sensor (12). You will hear
1 IMPORTANT: Remove (shelves, grids, side supports the shelves, telescopic guide inside the oven and close the oven door.
2 Touch the On / Off sensor (10).
3 Touch sensor (12).
4 You will see P2 (pyrolytic programme 2) flashing on the display (4) and the - sensors will light up.
5 You can now change the pyrolytic programme to P1, P2 or P3 by pressing the - sensors:
P1: Minimum programme. Duration 1 hour
P2: Standard programme. Durat and 30 minutes
P3: Maximum programme. Duration 2 hours
On the pyrolytic programme is a touch sensor (12). You will hear beep confirming that the programme is set all accessories. After a short time, you will see to hold up remaining for the selected pro the display (4) to end. You will see t rent time on the timer display (5). The oven will start to heat up.
8 After a brief time, the door loc light (3) will turn on and you will not be able to open the oven door.
IMPORTANT: At this point, the oven is programmed and the pyrolytic cleaning underway. During the cycle, none of the time functions can be selected, excelock. Do not try to open the oven door may interrupt the cleaning process.
9 When the pyrolytic cleaning cycl13 Damp fit the oven door and wipe the nished, you will hear an alarm. with a damp cloth, cleaning it
10 Touch any of the oven's sensors to stop from the cleaning cycle. Areas in the oven, that are difficult to access will need to I the alarm.
11 The oven's heating process has finished. However, the oven is extremely hot and cannot be used. The cooling motor will replace the supports and accessories. operate and the indicator light (3) remain on until the oven cools down. 15 The oven is now ready to be used again.
IMPORTANT
The cooling process may last up to 2 owing to the high temperature oven.
12 Once the oven has cooled down, indicator light (3) will automatically turn off.
IMPORTANT: If any incidents are detected in the programming and operation of this 10 hours, Iq n consult the section "I inside the Operating the Pyrolytic Function".
CANCELLING THE PYROLYTIC CLEANING CYCLE
To cancel the pyrolytb) The ovenshot:ing cycle,
remember:
a) The oven is cold:
- Switch off the oven by touching s (10).
- You will see the time remaining until the door unlocks on the display (4).
-
When this time gets to 0:00 and indicator light (3) turns off, you will be able to open the oven door.
-
Switch off the oven by touching (10). The time 0:00 will be shown on the central display (4).
sensor - The oven's cooling motor will continue to operate and the door lock indicator light the (3) will be lit up.
- When the electronics detect that the oven is cold, you will see the time remaining until the door unlocks display (4).
- When this time gets to 0:00 and ir tor light (3) turns off, you will be abl open the oven door.
INCIDENTS WHEN OPERATING THE PYROLYTIC FUNCTION
| INCIDENT CAUSE SOLUCIÓN | ||
| My accessories and shelf supports are damaged. | You have not removed the accessories and supports during the pyrolytic cleaning cycle. | You must replace them and remove them in later cleaning cycles. |
| The enamel colour has changed or stains have appeared. | The chemical composition of some foodstuffs may cause changes in the enamel. | This is normal and does not damage the properties of the enamel. |
| A flashing symbo 🔍 🔍 appears on the temperature display (2) and an alarm sounds. | The oven is programmed to carry out a pyrolytic cleaning cycle but the door is open. | Close the door to enable the function to be carried out. |
| I have programmed the pyrolytic function, the oven is working properly but indicator light (3) is not lit up. | Indicator light (3) does not work properly. | Call the Technical Assistance Service. |
| The pyrolytic programme has finished but the oven door is locked. | The oven has not cooled down to the safe temperature. | Wait until the oven cools down and indicator light (3) turns off. |
| A flashing symbol E:1 appears on the temperature display (2) and an alarm sounds. The oven has stopped heating up. | The oven door has not been locked. The door is not closed properly and cannot be locked. | Touch any sensor to stop the alarm. Check the door and make sure that it is closed properly. |
| INCIDENTCAUSESOLUTION | ||
| A flashing symbol E:1appears on the temperature display (2) and an alarm sounds. The oven has stopped heating up. | The oven door has not been locked. The door lock has not worked. | Touch any sensor to stop the alarm. Call the Technical Assistance Service. |
| A flashing symbol E:1appears on the temperature display (2) and an alarm sounds. The oven has stopped heating up. | The door is locked but the door lock indicator light (3) does not light up. | Touch sensors and (12) at the same time and the door should unlock. Call the Technical Assistance Service. |
| A flashing symbol E:2appears on the temperature display (2) and an alarm sounds. | You have opened the door before it has been locked. | Touch any sensor to stop the alarm. You will see the time left before the oven can be used again on the display (4). When the display shows 0:00, close the door before programming the pyrolytic function again. |
| A flashing symbol E:3appears on the temperature display (2) and an alarm sounds. | You have opened the door during the pyrolytic function. The door lock has not worked. | Call the Technical Assistance Service - your oven is operating in potentially dangerous conditions. The door should be locked with the pyrolytic function. |
| A flashing symbol E:4appears on the temperature display (2) and an alarm sounds. You will see that the door lock indicator light (3) is on. | The door has been locked without a pyrolytic cleaning cycle being programmed. | Touch any sensor to stop the alarm. The E4 symbol will continue to flash and the time remaining until the door is unlocked will be shown on the display (4). After this time, indicator light (3) will turn off and you will be able to open the door. Touch any sensor to remove the symbol E4. Call the Technical Assistance Service. |
| IMPORTANTIf the temperature inside the oven is very high (above 250 °C), you will see that E4 flashes but the time does not start to count down. You should wait until the oven cools down, when the countdown will begin. | ||
| A flashing symbol E:5 appears on the temperature display (2). | The oven's clock is set but the oven door is locked. | You will see the time left before the oven can be used again on the display (4).When the display shows 0:00, indicator light (3) will turn off and you will be able to open the oven door and use the oven as normal. |
| I have followed the above instructions but the door is still locked and the oven is cold. | No specific cause Press sensors and (12) + at the same time and the door should unlock. | |
| The door is locked, indicator light (3) is on and 0:00 is shown on the central display. | During the cancellation process, you have not waited for the time to finish and have opened the door too early. | Touch the OFF sensor and you will see the remaining time on the display (4). |
IMPORTANT
Should the oven door be still locked even though you have followed all these instructions, please contact the Technical Assistance Service.


- KE60 MTL PIRO INOX
- Control Panel
- Oven Functions
- — Convencional
- Conventional with Fan
- — Lower Element
- Turbo
- — Grill and Lower Element
- " Grill
- Pizza
- Maxigrill
- Slow cooker
- MaxiGrill with Fan
- Defrosting
- Caution
- Recommendations for Defrosting Food
- Oven Use
- Use of the electronic timer
- Setting the Electronic Clock
- Manual Operation
- Oven Lighting
- IMPORTANT
- Electronic Clock Functions
- Programming the Timer Alarm
- Programming Cooking Time
- Programming the Cooking Stop Time
- Programming Cooking Time and Cooking
- Stop Time
- Child Safety Function
- kCaution the
- CANCELLING THE PYROLYTIC CLEANING CYCLE
- INCIDENTS WHEN OPERATING THE PYROLYTIC FUNCTION
Brand : Foster
Model : 7144 044
Category : Oven