
ZSR4174WE - Router Zonet - Free user manual and instructions
Find the device manual for free ZSR4174WE Zonet in PDF.


| Product Type | Portable 802.11n Wireless Access Point/Router |
| Model | ZSR4174WE |
| Wireless Standards | IEEE 802.11n, 802.11g, 802.11b |
| Maximum Data Rate | 150 Mbps (receive and transmit) |
| Frequency Band | 2.4 GHz (2.4-2.4835 GHz) |
| Modes | Wireless AP, Client+AP, WDS+AP, WISP Router, Wireless Router |
| Ports | 1 x 10/100 Mbps LAN/WAN port (Auto MDI/MDIX) |
| Power Supply | 5V DC, 1.2A (via USB cable with included power adapter or PC USB port) |
| Power Consumption | Max 5W |
| Wireless Security | 64/128-bit WEP, WPA-Personal, WPA2-Personal, Mixed WPA/WPA2 |
| WPS | Yes (Push Button and PIN) |
| Antenna | 1 internal ceramic antenna |
| Dimensions (L x W x H) | 102.5 mm x 63 mm x 13 mm |
| Operating Temperature | 0°C to 40°C |
| Operating Humidity | 10% to 90% RH (non-condensing) |
| LED Indicators | AP, Client+AP, WDS+AP, WISP Router, Wireless Router, WPS, LAN/WAN |
| Management | Web-based (default IP 192.168.2.1, admin/admin) |
| Package Contents | ZSR4174WE, CD with manual, Quick Installation Guide, RJ-45 cable, USB cable, power adapter, travel bag |
Frequently Asked Questions - ZSR4174WE Zonet
User questions about ZSR4174WE Zonet
0 question about this device. Answer the ones you know or ask your own.
Ask a new question about this device
Download the instructions for your Router in PDF format for free! Find your manual ZSR4174WE - Zonet and take your electronic device back in hand. On this page are published all the documents necessary for the use of your device. ZSR4174WE by Zonet.
USER MANUAL ZSR4174WE Zonet
USER MANUAL
Copyright Statement
Zonet is the registered trademark of Zonet Technology Inc. All the products and product names mentioned herein are the trademarks or registered trademarks of their respective holders. Copyright of the whole product as integration, including its accessories and software, belongs to Zonet Technology Inc. Without the permission of Zonet Technology Inc., any individual or party is not allowed to copy, plagiarize, imitate or translate it into other languages.
Table of Contents
Chapter 1 Introduction......1
1.1 Welcome....1
1.2 Features....1
1.3 Package contents....1
Chapter 2 Hardware Installation....2
2.1 Panel Layout....2
2.1.1 Top Panel....2
2.1.2 Rear Panel....3
2.1.3 Side Panel....3
2.2 System Requirements....4
2.3 Installation Environment Requirements....4
2.4 Hardware Connection....5
Chapter 3 Configure your Computer....6
3.1 TCP/IP Address Setting....6
3.1.1 Windows XP....6
3.1.2 Windows Vista/7....8
Chapter 4 Wireless AP Mode(Default)......11
4.1 Log in....11
4.2 Setup Wizard....12
4.3 LAN Settings....15
4.4 Wireless Settings....16
4.4.1 Basic Settings....16
4.4.2 Wireless Security Settings....18
4.4.2.1 Mixed WEP....18
4.4.2.2 WPA-Personal....19
4.4.2.3 WPA2-Personal....20
4.4.2.4 Mixed WPA/WPA2-Personal....21
4.4.3 Advanced Settings....22
4.4.4 WPS Settings....23
4.4.5 Access Control....24
4.4.6 Connection Status....25
4.5 System Tools....26
4.5.1 Time Settings.....26
4.5.2 Backup/Restore....27
4.5.3 Restore to Factory Default Settings....27
4.5.4 Upgrade....28
4.5.5 Reboot....28
4.5.6 Change Password....29
4.5.7 System Log....29
Chapter 5 Client+AP Mode....30
5.1 Setup Wizard....30
5.2 LAN Settings....33
5.3 Wireless Settings....33
5.4 System Tools....33
Chapter 6 WDS+AP Mode....34
6.1 Setup Wizard....34
6.2 LAN Settings....37
6.3 Wireless Settings....37
6.3.1 Basic Settings....38
6.3.2 Wireless Security Settings....38
6.3.3 Advanced Settings....38
6.3.4 WPS Settings....38
6.3.5 WDS Settings....39
6.3.6 Access Control....40
6.3.7 Connection Status....40
6.4 System Tools....41
Chapter 7 WISP Mode....42
7.1 Setup Wizard....42
7.2 Advanced Settings....48
7.2.1 LAN Settings....48
7.2.2 WAN Settings....49
7.2.2.1 PPPoE....49
7.2.2.2 Dynamic IP....50
7.2.2.3 Static IP....50
7.2.2.4 L2TP....51
7.2.2.5 PPTP....52
7.2.3 DNS Settings....53
7.3 Wireless Settings....54
7.4 DHCP Server....55
7.4.1 DHCP Server....55
7.4.2 DHCP Server List & Binding....55
7.5 Virtual Server....56
7.5.1 Port Range Forwarding....56
7.5.2 DMZ Settings....57
7.5.3 UPnP Settings....57
7.6 Security Settings....58
7.6.1 Client Filter....58
7.6.2 URL Filter....59
7.6.3 MAC Filter....60
7.6.4 Prevent Network Attack....61
7.6.5 Remote WEB Management....62
7.6.6 WAN Ping....63
7.7 Routing Settings....64
7.7.1 Routing Table....64
7.8 System Tools....65
7.8.1 Time Settings....65
7.8.2 DDNS....65
7.8.3 Backup/Restore....65
7.8.4 Restore to Factory Default Settings....65
7.8.5 Upgrade....66
7.8.6 Reboot....66
7.8.7 Change Password....66
7.8.8 System Log....66
Chapter 8 Wireless Router Mode....67
8.1 Setup Wizard....67
8.2 Advanced Settings....72
8.2.1 LAN Settings....72
8.2.2 WAN Settings....72
8.2.3 MAC Address Clone....72
8.2.4 DNS Settings....72
8.3 Wireless Settings....73
8.4 DHCP Server....73
8.5 Virtual Server....73
8.6 Security Settings....73
8.7 Routing Settings....73
8.8 System Tools....73
Appendix 1: Product Features & Specifications....74
Appendix 2: Troubleshooting....76
Chapter 1 Introduction
1.1 Welcome
Thank you for purchasing Zonet ZSR4174WE - 802.11n Portable Access Point/Router. ZSR4174WE is a portable wireless AP/Router with up to 150Mbps transmission rate. It supports five working modes: wireless AP, Client+AP, WDS+AP, WISP Router and Wireless Router. Having wireless AP and wireless Router function, ZSR4174WE is equipped with a "Mode" button to switch the modes to achieve different wireless access. In addition, the device can be powered by an alternative power supply through the USB port to establish wireless networks freely. It also supports 64/128-bit WEP, WPA, WPA2. The MAC address filter can protect your network against any malicious intrusion. Moreover, the Web management utility can benefit you to manage the device easily. ZSR4174WE is the best choice for people always moving and need to search a fast, secure, easy-to-use, and feature-rich wireless network.
1.2 Features
● Supports IEEE 802.11n, IEEE 802.11g, IEEE 802.11b standards
● Provide wireless AP, Client+AP, WDS+AP, WISP Router, Wireless Router mode
● Provide 1 WAN/LAN port, 10/100M Auto-Negotiation, supports Auto MDI/MDIX
● Provides 150Mbps receiving rate and 150Mbps sending rate
● Support basic DHCP server settings
- Support remote/local Web management.
● Support 64/128 bits WEP and WPA/WPA2 wireless security standard
- WPS (Wi-Fi Protected Setup) simplify the security setup and management of Wi-Fi® networks.
● External power adapter
1.3 Package Contents
- One ZSR4174WE
- One CD w/User Manual
● One Quick Installation Guide
● One RJ-45 Ethernet Cable - One USB Cable
● One Power Adapter
● One Protective Travel bag
Contact your local authorized reseller or the store purchased from for any items damaged and/or missing.
Chapter 2 Hardware Installation
2.1 Panel Layout
2.1.1 Top Panel

| LED Indicator | Action | Description |
| AP | ON ZR4174WE is in AP working mode | |
| OFF | AP mode off | |
| Client+AP | ON ZR4174WE is in Client+AP working mode | |
| OFF Client+AP mode off | ||
| WDS+AP | ON ZR4174WE is in WDS+AP working mode | |
| OFF WDS+AP mode off | ||
| WISP Router | ON ZR4174WE is in WISP Router working mode | |
| OFF WISP Router mode off | ||
| Wireless Router | ON Z$R4174WE is in Wireless Router working mode | |
| OFF Wireless Router mode off | ||
| WPS | Flashing | ZSR4174WE is negotiating with the client in WPS mode |
| OFF WPS off | ||
| LAN/WAN | ON | ZSR4174WE is well connected |
| Flashing | ZSR4174WE is transmitting data | |
Note: ZSR4174WE will be ready to use after all lights on the panel blink from left to right and LAN/WAN light starts to flash.
2.1.2 Rear Panel

natural_image
Illustration of a black USB router with an Ethernet port and a small USB symbol (no text or labels)| Item Name | Description |
| POWER | Use the USB cable applied with ZSR4174WE to connect with power adapter applied or USB port of PC |
| LAN/WAN | AP Mode: A LAN 10/100Mbps RJ45 port for connecting to the router/modem, local PC or switch/hub. |
| Client+AP Mode: A LAN 10/100Mbps RJ45 port for connecting to the router/modem, local PC or switch/hub. | |
| WDS+AP Mode: A LAN 10/100Mbps RJ45 port for connecting to the router/modem, local PC or switch/hub. | |
| WISP Router Mode: A LAN 10/100Mbps RJ45 port for connecting to the router/modem, local PC or switch/hub. | |
| Wireless Router mode: A WAN 10/100Mbps RJ45 port for connecting to the DSL/Cable Modem generally. |
2.1.3 Side Panel

| Button Name Description | |
| WPS/RESET | Wi-Fi Protection Setup / Factory Default Reset button. Press and hold the button until WPS indicator flashing (about 1 second) to enable WPS function. Press and hold the button for 7 seconds to restore all settings to factory defaults. |
| MODE Switching modes to | achieve different wireless access |
2.2 System Requirements
● Computer or network devices with wired or wireless network interface card
- TCP/IP protocol must be installed on each PC
- Web browser Microsoft Internet Explorer 6.0 or later
● Computer with an available USB2.0 slot
2.3 Installation Environment Requirements
- Do not in direct sunlight or near a heater or heating vent
- Do not in cluttered or crowded place. There should be at least 2 inches (5 cm) of clear space on all sides of ZSR4174WE
● Well ventilated (especially if it is in a closet) - Operating temperature: 0°C\~40°C
- Operating Humidity: 10%\~90%RH, Non-condensing
2.4 Hardware Connection
Note: Before connecting ZSR4174WE, be sure to power off your computer, DSL/Cable modem, and ZSR4174WE.
- Connect one end of the cable to your broadband router, PC or Switch/Hub port and connect the other end to the LAN port of ZSR4174WE.

- Power on ZSR4174WE by connecting one end of supplied USB cable to the power socket of ZSR4174WE and connecting the other end with power adapter applied to the wall socket or USB port of PC.

natural_image
Diagram showing connection between a network device via USB cable and a server rack (no text or symbols)- Power on your wireless device.
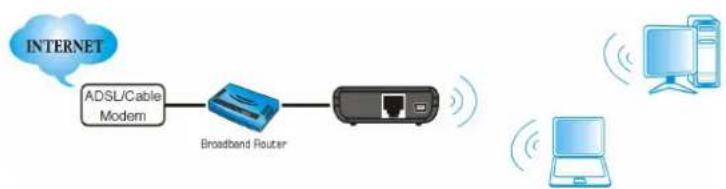
flowchart
graph LR
    A["ADSL/Cable Modem"] --> B["Broadband Router"]
    B --> C["Internet"]
    D["Computer"] -->|Wireless| E["Internet"]
    F["Computer"] -->|Wireless| G["Internet"]
-
Please check all LEDs on the top panel.
-
Corresponding Mode LED should be steadily on (Default Mode is AP mode)
- LAN/WAN LED should be flash if the computer / network device connected to the ZSR4174WE is powered on and correctly connected.
Note: If any LED you expected is not on, please recheck the cabling, or jump to Troubleshooting in User Manual for possible reasons and solution.
Chapter 3 Configure your computer
3.1 TCP/IP Address Setting
Default IP Address: 192.168.2.1
Default Subnet Mask: 255.255.255.0
3.1.1 Windows XP
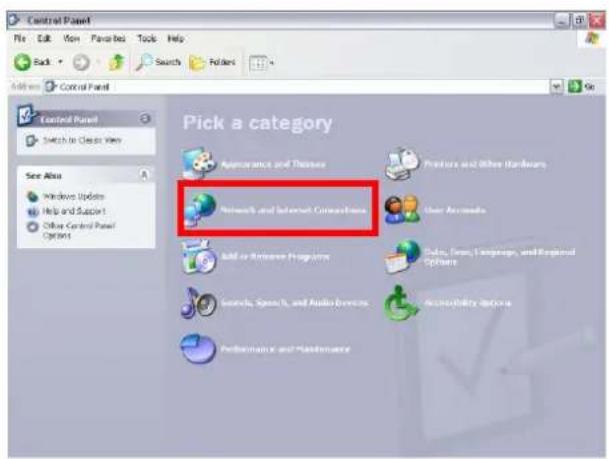
- Click Start → Control Panel → Network and Internet Connections
- Click Network Connections.
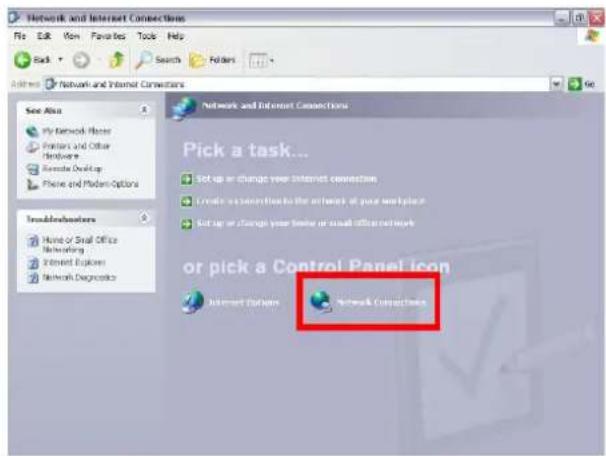
- Right click Local Area Connection and select Properties.

- Select Internet Protocol (TCP/IP) and click Properties.

- Select Obtain an IP address automatically and Obtain DNS server address automatically. Click OK to save the configurations.

- Or select Use the following IP address and enter the IP address as 192.168.2.X (X is from 2 to 253), Subnet mask. Of course, you need to input the DNS server address provided by your ISP. Otherwise, you can use the ZSR4174WE's default gateway as the DNS proxy server. Click OK to save the configurations.
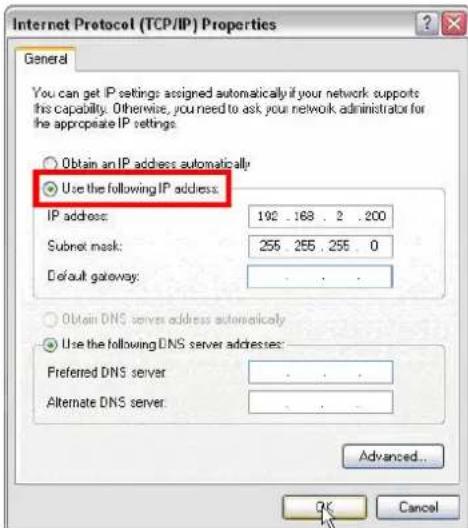
- Click OK to apply and return to Local Area Connection Properties page and then click OK to exit the setting window.
3.1.2 Windows Vista/7
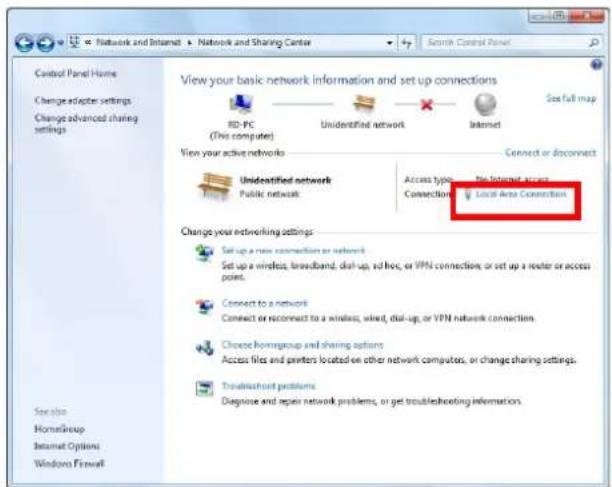
- Click Start → Control Panel → Network and Internet.

- Click Network and Sharing Center.

- Click Local Area Connection and then Local Area Connection Status window will pop-out.
-
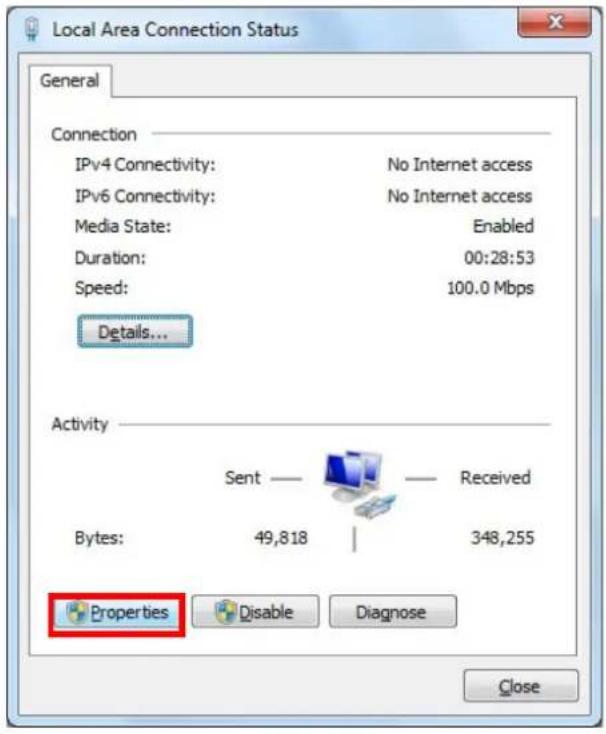
Click Properties from Local Area Connection Status.
-
Select Internet Protocol Version 4 (TCP/IPv4) and click Properties.
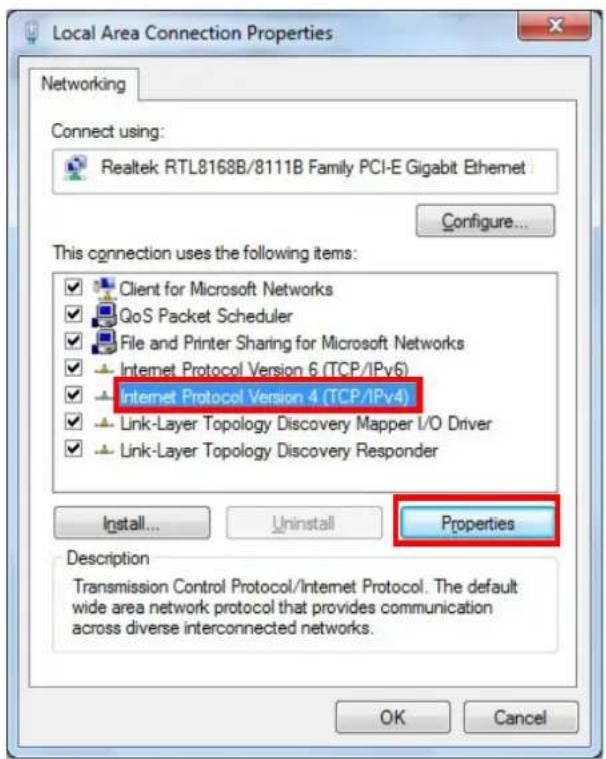
- Select Obtain an IP address automatically and Obtain DNS server address automatically. Click OK to save the configurations.

- Or select Use the following IP address and enter the IP address as 192.168.2.X (X is from 2 to 253), Subnet mask. Of course, you need to input the DNS server address provided by your ISP. Otherwise, you can use the ZSR4174WE's default gateway as the DNS proxy server. Click OK to save the configurations.

- Click OK to apply and return to Local Area Connection Properties page and then click OK to exit the setting window.
Chapter 4 Wireless AP Mode (Default)
4.1 Log in
This section is showing you how to configure your new ZSR4174WE through the Web-based Configuration Utility.
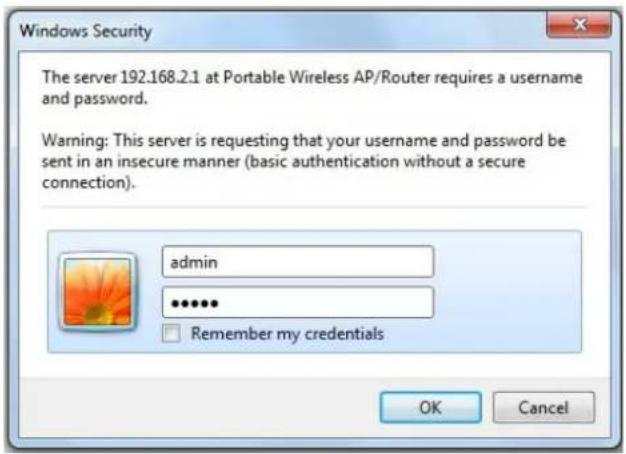
- Open an Internet Explorer, type 192.168.2.1 in the address bar, and then press Enter.
- Input user name and password and then press OK.
Default User Name: admin
Default Password: admin
- After login successfully, home page will be displayed.
4.2 Setup Wizard
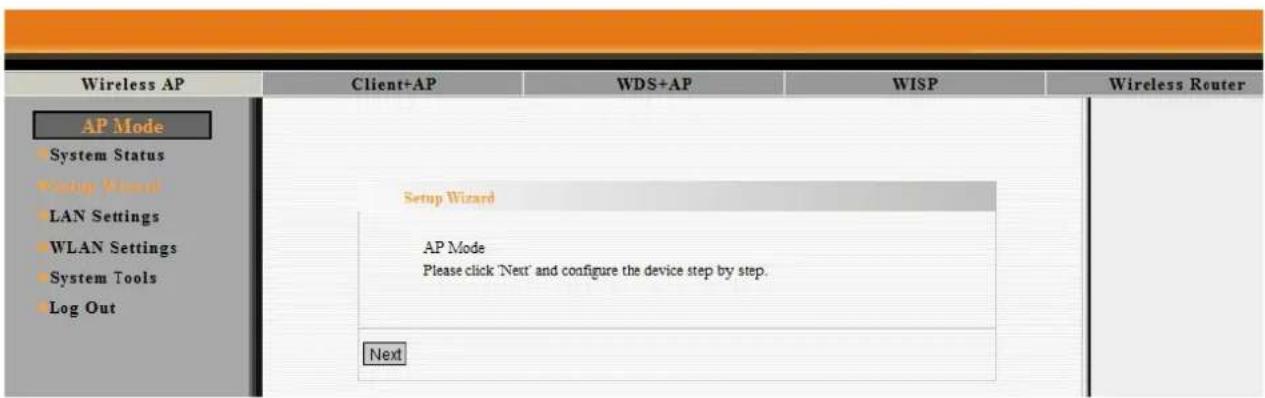
Default mode of ZSR4174WE is AP Mode.
- When Setup Wizard appears, click Next to continue.
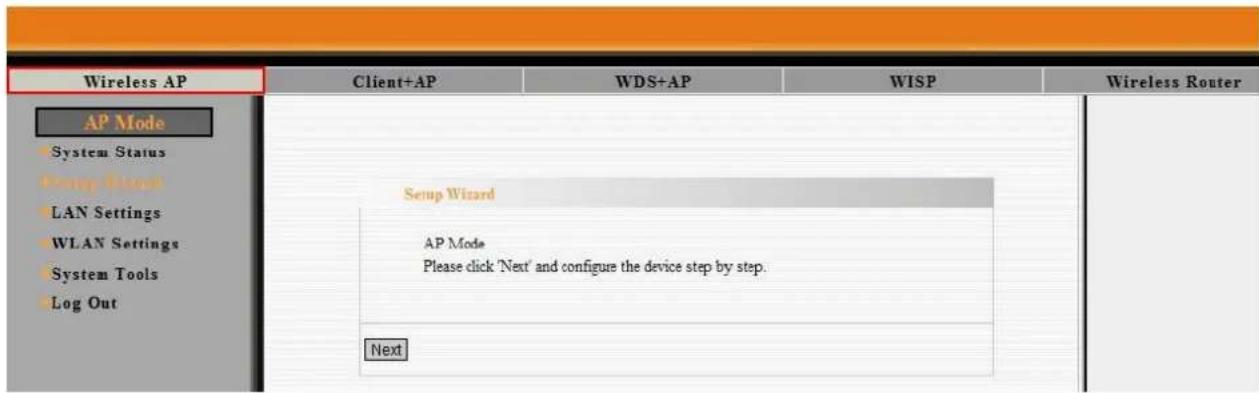
- Configure Wireless Basic Settings, and then click Next.
For more detail, please refer to 4.4.1 Basic Settings.

- Configure Wireless Security Settings, and then click Next. For more detail, please refer to 4.4.2 Wireless Security Settings.

- Click Apply and ZSR4174WE will reboot automatically to activate AP mode.

In AP mode, ZSR4174WE will act as a central hub for different wireless LAN clients. For example, when traveling to a hotel that has high-speed internet access, you can connect to the internet through ZSR4174WE which is connected to an Ethernet cable in the room.

flowchart
graph LR
    A["Cable/DSL Modem"] --> B["Broadband Router"]
    B --> C["11n Wireless AP/Router ZSR4174WE"]
    C --> D["Desktop with PCI Adapter ZEW1642S"]
    C --> E["Notebook with USB Adapter ZEW2546"]
    C --> F["Notebook with PCMCIA Adapter ZEW1542"]
4.3 LAN Settings

- MAC Address: ZSR4174WE's physical MAC address on your local network is unchangeable.
-
IP Mode: ZSR4174WE provides two IP modes:
-
Static IP: Fill the network address information from your ISP in the IP Address, Subnet Mask, Gateway and Primary DNS server fields
- Dynamic IP: Adjust the connection properties to obtain an IP address and DNS sever automatically in Internet protocol.
- IP Address: ZSR4174WE's LAN IP address (not your PC's IP address). Once you modify the IP address, you need to remember it for the Web-based Utility login next time. Default value is 192.168.2.1.
- Subnet Mask: ZSR4174WE's subnet mask for measurement of the network size. Default value is 255.255.255.0.
- Default Gateway: Enter the gateway provided by your ISP.
● Primary DNS server: Enter the Primary DNS server provided by your ISP. - Secondary DNS server: Enter the second address if your ISP provides, which is optional.
- Host name: Enter the host name which is optional.
Note: If the IP address changed, the login IP address to the Web-based management interface will change correspondingly.
4.4 Wireless Settings
4.4.1 Basic Settings
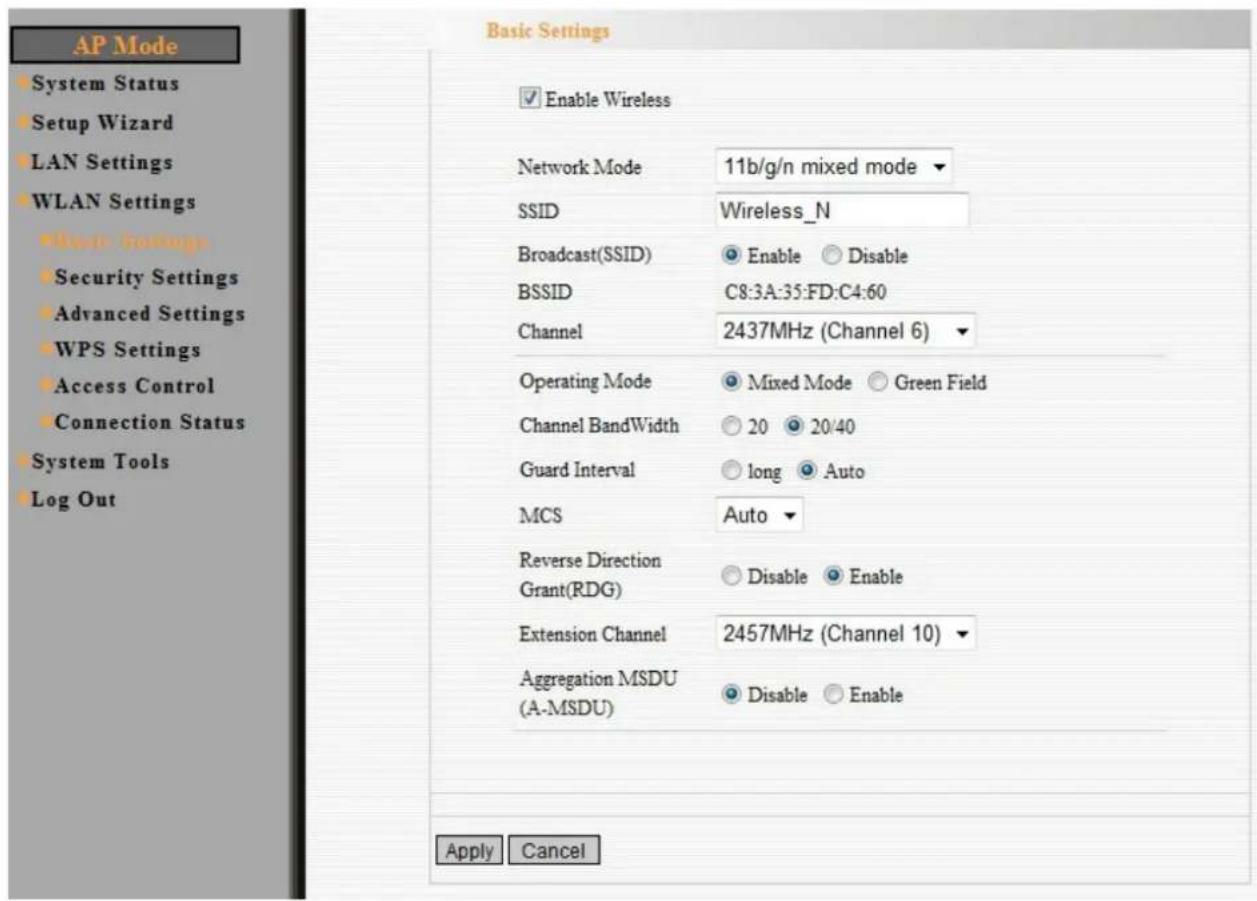
- Network Mode: Supports 11b, 11g, 11b/g mixed, 11b/g/n mixed modes. Default value is 11b/g/n mixed mode.
- SSID: Main Service Set Identifier. It's the name of your wireless network. Default value is Wireless_N.
● Broadcast (SSID): Decide if ZSR4174WE will broadcast its own ESSID or not.
● BSSID: It is a 48bit identity used to identify a particular BSS (Basic Service Set) within an area. In Infrastructure BSS networks, the BSSID is the MAC address of the AP
● Channel: Select the channel used for wireless communication from drop-down list. Available channel numbers are 1 to 13 for European countries, 1 to 11 for USA.
● Operating Mode: Supports two modes:
Mixed Mode: In this mode packets are transmitted with a preamble compatible with the legacy 802.11a/g – the legacy Short Training Field(STF), the legacy Long Training Field(LTF) and the legacy signal field are transmitted so they can be decoded by legacy 802.1a/g devices. The rest of the packet has a new format. In Mixed Mode the receiver shall be able to decode both the Mixed Mode packets and legacy packets.
◆ Green Mode: It is an optional mode only for 802.11n. In this mode high throughput packets are transmitted without a legacy compatible part. In Green Mode the receiver shall be able to decode both Green Field mode packets, Mixed Mode packets and legacy format packets.
- Channel Bandwidth: Select the channel bandwidth from 20M or 20/40M to improve the wireless performance.
- Guard Interval: In telecommunications, guard intervals are used to ensure that distinct transmissions do not interfere with one another. These transmissions may belong to different users (as in TDMA) or to the same user (as in OFDM). The purpose of the guard interval is to introduce immunity to propagation delays, echoes and reflections, to which digital data is normally very sensitive.
● MCS: Transmission Speed. Usually, select Auto. - Reverse Direction Grant(RDG): Default value is Enable. Permitting receiving response packets while sending packets enables speeding up.
- Extension Channel: To increase data throughput of wireless network, the extension channel range is used in 11n mode.
- Aggregation MSDU(A-MSDU): Default value is Disable. In a combination of many transmission data, a large number of data can be sent by one transmission operation.
4.4.2 Wireless Security Settings
Security Settings contains seven Authentication Types, including Disable, Open, Shared, Mixed WEP, WPA-Personal, WPA2-Personal, and Mixed WPA/WPA2-Personal.

4.4.2.1 Mixed WEP
WEP (Wired Equivalent Privacy) is an encryption method used to protect your wireless data communications. WEP uses a combination of 64-bit or 128-bit keys to provide access control to your network and encryption security for every data transmission.

- Default Key: You can set up to four sets of WEP key, and you can decide which key is being used by default here.
- WEP Key1, 2, 3, 4: Input WEP key characters here, the number of characters must be the same as the number displayed at "Key Format" field. You can use any alphanumerical characters (0-9, a-z, and A-Z) if you select "ASCII" key format, and if you select "Hex" as key format, you can use characters 0-9, a-f, and A-F. You must enter at least one encryption key here, and if you entered multiple WEP keys, they should not be same with each other.
4.4.2.2 WPA-Personal
Wi-Fi Protected Access (WPA) is an advanced security standard. It uses TKIP and AES to change the encryption key frequently.

● WPA Algorithms: Select one encryption type, AES, TKIP or TKIP&AES.
● Pass Phrase: Enter the key which must have 8-63 ASCII characters.
● Key Renewal Interval: Specifies the timer the WPA key must changes. The change is done automatically between the server and the client.
4.4.2.3 WPA2-Personal
The WPA2 is a stronger version of WPA.
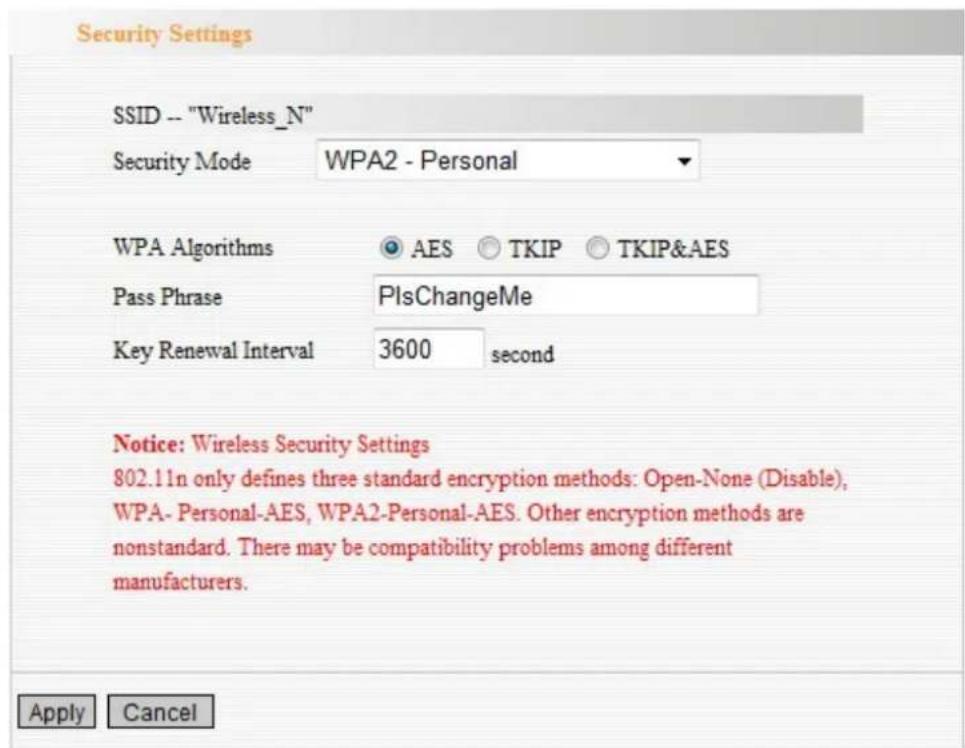
- WPA Algorithms: Select one encryption type, AES, TKIP or TKIP&AES.
● Pass Phrase: Enter the key which must have 8-63 ASCII characters.
● Key Renewal Interval: Specifies the timer the WPA key must changes. The change is done automatically between the server and the client.
4.4.2.4 Mixed WPA/WPA2-Personal

● WPA Algorithms: Select one encryption type, AES, TKIP or TKIP&AES.
● Pass Phrase: Enter the key which must have 8-63 ASCII characters.
● Key Renewal Interval: Specifies the timer the WPA key must changes. The change is done automatically between the server and the client.
4.4.3 Advanced Settings
ZSR4174WE provides some advanced control of wireless parameters.

- BG protection Mode: Auto by default. You can also select On or Off.
- Basic Data Rates: For different requirement, you can select one of the suitable Basic Data Rates. Default value is (1-2-5.5.-11Mbps).
- Beacon Interval: Set the beacon interval of wireless radio. Do not modify default value if you don't know what it is, default value is 100.
- Fragment Threshold: Set the Fragment threshold of wireless radio. Do not modify default value if you don't know what it is, default value is 2346.
- RTS Threshold:Set the RTS threshold of wireless radio. Do not modify default value if you don't know what it is, default value is 2347.
- TX Power: You can set the output power of wireless radio. Unless you're using ZSR4174WE in a really big space, you may not have to set output power to 100%. This will enhance security (malicious / unknown users in distance will not be able to reach your ZSR4174WE).
- WMM Capable: It will enhance the data transfer performance of multimedia contents when they're being transferred over wireless network. If you don't know what it is / not sure if you need it, it's safe to set this option to 'Enable', default value is Enable.
● APSD Capable: It is used for auto power-saved service. The default is Disabled.
4.4.4 WPS Settings
Wi-Fi Protected Setup (WPS) is the simplest way to build connection between wireless network clients and ZSR4174WE. You don't have to select encryption mode and input a long encryption passphrase every time when you need to setup a wireless client, you only have to press a button on wireless client and ZSR4174WE, and the WPS will do the rest for you.

● WPS Setting: Select it to enable or disable WPS function. The default is Enabled.
● WPS Mode: Supports two ways to configure WPS settings:
PBC) and PIN code.
◆ PBC(Push-Button Configuration): If you want to use PBC, you have to push a specific button on the wireless client to start WPS mode, and switch ZSR4174WE to WPS mode too. You can push WPS button of ZSR4174WE, or click PBC button in the web configuration interface to enable WPS
Note: Press WPS button of ZSR4174WE for one second and WPS indicator will blinking for 2 minutes. During the blinking time, WPS connection is enabled. At present, the WPS supports up to 32 clients access. Two minutes later, the WPS indicator will be off, which means WPS connection is completed.
◆ PIN: if you want to use PIN code, you have to know the PIN code of wireless client and switch it to WPS mode, then provide the PIN code of the wireless client you wish to connect to ZSR4174WE.
● WPS Summary: Shows the current status of WPS.
◆ WPS Current Status: Idle means WPS in idle state. Start MSC process means the process has been started and waits for being connected.
Configured means the negotiation is successful between server and clients.
◆ WPS Configured: yes means WPS feature is enabled and goes into effect. No means it is not used. Usually the AP-security has been enabled, here will displayed No.
◆ WPS SSID: Show the main SSID set by WPS.
◆ WPS Auth. Mode: The authorization mode deployed by WPS.
◆ WPS Encrypt Type: The encryption type used by WPS.
◆ WPS key: The effective key generated by ZSR4174WE automatically.
◆ AP PIN: The PIN code used by default.
- Reset OOB: When clicking the button, the WPS client will be idle state, and WPS indicator will be turned off. ZSR4174WE will not respond the WPS client's requests.
4.4.5 Access Control
This function will help you to prevent unauthorized users from connecting to ZSR4174WE; only those wireless devices who have the MAC address you assigned here can gain access to your ZSR4174WE. You can use this function with other security measures described in previous section, to create a safer wireless environment.
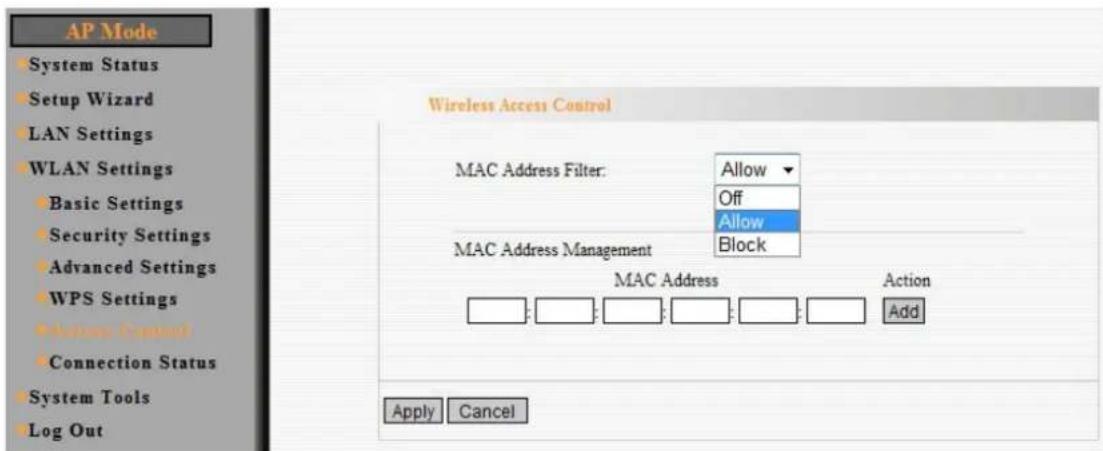
- MAC Address Filter: Select Off to mal-function MAC address; Block to prevent the MAC addresses in the list from accessing the wireless network; Allow to allow the MAC address in the list to access the wireless network.
- MAC Address: To specify an external IP address, please add the MAC address manually and click Add.
- MAC Address List: The added MAC addresses are listed here. Click Delete to delete the filter management for this MAC address.
4.4.6 Connection Status
Click Refresh to update the wireless connection information.
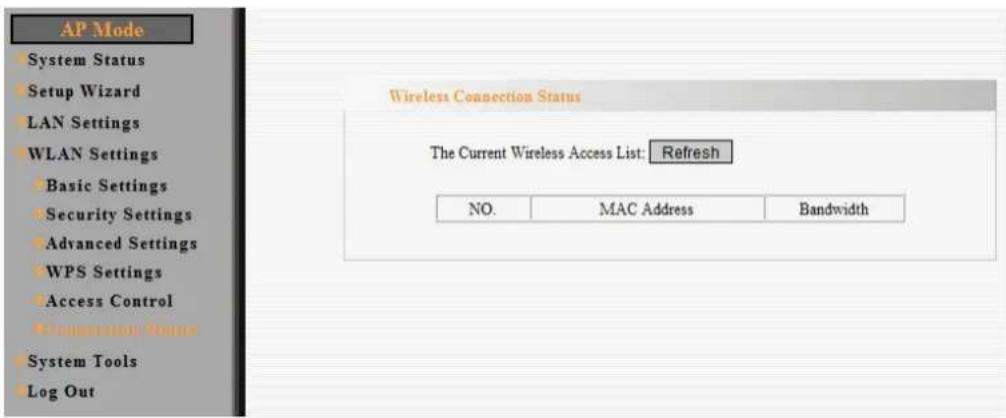
- MAC Address: Shows the connecting PC's MAC address.
● Bandwidth: Displays the channel bandwidth of the wireless client.
4.5 System Tools
4.5.1 Time Settings
This function is to select the time zone for your location. If you turn off ZSR4174WE, the time settings will disappear. However, ZSR4174WE will automatically obtain the GMT time again once it access to the Internet.
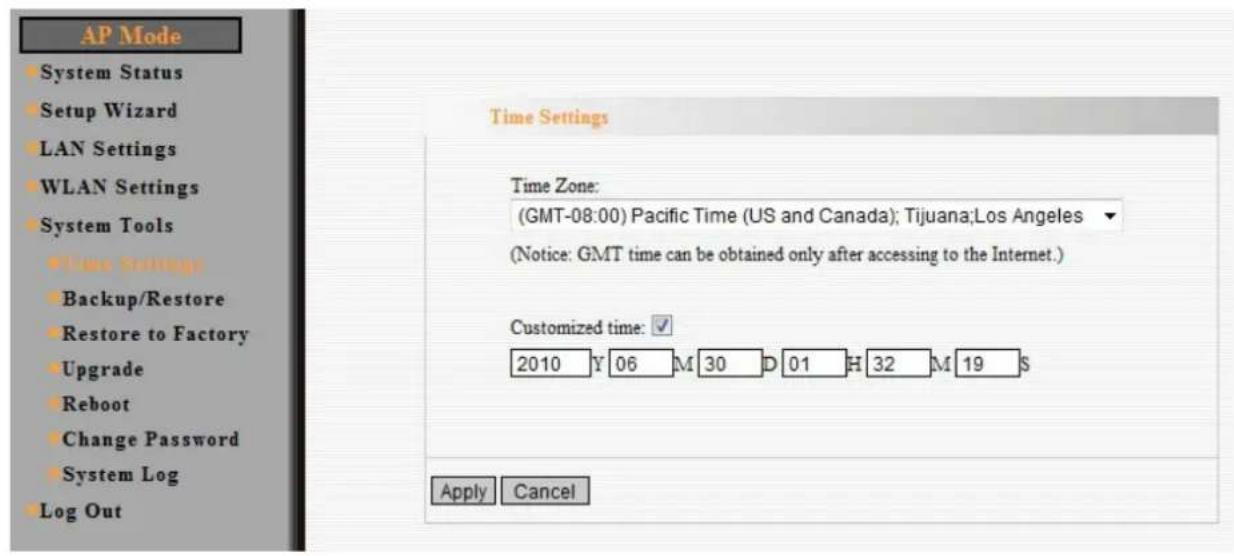
● Time Zone: Select your time zone from the drop-down menu.
- Customized time: Select the checkbox and input the time you customize.
- Backup: Click to back up ZSR4174WE's configurations.
- Browse: Click to browse the path where you want to save files.
- Restore: Click to restore ZSR4174WE's configurations.
4.5.3 Restore to Factory Default Settings

- Restore to Factory Default Settings: Click to restore to default settings.
Factory Default Settings:
User Name: admin
Password: admin
IP Address: 192.168.2.1
Subnet Mask: 255.255.255.0
NOTE: After restoring to default settings, please reboot ZSR4174WE so the settings will take effect.
4.5.4 Upgrade
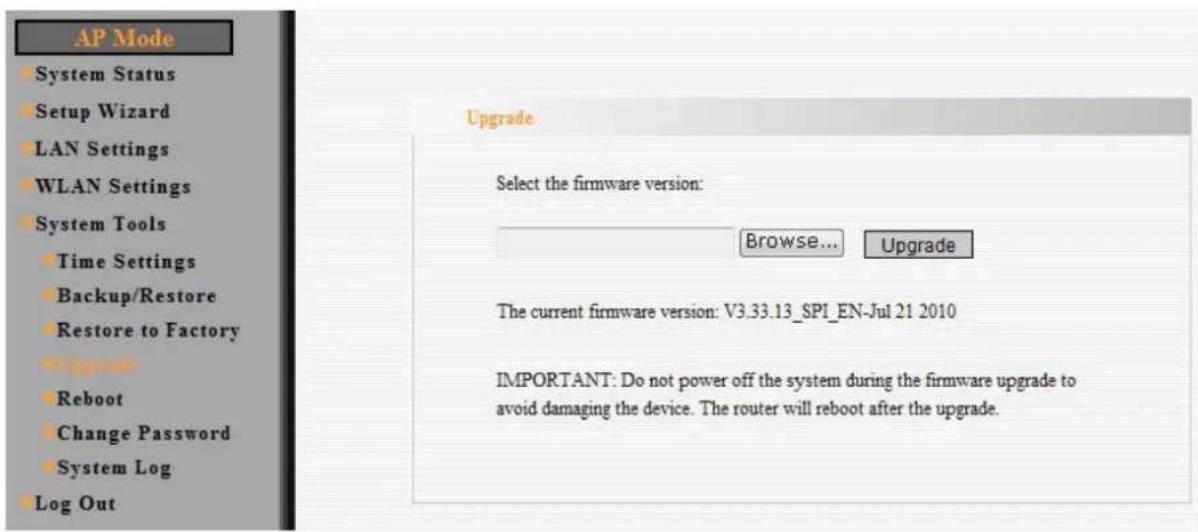
- Browse: Click to browse the path to the upgraded firmware files.
- Upgrade: Click to start upgrade firmware.
IMPORTANT: Do not power off the system during the firmware upgrade to avoid damaging. ZSR4174WE will reboot automatically after the upgrade.
4.5.5 Reboot

● Reboot the router: Click to reboot ZSR4174WE.
4.5.6 Change Password
The new password should be less than 14 characters.

- User Name: Enter a new user name.
- Old Password: Enter the old password.
- New Password: Enter a new password.
- Re-enter to Confirm: Re-enter to confirm the new password.
NOTE: It is highly recommended to change the password to secure your network and ZSR4174WE.
4.5.7 System Log
If the log is over 150 records, it will clear them automatically.
![AP Mode System Status Setup Wizard LAN Settings WLAN Settings System Tools Time Settings Backup/Restore Restore to Factory Upgrade Reboot Change Password Log Out System Log Page 1 content 1 2010-06-30 00:00:01 System wins started. 2 2010-06-30 00:00:01 System!=system start. [1] Refresh Clear](/content/2026/05/1067966/images/9e9888f81de5f032a3601b7b1246e36c726ecfbe4a35001ed2b6c2b7afb669db.jpg)
- Refresh: Click to update the log.
- Clear: Click to clear the current shown log.
Chapter 5 Client+AP Mode
5.1 Setup Wizard
- Select Client+AP on top banner and then select Setup Wizard on the left list. Click Next to continue.

- Configure Client Settings, and then click Next.
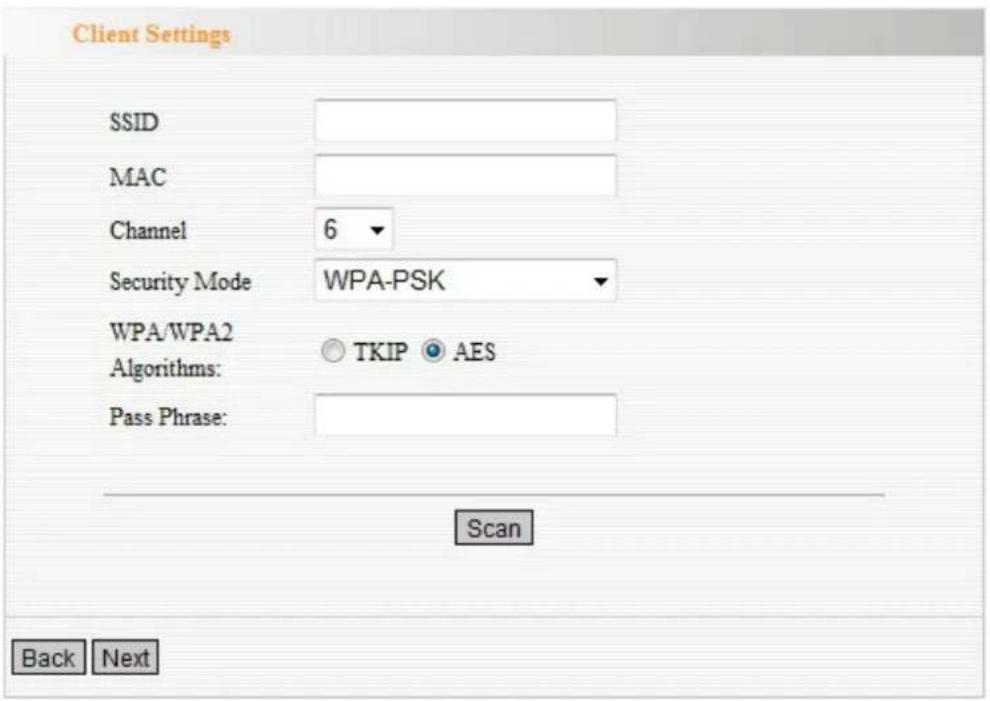
- SSID: Input the SSID of the AP you want to connect. Or click Scan button to select an AP you want to connect.
- MAC: Input the MAC address of the AP you want to connect. Or click Scan button to select an AP you want to connect.
-
Channel: Select the channel used for wireless communication from drop-down list. Available channel numbers are 1 to 13 for European countries, 1 to 11 for USA.
● Security Mode: Select from None, WEP, WPA-PSK, WPA2-PSK.
● Pass Phrase: Enter the key which must have 8-63 ASCII characters. -
Configure Wireless Basic Settings, and then click Next. For more detail, please refer to 4.4.1 Basic Settings.

- Configure Wireless Security Settings, and then click Next. For more detail, please refer to 4.4.2 Wireless Security Settings.
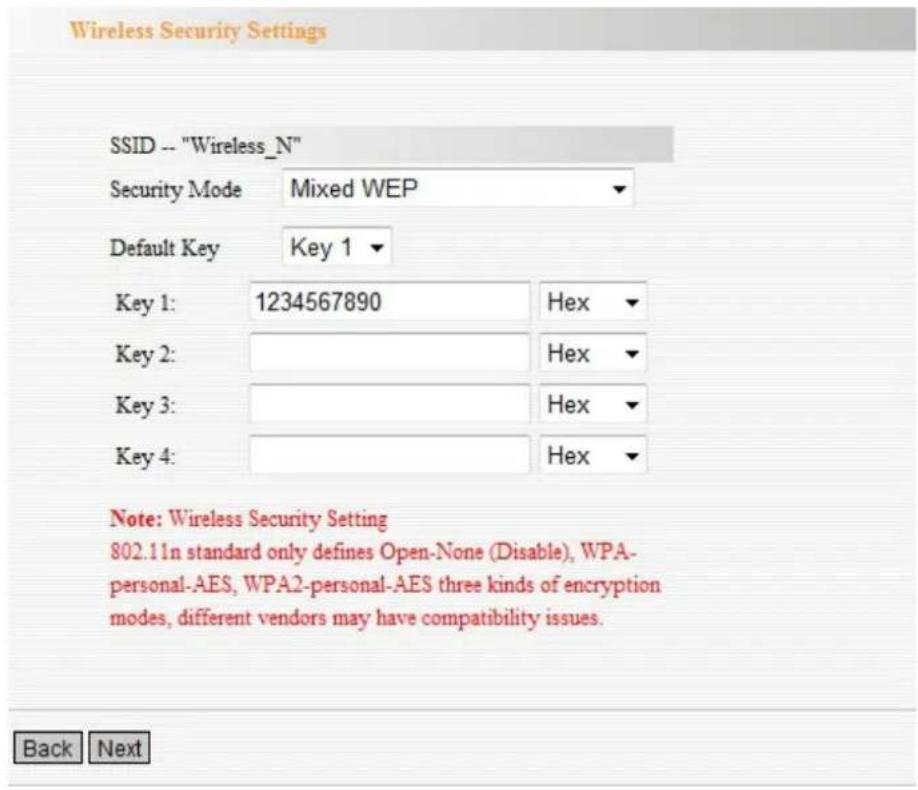
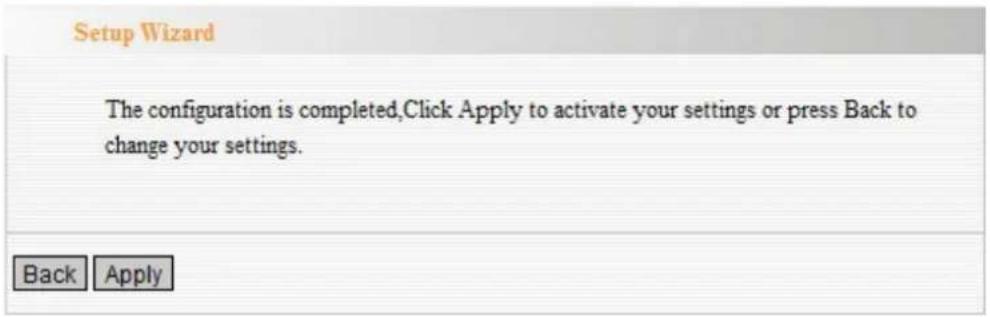
- Click Apply and ZSR4174WE will reboot automatically to activate Client+AP mode.
NOTE: Two access points must use the same channel number, extension channel, and security setting.
- After activating Client+AP mode successfully, web page will be displayed as below.

In Client+AP mode, ZSR4174WE associates with another AP within its range. ZSR4174WE behaves like a wireless network adapter.
Figure below shows the Client+AP mode ZSR4174WE as a wireless client. Connect the LAN port of the ZSR4174WE with Ethernet interface of the wired network.

flowchart
graph LR
    A["INTERNET"] --> B["Cable/DSL Modem"]
    B --> C["Wireless Broadband Router ZSR4154WS"]
    C --> D["Switch Hub"]
    D --> E["Laptop"]
    D --> F["Laptop"]
5.2 LAN Settings
For more detail, please refer to 4.3 LAN Settings.
5.3 Wireless Settings
For more detail, please refer to 4.4 Wireless Settings.
5.4 System Tools
For more details, please refer to 4.5 System Tools.
Chapter 6 WDS+AP Mode
6.1 Setup Wizard
- Select WDS+AP on top banner and then select Setup Wizard on the left list. Click Next to continue.

- Configure WDS Settings, and then click Next.

NOTE: Maximum four (4) ZSR4174WE is allowed to connect in WDS+AP mode.
● AP MAC: Input the MAC address of another wireless router or AP with WDS function. Or click Scan button to select the AP you want to connect.
- Channel: Select the channel used for wireless communication from drop-down list. Available channel numbers are 1 to 13 for European countries, 1 to 11 for USA.
● Encrypt Type: Select from None, WEP, TKIP, AES.
- Configure Wireless Basic Settings, and then click Next. For more detail, please refer to 4.4.1 Basic Settings.

- Configure Wireless Security Settings, and then click Next. For more detail, please refer to 4.4.2 Wireless Security Settings.

- Click Apply and ZSR4174WE will reboot automatically to activate WDS+AP mode.

NOTE: Two access points must use the same channel number, extension channel, and security setting.
- After activating WDS+AP mode successfully, web page will be displayed as below.

In WDS+AP mode, ZSR4174WE will work similar as WDS mode. It supports the wireless bridge between the two wired networks; the connection of wireless network is also supported at the same time.

flowchart
graph TD
    A["Switch Hub"] -->|WDS| B["PCMCIA Adapter ZEW1542"]
    B -->|WDS| C["Switch Hub"]
    C -->|WDS| D["PCMCIA Adapter ZEW1542"]
    D -->|WDS| E["Switch Hub"]
    E -->|WDS| F["PCMCIA Adapter ZEW1542"]
    F -->|WDS| G["Switch Hub"]
    G -->|WDS| H["PCMCIA Adapter ZEW1542"]
6.2 LAN Settings
For more detail, please refer to 4.3 LAN Settings.
6.3 Wireless Settings
6.3.1 Basic Settings
For more detail, please refer to 4.4.1 Basic Settings.
6.3.2 Wireless Security Settings
For more detail, please refer to 4.4.2 Wireless Security Settings.
6.3.3 Advanced Settings
For more detail, please refer to 4.4.3 Advanced Settings.
6.3.4 WPS Settings
For more detail, please refer to 4.4.4 WPS Settings.
6.3.5 WDS Settings
WDS (Wireless Distribution System) is used to expand wireless coverage area. ZSR4174WE provides three modes: Lazy, Bridge and Repeater.
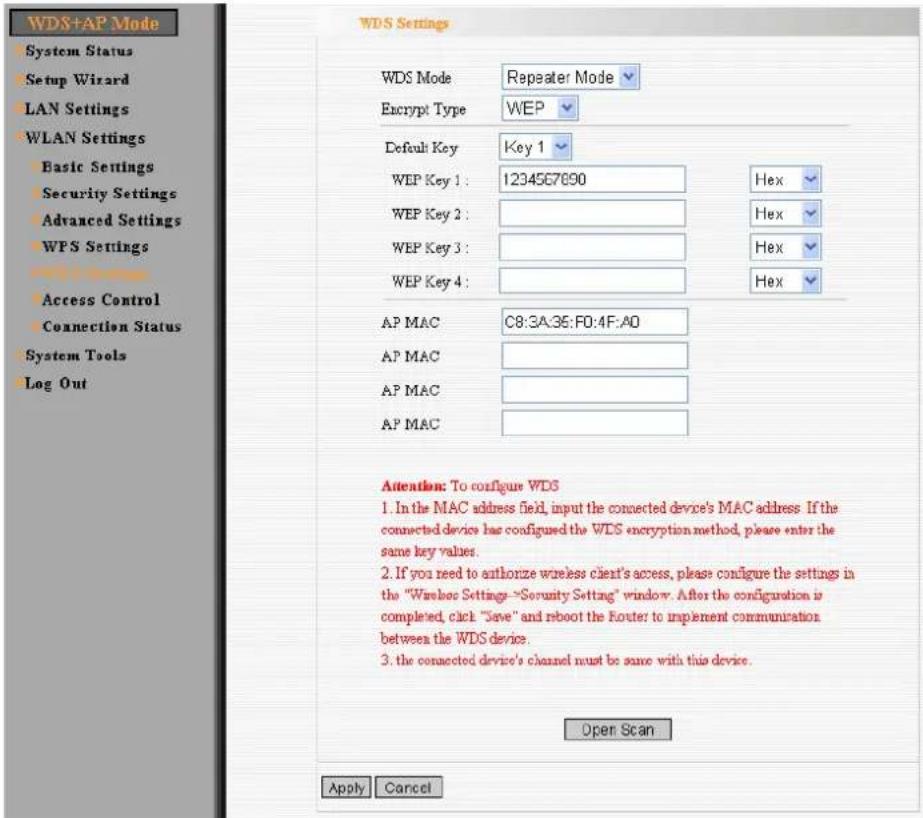
- WDS Mode:
Lazy Mode: You need to configure ZSR4174WE's BSSID into another device, but don't need to input another device's BSSID in ZSR4174WE, and they will connect together automatically.
◆ Bridge Mode: You can wirelessly connect two or more wired networks via this mode. In this mode, you need to add the Wireless MAC address of the connecting device into ZSR4174WE's AP MAC address table or select one from the scanning table. At the same time, the connecting device should be in Lazy, Repeater or Bridge mode.
◆ Repeater Mode: You can select the mode to extend the distance between the two WLAN devices. Functioning as a WDS repeater, ZSR4174WE connects to both a client card as an AP and to another AP. In typical repeater applications, APs connecting to other APs equipped with WDS functionality must also support WDS. In this mode, you need to add the MAC address of the connecting device into ZSR4174WE's AP MAC address table and the connecting client should be in Lazy, Repeater or client mode.
- Encrypt Type: Select from WEP, TKIP or AES for security here.
● Pass phrase: Enter the key, the key format according to encryption you selected.
● AP MAC: Input the MAC address of another wireless router. Maximum four (4) ZSR4174WE is allowed to connect in WDS mode.
NOTE: Two wireless routers must use the same bandwidth, channel number, and security setting. Apply the settings and reboot ZSR4174WE to activate it.
6.3.6 Access Control
For more detail, please refer to 4.4.5 Access Control.
6.3.7 Connection Status
For more detail, please refer to 4.4.6 Connection Status.
6.4 System Tools
For more details, please refer to 4.5 System Tools.
Chapter 7 WISP Mode
7.1 Setup Wizard
- Select WISP on top banner and then select Setup Wizard on the left list. Click Next to continue.

- Configure WISP Settings, and then click Next.

- SSID: Input the SSID of the AP you want to connect. Or click Scan button to select an AP you want to connect.
- MAC: Input the MAC address of the AP you want to connect. Or click Scan button to select an AP you want to connect.
-
Channel: Select the channel used for wireless communication from drop-down list. Available channel numbers are 1 to 13 for European countries, 1 to 11 for USA.
● Security Mode: Select from None, WEP, WPA-PSK, WPA2-PSK.
● Pass Phrase: Enter the key which must have 8-63 ASCII characters. -
Select one Internet connection type you're using in Connection Method, and then click Next.

a. Dynamic IP (via DHCP)
The default method is Dynamic IP. It means your IP address keeps changing every time you connect. You do not need to enter the information. Click Next to continue directly.

b. Static IP
Fill the network address information from your ISP in the IP Address, Subnet Mask, Gateway and Primary DNS server fields and click Next.
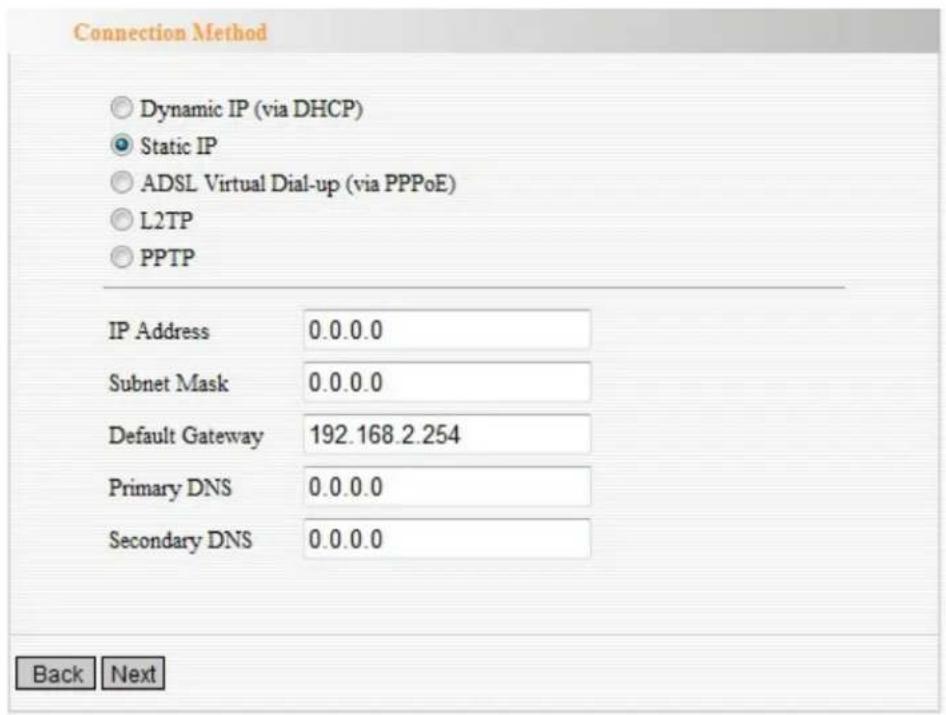
c. ADSL Virtual Dial-up (via PPPoE)
Enter the User Name and Password provided by your ISP, and click Next.

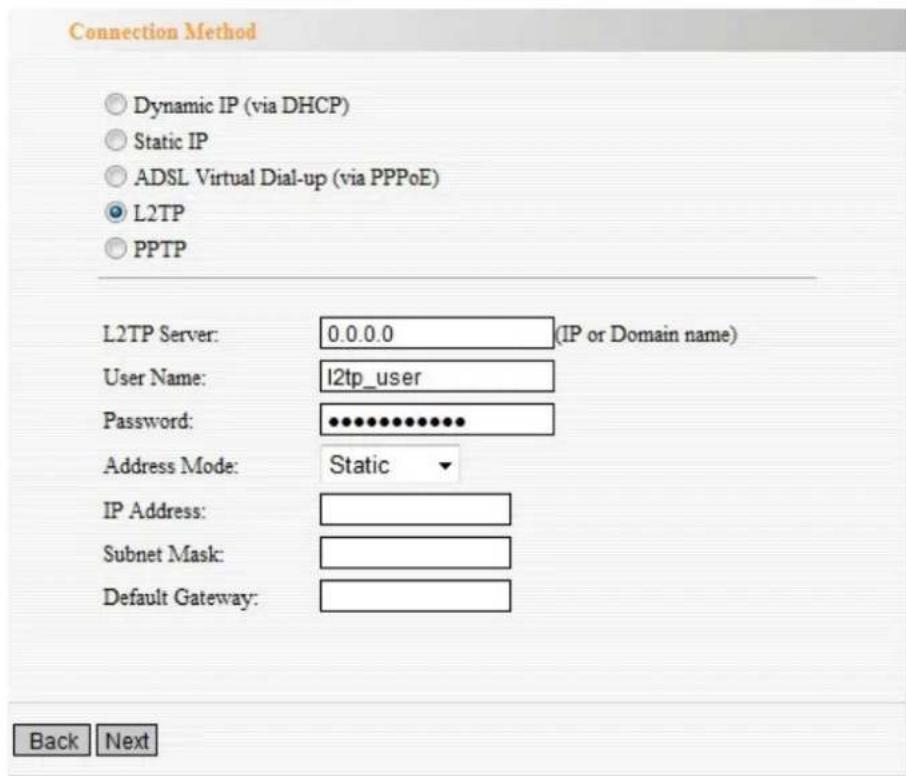
d. L2TP
Enter the User Name and Password provided by your ISP, and click Next.
L2TP(Layer 2 Tunneling Protocol) provides two address modes.
- Dynamic IP: If the L2TP offered by your ISP is Dynamic IP, please select Dynamic IP.
- Static IP: Please fill in the parameters provided by your ISP.
e. PPTP
Enter the Server IP Address, User Name, and Password provided by your ISP, and click Next.
PPTP(PP Tunneling Protocol) provides two address modes.
- Dynamic IP: If the PPTP offered by your ISP is Dynamic IP, please select Dynamic IP.
- Static IP: Please fill in the parameters provided by your ISP.

- Configure Wireless Basic Settings, and then click Next.
For more detail, please refer to 4.4.1 Basic Settings.

- Configure Wireless Security Settings, and then click Next.
For more detail, please refer to 4.4.2 Wireless Security Settings.
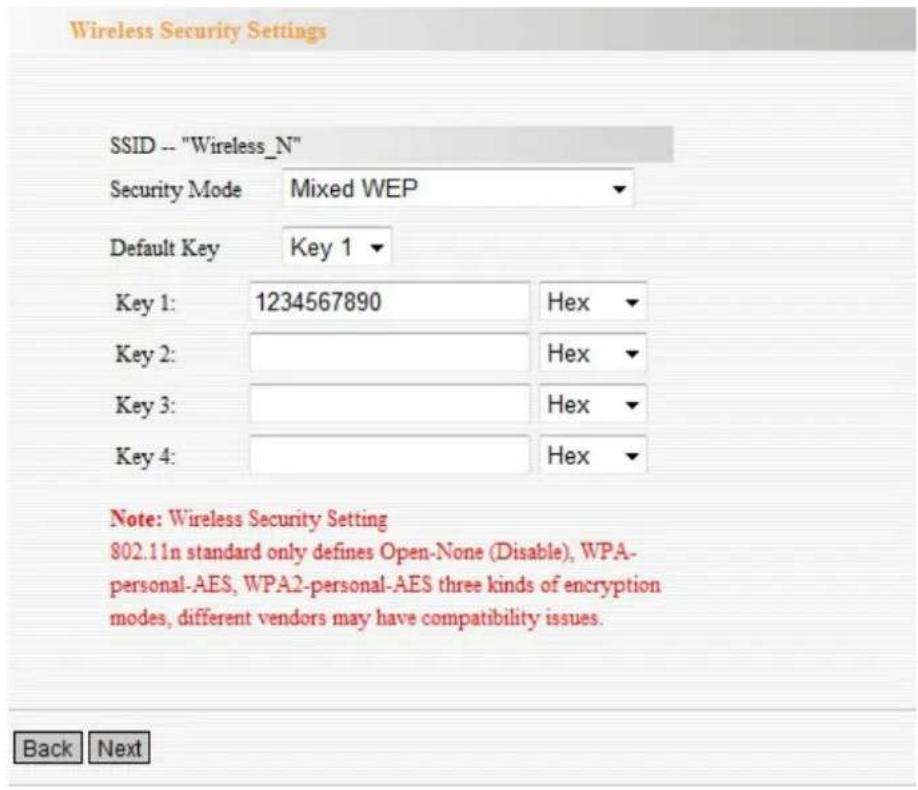
- Click Apply and ZSR4174WE will reboot automatically to activate WISP mode.

NOTE: Two access points must use the same channel number, extension channel, and security setting.
- After activating WISP mode successfully, web page will be displayed as below.
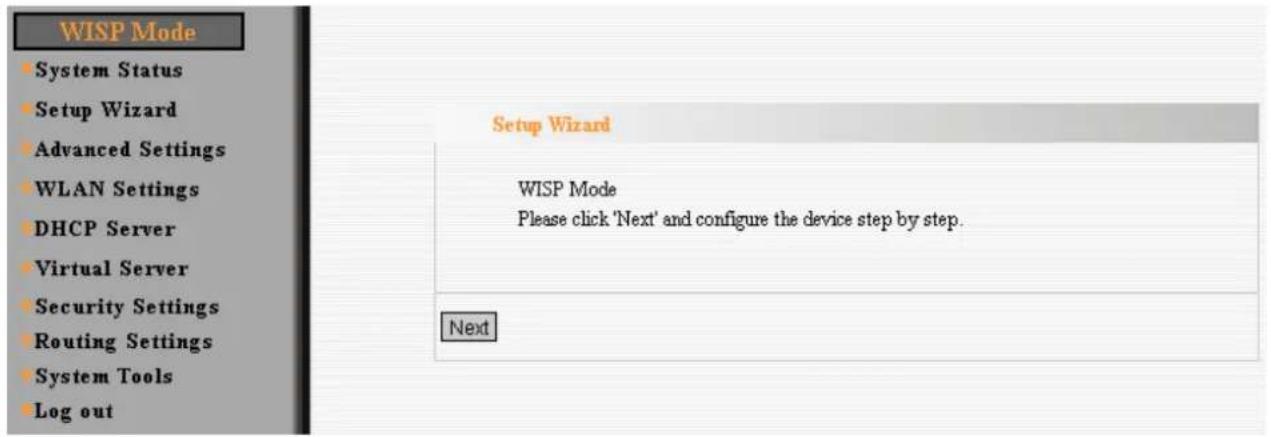
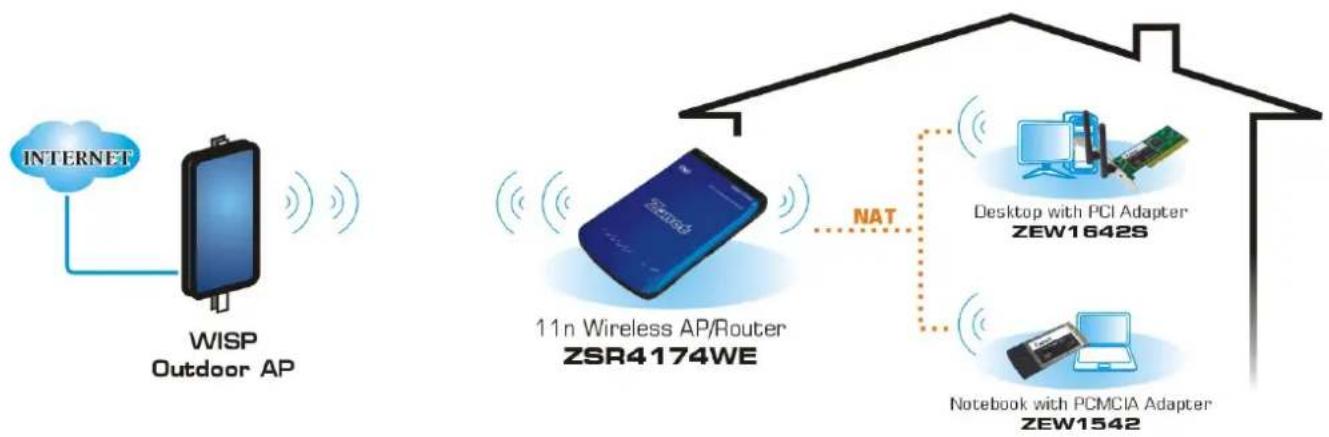
In WISP mode, ZSR4174WE will behave just the same as the Client mode for wireless function. However, router functions are added between the Wireless WAN side and the Ethernet LAN side. Therefore, the WISP subscriber can share the WISP connection without the need for extra router. The NAT is enabled and PCs in Ethernet ports share the same IP address assigned by DHCP function to ISP through wireless LAN.
flowchart
graph TD
    A["INTERNET"] --> B["WISP Outdoor AP"]
    B --> C["11n Wireless AP/Router ZSR4174WE"]
    C --> D["Desktop with PCI Adapter ZEW1642S"]
    C --> E["Notebook with PCMCIA Adapter ZEW1542"]
    C --> F["NAT"]
7.2 Advanced Settings
7.2.1 LAN Settings
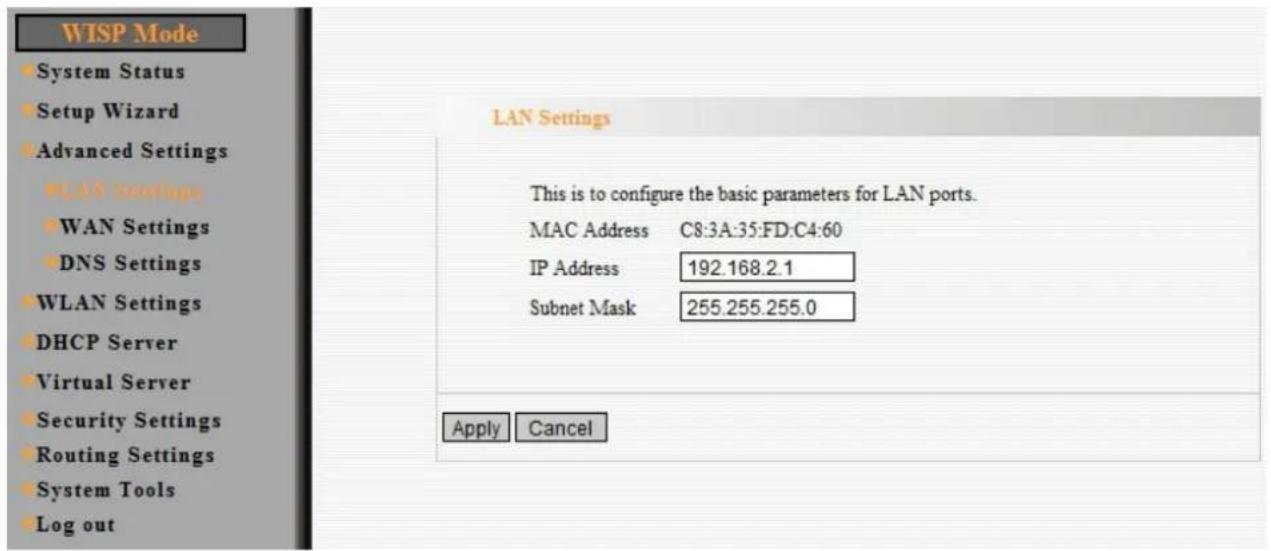
- MAC Address: ZSR4174WE's physical MAC address on your local network is unchangeable.
- IP Address: ZSR4174WE's LAN IP address (not your PC's IP address). Once you modify the IP address, you need to remember it for the Web-based Utility login next time. Default value is 192.168.2.1.
- Subnet Mask: ZSR4174WE's subnet mask for measurement of the network size. Default value is 255.255.255.0.
Note: If the IP address changed, the login IP address to the Web-based management interface will change correspondingly.
7.2.2 WAN Settings
7.2.2.1 PPPoE

- Connection Mode: Show your current connection mode.
● Account: Provided by your ISP.
● Password: Provided by your ISP.
● MTU: Maximum Transmission Unit. It is the size of largest datagram that can be sent over a network. The default value is 1460. Do NOT modify it unless necessary. - Service Name: It is defined as a set of characteristics that are applied to a PPPoE connection. Enter it if provided. Do NOT modify it unless necessary.
● AC Name: Enter it if provided. Do NOT modify it unless necessary.
Internet Connection Option:
- Connect Automatically: Connect automatically to the Internet after rebooting system or connection failure.
- Connect Manually: Connect to the Internet by the user manually.
- Connect on Demand: Re-establish your connection to the Internet after the specific time (Max Idle Time). Zero means your Internet connection at all time. Otherwise, enter the minutes to be elapsed before you want to disconnect the Internet access.
- Connect on Fixed Time: Connect to the Internet during the time you fix when you have set the current time in Time Settings from System Tools.
7.2.2.2 Dynamic IP

● MTU: Maximum Transmission Unit. It is the size of largest datagram that can be sent over a network. The default value is 1500. Do NOT modify it unless necessary.
7.2.2.3 Static IP

- IP Address: Enter the WAN IP address provided by your ISP.
- Subnet Mask: Enter the WAN Subnet Mask.
● Gateway: Enter the WAN Gateway.
● Primary DNS Server: Enter the Primary DNS server provided by your ISP. - Secondary DNS Server: Enter the second address if your ISP provides, which is optional.
- MTU: Maximum Transmission Unit. It is the size of largest datagram that can be sent over a network. The default value is 1500. Do NOT modify it unless necessary.
7.2.2.4 L2TP
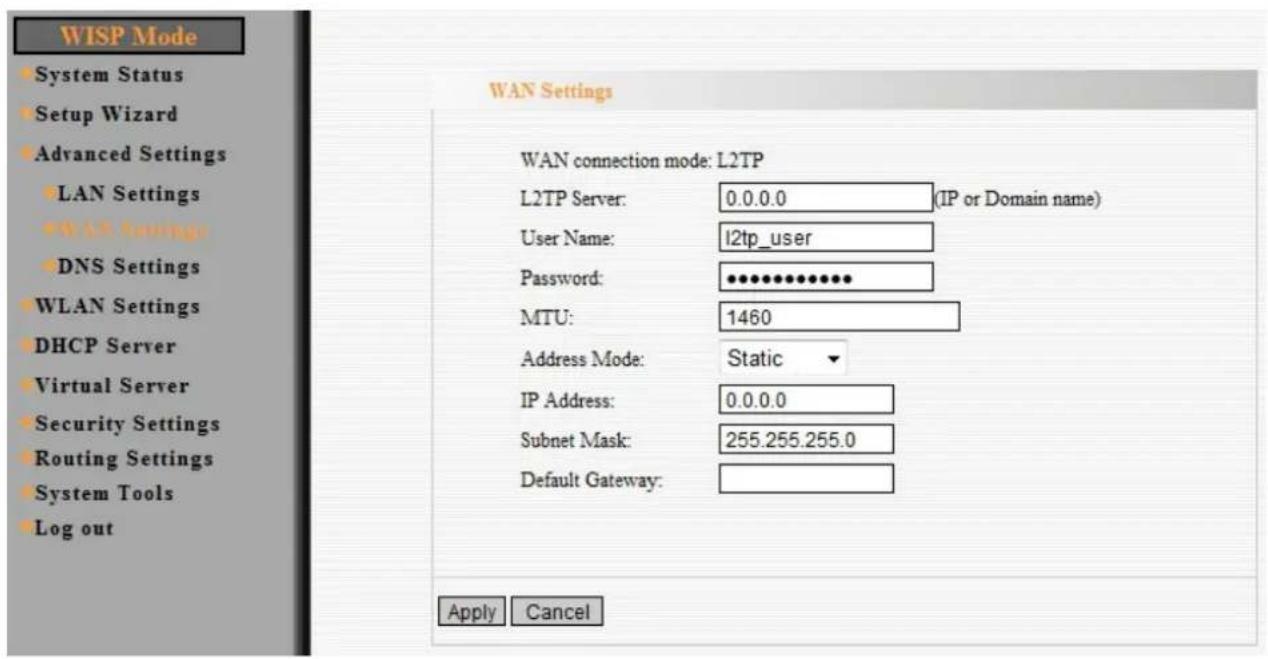
● L2TP Server IP: Enter the Server IP provided by your ISP.
- User Name: Enter L2TP username.
- Password: Enter L2TP password.
- MTU: Maximum Transmission Unit, you may need to change it for optimal performance with your specific ISP. 1460 is the default MTU.
- Address Mode: Select Static if your ISP supplies you with the IP address, subnet mask, and gateway. In most cases, select Dynamic.
- IP Address: Enter the L2TP IP address supplied by your ISP.
- Subnet Mask: Enter the Subnet Mask supplied by your ISP.
● Default Gateway: Enter the Default Gateway supplied by your ISP.
7.2.2.5 PPTP

● PPTP Server IP: Enter the Server IP provided by your ISP.
- User Name: Enter PPTP username provided by your ISP.
- Password: Enter PPTP password provided by your ISP.
● MTU: Maximum Transmission Unit, you may need to change it for optimal performance with your specific ISP. 1478 is the default MTU.
- Address Mode: Select Static if your ISP supplies you with the IP address, subnet mask, and gateway. In most cases, select Dynamic.
- IP Address: Enter the PPTP IP address supplied by your ISP.
- Subnet Mask: Enter the Subnet Mask supplied by your ISP.
● Default Gateway: Enter the Default Gateway supplied by your ISP.
7.2.3 DNS Settings

● DNS Settings: Select the checkbox to enable the DNS server.
● Primary DNS Address: Enter the necessary address provided by your ISP.
- Secondary DNS Address: Enter the second address if your ISP provides, which is optional.
7.3 Wireless Settings
For more detail, please refer to 4.4 Wireless settings.
7.4 DHCP Server
7.4.1 DHCP Server

- DHCP Server: Select the checkbox to enable DHCP server.
- IP Address Start/End: Enter the range of IP address for DHCP server distribution.
- Lease Time: choose a lease time (the duration that every computer can keep a specific IP address) of every IP address assigned by ZSR4174WE from dropdown menu. Ex. If the lease time is an hour, then DHCP server will reclaim the IP address each hour.
7.4.2 DHCP Server List & Binding

- IP Address: Input the IP address for the computer on the LAN network.
- MAC Address: Enter the MAC address of the computer you want to assign. And then click Add to add to the list.
- Hostname: The name of the computer.
● Lease Time: The time length of the corresponding IP address lease.
7.5 Virtual Server
7.5.1 Port Range Forwarding
This section deals with the port range forwarding mainly. The Port Range Forwarding allows you to set up a range of public services such as web servers, ftp, e-mail and other specialized Internet applications to an assigned IP address on your LAN.

- Start/End Port: Enter the start/end port number which ranges the External ports used to set the server or Internet applications.
- IP Address: Enter the IP address of the PC where you want to set the applications.
- Protocol: Select the protocol (TCP/UDP/Both) for the application.
- Well-Known Service Port: Select the well-known services as DNS, FTP from the drop-down menu to add to the configured one above.
NOTE: If you set the virtual server of the service port as 80, you must set the Web management port on. Remote Web Management page to be any value except 80 such as 8080. Otherwise, there will be a conflict to disable the virtual server.
- Delete/Enable: Click to check it for corresponding operation.
7.5.2 DMZ Settings
The DMZ(Demilitarized Zone) function is to allow one computer in LAN to be exposed to the Internet for a special-purpose service as Internet gaming or videoconferencing.
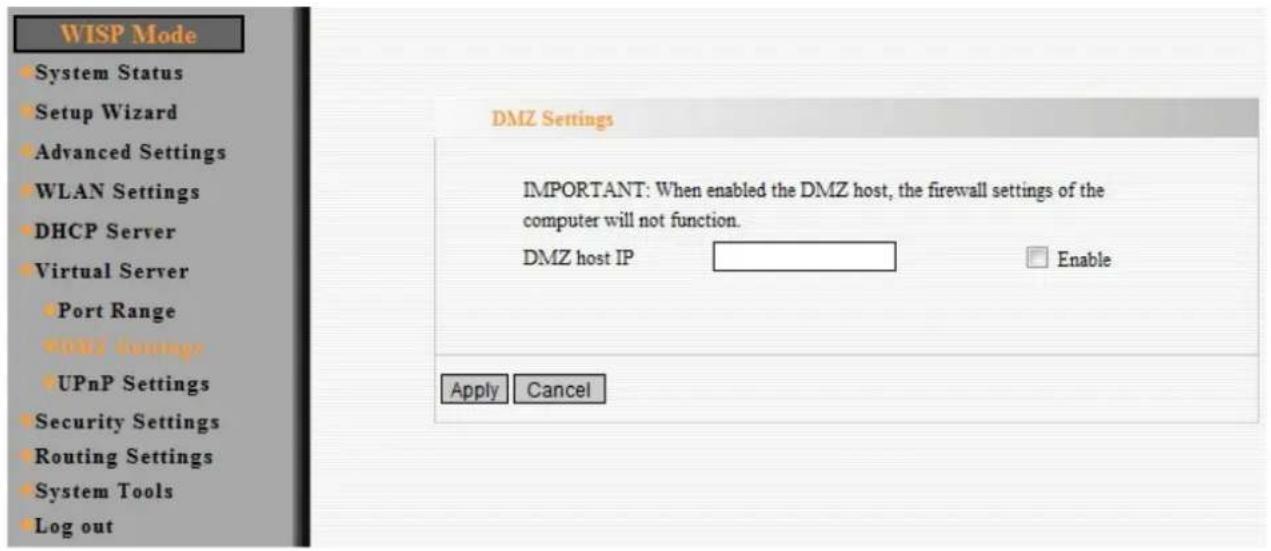
● DMZ Host IP Address: The IP address of the computer you want to expose.
- Enable: Select the checkbox to enable the DMZ host.
IMPORTANT: When enabled the DMZ host, the firewall settings of the DMZ host will not function.
7.5.3 UPnP Settings
Universal Plug and Play function enables network auto-configuration for peer-to-peer communications. With this function, network devices will be able to communicate with other devices directly, and learn about information about other devices. Many network device and applications rely on UPnP function nowadays.
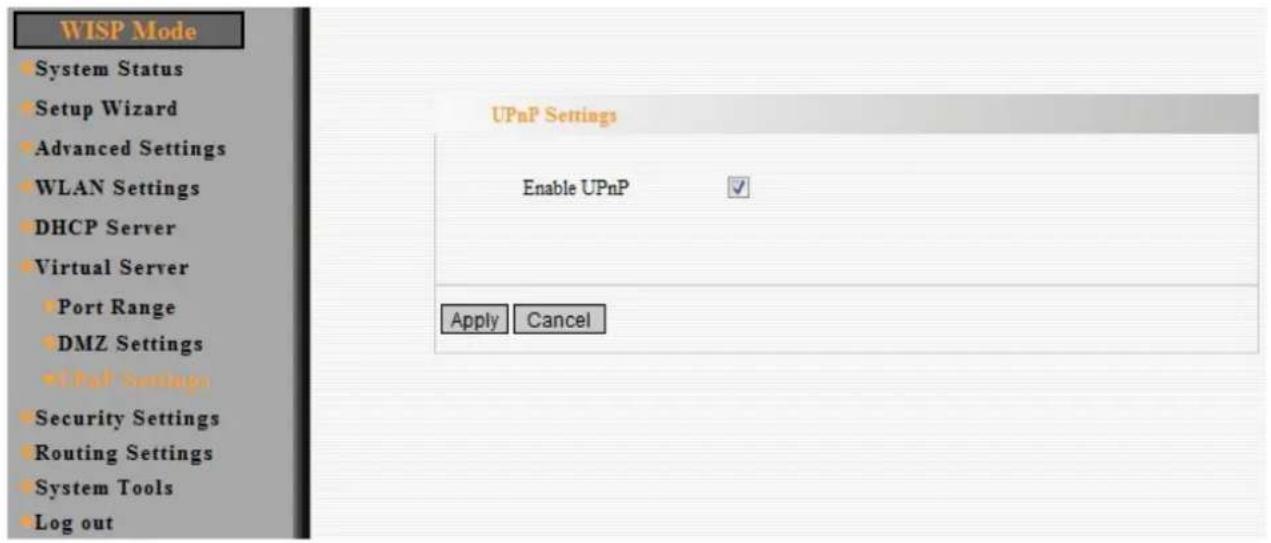
- Enable UPnP: Select the checkbox to enable the UPnP.
7.6 Security Settings
7.6.1 Client Filter
To benefit your further management to the computers in the LAN, you can control some ports access to Internet by data packet filter function.

- Client Filtering Settings: Select the checkbox to enable client filter.
- Access Policy: Select one number from the drop-down menu.
- Enable: Select the checkbox to enable the access policy.
- Delete the Policy: Click Clear button to clear all settings for the policy.
● Filtering Mode: Select one button to enable or disable to access the Internet.
● Policy Name: Enter a name for the access policy selected. - Start/End IP: Enter the starting/ending IP address.
- Port: Enter the port range over the protocol for access policy.
● Type: Select one protocol (TCP/UDP/Both) from drop-down menu. - Times: Select the time range of client filter.
● Days: Select the day(s) to run the access policy.
7.6.2 URL Filter
If you want to prevent computers in local network from accessing certain website (like pornography, violence, or anything you want to block), you can use this function to stop computers in local network from accessing the site you defined here.

- URL Filtering Setting: Select the checkbox to enable URL filter.
- Access Policy: Select one number from the drop-down menu.
- Enable: Select the checkbox to enable the access policy.
- Delete the Policy: Click Clear button to clear all settings for the policy.
- Filtering Mode: Select one button to enable or disable to access the Internet.
● Policy Name: Enter a name for the access policy selected. - Start/End IP: Enter the starting/ending IP address.
- URL: Input the string or keyword which is contained in URL. If any part of the URL contains these strings or words, the web page will or won't be accessible and display (According to Filtering Mode). Separate the strings or words by comma.
● Times: Select the time range of client filter.
● Days: Select the day(s) to run the access policy.
7.6.3 MAC Filter

● MAC Filtering Settings: Select the checkbox to enable MAC address filter.
- Access Policy: Select one number from the drop-down menu.
- Enable: Select the checkbox to enable the access policy.
- Delete the Policy: Click Clear button to clear all settings for the policy.
● Filtering Mode: Select one button to enable or disable to access the Internet.
● Policy Name: Enter a name for the access policy selected.
● MAC Address: Enter the MAC address you want to run the access policy.
- Times: Select the time range of client filter.
● Days: Select the day(s) to run the access policy.
7.6.4 Prevent Network Attack
This function is to protect the internal network from exotic attack such as SYN Flooding attack, Smurf attack, LAND attack, etc. Once detecting the unknown attack, ZSR4174WE will restrict its bandwidth automatically. The attacker's IP address can be found from System Log.

- Prevent Network Attack: Select the checkbox to enable it.
7.6.5 Remote WEB Management
This function is to allow the network administrator to manage ZSR4174WE remotely. If you want to access ZSR4174WE from outside the local network, please select the Enable.
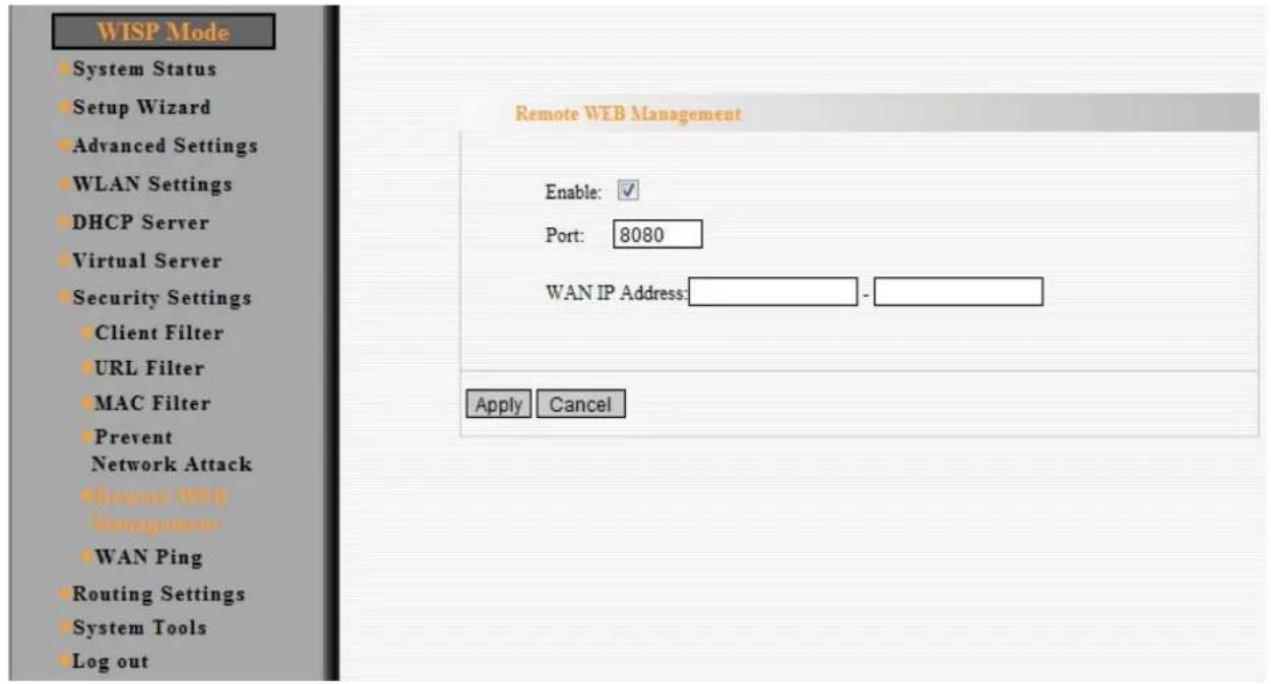
- Enable: Select the checkbox to enable remote web management.
- Port: The management port open to outside access. Default value is 8080.
Note: If you want to login ZSR4174WE's Web-based interface via port 8080, you need use the format of WAN IP address: port (ex. http://219.134.32.101: 8080) to implement remote login.
- WAN IP Address: Specify the range of the WAN IP address for remote management.
7.6.6 WAN Ping
The ping test is to check the status of your internet connection. When disabling the test, the system will ignore the ping test from WAN.

● Disable the Ping for WAN: Select the checkbox to enable it.
7.7 Routing Settings
7.7.1 Routing Table
The main duty for ZSR4174WE is to look for a best path for every data frame, and transfer this data frame to destination. So, it's essential for ZSR4174WE to choose the best path. In order to finish this function, many transferring paths are saved in ZSR4174WE for choosing when needed.
| Destination IP | Subnet Mask | Gateway | Metric | Interface |
| 239.255.255.250 | 255.255.255.255 | 0.0.0.0 | 0 | br0 |
| 192.168.2.0 | 255.255.255.0 | 0.0.0.0 | 0 | br0 |
| 192.168.0.0 | 255.255.255.0 | 0.0.0.0 | 0 | apcli0 |
| 0.0.0.0 | 0.0.0.0 | 192.168.0.1 | 0 | apcli0 |
| Refresh | ||||
7.8 System Tools
7.8.1 Time Settings
For more detail, please refer to 4.5.1 Time Settings.
7.8.2 DDNS
DDNS (Dynamic Domain Name System) is to assign a fixed host and domain name to a dynamic Internet IP address, which is used to monitor hosting website, FTP server and so on behind ZSR4174WE. If you want to activate this function, please select Enable and a DDNS service provider to sign up.

● DDNS: Select one button to enable or disable the DDNS service.
- Service Provider: Select one from the drop-down menu and press Sign up for registration.
- User Name: Enter the same user name as the registration name.
- Password: Enter the password you set.
- Domain Name: Enter the domain name which is optional.
7.8.3 Backup/Restore
For more detail, please refer to 4.5.2 Backup/Restore.
7.8.4 Restore to Factory Default Settings
For more detail, please refer to 4.5.3 Restore to Factory Default Settings.
7.8.5 Upgrade
For more detail, please refer to 4.5.4 Upgrade.
7.8.6 Reboot
For more detail, please refer to 4.5.5 Reboot.
7.8.7 Change Password
For more detail, please refer to 4.5.6 Change Password.
7.8.8 System Log
For more detail, please refer to 4.5.7 System log.
Chapter 8 Wireless Router Mode
8.1 Setup Wizard
- Select Wireless Router on top banner and then select Setup Wizard on the left list. Click Next to continue.

- Select one Internet connection type you're using in Connection Method, and then click Next.
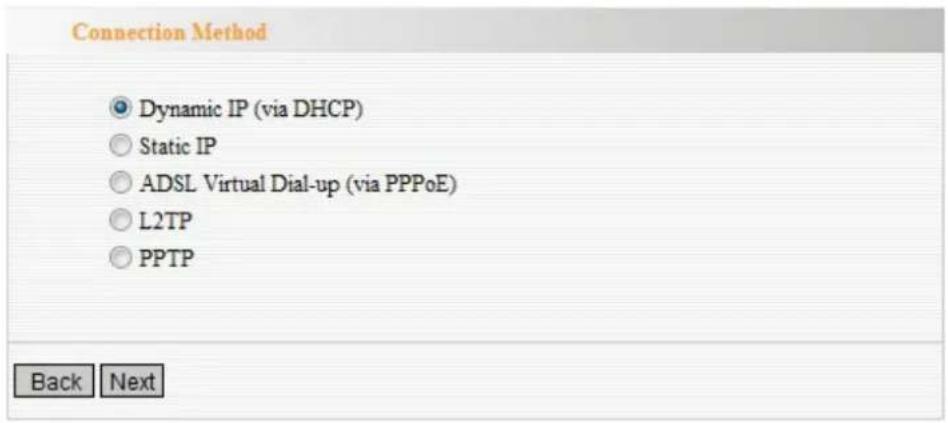
a. Dynamic IP (via DHCP)
The default method is Dynamic IP. It means your IP address keeps changing every time you connect. You do not need to enter the information. Click Next to continue directly.

b. Static IP
Fill the network address information from your ISP in the IP Address, Subnet Mask, Gateway and Primary DNS server fields and click Next.

c. ADSL Virtual Dial-up (via PPPoE)
Enter the User Name and Password provided by your ISP, and click Next.

d. L2TP
Enter the User Name and Password provided by your ISP, and click Next.
L2TP(Layer 2 Tunneling Protocol) provides two address modes.
- Dynamic IP: If the L2TP offered by your ISP is Dynamic IP, please select Dynamic IP.
- Static IP: Please fill in the parameters provided by your ISP.

e. PPTP
Enter the Server IP Address, User Name, and Password provided by your ISP, and click Next.
PPTP(PP Tunneling Protocol) provides two address modes.
- Dynamic IP: If the PPTP offered by your ISP is Dynamic IP, please select Dynamic IP.
- Static IP: Please fill in the parameters provided by your ISP.
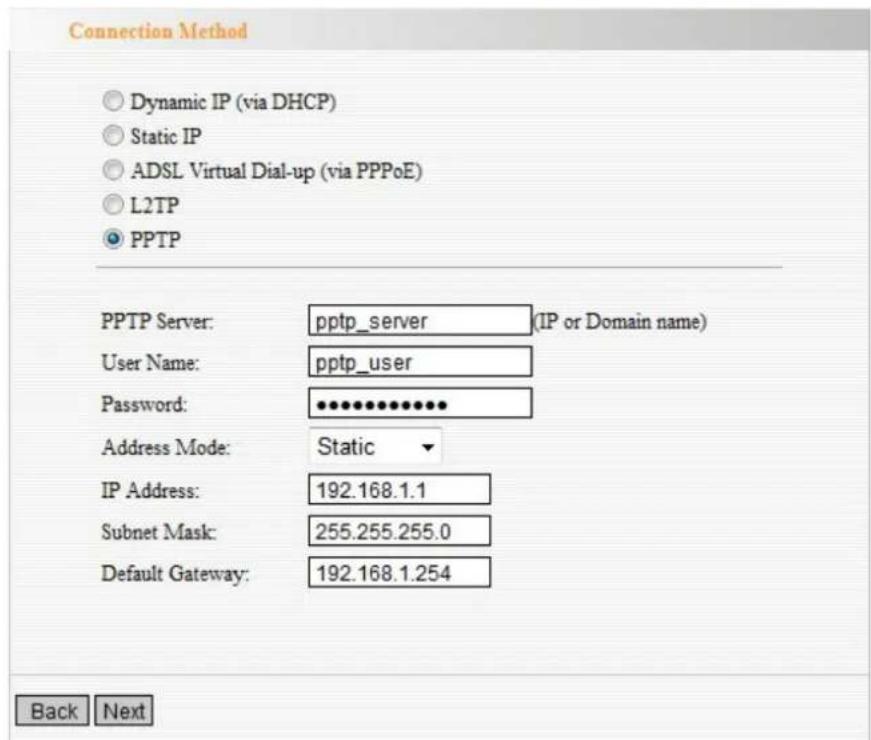
3. Configure Wireless Basic Settings, and then click Next.
For more detail, please refer to 4.4.1 Basic Settings.

4. Configure Wireless Security Settings, and then click Next.
For more detail, please refer to 4.4.2 Wireless Security Settings.

- Click Apply and ZSR4174WE will reboot automatically to activate Wireless Router mode.
Setup Wizard
The configuration is completed, Click Apply to activate your settings or press Back to change your settings.
Back Apply
- After activating Wireless Router mode successfully, web page will be displayed as below.

In Wireless Router mode, ZSR4174WE will behave as the router with wireless NAT function and DHCP sever. And PCs can get the IP address automatically assigned by DHCP server.
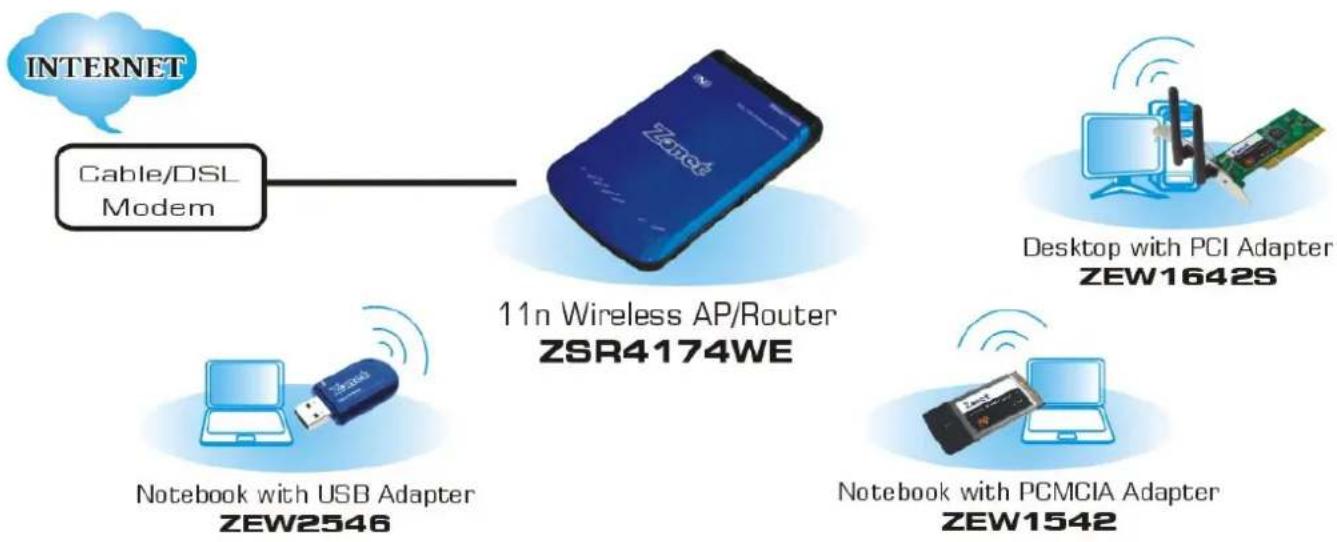
flowchart
graph TD
    A["INTERNET"] --> B["Cable/DSL Modem"]
    B --> C["11n Wireless AP/Router ZSR4174WE"]
    C --> D["Notebook with USB Adapter ZEW2546"]
    C --> E["Desktop with PCI Adapter ZEW1642S"]
    C --> F["Notebook with PCMCIA Adapter ZEW1542"]
8.2 Advanced Settings
8.2.1 LAN Settings
For more detail, please refer to 7.2.1 LAN settings.
8.2.2 WAN Settings
For more detail, please refer to 7.2.2 WAN settings.
8.2.3 MAC Address Clone

● MAC Address: The MAC address registered with your Internet service provider.
- Clone MAC address: Register your PC's MAC address.
- Restore default MAC address: Restore the default hardware MAC address.
8.2.4 DNS Settings
For more detail, please refer to 7.2.3 DNS Settings.
8.3 Wireless Settings
For more detail, please refer to 6.3 Wireless Settings.
8.4 DHCP Server
For more detail, please refer to 7.4 DHCP Server.
8.5 Virtual Server
For more detail, please refer to 7.5 Virtual Server.
8.6 Security Settings
For more detail, please refer to 7.6 Security Settings.
8.7 Routing Settings
For more detail, please refer to 7.7 Routing Settings.
8.8 System Tools
For more detail, please refer to 7.8 System Tools.
Appendix 1: Product Features & Specifications
Features:
● Integrates router, wireless access point, and firewall in one
- Complies with IEEE802.11n, IEEE802.11b and IEEE802.11g standards
- Provide wireless AP, Client+AP, WDS+AP, WISP, Wireless Router mode
● Provides 150Mbps receiving rate and 150Mbps sending rate
● Provide 1 LAN port, 10/100M Auto-Negotiation, supports Auto MDI/MDIX
● Supports WMM for Multimedia Applications in Wi-Fi® Networks
● Supports 64/128-bit WEP, WPA, WPA2 encryption methods
- WPS (Wi-Fi Protected Setup) simplify the security setup and management of Wi-Fi® networks.
● Supports remote/local Web management
● Supports wireless Roaming technology and ensures high-efficient wireless connections
● Supports wireless SSID stealth mode and MAC address access control
● Supports Auto MDI/MDIX
● Provides system log to record the status of ZSR4174WE
● Supports MAC address filtering, NAT
● Supports UPnP & DDNS
● Supports DHCP server
● Supports virtual server and DMZ host
● Supports auto wireless channel selection
● Supports WDS function (wireless distribution system)
Specifications:
| Standards IEEE 802.11n, IEEE 802.11g, IEEE 802.11b standards | |
| Chipset | Ralink: RT3050 |
| OS | Windows 2000, XP, Vista, 7 |
| User interface | Easy to use user configuration software |
| Transmit distance | Indoor up to 150m (limited to environment) |
| roaming | Support multipoint auto roaming and configuration; Support wireless network environments auto detect. |
| LED | LAN&WAN/AP/Client+AP/WDS+AP/ WISP Router/ Wireless Router/WPS |
| Antenna type One internal | Ceramic antenna |
| Frequency range | 2.4GHz ~ 2.4835GHz |
| Radio data rate | 11n: 150/130/117/104/78/52/39/26/13Mbps65/58.5/52/39/26/19.5/13/6.5Mbps11g: 54/48/36/24/18/12/9/6Mbps11b: 11/5.5/2/1Mbps |
| Modulation | OFDM, CCK, BPSK, QPSK |
| Spectrum Spread Technology | DSSS |
| Sensitivity | 11n 20MHz/40MHz: -65dBm54Mbps: -72dBm11Mbps: -88dBm |
| Power | 5V 1.2A |
| Max. Consumption | 5W |
| Flash | 2M Bytes |
| System Memory | 16M Bytes |
| MAC Address Entry 1K | |
| Channels | 11 Channels (USA, Canada) ; 13 Channels (Europe) |
| Media Access Protocol | WMM |
| Data security | WPA/WPA2; 64/128-bit WEP; TKIP/AES |
| Operation Temp. | 0°C ~ 40°C |
| Storage Temp. | -20°C ~ 70°C |
| Operation Humidity | 10%~90% RH no condensing |
| Operation Humidity | 5%~90% RH no condensing |
| Dimension (L x W x H) | 102.5mm x 63mm x 13mm |
Appendix 2: Troubleshooting
Q1. I can not login to the Web interface of ZSR4174WE after entering the IP address in the address field?
Step 1: Check ZSR4174WE if it works well. Once the device is powered on for a few seconds, the LAN/WAN indicator on the panel will start flashing. If it is not, please contact us.
Step 2: Check if ZSR4174WE is in Wireless Router Mode. ZSR4174WE in Wireless Router Mode only can visit Web interface wirelessly.
Step 3: Check the network cable if it is work and the corresponding indicator is on.
Step 4: Run "Ping" command and check if it can ping ZSR4174WE's LAN IP address 192.168.2.1. If it is OK, please make sure your browser does not access the Internet by proxy server. If the ping fails, you can press the RESET button for 7 seconds to restore to default settings. And then repeat the ping operation. If it still does not work, please contact us.
Q2. I forget the login password and can not enter the setting page. What can I do?
Press the RESET button for 7 seconds to restore ZSR4174WE to default settings.
Q3. The computer connected with ZSR4174WE shows IP address conflict. What can I do?
Check if there are other DHCP servers in the LAN. If there have, disable them. The default IP address of ZSR4174WE is 192.168.2.1 and please make sure the address is not occupied by other devices. If there are two computers with the same IP addresses, please modify one.
Q4. I can not use E-mail and access the Internet. What can I do?
It happens in ADSL connection and Dynamic IP users. And you need to modify the default MTU value (1492). Please modify the MTU value with the recommended value as 1450 or 1400 in WAN Setting (refer to 5.2 WAN Setting).
Q5. How to configure and access the Internet via Dynamic IP?
In Setup Wizard of the Web utility interface, select "Dynamic IP" connection type and click "Save" to activate it. As some ISPs bind the user computer's MAC address, you need to clone ZSR4174WE's WAN MAC address to the binding PC's MAC address. Select "MAC Address Clone" in "Advanced Setting" to input your computer's MAC address and click "Apply" to activate it.
Q6. How to share my computer's source with other users in Internet?
If you want Internet users to access the internal server via ZSR4174WE such as e-mail server, Web, FTP, you can configure the "Virtual Server" to come true.
Step 1: create your internal server, make sure the LAN users can access these servers and know related service port. For example, Web server's port is 80; FTP is 21; SMTP is 25 and POP3 is 110.
Step 2: In the Router's web click "Virtual Server" and select "Single Port Forwarding".
Step 3: Input the external service port given by the Router, for example, 80.
Step 4: Input the internal Web service port, for example, 80.
Step 4: Input the internal server's IP address. If your Web server's IP address is 192.168.2.10, please input it.
Step 6: Select the communication protocol used by your internal host: TCP, UDP, ICMP.
Step 7: click "Apply" to activate the settings.
Q7. Why can't I use wireless WAN function to access the Internet?
Step 1: Make sure that the wireless adapter can access the Internet when connected to the computer, wireless signals scanned by the adapter are strong enough, and quality of signals is good enough. If it can scan too many wireless signals, we recommend you to use 11b/g mode for reducing interference.
Step 2: Make sure that the needed parameters such as SSID, MAC address etc. are correct. It is recommended to use Auto Scan to finish the settings in the setup process.
Step 3: Make sure that IP address range obtained at WAN port are different as the one obtained at LAN port. If they are at the same range, you can modify the LAN IP address to solve the problem.
Q8. How to connect Xbox360 and PlayStation to ZSR4174WE?
You must obtain a Static IP address from your ISP. Follow the instruction in the CD ROM filename Xbox360.pdf and setup your game console properly. After you have successfully configured your game console, you have to open ports from the ZSR4174WE to allow two way communications. For more information on port forwarding instruction, please refer this user manual to 7.5 Virtual Server.

- Copyright Statement
- Table of Contents
- Chapter 1 Introduction......1
- Chapter 2 Hardware Installation....2
- Chapter 3 Configure your Computer....6
- Chapter 4 Wireless AP Mode(Default)......11
- Chapter 5 Client+AP Mode....30
- Chapter 6 WDS+AP Mode....34
- Chapter 7 WISP Mode....42
- Chapter 8 Wireless Router Mode....67
- Appendix 1: Product Features & Specifications....74
- Appendix 2: Troubleshooting....76
- Chapter 1 Introduction
- Welcome
- Features
- Package Contents
- Chapter 2 Hardware Installation
- Panel Layout
- Top Panel
- Rear Panel
- Side Panel
- System Requirements
- Installation Environment Requirements
- Hardware Connection
- Chapter 3 Configure your computer
- TCP/IP Address Setting
- Windows XP
- Windows Vista/7
- Chapter 4 Wireless AP Mode (Default)
- Log in
- Setup Wizard
- LAN Settings
- Wireless Settings
- Basic Settings
- Wireless Security Settings
- Mixed WEP
- WPA-Personal
- WPA2-Personal
- Mixed WPA/WPA2-Personal
- Advanced Settings
- WPS Settings
- Access Control
- Connection Status
- System Tools
- Time Settings
- Restore to Factory Default Settings
- Upgrade
- Reboot
- Change Password
- System Log
- Chapter 5 Client+AP Mode
- Setup Wizard
- LAN Settings
- Wireless Settings
- System Tools
- Chapter 6 WDS+AP Mode
- Setup Wizard
- LAN Settings
- Wireless Settings
- Basic Settings
- Wireless Security Settings
- Advanced Settings
- WPS Settings
- WDS Settings
- - WDS Mode:
- Access Control
- Connection Status
- System Tools
- Chapter 7 WISP Mode
- Setup Wizard
- a. Dynamic IP (via DHCP)
- b. Static IP
- c. ADSL Virtual Dial-up (via PPPoE)
- d. L2TP
- e. PPTP
- Advanced Settings
- LAN Settings
- WAN Settings
- PPPoE
- Internet Connection Option:
- Dynamic IP
- Static IP
- L2TP
- PPTP
- DNS Settings
- Wireless Settings
- DHCP Server
- DHCP Server
- DHCP Server List & Binding
- Virtual Server
- Port Range Forwarding
- DMZ Settings
- UPnP Settings
- Security Settings
- Client Filter
- URL Filter
- MAC Filter
- Prevent Network Attack
- Remote WEB Management
- WAN Ping
- Routing Settings
- Routing Table
- System Tools
- Time Settings
- DDNS
- Backup/Restore
- Restore to Factory Default Settings
- Upgrade
- Reboot
- Change Password
- System Log
- Chapter 8 Wireless Router Mode
- Setup Wizard
- Configure Wireless Basic Settings, and then click Next.
- Configure Wireless Security Settings, and then click Next.
- Setup Wizard
- Advanced Settings
- LAN Settings
- WAN Settings
- MAC Address Clone
- DNS Settings
- Wireless Settings
- DHCP Server
- Virtual Server
- Security Settings
- Routing Settings
- System Tools
- Appendix 1: Product Features & Specifications
- Features:
- Appendix 2: Troubleshooting
- Q1. I can not login to the Web interface of ZSR4174WE after entering the IP address in the address field?
- Q2. I forget the login password and can not enter the setting page. What can I do?
- Q3. The computer connected with ZSR4174WE shows IP address conflict. What can I do?
- Q4. I can not use E-mail and access the Internet. What can I do?
- Q5. How to configure and access the Internet via Dynamic IP?
- Q6. How to share my computer's source with other users in Internet?
- Q7. Why can't I use wireless WAN function to access the Internet?
- Q8. How to connect Xbox360 and PlayStation to ZSR4174WE?
Brand : Zonet
Model : ZSR4174WE
Category : Router