
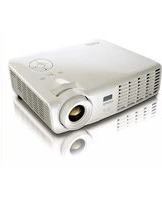
D326WX - Video projector VIVITEK - Free user manual and instructions
Find the device manual for free D326WX VIVITEK in PDF.


| Brand | Vivitek |
| Model | D326WX |
| Product Type | Video Projector |
| Display Technology | DLP (TI DMD Type X, 0.65 inch) |
| Native Resolution | WXGA (1280 x 768) |
| Projection Distance | 1.5 m – 10 m |
| Screen Size | 39 – 300 inches |
| Lens | Manual focus / manual zoom, zoom ratio 1.15:1 |
| Keystone Correction | Vertical ±15° |
| Projection Modes | Front, rear (desktop) |
| Video Compatibility | NTSC, PAL, SECAM |
| Inputs | VGA, HDMI, S-Video, Composite video, Audio (mini-jack) |
| USB | For service only |
| Audio | 1W mono speaker |
| Power Supply | AC 100-240V, 50/60 Hz |
| Power Consumption | 260W (Normal), 210W (ECO), <5W standby |
| Lamp | 200W (Normal) / 160W (ECO), user-replaceable |
| Security | Kensington lock slot |
| Dimensions (W x H x D) | 220 x 71 x 178 mm |
| Weight | Approx. 1.8 kg |
| Operating Temperature | 5°C – 35°C |
| Safety Certifications | FCC-B, UL, cUL, CB, CE, CCC |
| Maintenance | Clean lens and case with damp cloth; allow lamp to cool before cleaning or replacement |
| Lamp Replacement | User-replaceable; unplug and cool 30 min before; reset lamp hour counter |
Frequently Asked Questions - D326WX VIVITEK
User questions about D326WX VIVITEK
0 question about this device. Answer the ones you know or ask your own.
Ask a new question about this device
Download the instructions for your Video projector in PDF format for free! Find your manual D326WX - VIVITEK and take your electronic device back in hand. On this page are published all the documents necessary for the use of your device. D326WX by VIVITEK.
USER MANUAL D326WX VIVITEK
This publication, including all photographs, illustrations and software, is protected under international copyright laws, with all rights reserved. Neither this manual, nor any of the material contained herein, may be reproduced without written consent of the author.
© Copyright January, 2008
Disclaimer
The information in this document is subject to change without notice. The manufacturer makes no representations or warranties with respect to the contents hereof and specifically disclaims any implied warranties of merchantability or fitness for any particular purpose. The manufacturer reserves the right to revise this publication and to make changes from time to time in the content hereof without obligation of the manufacturer to notify any person of such revision or changes.
Trademark Recognition
Kensington is a U.S. registered trademark of ACCO Brand Corporation with issued registrations and pending applications in other countries throughout the world.
All other product names used in this manual are the properties of their respective owners and are acknowledged.
Important Safety Information
Important:
It is strongly recommended that you read this section carefully before using the projector. These safety and usage instructions will ensure that you enjoy many years of safe use of the projector. Keep this manual for future reference.
Symbols Used
Warning symbols are used on the unit and in this manual to alert you of hazardous situations.
The following styles are used in this manual to alert you to important information.
Note:
Provides additional information on the topic at hand.
Important:
Provides additional information that should not be overlooked.
Caution:
Alerts you to situations that may damage the unit.
Warning:
Alerts you to situations that may damage the unit, create a hazardous environment, or cause personal injury.
Throughout this manual, component parts and items in the OSD menus are denoted in bold font as in this example:
"Push the Menu button on the remote control to open the Main menu."
General Safety Information
Do not open the unit case. Aside from the projection lamp, there are no user-serviceable parts in the unit. For servicing, contact qualified service personnel.
➢ Follow all warnings and cautions in this manual and on the unit case.
The projection lamp is extremely bright by design. To avoid damage to eyes, do not look into the lens when the lamp is on.
Do not place the unit on an unstable surface, cart, or stand.
- Avoid using the system near water, in direct sunlight, or near a heating device.
Do not place heavy objects such as books or bags on the unit.
Power Safety
▶ Only use the supplied power cord.
Do not place anything on the power cord. Place the power cord where it will not be in the way of foot traffic.
Remove the batteries from the remote control when storing or not in use for a prolonged period.
Replacing the Lamp
Replacing the lamp can be hazardous if done incorrectly. See Replacing the Projection Lamp on page 31 for clear and safe instructions for this procedure. Before replacing the lamp:
▶ Unplug the power cord.
- Allow the lamp to cool for about one hour.
Cleaning the Projector
➢ Unplug the power cord before cleaning. See Cleaning the Projector on page 34.
- Allow the lamp to cool for about one hour.
Regulatory Warnings
Before installing and using the projector, read the regulatory notices in the Regulatory Compliance section on page 46.
Main Features
- Lightweight unit, easy to pack away and transport.
- Compatible with all major video standards including NTSC, PAL, and SECAM.
- A high brightness rating allows for presentations in daylight or in lit rooms.
• Supports resolutions up to UXGA at 16.7 million colors to deliver crisp, clear images. - Flexible setup allows for front, rear projections.
- Line-of-vision projections remain square, with advanced keystone correction for angled projections.
- Input source automatically detected.
About this manual
This manual is intended for end users and describes how to install and operate the DLP projector. Wherever possible, relevant information—such as an illustration and its description—has been kept on one page. This printer-friendly format is both for your convenience and to help save paper, thereby protecting the environment. It is suggested that you only print sections that are relevant to your needs.
Table of Contents
GETTING STARTED....1
PACKING CHECKLIST .... 1
VIEWS OF PROJECTOR PARTS....2
Front-right View 2
Top view—On-screen Display (OSD) buttons and LEDs 3
Rear view 4
Bottom view....5
REMOTE CONTROL PARTS 6
SETUP AND OPERATION....9
INSERTING THE REMOTE CONTROL BATTERIES 9
CONNECTING INPUT DEVICES....10
STARTING AND SHUTTING DOWN THE PROJECTOR.... 11
SETTING AN ACCESS PASSWORD (SECURITY LOCK) 13
ADJUSTING THE PROJECTOR LEVEL 15
ADJUSTING THE ZOOM, FOCUS AND KEYSTONE 16
ADJUSTING THE VOLUME 17
ON-SCREEN DISPLAY (OSD) MENU SETTINGS.... 18
OSD MENU CONTROLS 18
Navigating the OSD 18
SETTING THE OSD LANGUAGE 19
OSD MENU OVERVIEW 20
OSD SUB-MENU OVERVIEW 21
IMAGE MENU....22
Color Manager....23
COMPUTER MENU....24
VIDEO/AUDIO MENU 25
INSTALLATION I MENU 26
INSTALLATION II MENU....27
OSD Menu Setting 28
Peripheral Test....29
Lamp Hour Reset 29
Factory Reset 30
Status.... 30
MAINTENANCE AND SECURITY....31
REPLACING THE PROJECTION LAMP....31
Resetting the Lamp....33
CLEANING THE PROJECTOR....34
Cleaning the Lens 34
Cleaning the Case.... 34
USING THE KENSINGTON ^® LOCK 35
TROUBLESHOOTING 36
COMMON PROBLEMS AND SOLUTIONS 36
TIPS FOR TROUBLESHOOTING 36
LED ERROR MESSAGES....37
IMAGE PROBLEMS....37
LAMP PROBLEMS 38
REMOTE CONTROL PROBLEMS 38
AUDIO PROBLEMS 38
HAVING THE PROJECTOR SERVICED 38
SPECIFICATIONS....39
SPECIFICATIONS....39
Input connectors....39
PROJECTION DISTANCE V.S. PROJECTION SIZE....40
TIMING MODE TABLE 41
PROJECTOR DIMENSIONS 45
REGULATORY COMPLIANCE 46
FCC WARNING 46
CANADA 46
SAFETY CERTIFICATIONS 46
EN 55022 WARNING 46
GETTING STARTED
Packing Checklist
Carefully unpack the projector and check that the following items are included:

natural_image
Line drawing of a projector with ventilation slots and a strap, no text or symbols presentDLP PROJECTOR

REMOTE CONTROL (WITH ONE 3V CR2025 BATTERY)

natural_image
Line drawing of a USB cable with two connectors (no text or symbols)RGB CABLE

POWER CORD

natural_image
Technical line drawing of an electronic component with no visible text or symbolsRGB TO COMPONENT ADAPTER (OPTIONAL)

natural_image
Line drawing of an open suitcase with lid open, showing internal compartments and handle (no text or symbols)CARRYING CASE

CD-ROM (THIS USER'S MANUAL)
Contact your dealer immediately if any items are missing, appear damaged, or if the unit does not work. It is recommend that you keep the original packing material should you ever need to return the equipment for warranty service.
Caution:
Avoid using the projector in dusty environments.
Views of Projector Parts
Front-right View
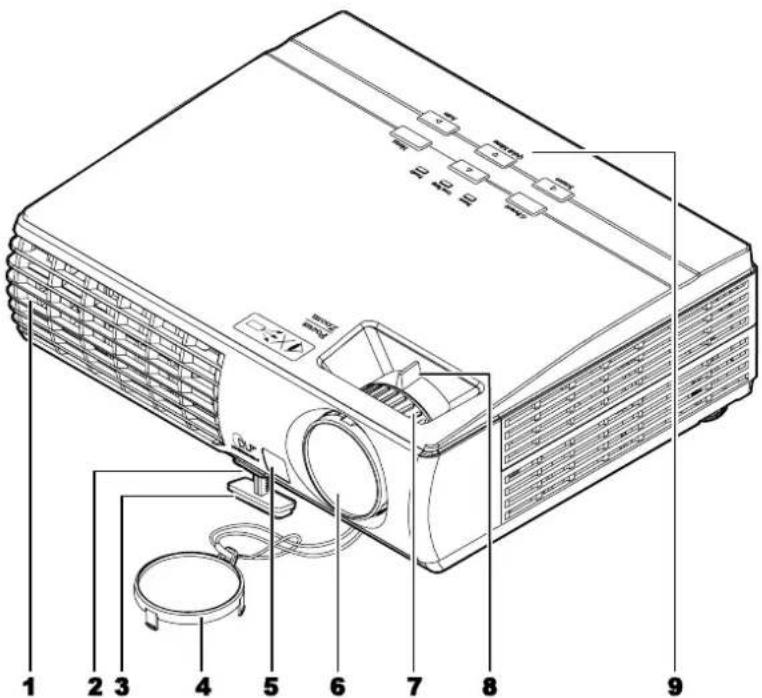
| ITEM | LABEL | DESCRIPTION | SEE PAGE: |
| 1. | Ventilation opening | Do not block in order to keep the projector lamp cool | |
| 2. | Height-adjuster button Push to release height adjuster | 15 | |
| 3. | Height adjuster Adjusts level of projector | ||
| 4. | Lens cap | Covers lens to protect when not in use | |
| 5. | IR receiver Receiver for IR signal from remote control | 6 | |
| 6. | Lens Remove lens cap before use | ||
| 7. | Focus ring Focuses the projected image | 16 | |
| 8. | Zoom ring Enlarges the projected image | ||
| 9. | Function keys | See Top view—On-screen Display (OSD) buttons and LEDs. | 3 |
Important:
Ventilation openings on the projector allow for good air circulation, which keeps the projector lamp cool. Do not obstruct any of the ventilation openings.
Top view—On-screen Display (OSD) buttons and LEDs

flowchart
graph TD
    A["Power"] --> B["△"]
    C["Power"] --> B
    D["Over Temp"] --> B
    E["Ready"] --> B
    F["Source"] --> G["Quick Menu"]
    G --> H["Auto"]
| ITEM LABEL DESCRIPTION | SEE PAGE: | |||
| 1. | (Power) | Turns the projector On or Off | ||
| 2. | (Ap cursor) Navigates and changes settings in the OSD | 18 | ||
| 3. | Power LED | Green Power | On | |
| Off Power Off (AC Off) | ||||
| Flashing | Error code | |||
| 4. | Over Temp LED | On System over temperature | ||
| Off | Normal State | |||
| 5. | Ready LED | Orange Lamp is ready to be powered-on. | ||
| Flashing | Lamp not ready (Warm-up/shutting down/cooling) (see LED Error Messages on page 37) | |||
| 6. | Menu Open and exits the OSD buttons | |||
| 7. | (Left cursor)/Source | Detects the input device Navigates and changes settings in the OSD | 18 | |
| 8. | (Down cursor) / Quick Menu | Quick Menu – For Keystone, Audio Volume Navigates and changes settings in the OSD | 16, 17, 18 | |
| 9. | (Right cursor)/Auto | Optimizes image size, position, and resolution Navigates and changes settings in the OSD | 18 | |
Rear view
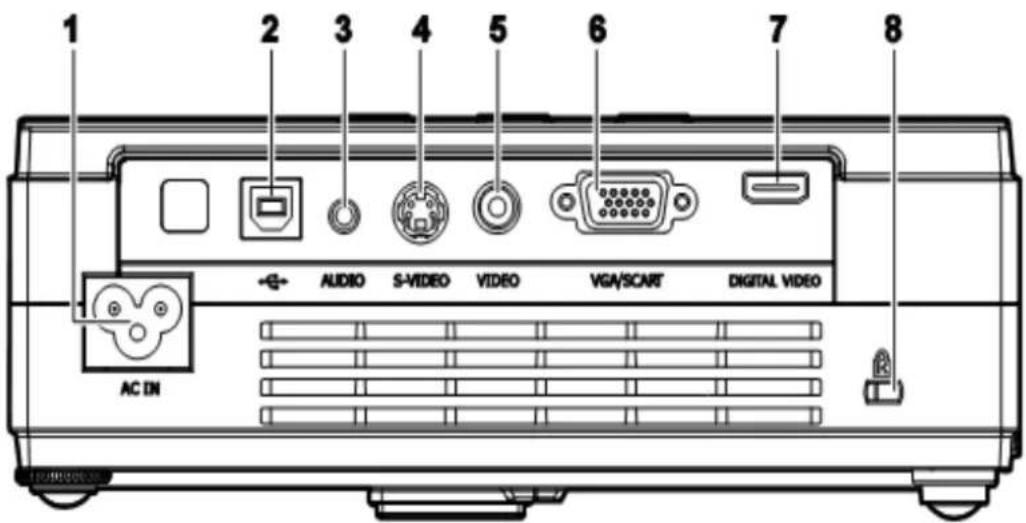
| ITEM | LABEL | DESCRIPTION | SEE PAGE: |
| 1. | AC IN Connect the POWER CABLE | 11 | |
| 2. | USB Connect the USB CABLE from a computer | 10 | |
| 3. | AUDIO Connect the AUDIO CABLE from the input device | ||
| 4. | S-VIDEO Connect the S-VIDEO CABLE from a video device | ||
| 5. | VIDEO Connect the VIDEO CABLE from a video device | ||
| 6. | VGA Connect the RGB cable (supplied) from a computer | ||
| 7. | DIGITAL VIDEO(For D326WX only) | Connect the HDMI digital video CABLE from a video device | |
| 8. | (Security Lock) Secure to permanent object with a Kensington® Lock | 35 | |
Note:
If your video equipment has both S-VIDEO and RCA jacks (composite video) connect to the S-VIDEO connector. S-VIDEO provides a better quality signal.
Bottom view

| ITEM | LABEL | DESCRIPTION | SEE PAGE: |
| 1. | Lamp cover Remove when changing the lamp. | 31 | |
| 2. | Lens cap hook Place strap through to fasten the lens cap cover. | ||
| 3. | Tilt adjustor Rotate adjuster lever to adjust angle position. | 15 | |
| 4. | Height adjustor button Push to release adjustor. | ||
| 5. | Height adjustor Adjuster drops down when adjuster button is pushed. | ||
Remote Control Parts

Important:
- Avoid using the projector with bright fluorescent lighting turned on. Certain high-frequency fluorescent lights can disrupt remote control operation.
- Be sure nothing obstructs the path between the remote control and the projector. If the path between the remote control and the projector is obstructed, you can bounce the signal off certain reflective surfaces such as projector screens.
- The buttons and keys on the projector have the same functions as the corresponding buttons on the remote control. This user's manual describes the functions based on the remote control.
| ITEM | LABEL | DESCRIPTION | SEE PAGE: |
| 1. | Up cursor Navigates and changes settings in the OSD | 18 | |
| 2. | Enter Changes settings in the OSD | ||
| 3. | Power Turns the projector | On or Off | 11 |
| 4. | Right cursor Navigates and changes settings in the OSD | 18 | |
| 5. | Volume + Increase volume | 17 | |
| 6. | Volume - Decrease volume | ||
| 7. | Mute Mutes the built-in speaker | ||
| 8. | Freeze Freeze/unfreezes the on-screen picture | ||
| 9. | Source Detects the input device | ||
| 10. | Auto Auto adjustment for frequency, tracking, size, position (RGB only) | ||
| 11. | Keystone top Corrects image-trapezoid (wider top) effect | 16 | |
| 12. | Keystone bottom Corrects image trapezoid (wider bottom) effect | ||
| 13. | Down cursor | Navigates and changes settings in the OSD | 18 |
| 14. | Left cursor | Navigates and changes settings in the OSD | |
| 15. | Menu | Opens the OSD | |
Remote Control Operating Range
The remote control uses infrared transmission to control the projector. It is not necessary to point the remote directly at the projector. Provided you are not holding the remote perpendicular to the sides or the rear of the projector, the remote will function well within a radius of about 7 meters (23 feet) and 15 degrees above or below the projector level. If the projector does not respond to the remote control, move a little closer.
Projector and Remote Control Buttons
The projector can be operated using the remote control or the buttons on the top of the projector. All operations can be carried out with the remote control; however, the buttons on the projector are limited in use. The following illustration shows the corresponding buttons on the remote control and on the projector.
Remote Control


flowchart
graph TD
    A["Power"] --> B["Source"]
    B --> C["Quick Menu"]
    C --> D["Auto"]
    E["Over Temp"] --> F["Menu"]
    G["Ready"] --> H["Menu"]
    I["4/8"] --> J["1"]
    K["10"] --> L["3/6/7"]
    M["9"] --> N["2/5"]
Some buttons on the projector have multiple functions. For example, item 3/6/7 on the projector functions as the keystone button, volume adjuster, and as the down cursor key.
Inserting the Remote Control Batteries
- Remove the battery compartment cover by sliding the cover in the direction of the arrow. (A) Pull out the cover. (B)
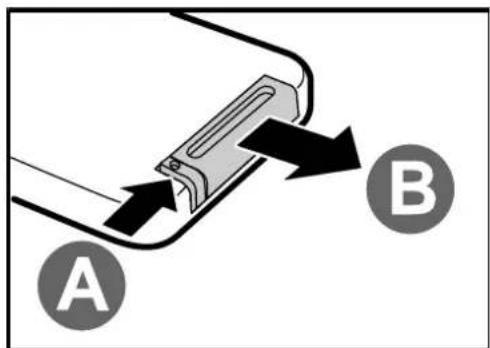
- Insert the battery with the positive side facing up.

natural_image
Diagram showing a device with a circular component and a mechanical clamp, no text or symbols present- Replace the cover.

natural_image
Diagram of a cable connector with a black arrow pointing to its connector (no text or symbols present)Caution:
- Only use a 3V lithium battery (CR2025).
- Dispose of used batteries according to local ordinance regulations.
- Remove the battery when not using the projector for prolonged periods.
Connecting Input Devices
A PC or notebook computer and video devices can be connected to the projector at the same time. Video devices include DVD, VCD, and VHS players, as well as movie camcorders and digital still cameras. Check the user manual of the connecting device to confirm it has the appropriate output connector.
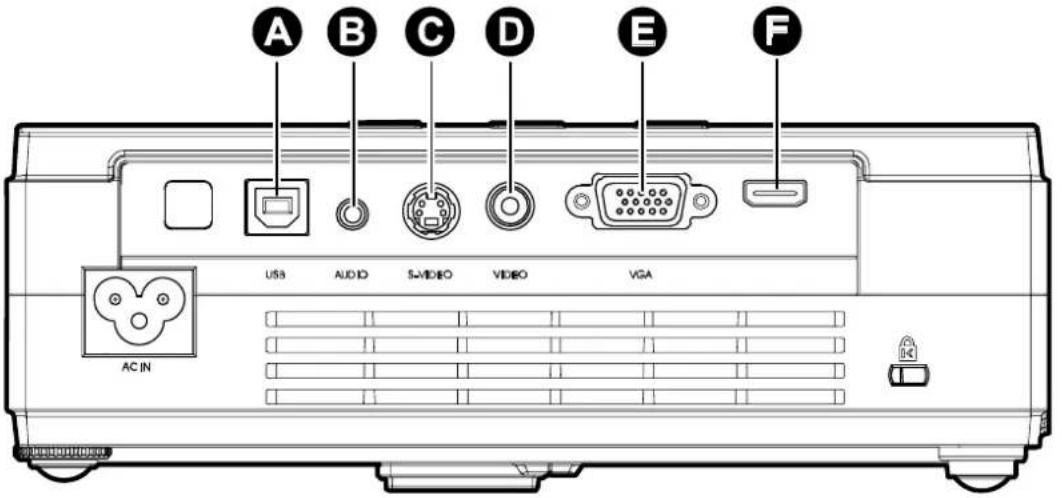
| ITEM LABEL DESCRIPTION | ||
 | USB Connect the USB CABLE from a computer. | |
 | AUDIO | Connect the AUDIO CABLE from the computer's audio-out connector. Connect the AUDIO CABLE (mini jack-to-RCA x 2) from a video device. |
 | S-VIDEO Connect the S-VIDEO CABLE from a video device. | |
 | VIDEO Connect the VIDEO CABLE from a video device. | |
 | VGA | Connect the RGB CABLE from a computer. Connect DVD input YCbCr / YPbPr, through optional RGB to COMPONENT ADAPTOR. |
 | Digital Video (HDMI) (For D326WX only) | Connect the Digital Video from any video device |
Warning:
As a safety precaution, disconnect all power to the projector and connecting devices before making connections.
Starting and Shutting down the Projector
- Connect the power cord to the projector. Connect the other end to a wall outlet. The ⏻ Power and Ready LEDs on the projector light.
- Turn on the connected devices.
- Ensure the Ready LED displays a solid orange and not a flashing orange. Then press the ⏻ Power button to turn on the projector.
The projector splash screen displays and connected devices are detected.
See Setting an Access Password (Security Lock) on page 13 if security lock is enabled.

flowchart
graph TD
    A["Start"] --> B((3-lobed object))
    B --> C["Final box"]

- If more than one input device is connected, press the Source button and use ▲▼ to scroll among devices. (Component is supported through the RGB to COMPONENT ADAPTER.)
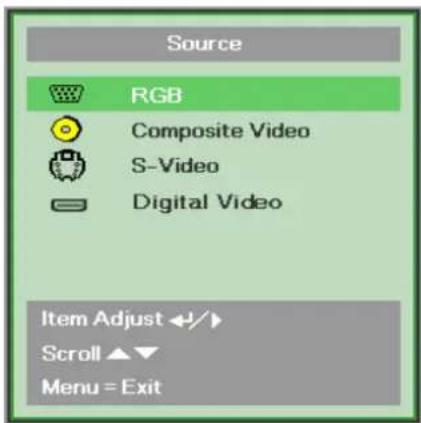
-
RGB: Analog RGB Component: DVD input YCbCr / YPbPr, or HDTV input YPbPr via HD15 connector
• Composite Video: Traditional composite video
• S-Video: Super video (Y/C separated)
• Digital Video (HDMI): Digital Video source -
When the "Power Off? /Press Power again" message appears, press the Power button. The projector turns off.

Caution:
- Be sure to remove the lens cap before starting projector.
- Do not unplug the power cord until the Ready LED stops flashing-indicating the projector has cooled down.
Setting an Access Password (Security Lock)
You can use the four (arrow) buttons to set a password and prevent unauthorized use of the projector. When enabled, the password must be entered after you power on the projector. (See Navigating the OSD on page 18 and Setting the OSD Language on page 19 for help on using OSD menus.)
Important:
Keep the password in a safe place. Without the password, you will not be able to use the projector. If you lose the password, contact your reseller for information on clearing the password.
- Press the Menu button to open the OSD menu.
- Press the cursor ◀▶ button to move to the Installation I menu.

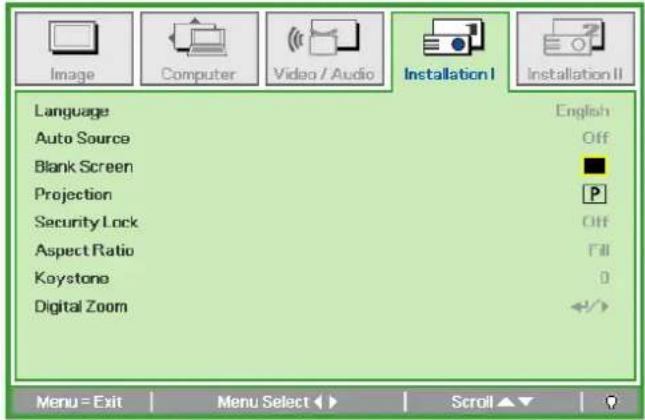
-
Press the cursor ▲▼ button to select Security Lock.
-
Press the cursor ◀▶ button to enable or disable security lock function.
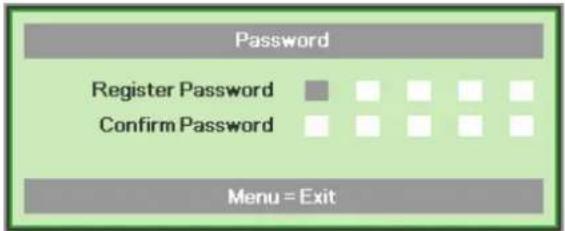
A password dialog box automatically appears.

- You can use the cursor buttons ▲▼◀▶ either on keypad or IR remote control for password entry. You can use any combination including the same arrow five times, but not less than five.
Press the cursor buttons in any order to set the password. Push the Menu button to exit the dialog box.

flowchart
graph TD
    A["Password"] --> B["Register Password"]
    A --> C["Confirm Password"]
    B --> D["* * * * * *"]
    C --> E["* * * * * *"]
    D --> F["OK"]
    E --> F
    G["Menu = Exit"] --> H["End"]
- The password confirm menu appears when user presses the power-on key in case the Security Lock is enabled.
Enter the password in the order you set it at step 5. In case you forget the password, please contact the service center.
Service center will validate the owner and help reset the password.

flowchart
graph TD
    A["Password"] --> B["■"]
    B --> C["■"]
    C --> D["■"]
    D --> E["■"]
    E --> F["Menu = Cancel"]
Adjusting the Projector Level
Take note of the following when setting up the projector:
- The projector table or stand should be level and sturdy.
• Position the projector so that it is perpendicular to the screen. - Ensure the cables are in a safe location. You could trip over them.

- To raise the level of the projector, lift the projector [A] and press the height-adjuster button [B].
The height adjuster drops down [C]. - To lower the level of the projector, press the height-adjuster button and push down on the top of the projector.
- To adjust the angle of the picture, turn the tilt-adjuster [D] right or left until the desired angle has been achieved.
Adjusting the Zoom, Focus and Keystone
-
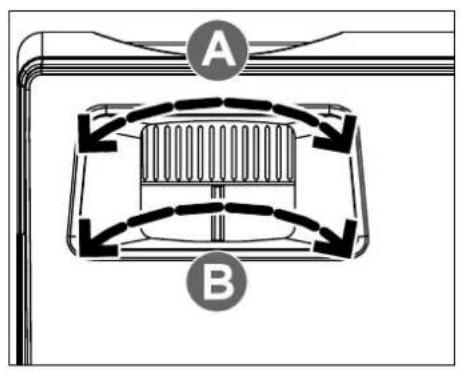
Use the Image-zoom control (on the projector only) to resize the projected image and screen size B.
-
Use the Image-focus control (on the projector only) to sharpen the projected image Ⓐ.
-
Use the Quick Menu button on the projector or Keystone on the remote control to correct image-trapezoid (wider top or bottom) effect.
-
The keystone control appears on the display.
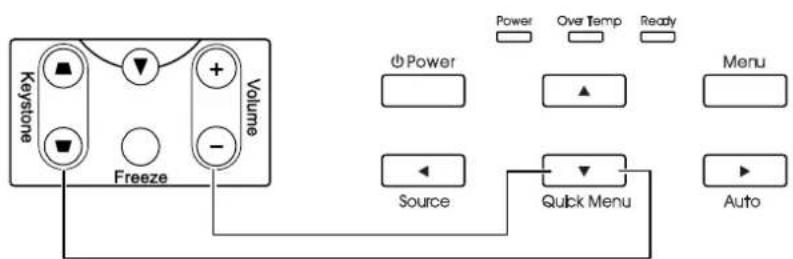
flowchart
graph TD
    A["Keystone"] --> B["Volume"]
    B --> C["Freeze"]
    C --> D["Source"]
    D --> E["Quick Menu"]
    E --> F["Auto"]
    G["Power"] --> H["Over Temp"]
    H --> I["Ready"]
    J["Menu"] --> K["Active"]
Remote control and OSD panel

Adjusting the Volume
- Press the Volume +/- buttons on the remote control. The volume control appears on the display.
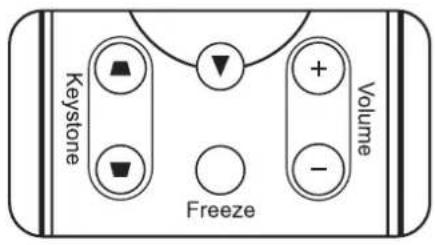
- Press the Down Cursor button on the keypad to adjust Volume +/-

flowchart
graph LR
    A["Power"] --> B["Δ"]
    B --> C["Menu"]
    D["Source"] --> E["Quick Menu"]
    E --> F["Auto"]
    G["Power"] --> H["Over Temp"]
    H --> I["Ready"]

- Press the Mute button to turn off the volume (This feature is available only on the remote).

ON-SCREEN DISPLAY(OSD) MENU SETTINGS
OSD Menu Controls
The projector has an OSD that lets you make image adjustments and change various settings.
Navigating the OSD
You can use the remote control cursor buttons or the buttons on the top of the projector to navigate and make changes to the OSD. The following illustration shows the corresponding buttons on the remote control and on the projector.

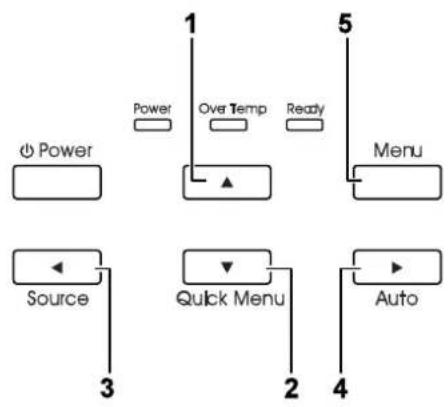
flowchart
graph TD
    A["Power"] --> B["Source"]
    B --> C["Quick Menu"]
    C --> D["Auto"]
    E["Over Temp"] --> F["Menu"]
    G["Ready"] --> H["Menu"]
    I["Power"] --> J["Up/Down Arrow"]
    K["Up/Down Arrow"] --> L["Up/Down Arrow"]
- To enter the OSD, press the Menu button.
- There are five menus. Press the cursor ◀▶ button to move through the menus.
- Press the cursor ▲▼ button to move up and down in a menu.
- Press ◀▶ to change values for settings.
- Press Menu to close the OSD or leave a submenu.

Note:
Depending on the video source, not all items in the OSD are available. For example, the Horizontal/Vertical Position items in the Computer menu can only be modified when connected to a PC. Items that are not available cannot be accessed and are grayed out.
Setting the OSD Language
Set the OSD language to your preference before continuing.
- Press the Menu button. Press the cursor ◀▶ button to navigate to Installation I.
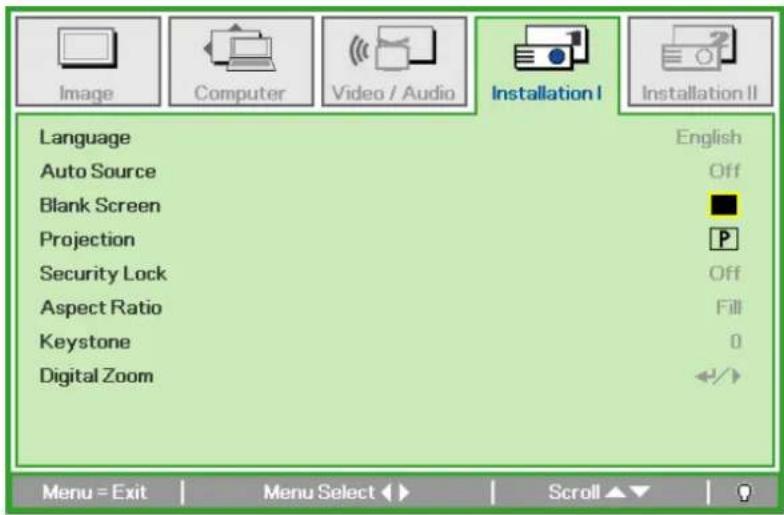
- Press the cursor ▲▼ button until Language is highlighted.
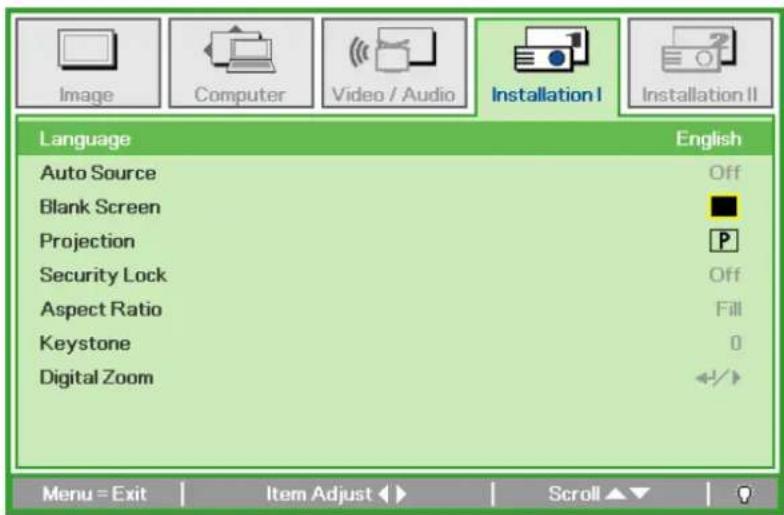
- Press the cursor ◀▶ button until the language you want is highlighted.
- Press the Menu button twice to close the OSD.
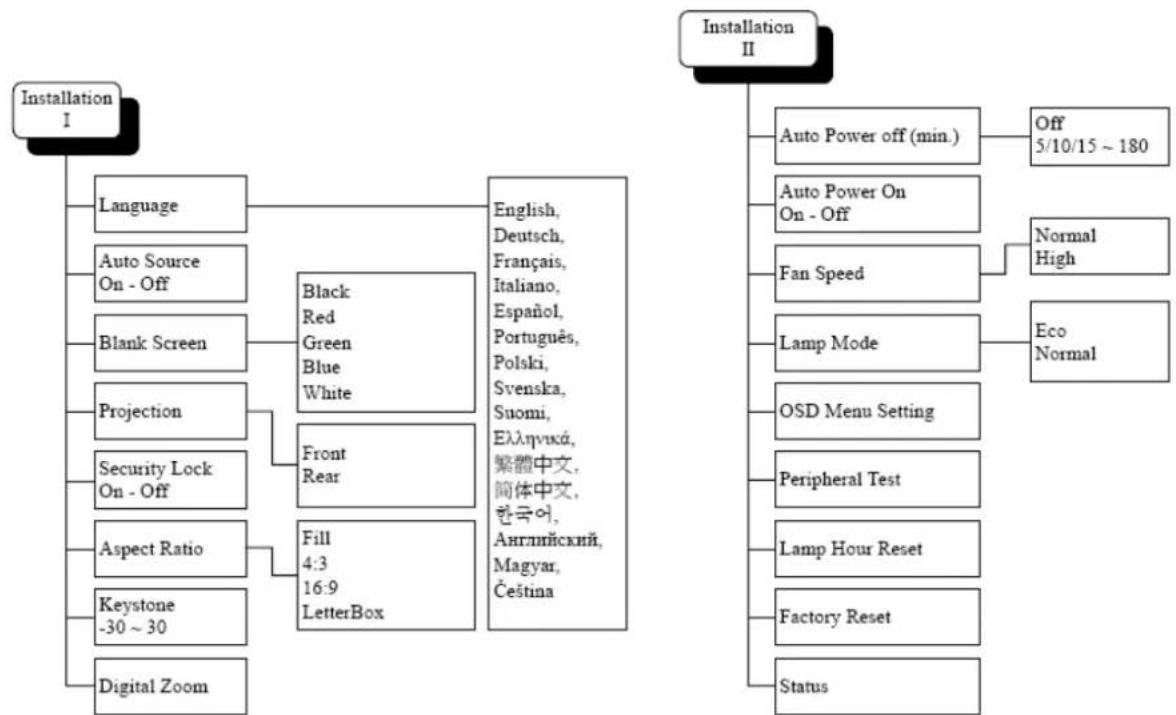
OSD Menu Overview
Use the following illustration to quickly find a setting or determine the range for a setting.

flowchart
graph TD
    A["Image"] --> B["Display Mode"]
    A --> C["Brilliant Color 0 ~ 2"]
    A --> D["Brightness 0 ~ 100"]
    A --> E["Contrast 0 ~ 100"]
    A --> F["Sharpness 0 ~ 31"]
    A --> G["Gamma"]
    A --> H["Color Space"]
    A --> I["Color Temperature"]
    A --> J["Color Manager"]
    A --> K["Reset"]

    L["Computer"] --> M["Presentation Bright Game Movie TV sRGB User"]
    L --> N["PC MAC Video Chart B&W"]
    L --> O["Auto RGB YCbCr YPbPr"]
    L --> P["6500 K 9300 K 10500 K"]

    Q["Video / Audio"] --> R["Horizontal Position"]
    Q --> S["Vertical Position"]
    Q --> T["Frequency"]
    Q --> U["Tracking -5 ~ 5"]
    Q --> V["Auto Image"]

    W["Video AGC On - Off"] --> X["Video AGC On - Off"]
    Y["Video Saturation 0 ~ 100"] --> Z["Video Saturation 0 ~ 100"]
    AA["Video Tint 0 ~ 100"] --> AB["Video Tint 0 ~ 100"]
    AC["Film Mode"] --> AD["Film Mode"]
    AE["Video Overscan On - Off"] --> AF["Video Overscan On - Off"]
    AG["Volume 0 ~ 8"] --> AH["Volume 0 ~ 8"]
    AI["Mute On - Off"] --> AJ["Mute On - Off"]
    AK["Reset"] --> AL["Reset"]

    M --> Q
    S --> Q
    T --> Q
    U --> Q
    V --> Q
    X --> Q
    Y --> Q
    Z --> Q
    AD --> Q
    AF --> Q
    AH --> Q
    AI --> Q
    AL --> Q
flowchart
graph TD
    A["Installation I"] --> B["Language"]
    A --> C["Auto Source On - Off"]
    A --> D["Blank Screen"]
    A --> E["Projection"]
    A --> F["Security Lock On - Off"]
    A --> G["Aspect Ratio"]
    A --> H["Keystone -30 ~ 30"]
    A --> I["Digital Zoom"]

    B --> J["Black Red Green Blue White"]
    C --> K["Front Rear"]
    D --> L["Fill 4:3 16:9 LetterBox"]

    M["Installation II"] --> N["Auto Power off (min.)"]
    M --> O["Auto Power On On - Off"]
    M --> P["Fan Speed"]
    M --> Q["Lamp Mode"]
    M --> R["OSD Menu Setting"]
    M --> S["Peripheral Test"]
    M --> T["Lamp Hour Reset"]
    M --> U["Factory Reset"]
    M --> V["Status"]

    N --> W["Off 5/10/15 ~ 180"]
    O --> X["Normal High"]
    P --> Y["Eco Normal"]
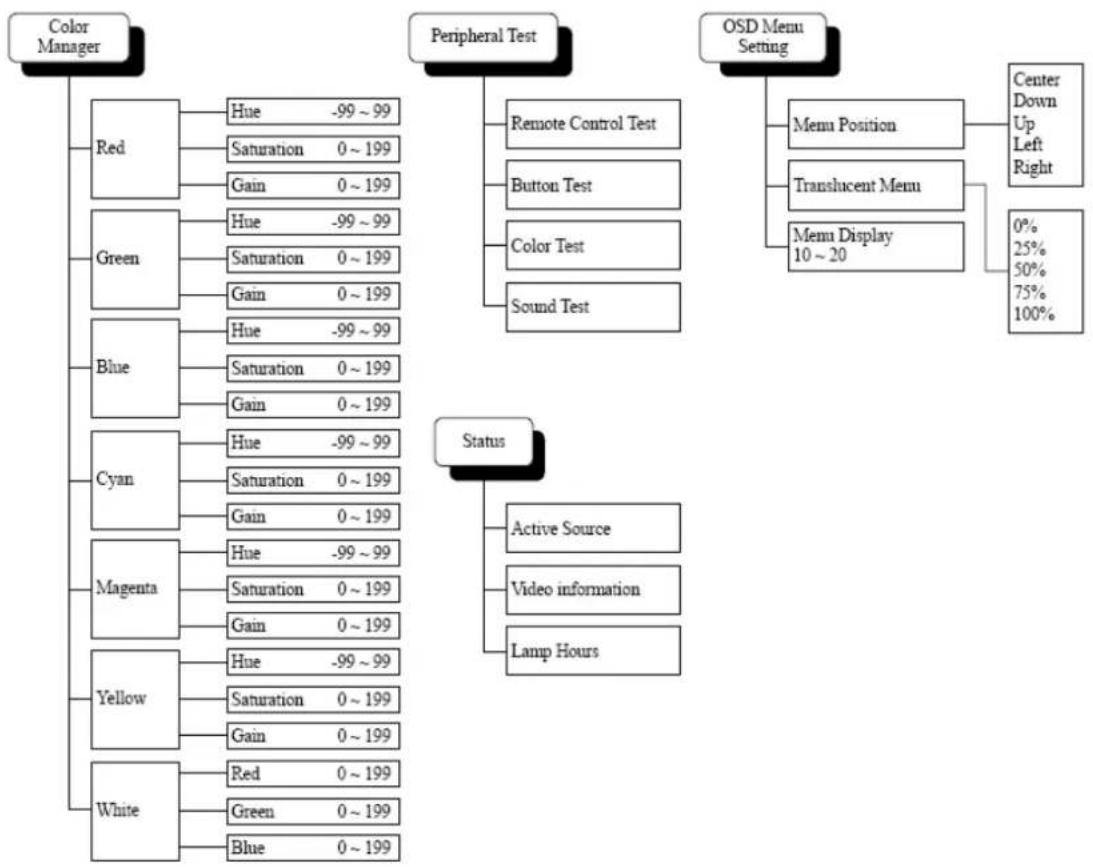
OSD Sub-Menu Overview
flowchart
graph TD
    A["Color Manager"] --> B["Red"]
    A --> C["Green"]
    A --> D["Blue"]
    A --> E["Cyan"]
    A --> F["Magenta"]
    A --> G["Yellow"]
    A --> H["White"]

    B --> I["Hue -99 ~ 99"]
    B --> J["Saturation 0 ~ 199"]
    B --> K["Gain 0 ~ 199"]

    C --> L["Hue -99 ~ 99"]
    C --> M["Saturation 0 ~ 199"]
    C --> N["Gain 0 ~ 199"]

    D --> O["Hue -99 ~ 99"]
    D --> P["Saturation 0 ~ 199"]
    D --> Q["Gain 0 ~ 199"]

    E --> R["Hue -99 ~ 99"]
    E --> S["Saturation 0 ~ 199"]
    E --> T["Gain 0 ~ 199"]

    F --> U["Hue -99 ~ 99"]
    F --> V["Saturation 0 ~ 199"]
    F --> W["Gain 0 ~ 199"]

    G --> X["Hue -99 ~ 99"]
    G --> Y["Saturation 0 ~ 199"]
    G --> Z["Gain 0 ~ 199"]

    H --> AA["Red 0 ~ 199"]
    H --> AB["Green 0 ~ 199"]
    H --> AC["Blue 0 ~ 199"]

    I --> AD["Remote Control Test"]
    I --> AE["Button Test"]
    I --> AF["Color Test"]
    I --> AG["Sound Test"]

    J --> AH["OSD Menu Setting"]
    K --> AH
    L --> AH
    M --> AH
    N --> AH
    O --> AH
    P --> AH
    Q --> AH
    R --> AH
    S --> AH
    T --> AH
    U --> AH
    V --> AH
    W --> AH
    X --> AH
    Y --> AH
    Z --> AH
    AA --> AI["Menu Position"]
    AA --> AJ["Translucent Menu"]
    AA --> AK["Menu Display 10 ~ 20"]

    AH --> AL["Center Down Up Left Right"]
    AH --> AM["0% 25% 50% 75% 100%"]

    AI --> AD
    AJ --> AH
    AK --> AH
Image Menu
Press the Menu button to open the OSD menu. Press the cursor ◀▶ button to move to the Image Menu. Press the cursor ▲▼ button to move up and down in the Image menu. Press ◀▶ to change values for settings.

| ITEM DESCRIPTION | |
| Display Mode | Press the cursor ◀► button to set the display mode. |
| Brilliant Color | Press the cursor ◀► button to adjust the Brilliant Color value. |
| Brightness | Press the cursor ◀► button to adjust the display brightness. |
| Contrast | Press the cursor ◀► button to adjust the display contrast. |
| Sharpness | Press the cursor ◀► button to adjust the display sharpness level. |
| Gamma | Press the cursor ◀► button to adjust the gamma correction of the display. |
| Color Space | Press the cursor ◀► button to adjust the color space. |
| Color Temperature | Press the cursor ◀► button to select different color temperature. |
| Color Manager | Press Enter / ► to enter the color manager menu.See Color Manager on page 23 for more information. |
| Reset | Press Enter / ► to reset all settings to default values. |
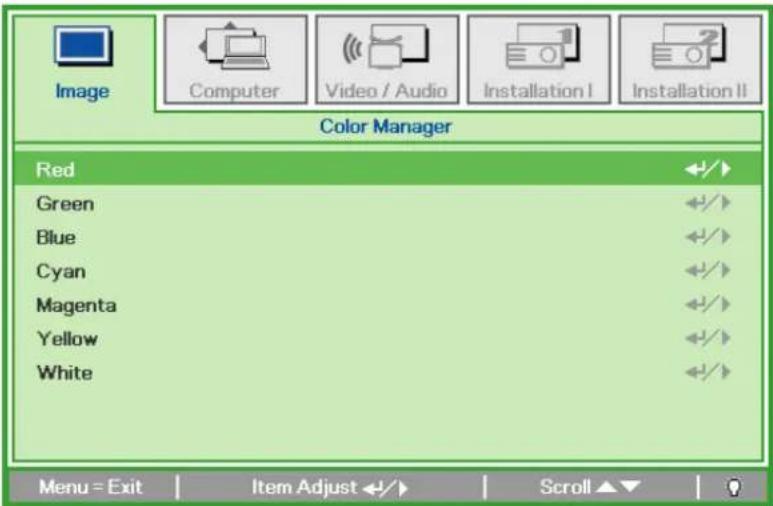
Color Manager
Press ◀(Enter) / ▶ to enter the color manger sub menu.
| ITEM DESCRIPTION | |
| Red | Select to enter the Red Color Manager.Press the ◀▶ buttons to adjust the Hue, Saturation, and Gain. |
| Green | Select to enter the Green Color Manager.Press the ◀▶ buttons to adjust the Hue, Saturation, and Gain. |
| Blue | Select to enter the Blue Color Manager.Press the ◀▶ buttons to adjust the Hue, Saturation, and Gain. |
| Cyan | Select to enter the Cyan Color Manager.Press the ◀▶ buttons to adjust the Hue, Saturation, and Gain. |
| Magenta | Select to enter the Magenta Color Manager.Press the ◀▶ buttons to adjust the Hue, Saturation, and Gain. |
| Yellow | Select to enter the Yellow Color Manager.Press the ◀▶ buttons to adjust the Hue, Saturation, and Gain. |
| White | Select to enter the White Color Manager.Press the ◀▶ buttons to adjust the Hue, Saturation, and Gain. |
Computer Menu
Press the Menu button to open the OSD menu. Press the cursor ◀▶ button to move to the Computer menu. Press the cursor ▲▼ button to move up and down in the computer menu. Press ◀▶ to change values for settings.

| ITEM DESCRIPTION | |
| Horizontal Position | Press the cursor ◀▶ button to adjust the display position to left or right. |
| Vertical Position | Press the cursor ◀▶ button to adjust the display position to up or down. |
| Frequency | Press the cursor ◀▶ button to adjust the A/D sampling clock. |
| Tracking | Press the cursor ◀▶ button to adjust the A/D sampling dot. |
| Auto Image | Press ←(Enter) / ▶ to automatically adjustment for phase, tracking, size and position. |
Video/Audio Menu
Press the Menu button to open the OSD menu. Press the cursor ◀▶ button to move to the Video/Audio menu. Press the cursor ▲▼ button to move up and down in the Video/Audio menu. Press ◀▶ to change values for settings.
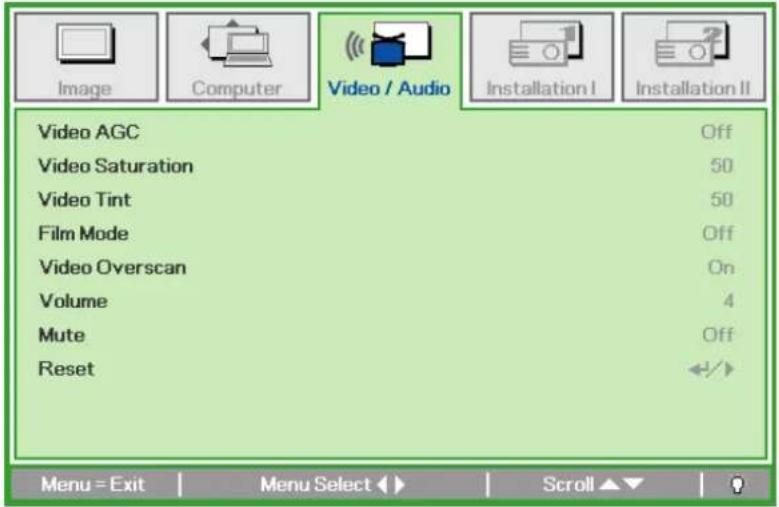
| ITEM DESCRIPTION | |
| Video AGC | Press the ◀▶ buttons to enable or disable the Automatic Gain Control for video source. |
| Video Saturation | Press the ◀▶ buttons to adjust the video saturation. |
| Video Tint | Press the ◀▶ buttons to adjust the video tint/hue. |
| Film Mode | Press the ◀▶ buttons to select a different film mode. |
| Video Overscan | Press the ◀▶ buttons to enable or disable video over scan. |
| Volume | Press the ◀▶ buttons to adjust the audio volume level. |
| Mute | Press the ◀▶ buttons to turn On or Off the speaker. |
| Reset | Press Enter / ▶ to reset all settings to default values. |
Note:
Video jagging may occur when playing interlace video. To overcome this issue, open the Video / Audio menu and adjust the Film Mode feature.
Installation I Menu
Press the Menu button to open the OSD menu. Press the cursor ◀▶ button to move to the Installation I menu. Press the cursor ▲▼ button to move up and down in the Installation I menu. Press ◀▶ to change values for settings.
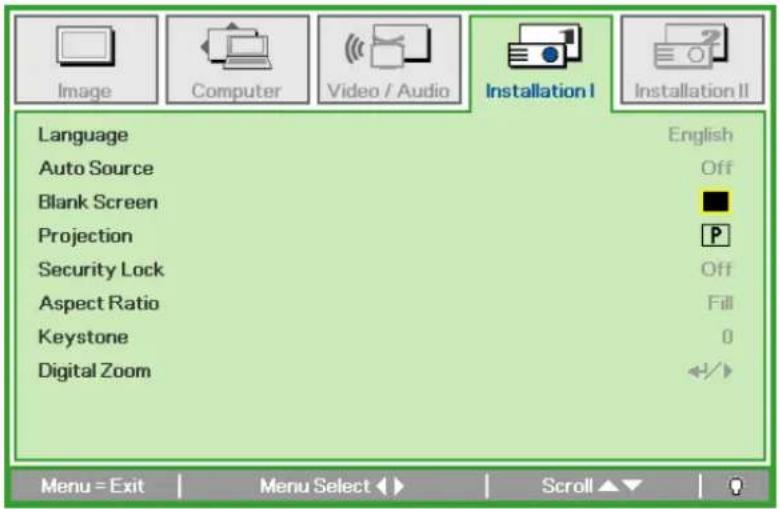
| ITEM DESCRIPTION | |
| Language | Press the cursor ◀► button to select a different localization menu. |
| Auto Source | Press the cursor ◀► button to enable or disable the automatically searching of all input port to find out the valid source. |
| Blank Screen | Press the cursor ◀► button to select different color to blank the screen. |
| Projection | Press the cursor ◀► button to choose from two projection methods: |
| Security Lock | Press the cursor ◀► button to enable or disable security lock function. |
| Aspect Ratio | Press the cursor ◀► button to adjust the video aspect ratio.Note:The Aspect Ratio function is only accessible when the Digital Zoom is not active. |
| Keystone | Press the cursor ◀► button to adjust the display keystone. |
| Digital Zoom | Press Enter / ► to enter the Digital Zoom menu. Press ▲ to zoom in; press ▼ to zoom out.Use the▲▼ buttons to employ the Pan function.Note:You must zoom in before the Pan menu is accessible.Note:Digital zoom is disabled in SXGA/SXGA+/UXGA resolutions. |
Installation II Menu
Press the Menu button to open the OSD menu. Press the cursor ◀▶ button to move to the Installation II menu. Press the cursor ▲▼ button to move up and down in the Installation II menu.
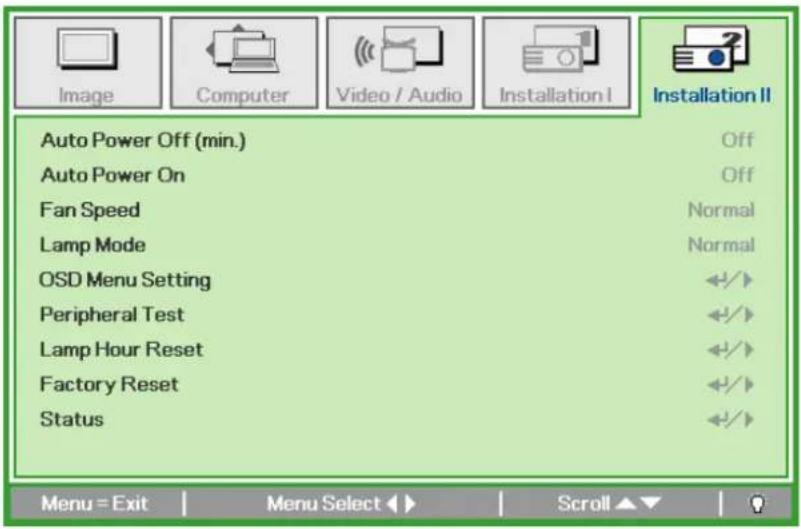
| ITEM DESCRIPTION | |
| Auto Power Off (min.) | Press the cursor ◀► button to enable or disable automatic shutdown of lamp when no signal. |
| Auto Power On | Press the cursor ◀► button to enable or disable automatic power On when AC power is supplied. |
| Fan Speed | Press the cursor ◀► button to toggle between Normal and High fan speeds.Note: We recommend selecting high speed in high temperatures, high humidity, or high altitude areas. |
| Lamp Mode | Press the cursor ◀► button to select the lamp mode for higher brightness or lower brightness to save lamp life. |
| OSD Menu Setting | Press ←(Enter) / ► to enter the OSD setting menu. See page 18 for more information on OSD setting menu. |
| Peripheral Test | Press ←(Enter) / ► to enter the Peripheral Test menu. See page 29 for more information on Peripheral Test. |
| Lamp Hour Reset | Press ←(Enter) / ► to confirm lamp hour reset. Press Menu to cancel. See page 29 for more information on Lamp Hour Reset. |
| Factory Reset | Press ←(Enter) / ► to reset the entire item to default value. See page 30 for more information on Factory Reset. |
| Status | Press ←to (Enter) status menu. See page 30 for more information on Status. |
OSD Menu Setting

| ITEM DESCRIPTION | |
| Menu Position | Press ◀► button to select different OSD location. |
| Translucent Menu | Press ◀► button to select OSD background translucent level. |
| Menu Display | Press ◀► button to select OSD timeout delay. |
Peripheral Test
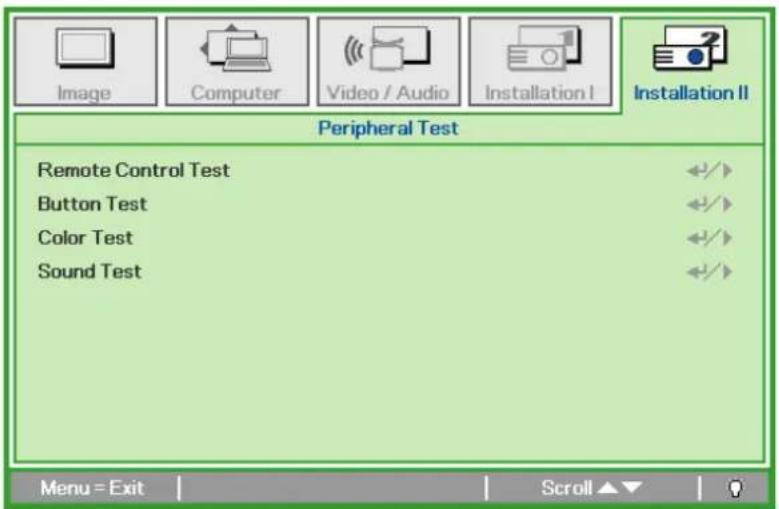
| ITEM DESCRIPTION | |
| Remote Control Test | Press ← (Enter) / ▶ to test the IR remote controller for diagnostic. |
| Button Test | Press ← (Enter) / ▶ to test the button on keypad. |
| Color Test | Press ← (Enter) / ▶ to select different colors on screen. |
| Sound Test | Press ← (Enter) / ▶ to test the sound function of the internal speaker. |
Lamp Hour Reset

Please refer to Resetting the Lamp on page 33 to reset the lamp hour counter.
Factory Reset
Press the cursor ▲▼ button to move up and down in the Installation II menu. Select the Factory Reset sub menu and press ←(Enter) / ▶ to reset all the menu items to the factory default values.

Status
Press the cursor ▲▼ button to move up and down in the Installation II menu. Select the Installation II sub menu and press ← (Enter) / ▶ to enter the Status sub menu.

| ITEM DESCRIPTION | |
| Active Source Display | the activated source. |
| Video Information Displays resolution/video information for RGB source and color standard for Video source. | |
| Lamp Hours Lamp hour used information is displayed. ECO and Normal counter are separated. | |
MAINTENANCE AND SECURITY
Replacing the Projection Lamp
The projection lamp should be replaced when it burns out. It should only be replaced with a certified replacement part, which you can order from your local dealer.
Important:
a. The projection lamp used in this product contains a small amount of mercury
b. Do not dispose this product with general household waste.
c. Disposal of this product must be carried out in accordance with the regulations of your local authority.
Warning:
Be sure to turn off and unplug the projector at least 30 minutes before replacing the lamp. Failure to do so could result in a severe burn.
-
Loosen the two captive screws on the lamp compartment cover (A).
-
Remove the lamp compartment cover (B).

- Remove the two screws from the lamp module (A).
- Lift the module handle up (B).
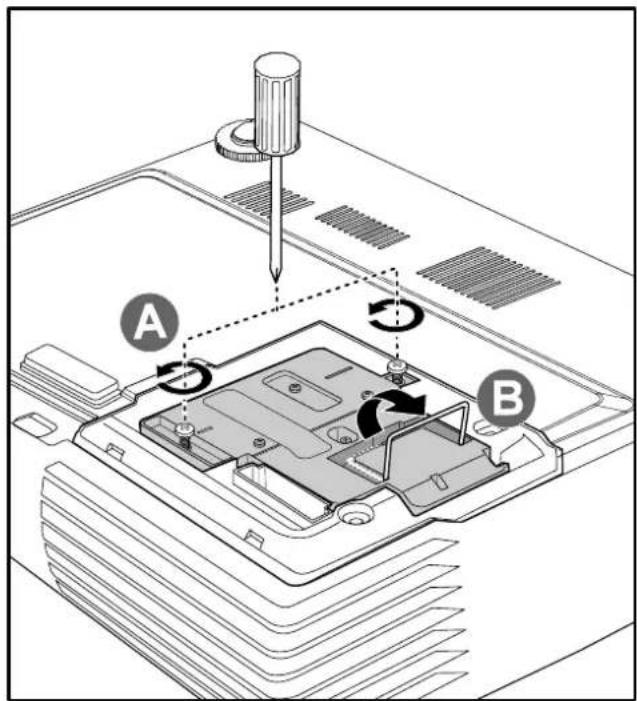
- Pull firmly on the module handle to remove the lamp module.

natural_image
Technical illustration of a mechanical device with an upward arrow indicating motion or assembly (no text or symbols present)- Reverse steps 1 to 5 to install the new lamp module. While installing, align the lamp module with the connector and ensure it is level to avoid damage.
Note: The lamp module must sit securely in place and the lamp connector must be connected properly before tightening the screws.

natural_image
Technical diagram of a mechanical component with a black arrow indicating a downward force or adjustment, no visible text or symbols.Resetting the Lamp
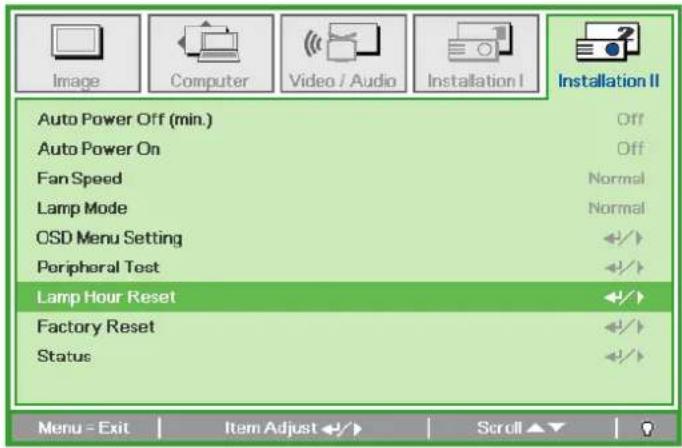
After replacing the lamp, you should reset the lamp hour counter to zero. Refer to the following:
- Press the Menu button to open the OSD menu.
- Press the cursor ◀▶ button to move to the Installation II menu.
- Press the cursor ▲▼ button to move down to Lamp Hour Reset.
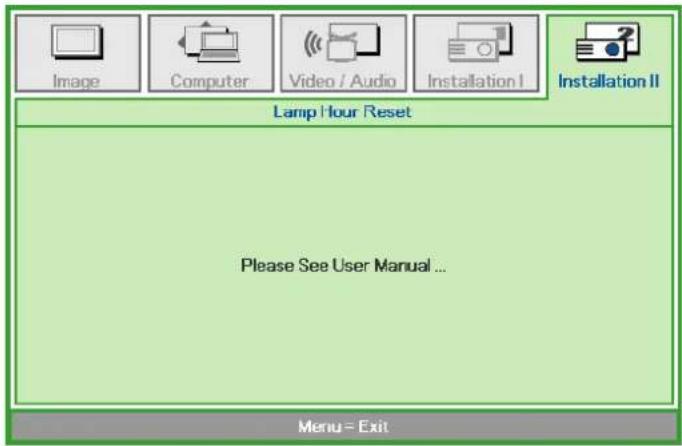
- Press the cursor ▶ or ← button. A message screen appears.
- Press ▼▲◀▶ buttons to reset the lamp hour.
- Press the Menu button to get back to Installation II.
Cleaning the Projector
Cleaning the projector to remove dust and grime will help ensure trouble-free operation.
Warning:
- Be sure to turn off and unplug the projector at least 30 minutes before cleaning. Failure to do so could result in a severe burn.
- Use only a dampened cloth when cleaning. Do not allow water to enter the ventilation openings on the projector.
- If a little water gets into the projector interior while cleaning, leave unplugged in a well-ventilated room for several hours before using.
- If a lot of water gets into the projector interior when cleaning, have the projector serviced.
Cleaning the Lens
You can purchase optic lens cleaner from most camera stores. Refer to the following to clean the projector lens.
- Apply a little optic lens cleaner to a clean soft cloth. (Do not apply the cleaner directly to the lens.)
- Lightly wipe the lens in a circular motion.
Caution:
-
Do not use abrasive cleaners or solvents.
-
To prevent discoloration or fading, avoid getting cleaner on the projector case.
Cleaning the Case
Refer to the following to clean the projector case.
- Wipe off dust with a clean dampened cloth.
- Moisten the cloth with warm water and mild detergent (such as used to wash dishes), and then wipe the case.
- Rinse all detergent from the cloth and wipe the projector again.
Caution:
To prevent discoloration or fading of the case, do not use abrasive alcohol-based cleaners.
Using the Kensington® Lock
If you are concerned about security, attach the projector to a permanent object with the Kensington slot and a security cable.

Note:
Contact your vendor for details on purchasing a suitable Kensington security cable.
The security lock corresponds to Kensington's MicroSaver Security System. If you have any comment, contact: Kensington, 2853 Campus Drive, San Mateo, CA 94403, U.S.A. Tel: 800-535-4242, http://www.Kensington.com.
Common problems and solutions
These guidelines provide tips to deal with problems you may encounter while using the projector. If the problem remains unsolved, contact your dealer for assistance.
Often after time spent troubleshooting, the problem is traced to something as simple as a loose connection. Check the following before proceeding to the problem-specific solutions.
• Use some other electrical device to confirm that the electrical outlet is working.
- Ensure the projector is turned on.
- Ensure all connections are securely attached.
- Ensure the attached device is turned on.
- Ensure a connected PC is not in suspending mode.
- Ensure a connected notebook computer is configured for an external display. (This is usually done by pressing an Fn-key combination on the notebook.)
Tips for Troubleshooting
In each problem-specific section, try the steps in the order suggested. This may help you to solve the problem more quickly.
Try to pin point the problem and thus avoid replacing non-defective parts.
For example, if you replace batteries and the problem remains, put the original batteries back and go to the next step.
Keep a record of the steps you take when troubleshooting: The information may be useful when calling for technical support or for passing on to service personnel.
LED Error Messages
| ERROR CODE MESSAGES | Power LED Blink | Over Temp LED | Ready LED Blink | |
| Over temperature | 0 | ON | ||
| Thermal break status error 4 0 0 | ||||
| Lamp error | 5 | 0 | ||
| Fan1 error | 6 | 0 | ||
| Fan2 error | 6 | 0 | ||
| Fan3 error | 6 | 0 | ||
| Lamp door | open | 7 | ||
| DMD error | 8 | 0 | ||
| Color wheel error 9 0 0 | ||||
In the event of an error, please disconnect the AC power cord and wait for one (1) minute before re-starting the projector. If the Power or Ready LEDs are still blinking or the Over Temp LED is lit, contact your service center.
Image Problems
Problem: No image appears on the screen
- Verify the settings on your notebook or desktop PC.
- Turn off all equipment and power up again in the correct order.
Problem: The image is blurred
- Adjust the Focus on the projector.
- Press the Auto button on the remote control or projector.
- Ensure the projector-to-screen distance is within the 10-meter (33-feet) specified range.
- Check that the projector lens is clean.
Problem: The image is wider at the top or bottom (trapezoid effect)
- Position the projector so it is as perpendicular to the screen as possible.
- Use the Keystone button on the remote control or Quick Menu on the projector to correct the problem.
Problem: The image is reversed
Check the Projection setting on the Installation I menu of the OSD.
Problem: The image is streaked
- Set the Frequency and Tracking settings on the Computer menu of the OSD to the default settings.
- To ensure the problem is not caused by a connected PC's video card, connect to another computer.
Problem: The image is flat with no contrast
Adjust the Contrast setting on the Image menu of the OSD.
Problem: The color of the projected image does not match the source image.
Adjust the Color Temperature and Gamma settings on the Image menu of the OSD.
Lamp Problems
Problem: There is no light from the projector
- Check that the power cable is securely connected.
- Ensure the power source is good by testing with another electrical device.
- Restart the projector in the correct order and check that the Power LED is green.
- If you have replaced the lamp recently, try resetting the lamp connections.
- Replace the lamp module.
- Put the old lamp back in the projector and have the projector serviced.
Problem: The lamp goes off
- Power surges can cause the lamp to turn off. Re-plug power cord. When the Ready LED is on, press the power button.
- Replace the lamp module.
- Put the old lamp back in the projector and have the projector serviced.
Remote Control Problems
Problem: The projector does not respond to the remote control
- Direct the remote control towards remote sensor on the projector.
- Ensure the path between remote and sensor is not obstructed.
- Turn off any fluorescent lights in the room.
- Check the battery polarity.
- Replace the batteries.
- Turn off other Infrared-enabled devices in the vicinity.
- Have the remote control serviced.
Audio Problems
Problem: There is no sound
- Adjust the volume on the remote control.
- Adjust the volume of the audio source.
- Check the audio cable connection.
- Test the source audio output with other speakers.
- Have the projector serviced.
Problem: The sound is distorted
- Check the audio cable connection.
- Test the source audio output with other speakers.
- Have the projector serviced.
Having the Projector Serviced
If you are unable to solve the problem, you should have the projector serviced. Pack the projector in the original carton. Include a description of the problem and a checklist of the steps you took when trying to fix the problem: The information may be useful to service personnel. For servicing, return the projector to the place you purchased it.
Specifications
| Model | D326MX D326WX | |
| Display type | TI DMD Type X, 0.55 inches, XGA TI | DMD Type X, 0.65 inches, WXGA |
| Resolution | XGA 1024x768 Native WXGA 1 | 280x768 Native |
| Projection distance | 1.5 meters ~ 10 meters | |
| Projection screen size | 34 to 260 inches 39 to 300 inches | |
| Projection lens | Manual focus / Manual zoom | |
| Zoom ratio | 1.15:1 | |
| Vertical keystone correction | +/- 15 degrees | |
| Projection methods | Desktop front/rear | |
| Data compatibility | IBM PC or compatibles (VGA, SVGA, XGA, SXGA, UXGA), Mac | |
| SDTV/EDTV/ HDTV | 480i, 576i, 480p, 576p, 720p, 1080i | |
| Video compatibility | NTSC/NTSC 4.43, PAL (B/G/H/I/M/N 60), SECAM | |
| H-Sync | 15, 31 - 70 KHz 15, 31 - 90 KHz | |
| V-Sync | 50 - 85 Hz | |
| Safety certification | FCC-B, UL, cUL, CB, CE, CCC | |
| Operation temperature | 5° ~ 35°C | |
| Dimensions | 220 mm (W) x 71 mm (H) x 178 mm (D) | |
| AC Input | AC Universal 100 ~ 240, Typical @ 110 VAC (100~240)/±10% | |
| Power consumption | Typical 260W (standard mode); Typical 210W (ECO mode) | |
| Stand By | < 5 watts | |
| Lamp | Normal Mode: 200W; Eco Mode: 160W | |
| Audio speaker | 1W / 4 ohm mono speaker | |
| PC | RGB | |
| Video | Composite video (RCA X 1) Composite video (RCA X 1); HDMI | |
| S-Video (Mini-DIN) | ||
| Audio | Mini-jack | |
| Security | Kensington lock | |
Input connectors
| PC | VGA |
| USB (Service only) | |
| Video | Composite video (RCAx1) |
| S-Video (Mini-DIN); HDMI | |
| Audio | Mini-jack |
| Security | Kensington slot |
Projection Distance V.S. Projection Size
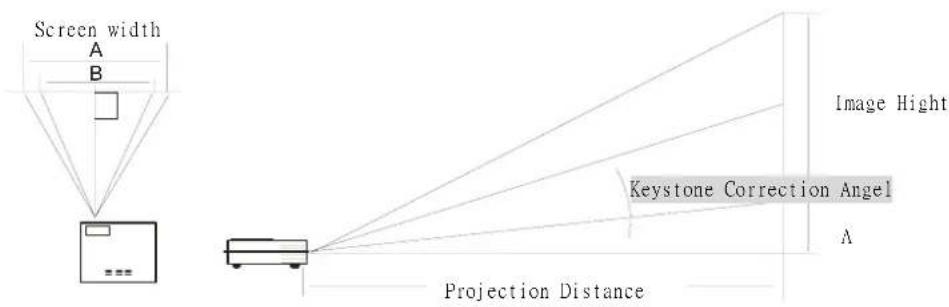
| Projection Distance L | Maximum Screen Size (W) Maximum Screen Size (Tele) | ||||||||||
| diagonal | Height C | Width A | Projection Distance | diagonal | Height D | Width B | |||||
| XGA | WXGA | XGA | WXGA | XGA | WXGA | XGA | WXGA | ||||
| 1.16m | 0.76m | 0.89m | 0.46m | 0.61m | 0.76m | 1.34m | 0.76m | 0.89m | 0.46m | 0.61m | 0.76m |
| 3.8' | 30" | 35" | 18" | 24" | 30" | 4.4' | 30" | 35" | 18" | 24" | 30" |
| 2.32m | 1.52m | 1.78m | 0.91m | 1.22m | 1.52m | 2.68m | 1.52m 1.78m | 0.91m | 1.22m | 1.52m | |
| 7.6' | 60" | 70" | 36" | 48" | 60" | 8.8' | 60" | 70" | 36" | 48" | 60" |
| 3.47m | 2.29m | 2.67m | 1.37m | 1.83m | 2.29m | 4.02m | 2.29m | 2.67m | 1.37m | 1.83m | 2.29m |
| 11.4' | 90" | 105" | 54" | 72" | 90" | 13.2' | 90" | 105" | 54" | 72" | 90" |
| 4.63m | 3.05m | 3.55m | 1.83m | 2.44m | 3.05m | 5.36m | 3.05m | 3.55m | 1.83m | 2.44m | 3.05m |
| 15.2' | 120" | 140" | 72" | 96" | 120" | 17.6' | 120" | 140" | 72" | 96" | 120" |
| 5.79m | 3.81m | 4.44m | 2.29m | 3.05m | 3.81m | 6.71m | 3.81m | 4.44m | 2.29m | 3.05m | 3.81m |
| 19' | 150" | 175" | 90" | 120" | 150" | 22' | 150" | 175" | 90" | 120" | 150" |
| 7.72m | 5.08m | 5.92m | 3.05m | 4.06m | 5.08m | 8.94m | 5.08m | 5.92m 3.05m | 4.06m | 5.08m | |
| 25.3' | 200" | 233" | 120" | 160" | 200" | 29.3' | 200" | 233" | 120" | 160" | 200" |
| 9.65m | 6.35m | 7.41m | 3.81m | 5.08m | 6.35m | 1.18m | 6.35m | 7.41m 3.81m | 5.08m | 6.35m | |
| 31.7' | 250" | 292" | 150" | 200" | 250" | 36.7' | 250" | 292" | 150" | 200" | 250" |
| 11.58m | 7.62m | 4.57m | 6.1m | ||||||||
| 38' | 300" | 180" | 240" | ||||||||
Timing Mode Table
The projector can display several resolutions. The following table outlines the resolutions that can be displayed by the projector.
| Signal | Resolution | Frequency (KHz) | Refresh Rate(Hz) | XGA WXGA | Video Digital Analog | ||||
| Video | Digital Analog | ||||||||
| NTSC | -- | 15.734 | 60.0 | ○ | -- | -- | ○ | -- | -- |
| PAL/ SECAM | -- | 15.625 | 50.0 | ○ | -- | -- | ○ | -- | -- |
| VESA | 640 x 350 | 31.5 | 70.1 | -- | -- | ○ | -- | ○ | ○ |
| 640 x 350 | 37.9 | 85.1 | -- | -- | ○ | -- | ○ | ○ | |
| 720 x 350 | 31.5 | 70 | -- | -- | ○ | -- | ○ | ○ | |
| 640 x 400 | 31.5 | 70.1 | -- | -- | ○ | -- | ○ | ○ | |
| 640 x 400 | 37.9 | 85.1 | -- | -- | ○ | -- | ○ | ○ | |
| 720 x 400 | 31.5 | 70 | -- | -- | ○ | -- | ○ | ○ | |
| 720 x 400 | 37.9 | 85 | -- | -- | ○ | -- | ○ | ○ | |
| 640 x 480 | 31.5 | 60 | -- | -- | ○ | -- | ○ | ○ | |
| 640 x 480 | 37.9 | 72.8 | -- | -- | ○ | -- | ○ | ○ | |
| 640 x 480 | 37.5 | 75 | -- | -- | ○ | -- | ○ | ○ | |
| 640 x 480 | 43.3 | 85 | -- | -- | ○ | -- | ○ | ○ | |
| 800 x 600 | 35.2 | 56.3 | -- | -- | ○ | -- | ○ | ○ | |
| 800 x 600 | 37.9 | 60.3 | -- | -- | ○ | -- | ○ | ○ | |
| 800 x 600 | 46.9 | 75 | -- | -- | ○ | -- | ○ | ○ | |
| 800 x 600 | 48.1 | 72.2 | -- | -- | ○ | -- | ○ | ○ | |
| 800 x 600 | 53.7 | 85.1 | -- | -- | ○ | -- | ○ | ○ | |
| 1024 x 768 | 48.4 | 60 | -- | -- | ○ | -- | ○ | ○ | |
| 1024 x 768 | 56.5 | 70.1 | -- | -- | ○ | -- | ○ | ○ | |
| 1024 x 768 | 57.7 | 72 | -- | -- | ○ | -- | ○ | ○ | |
| 1024 x 768 | 60.0 | 75 | -- | -- | ○ | -- | ○ | ○ | |
| 1024 x 768 | 68.7 | 85 | -- | -- | ○ | -- | ○ | ○ | |
| 1280 x 1024 | 64.0 | 60 | -- | -- | ○ | -- | ○ | ○ | |
| 1280 x 1024 | 80.0 | 75 | -- | -- | ○ | -- | ○ | ○ | |
| 1280 x 1024 | 91.1 | 85 | -- | -- | ○ | -- | ○ | ○ | |
| 1280 x 768 | 47.4 | 60 | -- | -- | ○ | -- | ○ | ○ | |
| 1600 x 1200 | 75.0 | 60 | -- | -- | ○ | -- | ○ | ○ | |
| Signal | Resolution | Frequency (KHz) | Refresh Rate (Hz) | XGA WXGA | |||||
| Video | Digital | Analog | Video | Digital | Analog | ||||
| Macbook相容性 | 800x600 | -- | 60 | -- | -- | ○ | -- | ○ | ○ |
| 800x600 | -- | 72 | -- | -- | ○ | -- | ○ | ○ | |
| 800x600 | -- | 75 | -- | -- | ○ | -- | ○ | ○ | |
| 800x600 | -- | 85 | -- | -- | ○ | -- | ○ | ○ | |
| 1024x768 | -- | 60 | -- | -- | ○ | -- | ○ | ○ | |
| 1024x768 | -- | 70 | -- | -- | ○ | -- | ○ | ○ | |
| 1024x768 | -- | 75 | -- | -- | ○ | -- | ○ | ○ | |
| 1024x768 | -- | 85 | -- | -- | ○ | -- | ○ | ○ | |
| 1280x720 | -- | 60 | -- | -- | -- | -- | ○ | ○ | |
| 1280x720 | -- | 75 | -- | -- | -- | -- | -- | ○ | |
| 1280x720 | -- | 85 | -- | -- | -- | -- | -- | ○ | |
| 1280x768 | -- | 60 | -- | -- | ○ | -- | ○ | ○ | |
| 1280x768 | -- | 75 | -- | -- | ○ | -- | -- | -- | |
| 1280x768 | -- | 85 | -- | -- | ○ | -- | -- | -- | |
| 1280x800 | -- | 60 | -- | -- | ○ | -- | -- | ○ | |
| 1280x1024 | -- | 60 | -- | -- | -- | -- | ○ | -- | |
| 1280x1024 | -- | 75 | -- | -- | -- | -- | ○ | -- | |
| Mac bookPro(Intel)相容性 | 800x600 | -- | 60 | -- | -- | ○ | -- | ○ | ○ |
| 800x600 | -- | 72 | -- | -- | ○ | -- | ○ | ○ | |
| 800x600 | -- | 75 | -- | -- | ○ | -- | ○ | ○ | |
| 800x600 | -- | 8.5 | -- | -- | ○ | -- | -- | ○ | |
| 1024x768 | -- | 60 | -- | -- | ○ | -- | ○ | ○ | |
| 1024x768 | -- | 70 | -- | -- | ○ | -- | ○ | ○ | |
| 1024x768 | -- | 75 | -- | -- | ○ | -- | ○ | ○ | |
| 1024x778 | -- | 85 | -- | -- | ○ | -- | ○ | ○ | |
| 1280x720 | -- | 60 | -- | -- | ○ | -- | -- | ○ | |
| 1280x720 | -- | 75 | -- | -- | -- | -- | -- | ○ | |
| 1280x720 | -- | 85 | -- | -- | -- | -- | -- | ○ | |
| 1280x768 | -- | 60 | -- | -- | ○ | -- | ○ | ○ | |
| 1280x778 | -- | 75 | -- | -- | ○ | -- | -- | -- | |
| 1280x768 | -- | 85 | -- | -- | ○ | -- | -- | -- | |
| 1280x800 | -- | 60 | -- | -- | ○ | -- | -- | ○ | |
| 1280x1024 | -- | 60 | -- | -- | ○ | -- | -- | ○ | |
| 1280x1024 | -- | 75 | -- | -- | ○ | -- | -- | ○ | |
| Power Mac G5相容性 | 800x600 | -- | 56 | -- | -- | -- | -- | -- | -- |
| 800x600 | -- | 60 | -- | -- | O | -- | -- | O | |
| 800x600 | -- | 72 | -- | -- | O | -- | -- | O | |
| 800x600 | -- | 75 | -- | -- | O | -- | -- | O | |
| 800x600 | -- | 85 | -- | -- | O | -- | -- | O | |
| 1024x768 | -- | 60 | -- | -- | O | -- | -- | O | |
| 1024x768 | -- | 70 | -- | -- | O | -- | -- | O | |
| 1024x768 | -- | 75 | -- | -- | O | -- | -- | O | |
| 1024x768 | -- | 85 | -- | -- | O | -- | -- | O | |
| 1280x720 | -- | 60 | -- | -- | -- | -- | -- | -- | |
| 1280x720 | -- | 75 | -- | -- | -- | -- | -- | -- | |
| 1280x720 | -- | 85 | -- | -- | -- | -- | -- | -- | |
| 1280x768 | -- | 60 | -- | -- | -- | -- | -- | O | |
| 1280x800 | -- | 60 | -- | -- | -- | -- | -- | -- | |
| 1280x1024 | -- | 60 | -- | -- | O | -- | -- | O | |
| 1280x1024 | -- | 75 | -- | -- | O | -- | -- | O | |
| 1280x1024 | -- | 85 | -- | -- | -- | -- | -- | O | |
| Power Mac G4相容性 | 800x600 | -- | 56 | -- | -- | -- | -- | O | -- |
| 800x600 | -- | 60 | -- | -- | O | -- | O | O | |
| 800x600 | -- | 72 | -- | -- | O | -- | O | O | |
| 800x600 | -- | 75 | -- | -- | O | -- | O | O | |
| 800x600 | -- | 85 | -- | -- | O | -- | O | O | |
| 1024x768 | -- | 60 | -- | -- | O | -- | O | O | |
| 1024x768 | -- | 70 | -- | -- | O | -- | O | O | |
| 1024x768 | -- | 75 | -- | -- | O | -- | O | O | |
| 1024x768 | -- | 85 | -- | -- | O | -- | O | O | |
| 1280x720 | -- | 60 | -- | -- | -- | -- | -- | O | |
| 1280x720 | -- | 75 | -- | -- | -- | -- | -- | O | |
| 1280x720 | -- | 85 | -- | -- | -- | -- | -- | O | |
| 1280x768 | -- | 60 | -- | -- | -- | -- | O | O | |
| 1280x800 | -- | 60 | -- | -- | O | -- | -- | O | |
| 1280x1024 | -- | 60 | -- | -- | O | -- | O | O | |
| 1280x1024 | -- | 75 | -- | -- | O | -- | O | O | |
| 1280x1024 | -- | 85 | -- | -- | -- | -- | O | -- | |
| Signal | Resolution | Frequency (KHz) | Refresh Rate(HZ) | XGA WXGA | |||||
| Video | Digital | Analog | Video | Digital | Analog | ||||
| HDTV | 1920 x 1080 | 33.8 | 30.0 | ○ | -- | -- | ○ | -- | -- |
| 1920 x 1080 | 28.1 | 25.0 | ○ | -- | -- | ○ | -- | -- | |
| 1280 x720 | 45.0 | 60.0 | ○ | -- | -- | ○ | -- | -- | |
| SDTV | 720 x 576 | 31.3 | 50.0 | ○ | -- | -- | ○ | -- | -- |
| 720 x 480 | 31.5 | 60.0 | ○ | -- | -- | ○ | -- | -- | |
○: Frequency supported
—: Frequency not supported
- The resolution of the panel for the XGA is 1024 x 768 and 1280 x 768 for the WXGA. Resolution other than native resolution may display with uneven size of text or lines.
• HDTV timing: DVD player (main source), VG828 (secondary source).
Projector Dimensions

FCC Warning
This equipment has been tested and found to comply with the limits for a Class B digital device pursuant to Part 15 of the FCC Rules. These limits are designed to provide reasonable protection against harmful interference when the equipment is operated in a commercial environment.
This equipment generates, uses, and can radiate radio frequency energy and, if not installed and used in accordance with the instruction manual, may cause harmful interference to radio communications. Operation of this equipment in a residential area is likely to cause harmful interference in which case the user will be required to correct the interference at his/her own expense.
Changes or modifications not expressly approved by the parties responsible for compliance could void the user's authority to operate the equipment.
Canada
This class B digital apparatus complies with Canadian ICES-003.
Safety Certifications
FCC-B, UL, and CCC
EN 55022 Warning
This is a Class B product. In a domestic environment, it may cause radio interference, in which case the user may be required to take adequate measures. The typical use is in a conference room, meeting room, or auditorium.
- Disclaimer
- Trademark Recognition
- Important Safety Information
- Important:
- Symbols Used
- Note:
- Caution:
- Warning:
- General Safety Information
- Power Safety
- Replacing the Lamp
- Cleaning the Projector
- Regulatory Warnings
- Main Features
- About this manual
- Table of Contents
- GETTING STARTED....1
- SETUP AND OPERATION....9
- ON-SCREEN DISPLAY (OSD) MENU SETTINGS.... 18
- MAINTENANCE AND SECURITY....31
- TROUBLESHOOTING 36
- SPECIFICATIONS....39
- GETTING STARTED
- Packing Checklist
- Views of Projector Parts
- Bottom view
- Remote Control Parts
- Remote Control Operating Range
- Projector and Remote Control Buttons
- Inserting the Remote Control Batteries
- Connecting Input Devices
- Starting and Shutting down the Projector
- Setting an Access Password (Security Lock)
- Adjusting the Projector Level
- Adjusting the Zoom, Focus and Keystone
- Adjusting the Volume
- ON-SCREEN DISPLAY(OSD) MENU SETTINGS
- OSD Menu Controls
- Navigating the OSD
- Setting the OSD Language
- OSD Menu Overview
- Image Menu
- Color Manager
- Computer Menu
- Video/Audio Menu
- Installation I Menu
- Installation II Menu
- OSD Menu Setting
- Peripheral Test
- Lamp Hour Reset
- Factory Reset
- Status
- MAINTENANCE AND SECURITY
- Replacing the Projection Lamp
- Resetting the Lamp
- Cleaning the Lens
- Cleaning the Case
- Using the Kensington® Lock
- Common problems and solutions
- Tips for Troubleshooting
- Image Problems
- Problem: No image appears on the screen
- Problem: The image is blurred
- Problem: The image is wider at the top or bottom (trapezoid effect)
- Problem: The image is reversed
- Problem: The image is streaked
- Problem: The image is flat with no contrast
- Problem: The color of the projected image does not match the source image.
- Lamp Problems
- Problem: There is no light from the projector
- Problem: The lamp goes off
- Remote Control Problems
- Problem: The projector does not respond to the remote control
- Audio Problems
- Problem: There is no sound
- Problem: The sound is distorted
- Having the Projector Serviced
- Timing Mode Table
- ○: Frequency supported
- —: Frequency not supported
- FCC Warning
- Canada
- Safety Certifications
- EN 55022 Warning
Brand : VIVITEK
Model : D326WX
Category : Video projector