
DVP3570 - DVD player PHILIPS - Free user manual and instructions
Find the device manual for free DVP3570 PHILIPS in PDF.


| Product Type | DVD Player |
| Brand | Philips |
| Model | DVP3570 |
| Dimensions (W x H x D) | 14.2 x 2.0 x 8.5 inches (360 x 50 x 215 mm) |
| Weight | 3.2 lbs (1.45 kg) |
| Power Requirements | 120 V AC, 60 Hz |
| Power Consumption | 8 W (standby: 0.8 W) |
| Disc Compatibility | DVD-Video, DVD+RW/+R, DVD-RW/-R (video mode), CD-DA, CD-RW, CD-R, Kodak Picture CD, MP3, JPEG |
| Playable File Formats | MP3, JPEG |
| Video Outputs | Composite (RCA), S-Video, Component (Y/Pb/Pr), HDMI |
| Audio Outputs | Analog stereo (RCA), Digital coaxial |
| HDMI Resolution | 480p, 720p, 1080i, 1080p (auto selectable) |
| Progressive Scan | Yes (525p/480p), selectable on/off |
| Audio Decoding | Dolby Digital (2-channel downmix), LPCM |
| Special Features | EasyLink (HDMI CEC), Parental Control (Ratings Lock), Zoom, A-B Repeat, Marker Search, Screen Saver |
| Remote Control Battery | 2 x AA (1.5 V) |
| Operating Temperature | 41°F – 104°F (5°C – 40°C) |
| Operating Humidity | Less than 80% (no condensation) |
| Lens Cleaning | Use a cleaning disc or consult service center |
| Safety Certifications | FCC Class B, ICES-003, Laser Class 1 |
Frequently Asked Questions - DVP3570 PHILIPS
User questions about DVP3570 PHILIPS
0 question about this device. Answer the ones you know or ask your own.
Ask a new question about this device
Download the instructions for your DVD player in PDF format for free! Find your manual DVP3570 - PHILIPS and take your electronic device back in hand. On this page are published all the documents necessary for the use of your device. DVP3570 by PHILIPS.
USER MANUAL DVP3570 PHILIPS
For further assistance, call the customer support service in your country.
• To obtain assistance in the U.S.A., Canada, Puerto Rico, or the U.S. Virgin Islands, contact Philips Customer Care Center at 1-866-309-0866
PHILIPS
PRECAUTIONS
The model and serial numbers of this unit may be found on the cabinet.
Model No.:
You should record and retain those numbers for future reference.
Serial No.:
WARNING:
TO REDUCE THE RISK OF FIRE OR ELECTRIC SHOCK, DO NOT EXPOSE THIS APPARATUS TO RAIN OR MOISTURE.
APPARATUS SHALL NOT BE EXPOSED TO DRIPPING OR SPLASHING AND NO OBJECTS FILLED WITH LIQUIDS, SUCH AS VASES, SHALL BE PLACED ON THE APPARATUS.

CAUTION
RISK OF ELECTRIC SHOCK DO NOT OPEN

CAUTION:
TO REDUCE THE RISK OF ELECTRIC SHOCK, DO NOT REMOVE COVER (OR BACK). NO USER SERVICEABLE PARTS INSIDE. REFER SERVICING TO QUALIFIED SERVICE PERSONNEL.
The important note and rating are located on the rear or bottom of the cabinet.

The lightning flash with arrowhead symbol, within an equilateral triangle, is intended to alert the user to the presence of uninsulated "dangerous voltage" within the product's enclosure that may be of sufficient magnitude to constitute a risk of electric shock to persons.

The exclamation point within an equilateral triangle is intended to alert the user to the presence of important operating and maintenance (servicing) instructions in the literature accompanying the appliance.

The symbol for CLASS II (Double Insulation)
IMPORTANT SAFETY INSTRUCTIONS
- Read these instructions.
- Keep these instructions.
- Heed all warnings.
- Follow all instructions.
- Do not use this apparatus near water.
- Clean only with dry cloth.
- Do not block any ventilation openings. Install in accordance with the manufacturer's instructions.
- Do not install near any heat sources such as radiators, heat registers, stoves, or other apparatus (including amplifiers) that produce heat.
-
Do not defeat the safety purpose of the polarized or grounding-type plug. A polarized plug has two blades with one wider than the other. A grounding type plug has two blades and a third grounding prong. The wide blade or the third prong are provided for your safety. If the provided plug does not fit into your outlet, consult an electrician for replacement of the obsolete outlet.
-
Protect the power cord from being walked on or pinched particularly at plugs, convenience receptacles, and the point where they exit from the apparatus.
- Only use attachments / accessories specified by the manufacturer.
- Use only with the cart, stand, tripod, bracket, or table specified by the manufacturer, or sold with the apparatus. When a cart is used, use caution when moving the cart / apparatus combination to avoid injury from tip-over.
- Unplug this apparatus during lightning storms or when unused for long periods of time.
- Refer all servicing to qualified service personnel. Servicing is required when the apparatus has been damaged in any way, such as power-supply cord or plug is damaged, liquid has been spilled or objects have fallen into the apparatus, the apparatus has been exposed to rain or moisture, does not operate normally, or has been dropped.

FCC WARNING
This equipment may generate or use radio frequency energy. Changes or modifications to this equipment may cause harmful interference unless the modifications are expressly approved in the manual. The user could lose the authority to operate this equipment if an unauthorized change or modification is made.
RADIO-TV INTERFERENCE
This equipment has been tested and found to comply with the limits for a Class B digital device, pursuant to Part 15 of the FCC Rules. These limits are designed to provide reasonable protection against harmful interference in a residential installation. This equipment generates, uses, and can radiate radio frequency energy and, if not installed and used in accordance with the instructions, may cause harmful interference to radio communications. However, there is no guarantee that interference will not occur in a particular installation. If this equipment does cause harmful interference to radio or television reception, which can be determined by turning the equipment off and on, the user is encouraged to try to correct the interference by one or more of the following measures:
1) Reorient or relocate the receiving antenna.
2) Increase the separation between the equipment and receiver.
3) Connect the equipment into an outlet on a circuit different from that to which the receiver is connected.
4) Consult the dealer or an experienced radio / TV technician for help.
This Class B digital apparatus complies with Canadian ICES-003.
Disconnect the mains plug to shut off when find trouble or not in use. The mains plug shall remain readily operable.
CAUTION: Danger of explosion if battery is incorrectly replaced. Replace only with the same or equivalent type.
WARNING: Batteries (Battery pack or battery installed) shall not be exposed to excessive heat such as sunshine, fire, or the like.
LASER SAFETY
This apparatus employs a laser. Only a qualified service person should remove the cover or attempt to service this apparatus, due to possible eye injury.
CAUTION: Use of controls or adjustments or performance of procedures other than those specified herein may result in hazardous radiation exposure.
CAUTION: Visible and invisible laser radiation when open and interlocks defeated. Do not stare into beam.
LOCATION: Inside, near the deck mechanism.
IMPORTANT COPYRIGHT INFORMATION
Unauthorized copying, broadcasting, public performance and lending of discs are prohibited. This product incorporates copyright protection technology that is protected by U.S. patents and other intellectual property rights. Use of this copyright protection technology must be authorized by Macrovision, and is intended for home and other limited viewing uses only unless otherwise authorized by Macrovision. Reverse engineering or disassembly is prohibited.
Do not place the unit on the furniture that is capable of being tilted by a child and an adult leaning, pulling, standing or climbing on it. A falling unit can cause serious injury or even death.
To Avoid the Hazards of Electrical Shock and Fire
- Do not handle the AC power cord with wet hands.
- Do not pull on the AC power cord when disconnecting it from an AC outlet. Grasp it by the plug.
- Do not put your fingers or objects into the unit.
Location and Handling
- Do not install the unit in direct sunlight, near strong magnetic fields, or in a place subject to dust or strong vibration.
- Avoid a place with drastic temperature changes.
- Install the unit in a horizontal and stable position. Do not place anything directly on top or bottom of the unit. Depending on your external devices, noise or disturbance of the picture and / or sound may be generated if the unit is placed too close to them. In this case, please ensure enough space between the external devices and the unit.
- Depending on the environment, the temperature of this unit may increase slightly. This is not a malfunction.
- Be sure to remove the disc and unplug the AC power cord from the outlet before carrying the unit.
Dew Condensation Warning
- Dew condensation may form inside the unit in the following conditions. If so, do not use this unit at least for a few hours until its inside gets dry.
- The unit is moved from a cold place to a warm place.
- Under conditions of high humidity.
- After heating a cold room.
Note about Recycling
- This unit's packaging materials are recyclable and can be reused. Please dispose of any materials in accordance with your local recycling regulations.
- Batteries should never be thrown away or incinerated but disposed of in accordance with your local regulations concerning chemical wastes.
Notice for Progressive Scan Output
- Consumers should note that not all high definition television sets are fully compatible with this product and may cause artifacts to be displayed in the picture. In case of picture problems with 525(480) progressive scan output, it is recommended that the user switch the connection to the 'standard definition' output. If there are questions regarding your TV set compatibility with this 525p (480p) DVD player, please contact our customer service center.

Supplied Accessories
remote control with AA (1.5 V) battery x 2
audio/video cables
User Manual Quick Start Guide
registration card
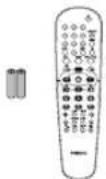


ENERGY STAR® is a joint program of the U.S. Environmental Protection Agency and the U.S. Department of Energy helping us all save money and protect the environment through energy efficient products and practices.
Maintenance
Servicing
- Please refer to relevant topics on "TROUBLESHOOTING" on page 25 before returning the product.
- If you need to call a customer service representative, please know the model number and serial number of your product before you call. This information is displayed on the back of the product. Also, please take a moment to identify the problem you are having, and be prepared to explain this to the representative. If you believe the representative will need to help you with operations, please stay near the product. Our representatives will be happy to assist you. For online reference, please visit our web site at http://www.philips.com/welcome
Cleaning the cabinet
- Wipe the front panel and other exterior surfaces of the unit with a soft cloth.
- Never use a solvent, thinner, benzene or alcohol to clean the unit. Do not spray insecticide liquid near the unit. Such chemicals may discolor the surface or damage the unit.
Cleaning discs
- When a disc becomes dirty, clean it with a cleaning cloth. Wipe the disc from the center to out. Do not wipe in a circular motion.
- Do not use solvents such as benzine, thinner, commercially available cleaners, detergent, abrasive cleaning agents or antistatic spray intended for analog records.
Cleaning the disc lens
- If this unit still does not perform properly although you refer to the relevant sections and to "TROUBLESHOOTING" in this user manual, the laser optical pickup unit may be dirty. Consult your dealer or an Authorized Service Center for inspection and cleaning of the laser optical pickup unit.
Disc handling
- Handle the discs so that fingerprints and dust do not adhere to the surfaces of the discs.
- Always store the disc in its protective case when it is not used.
- Note that discs with special shapes (heart-shaped discs, octagonal discs, etc.) cannot be played back on this unit. Do not attempt to play such discs, as they may damage the unit.
Installation Location
For safety and optimum performance of this unit:
- Install the unit in a horizontal and stable position.
- Keep the unit away from electronic equipment such as an amplifier, TV, etc. to prevent warping, damage, fire and malfunction.
- Do not place anything directly on top of the unit.
- Shield it from direct sunlight and keep it away from devices of intense heat. Avoid dusty or humid places. Avoid places with insufficient ventilation for proper heat dissipation. Do not block the ventilation holes on the sides of the unit. Avoid locations subject to strong vibration or strong magnetic fields.
- Be sure to remove the disc and unplug the AC power cord from the outlet before carrying the unit.
Trademark Information

Manufactured under license from Dolby Laboratories. Dolby and the double-D symbol are trademarks of Dolby Laboratories.

HDMI, the HDMI Logo, and High-Definition Multimedia Interface are trademarks or registered trademarks of HDMI Licensing LLC in the United States and other countries.
DVD is a trademark of DVD Format/Logo Licensing Corporation.
Symbols Used in this User Manual
To specify for which media type each function is, we put the following symbols at the beginning of each item to operate.
* DVD-RW/-R recorded in VR mode or non compatible recording format are not playable.
Symbol Description

Description refers to DVD-video

Description refers to audio CD

Description refers to DVD, CD-RW/-R with MP3 files

Description refers to DVD, CD-RW/-R with JPEG files.
If you do not find any of the symbols listed above under the function heading, the operation is applicable to all media.
CONTENTS
Introduction
PRECAUTIONS 2
Symbols Used in this User Manual ....4
FUNCTIONAL OVERVIEW 6
Front Panel 6
Rear Panel 6
Remote Control....7
Connections
CONNECTIONS....9
Connection to the TV....9
Connecting to RF Modulator (Not Supplied) ..... 10
Connection to an Audio System 10
Basic Setup
BEFORE YOU START....12
Finding the Viewing Channel on Your TV ..... 12
Playback
INFORMATION ON PLAYBACK 13
On Screen Display.... 14
How to Insert a Disc.... 14
BASIC PLAYBACK 15
Playing Back a DVD or an Audio CD.... 15
Playing Back a Disc with MP3 / JPEG Files..... 16
SPECIAL PLAYBACK 17
Fast Forward / Fast Reverse 17
Slow Forward / Slow Reverse 17
Step by Step Playback.... 17
Zoom 17
Repeat Playback 17
A-B Repeat 17
Random Playback.... 18
Programmed Playback 18
Track / File / Folder Search.... 18
SEARCH 19
Title / Chapter Search 19
Time Search.... 19
Marker Search.... 19
SELECTING THE FORMAT OF AUDIO AND VIDEO .. 20
Switching Subtitles.... 20
Switching Audio Language 20
Switching Camera Angles 20
Swiching Stereo Sound Mode 20
Switching Sound Menu 20
Function Setup
LIST OF SETTINGS 21
SETUPS.... 23
TV Aspect 23
Progressive Scan 23
EasyLink (HDMI CEC) 23
Ratings Lock 24
Reset to Factory Default 24
Others
TROUBLESHOOTING 25
GLOSSARY 26
SPECIFICATIONS 27
Español
ESPAÑOL.... 28
NINETY (90) DAY LIMITED WARRANTY .... 30
FUNCTIONAL OVERVIEW
Front Panel

* The unit can also be turned on by pressing these buttons.
1. Disc tray
- Place a disc when opening the disc tray.
2. Infrared sensor window
- Receive signals from your remote control so that you can control the unit from a distance.
3. ▲ (open/close) button\*
- Press to open or close the disc tray.
4. ■ (stop) button
- Press to stop playback.
5. Play indicator
- Lights up when the inserted disc is being played back.
6. ▶ (play) button
- Press to start or resume playback.
7. Standby-On indicator
- This indicator lights up in red when the unit is in standby mode and turns off when the power is on.
8. ⏻(standby-on) button
- Press to turn on the unit, or to turn the unit to the standby mode. (To completely shut down the unit, you must unplug the AC power cord.)
- If timer programmings have been set, press to set the unit in timer-standby mode.
Rear Panel

1. AC Power Cord
- Connect to a standard AC outlet to supply power to this unit. - Unplug this cord from the AC outlet to completely shut down the unit.
2. AUDIO OUT jacks
- Use to connect a TV monitor, an AV receiver / amplifier or other device with an audio cable.
3. COMPONENT VIDEO OUT jacks
- Use to connect a TV monitor with component video inputs with a component video cable.
4. S-VIDEO OUT jack
- Use to connect the S-video input of a TV monitor, AV receiver or other device with an S-video cable.
5. HDMI OUT jack
- Use to connect a TV with an HDMI compatible port with an HDMI cable.
6. DIGITAL AUDIO OUT (COAXIAL) jack
- Use to connect an AV receiver / amplifier, Dolby Digital decoder or other device with a digital audio coaxial input jack with a digital audio coaxial cable.
7. VIDEO OUT jack
- Use to connect a TV monitor, an AV receiver / amplifier or other device with a video cable.
Note
- Do not touch the inner pins of the jacks on the rear panel. Electrostatic discharge may cause permanent damage to the unit.
- This unit does not have the RF modulator.
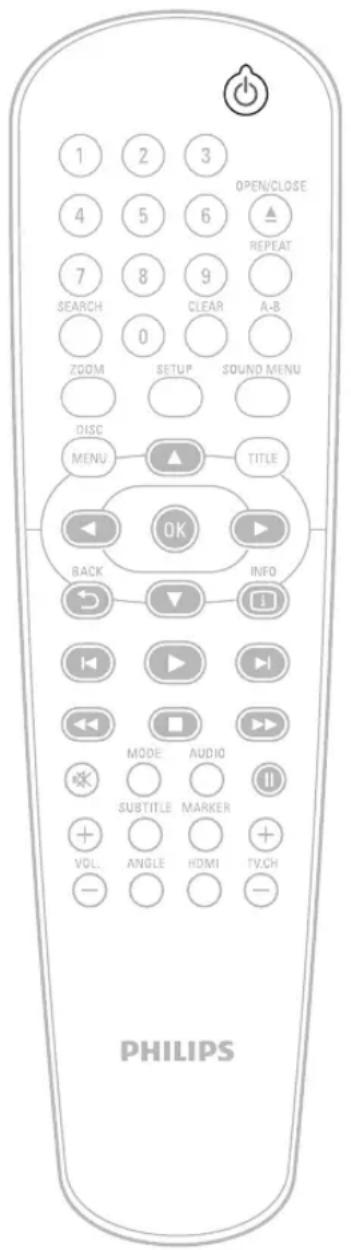
Remote Control

* The unit can also be turned on by pressing these buttons.
1. ⏻ (standby-on) button
- Press to turn on the unit, or to turn the unit to the standby mode. (To completely shut down the unit, you must unplug the AC power cord.)
- If timer programmings have been set, press to set the unit in timer-standby mode.
2. Number buttons
- Press to select a chapter or title during playback.
- Press to enter values in the input field.
3. SEARCH button
• To search chapter, title or time.
- To search tracks, time or folders.
4. ZOOM button
- Press to enlarge the picture on the TV screen.
5. DISC MENU button
- Press to display the disc menu.
6. ▲/▼/◄/► buttons
- Press to select items or settings.
7. OK button
- Press to confirm or select menu items.
8. BACK ↩ button
- Press to return to the previously displayed menu or screen function.
9. ◀ (previous) button
- During playback, press once to return to the beginning of the current chapter, track or file.
- During playback, press twice to return to the previous chapter, track or file.
10.▶| (next) button
- During playback, press to skip to the next chapter, track or file.
11.MODEbutton
- To arrange the playing order or play randomly.
12. (mute) button
- Press to mute the TV volume (only applicable to the PHILIPS brand TV).
13. SUBTITLE button
- Press to select subtitles on a disc.
14.VOL.+/- button
- Press to adjust the TV volume (only applicable to the PHILIPS brand TV).
15. ANGLE button
- Press to select camera angles on a disc.
16. OPEN/CLOSE▲ button\*
- Press to open or close the disc tray.
17. REPEAT button
- Press to toggle between various repeat modes.
18.A-B button
- Press to play back a defined section between point A and B repeatedly.
19. CLEAR button
- To remove status number in program input.
• To clear the numbers entered incorrectly.
• To clear the marker settings.
• To cancel the point for A-B repeat.
20.SOUND MENU button
- Press to select a sound mode.
21. SETUP button
- Press to display the setup menu.
22. TITLE button
- Press to display the title menu.
23.INFO i button
- Press to display the information display.
24.▶ (play) button
- Press to start playback or resume playback.
25. ◀◀ (reverse) button
- During playback, press to fast reverse the playback.
- When playback is in pause mode, press to slow reverse the playback.
26.▶▶ (forward) button
- During playback, press to fast forward the playback.
- When playback is in pause mode, press to slow forward the playback.
27. ■ (stop) button
- Press to stop playback.
28. II (pause) button
- Press to pause playback.
- When playback is in pause mode, press repeatedly to forward the playback step by step.
29. AUDIO button
- Press to select the audio channel (such as audio languages) on a disc.
• To select "STEREO", "L-ch" or "R-ch".
30.TV.CH +/- button
- Press to change the channel up and down (only applicable to the PHILIPS brand TV).
31. MARKER button
- During playback, press to display the marker setting.
32.HDMI button
- Press to set the HDMI output mode.
Installing the Batteries in the Remote Control Using a Remote Control
Install the 2 AA (1.5 V) batteries matching the polarity indicated inside battery compartment of the remote control.
1) Open the cover.

2)Insertbatteries.

Make sure to match + and - on the batteries to the marks indicated in the battery compartment.
3)Closethecover.

Keep in mind the following when using the remote control:
- Make sure that there are no obstacles between the remote control and the infrared sensor window on the unit.
- Remote operation may become unreliable if strong sunlight or fluorescent light is shining on the infrared sensor window of the unit.
- Remote control for different devices can interfere with each other. Avoid using remote control for other device located close to the unit.
- Replace the batteries when you notice a fall off in the operating range of the remote control.
-
The maximum operable ranges from the unit are as follows.
-
Line of sight: approx. 23 feet (7m)
- Either side of the center:
- approx. 16 feet (5m) within 30°
- Above: approx. 16 feet (5m) within 15°
-Below: approx. 10 feet (3m) within 30^

16 feet (5m) 23 feet (7m) 16 feet (5m)
Note
Incorrect use of batteries can result in hazards such as leakage and bursting. Please observe the following:
- Do not mix new and old batteries together.
- Do not use different kinds of batteries together. Although they may look similar, different batteries may have different voltages.
- Make sure that the + and - ends of each battery match the indications in the battery compartment.
- Remove batteries from battery compartment that is not going to be used for a month or more.
- When disposing of used batteries, please comply with governmental regulations or environmental public instruction's rules that apply in your country or area.
- Do not recharge, short-circuit, heat, burn or disassemble batteries.
CONNECTIONS
Connection to the TV
- Make one of the following connections, depending on the capabilities of your existing device.

flowchart
graph LR
    A["Method 1 Method 2 Method 3*"] --> B["1"]
    B --> C["Method 4*2"]
analog audio standard picture good picture better picture

best audio /

flowchart
```mermaid
graph TD
    A["TV"] --> B["TV"]
    B --> C["TV"]
    C --> D["TV"]
    D --> E["TV"]
    E --> F["TV"]
    F --> G["TV"]
    G --> H["TV"]
    H --> I["TV"]
    I --> J["TV"]
    J --> K["TV"]
    K --> L["TV"]
    L --> M["TV"]
    M --> N["TV"]
    N --> O["TV"]
    O --> P["TV"]
    P --> Q["TV"]
    Q --> R["TV"]
    R --> S["TV"]
    S --> T["TV"]
    T --> U["TV"]
    U --> V["TV"]
    V --> W["TV"]
    W --> X["TV"]
    X --> Y["TV"]
    Y --> Z["TV"]
    Z --> AA["TV"]
    AA --> AB["TV"]
    AB --> AC["TV"]
    AC --> AD["TV"]
    AD --> AE["TV"]
    AE --> AF["TV"]
    AF --> AG["TV"]
    AG --> AH["TV"]
    AH --> AI["TV"]
    AI --> AJ["TV"]
    AJ --> AK["TV"]
    AK --> AL["TV"]
    AL --> AM["TV"]
    AM --> AN["TV"]
    AN --> AO["TV"]
    AO --> AP["TV"]
    AP --> AQ["TV"]
    AQ --> AR["TV"]
    AR --> AS["TV"]
    AS --> AT["TV"]
    AT --> AU["TV"]
    AU --> AV["TV"]
    AV --> AW["TV"]
    AW --> AX["TV"]
    AX --> AY["TV"]
    AY --> AZ["TV"]
    AZ --> BA["TV"]
    BA --> BB["TV"]
    BB --> BC["TV"]
    BC --> BD["TV"]
    BD --> BE["TV"]
    BE --> BF["TV"]
    BF --> BG["TV"]
    BG --> BH["TV"]
    BH --> BI["TV"]
    BI --> BJ["TV"]
    BJ --> BK["TV"]
    BK --> BL["TV"]
    BL --> BM["TV"]
    BM --> BN["TV"]
    BN --> BO["TV"]
    BO --> BP["TV"]
    BP --> BQ["TV"]
    BQ --> BR["TV"]
    BR --> BS["TV"]
    BS --> BT["TV"]
    BT --> BU["TV"]
    BU --> BV["TV"]
    BV --> BW["TV"]
    BW --> BX["TV"]
    BX --> BY["TV"]
    BY --> BZ["HDMI OUT"]

    subgraph "picture"
        direction TB
        direction LR
        direction AL
        direction DB
        direction BF
        direction BG
        direction BH
        direction BI
        direction BJ
        direction BK
        direction BL
        direction BM
        direction BN
        direction BO
        direction BB
        direction BF
        direction BG
        direction BH
        direction BI
        direction BJ
        direction BK
        direction BL
        direction BG
        direction BH
        direction BI
        direction BJ
        direction BK
        direction BL
        direction BG
        direction BH
        direction BI
        direction BJ
        direction BK
        direction BL
        direction BG
        direction BH
        direction BI
        direction BJ
        direction BK
        direction BL
        direction BG
        direction BH
        direction BI
        direction BJ
        direction BK
        direction BL
        direction BN
        direction BG
        direction BH
        direction BI
        direction BJ
        direction BK
        direction BL
        direction BG
        direction BH
        direction BI
        direction BJ
        direction BK
        direction BL
        direction BG
        direction BH
        direction BI
        direction BJ
        direction BK
        direction BL
        direction BG
        direction BH
        direction BI
        direction BJ
        direction BK
        direction BL
        direction BH
        direction BI
        direction BJ
        direction BK
        direction BL
        direction BG
        direction BH
        direction BI
        direction BJ
        direction BK
        direction BL
        direction BG
        direction BH
        direction BI
        direction BJ
        direction BK
        direction BL
        direction BG
        direction BH
        direction BI
        direction BJ
        direction BK
        direction BL
        direction BG
        direction Bh
        direction BH
        direction BI
        direction BJ
        direction BK
        direction BL
        direction BG
        direction BH
        direction BI
        direction BJ
        direction BK
        direction BL
        direction BG
        direction BH
        direction BI
        direction BJ
        direction BK
        direction BL
        direction BG
        direction BH
        direction BI
        direction BJ
        direction BK
        direction BL
        direction BG
        directionBH
        direction BH
        BH --> BI["HDMI OUT"]
    end

    subgraph "picture"
            direction LR
            direction AL
            direction BD
            direction BF
            direction BG
            direction BH
            direction BI
            direction BJ
            direction BK
            direction BL
            direction BG
            direction BH
            direction BI
            direction BJ
            direction BK
            direction BL
            direction BG
            direction BH
            direction BI
            direction BJ
            direction BK
            direction BL
            direction BG
            direction BH
            direction BI
*1 This unit is compatible with the progressive scan system. The feature provides you with the higher quality pictures than traditional output system does. To utilize this feature, a component connection is required. Refer to "HDMI Video" or "Progressive Scan" setting on pages 21-22 to set the video resolution.
*2 Analog audio connection is not required for this connection.
Supplied cables used in this connection are as follows:
- audio cable (L/R) x 1
- video cable x 1
Please purchase the rest of the necessary cables at your local store.
Note:
- Connect this unit directly to your TV. If audio/video cables are connected to a VCR, pictures may be distorted due to the copy protection system.
- Changing "Progressive Scan" setting is not available while HDMI cable is connected.
If your TV is compatible with 525 (480) progressive scanning and you want to enjoy that high quality picture;
You must select the connection COMPONENT VIDEO OUT above and progressive scanning mode. To set the mode, set "Progressive Scan" to "On" in "Video" menu. Refer to page 23 for more details.
- When "Progressive Scan" is "On", video signals from the unit's VIDEO OUT and S-VIDEO OUT jacks will be distorted or not be output at all.
If your TV is not compatible with progressive scanning;
Use this unit in interlace mode and set "Progressive Scan" to "Off" in "Video" menu or by pressing and holding [▶ (play)] on the front of the unit for more than 5 seconds.
Connecting to RF Modulator (Not Supplied)
If your TV has antenna in jack only, it is still possible to connect this unit to your TV by using an RF modulator. In this case, follow the instructions below.
1) Disconnect the power cords of the devices from the AC outlet.
2) Make the connection as illustrated below.
3) Set your RF modulator's channel 3/4 switch to either 3 or 4, whichever the TV channel is least used in your area. If your RF modulator has a modulator / antenna switch, set it according to the manual supplied with the RF modulator.
4) Plug in the power cords of the devices to the AC outlet.
5) Turn on your TV and choose the same channel as you set the RF modulator's channel 3/4 switch to. For more details, follow the manual supplied with the RF modulator.

flowchart
graph TD
    A["rear of this unit"] --> B["TV"]
    B --> C["VHF / UHF antenna"]
    C --> D["cable TV company"]
    D --> E["RF"]
    E --> F["RF coaxial cable"]
    F --> G["Set channel 3 or 4"]
    H["video cable"] --> I["RF coaxial cable"]
    I --> J["rear of TV"]
    J --> K["RF coaxial cable"]
Note:
- RF modulator is not supplied with this unit. You need to purchase it at your local store.
- The quality of picture may become poor if this unit is connected to an RF modulator.
Connection to an Audio System
- When you change the connections, all devices should be turned off.
- Refer to the manual accompanying external devices for more information.
2 Channel Analog Audio Connection Digital Audio Connection
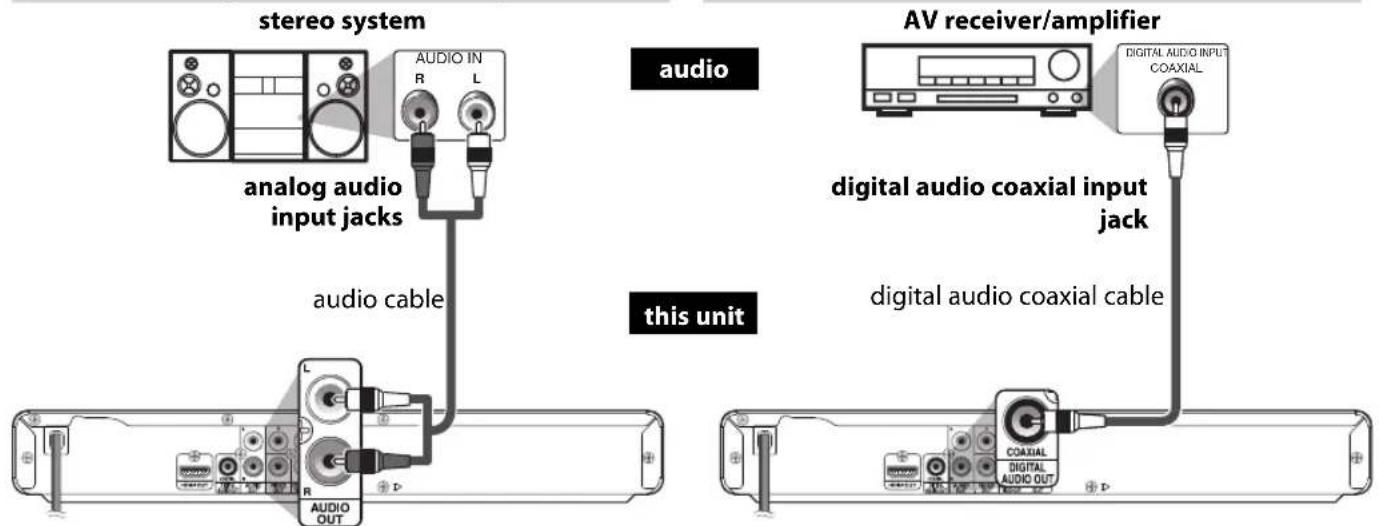
AUDIO OUT DIGITAL AUDIO OUT (COAXIAL)
| Connection\Setting | Setup > Audio>Digital Out |
| Connecting to a Dolby Digital decoder for Dolby Digital audio output. | Bitstream |
| Connecting to the other device (an MD deck or DAT deck etc.) without Dolby Digital decoder. | LPCM |
* To complete these settings, refer to pages 22.
Note:
- The audio source on a disc in a Dolby Digital multi-channel surround format cannot be recorded as digital sound by an MD or DAT deck.
- By hooking this unit up to a Dolby Digital decoder, you can enjoy high-quality Dolby Digital multi-channel surround sound as heard in the movie theaters.
- Playing back a DVD using incorrect settings may generate noise distortion and may also damage the speakers.
- "Digital Out" setting is not available while HDMI audio is output.
HDMI Audio
| Media Audio Recording Format | HDMI Audio Setting | ||
| Bistream LPCM | |||
| DVD-Video | Dolby Digital Dolby Digital Multi PCM | ||
| LPCM Multi PCM Multi PCM | |||
| audio CD 2ch PCM 2ch PCM | |||
| MP3 2ch PCM 2ch PCM | |||
HDMI Mode and Actual Output Signals
Press [HDMI] to change the resolution of the video signal being output from HDMI OUT jack. The video resolution changes as follows every time [HDMI] is pressed. Or change the setting in the "HDMI Video" in the settings menu.

flowchart
graph LR
    A["480p"] --> B["480p → 720p"]
    B --> C["480p → 1080i"]
    C --> D["480p → 1080p"]
e.g.) when 480p is selected as an default.
Copyright protection system
To play back the digital video images of DVD-video via an HDMI connection, it is necessary that both the player and the display device (or an AV receiver / amplifier) support a copyright protection system called HDCP (highbandwidth digital content protection system). HDCP is copy protection technology that comprises data encryption and authentication of the connected AV device. This unit supports HDCP. Please read the operating instructions of your display device (or AV receiver / amplifier) for more information.
Note:
- When using HDCP-incompatible display device, the picture will not be viewed properly.
- The audio signals from the HDMI jack (including the sampling frequency, the number of channels and bit length) may be limited by the device that is connected.
- Among the display device(s) that support HDMI, some do not support audio output (for example, projectors). In connections with device such as this unit, audio signals are not output from HDMI OUT jack.
- When this unit's HDMI jack is connected to a DVI-D compatible display device(s) (HDCP compatible) with an HDMI DVI converter cable, the signals are output in digital RGB.
- Pressing [HDMI] does not work when HDMI cable is not connected, or when no video signal is being output from HDMI OUT jack.
- Pressing [HDMI] does not work when a DVI compatible display devices is connected. Change the video resolution in the "HDMI Video" in the settings menu.
- When you make a selection, the TV monitor temporarily goes blank and then comes back again. If it does not, press [HDMI] repeatedly to change the resolution or press and hold [▶ (play)] on the front panel for 5 seconds to change the setting back to its default.
BEFORE YOU START
After you have completed all the connections, you must find the viewing channel (external input channel) on your TV.
Finding the Viewing Channel on Your TV
1 After you have made all the necessary connections, press [⏻ (standby-on)] to turn on the unit.
2 Turn on your TV.
3 Press the button on the TV's remote control that accesses the external input channel. It may be labeled "SOURCE", "AV" or "SELECT" (refer to your TV's user manual). Or press "2" on the TV's remote control, then press channel down button repeatedly until you see the opening screen.
PHILIPS
This is the correct viewing channel (external input channel).
INFORMATION ON PLAYBACK
Before you start playing back a disc, read the following information.
playable Discs and Files
This unit is compatible to play back the following discs. To play back a disc, make sure that it meets the requirements for region codes and color systems as described below. You can play back discs that have the following logos. Other disc types are not guaranteed to play back.
playable discs Logos
| DVD-video |  | |
| DVD+RW(Single layer) |  | |
| DVD+R(Single/Double layer) |  |  |
| DVD-RW(Single layer)(Finalized video mode discs only) |  | |
| DVD-R(Single/Double layer)(Finalized video mode discs only) |  | |
| CD-DA (audio CD) |  | |
| CD-RW | COMPACTDISCGITALLAURIDReWritable | COMPACTDISC(ReWritable) |
| CD-R | COMPACTDISCDIGITALAUDIDRecordable | COMPACTDISCRecordable |
| Kodak Picture CD | KodakPicture CDCOMPATIBLE | |
| Playable files Media | |
| MP3 | DVD, CD-RW/-R |
| JPEG | |
Unplayable Discs
The following discs will not play back on this unit.
- CD-ROM • Compact Disc-Interactive (CD-I)
• DVD-RAM • Video Single Disc (VSD)
• DVD-ROM • DVD audio - HD DVD
- Unfinalized disc
- Blu-ray Disc
- DTS-CD
- DVD-R or DVD-RW recorded in VR mode or non compatible recording format.
- Super audio CD - Only the sound on the CD layer can be heard. The sound on the high-density super audio CD layer cannot be heard.
Color Systems
DVD-video are recorded in different color systems throughout the world. The most common color system is NTSC (which is used primarily in the United States and Canada).
This unit employs NTSC color system, so the disc you play back must be recorded in the NTSC system. You cannot play back the disc recorded in other color systems.
Region Codes
This unit has been designed to play back DVD-video with region "1" or "ALL". You cannot play back DVD-video that are labeled for other regions. Look for the symbols on the right on your DVD-video. If these region symbols do not appear on your DVD-video, you cannot play back the disc in this unit. The number inside the globe refers to region of the world. A DVD-video labeled for a specific region can only play back on the unit with the same region code.
DVD-video

Hint for Disc Playback
The contents of disc are generally divided into sections or folders (groups of titles/files) as shown below.

flowchart
graph LR
    A["DVD-video"] --> B["title 1"]
    A --> C["title 2"]
    A --> D["title 3"]
    B --> E["chapter 1"]
    B --> F["chapter 2"]
    C --> G["chapter 1"]
    C --> H["chapter 2"]
    D --> I["chapter 3"]
    D --> J["chapter 4"]
    K["Audio CD"] --> L["track 1"]
    K --> M["track 2"]
    K --> N["track 3"]
    K --> O["track 4"]
    K --> P["track 5"]

flowchart
graph TD
    A["MP3 / JPEG"] --> B["folder(group) 1"]
    A --> C["folder(group) 2"]
    B --> D["file 1"]
    B --> E["file 2"]
    C --> F["file 1"]
    C --> G["file 2"]
    C --> H["file 3"]
On Screen Display
You can check the information about the current disc by pressing [INFO i].

flowchart
graph TD
    A["1"] --> B["T(Title): current title number / total titles"]
    B --> C["elapsed time of the current time"]
    C --> D["current repeat mode (Off/Title/Chapter/A-B)"]
    D --> E["current chapter number / total chapters"]
    F["2"] --> G["current audio"]
    G --> H["current subtitle"]
    H --> I["angle information"]
    J["3"] --> K["elapsed time of current chapter"]
    K --> L["remaining time of current chapter"]
    M["4"] --> N["elapsed time of current title"]
    N --> O["remaining time of current title"]
Note:
- Some DVD will not allow you to set chapter playback correctly.

flowchart
graph TD
    A["1"] --> B["T(Track): current track number / total track"]
    B --> C["current repeat mode (Off / All / Track / A-B)"]
    B --> D["current play mode (Program / Random)"]
    B --> E["elapsed time of the current time"]
    F["2"] --> G["elapsed time of current track"]
    G --> H["remaining time of current track"]
    H --> I["3"]
    I --> J["elapsed time of Disc"]
    J --> K["remaining time of Disc"]
    L["4"] --> M["40:00:25 00:40:00"]

MP3

JPEG
- Only in stop mode for JPEG.

How to Insert a Disc
1) Press [OPEN/CLOSE ▲] to open the disc tray.
2) Place the disc on the disc tray with its label side facing up.

natural_image
Illustration of a hand using a circular tool to press or rotate a mechanical component (no text or symbols visible)Align the disc to the disc tray guide.
* Make sure the disc is compatible with this unit. (Refer to page 13 for the list of compatible discs.)
3) Press [OPEN/CLOSE ▲] to close the disc tray.
It may take a while to load the disc.
To eject the disc:
Press [OPEN/CLOSE ▲] to open the disc tray.
Remove the disc.
Press [OPEN/CLOSE ▲] to close the disc tray.
BASIC PLAYBACK
Playing Back a DVD or an Audio CD


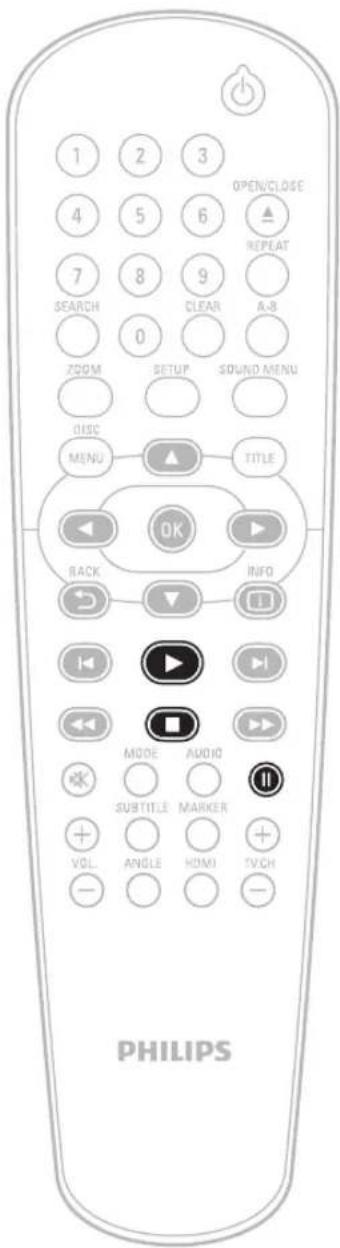
1 Insert a disc (refer to page 14 on how to insert a disc).
2 Playback may start automatically. If not, press [▶ (play)].
Some discs may show a title or a disc menu. In such case, refer to "Using the Title / Disc Menu" on page 15.
To pause playback:
Press [II (pause)].
To return to the normal playback:
Press [▶ (play)].
To stop playback:
Press [■ (stop)].
Playback will be in Resume-On-Stop mode.
When you press [▶ (play)] next time, the playback will start from the point where it has been stopped.
Note
- Resume-On-Stop mode remains in effect even after power is turned off, but will be canceled once the disc is ejected.
- To cancel resume, press [■ (stop)] one more time in the resume-On-Stop mode.
Using the Title / Disc Menu

Some DVD-video may contain a title menu (DVD) which describes the contents of the disc which guides you through the available functions in the disc.
With such discs, a title menu or a disc menu may appear automatically when you insert the disc. Otherwise, press [TITLE] or [DISC MENU] to call up the menu. Refer to the disc's manual on how to navigate through the menu.
Note
- Menus vary among discs. Refer to the information accompanying the disc for details.
- [TITLE] or [DISC MENU] may not work with some discs.
Playing Back a Disc with MP3 / JPEG Files

MP3

JPEG
MP3 / JPEG is a method of compressing files. You can copy MP3 / JPEG files on DVD or CD-RW/-R from the computer and play back the files on this unit.

How to Navigate through the Track/File List
- Use [ / ] to move the highlight up and down in the list.
Recommended specifications:
- Sampling frequency : 44.1 kHz or 48 kHz.
- Constant bit rate : 32 kbps - 320 kbps.
For MP3 file recorded in VBR (variable bit rate), the unit may not display the actual elapsed time.
• Upper limit : 6,300 x 5,100
- Pixel lower limit : 32 x 32 pixel
- File size : Max. 7 MB
A JPEG image that extends beyond the TV screen is reduced so that it will be displayed within the TV screen.
1
Insert a disc (refer to page 14 on how to insert a disc). Playback will automatically start from the first file of the folder or files.
- File list will automatically appear.
- For a disc with MP3 or JPEG files only, all repeat playback will start automatically.
2
Select the desired folder or file.
e.g.) JPEG

3
Press [OK] or [▶ (play)]. Playback of the selected file will be start.
Note
- Some selections may take a while to be recognized.
- Refer to "On Screen Display" on page 14 for more details.
- If you record data over 20 times, it may not be played back correctly.
- For a disc with JPEG files only, the file list will appear while in stop mode.
- A maximum of 498 folders or 4000 files may be recognized on one disc.
- Up to 8 hierarchies can be recognized in one folder. File in the 9th or deeper hierarchies cannot be played back.
- To rotate the picture, press cursors during playback JPEG files.
SPECIAL PLAYBACK
Fast Forward / Fast Reverse


1) During playback, press [▶▶ (forward)] repeatedly for fast forward.
During playback, press [◀◀ (reverse)] repeatedly for fast reverse.
Every time you press [▶▶ (forward)] or [◀◀ (reverse)], the playback speed will change.
- For DVD, speed changes in 5 different levels.
2) Press[▶ (play)] to return to the normal playback.
Slow Forward / Slow Reverse

1) During playback, press [Ⅱ (pause)]. Then press [▶▶ (forward)] or [◀◀ (reverse)].
Every time you press [▶▶ (forward)] or [◀◀ (reverse)], playback speed changes in 5 different levels.
2) Press[▶ (play)] to return to the normal playback.
Step by Step Playback

1) In pause mode, press [II (pause)] repeatedly.
Every time you press [11 (pause)], playback will advance one step at a time.
2) Press[▶ (play)] to return to the normal playback.
Note
- Only step by step forward is available.
Zoom


During playback, you can zoom up the picture.
1) During playback, press [ZOOM] repeatedly.
Every time you press [ZOOM], Zoom factor will change.
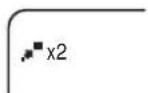
2) You can move over the zoomed picture using [▲/▼/◄/►].
To exit zoom function, press [ZOOM] repeatedly to select "off."
Note
- For some DVD, 4x zoom is not available.
• [ZOOM] does not work while DVD menu is displayed. - Some part of the picture may not be zoomed depending on the disc or playback status.
Repeat Playback



Available repeat function varies depending the discs.
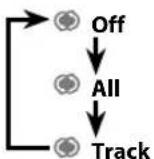
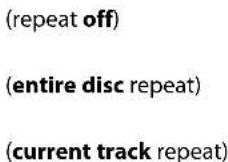
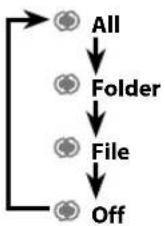
1) During playback, press [REPEAT] repeatedly to select the desired repeat function.





Note
- Repeat setting (except "All") will be cleared when moving to another title or chapter (only for DVD and CD).
- To clear the repeat setting for MP3 and JPEG files, set the repeat setting to "Off".
- This function is not available with some discs or during repeat A-B playback.
A-B Repeat



A-B repeat function is available only during playback and set the repeat setting to "Off".
1) During playback, press [A-B] once at the point where you want to set point A.
2) During playback, press [A-B] again at the point where you want to set point B.
As soon as you set the point B, the part between point A and point B will start to play repeatedly.
To cancel A-B repeat:
Press [A-B] repeatedly until "Off" appears.
Note
• To cancel point A, press [CLEAR] at step 1.
- This function does not work in the other repeat modes.
Random Playback


This function shuffles the playing order of chapters or tracks instead of playback in the sequence.
1) Press [MODE] repeatedly to select "Random". Random playback will start.
Note
- During random playback, you cannot go back to the previous track, using [▶] (next)] allows you to search chapters or tracks randomly.
Programmed Playback



You may determine the order in which chapters or tracks will play back.
1) Press [MODE] repeatedly to select "Program".
2) Select a track or a file.
e.g.) MP3
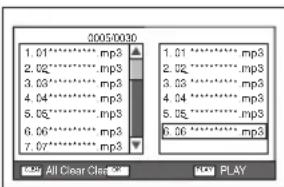
- Up to 20 chapters or tracks can be ordered.
| When the highlight is in the track/file list |
| [BACK]:exit from the program menu.[OK]: select a track/file.[▶ (play)]: start program playback. |
| When the highlight is in the programmed list |
| [CLEAR]: erase all the track/file in the program.[OK]: erase the track/file you select.[▶ (play)]: start program playback. |
Note
- While a program is being played back, [■ (stop)] works as follows;
- Press [■ (stop)] and [▶ (play)] next, so that the programmed playback restarts.
- Press [■ (stop)] twice and [▶ (play)] next, so that playback restarts from the first track in the original order. However, your programmed playback can be restarted when you follow the above steps. (Your programs are still stored until either the disc is removed or power is turned off.)
Track/File/Folder Search

CD

MP3

Using [SEARCH]
1) Press[SEARCH].
e.g.) CD
![PHILIPS DVP3570 - Using [SEARCH] - 1](/content/2026/05/1066942/images/2684bc223abfcefd11ab6bd34788f6251b09d36f80135b9f5d5e1df09bccd1c9.jpg)
2) Use [the Numbers buttons] to enter track/file/folder number within 10 seconds.
3) Press[OK].
Playback will start from the desired track / file / folder.
Using [◀ (previous)] / [▶ (next)]
1) During playback, press ▶(next)] to skip the current track / file / folder and move to the next.
The track / file / folder will move forward by one at a time.
To go back to the beginning of the current track / file / folder, press [◀ (previous)].
Press [◀(previous)] repeatedly to go to the previous track/file/folder. The track/file/folder may move backward one at a time.
Using [the Number buttons] (Direct Search)
1) Enter the track / file / folder number you want to search using [the Number buttons].
e.g.)
-for file 14, press [1], [4] and [OK].
-for file 114, press [1], [1], [4] and [OK].
- for file 1114, press [1], [1], [1] and [4].
Playback will start from the desired track / file / folder.
Note
- Track / file / folder search is not available for programmed or random playback.
SEARCH
Title / Chapter Search

Using [SEARCH]
1) Press [SEARCH].
![PHILIPS DVP3570 - Using [SEARCH] - 1](/content/2026/05/1066942/images/2a42a9474bbee8c6b22a174516c8f9be9f44ee12ca4f2cfd42b15666a6ac6fb0.jpg)
2) Use [▶] to Select "T" or "CH".
3) Use [the Number buttons] to enter the title/chapter number within 10 seconds.
4) Press[OK].
Playback will start from the beginning of the title / chapter.
Using [◀ (previous)] / [▶ (next)]
1) During playback, press [▶(next)] to skip the current title or chapter and move to the next.
The title or chapter will move forward by one at a time. - If there is no chapter in one title, the current title may be skipped.
To go back to the beginning of the current title or chapter, press [◀ (previous)].
Press [I◀ (previous)] repeatedly to go to the previous title or chapter. The title or chapter may move backward one at a time.
Using [the Number buttons] (Direct Search)
Title Search
1) In stop mode, enter the title number you want to search using [the Number buttons].
Playback of the title will start in a few seconds.
Chapter Search
1) During playback of a title, enter the chapter number you want to search using [the Number buttons].
Playback of the chapter will start in a few seconds.
Time Search

1) During playback, press [SEARCH]. e.g.) DVD

2) Use [▶] to select " ⊙".
3) Use [the Number buttons] to enter the time count you want to jump to with 10 seconds.
e.g.;
Entering 1 hour 45 minutes and 15 seconds.
Press ① ④ ⑤ ① ⑤
4) Press[OK].
Playback will start from the desired time count.
Note
- Time search is not available for programmed or random playback.
Marker Search

This feature allows you to assign a specific point on a title or track to be called back later.
1) During playback, press [MARKER].
2) Use [◀/▶] to select a marker number (1-12).
3) When the disc reaches the point you want to set a marker, press [OK].
- The title or track and elapsed playback time will appear on the TV screen.
4) Press [MARKER] to exit.
5) To return to the marker later, call the marker setting by pressing [MARKER] during playback or in stop mode, and use [◀/▶] to choose a desired marker, then press [OK].
Note
- Opening the disc tray, turning the unit to the standby mode will erase all markers.
- To clear a marker, use [◀/▶] to select the marker number to be cleared and press [CLEAR].
- You can mark up to 12 points.
- Marker search is not available in stop mode.
SELECTING THE FORMAT OF AUDIO AND VIDEO
You can select the format of audio and video as you prefer depending on the contents of the disc you are playing back.
Switching Subtitles

Some video materials may have subtitles in one or more languages. For commercially available discs, the supported languages can be found on the disc case. Follow the steps below to switch the subtitle language during playback.
1) During playback, press [SUBTITLE] to bring up the information bar.

2) Use [SUBTITLE] repeatedly to switch the subtitle.
Note
- If your language is not shown after pressing [SUBTITLE] several times, the disc may not have that language. However, some discs allow subtitle language setting on the disc menu. (Operation varies depending on the disc, so refer to the manual along with the disc.)
- When "⊗" appears on the TV screen, it means no subtitle is recorded on the scene.
- Some discs will only allow you to change the subtitle from the disc menu. Refer to the manual accompanying the discs for details.
Switching Audio Language

When playing back a video material recorded with 2 or more soundtracks (these are often in different languages), you can switch them during playback.
1) During playback, press [AUDIO] to bring up the information bar.
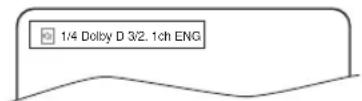
2) Use [AUDIO] repeatedly to switch the audio language.
Note
- Some discs will only allow you to change the audio setting from the disc menu. Refer to the manual accompanying the discs for details.
- If your language is not shown after pressing [AUDIO] several times, the disc may not have that language. However, some discs allow audio language setting on the disc menu. (Operation varies depending on the disc, so refer to the manual along with the disc.)
Switching Camera Angles

Some DVD-video may have scenes shot from 2 or more angles. Angle information should be on the disc case if the disc contains multi-angle scenes.
You can change the camera angle if 📋 appears on the TV screen. If the "Angle Icon" setting is "Off" in "Display" menu, 📋 will not appear. (Refer to page 21.)
1) During playback, press [ANGLE] to bring up the information bar.
2) Use [ANGLE] repeatedly to switch the angle.
Switching Stereo Sound Mode

This unit allows you to select a sound mode during CD playback.
1) During playback, press [AUDIO] to bring up the information bar.
2) Use [AUDIO] repeatedly to switch the stereo sound mode.
Switching Sound Menu


You can enjoy stereophonic virtual world on your existing 2 channel stereo system.
1) During playback, press [SOUND MENU] to bring up the information bar.

2) Pressing [SOUND MENU] to switch the sound menu.
Off: no effects (original sound)
3D: sound mode suitable for setting stereophonic audio.
Jazz: sound mode suitable for jazz music
Rock: sound mode suitable for rock music
Pop: sound mode suitable for pop music
Classic: sound mode suitable for classic music
Note
- Sound Menu is available under the following condition:
- When the unit is connected to a TV using AUDIO OUT jacks.
- When "HDMI Audio" is set to "LPCM".
- When "Digital Out" is set to "LPCM".
LIST OF SETTINGS
In the settings menu, you can customize the various kinds of settings as you prefer.
Refer to the following instruction to navigate through the settings menus.
1) Press [SETUP] to display the setup menu.
2) Use [◀/▶] to select the category, then press [OK].
3) Use [▲/▼] to move the highlight up and down in the list.
Sub menus/options of the highlighted item will be displayed in the list on the right whenever available.
4) To make a selection or to access the sub menus/option of an item, highlight the desired item, then press [OK].
5) Press [SETUP] to exit.
Refer to the following table for the types of settings you can customize.
The item highlighted in gray is the default setting.
| Category Menus | Options/Sub-Menus | Description | |
| Language | Player Menu English Sets the language for player menu (OSD menu). | ||
| Subtitle *1 *2 Off Sets the subtitle language for DVD-video playback. | |||
| Audio *1 *2 Original • Sets the audio language for DVD-video playback. | |||
| Disc Menu *1 English Sets the language for disc menu. | |||
| Display | Angle Icon On | Set to “On” to display when multiple camera angles are available during DVD playback. | |
| Off | |||
| Screen Saver On Sets whether to activate the screen saver after 5 minutes of no action on the unit. | |||
| Video | TV Aspect Refer to page 23 for more information. | 16:9 Wide | Sets the aspect ratio of the playback image to fit your TV. Select “16:9 Wide” if a wide-screen TV is connected to this unit. Select “4:3 Normal”, so that black bars may appear on the top and bottom of the TV screen. Select “4:3 Crop” for a full height picture with both sides adjusted. |
| 4:3 Normal | |||
| 4:3 Crop | |||
| Progressive Scan | On | You can set “Progressive Scan” to “Off” in “Video” menu or press and hold [▶(play)] on the front of the unit for more than 5 seconds during playback. Changing “Progressive Scan” setting is not available while HDMI cable is connected. When “Progressive Scan” is “On”, video signals from the unit’s VIDEO OUT and S-VIDEO OUT jacks will be distorted or not be output at all. | |
| Off | |||
Note
*1
- Language options are not available with some discs.
- If "Other" is selected in the "Audio", "Subtitle" or "Disc Menu" screen, select the desired language using [▲/▼]. Press [OK].
- Only the languages supported by the disc can be selected.
*2
- "Language" setting for "Audio" and "Subtitle" are not available with some discs. Then press [AUDIO] and [SUBTITLE]. Details are on page 20.
| Category | Menus | Options/Sub-Menus | Description | |
| Audio Dual | mono Stereo This unit allows you to select a sound mode. | |||
| Down Sampling | On | When playing back disc with copyright protection, the sound will be down sampled at 48kHz, even if you set to "Off". Set to "On" when outputting in 48kHz. Set to "Off" when outputting the original sound. | ||
| Off | ||||
| DRC On This function is available only on the discs which are recorded in the Dolby Digital format. "On" "7/8 - 1/8" "Off": Compress the range between soft and loud sounds. | ||||
| Effect Normal You can set the reverberation effect. | ||||
| Digital Out Refer to page 10 for more information. | Bitstream LPCM | Set to "Bitstream" when the unit is connected to a Dolby Digital decoder. When HDMI cable is connected, make sure "HDMI Audio" setting is set to "Off" to change the "Digital Out" setting. "Bitstream": Outputs a Dolby Digital signals. "LPCM": Convert the Dolby Digital into LPCM (2 channel). | ||
| Other | Auto Power Off | On Off | Set to "On" to turn this unit off automatically after 30 minutes of no use. | |
| HDMI | HDMI Video | Auto 480p 720p 1080i 1080p | You cannot select the video resolutions which are not supported by the connected TV, except when this unit's HDMI OUT jack is connected to a DVI compatible display devices with an HDMI-DVI cable (default is 480p in such case).Video and audio signals may be distorted temporarily when switching to/from the HDMI output mode.HDMI Video: Auto: HDMI video resolution will be selected automatically depending on the connected HDMI device. If you want to change the resolution manually, press [HDMI] repeatedly.When you make a selection, the TV monitor temporarily goes blank and then comes back again. If it does not, press [HDMI] to change the resolution or press and hold [▶(play)] on the front panel for 5 seconds to change the setting back to its default.EasyLink (HDMI CEC):This feature is available only when the display device is connected with an HDMI cable, and when it supports EasyLink (HDMI CEC) feature.Refer to page 23 for more information. | |
| HDMI Audio | Bitstream LPCM Off | |||
| EasyLink (HDMI CEC) | On Off | |||
| Ratings Lock | Rating Level | Off Sets the rating level 8 [Adult] 7 [NC-17] 6 [R] 5 [PGR] 4 [PG13] 3 [PG] 2 [G] 1 [Kid Safe] | Level for the disc playback. | |
| New PIN | Sets the new password for the "Ratings Lock" setting. | |||
| Factory Default | Yes No | "Yes": Resets all the settings, except for "Ratings Lock", in "Settings" to the factory default."No": Does not perform the initialization. | ||
| Product Info | "Product Info" screen provides you with the information on this unit's hardware and software version information. | |||
SETUPS
TV Aspect
SETUP "Video" 📋V Aspect"

Use this feature to adjust the aspect ratio of the video source which is different from your TV's ratio to fit your TV monitor without distorting the picture. Descriptions of each setting are as follows:
| Video source | Your TV | Option Description | |
| 16:9 | 16:9 | 16:9Wide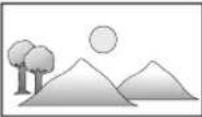 | To enjoy 16:9picture on 16:9monitor:Select this settingwhen you want toenjoy 16:9 pictureon the 16:9 TV. |
| 4:3 | 4:3 Normal | To enjoy 16:9picture on 4:3monitor:16:9 picture isscaled down untilthe both sides ofthe picture fits the4:3 TV. | |
4:3 Crop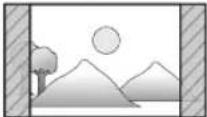 | To enjoy 16:9picture on 4:3monitor:Both sides of thepicture are trimmedto fit the 4:3 TVwithout distortingthe aspect ratio ofthe picture. | ||
Progressive Scan
SETUP "Video" "Progressive Scan"

You can set "Progressive Scan" to "Off" in "Video" menu or press and hold [▶ (play)] on the front of the unit for more than 5 seconds during playback.
Changing "Progressive Scan" setting is not available while HDMI cable is connected.
When "Progressive Scan" is "On", video signals from the unit's VIDEO OUT and S-VIDEO OUT jacks will be distorted or not be output at all.
1) With "Video" selected in the "SETUP" menu, press [OK].
2) Select "Progressive Scan" to "On".
3) Press [OK].
4) Select "Yes" using ▲ / ▼] then press [OK].
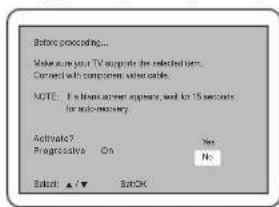
5) Select "Yes" using ▲ / ▼ then press [OK].
6) Press [OK] to complete "Progressive Scan" setting.
Note
- If there is no picture or you do not press any buttons for 15 seconds, "Progressive Scan" will switch to "Off" and it will exit the "Progressive Scan" setting.
EasyLink (HDMI CEC)
SETUP "Other" →

"EasyLink (HDMI CEC)"
EasyLink (HDMI CEC) function allows your TV (limited to PHILIPS brand EasyLink TV) to act in conjunction with this unit, or vice versa.
When "EasyLink (HDMI CEC)" setting is set to "On", functions listed below will be available.
One Touch Play
When this unit is turned on, the TV also is turned on and the appropriate external input channel will be selected automatically. The appropriate external input channel can also be selected on your TV automatically when you press [▶ (play)], [◀ (previous)], [▶ (next)], [SETUP], [the Number buttons] or [INFO i] when the unit's power is on.
Standby
When you press and hold [○ (standby-on)] for 2 seconds, it turns off the power of the TV first and then turns off the power of this unit also.
System Information
Get & Set Menu Language
The unit recognizes the OSD language set for the TV and automatically sets the same language as the player menu language (OSD menu language) for this unit. Refer to the "Player Menu" on page 21 for available languages.
Ratings Lock
| SETUP | → | “Other” | → | “Ratings Lock” |
Ratings Lock allows you to set the rating levels of your DVD. Playback will stop if the ratings exceed the levels you set.
Rating Level
1) With "Rating Level" selected in the "Ratings Lock" menu, press [OK].
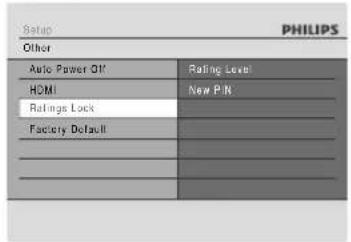
2) Select desired rating level using [▲/▼] then press [OK].
![Setup PHILIPS Ratings Lock Rating Level 0? New PIN 8 [Adult] 7 [NC-1/] 6 [R] 5 [PGR] 4 [PG-13] 3 [PG]](/content/2026/05/1066942/images/6ac64beed204305a98514618ca4e7e7dc7b5b82b16868eb6a128e83312a5916d.jpg)
3) If a password has not been set yet, proceed to step 3-a. If a password has already been set, proceed to step 3-b.
3-a) Enter 4 digit password using [the Number buttons]. Enter the password again then press [OK].
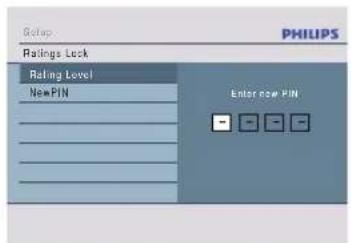
- "4737" cannot be used.
3-b) Enter 4 digit password using [the Number buttons]. Enter the password again then press [OK].
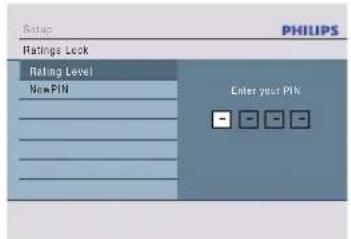
Note
- Record the password in case you forget it.
- If you forget the password, press [4], [7], [3], [7] at step 3 above, then enter your new password. Password will be cleared.
| RATING EXPLANATIONS | |
| Off | |
| 8 [Adult] • DVD | software of any grades (adult/ general/children) can be played back. |
| 7 [NC-17] • No one under 17 admitted. | |
| 6 [R] • Restricted | under 17 requires accompanying parent or adult guardian. |
| 5 [PGR] • Parental | Guidance Recommended. |
| 4 [PG13] • Unsuitable for children under 13. | |
| 3 [PG] • Parental | Guidance suggested. |
| 2 [G] • General Audience. | |
| 1 [Kid Safe] • Suitable for children. | |
4) Press [SETUP] to exit.
New PIN
1) With "New PIN" selected in the "Ratings Lock" menu, press [OK].
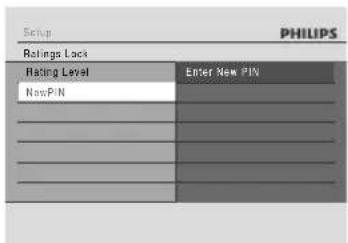
2) Enter 4 digit password using [the Number buttons]. Enter the password again then press [OK].
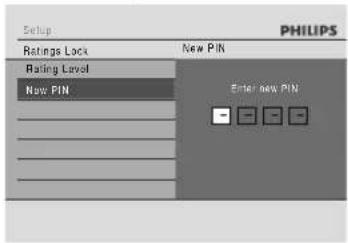
3) Press [SETUP] to exit.
Reset to Factory Default
| SETUP | → | "Other" | → | "Factory Default" |
You can reset the settings to default.
1) With "Factory Default" selected in the "Other" menu, press [OK].
2) Select "Yes" then press [OK].
Note
- All the settings except for the "Ratings Lock" setting will be reset to default.
- When you do not wish to initialize, press [SETUP] to exit the menu at step 1 or select "No" at step 2.
TROUBLESHOOTING
If the unit does not perform properly when operated as instructed in this owner's manual, refer to the following.
| Problem Tip | |
| No power | - Check if the AC power cord is properly connected.- Unplug the outlet once, and wait for 5-10 seconds and then plug it in again. |
| No sound or picture | - Check if the TV is switched on.- Check the video connection.- Check the audio / video cable connections to the TV.(Refer to pages 9-10.)- When “Progressive Scan” is “On”, video signals from the unit’s VIDEO OUT and S-VIDEO OUT jacks will be distorted or not be output at all.- Check whether the connected TV or other device supports HDCP.(This unit will not output a video signal unless the other device supports HDCP.) |
| Distorted picture | - Sometimes a small amount of picture distortion may appear.This is not a malfunction.- Connect the unit directly to the TV.- Set “Progressive Scan” correctly in “Video” menu. Turn it on only if your TV has progressive scan and you are using the component video connections between the unit and the TV. Disable progressive scan for all other connections. (Refer to page 9.) |
| Completely distorted picture or black / white picture with DVD | - Connect this unit directly to the TV.- Make sure the disc is compatible with the unit. |
| No sound or distorted sound | - Adjust the volume.- Check that the speakers are connected correctly. |
| No audio at digital output | - Check the digital connections.- Check if the audio format of the selected audio language matches your receiver capabilities. |
| No DTS audio is output. | - This unit does not support DTS audio.This is not a malfunction. |
| Picture freezes momentarily during playback. | - Check the disc for fingerprints / dirty and clean with a soft cloth wiping from center to edge. |
| Disc cannot be played back. | - Clean the disc.- Ensure the disc is inserted in correct direction.- Check if the disc is defective by trying another disc.- Check the “Ratings Lock” setting.- Insert a correct disc that plays back on this unit.- Handle a disc with special care so that it does not have fingerprints, scratches, or dusts on its surface. |
| No return to start-up screen when disc is removed. | - Reset the unit by switching off the unit, then on again. |
| The unit does not respond to the remote control. | - Aim the remote control directly at the sensor on the front panel.- Reduce the distance to the unit.- Replace the batteries in the remote control.- Re-insert the batteries with their polarities (+/– signs) as indicated.- Press and hold any button on remote control toward a digital camera. The remote control is working if you confirm infrared light through the digital camera. |
| Buttons do not work or the unit stops responding. | - To completely reset the unit, unplug the AC cord from the AC outlet for 5-10 seconds. |
| The unit does not respond to some operating commands during playback. | - Operations may not be permitted by the disc. Refer to the instructions of the disc. |
| The unit cannot read CD / DVD. | - Use a commonly available cleaning CD / DVD to clean the lens before sending the unit for repair. |
| Angle does not switch. | - The angle cannot be switched for DVD which do not contain multiple angles. In some cases multiple angles are only recorded for specific scenes. |
| Playback does not start when the title is selected. | - Check the “Ratings Lock” setting. |
| The password for rating level has been forgotten. | - Enter the default password “4737”, then your forgotten password will be cleared. |
| Error message appears when I select “Auto” in the “Player Menu”. | - Make sure that the unit is connected to the PHILIPS brand EasyLink TV and the “EasyLink (HDMI CEC)” is set to “On”.- This error message may appear when your TV’s OSD language is not supported by this unit. |
- Some functions are not available in specific modes, but this is not a malfunction. Read the description in this user manual for more details on correct operations.
- Playback from a desired track and random playback are not available during programmed playback.
- Some functions are prohibited on some discs.
GLOSSARY
Analog Audio
An electrical signal that directly represents sound. Compare this to digital audio which can be an electrical signal, but is an indirect representation of sound. See also "Digital Audio".
Aspect Ratio
The width of a TV screen relative to its height. Conventional TVs are 4:3 (in other words, the TV screen is almost square); widescreen models are 16:9 (the TV screen is almost twice as wide as it is high).
Chapter
Just as a book is split up into several chapters, a title on a DVD-video is usually divided into chapters. See also "Title".
Component Video Output
Each signal of luminance (Y) and component ( P_B/C_B , P_R/C_R ) is independent to output so that you can experience picture color as it is.
Also, due to compatibility with progressive video (525p/480p), you can experience higher-density picture than that in interlace (525i/480i).
Digital Audio
An indirect representation of sound by numbers. During recording, the sound is measured at discrete intervals (44,100 times a second for CD audio) by an analog-to-digital converter, generating a stream of numbers. On playback, a digital-to-analog converter generates an analog signal based on these numbers. See also "Sampling Frequency" and "Analog Audio".
Dolby Digital
The system to compress digital sound developed by Dolby Laboratories. It offers you sound of stereo(2ch) or multi-channel audio.
EasyLink (HDMI CEC) (Consumer Electronics Control)
EasyLink (HDMI CEC) allows you to operate the linked functions of this player with Philips brand TV with EasyLink feature.
Philips does not guarantee 100 % interoperability with other brands of HDMI CEC compliant devices.
JPEG (Joint Photographic Experts Group)
JPEG is a method of compressing still picture files. You can copy JPEG files on CD-RW/-R, DVD or SD Memory Card from a computer and play back the files on this unit.
MP3 (MPEG audio layer 3)
MP3 is a method of compressing files. You can copy MP3 files on CD-RW/-R, DVD+RW/+R or DVD-RW/-R from the computer and play back the files on this unit.
The most common system of encoding digital audio, found on CD and DAT. Excellent quality, but requires a lot of data compared to formats such as Dolby Digital and MPEG audio. For compatibility with digital audio recorders (CD, MD and DAT) and AV amplifiers with digital inputs, this unit can convert Dolby Digital and MPEG audio to PCM. See also "Digital Audio".
Progressive Scan (525p/480p)
A type of display that does not split each frame into fields, and instead scans directly through all the scanlines of each frame in order. Progressive scan provides less flickering and higher image resolution than traditional (525i/480i) TV signals.
Region Code
Regions associate discs and players with particular areas of the world. This unit will only play back discs that have compatible region codes. You can find the region code of your unit by looking on the rear panel. Some discs are compatible with more than one region (or all regions).
Sampling Frequency
The rate which sound is measured by a specified interval to turn into digital audio data. The numbers of sampling in one second defines as sampling frequency. The higher the rate, the better the sound quality.
Title
A collection of chapters on DVD-video. See also "Chapter".
Track
Audio CD use tracks to divide up the content of a disc. The DVD-video equivalent is called a chapter. See also "Chapter".
SPECIFICATIONS
General
| Signal system NTSC color |
| Power requirements 120V AC, 60Hz |
| Power consumption 8W (standby: 0.8W) |
| Dimensions (width x height x depth) 14.2 x 2.0 x 8.5 inches (360 x 50 x 215mm) |
| Weight 3.2 lbs. (1.45kg) |
| Operating temperature 41°F (5°C) to 104°F (40°C) |
| Operating humidity Less than 80% (no condensation) |
Terminals
| Audio output (Analog)RCA jack x 2 L/R: 2Vrms (output impedance: more than 1kΩ) | |||
| Video outputRCA jack x 1 1Vp-p (75Ω) | |||
| Component video outputRCA jack x 3 Y: 1Vp-p (75Ω) P | B/CB: 700mVp-p (75Ω) | PR/CR: 700mVp-p (75Ω) | |
| Audio output (Digital)RCA jack x 1 500mVp-p (75Ω) | |||
| S-video outputY(luminance)-Output levelC(color)-Output leveljack x 1 | Output 1(rear)1Vp-p (75Ω)286Vp-p (75Ω)4 pin mini DIN | ||
| HDMI outputHDMI jack x 1 Video: 480p, 720p, 1080i, 1080p/Audio | |||
Note
• The specifications and design of this product are subject to change without notice.
Mando a Distancia

natural_image
Illustration of a hand using a circular tool to press or install a mechanical component (no text or symbols visible)This warranty obligation is limited to the terms set forth below.
WHO IS COVERED:
This product is warranted to the original purchaser or the person receiving the product as a gift against defects in materials and workmanship as based on the date of original purchase ("Warranty Period") from an Authorized Dealer. The original sales receipt showing the product name and the purchase date from an authorized retailer is considered such proof.
WHAT IS COVERED:
This warranty covers new products if a defect in material or workmanship occurs and a valid claim is received within the Warranty Period. At its option, the company will either (1) repair the product at no charge, using new or refurbished replacement parts, or (2) exchange the product with a product that is new or which has been manufactured from new, or serviceable used parts and is at least functionally equivalent or most comparable to the original product in current inventory, or (3) refund the original purchase price of the product. The Company warrants replacement products or parts provided under this warranty against defects in materials and workmanship from the date of the replacement or repair for ninety (90) days or for the remaining portion of the original product's warranty, whichever provides longer coverage for you. When a product or part is exchanged, any replacement item becomes your property and the replaced item becomes the company's property. When a refund is given, your product becomes the company's property. Note: Any product sold and identified as refurbished or renewed carries a ninety (90) day limited warranty.
Replacement product can only be sent if all warranty requirements are met. Failure to follow all requirements can result in delay.
WHAT IS NOT COVERED - EXCLUSIONS AND LIMITATIONS:
This Limited Warranty applies only to the new products that can be identified by the trademark, trade name, or logo affixed to it. This Limited Warranty does not apply to any non-Philips hardware product or any software, even if packaged or sold with the product. Non-Philips manufacturers, suppliers, or publishers may provide a separate warranty for their own products packaged with the bundled product.
The Company is not liable for any damage to or loss of any programs, data, or other information stored on any media contained within the product, or any non-Philips product or part not covered by this warranty. Recovery or reinstallation of programs, data or other information is not covered under this Limited Warranty.
This warranty does not apply (a) to damage caused by accident, abuse, misuse, neglect, misapplication, or non-Philips product, (b) to damage caused by service performed by anyone other than an Authorized Service Location, (c) to a product or
a part that has been modified without written permission, or (d) if any serial number has been removed or defaced, or (e) product, accessories or consumables sold "AS IS" without warranty of any kind by including refurbished Philips product sold "AS IS" by some retailers.
This Limited Warranty does not cover:
• Shipping charges to return defective product.
- Labor charges for installation or setup of the product, adjustment of customer controls on the product, and installation or repair of antenna/signal source systems outside of the product.
- Product repair and/or part replacement because of improper installation or maintenance, connections to improper voltage supply, power line surge, lightning damage, retained images or screen markings resulting from viewing fixed stationary content for extended periods, product cosmetic appearance items due to normal wear and tear, unauthorized repair or other cause not within the control of the company.
- Damage or claims for products not being available for use, or for lost data or lost software.
- Damage from mishandled shipments or transit accidents when returning product.
- A product that requires modification or adaptation to enable it to operate in any country other than the country for which it was designed, manufactured, approved and/or authorized, or repair of products damaged by these modifications.
- A product used for commercial or institutional purposes (including but not limited to rental purposes).
- Product lost in shipment and no signature verification receipt can be provided.
- Failure to operate per Owner's Manual.
TO OBTAIN ASSISTANCE IN THE U.S.A., CANADA, PUERTO RICO, OR U.S. VIRGIN ISLANDS...
Contact Customer Care Center at: 1-866-309-0866
REPAIR OR REPLACEMENT AS PROVIDED UNDER THIS WARRANTY IS THE EXCLUSIVE REMEDY FOR THE CONSUMER. PHILIPS SHALL NOT BE LIABLE FOR ANY INCIDENTAL OR CONSEQUENTIAL DAMAGES FOR BREACH OF ANY EXPRESS OR IMPLIED WARRANTY ON THIS PRODUCT. EXCEPT TO THE EXTENT PROHIBITED BY APPLICABLE LAW, ANY IMPLIED WARRANTY OF MERCHANTABILITY OR FITNESS FOR A PARTICULAR PURPOSE ON THIS PRODUCT IS LIMITED IN DURATION TO THE DURATION OF THIS WARRANTY.
Some states do not allow the exclusions or limitation of incidental or consequential damages, or allow limitations on how long an implied warranty lasts, so the above limitations or exclusions may not apply to you.
This warranty gives you specific legal rights. You may have other rights which vary from state/province to state/province.
P&F USA, Inc.
PO Box 430 Daleville, IN 47334-0430
MEMO
PHILIPS CONSUMER ELECTRONICS
PO Box 430 Daleville, IN 47334-0430
Meet Philips at the Internet
http://www.philips.com/welcome

Be responsible
Respect copyrights

DVP3570/F7
CLASS 1 LASER PRODUCT


- PRECAUTIONS
- WARNING:
- CAUTION
- RISK OF ELECTRIC SHOCK DO NOT OPEN
- CAUTION:
- IMPORTANT SAFETY INSTRUCTIONS
- FCC WARNING
- RADIO-TV INTERFERENCE
- LASER SAFETY
- IMPORTANT COPYRIGHT INFORMATION
- To Avoid the Hazards of Electrical Shock and Fire
- Location and Handling
- Dew Condensation Warning
- Note about Recycling
- Notice for Progressive Scan Output
- Supplied Accessories
- Maintenance
- Servicing
- Cleaning the cabinet
- Cleaning discs
- Cleaning the disc lens
- Disc handling
- Installation Location
- Trademark Information
- Symbols Used in this User Manual
- Symbol Description
- CONTENTS
- Introduction
- Connections
- Basic Setup
- Playback
- Function Setup
- Others
- Español
- FUNCTIONAL OVERVIEW
- Front Panel
- Disc tray
- Infrared sensor window
- ▲ (open/close) button\*
- ■ (stop) button
- Play indicator
- ▶ (play) button
- Standby-On indicator
- ⏻(standby-on) button
- Rear Panel
- AC Power Cord
- AUDIO OUT jacks
- COMPONENT VIDEO OUT jacks
- S-VIDEO OUT jack
- HDMI OUT jack
- DIGITAL AUDIO OUT (COAXIAL) jack
- VIDEO OUT jack
- Note
- Remote Control
- ⏻ (standby-on) button
- Number buttons
- SEARCH button
- ZOOM button
- DISC MENU button
- ▲/▼/◄/► buttons
- OK button
- BACK ↩ button
- ◀ (previous) button
- 10.▶| (next) button
- 11.MODEbutton
- (mute) button
- SUBTITLE button
- 14.VOL.+/- button
- ANGLE button
- OPEN/CLOSE▲ button\*
- REPEAT button
- 18.A-B button
- CLEAR button
- 20.SOUND MENU button
- SETUP button
- TITLE button
- 23.INFO i button
- 24.▶ (play) button
- ◀◀ (reverse) button
- 26.▶▶ (forward) button
- ■ (stop) button
- II (pause) button
- AUDIO button
- 30.TV.CH +/- button
- MARKER button
- 32.HDMI button
- Installing the Batteries in the Remote Control Using a Remote Control
- Connection to the TV
- Supplied cables used in this connection are as follows:
- Note:
- If your TV is compatible with 525 (480) progressive scanning and you want to enjoy that high quality picture;
- If your TV is not compatible with progressive scanning;
- Connecting to RF Modulator (Not Supplied)
- Connection to an Audio System
- HDMI Mode and Actual Output Signals
- Copyright protection system
- BEFORE YOU START
- Finding the Viewing Channel on Your TV
- INFORMATION ON PLAYBACK
- playable Discs and Files
- Unplayable Discs
- Color Systems
- Region Codes
- Hint for Disc Playback
- On Screen Display
- How to Insert a Disc
- It may take a while to load the disc.
- To eject the disc:
- BASIC PLAYBACK
- Playing Back a DVD or an Audio CD
- Insert a disc (refer to page 14 on how to insert a disc).
- Playback may start automatically. If not, press [▶ (play)].
- Using the Title / Disc Menu
- Playing Back a Disc with MP3 / JPEG Files
- How to Navigate through the Track/File List
- Recommended specifications:
- 1
- Insert a disc (refer to page 14 on how to insert a disc). Playback will automatically start from the first file of the folder or files.
- 2
- 3
- Press [OK] or [▶ (play)]. Playback of the selected file will be start.
- SPECIAL PLAYBACK
- Fast Forward / Fast Reverse
- Slow Forward / Slow Reverse
- Step by Step Playback
- Zoom
- Repeat Playback
- A-B Repeat
- To cancel A-B repeat:
- Random Playback
- Programmed Playback
- Track/File/Folder Search
- Using [SEARCH]
- Using [◀ (previous)] / [▶ (next)]
- Using [the Number buttons] (Direct Search)
- SEARCH
- Title / Chapter Search
- Title Search
- Chapter Search
- Time Search
- Marker Search
- SELECTING THE FORMAT OF AUDIO AND VIDEO
- Switching Subtitles
- Switching Audio Language
- Switching Camera Angles
- Switching Stereo Sound Mode
- Switching Sound Menu
- LIST OF SETTINGS
- SETUPS
- TV Aspect
- Progressive Scan
- EasyLink (HDMI CEC)
- One Touch Play
- Standby
- System Information
- Get & Set Menu Language
- Ratings Lock
- Rating Level
- New PIN
- Reset to Factory Default
- TROUBLESHOOTING
- GLOSSARY
- Analog Audio
- Aspect Ratio
- Chapter
- Component Video Output
- Digital Audio
- Dolby Digital
- EasyLink (HDMI CEC) (Consumer Electronics Control)
- JPEG (Joint Photographic Experts Group)
- MP3 (MPEG audio layer 3)
- Progressive Scan (525p/480p)
- Region Code
- Sampling Frequency
- Title
- Track
- SPECIFICATIONS
- Mando a Distancia
- WHO IS COVERED:
- WHAT IS COVERED:
- WHAT IS NOT COVERED - EXCLUSIONS AND LIMITATIONS:
- This Limited Warranty does not cover:
- TO OBTAIN ASSISTANCE IN THE U.S.A., CANADA, PUERTO RICO, OR U.S. VIRGIN ISLANDS...
- MEMO
- PHILIPS CONSUMER ELECTRONICS
Brand : PHILIPS
Model : DVP3570
Category : DVD player