Turtle Beach Ear Force X1 - Headphones MAD CATZ - Free user manual and instructions
Find the device manual for free Turtle Beach Ear Force X1 MAD CATZ in PDF.

User questions about Turtle Beach Ear Force X1 MAD CATZ
0 question about this device. Answer the ones you know or ask your own.
Ask a new question about this device
Download the instructions for your Headphones in PDF format for free! Find your manual Turtle Beach Ear Force X1 - MAD CATZ and take your electronic device back in hand. On this page are published all the documents necessary for the use of your device. Turtle Beach Ear Force X1 by MAD CATZ.
USER MANUAL Turtle Beach Ear Force X1 MAD CATZ
Configuring Xbox Settings
IMPORTANT: In order to hear other players you must make sure that the following is set from the Xbox 360 dashboard.
- From the Xbox 360 Dashboard, press the Xbox Guide button (the X button in the center of your controller) to access your Xbox Live Settings.
- Navigate to the "Personal Settings" selection, and press the "A" button on your controller.
- Select "Voice" from the following menu, and press "A".
- On the Voice screen, make sure that "Play Through Headset" is selected for Voice Output selection and that volume is set to 10 (see below).
- You can fine tune game audio and chat volumes using the X1 amplifier and chat volume controls.

text_image
Test options for to-gate video and private chat. Volume: 50 Microphones □ Make Voice output □ Play Through Headset □ Play Through Speakers □ Play Through BothGame Audio Volume:
This dial allows you to control the amount of amplification that the X1 will apply to your game audio.
Mic Mute Switch:
This switch will mute your microphone.
Amplifier LED:
When your X1's have power, this LED will light green. When the Mic Mute Switch is engaged, your microphone will be muted and this LED will glow red.

text_image
Game Audio Volume Mic Mute Switch EAR FORCE TURBAGE & WOCH Xbox Controller Cable Connection (on side) Amplifier LEDConnecting to PC
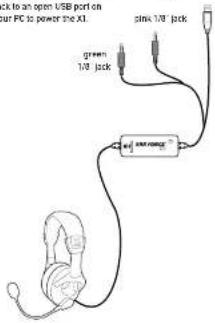
The X1 headphones can also be used as a powered headset and microphone for PC gaming or VoIP.
Step 1.
Connect the X1's green 1/8" jack to the speaker output of your PC's sound card.
Step 2
Connect the X1's pink 1/8" jack to the microphone input of your PC's sound card.

Step 3.
Connect the X1's USB/Power jack to an open USB port on your PC to power the X1.
text_image
pick to an open USB port on our PC to power the XL green 1/8 jack pink 1/8 jack new rangeOptional Power Adapter Using the Amplifier
The X1 headphones are powered by USB. If you'd like to use the X1s and don't have access to a USB port you can use an optional AC to USB converter. For more information visit TurtleBeach.com.
EAR FORCE X1
Voice Chat plus Game Audio
Operating Instructions

Turtle Beach
For more products, accessories, and our support knowledge base. visit www.turtlebeach.com
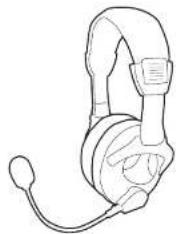
About the X1 Headphones
Ear Force X1 amplified headphones give serious gamers the ultimate competitive edge by combining Xbox Live chat and stereo game audio into an immersive sound experience.
X1's integrated design overcomes the limitation of communicator headsets that block game sound from one ear and eliminates voice chat interference caused by the headset microphone picking up sound from external speakers.
Pump up the volume without disturbing friends, family or neighbors. Hear every nuance of the game - from an opponent sneaking up behind you to your teammate's voice right next to you. Trash talk online. Block out distractions. It's everything you need for an amazing gaming experience.
natural_image
Line drawing of a headset with earbuds and antenna (no text or symbols)Important Information
- Be careful when turning on the master volume control on the headphones. Before placing the headphones over your ears, set the volume control to minimum, then slowly increase until you reach a comfortable level.
- Like any speakers, overdriving headphones may cause damage to both the headphones and your ears. Please listen at moderate levels.
- WARNING: Long term exposure to loud music or other sounds in headphones may cause hearing damage. It is best to avoid extreme volume levels when using headphones, especially for extended periods. Over time, your ears adapt to the volume level, so a level that may not cause initial discomfort might still damage your hearing.
Connecting the Xbox
Use the included cables to connect the headphones. Xbox and TV (or sound system) as shown. This will allow you to hear the Xbox with either the TV or the X1 headphones.

flowchart
graph TD
    A["USB Power"] --> B["Video"]
    B --> C["Audio"]
    C --> D["Splitter cable"]
    D --> E["TV"]
    E --> F["pink 1/8" jack"]
    F --> G["green 1/8" jack"]
    G --> H["USB Extension cable if necessary"]
    H --> I["USB Power jack to open USB port on the Xbox 36C. Use the Included USB extension cable if necessary"]
Connecting the Microphone
The X1 microphone may be used to communicate with other players during Xbox Live multi-player gaming sessions. Use the included cable to connect the headphones to the Xbox controller.

Insert the "puck" shaped plug into the headphone jack on the Xbox game controller.
Insert the other end into the headphone jack on the X1 amplifier.
Use the Mic Mute button on the XI amplifier to present your voice from being heard by other players.
The volume control on the "pack" shaped plug may be used to adjust the volume of the Xbox Live chat.
Package Contents
• Ear Force X1 headphones
• Transmitter base unit
- USB extender cable
• Xbox controller connection cable
• Audio connection cables
• This user's guide
For warranty information please visit http://support.turtlebeach.com
Copyright © 2006. Voyetra Turtle Beach, Inc. (VTB). All rights reserved. No part of this document may be reproduced without permission. Turtle Beach, the Turtle Beach logo and Ear Force are registered trademarks of VTE. Xbox and Xbox Live are registered trademarks of Microsoft Corporation. All other trademarks are properties of their respective companies and are hereby acknowledged. Product features, visual design, package contents and specifications are subject to change without notice.
Product TBS-2055