
GR-D796 - Camera JVC - Free user manual and instructions
Find the device manual for free GR-D796 JVC in PDF.

| Product Type | Digital Video Camera (Camcorder) |
| Model Number | GR-D796 |
| Brand | JVC |
| Video Format | Mini DV (NTSC) |
| Image Sensor | 1/6" CCD |
| Optical Zoom | 34x (F2.0, f=2.3mm-78.2mm) |
| Digital Zoom | Up to 800x (selectable 68x or 800x) |
| Display | 2.7" LCD monitor (rotatable 270°) and 0.33" color viewfinder |
| Storage Media | Mini DV cassette (video), SD Memory Card / MultiMediaCard (still images) |
| Still Image Resolution | 640 x 480 pixels (JPEG) |
| Power Supply | DC 11V (AC adapter) or DC 7.2V (JVC BN-VF808U/VF815U/VF823U battery pack) |
| Power Consumption | Approx. 2.2W (viewfinder on) / 2.7W (LCD on) / 7.5W max (charging) |
| Dimensions (W x H x D) | 61mm x 94mm x 114mm (closed, viewfinder retracted) |
| Weight | Approx. 410g (without battery, cassette, lens cap) |
| Recording Modes | SP (standard play) and LP (long play) |
| Key Features | LED Light, Backlight Compensation, Wipe/Fader Effects, Program AE (Sports, Snow, Spotlight, Twilight, Night), Shutter Effects, Manual Focus/Exposure, White Balance, Dual Recording (video + still) |
| Connectivity | AV output, DV (i.LINK) input/output, USB (Mini-B), DC input |
| Cleaning | Exterior: soft cloth; Lens: blower brush and lens paper; Viewfinder: blower brush; Video heads: optional cleaning cassette |
| Safety Precautions | Do not disassemble, avoid moisture and extreme temperatures, use only JVC batteries/accessories, keep ventilation clear |
| Recommended Accessories | JVC battery packs (BN-VF808U/VF815U/VF823U), AC adapter, cleaning cassette, Mini DV tapes, SD/MMC cards |
| Warranty and Support | Refer to JVC dealer or service center; repairs by qualified personnel only |
Frequently Asked Questions - GR-D796 JVC
User questions about GR-D796 JVC
0 question about this device. Answer the ones you know or ask your own.
Ask a new question about this device
Download the instructions for your Camera in PDF format for free! Find your manual GR-D796 - JVC and take your electronic device back in hand. On this page are published all the documents necessary for the use of your device. GR-D796 by JVC.
USER MANUAL GR-D796 JVC
Thank you for purchasing this digital video camera. Before use, please read the safety information and precautions contained in the pages 3 – 5 to ensure safe use of this product.
ENGLISH
GETTING STARTED 7
natural_image
Line drawing of a digital video camera with open lid and rear panel (no text or symbols)Mini DV NTSC

MultiMediaCard
For Customer Use:
Enter below the Model No. and Serial No. which is located on the bottom of the camcorder. Retain this information for future reference. Model No.
Serial No.
To deactivate the demonstration, set "DEMO MODE" to "OFF". ( page 29, 32)
Major Features of this Camcorder
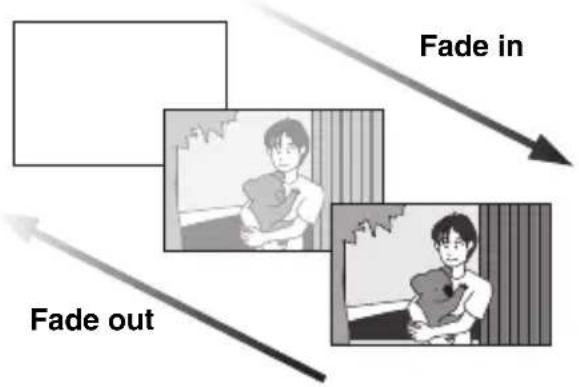
Wipe/Fader Effects
You can use the Wipe/Fader Effects to make pro-style scene transitions.
(pg. 38)
flowchart
graph TD
    A["Start"] --> B["Fade out"]
    B --> C["Action 1"]
    C --> D["Action 2"]
    D --> E["Action 3"]
    E --> F["Action 4"]
    F --> G["Action 5"]
    G --> H["Action 6"]
    H --> I["Action 7"]
    I --> J["Action 8"]
    J --> K["Action 9"]
    K --> L["Action 10"]
    L --> M["Action 11"]
    M --> N["Action 12"]
    N --> O["Action 13"]
    O --> P["Action 14"]
    P --> Q["Action 15"]
    Q --> R["Action 16"]
    R --> S["Action 17"]
    S --> T["Action 18"]
    T --> U["Action 19"]
    U --> V["Action 20"]
    V --> W["Action 21"]
    W --> X["Action 22"]
    X --> Y["Action 23"]
    Y --> Z["Action 24"]
    Z --> AA["Action 25"]
    AA --> AB["Action 26"]
    AB --> AC["Action 27"]
    AC --> AD["Action 28"]
    AD --> AE["Action 29"]
    AE --> AF["Action 30"]
    AF --> AG["Action 31"]
    AG --> AH["Action 32"]
    AH --> AI["Action 33"]
    AI --> AJ["Action 34"]
    AJ --> AK["Action 35"]
    AK --> AL["Action 36"]
    AL --> AM["Action 37"]
    AM --> AN["Action 38"]
    AN --> AO["Action 39"]
    AO --> AP["Action 40"]
    AP --> AQ["Action 41"]
    AQ --> AR["Action 42"]
    AR --> AS["Action 43"]
    AS --> AT["Action 44"]
    AT --> AU["Action 45"]
    AU --> AV["Action 46"]
    AV --> AW["Action 47"]
    AW --> AX["Action 48"]
    AX --> AY["Action 49"]
    AY --> AZ["Action 50"]
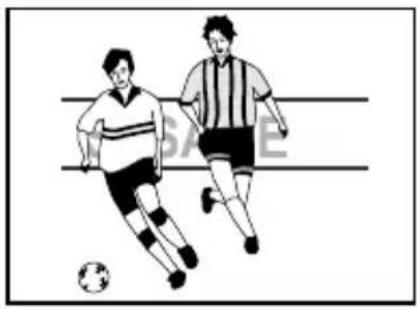
Program AE, Effects and Shutter Effects
For example, "SPORTS" mode allows fast-moving images to be captured one frame at a time, for vivid, stable slow-motion.
(pg. 38)
natural_image
Two soccer players in action, one kicking a ball and the other defending (no text or symbols visible)LED Light
You can brighten the subject in the dark place with the LED Light. (LFP pg. 34)
natural_image
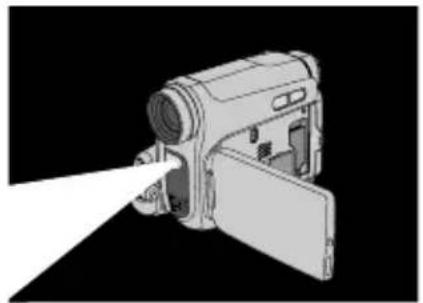
Illustration of a digital camera with a flash beam pointing to the lens (no text or symbols)Backlight Compensation
Simply pressing the button brightens the image darkened by backlight. (pg. 36)

natural_image
Two-panel illustration showing a person looking out at a window with distant figures, one transforming into another (no text or symbols)Data Battery
You can check the battery status by simply pressing the DATA button. (17 pg. 14)
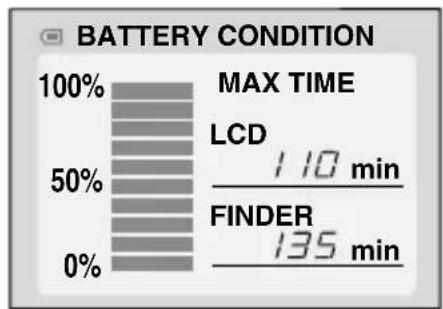
bar
BATTERY CONDITION | Category | Value (%) | |---|---| | MAX TIME LCD | 110 min | | FINDER | 135 min |Auto Button
You can change the recording mode between manual setting to the standard mode setting of the camcorder by pressing the AUTO button. (pg. 20)
Dual Rec.
You can capture and view still images without disturbing the recording in progress. (pg. 20)
Read This First!
- Before recording important video, be sure to make a trial recording.
Play back your trial recording to make sure the video and audio have been recorded properly.
- We recommend cleaning your video heads before use.
If you haven't used your camcorder for awhile, the heads may be dirty. We recommend periodically cleaning the video heads with a cleaning cassette (optional).

natural_image
Pixelated grayscale image of a person's face with no visible text or symbols- Be sure to store your cassette tapes and camcorder in the proper environment.
Video heads can become dirty more easily if your cassette tapes and camcorder are stored in a dusty area. Cassette tapes should be removed from the camcorder and stored in cassette cases. Store the camcorder in a bag or other container.
- Use SP (Standard) mode for important video recordings.
LP (Long Play) mode lets you record 50% more video than SP (Standard) mode, but you may experience mosaic-like noise during playback depending on the tape characteristics and the usage environment.
So, for important recordings, we recommend using SP mode.
- For safety and reliability.
It is recommended only genuine JVC batteries and accessories are used in this camcorder.
- This product includes patented and other proprietary technology and will operate only with JVC Data Battery. Use the JVC BN-VF808U/VF815U/VF823U battery packs. Using generic non-JVC batteries can cause damage to the internal charging circuitry.
- This camcorder is designed exclusively for the digital video cassette, SD Memory Card and MultiMediaCard. Only cassettes marked
“MID”
and memory cards marked "
or "MultifediaCard" unit.
- SDHC Memory Card cannot be used with this camcorder.
- Remember that this camcorder is not compatible with other digital video formats.
- It is recommended that you use JVC brand cassette tapes.
Your camcorder is compatible with all brands of commercially available cassette tapes complying with the MiniDV standard, but JVC brand cassette tapes are designed and
optimized to maximize the performance of your camcorder.
- Remember that this camcorder is intended for private consumer use only.
Any commercial use without proper permission is prohibited. (Even if you record an event such as a show, performance or exhibition for personal enjoyment, it is strongly recommended that you obtain permission beforehand.)
• DO NOT leave the unit
- in place of over 50°C (122°F)
- in place where humidity is extremely low (below 35%) or extremely high (80%).
- in direct sunlight.
- in a closed car in summer.
-
near a heater.
-
The LCD monitor is made with high-precision technology. However, black spots or bright spots of light (red, green or blue) may appear constantly on the LCD monitor. These spots are not recorded on the tape. This is not due to any defect of the unit. (Effective dots: more than 99.99%)
- Do not leave the battery pack attached when the camcorder is not in use and check the unit regularly whether it is working or not.
Also read "CAUTIONS" on pages 44 - 46.
- Microsoft ^® and Windows ^® are either registered trademarks or trademarks of Microsoft Corporation in the United States and/or other countries.
- Macintosh is a registered trademark of Apple Computer, Inc.
- QuickTime is a registered trademark of Apple Computer, Inc.
”
can be used with this
SAFETY PRECAUTIONS

CAUTION
RISK OF ELECTRIC SHOCK DO NOT OPEN

CAUTION: TO REDUCE THE RISK OF ELECTRIC SHOCK, DO NOT REMOVE COVER (OR BACK). NO USER-SERVICEABLE PARTS INSIDE. REFER SERVICING TO QUALIFIED SERVICE PERSONNEL.

The lightning flash with arrowhead symbol, within an equilateral triangle, is intended to alert the user to the presence of uninsulated "dangerous voltage" within the product's enclosure that may be of sufficient magnitude to constitute a risk of electric shock to persons.

The exclamation point within an equilateral triangle is intended to alert the user to the presence of important operating and maintenance (servicing) instructions in the literature accompanying the appliance.
WARNING: TO PREVENT FIRE OR SHOCK HAZARD, DO NOT EXPOSE THIS UNIT TO RAIN OR MOISTURE.
CAUTIONS:
- This camcorder is designed to be used with NTSC-type color television signals. It cannot be used for playback with a television of a different standard. However, live recording and LCD monitor/viewfinder playback are possible anywhere.
- This product includes patented and other proprietary technology and will operate only with JVC Data Battery. Use the JVC BN-VF808U/VF815U/VF823U battery packs and, to recharge them or to supply power to the camcorder from an AC outlet, use the provided multi-voltage AC Adapter. (An appropriate conversion adapter may be necessary to accommodate different designs of AC outlets in different countries.)
This product contains a CR Coin Cell Lithium Battery which contains Perchlorate Material - special handling may apply. See www.dtsc.ca.gov/hazardouswaste/perchlorate
NOTES:
- The rating plate (serial number plate) and safety caution are on the bottom and/or the back of the main unit.
- The rating information and safety caution of the AC Adapter are on its upper and lower sides.
When the equipment is installed in a cabinet or on a shelf, make sure that it has sufficient space on all sides to allow for ventilation (10 cm (3-15/16") or more on both sides, on top and at the rear).
Do not block the ventilation holes.
(If the ventilation holes are blocked by a newspaper, or cloth etc. the heat may not be able to get out.)
No naked flame sources, such as lighted candles, should be placed on the apparatus.
When discarding batteries, environmental problems must be considered and the local rules or laws governing the disposal of these batteries must be followed strictly.
The apparatus shall not be exposed to dripping or splashing.
Do not use this equipment in a bathroom or places with water.
Also do not place any containers filled with water or liquids (such as cosmetics or medicines, flower vases, potted plants, cups etc.) on top of this unit.
(If water or liquid is allowed to enter this equipment, fire or electric shock may be caused.)
Do not point the lens or the viewfinder directly into the sun. This can cause eye injuries, as well as lead to the malfunctioning of internal circuitry. There is also a risk of fire or electric shock.
CAUTION!
The following notes concern possible physical damage to the camcorder and to the user.
When carrying, be sure to always securely attach and use the provided strap. Carrying or holding the camcorder by the viewfinder and/or the LCD monitor can result in dropping the unit, or in a malfunction.
Take care not to get your finger caught in the cassette holder cover. Do not let children operate the camcorder, as they are particularly susceptible to this type of injury.
Do not use a tripod on unsteady or unlevel surfaces. It could tip over, causing serious damage to the camcorder.
CAUTION!
Connecting cables (Audio/Video, S-Video, etc.) to the camcorder and leaving it on top of the TV is not recommended, as tripping on the cables will cause the camcorder to fall, resulting in damage.
IMPORTANT SAFETY INSTRUCTIONS
- Read these instructions.
- Keep these instructions.
- Heed all warnings.
- Follow all instructions.
- Do not use this apparatus near water.
- Clean only with dry cloth.
- Do not block any ventilation openings. Install in accordance with the manufacturer's instructions.
- Do not install near any heat sources such as radiators, heat registers, stoves, or other apparatus (including amplifiers) that produce heat.
-
Only use attachments/accessories specified by the manufacturer.
-
Use only with the cart, stand, tripod, bracket, or table specified by the manufacturer, or sold with the apparatus. When a cart is used, use caution when moving the cart/

natural_image
Symbolic icon of a person climbing a ladder inside a circle (no text or symbols)apparatus combination to avoid injury from tip-over.
-
Unplug this apparatus during lightning storms or when unused for long periods of time.
-
Refer all servicing to qualified service personnel. Servicing is required when the apparatus has been damaged in any way, such as power-supply cord or plug is damaged, liquid has been spilled or objects have fallen into the apparatus, the apparatus has been exposed to rain or moisture, does not operate normally, or has been dropped.
Cleaning The Camcorder
Before cleaning, turn off the camcorder and remove the battery pack and AC Adapter.
To clean the exterior
Wipe gently with a soft cloth. Put the cloth in diluted mild soap and wring it well to wipe off heavy dirt. Then wipe again with a dry cloth.
To clean the LCD monitor
Wipe gently with a soft cloth. Be careful not to damage the monitor. Close the LCD monitor.
To clean the lens
Blow it with a blower brush, then wipe gently with lens cleaning paper.
To clean the viewfinder lens
Remove dust from the viewfinder using a blower brush.
NOTES:
- Avoid using strong cleaning agents such as benzine or alcohol.
- Cleaning should be done only after the battery pack has been removed or other power units have been disconnected.
- Mold may form if the lens is left dirty.
- When using a cleaner or chemically treated cloth refer to the cautions of each product.
- To clean the viewfinder, please consult your nearest JVC dealer.

USE CLEANING CASSETTE
Appears if dirt is detected on the heads during recording. Use an optional cleaning cassette (17 pg. 3).
GETTING STARTED 7
Regarding This Manual ....7
Provided Accessories....7
Index......8
Grip Adjustment....12
Power 13
Language Settings....14
Date/Time Settings....15
Viewfinder Adjustment....15
Brightness Adjustment Of The Display......15
Tripod Mounting....15
Loading/Unloading A Cassette....16
Loading/Unloading A Memory Card .....17
16:9 Wide Mode ....17
Basic Recording ....18
Tape Remaining Time 18
Quick Review....18
Zooming....19
Journalistic Shooting 19
Interface Shooting 19
Time Code....20
Recording From The Middle Of A Tape...20
Dual Rec....20
Auto/Manual Mode 20
VIDEO PLAYBACK 21
Normal Playback 21
Still Playback 21
Variable Shuttle Search....22
Blank Search 22
Playback Snapshot....22
Connections To A TV Or VCR....23
D.S.C. RECORDING....24
Basic Shooting (D.S.C. Snapshot) .....24
D.S.C. PLAYBACK......25
Normal Playback Of Images....25
Auto Playback Of Images....25
Index Playback Of Files....25
Removing On-Screen Display 25
ADDITIONAL FEATURES FOR D.S.C. 26
Resetting The File Name......26
Protecting Files....26
Deleting Files....27
Setting Print Information (DPOF Setting)*...27
Initializing A Memory Card....28
ADVANCED FEATURES 29
MENUS FOR DETAILED ADJUSTMENT ......29
Changing The Menu Settings.... 29
Recording Menus ....30
Playback Menus....33
FEATURES FOR RECORDING ....34
LED Light 34
Snapshot (Record Still Image On Tape) ..... 34
Manual Focus.... 35
Exposure Control.... 35
Iris Lock....36
Backlight Compensation.... 36
Spot Exposure Control ....36
White Balance Adjustment ....37
Manual White Balance Adjustment 37
Wipe Or Fader Effects.... 38
Program AE, Effects And Shutter Effects.... 38
Dubbing Still Images Recorded On A Tape To A Memory Card 39
EDITING 39
Dubbing To A VCR.... 39
Dubbing To Or From A Video Unit Equipped With A DV Connector (Digital Dubbing) .. 40
Connection To A Personal Computer...... 41
REFERENCES 42
TROUBLESHOOTING....42
CAUTIONS......44
SPECIFICATIONS 47
TERMS 48
Regarding This Manual
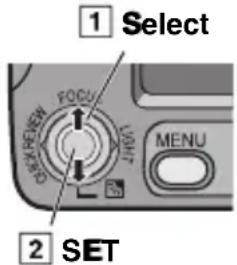
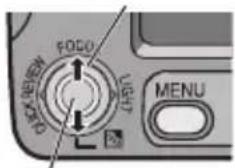
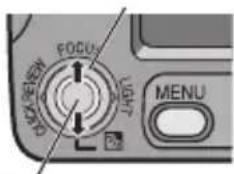
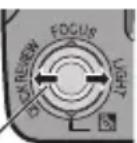
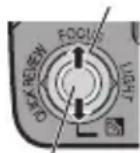
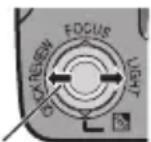
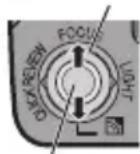
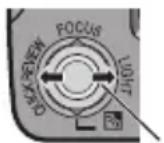
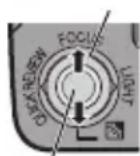
Control Lever
Control lever
There are two kinds of operation using the control lever: moving the lever towards up/down/left/right, or pressing down the lever.
They are described and illustrated as shown below.
1) Move the control lever up/down/left/right ( // ) to select:

| Operation To select | |||
| ^ | ▶/■ | FOCUS | Move the control lever up. |
| ∨ | ■ | Move the control lever down. | |
| > | ▶▶ | LIGHT | Move the control lever right. |
| < | ◀◀ | QUICK REVIEW | Move the control lever left. |
2) Press down the control lever to select SET:

Provided Accessories
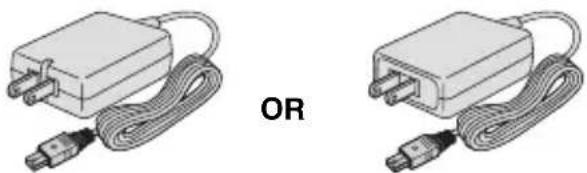
natural_image
Two identical electrical connectors with cables and connectors, labeled 'OR' (no text or symbols on the devices themselves)AC Adapter AP-V14U or AP-V18U

OR

Audio/Video Cable
(ø3.5 mini-plug to RCA plug)
Battery Pack
BN-VF808U x 2


USB Cable CD-ROM

Shoulder Strap (pg. 12)

Lens Cap (pg. 12)
NOTES:
- In order to maintain optimum performance of the camcorder, provided cables may be equipped with one or more core filter. If a cable has only one core filter, the end that is closest to the filter should be connected to the camcorder.
- Make sure to use the provided cables for connections. Do not use any other cables.
Index
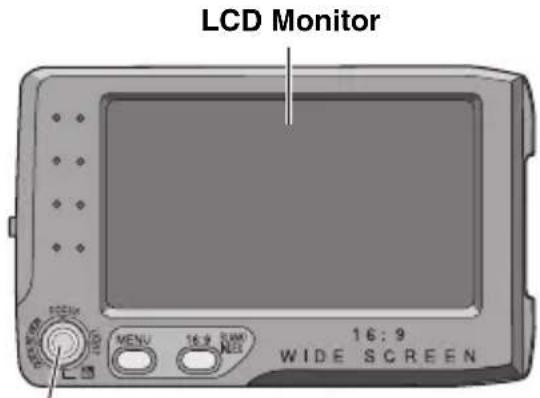
How to open the LCD monitor
Pull on the end Ⓐ of the LCD monitor.
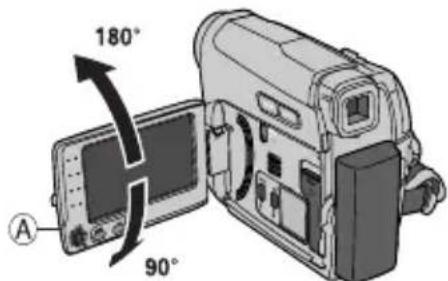
The LCD monitor can rotate 270°.
Power-linked operation
When the power switch is set to "REC", you can also turn the camcorder on/off by opening/closing the LCD monitor or pulling out/pushing in the viewfinder.
NOTES:
- The image will not appear simultaneously on the LCD monitor and the viewfinder. When the viewfinder is pulled out while the LCD monitor is opened, you can select which one to use. Set "PRIORITY" to the desired mode in SYSTEM Menu. (pg. 32)
- Colored bright spots may appear all over the LCD monitor or the viewfinder. However, this is not a malfunction.
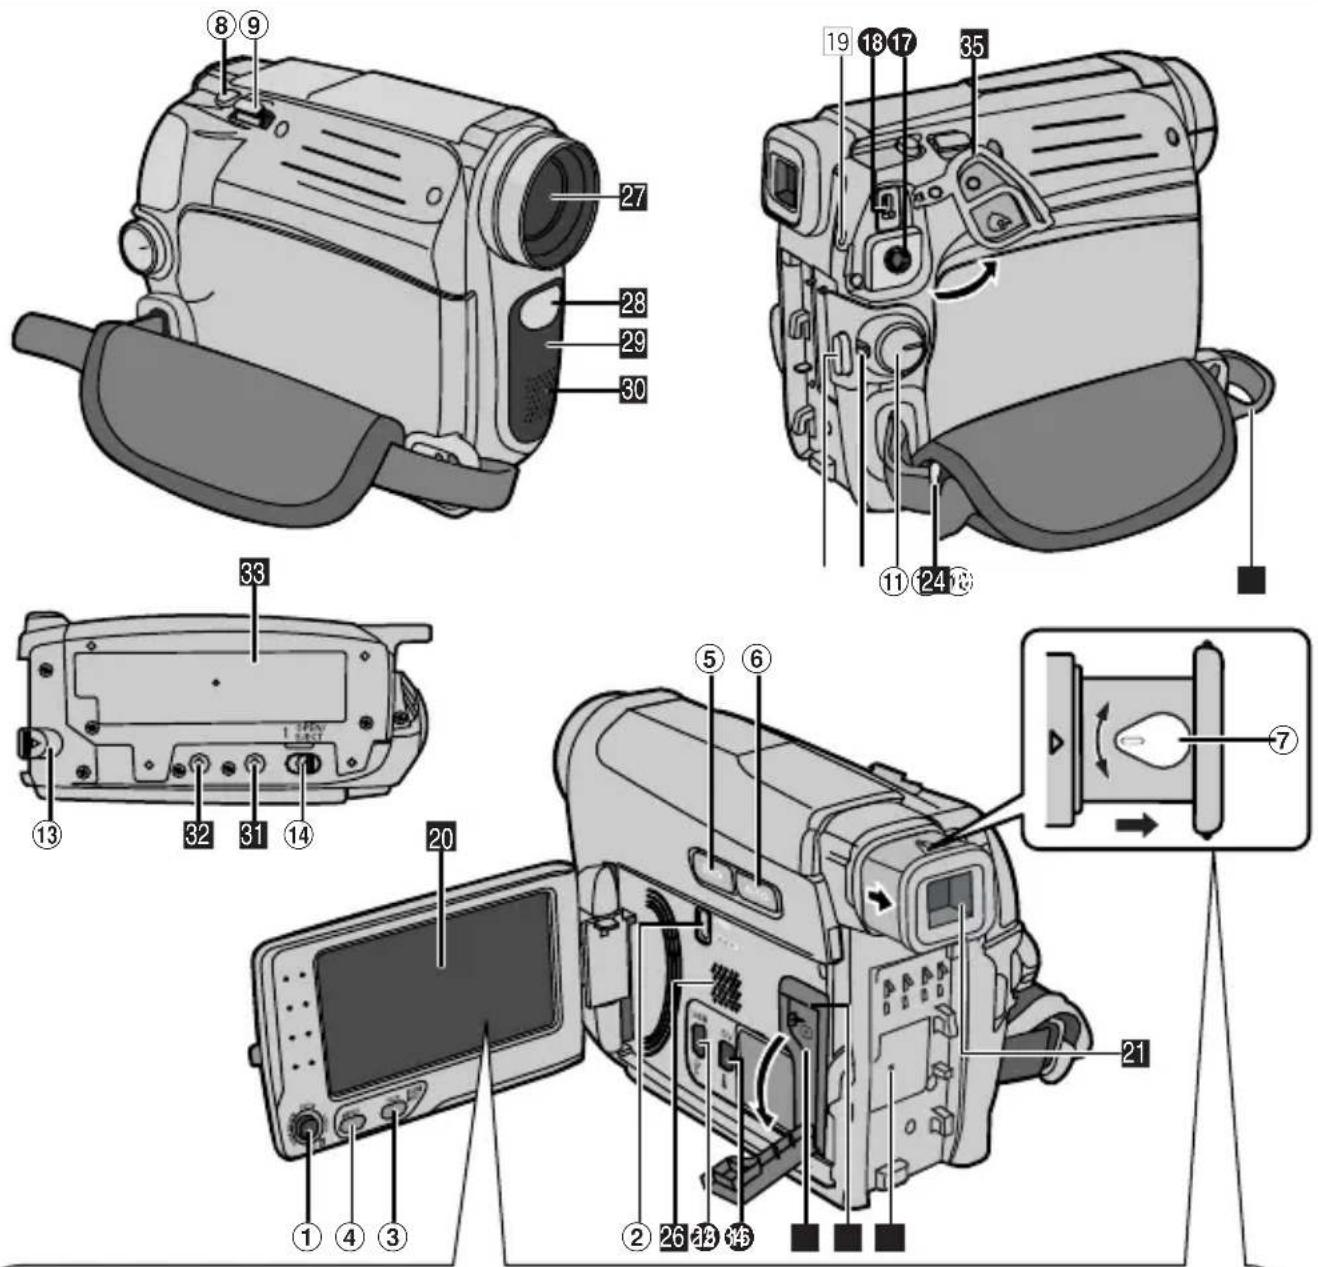
Controls
①< : Left/Rewind (◀◀) (▶ pg. 21)/
Quick Review [QUICK REVIEW] (pg. 18)
: Right/Fast-Forward (▶▶) (pg. 21)/
LED Light [LIGHT] (pg. 34)
^ : Up/Play/Pause (▶/■) (pg. 21)/
Manual Focus [FOCUS] (pg. 35)
∨ : Down/Stop (■) (pg. 21)/
Backlight Compensation [ ] (pg. 36)/
Spot Exposure (pg. 36)
Press down : SET
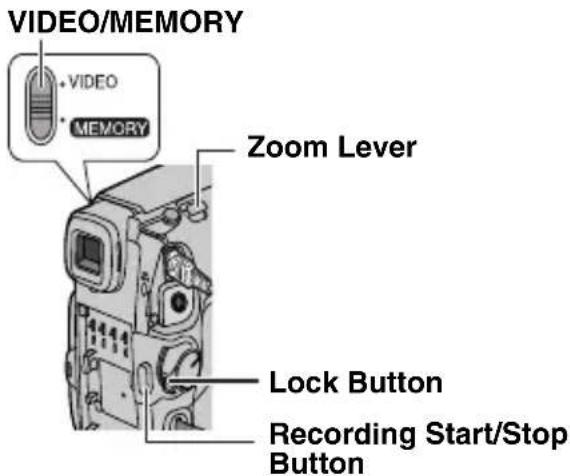
②VIDEO/MEMORY Switch
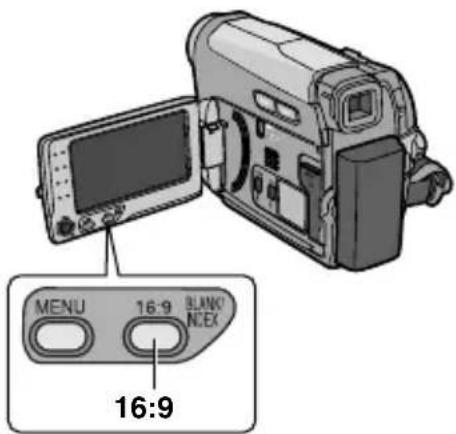
③16:9 Wide Screen Button [16:9] (pg. 17)
Blank Search [BLANK] (pg. 22)
Index Button [INDEX] (pg. 25)
④Menu Button [MENU] (pg. 29)
⑤Data Battery Button [DATA] (pg. 14)
⑥Auto Button [AUTO] (pg. 20)
⑦ Diopter Adjustment Control (pg. 15)
⑧Snapshot Button [SNAPSHOT] ( page 24, 34)
⑨Power Zoom Lever [T/W] (pg. 19)
Speaker Volume Control [VOL. +, -] ( page 21)
⑩ Recording Start/Stop Button [START/STOP] ( page 18)
⑪Power Switch [REC, PLAY, OFF]
⑫Lock Button
⑬Battery Release Button [BATT.] (pg. 13)
⑭Cassette Open/Eject Switch [OPEN/EJECT] (pg. 16)
Connectors
15 USB (Universal Serial Bus) Connector (pg. 41)
16 Digital Video Connector [DV IN/OUT] (i.LINK*) (pg. 40, 41)
* i.LINK refers to the IEEE1394-1995 industry specification and extensions thereof. The i logo is used for products compliant with the i.LINK standard.
The connectors are located beneath the covers.
17 Audio/Video Output Connector [AV] (LFP pg. 23, 39)
18 DC Input Connector [DC] (pg. 13)
Indicators
19 POWER/CHARGE Lamp (pg. 13)
Other Parts
20 LCD Monitor (pg. 8)
21 Viewfinder (pg. 15)
22 Card Cover [ ] (s pg. 17)
23 Battery Pack Mount (pg. 13)
24 Shoulder Strap Eyelet (pg. 12)
25 Grip Strap (pg. 12)
26 Speaker (pg. 21)
27 Lens
28 LED Light (pg. 34)
29 Camera Sensor (Be careful not to cover this area, a sensor necessary for shooting is built-in here.)
30 Stereo Microphone
32 Tripod Mounting Socket (pg. 15)
33 Cassette Holder Cover (pg. 16)
34 Memory Card Slot
35 Connector Cover
| Power Switch Position |
| REC:To perform recording on the tape or in the memory card. |
| OFF:To switch off the camcorder. |
| PLAY:●To play back a recording on the tape.●To display a still image stored in the memory card or to transfer a still image stored in the memory card to a PC. |
| VIDEO/MEMORY Switch Position |
| VIDEO:To record on a tape or play back a tape. |
| MEMORY:To record in a memory card or access data stored in a memory card. |
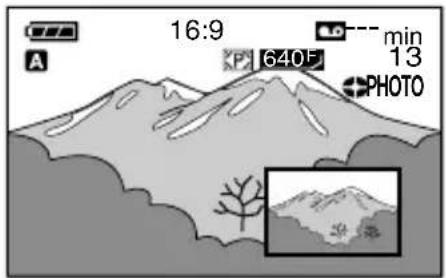
LCD Monitor/Viewfinder Indications
During Video Recording Only
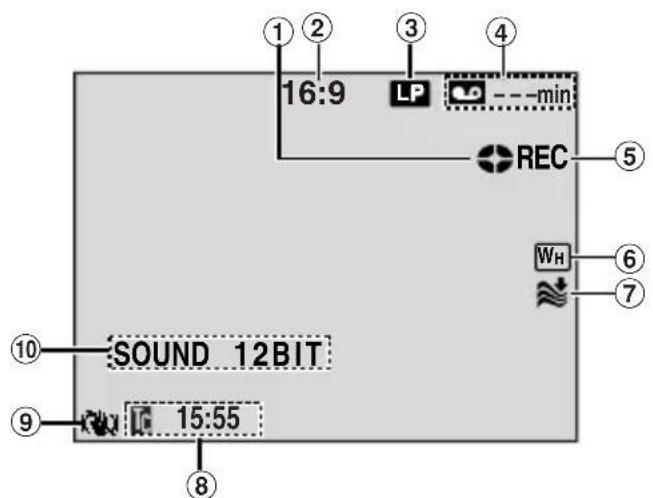
①Tape Running Indicator (Rotates while tape is running.)
② Selected Wide Mode Indicator (pg. 17) (only 16:9 indicator is displayed)
③Recording Speed Mode (SP/LP) (pg. 31) (only LP indicator is displayed)
④ Tape Remaining Time (pg. 18)
⑤REC: (Appears during recording.)
( page 18)
⑥ Selected Wipe/Fader Effect Indicator (pg. 38)
⑦Wind Cut Indicator (pg. 31)
⑧Time Code (pg. 32)
⑨Digital Image Stabilizer ("DIS") (pg. 30) (only indicator is displayed)
⑩ SOUND 12BIT/16BIT: Sound Mode Indicator (LPG. 31) (Appears for approx. 5 seconds after turning on the camcorder.)
During Both Video And D.S.C. Recording
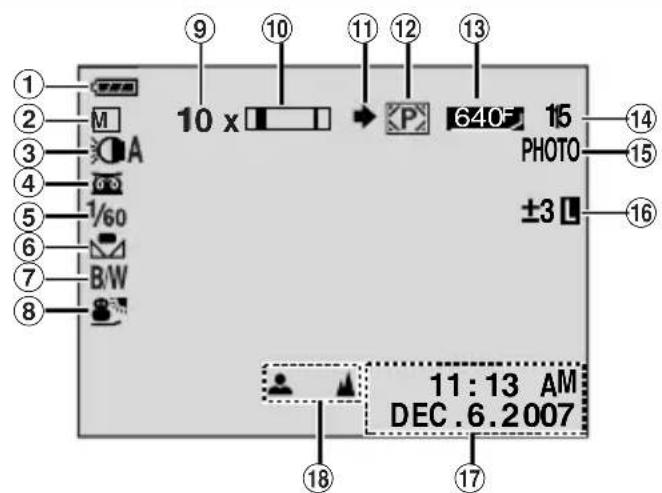
①Battery Remaining Power Indicator
②Operation Mode (pg. 20)
A : Auto Mode
M : Manual Mode
③LED Light Indicator (pg. 34)
④: Night-Alive Indicator (pg. 38) ※A: Gain Up Mode (pg. 31)
⑤Shutter Speed (pg. 39)
⑥White Balance Indicator (pg. 37)
⑦Selected Effect Indicator (pg. 38)
⑧Selected Program AE Indicator (pg. 38)
⑨Approximate Zoom Ratio (pg. 19)
⑩Zoom Indicator (pg. 19)
⑪ Shooting Icon (Appears and blinks during shooting.)
⑫Card Icon (pg. 24)
P: Appears during shooting.
M: Blinks in white when a memory card is not loaded.
⑬ Image Size/Picture Quality: 640 F x 480 F 640 F (FINE) and 640 x 480 S 540 S (STANDARD) (in order of quality) (pg. 31)
⑭ Remaining Number Of Shots (pg. 24) (Displays the approximate remaining number of shots that can be stored during D.S.C. recording.)
⑮ PHOTO. (Appears when taking Snapshot.) (pg. 24, 34)
⑯: Spot Exposure Control Indicator (pg. 36)
: Backlight Compensation Indicator (pg. 36)
±: Exposure Adjustment Indicator (pg. 35)
L: Iris Lock Indicator (pg. 36)
⑰Date/Time (pg. 15)
⑱ Manual Focus Adjustment Indicator (17 pg. 35)
During Video Playback
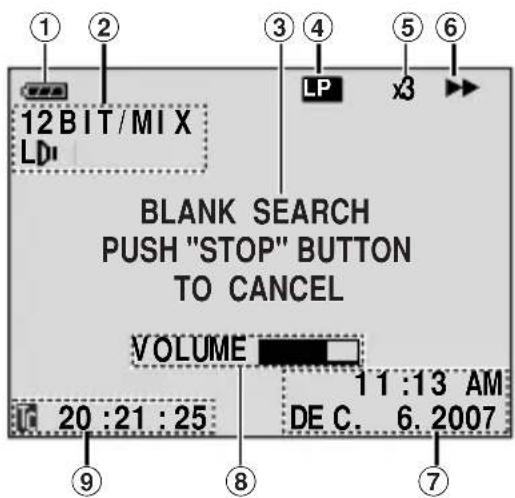
①Battery Remaining Power Indicator
②Sound L/R Indicator (pg. 33)
③Blank Search Indicator (pg. 22)
④ Tape Speed (SP/LP) (pg. 33) (only LP indicator is displayed)
⑤Variable Search Speed Indicator: x-10, x-3, x3 and x10 (pg. 22)
⑥▶: Playback
▶▶: Fast-Forward/Shuttle Search
◀◀: Rewind/Shuttle Search
II: Pause
⑦Date/Time (pg. 33)
⑧VOLUME: Volume Level Indicator (pg. 21)
⑨Time Code (pg. 33)
During D.S.C. Playback
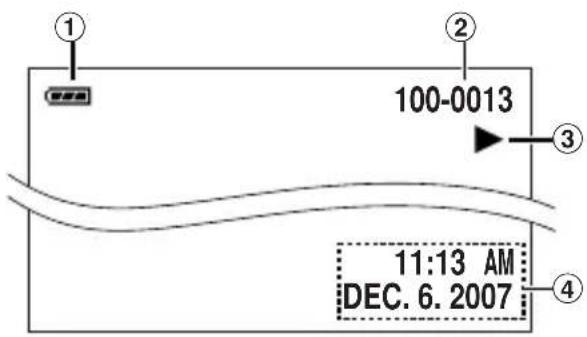
①Battery Remaining Power Indicator
②Folder/File Number
③Operation Mode Indicator
④Date/Time
12 EN GETTING STARTED
How To Attach The Lens Cap
To protect the lens, attach the provided lens cap to the camcorder as shown in the illustration.
NOTE:
To confirm the lens cap is on correctly make sure the cap is flush to the camcorder.
flowchart
graph TD
    A["Device with cable"] --> B["Insert cable"]
    B --> C["Device with cable"]
    C --> D["Device with cable"]
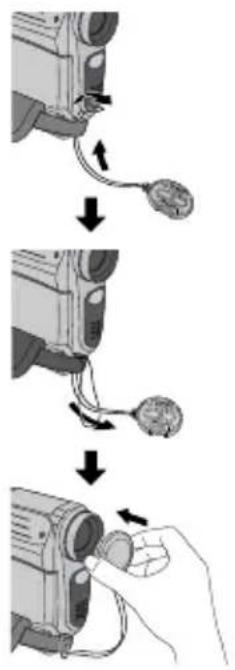
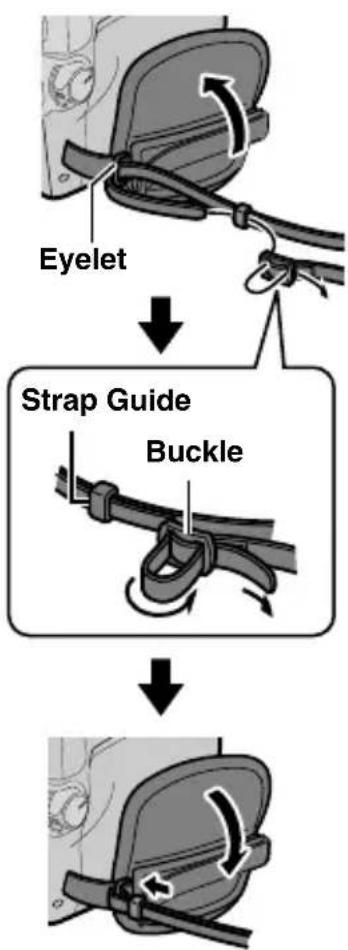
How To Attach The Shoulder Strap
1 Peel off the pad and thread the end of the strap through the eyelet.
2 Thread the strap through the buckle, adjust its length, and use the strap guide to fix it in place.
3 Position the buckle near the eyelet and reattach the pad.
flowchart
graph TD
    A["Eyelet"] --> B["Strap Guide"]
    B --> C["Buckle"]
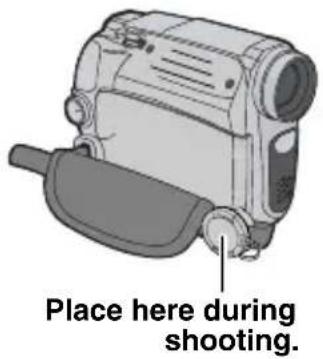
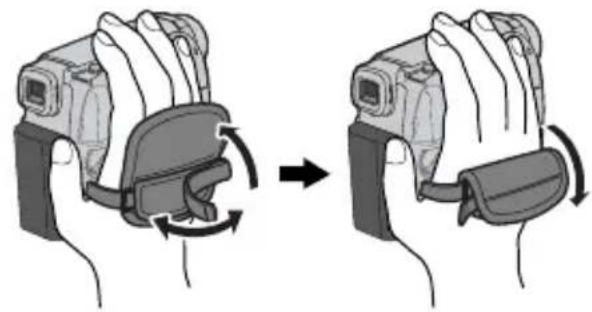
Grip Adjustment
Open the pad and make grip adjustments. ●Before making the adjustment, remove any security tags that may be attached to the velcro.
natural_image
Illustration of a hand gripping a camera lock, showing the left and right hands with rotation arrows (no text or symbols)Power
Charging The Battery Pack
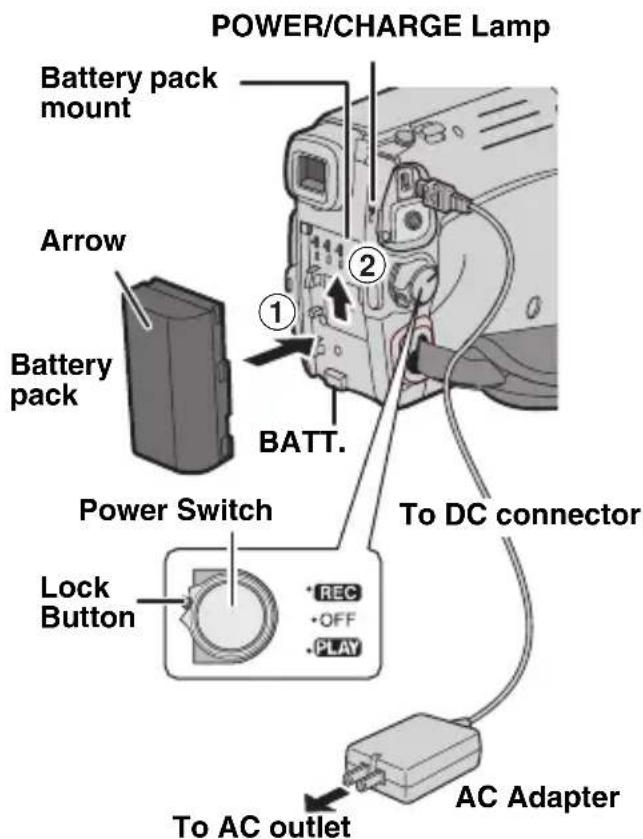
1 Set the Power Switch to "OFF".
2 With the arrow on the battery pack pointing upward, push the battery pack slightly against the battery pack mount ①.
3 Slide up the battery pack until it locks in place ②.
4 Plug the AC Adapter into an AC outlet.
5 Connect the AC Adapter to the camcorder.
●The POWER/CHARGE lamp on the camcorder blinks to indicate charging has started.
- When the POWER/CHARGE lamp goes out, charging is finished. Unplug the AC Adapter from the AC outlet. Disconnect the AC Adapter from the camcorder.
To detach the battery pack
Slide the battery pack downward while pressing BATT. to detach it.
| Battery pack Charging time | |
| BN-VF808U* Approx. | 1 hr. 30 min. |
| BN-VF815U Approx. | 2 hrs. 40 min. |
| BN-VF823U Approx. | 3 hrs. 50 min. |
* Provided
NOTES:
- If the protective cap is attached to the battery pack, remove it first.
●During charging, the camcorder cannot be operated.
●Charging is not possible if the wrong type of battery is used. - When charging the battery pack for the first time or after a long storage period, the POWER/CHARGE lamp may not light. In this case, remove the battery pack from the camcorder, then try charging again.
- If a fully charged battery pack is attached to the unit, POWER/CHARGE lamp will blink for approx. 10 seconds before it turns off.
- If the battery operation time remains extremely short even after having been fully charged, the battery is worn out and needs to be replaced. Please purchase a new one.
●Since the AC Adapter processes electricity internally, it becomes warm during use. Be sure to use it only in well-ventilated areas.
●After 5 minutes have elapsed in Record-Standby mode with the cassette inserted and no operation is performed, the camcorder will automatically turn off its power supplied from the AC adapter. In this case, the battery charge starts if the battery is attached to the camcorder. - Please do not pull or bend the AC adapter plug and cable. This may damage the AC adapter.
About Batteries
DANGER! Do not attempt to take the batteries apart, or expose them to flame or excessive heat, as it may cause a fire or explosion.
WARNING! Do not allow the battery or its terminals to come in contact with metals, as this can result in a short circuit and possibly start a fire.
To restore the accuracy of the battery power indicator
If the battery power indication differs from the actual operating time, fully charge the battery, and then run it down. However this method may not work if the battery was used for a long period of time under extremely high/low temperature condition or charged too many times.
Using The Battery Pack
Perform steps 2 – 3 in “Charging The Battery Pack” (LFP pg. 13).
Maximum continuous recording time
| Battery pack | LCD monitor on | Viewfinder on |
| BN-VF808U* 1 | hr. 50 min. 2 hrs. | 15 min. |
| BN-VF815U 3 | hrs. 40 min. 4 hrs. | 30 min. |
| BN-VF823U 5 | hrs. 30 min. 6 hrs. | 45 min. |
* Provided
NOTES:
●Recording time is reduced significantly under the following conditions:
- Zoom or Record-Standby mode is engaged repeatedly.
- The LCD monitor is used repeatedly.
- The playback mode is engaged repeatedly.
- The LED Light is used.
●Before extended use, it is recommended that you prepare enough battery packs to cover 3 times the planned shooting time.
ATTENTION:
Before detaching the power source, make sure that the camcorder's power is turned off. Failure to do so can result in a camcorder malfunction.
Data Battery System
You can check the remaining battery power and the recordable time.
When the battery is attached, press DATA.
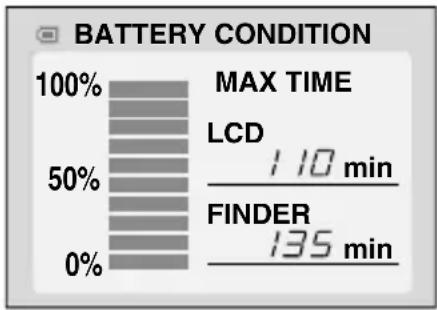
bar
BATTERY CONDITION | Category | Value (%) | |---|---| | MAX TIME LCD | 110 min | | FINDER | 135 min |- When the Power Switch is set to "OFF", it is displayed for approx. 3 seconds if the button is pressed and released quickly, and for approx. 15 seconds if the button is pressed and hold for several seconds.
- When the Power Switch is set to "PLAY" or "REC", press DATA again to return to the normal screen.
●Data battery status cannot be displayed during playback or while recording is in progress.
- If "COMMUNICATION ERROR" appears instead of the battery status even though you tried to press DATA several times, there may be a problem with your battery. In such a case, consult your nearest JVC dealer.
Using AC Power
Perform step 4 – 5 in “Charging The Battery Pack” (pg. 13).
NOTE:
The provided AC Adapter features automatic voltage selection in the AC range from 110 V to 240 V.
INFORMATION:
The following explanations in this manual supposes the use of LCD monitor in your operation. If you want to use the viewfinder, close the LCD monitor and pull out the viewfinder fully.
Language Settings
The language on the display can be changed. ( page 32)

1 Open the LCD monitor fully.
2 Set the Power Switch to "REC" or "PLAY" while pressing down the Lock Button located on the switch.
- If set to "REC", the recording mode should be set to "M" (13) pg. 20).
3 Press MENU.
4 Select "SYSTEM", press SET or >.
5 Select "LANGUAGE", press SET or >.
6 Select the desired language, press SET or >.
7 Press MENU.
Date/Time Settings
1 Select
2 SET
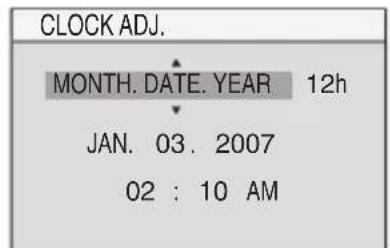
The date/time is recorded onto the tape at all times, but its display can be turned on or off. (pg. 32, 33)
Perform steps 1 - 3 in "Language Settings" (pg. 14).
1 Select "DISPLAY", press SET or >.
2 Select "CLOCK ADJ.", press SET or >.
3 Select the desired date display format, press SET or >.
- Repeat this step to input time display format (Select from "24h" or "12h"), month, date, year, hour and minutes.
4 Press MENU.
Press < whenever you want to return to the previous menu screen/setting.
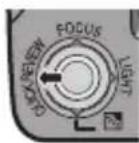
Viewfinder Adjustment
1 Set the Power Switch to "REC" while pressing down the Lock Button located on the switch.
2 Make sure the LCD monitor is closed and locked. Pull out the viewfinder fully.
3 Turn the Diopter Adjustment Control until the indications in the viewfinder are clearly focused.
Example:
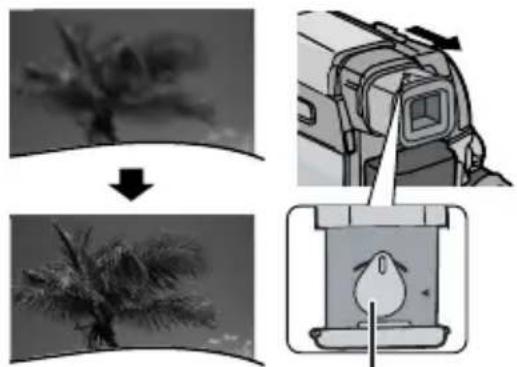
natural_image
Four-panel diagram showing a bird in flight, before and after takeoff, and after takeoff of a bird on a device (no text or symbols)Diopter Adjustment Control
CAUTION:
When retracting the viewfinder, take care not to pinch your fingers.
Brightness Adjustment Of The Display
1 Select

2 SET
Perform steps 1 - 3 in "Language Settings" (pg. 14).
- To adjust the brightness of the viewfinder, pull out the viewfinder fully and set "PRIORITY" to "FINDER" (LPG. 32).
1 Select "DISPLAY", press SET or >.
2 Select "BRIGHT", press SET or >.
3 Select the appropriate brightness, press SET or>.
4 Press MENU.
Press < whenever you want to return to the previous menu screen.
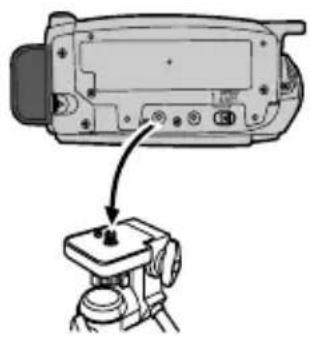
Tripod Mounting
To attach the camcorder to a tripod, align the direction stud and screw to the mounting socket and stud hole on the camcorder. Then tighten the screw clockwise.
●Some tripods are not equipped with studs.
natural_image
Diagram showing a device with an attached sensor or camera module, no text or symbols presentLoading/Unloading A Cassette
The camcorder needs to be powered up to load or eject a cassette.
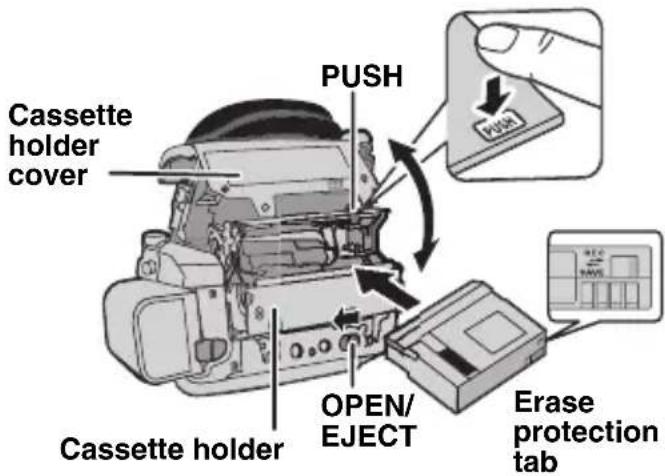
Make sure the window side is facing out.
1 Slide and hold OPEN/EJECT in the direction of the arrow, then pull the cassette holder cover open until it locks. The cassette holder opens automatically.
- Do not touch internal components.
2 Insert or remove a tape and press "PUSH" to close the cassette holder.
- Be sure to press only the section labeled "PUSH" to close the cassette holder; touching other parts may cause your finger to get caught in the cassette holder, resulting in injury or product damage.
- Once the cassette holder is closed, it recedes automatically. Wait until it recedes completely before closing the cassette holder cover.
- When the battery pack's charge is low, you may not be able to close the cassette holder cover. Do not apply force. Replace the battery pack with a fully charged one or use AC power before continuing.
3 Close the cassette holder cover firmly until it locks into place.
NOTES:
- If you wait a few seconds and the cassette holder does not open, close the cassette holder cover and try again. If the cassette holder still does not open, turn the camcorder off then on again.
- If the tape does not load properly, open the cassette holder cover fully and remove the cassette. A few minutes later, insert it again.
- When the camcorder is suddenly moved from a cold place to a warm environment, wait a short time before opening the cassette holder cover.

- Appears if a tape is loaded while the Power Switch is set to "REC".
- Blinks when no tape is loaded.
TAPE!
Appears if a tape is not loaded when the Recording Start/Stop Button or SNAPSHOT Button is pressed while the Power Switch is set to "REC" and the VIDEO/MEMORY Switch is set to "VIDEO".
CHECK TAPE'S ERASE PROTECTION TAB
Appears when the erase protection tab is set to "SAVE" while the Power Switch is set to "REC" and the VIDEO/MEMORY Switch is set to "VIDEO". (07 pg. 18)
Loading/Unloading A Memory Card
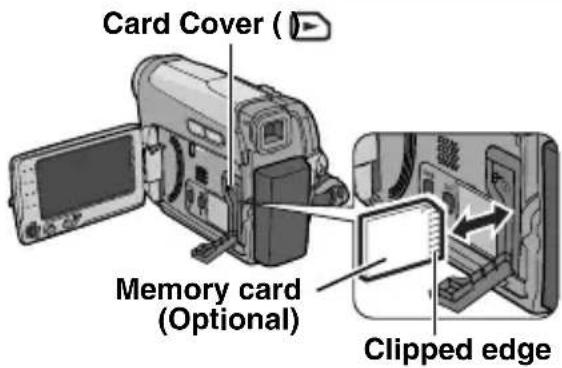
1 Make sure the camcorder's power is off.
2 Open the card cover (☐)
3 To load a memory card, firmly insert it with its clipped edge first.
To unload a memory card, push it once. After the memory card comes out of the camcorder, pull it out.
- Do not touch the terminal on the reverse side of the label.
4 Close the card cover.
NOTES:
●Some brands of memory cards are not compatible with this camcorder. Before purchasing a memory card, consult its manufacturer or dealer.
- Before using a new memory card, it is necessary to format the card. (pg. 28)
PLEASE FORMAT
Appears when there is a problem with a memory card and its memory is corrupt, or it has not been initialized. Initialize the memory card. (pg. 28)
CARD ERROR!
Appears when the camcorder does not recognize the loaded memory card. Remove the memory card once and insert it again. Repeat these procedures until no indication appears. If the indication still appears, the memory card is corrupted.
16:9 Wide Mode
You can record videos at 4:3 size and 16:9 size. By default, the camera is set to record videos at the 16:9 size.
1 Set the Power Switch to "REC".
2 Set the VIDEO/MEMORY Switch to "VIDEO". Each press 16:9 switches the screen size.
On the LCD monitor:

On the viewfinder:

NOTE:
If you record videos in 16:9 size, the image may appear to be slightly vertically stretched when playing back on TV with the 4:3 screen.
(pg. 32, 33)
Basic Recording
NOTE:
Before continuing, perform the procedures listed below:
●Power (pg. 13)
●Loading A Cassette (pg. 16)
- Remove the lens cap. (pg. 12)
- Open the LCD monitor fully.
- Select videos at 4:3 size or 16:9 (wide) size. (pg. 17)
1 Set the VIDEO/MEMORY Switch to "VIDEO".
2 Set the Power Switch to "REC" while pressing down the Lock Button located on the switch.
3 Press START/STOP button to start recording. "REC" appears on the display while recording is in progress. To stop recording press START/STOP again.
Approximate recording time
- If the Record-Standby mode continues for 5 minutes and no operation is performed, the camcorder's power shuts off automatically. To turn the camcorder on again, push back and pull out the viewfinder again or close and re-open the LCD monitor.
- When a blank portion is left between recorded scenes on the tape, the time code is interrupted and errors may occur when editing the tape. To avoid this, refer to "Recording From The Middle Of A Tape" (pg. 20).
●To record in LP (Long Play) mode, pg. 31.
Tape Remaining Time
Approximate tape remaining time appears on the display. “— — — min” means the camcorder is calculating the remaining time. When the remaining time reaches 2 minutes, the indication starts blinking.

- The time required to calculate and display the remaining tape length, and the accuracy of the calculation, may vary according to the type of tape used.
Quick Review
Enables to check the end of the last recording.
1) Press QUICK REVIEW during the Recording-Standby mode.
2) Tape is rewound for about several seconds and played back automatically, then pauses in the
Recording-Standby mode for the next shot.
- Distortion may occur at start of playback. This is normal.
- Slide the Power Zoom Lever repeatedly to change the sound setting to on/off.
Zooming
While recording
Zoom out

W: Wide angle
Zoom in

T: Telephoto
- You can zoom in up to 34X by using the optical zoom.
- Zoom magnification over 34X is done through digital image processing, and is therefore called digital zoom. Digital zooming is possible up to 800X. Set (ZOOM) to [68X] or [800X]. (pg. 30)
Optical zoom (up to 34X)

Digital zoom (up to 800X)
NOTES:
- Macro shooting is possible as close as approx. 5 cm (2") to the subject when the zoom lever is set all the way to W.
- When you zoom into a subject close to the lens, the camera may automatically zoom out depending on the distance to the subject. In this case, set "TELE MACRO" to "ON". (I) pg. 30)
Journalistic Shooting
In some situations, different shooting angles may provide more dramatic results. Hold the camcorder in the desired position and tilt the LCD monitor in the most convenient direction. It can rotate 270° (90° downward, 180° upward).

natural_image
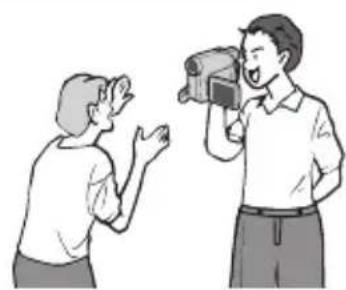
Illustration of a group of people observing a large screen displaying cartoon figures (no text or symbols visible)Interface Shooting
The person you shoot can view himself/herself in the LCD monitor, and you can even shoot yourself while viewing your own image in the LCD monitor.
1) Open the LCD monitor and tilt it upward to 180^ so that it faces forward. Then, pull out the viewfinder fully.
2) Point the lens
toward the subject (yourself when self-recording) and start recording.
- During Interface Shooting, the monitor image appears inverted as it would when viewing a mirror. However, the actual recorded image does not appear inverted.
- If the Quick Review (LFP pg. 18) is executed during the interface shooting, the LCD monitor will be turned off. In such a case, check the playback picture in the viewfinder.
●To check the playback picture in the LCD monitor, close the viewfinder.
natural_image
Illustration of two people interacting, one holding a megaphone and gesturing, the other gesturing with open hands (no text or symbols present)
Time Code
During recording, a time code is recorded on the tape. This code is to confirm the location of the recorded scene on the tape during playback.
Display
* Frames are not displayed during recording. If recording starts from a blank portion, the time code begins counting from "00:00:00" (minute:second:frame). If recording starts from the end of a previously recorded scene, the time code continues from the last time code number. If during recording a blank portion is left partway through the tape, the time code is interrupted. When recording is resumed, the time code starts counting up again from "00:00:00". This means the camcorder may record the same time codes as those existing in a previously recorded scene. To prevent this, perform Recording From The Middle Of A Tape (pg. 20) in the following cases;
- When shooting again after playing back a recorded tape.
- When power shuts off during shooting.
- When a tape is removed and re-inserted during shooting.
- When shooting using a partially recorded tape.
- When shooting on a blank portion located partway through the tape.
- When shooting again after shooting a scene then opening/closing the cassette holder cover.
NOTES:
●The time code cannot be reset.
●During fast-forwarding and rewinding, the time code indication does not move smoothly.
●The time code is displayed only when "TIME CODE" is set to "ON". (pg. 32)
Recording From The Middle Of A Tape
1) Play back a tape or use Blank Search (pg. 22) to find the spot at which you want to start recording, then engage the Still Playback mode. (pg. 21)
2) Set the Power Switch to "REC" while pressing down the Lock Button located on the switch, then start recording.
Dual Rec.
You can capture still images without disturbing the recording in progress. Press SNAPSHOT. A sub screen will be displayed for approx. 6 seconds to show you the snapshot image.
● The Still image is saved into the memory card while video is recorded onto the cassette tape.
- "REC SELECT" must be set to "→M (CARD)" only.
Auto/Manual Mode
Press AUTO button repeatedly to switch to auto/manual recording mode. When manual mode is selected, the indicator "M" appears on the LCD monitor.
Auto Mode : A
You can record using no special effects or manual adjustments.
Manual Mode : M
Manual recording is possible by setting various functions.
Normal Playback
1 Load a cassette. (pg. 16)
2 Set the VIDEO/MEMORY Switch to "VIDEO".
3 Set the Power Switch to "PLAY" while pressing down the Lock Button located on the switch.

- The above screen (referring to the control lever (C ^5 pg. 7)) will be displayed for approx. 3 seconds on the LCD Monitor.
| Operation To | select |
| ▶/II | Move the control lever up. |
| ■ | Move the control lever down. |
| ▶▶ | Move the control lever right. |
| ◀◀ | Move the control lever left. |
4 To start playback, press ▶/II.
5 To stop playback, press ■.
- During Stop mode, press ◀◀ to rewind, or ▶▶ to fast-forward the tape.
- Press SET to display the guide operation screen.
To control the speaker volume
Slide the Power Zoom Lever (VOL. +/−) towards “+” to turn up the volume, or towards “−” to turn down the volume.
NOTES:
●The playback picture can be viewed in the LCD monitor, viewfinder or on a connected TV. (pg. 23)
- If Stop mode continues for 5 minutes when power is supplied from a battery, the camcorder shuts off automatically. To turn the camcorder on again, push back and pull out the viewfinder again or close and re-open the LCD monitor.
- When a cable is connected to the AV connector, the sound is not heard from the speaker.
HDV
Appears when pictures recorded in the HDV format are detected. The pictures in the HDV format cannot be played back with this camcorder.
Still Playback
Pauses during video playback.
1) Press ▶/Ⅱ during playback.
2) To resume normal playback, press ▶/Ⅱ again.
- If still playback continues for more than about 3 minutes, the camcorder's Stop mode is automatically engaged.
Variable Shuttle Search
Allows variable-speed search in either direction during video playback.
1) During playback, press ▶▶ once or twice for forward search, or ◀◀ once or twice for reverse search.
| ◀◀ | ▶▶ | ||
| x-10 x-3 | x3 x10 | ||
2) To resume normal playback, press ▶/II.
- During playback, press and hold ▶▶ or ◀◀. The search continues as long as you hold the button. Once you release the button, normal playback resumes.
●A slight mosaic effect appears on the display during Shuttle Search. This is not a malfunction.
ATTENTION:
During Shuttle Search, parts of the picture may not be clearly visible, particularly on the left side of the screen.

natural_image
Cartoon illustration of a smiling man's head and shoulders (no text or symbols)During Shuttle Search, parts of the picture may not be clearly visible across the screen.

natural_image
Cartoon illustration of a smiling man's face (no text or symbols)Blank Search
Helps you find where you should start recording in the middle of a tape to avoid time code interruption. (LFP pg. 20)
1 Perform steps 1 - 3 in "Normal Playback" (pg. 21).
2 Press BLANK.
- The “BLANK SEARCH” indication appears and the camcorder automatically starts reverse or forward search, then stops at the spot which is about 3 seconds of tape before the beginning of the detected blank portion.
- To cancel Blank Search, press ■ or BLANK.
NOTES:
- Before starting Blank Search, if the current position is at a blank portion, the camcorder searches in the reverse direction. If the current position is at a recorded portion, the camcorder searches in the forward direction.
- If the beginning or end of the tape is reached during Blank Search, the camcorder stops automatically.
●A blank portion which is shorter than 5 seconds of tape may not be detected.
●The detected blank portion may be located between recorded scenes. Before you start recording, make sure there is no recorded scene after the blank portion.
Playback Snapshot
This camcorder allows you to take snapshots during video playback.
Press SNAPSHOT.
Connections To A TV Or VCR
flowchart
graph TD
    A["TV"] --> B["VCR"]
    B --> C["Audio/Video cable (provided)"]
    C --> D["To AV connector"]
    D --> E["or"]
    E --> F["1"]
    E --> G["2"]
    E --> H["3"]
① Yellow to VIDEO IN (Connect when your TV/VCR has only A/V input connectors.)
② Red to AUDIO R IN*
③ White to AUDIO L IN*
* Not required for watching still images only.
1 Make sure all units are turned off.
2 Connect the camcorder to a TV or VCR as shown in the illustration.
If using a VCR, go to step 3.
If not, go to step 4.
3 Connect the VCR output to the TV input, referring to your VCR's instruction manual.
4 Turn on the camcorder, the VCR and the TV.
5 Set the VCR to its AUX input mode, and set the TV to its VIDEO mode.
6 Start playback on the camcorder. (pg. 21)
- Please set "16:9 OUTPUT" of Playback Menus so that the image may suit your TV (16:9 TV or 4:3 TV). (17 pg. 32, 33)
To choose whether or not the following displays appear on the connected TV
- Date/Time
Set "DATE/TIME" to "ON" or "OFF" (pg. 33).
●Time Code
Set "TIME CODE" to "ON" or "OFF" (pg. 33). - Indications other than date/time and time code Set "ON SCREEN" to "OFF", "LCD" or "LCD/TV" (pg. 33).
NOTES:
- It is recommended to use the AC Adapter as the power supply instead of the battery pack. (7 pg. 13)
- To monitor the picture and sound from the camcorder without inserting a tape or memory card, set the camcorder's Power Switch to "REC", then set your TV to the appropriate input mode.
●Make sure you adjust the TV sound volume to its minimum level to avoid a sudden burst of sound when the camcorder is turned on.
Basic Shooting (D.S.C. Snapshot)
You can use your camcorder as a Digital Still Camera for taking snapshots. Still images are stored in the memory card.
NOTE:
Before continuing, perform the procedures listed below:
●Power (pg. 13)
- Loading a Memory Card (17) pg. 17
- Remove the lens cap.
- Open the LCD monitor fully. (17 pg. 8)
1 Set the VIDEO/MEMORY Switch to "MEMORY".
2 Set the Power Switch to "REC" while pressing down the Lock Button located on the switch.
●To change the Picture Quality, ☐ pg. 29, 31.
3 Press SNAPSHOT. The "PHOTO" indication appears while the snapshot is being taken.
- To delete unwanted still images, refer to "Deleting Files" (pg. 27).
- When you do not want to hear the shutter sound, set "MELODY" to "OFF"(☐ pg. 32).
NOTE:
If shooting is not performed for approx. 5 minutes when the Power Switch is set to "REC" and power is supplied from the battery pack, the camcorder shuts off automatically to save power. To perform shooting again, push back and pull out the viewfinder again or close and re-open the LCD monitor.
CHECK CARD'S WRITE PROTECTION SWITCH
Appears when you attempt to shoot digital still images when the write protection tab on the SD Memory Card is set to the "LOCK" position.
MEMORY CARD!
Appears if there is no memory card loaded when the SNAPSHOT Button is pressed.
Approximate Number of Storable Images
●The number increases or decreases depending on the Picture Quality/Image Size, etc.
| Image Size/Picture Quality | SD Memory Card | |||
| 8 MB | 16 MB | 32 MB | 64 MB | |
| 640 x 480/FINE640 x 360/FINE | 47 | 95 | 205 | 425 |
| 640 x 480/STANDARD640 x 360/STANDARD | 160 | 295 | 625 | 1285 |
| Image Size/Picture Quality | MultiMediaCard | ||
| 8 MB 16 | MB 32 | MB | |
| 640 x 480/FINE640 x 360/FINE | 55 10 | 5 215 | |
| 640 x 480/STANDARD640 x 360/STANDARD | 190 32 | 0 645 | |
Normal Playback Of Images
Images shot with the camcorder are automatically numbered, then stored in numerical order in the memory card. You can view the stored images, one at a time, much like flipping through a photo album.
VIDEO/MEMORY
![Lock Button • REC • OFF • PLAY Power Switch [PLAY] ▶,^^ SET [STOP] ■, √MENU INDEX](/content/2026/05/1066762/images/cb3b47183cf32321409137787000ab6ed6ffbe3d984298834fda88ac45da4291.jpg)
1 Load a memory card. (pg. 17)
2 Set the VIDEO/MEMORY Switch to "MEMORY".
3 Set the Power Switch to "PLAY" while pressing down the Lock Button located on the switch.
●A stored image is displayed.
4 Press < to display the previous file. Press > to display the next file.
NOTE:
Images shot and stored on the card with another device with resolutions other than "640 x 480" will be displayed as thumbnails only. These thumbnail images cannot be transferred to a PC.
NO IMAGES STORED
Appears if there are no image files stored in the memory card when you attempt memory card playback.
?
Appears when playing back a file that is not compatible with DCF or a file with a size that is not compatible with this camcorder.
Auto Playback Of Images
You can run through all the images stored in memory card automatically.
1 Perform steps 1 - 3 in "Normal Playback Of Images" (pg. 25).
2 Press ▶/Ⅱ to start Auto Playback.
- If you press < during Auto Playback, files are displayed in descending order.
- If you press > during Auto Playback, files are displayed in ascending order.
3 To end Auto Playback, press ■.
Index Playback Of Files
You can view several different files stored in the memory card at a time. This browsing capability makes it easy to locate a particular file you want.
1 Perform steps 1 - 3 in "Normal Playback Of Images" (pg. 25).
2 Press INDEX. The Index Screen appears.
3 Press ∨, ∧,
4 Press SET. The selected file is displayed.
Selected file
Removing On-Screen Display
1 Perform steps 1 - 3 in "Normal Playback Of Images" (pg. 25).
2 Press MENU.
3 Select "ON SCREEN", press SET or>. The ON SCREEN menu appears.
- Press < whenever you want to return to the previous menu screen.
4 Select "OFF", press SET or >.
5 Press MENU.
●The operation mode indicator, folder/file number, date/time and battery remaining power indicator dis
- To display the indicators again, select "ON".
1 Select
2 SET

Resetting The File Name
By resetting the file name, a new folder will be made. The new files you are going to make will be stored in the new folder. It is convenient to separate the new files from previously made files.
1 Perform steps 1 - 3 in "Normal Playback Of Images" (pg. 25).
2 Press MENU.
3 Select "NO.RESET", press SET or>. The NO. RESET screen appears.
4 Select "EXECUTE", press SET. The new folder (such as "101JVCGR") will be made and the file name of the next shot starts from DVC00001.
NOTE:
If the file name reaches DVC09999, a new folder (such as "101JVCGR") will be made and the file name will start again from DVC00001.
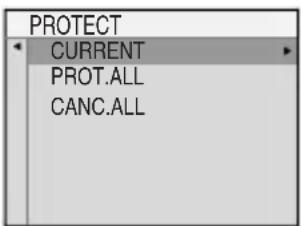
Protecting Files
The Protect mode helps prevent the accidental erasure of files.
1 Perform steps 1 - 3 in "Normal Playback Of Images" (LFP pg. 25).
2 Press MENU.
3 Select "PROTECT", press SET or >. The PROTECT menu appears.
- Press < whenever you want to return to the previous menu screen.
To protect the currently displayed file
4 Select "CURRENT", press SET or >. The PROTECT screen appears.
5 Press < or > to select the desired file.
Select
6 Select "EXECUTE", press SET.
- To cancel protection, select "RETURN".
- Repeat steps 5 and 6
for all files you want to protect.
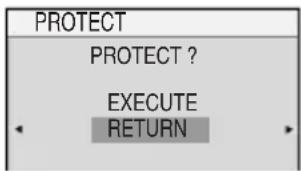
To protect all files stored in the memory card
4 Select "PROT.ALL", press SET or >. The PROTECT screen appears.
5 Select "EXECUTE", press SET.
- To cancel protection, select "RETURN".
NOTE:
If the “@” mark appears, the currently displayed file is protected.
To Remove Protection
Before doing the following, perform steps 1 – 3 in "Protecting Files".
To remove protection from the currently displayed file
4 Select "CURRENT", press SET or >. The PROTECT screen appears.
5 Press < or > to select the desired file.
6 Select "EXECUTE", press SET.
- To cancel selection, select "RETURN".
- Repeat steps 5 and 6 for all files you want to remove protection.
To remove protection from all files stored in the memory card
4 Select "CANC.ALL", press SET or >. The PROTECT screen appears.
5 Select "EXECUTE", press SET.
- To cancel selection, select "RETURN".
Deleting Files
Previously stored files can be deleted either one at a time or all at once.
1 Perform steps 1 - 3 in "Normal Playback Of Images" (LFP pg. 25).
2 Press MENU.
3 Select "DELETE", press SET or >. The DELETE Menu appears.
- Press < whenever you want to return to the previous menu screen.
1 Select
2 SET
To delete the currently displayed file
4 Select "CURRENT", press SET or >. The DELETE screen appears.

5 Press < or > to select the desired file.
Select
6 Select "EXECUTE", press SET.
- To cancel deletion, select "RETURN".
- Repeat steps 5 and 6 for all files you want to delete.
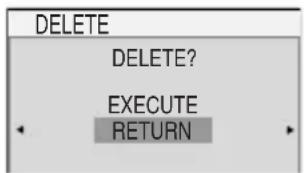
NOTE:
If the “@” mark appears, the selected file is protected and cannot be deleted.
To delete all files stored in the memory card
4 Select "ALL", press SET or >. The DELETE screen appears.
5 Select "EXECUTE", press SET.
- To cancel deletion, select "RETURN".
NOTES:
- Protected files (127 pg. 26) cannot be deleted. To delete them, remove protection first.
- Once files are deleted, they cannot be restored. Check files before deleting.
Setting Print Information (DPOF Setting)\*
This camcorder is compatible with the DPOF (Digital Print Order Format) standard in order to support future systems such as automatic printing.
* Up to a maximum limit of 999 stored files in the memory card.
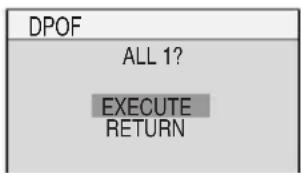
To Print All Still Images (One Print For Each)
1 Perform steps 1 - 3 in "Normal Playback Of Images" (pg. 25).
2 Press MENU.
1 Select
2 SET
3 Select "DPOF", press SET or>. The DPOF Menu appears.
- Press < whenever you want to return to the previous menu screen.
4 Select "ALL 1", press SET or>. The DPOF screen appears.
5 Select "EXECUTE", press SET. - To cancel selection, select "RETURN".
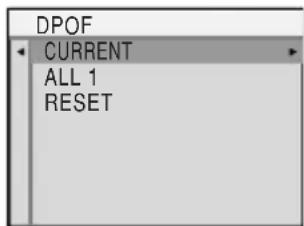
To Print By Selecting Still Images And Number Of Prints
1 Perform steps 1 – 3 in “To Print All Still Images (One Print For Each)” (pg. 27).
2 Select "CURRENT", press SET or >. The DPOF screen appears.
3 Press < or > to select the desired file.
Select
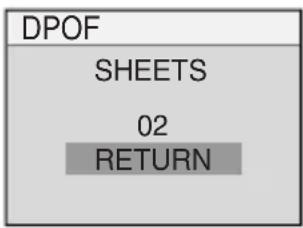
4 Press ∨ or ∧ to select the number indication (00), and press SET.
5 Select the number of prints by pressing to increase the number, or to decrease the number, and press SET.
1 Select
2 SET
- Repeat steps 3 through 5 for the desired number of prints.
●The number of prints can be set up to 15. - To correct the number of prints, select the image again and change the number.
6 Select "RETURN", press SET. The "SAVE?" appears.
- If you did not change any settings in step 3 through 5, the DPOF Menu reappears.
7 Select "EXECUTE", press SET.
- To cancel selection, select "CANCEL".

To Reset The Number Of Prints
1 Perform steps 1 – 3 in “To Print All Still Images (One Print For Each)” (pg. 27).
2 Select "RESET", press SET or >. The DPOF screen appears.
3 Select "EXECUTE", press SET.
- To cancel selection, select "RETURN".
●The number of prints is reset to 0 for all still images.
CAUTION:
While performing the above, never disconnect power, as this may cause the memory card to be corrupted.
NOTE:
When the image is printed from the printer, a black bar appears at the bottom of the screen. This is not a malfunction. By recording with "DIS" de-activated (17 pg. 30) this can be avoided.
■ Initializing A Memory Card
You can initialize a memory card any time. After initializing, all files and data stored in the memory card, including those which have been protected, are cleared.
1 Perform steps 1 - 3 in "Normal Playback Of Images" (pg. 25).
2 Press MENU.
3 Select "FORMAT", press SET or >. The FORMAT screen appears.
- Press < whenever you want to return to the previous menu screen.
1 Select
2 SET
4 Select "EXECUTE", press SET. The memory card is initialized.
- When initialization is finished, "NO IMAGES STORED" appears.
- To cancel initialization, select "CANCEL".
Changing The Menu Settings
This camcorder is equipped with an easy-to-use, on-screen menu system that simplifies many of the more detailed camcorder settings. (L7 pg. 29 – 33)
VIDEO/MEMORY
1 For Video and D.S.C. Recording Menus:
- Set the VIDEO/MEMORY Switch to "VIDEO" or "MEMORY".
- Set the Power Switch to "REC" while pressing down the Lock Button located on the switch.
- Set the recording mode to “M”. (LFP pg. 20)
For Video Playback Menu:
- Set the VIDEO/MEMORY Switch to "VIDEO".
- Set the Power Switch to "PLAY" while pressing down the Lock Button located on the switch.
- For D.S.C. Playback Menu, refer to "D.S.C. PLAYBACK" (pg. 25).
2 Open the LCD monitor fully. (pg. 8)
3 Press MENU. The Menu Screen appears.
Screen for Video and D.S.C. Recording Menu

Screen for Video
Playback Menu
* Video Recording Menu only
4 Select the desired function, press SET or >. The selected function menu appears.
Example: FUNCTION menu.
Current Setting
5 Select the desired selection, press SET or >.
Example: WIPE/FADER menu.
6 Select the desired setting, press SET or >. Selection is completed.
7 Press MENU. The Menu Screen closes.
- Press < whenever you want to cancel or return to the previous menu screen.
- Repeat the procedure if you wish to set other function menus.
In the following pages, [ ] refers to Factory preset settings.
Recording Menus
FUNCTION
- The following menu settings can be changed only when the Power Switch is set to "REC".
- Each setting (except “EFFECT” and “SHUTTER”) which is set in Video Recording Menu is also applied in the D.S.C. Recording Menu.
WIPE/FADER\*
(pg. 38), "Wipe or Fader Effects"
* Available only when the VIDEO/MEMORY Switch is set to "VIDEO".
PROGRAM AE
(pg. 38), "Program AE, Effects And Shutter Effects"
EFFECT
(pg. 38), "Program AE, Effects And Shutter Effects"
EXPOSURE
(pg. 35), "Exposure Control"
W. BALANCE
(pg. 37), "White Balance Adjustment"
SHUTTER
(pg. 39), "Program AE, Effects And Shutter Effects"
CAMERA
The following menu settings can be changed only when the Power Switch is set to "REC".
ZOOM\*
[34X]: When set to "34X" while using digital zoom, the zoom magnification will reset to 34X since digital zoom will be disengaged.
68X*: Allows you to use the Digital Zoom. By digitally processing and magnifying images, zooming is possible from 34X (the optical zoom limit), to a maximum of 68X digital magnification.
800X*: Allows you to use the Digital Zoom. By digitally processing and magnifying images, zooming is possible from 34X (the optical zoom limit), to a maximum of 800X digital magnification.
* Available only when the VIDEO/MEMORY Switch is set to "VIDEO".
TELE MACRO
[OFF]: Disables the function.
ON: When the distance to the subject is less than 1 m (3.3 ft), set "TELE MACRO" to "ON". You can shoot a subject as large as possible at a distance of approx. 40 cm (1.4 ft).
Depending on the zoom position, the lens may go out of focus.
DIS\*
OFF (Disables the function. (DIS disable icon appears.)
[ON]: To compensate for unstable images caused by camera-shake, particularly at high magnification.
NOTES:
- Accurate stabilization may not be possible if hand shake is excessive, or depending on the shooting condition.
- Switch off this mode when recording with the camcorder on a tripod.
- “DIS” cannot be activated when “NIGHT” in “PROGRAM AE” or “STROBE” in “EFFECT” is selected, or when LIGHT is set to on, or when SNAPSHOT is pressed.
* Available only when the VIDEO/MEMORY Switch is set to "VIDEO".
GAIN UP
OFF: Allows you to shoot dark scenes with no picture brightness adjustment.
[AGC]: The overall appearance may be grainy, but the image is bright.
AUTO : The shutter speed is automatically adjusted. Shooting a subject in low or poor lighting at slow shutter speed provides a brighter image than in the AGC mode, but the subject's movements are not smooth or natural. The overall appearance may be grainy. While the shutter speed is being automatically adjusted, “A” is displayed.
WIND CUT\*
[OFF]: Disengages the function.
ON Helps cut down on noise created by wind. The “ ” indicator appears. The quality of the sound will change. This is normal.
* Available only when the VIDEO/MEMORY Switch is set to "VIDEO".
IMAGE SIZE\*
[640 x 480 F] / 640 x 480 S
The Image Size mode can be selected to best match your needs. Two Picture Quality modes are available: FINE (640° and STANDARD (640° order of quality).
NOTE:
The number of storable images depends on the selected picture quality as well as the composition of the subjects in the images and the type of memory card being used. ( page 24)
* Available only when the VIDEO/MEMORY Switch is set to "MEMORY".
VTR
Available only when the VIDEO/MEMORY Switch is set to "VIDEO".
REC MODE
[SP]*: To record in the SP (Standard Play) mode.
LP: Long Play—more economical, providing 1.5 times the recording time.
* SP indicator does not appear on the screen.
NOTES:
- If the recording mode is switched, the playback picture will be blurred at the switching point.
●During playback of a tape recorded on another camcorder, blocks of noise may appear or there may be momentary pauses in the sound.
SOUND MODE
/[12BIT]: Enables video recording of stereo sound on four separate channels. (Equivalent to the 32 kHz mode of previous models)
16BIT: Enables video recording of stereo sound on two separate channels. (Equivalent to the 48 kHz mode of previous models)
REC SELECT
→ (TAPE): When Snapshot recording is performed with the VIDEO/MEMORY Switch set to "VIDEO", still images are recorded only onto the tape.
→ 📄/ → 📂 (TAPE/CARD): When Snaps recording is performed with the VIDEO/MEMORY Switch set to “VIDEO”, still images are recorded not only onto the tape but also in the memory card (640 x 480 pixels).
[★(QARD)]: When Snapshot recording is performed with the VIDEO/MEMORY Switch Set to "VIDEO", still images are recorded into the Memory Card only. Select this setting to perform Dual Rec.. (pg. 20)
DISPLAY
The “DISPLAY” settings (except “CLOCK ADJ.”, “16:9 OUTPUT” and “BRIGHT”) are effective only for shooting.
ON SCREEN
LCD: Keeps the camcorder's display (except the date, time and time code) from appearing on the connected TV screen.
[LCD/TV]: Makes the camcorder's display appear on screen when the camcorder is connected to a TV.
DATE/TIME
[OFF]: The date/time does not appear. ON: The date/time is always displayed.
CLOCK ADJ.
pg. 15, "Date/Time Settings"
TIME CODE\*
[OFF]: Time code is not displayed. ON: Time code is displayed on the camcorder and on the connected TV. Frame numbers are not displayed during recording. (17 pg. 20)
* Available only when the VIDEO/MEMORY Switch is set to "VIDEO".
16:9 OUTPUT
To enable your tv to display images in 16:9 wide mode, set the tv screen size correctly. 4:3 TV: For TV with an aspect ratio of 4:3.
[16:9 TV]: For TV with an aspect ratio of 16:9.
BRIGHT
pg. 15, "Brightness Adjustment Of The Display"
SYSTEM
The "SYSTEM" functions which are set when the Power Switch is set to "REC" are also applied when the Power Switch is set to "PLAY".
LANGUAGE
日本語 / 한국어 [ENGLISH] / FRANCAIS / ESPAÑOL / PORTUGUÊS
The language setting can be changed.
(pg. 14)
MELODY
OFF: Even though not heard while shooting, shutter sound is recorded on the tape.
[ON]: A melody sounds when any operation is performed. It also activates the shutter sound effect. (pg. 24, 34)
PRIORITY
[LCD]: The image is displayed on the LCD monitor when the viewfinder is pulled out while the LCD monitor is opened.
FINDER: The image is displayed in the viewfinder when the viewfinder is pulled out while the LCD monitor is opened.
DEMO MODE
OFF: Automatic demonstration will not take place.
[ON]: Demonstrates certain functions such as Wipe/Fader and Effects, etc., and can be used to confirm how these functions operate. Demonstration starts in the following cases:
- When the Menu Screen is closed after "DEMO MODE" is turned "ON".
- With "DEMO MODE" set to "ON", if there is no operation for about 3 minutes after the Power Switch is set to "REC".
●Performing any operation during the demonstration stops the demonstration temporarily. If no operation is performed for more than 3 minutes after that, the demonstration will resume.
NOTES:
- If a cassette is in the camcorder, the demonstration cannot be turned on.
- “DEMO MODE” remains “ON” even if the camcorder power is turned off.
CAM RESET
[CANCEL]: Does not reset all settings to the factory-preset.
EXECUTE: Resets all settings to the factory-preset.
Playback Menus
VTR
The settings below are effective only for video playback except "REC MODE". The parameters (except "SOUND L/R", "[T] → [M] COPY" and "NARRATION" settings) are the same as in the description on page 31.
SOUND L/R and NARRATION
During tape playback, the camcorder detects the sound mode in which the recording was made, and plays the sound back. Select the sound to accompany your playback picture.
REC MODE LP
Allows you to set the video recording mode (SP or LP) depending on your preference. It is recommended you use "REC MODE" in VIDEO Menu when using this camcorder as a recorder during dubbing. (LFP pg. 39, 40) * SP indicator does not appear on the screen.
NARRATION
[OFF]: Original sound is output on both "L" and "R" channels in stereo.
ON: Dubbed sound is output on both "L" and "R" channels in stereo.
MIX: Original and dubbed sounds are combined and output in stereo on both "L" and "R" channels.
[T] → [M] COPY
[OFF]: When the SNAPSHOT button is pressed during tape playback, the playback image pauses and normal playback will resume after approximately 6 seconds. (The still image is not recorded.)
ON: Enables dubbing of images recorded on a tape to a memory card. (pg. 39).
SOUND L/R
[STEREO ▶]: Sound is output on both "L" and "R" channels in stereo.
SOUND L ▶: Sound from the "L" channel is output.
SOUND R: Sound from the "R" channel is output.
DISPLAY
Each setting (except "OFF" in "ON SCREEN", "DATE/TIME" and "TIME CODE") is linked with "DISPLAY", which appears when the Power Switch is set to "REC".
The parameters (except "OFF" in "ON SCREEN" setting) are the same as in the description on ☐ pg. 32.
ON SCREEN OFF / [LCD] / LCD/TV
When set to "OFF", the camcorder's display disappears.
DATE/TIME ON
CLOCK ADJ.
pg. 15, "Date/Time Settings"
TIME CODE ON
pg. 20, "Time Code"
16:9 OUTPUT / [16:9 TV]
pg. 32, "16:9 OUTPUT"
BRIGHT
pg. 15, "Brightness Adjustment Of The Display"
SYSTEM
Each setting (except "DEMO MODE") is linked with "SYSTEM", which appears when the Power Switch is set to "REC".
The parameters are the same as in the description on page 32.
LED Light
LED Light can be used to brighten the subject in the dark place during video recording or D.S.C. shooting.

1 Press LIGHT repeatedly to change the setting.
The light is on always. (appears.)
The light turns on automatically when dark. (appears.)
Turns off the light.
2 Press the Recording Start/Stop Button to start video recording or SNAPSHOT to shoot a still image.
NOTES:
- Be careful not to point the LED Light directly to eyes.
- If the light does not reach the subject when the LED Light setting is "ON", the Night-Alive function will be activated, and makes it possible to shoot the subject brighter.
- Since subjects are shot at a reduced shutter speed when the LED Light setting is "ON", they will appear slightly blurred.
Snapshot (Record Still Image On Tape)
This feature lets you record still images that look like photographs onto a tape.
1 Set the VIDEO/MEMORY Switch to "VIDEO".
2 Set the Power Switch to "REC".
3 Set the recording mode to "M". (pg. 20)
4 Set "REC SELECT" to "→▶/▶▶M" or "→▶" (pg. 31)
5 Press SNAPSHOT.
- The "PHOTO" indication appears and a still image will be recorded for approx. 5 seconds, then the camcorder re-enters the Record-Standby mode.
- You can perform Snapshot also during recording. A still image will be recorded for approx. 5 seconds, then the normal recording resumes.
- Snapshot is effective when the recording mode selection is set to both “A” or “M”.
- If the image taken by snapshot is too dark or too bright, select 📄 (pg. 36) or "SPOTLIGHT" (pg. 38).
- The image size for snapshot in 16:9 mode is 640 × 360 . However, the approximate number of storable images is similar with snapshot in 4:3 mode. (→ pg. 24)
Motor Drive Mode
Keeping SNAPSHOT pressed in step 5 provides an effect similar to serial photography. (Interval between still images: approx. 1 second)
- The Motor Drive mode is disabled when "REC SELECT" is set to "→/→M" or "→M". (17 pg. 31)
Manual Focus
The camcorder's Full Range AF system offers continuous shooting ability from close-up (as close as approx. 5 cm (2") to the subject) to infinity.
However, correct focus may not be obtained depending on the shooting condition. In this case, use the manual focus mode.
1 Set the Power Switch to "REC".
2 Set the recording mode to "M". (pg. 20)
3 Press FOCUS. The manual focus indicator appears.
4 Press < or > to focus on a subject.
- When the focus level cannot be adjusted any further or closer, “▲” or “●” will blink.
5 Press SET. Focus adjustment is complete.
To reset to Auto Focus
Press FOCUS twice.
Manual focus is recommended in situations listed below.
- When two subjects overlap in the same scene.
- When illumination is low.*
- When the subject has no contrast (difference in brightness and darkness), such as a flat, one-color wall, or a clear, blue sky.*
- When a dark object is barely visible in the LCD monitor or the viewfinder.*
- When the scene contains minute patterns or identical patterns that are regularly repeated.
- When the scene is affected by sunbeams or light reflecting off the surface of a body of water.
- When shooting a scene with a high-contrast background.
* The following low-contrast warnings appear blinking: ▲, ◀, ▶ and .
Exposure Control
Manual exposure control is recommended in the following situations:
- When shooting using reverse lighting or when the background is too bright.
- When shooting on a reflective natural background such as at the beach or when skiing.
- When the background is overly dark or the subject is bright.
1 Select

2 SET
1 Open the LCD monitor fully.
2 Set the Power Switch to "REC".
3 Set the recording mode to "M". (17 pg. 20)
4 Press MENU.
5 Select "FUNCTION", press SET or >.
6 Select "EXPOSURE", press SET or >.
7 Select the appropriate exposure, press SET or >.
- To brighten the image, press ∧. To darken the image, press ∨. (maximum +/-6)
8 Press MENU.
NOTES:
- If the adjustment does not cause any visible change in brightness, set "GAIN UP" to "AUTO". (17 pg. 29, 31)
- You cannot use the manual exposure control at the same time when "PROGRAM AE" is set to "SPOTLIGHT" or "SNOW" (pg. 38), or with the backlight compensation.
Iris Lock
Like the pupil of the human eye, the iris contracts in well-lit environments to keep too much light from entering, and dilates in dim environments to allow in more light. Use this function in the following situations:
- When shooting a moving subject.
- When the distance to the subject changes (so its size in the LCD monitor or the viewfinder changes), such as when the subject is backing away.
- When shooting on a reflective natural background such as at the beach or when skiing.
- When shooting objects under a spotlight.
- When zooming.
1 Perform steps 1 - 6 in "Exposure Control" (pg. 35)
2 Adjust zoom so that the subject fills the LCD monitor or the viewfinder, then press and hold SET or > for over 2 seconds. The “L” indication appears.
3 Press SET or >. The iris is locked.
4 Press MENU.
Backlight Compensation
Backlight compensation brightens the subject quickly.
With simple operation, backlight compensation feature brightens the dark subject portion by increasing the exposure.
1 Set the Power Switch to "REC".
2 Set the recording mode to "M". (pg. 20)
3 Press ☐ so that the Backlight Compensation indicator “☐” appears.
SET
To cancel Backlight Compensation
Press twice so that the “ ” indicator disappears.
NOTE:
Using Backlight Compensation may cause the light around the subject to become too bright and the subject to become white.
Spot Exposure Control
Selection of a spot metering area enables more precise exposure compensation.
1 Set the Power Switch to "REC".
2 Set the recording mode to "M". (LFP pg. 20)
3 Press ☐vice so that the Spot Exposure Control indicator “☐” appears.
- A spot metering area frame appears at the center of the LCD monitor/viewfinder.
4 Press SET.
- Spot Exposure Control is engaged.
●Exposure is adjusted to make the brightness of the selected area most appropriate.
To lock the iris
After step 3, press and hold SET over 2 seconds. The “L” indication appears and the iris is locked.
To cancel Spot Exposure Control
Press once so that the “ ” indicator disappears.
NOTES:
- Depending on the shooting location and condition, optimum result may not be attained.
- "STROBE" in "EFFECT" cannot be used with Spot Exposure Control.
White Balance Adjustment Manual White Balance
The white balance refers to the correctness of color reproduction under various lighting. If the white balance is correct, all other colors will be accurately reproduced.
The white balance is usually adjusted automatically. However, more advanced camcorder operators control this function manually to achieve a more professional color/tint reproduction.
To change the setting
Set "W. BALANCE" to the desired mode. ( page 30)
- The selected mode indicator except "AUTO" appears.
[AUTO]: White balance is adjusted automatically.

MWB: Adjust the white balance
manually when shooting under various types of lighting. (“Manual White Balance Adjustment”, pg. 37)

FINE: Outdoors on a sunny day.

CLOUD: Outdoors on a cloudy day.
HALOGEN: A video light or similar type of lighting is used.
Adjust the white balance manually when shooting under various types of lighting.
1 Set the Power Switch to "REC".
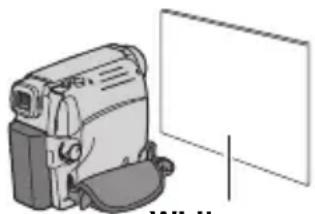
natural_image
Illustration of a vintage-style video camera next to a blank whiteboard (no text or symbols visible)White paper
2 Set the recording mode to "M". (L3 pg. 20)
3 Hold a sheet of plain white paper in front of the subject. Adjust zoom or position yourself so that the white paper fills the screen.
4 Select "MWB" in "W. BALANCE" menu (pg. 30), then press and hold SET or > until begins blinking.
- When the setting is completed, stops blinking.
5 Press SET or > to engage the setting.
6 Press MENU. The Menu Screen closes and the Manual White Balance indicator 📋 displayed.
NOTES:
- In step 3, it may be difficult to focus on the white paper. In such a case, adjust focus manually. (LFP pg. 35)
●Because the color temperature is different depending on the light source, use this function for a more natural result. - Once you adjust white balance manually, the setting is retained even if the power is turned off or the battery removed.
- White Balance cannot be activated simultaneously with "TWILIGHT" in "PROGRAM AE" (pg. 38).
- White Balance cannot be activated if the "SEPIA" or "MONOTONE" mode is activated.
Wipe Or Fader Effects
These effects let you make pro-style scene transitions. Use them to spice up the transition from one scene to the next.
Wipe or Fader works when video recording is started or stopped.
1 Set the VIDEO/MEMORY Switch to "VIDEO".
2 Set the Power Switch to "REC".
3 Set the recording mode to "M". (pg. 20)
4 Set "WIPE/FADER" in "FUNCTION" Menu. (pg. 30)
5 Press the Recording Start/Stop Button to activate the Fade-in/out or Wipe-in/out.
NOTE:
You can extend the length of a Wipe or Fader by pressing and holding the Recording Start/Stop Button.
WIPE/FADER
OFF: Disables the function. (Factory-preset)
WHITE made in or out with a white screen.
BLACK BRade in or out with a black screen.
SLIDE ▶Wipe in from right to left, or wipe out from left to right.
SCROLL ▲The scene wipes in from the bottom to the top of a black screen, or wipes out from top to bottom, leaving a black screen.
Program AE, Effects And Shutter Effects
1 Set the Power Switch to "REC".
2 Set the recording mode to "M". (pg. 20)
3 Set "EFFECT", "PROGRAM AE" or "SHUTTER" in "FUNCTION" Menu. (17 pg. 30)
- The selected effect will be shown for approx. 2 seconds before the camcorder returns to the menu screen.
NOTES:
- Shutter Effects cannot be used during "NIGHT".
- When a subject is too bright or reflective, a vertical streak may appear (smear phenomenon). Smear phenomenon tends to
occur when "SPORTS" or any mode of "SHUTTER 1/500 - 1/4000" is selected.
PROGRAM AE
OFF: Disables the function. (Factory-preset)
SPORTS
(Variable Shutter Speed: 1/250 - 1/4000):
This setting allows fast-moving images to be captured one frame at a time, for vivid, stable slow-motion playback. The faster the shutter speed, the darker the picture becomes. Use the shutter function under good lighting conditions.
SNOW Compensates for subjects that may otherwise appear too dark when shooting in extremely bright surroundings such as in the snow.
SPOTLIGHT Compensates for subjects that may otherwise appear too bright when shooting under extremely strong direct lighting such as spotlights.
TWILIGHT ▲Makes evening scenes look more natural. White Balance (→ pg. 37) is automatically set to "AUTO". When Twilight is chosen, the camcorder automatically adjusts the focus from approx. 10 m (32 ft) to infinity. From less than 10 m, adjust the focus manually.
NIGHT ☑ Makes dark subjects or areas even brighter than they would be under good natural lighting. Although the recorded image is not grainy, it may look as if it is strobing due to the slow shutter speed.
During Night-Alive, it may be difficult to bring the camcorder into focus. To prevent this, use of a tripod is recommended.
EFFECT
OFF: Disables the function. (Factory-preset)
SEPIA 📋 Recorded scenes have a brownish tint like old photos.
MONOTONE B/Wike classic black and white films, your footage is shot in B/W.
CLASSIC* gives recorded scenes a strobe effect.
STROBE* Your recording looks like a series of consecutive snapshots.
MIRROR* creates a mirror image on the left half of the screen, juxtaposed to the normal image on the other half.
* Not available for still image recording.
SHUTTER
OFF: Disables the function. (Factory-preset)
1/60 SHUTTER 1/60: The shutter speed is fixed at 1/60th of a second. Black bands that usually appear when shooting a TV screen become narrower.
1/100 SHUTTER 1/100: The shutter speed is fixed at 1/100th of a second. The flickering that occurs when shooting under a fluorescent light or mercury-vapour lamp is reduced.
SHUTTER 1/500/SHUTTER 1/4000*:
(Refer to PROGRAM AE - SPORTS ✦ mode.)
* Not available for still image recording.
Dubbing Still Images Recorded On A Tape To A Memory Card
Still images can be dubbed from a tape to a memory card.
1 Load a cassette. (pg. 16)
2 Load a memory card. (pg. 17)
3 Set the VIDEO/MEMORY Switch to "VIDEO".
4 Set the Power Switch to "PLAY" while pressing down the Lock Button located on the switch.
5 Set "[T] → [M] COPY" to "ON". (LFP pg. 33)
6 Press ▶/Ⅱ to start playback.
7 At the point you want to dub, press ▶/Ⅱ again to engage Still Playback.
8 To dub the image, press SNAPSHOT.
- The “→P” indication appears during dubbing.
Dubbing To A VCR
To use this camcorder as a player
1 Following the illustration, 17 pg. 23, "Connections To A TV Or VCR", connect the camcorder and the VCR's input connectors.
2 Perform steps 1 - 6 (pg. 23)
3 At the point you want to start dubbing, start recording on the VCR. (Refer to the VCR's instruction manual.)
4 To stop dubbing, stop recording on the VCR, then stop playback on the camcorder.
NOTES:
- It is recommended to use the AC Adapter as the power supply instead of the battery pack. (17 pg. 13)
●To choose whether or not the following displays appear on the connected TV
- Date/time Set "DATE/TIME" to "ON" or "OFF" (17 pg. 33).
- Time code Set "TIME CODE" to "OFF" or "ON" (☐ pg. 33).
- Indications other than date/time and time code Set "ON SCREEN" to "OFF", "LCD" or "LCD/TV" (pg. 33).
Dubbing To Or From A Video Unit Equipped With A DV Connector (Digital Dubbing)
It is also possible to copy recorded scenes from the camcorder onto another video unit equipped with a DV connector. Since a digital signal is sent, there is little, if any, image or sound deterioration.
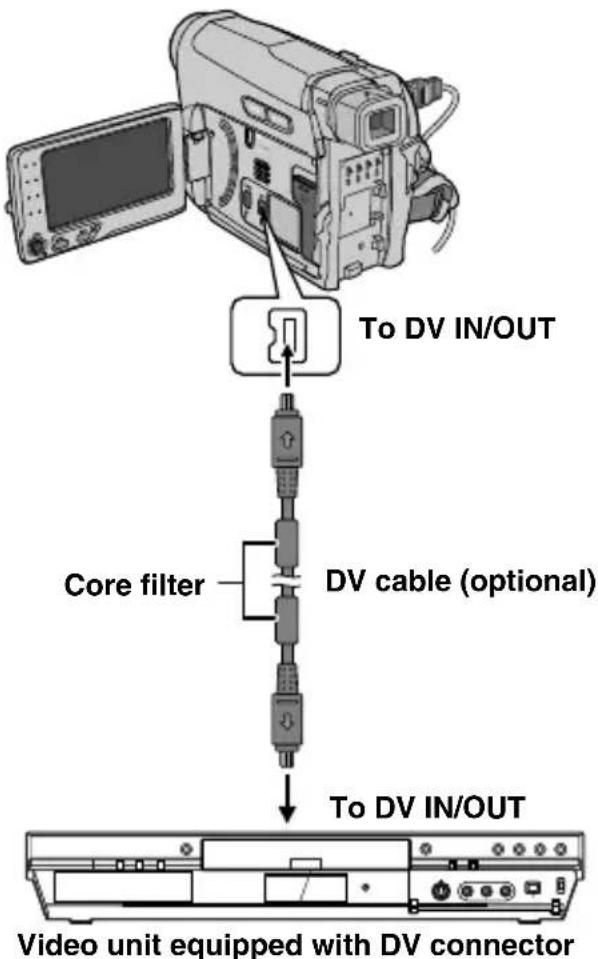
To use this camcorder as a player
1 Make sure all units are turned off.
2 Connect this camcorder to a video unit equipped with a DV input connector using a DV cable as shown in the illustration.
3 Start playback on the camcorder. (pg. 21)
4 At the point you want to start dubbing, start recording on the video unit. (Refer to the video unit's instruction manual.)
5 To stop dubbing, stop recording on the video unit, then stop playback on this camcorder.
NOTES:
- It is recommended to use the AC Adapter as the power supply instead of the battery pack. (pg. 13)
- If a blank portion or disturbed image is played back on the player during dubbing, the dubbing may stop so that an unusual image is not dubbed.
- Even though the DV cable is connected correctly, sometimes the image may not appear in step 4. If this occurs, turn off the power and make connections again.
- If SNAPSHOT is pressed during playback, only the original playback image recorded on the tape is output from the DV IN/OUT connector.
- When using a DV cable, be sure to use the optional JVC VC-VDV204U or VC-VDV206U DV cable.
To use this camcorder as a recorder
1 Make sure all units are turned off.
2 Connect this camcorder to a video unit equipped with a DV output connector using a DV cable as shown in the illustration.
3 Set the camcorder's Power Switch to "PLAY".
4 Set "REC MODE" to "SP" or "LP". (pg. 33)
5 Start playback on the player.
6 Press the Recording Start/Stop Button to engage the Record-Pause mode.
- The "DV IN" indication appears on the screen.
7 At the point you want to start dubbing, press the Recording Start/Stop Button to start dubbing. The ①dication rotates.
8 Press the Recording Start/Stop Button again to stop dubbing. The ④dication stops rotating.
9 Press ■ to return to the normal playback mode.
NOTE:
Digital Dubbing is performed in the sound mode recorded on the original tape, regardless of the current "SOUND MODE" setting. (17) pg. 31)
COPY PROTECTED
Appears if dubbing of copyguarded signals is attempted while this camcorder is being used as a recorder.
Connection To A Personal Computer

flowchart
graph TD
    A["USB cable (provided)"] --> B["To USB"]
    B --> C["PC"]
    D["Core filter"] --> E["DV cable (optional)"]
    F["Core filter"] --> G["To DV connector"]
    H["or"] --> I["PC with DV connector"]
    J["To USB connector"] --> K["PC"]
    L["To DV IN/OUT"] --> M["Core filter"]
    N["OR"] --> O["PC with DV connector"]
When connecting the camcorder to a PC using a DV cable, make sure to follow the procedure below. Connecting the cable incorrectly may cause malfunctions to the camcorder and/or the PC.
- Connect the DV cable first to the PC, and then to the camcorder.
- Connect the DV cable (plugs) correctly according to the shape of the DV connector.
[A] Using USB cable
It is possible to transfer still images stored on a memory card to a PC.
[B] Using DV cable
It is also possible to transfer still/moving images to a PC with a DV connector by using the provided software, software equipped with the PC or commercially available software. If you are using a Windows® XP, you can use Windows® Messenger to conduct video conferences over the Internet, using a camcorder. For details, refer to the help for the Windows® Messenger.
NOTES:
- Refer to "SOFTWARE INSTALLATION AND USB CONNECTION GUIDE" for the bundled software and drivers.
- It is recommended to use the AC Adapter as the power supply instead of the battery pack. (17 pg. 13)
●Never connect the USB cable and the DV cable simultaneously to the camcorder. Connect only the cable you wish to use to the camcorder. - When using a DV cable, be sure to use the optional JVC VC-VDV206U or VC-VDV204U DV cable depending on the type of DV connector (4 or 6 pins) on the PC.
- If the PC connected to the camcorder via the USB cable is not powered, the camcorder does not enter the USB mode.
●The date/time information cannot be captured into the PC.
●Refer to the instruction manuals of the PC and Software.
●The still images can also be transferred to a PC with a DV connector-equipped capture board.
●The system may not work properly depending on the PC or capture board you are using. - If, after connecting a DV cable to the camcoder and it doesn't work, restart the camcoder.
- Do not remove memory card during USB connection between PC and set.
"USB" and/or "←→" appears on the LCD monitor while the PC is accessing data in the camcorder or the camcorder is transferring a file to the PC. NEVER disconnect the USB cable while "←→" is displayed on the LCD monitor since this can result in product damage.
If, after following the steps in the chart below, the problem still exists, please consult your nearest JVC dealer.
No power is supplied.
- The power is not connected properly.
→Connect the AC Adapter securely. (pg. 13)
●The battery pack is not attached firmly.
→ Detach the battery pack once again and re-attach it firmly. (pg. 14)
●The battery is dead.
→Replace the dead battery with a fully charged one. (LFP pg. 13)
Recording cannot be performed.
- The tape's erase protection tab is set to "SAVE".
→ Set the tape's erase protection tab to "REC". (LPG. 16)
●“TAPE END” appears.
→Replace with new cassette. (pg. 16)
●The cassette holder cover is open.
→Close the cassette holder cover.
When shooting a subject illuminated by bright light, vertical lines appear.
This is not a malfunction.
When the screen is under direct sunlight during shooting, the screen becomes red or black for an instant.
This is not a malfunction
The LCD monitor or viewfinder indications blink.
●Effects function that cannot be used together are selected at the same time.
→Re-read the sections covering Effects.
( page 30)
The tape is moving, but there is no picture.
- Your TV has AV input terminals, but is not set to its VIDEO mode.
→Set the TV to the mode or channel appropriate for video playback. (17 pg. 23)
●The cassette holder cover is open.
→Close the cassette holder cover. (pg. 16)
Blocks of noise appear during playback, or there is no playback picture and the screen becomes blue.
Clean the video heads with an optional cleaning cassette. (17 pg. 5)
The focus does not adjust automatically.
●Focus is set to the Manual mode.
→Set Focus to the Auto mode. (pg. 35)
●The lens is dirty or covered with condensation.
→Clean the lens and check the focus again.
( page 35)
The color of Snapshot looks strange.
●The light source or the subject does not include white. Or there are various different light sources behind the subject.
→Find a white subject and compose your shot so that it also appears in the frame. (17 pg. 34, 37)
The POWER/CHARGE lamp on the camcorder does not light during charging.
●Charging is difficult in places subject to extremely high/low temperatures.
→To protect the battery, it is recommended to charge it in places with a temperature of 10^ C to 35^ C ( 50^ F to 95^ F). (☐ pg. 44)
●The battery pack is not attached firmly.
→Detach the battery pack once again and re-attach it firmly. (LFP pg. 13)
The image looks like the shutter speeds is too slow.
- When shooting in the dark, the unit becomes highly sensitive to light when “GAIN UP” is set to “AUTO”.
→If you want the lighting to look more natural, set "GAIN UP" to "AGC" or "OFF". (pg. 31)
Images on the LCD monitor appear dark or whitish.
- In places subject to low temperature, images become dark due to the characteristics of the LCD monitor. This is not a malfunction.
→Adjust the brightness and angle of the LCD monitor. (LFP pg. 8, 15) - When the LCD monitor's fluorescent light reaches the end of its service life, images on the LCD monitor become dark.
→Consult your nearest JVC dealer.
Picture does not appear on the LCD monitor.
- The viewfinder is pulled out and "PRIORITY" is set to "FINDER".
→Push the viewfinder back in or set "PRIORITY" to "LCD". (17) pg. 8, 32) - The LCD monitor's brightness setting is too dark.
→Adjust the brightness of the LCD monitor. ( page 15)
→If the monitor is tilted upward 180 degrees, open the monitor fully. (pg. 8)
Aspect ratio is strange
If the aspect ratio of the video you are playing is strange, change the setting in "16:9 OUTPUT". (17 pg. 32, 33)


natural_image
Simple line drawing of a smiling man in a suit (no text or symbols)
Displays the battery remaining power. Remaining power level

flowchart
graph LR
    A["Step 1"] --> B["Step 2"]
    B --> C["Step 3"]
    C --> D["Exhausted"]
As the battery power comes close to nil, the battery remaining power indicator blinks. When the battery power is exhausted, power turns off automatically.
TAPE END
Appears when the tape ends during recording or playback.
LENS CAP
Appears for 5 seconds after power is turned on if the lens cap is attached or when it is dark.
MEMORY IS FULL
Appears when the memory card's memory is full and shooting is not possible.
SET DATE/TIME!
- Appears when the date/time is not set. (pg. 15).
●The built-in clock battery has run out and the previously set date/time has been erased.
→Consult your nearest JVC dealer for replacement.
UNIT IN SAFEGUARD MODE REMOVE AND REATTACH BATTERY OR DC PLUG
Error indications 01, 02 or 06.
Remedy: Remove and reattach the power supply or battery.
UNIT IN SAFEGUARD MODE EJECT AND REINSERT TAPE
Error indications 03 or 04.
Remedy: Eject the cassette and reinsert.
In the above 2 error indications, the camcorder turns off automatically. Eject the cassette once and re-insert it, then check if the indication clears. When it does, you can resume using the camcorder. If the indication remains, consult your nearest JVC dealer.
AC Adapter
When using the AC Adapter in areas other than the USA
The provided AC Adapter features automatic voltage selection in the AC range from 110 V to 240 V.
USING HOUSEHOLD AC PLUG ADAPTER
In case of connecting the unit's power cord to an AC wall outlet other than American National Standard C73 series type use an AC plug adapter, called a “Siemens Plug”, as shown. For this AC plug adapter, consult your nearest JVC dealer.
Plug adapter

natural_image
Diagram of two types of electrical plugs, one straight and one open, with no text or symbols present.Battery Packs
The supplied battery pack is a lithium-ion battery. Before using the supplied battery pack or an optional battery pack, be sure to read the following cautions:
Terminals
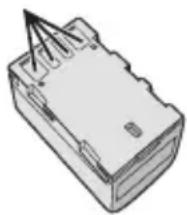
natural_image
Diagram of a rectangular electronic component with a pointed tip and internal structure (no text or symbols)●To avoid hazards
...do not burn.
...do not short-circuit the terminals. When transporting, make sure the provided battery cap is attached to the battery. If the battery cap is misplaced, carry the battery in a plastic bag. ...do not modify or disassemble.
...do not expose the battery to temperatures exceeding 60^ C ( 140^ F), as this may cause the battery to overheat, explode or catch fire. ...use only specified chargers.
- To prevent damage and prolong service life
...do not subject to unnecessary shock.
...charge in an environment where temperatures are within the tolerances shown in the chart below. This is a chemical reaction type battery — cooler temperatures impede chemical reaction, while warmer temperatures can prevent complete charging.
...store in a cool, dry place. Extended exposure to high temperatures will increase natural discharge and shorten service life.
...fully charge and then fully discharge the battery every 6 months when storing the battery pack over a long period time.
...remove from charger or powered unit when not in use, as some machines use current even when switched off.
The Benefits Of Lithium-Ion Batteries
Lithium-ion battery packs are small but have a large power capacity. However, when one is exposed to cold temperatures (below 10^ C/50°F), its usage time becomes shorter and it may cease to function. If this happens, place the battery pack in your pocket or other warm, protected place for a short time, then re-attach it to the camcorder.
NOTES:
- It is normal for the battery pack to be warm after charging, or after use.
Temperature Range Specifications
Charging: 10°C to 35°C (50°F to 95°F)
Operation: 0°C to 40°C (32°F to 104°F)
Storage: -20^ to 50^ ( -4^ to 122^ )
●The lower the temperature, the longer recharging takes.
●Charging times are for a fully discharged battery pack.
Cassettes
To properly use and store your cassettes, be sure to read the following cautions:
- During use
...make sure the cassette bears the Mini DV mark.
...be aware that recording onto prerecorded tapes automatically erases the previously recorded video and audio signals.
...make sure the cassette is positioned properly when inserting.
...do not load and unload the cassette repeatedly without allowing the tape to run at all. This slackens the tape and can result in damage.
...do not open the front tape cover. This exposes the tape to fingerprints and dust.
- Store cassettes
...away from heaters or other heat sources.
...out of direct sunlight.
...where they won't be subject to unnecessary shock or vibration.
...where they won't be exposed to strong magnetic fields (such as those generated by motors, transformers or magnets).
...vertically, in their original cases.
Memory Cards
To properly use and store your memory cards, be sure to read the following cautions:
- During use
...make sure the memory card bears the SD or MultiMediaCard mark.
...make sure the memory card is positioned properly when inserting.
- While the memory card is being accessed (during recording, playback, deletion, initialization, etc.)
...never unload the memory card and never turn off the camcorder.
- Store memory cards
...away from heaters or other heat sources.
...out of direct sunlight.
...where they won't be subject to unnecessary shock or vibration.
...where they won't be exposed to strong magnetic fields (such as those generated by motors, transformers or magnets).
LCD Monitor
- To prevent damage to the LCD monitor, DO NOT
...push it strongly or apply any shocks.
...place the camcorder with the LCD monitor on the bottom.
• To prolong service life
...avoid rubbing it with coarse cloth.
- Be aware of the following phenomena for LCD monitor use. These are not malfunctions
...While using the camcorder, the surface around the LCD monitor and/or the back of the LCD monitor may heat up.
...If you leave power on for a long time, the surface around the LCD monitor becomes hot.
Main Unit
●For safety, DO NOT
...open the camcorder's chassis.
...disassemble or modify the unit.
...short-circuit the terminals of the battery pack. Keep it away from metallic objects when not in use.
...allow inflammables, water or metallic objects to enter the unit.
...remove the battery pack or disconnect the power supply while the power is on.
...leave the battery pack attached when the camcorder is not in use.
- Avoid using the unit
...in places subject to excessive humidity or dust.
...in places subject to soot or steam such as near a cooking stove.
...in places subject to excessive shock or vibration.
...near a television set.
...near appliances generating strong magnetic or electric fields (speakers, broadcasting antennas, etc.).
...in places subject to extremely high (over 40^ C or 104^ F) or extremely low (under 0^ C or 32^ F) temperatures.
• DO NOT leave the unit
...in places of over 50°C (122°F).
...in places where humidity is extremely low (below 35%) or extremely high (above 80%).
...in direct sunlight.
...in a closed car in summer.
...near a heater.
• To protect the unit, DO NOT
...allow it to become wet.
...drop the unit or strike it against hard objects.
...subject it to shock or excessive vibration during transportation.
...keep the lens directed at extremely bright objects for long periods.
...expose the lens and viewfinder's lens to direct sunlight.
...carry it by holding the LCD monitor or the viewfinder.
...swing it excessively when using the hand strap or the grip.
...swing the soft camera case excessively when the camcorder is inside it.
- Dirty heads can cause the following problems:


...No picture during playback.
...Blocks of noise appear during playback.
...During recording or playback, the Head Clog Warning indicator “✗” appears.
...Recording cannot be performed properly. In such cases, use an optional cleaning cassette. Insert it and play back. If the cassette is used more than once consecutively, damage to the video heads may result. After the camcorder plays back for about 20 seconds, it stops automatically. Also refer to the cleaning cassette's instructions.
If, after using the cleaning cassette, the problems still exist, consult your nearest JVC dealer.
Mechanical moving parts used to move the video heads and video tape tend to become dirty and worn out over time. In order to maintain a clear picture at all times, periodic check-ups are recommended after using the unit for about 1,000 hours. For periodic check-ups please consult your nearest JVC dealer.
How To Handle A CD-ROM
●Take care not to soil or scratch the mirror surface (opposite to the printed surface). Do not write anything or put a sticker on either the front or back surface. If the CD-ROM gets dirty, gently wipe it with a soft cloth outward from the center hole.
- Do not use conventional disc cleaners or cleaning spray.
- Do not bend the CD-ROM or touch its mirror surface.
- Do not store your CD-ROM in a dusty, hot or humid environment. Keep it away from direct sunlight.
About moisture condensation
- You have observed that pouring a cold liquid into a glass will cause drops of water to form on the glass' outer surface. This same phenomenon occurs on the head drum of a camcorder when it is moved from a cool place to a warm place, after heating a cold room, under extremely humid conditions or in a place directly subjected to the cool air from an air conditioner.
●Moisture on the head drum can cause severe damage to the video tape, and can lead to internal damage to the camcorder itself.
CONDENSATION, OPERATION PAUSED PLEASE WAIT
Appears if condensation occurs. When this indication is displayed, wait more than 1 hour until condensation disappears.
Serious malfunctioning
If malfunctioning occurs, stop using the unit immediately and consult your local JVC dealer.
The camcorder is a microcomputer-controlled device. External noise and interference (from a TV, a radio, etc.) might prevent it from functioning properly. In such cases, first disconnect its power supply unit (battery pack, AC Adapter, etc.) and wait a few minutes and then re-connect it and proceed as usual from the beginning.
Declaration of Conformity
Model Number : GR-D796U
Trade Name : JVC
Responsible party : JVC AMERICAS
CORP.
Address : 1700 Valley Road
Wayne, N. J. 07470
Telephone Number : 973-317-5000
This device complies with Part 15 of FCC
Rules. Operation is subject to the following two conditions: (1) This device may not cause harmful interference, and (2) this device must accept any interference received, including interference that may cause undesired operation.
Changes or modifications not approved by JVC could void the user's authority to operate the equipment. This equipment has been tested and found to comply with the limits for a Class B digital device, pursuant to Part 15 of the FCC Rules. These limits are designed to provide reasonable protection against harmful interference in a residential installation. This equipment generates, uses, and can radiate radio frequency energy and, if not installed and used in accordance with the instructions, may cause harmful interference to radio communications. However, there is no guarantee that interference will not occur in a particular installation. If this equipment does cause harmful interference to radio or television reception, which can be determined by turning the equipment off and on, the user is encouraged to try to correct the interference by one or more of the following measures: Reorient or relocate the receiving antenna. Increase the separation between the equipment and receiver. Connect the equipment into an outlet on a circuit different from that to which the receiver is connected. Consult the dealer or an experienced radio/TV technician for help.
This Class B digital apparatus complies with Canadian ICES-003.
DC 11 V (Using AC Adapter)
DC 7.2 V (Using battery pack)
Power consumption
Approx. 2.2 W (2.3 W*) (LCD monitor off, viewfinder on)
Approx. 2.7 W (2.8 W*) (LCD monitor on, viewfinder off)
Approx. 7.5 W (Maximum; when charging the battery pack)
* Using LED Light
Dimensions (W x H x D)
61 mm x 94 mm x 114 mm (2-3/8" x 3-11/16" x
4-1/2") (with the LCD monitor closed and the viewfinder pushed back in)
Weight
Approx. 410 g (0.90 lbs) (without battery, cassette and lens cap)
Approx. 480 g (1.06 lbs) (incl. battery, cassette and lens cap)
Operating temperature
0^ to 40^ (32°F to 104°F)
Operating humidity
35% to 80%
Storage temperature
-20^ to 50^ (-4^ to 122^)
Pickup
1/6" CCD
Lens
F 2.0, f = 2.3 mm to 78.2 mm, 34:1 power zoom lens
Filter diameter
ø27 mm
LCD monitor
2.7" diagonally measured, LCD panel/TFT active matrix system
Viewfinder
Electronic viewfinder with 0.33" color LCD
Speaker
Monaural
LED Light
Effective distance: 1.5 m (5 ft)
For Digital Video Camera
Format
DV format (SD mode)
Signal format
NTSC standard
Recording/Playback format
Video: Digital component recording
Audio: PCM digital recording, 32 kHz 4-channel (12-BIT), 48 kHz 2-channel (16-BIT)
Cassette
Mini DV cassette
Tape speed
SP: 18.8 mm/s, LP: 12.5 mm/s
Maximum recording time (using 80 min. cassette)
SP: 80 min., LP: 120 min.
For Digital Still Camera
Storage media
SD Memory Card/MultiMediaCard
Compression system
JPEG (compatible)
File size
Still image:
640 x 480 pixels
Picture quality
2 modes (FINE/STANDARD)
Approximate number of storable images
pg. 24
For Connectors
AV
Video output: 1.0 V (p-p), 75 Ω, analog
Audio output: 300 mV (rms), 1 kΩ, analog, stereo DV
Input/output: 4-pin, IEEE1394 compliant
USB
Mini USB-B type, USB 1.1 compliant
AC Adapter
Power requirement
AC 110 V to 240 V\~, 50 Hz/60 Hz
Output
DC 11 V = =, 1 A
Specifications shown are for SP mode unless otherwise indicated. E & O.E. Design and specifications subject to change without notice.
A
AC Adapter ....14
Auto/Manual Mode .....20
B
Backlight Compensation 36
Battery Pack .....13, 14, 44
Blank Search ......22
Bright .....15, 32, 33
C
Cam Reset 32
Changing The Menu Settings ......29 – 33
Charging The Battery Pack 13
Clock Adj. .....15, 32, 33
Connection To A Personal Computer ....41
Connections To A TV Or VCR 23
Control Level 7
D
Data Battery ....14
Date/Time Settings .....15
Deleting Files ......27
Demonstration Mode .....32
Digital Image Stabilization (DIS) 30
Digital Still Camera .....24
DPOF Setting (Digital Print Order Format) ...27, 28
Dual Rec. 20
Dubbing 39, 40
E
Effects 38
Exposure Control .....35
G
Gain Up 31
|
Image Size ....31
Index Playback 25
Initializing A Memory Card ....28
Interface Shooting .....19
Iris Lock 36
J
Journalistic Shooting ..... 19
L
Language ......14, 32
LCD Monitor and Viewfinder .....8, 15
LED Light 34
Loading A Cassette ..... 16
Loading A Memory Card ..17
M
Manual Focus 35
Melody 32
Memory Card .....17, 45
Motor Drive Mode ...... 34
N
Narration ....33
Night Alive 38
0
On Screen 32, 33
P
Playback Sound ....33
Power-linked operation ...8
Priority 32
Program AE 38
Protecting Files ......26
Q
Quick Review ......18
R
Rec Mode 31, 33
Recording Capacity Memory Card .... 24 Tape .... 18
Recording Media Selection ....31
Resetting The File Name ......26
S
Shutter Effects ...... 38
Sound L/R 33
Sound Mode ...... 31, 33
Speaker Volume ...... 21
Specifications 47
Spot Exposure Control .. 36
T
Tape Speed (REC MODE) ... 31, 33
Tele Macro 30
Telephoto Setting ...... 30
Time Code ...... 20, 32, 33
Tripod Mounting ..... 15
Troubleshooting ..... 42, 43
V
Video/Memory Switch 9, 31
W
White Balance 37
Wind Cut 31
Wipe Or Fader Effects .. 38
Z
Zooming ...... 19, 24, 30
16:9 Output ...... 32, 33

- For Customer Use:
- Major Features of this Camcorder
- Wipe/Fader Effects
- Program AE, Effects and Shutter Effects
- LED Light
- Backlight Compensation
- Data Battery
- Auto Button
- Dual Rec.
- Read This First!
- SAFETY PRECAUTIONS
- CAUTION
- WARNING: TO PREVENT FIRE OR SHOCK HAZARD, DO NOT EXPOSE THIS UNIT TO RAIN OR MOISTURE.
- CAUTIONS:
- NOTES:
- CAUTION!
- IMPORTANT SAFETY INSTRUCTIONS
- Cleaning The Camcorder
- To clean the exterior
- To clean the LCD monitor
- To clean the lens
- To clean the viewfinder lens
- USE CLEANING CASSETTE
- GETTING STARTED 7
- ADDITIONAL FEATURES FOR D.S.C. 26
- ADVANCED FEATURES 29
- REFERENCES 42
- Regarding This Manual
- Provided Accessories
- Index
- How to open the LCD monitor
- Power-linked operation
- Controls
- Connectors
- Indicators
- Other Parts
- LCD Monitor/Viewfinder Indications
- During Video Playback
- During D.S.C. Playback
- EN GETTING STARTED
- How To Attach The Lens Cap
- NOTE:
- How To Attach The Shoulder Strap
- Grip Adjustment
- Power
- Charging The Battery Pack
- To detach the battery pack
- About Batteries
- To restore the accuracy of the battery power indicator
- Using The Battery Pack
- ATTENTION:
- Data Battery System
- Using AC Power
- INFORMATION:
- Language Settings
- Date/Time Settings
- Viewfinder Adjustment
- CAUTION:
- Brightness Adjustment Of The Display
- SET
- Tripod Mounting
- Loading/Unloading A Cassette
- TAPE!
- CHECK TAPE'S ERASE PROTECTION TAB
- Loading/Unloading A Memory Card
- PLEASE FORMAT
- CARD ERROR!
- 16:9 Wide Mode
- Basic Recording
- Tape Remaining Time
- Quick Review
- Zooming
- Journalistic Shooting
- Interface Shooting
- Time Code
- Recording From The Middle Of A Tape
- Auto/Manual Mode
- Auto Mode : A
- Manual Mode : M
- Normal Playback
- To control the speaker volume
- HDV
- Still Playback
- Variable Shuttle Search
- Blank Search
- Playback Snapshot
- Connections To A TV Or VCR
- To choose whether or not the following displays appear on the connected TV
- Basic Shooting (D.S.C. Snapshot)
- CHECK CARD'S WRITE PROTECTION SWITCH
- MEMORY CARD!
- Approximate Number of Storable Images
- Normal Playback Of Images
- NO IMAGES STORED
- ?
- Auto Playback Of Images
- Index Playback Of Files
- Removing On-Screen Display
- Resetting The File Name
- Protecting Files
- To protect the currently displayed file
- To protect all files stored in the memory card
- To Remove Protection
- To remove protection from the currently displayed file
- To remove protection from all files stored in the memory card
- Deleting Files
- To delete the currently displayed file
- To delete all files stored in the memory card
- Setting Print Information (DPOF Setting)\*
- To Print All Still Images (One Print For Each)
- To Print By Selecting Still Images And Number Of Prints
- To Reset The Number Of Prints
- ■ Initializing A Memory Card
- Changing The Menu Settings
- For Video and D.S.C. Recording Menus:
- For Video Playback Menu:
- Open the LCD monitor fully. (pg. 8)
- Press MENU. The Menu Screen appears.
- Select the desired function, press SET or >. The selected function menu appears.
- Select the desired selection, press SET or >.
- Select the desired setting, press SET or >. Selection is completed.
- Press MENU. The Menu Screen closes.
- Recording Menus
- FUNCTION
- WIPE/FADER\*
- PROGRAM AE
- EFFECT
- EXPOSURE
- BALANCE
- SHUTTER
- CAMERA
- ZOOM\*
- TELE MACRO
- DIS\*
- GAIN UP
- WIND CUT\*
- IMAGE SIZE\*
- VTR
- REC MODE
- SOUND MODE
- REC SELECT
- DISPLAY
- ON SCREEN
- DATE/TIME
- CLOCK ADJ.
- TIME CODE\*
- 16:9 OUTPUT
- BRIGHT
- SYSTEM
- LANGUAGE
- MELODY
- PRIORITY
- DEMO MODE
- CAM RESET
- Playback Menus
- SOUND L/R and NARRATION
- REC MODE LP
- NARRATION
- [T] → [M] COPY
- SOUND L/R
- ON SCREEN OFF / [LCD] / LCD/TV
- DATE/TIME ON
- TIME CODE ON
- 16:9 OUTPUT / [16:9 TV]
- Snapshot (Record Still Image On Tape)
- Motor Drive Mode
- Manual Focus
- To reset to Auto Focus
- Manual focus is recommended in situations listed below.
- Exposure Control
- Iris Lock
- To cancel Backlight Compensation
- Spot Exposure Control
- To lock the iris
- To cancel Spot Exposure Control
- White Balance Adjustment Manual White Balance
- To change the setting
- Wipe Or Fader Effects
- WIPE/FADER
- SPORTS
- Dubbing Still Images Recorded On A Tape To A Memory Card
- Dubbing To A VCR
- To use this camcorder as a player
- Dubbing To Or From A Video Unit Equipped With A DV Connector (Digital Dubbing)
- To use this camcorder as a recorder
- COPY PROTECTED
- Connection To A Personal Computer
- [A] Using USB cable
- [B] Using DV cable
- No power is supplied.
- Recording cannot be performed.
- When shooting a subject illuminated by bright light, vertical lines appear.
- When the screen is under direct sunlight during shooting, the screen becomes red or black for an instant.
- The LCD monitor or viewfinder indications blink.
- The tape is moving, but there is no picture.
- Blocks of noise appear during playback, or there is no playback picture and the screen becomes blue.
- The focus does not adjust automatically.
- The color of Snapshot looks strange.
- The POWER/CHARGE lamp on the camcorder does not light during charging.
- The image looks like the shutter speeds is too slow.
- Images on the LCD monitor appear dark or whitish.
- Picture does not appear on the LCD monitor.
- Aspect ratio is strange
- TAPE END
- LENS CAP
- MEMORY IS FULL
- SET DATE/TIME!
- UNIT IN SAFEGUARD MODE REMOVE AND REATTACH BATTERY OR DC PLUG
- UNIT IN SAFEGUARD MODE EJECT AND REINSERT TAPE
- AC Adapter
- When using the AC Adapter in areas other than the USA
- USING HOUSEHOLD AC PLUG ADAPTER
- Battery Packs
- ●To avoid hazards
- - To prevent damage and prolong service life
- The Benefits Of Lithium-Ion Batteries
- Temperature Range Specifications
- Cassettes
- - During use
- - Store cassettes
- Memory Cards
- - Store memory cards
- LCD Monitor
- • To prolong service life
- Main Unit
- ●For safety, DO NOT
- - Avoid using the unit
- • DO NOT leave the unit
- • To protect the unit, DO NOT
- - Dirty heads can cause the following problems:
- How To Handle A CD-ROM
- About moisture condensation
- CONDENSATION, OPERATION PAUSED PLEASE WAIT
- Serious malfunctioning
- Declaration of Conformity
- Power consumption
- Dimensions (W x H x D)
- Weight
- Operating temperature
- Operating humidity
- Storage temperature
- Pickup
- Lens
- Filter diameter
- Viewfinder
- Speaker
- For Digital Video Camera
- Format
- Signal format
- Recording/Playback format
- Cassette
- Tape speed
- Maximum recording time (using 80 min. cassette)
- For Digital Still Camera
- Storage media
- Compression system
- File size
- Picture quality
- For Connectors
- AV
- USB
- Power requirement
- Output
- A
- B
- C
- D
- E
- G
- |
- J
- L
- M
- N
- 0
- P
- Q
- R
- S
- T
- V
- W
- Z
Brand : JVC
Model : GR-D796
Category : Camera