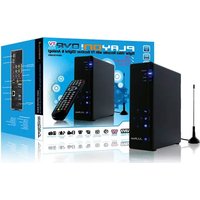
Playon!DVR TV - DVD player AC Ryan - Free user manual and instructions
Find the device manual for free Playon!DVR TV AC Ryan in PDF.


| Product Type | DVD player with DVR and hybrid TV tuner |
| Model | AC Ryan Playon!DVR TV |
| Dimensions (W x H x D) | 61 x 198 x 171 mm |
| Net Weight | Approx. 1.5 kg |
| Power Supply | AC 100-240V, 50-60Hz (external adapter, DC 12V) |
| Power Consumption | Approx. 35 W |
| Internal Hard Disk | 3.5" SATA HDD (user-installable) |
| Recording Format | MPEG-2 (.mpg or .ts) |
| Recording Quality Modes | HQ, SP, LP, EP, SLP (variable bitrate) |
| Video Playback Formats | DAT, VOB, IFO, MPG, AVI (XviD), MPEG-2 TS |
| Maximum Video Resolution | 1080i (1920x1080 interlaced) |
| Audio Playback Formats | MP3, OGG, WMA (standard, no DRM or Pro) |
| Photo Playback Formats | JPEG, BMP |
| TV Tuners | DVB-T (digital terrestrial) and Analog TV (PAL/SECAM) |
| Video Outputs | HDMI, Y/Pb/Pr component, Composite (A/V), S-Video (via adapter?) |
| Audio Outputs | Analog stereo (RCA), S/PDIF coaxial, S/PDIF optical |
| USB Ports | 2 x USB 2.0 host, 1 x USB 2.0 device |
| Network | 10/100 Ethernet, optional Wi-Fi (USB adapter) |
| Additional Features | Time Shift, EPG, Teletext, Internet Radio, NAS function |
Frequently Asked Questions - Playon!DVR TV AC Ryan
User questions about Playon!DVR TV AC Ryan
0 question about this device. Answer the ones you know or ask your own.
Ask a new question about this device
Download the instructions for your DVD player in PDF format for free! Find your manual Playon!DVR TV - AC Ryan and take your electronic device back in hand. On this page are published all the documents necessary for the use of your device. Playon!DVR TV by AC Ryan.
USER MANUAL Playon!DVR TV AC Ryan
2.1 Remote Control 15
2.2 Front Panel 20
2.3 Rear Panel 21
3. Getting Started.... 22
3.1 Selecting DVB-T TV 22
3.2 Selecting Analog TV 22
3.3 Selecting A/V In – Signal from the A/V IN jack 22
3.4 Selecting Playback – Playback and Edit Recorded Titles 22
3.5 Selecting Browser – Playback Multimedia Files 23
3.6 Selecting Setup 23
4. Watching DVB-T & Analog TV programs 24
4.1 Watching DVB-T TV programs 24
4.2 Watching Analog TV programs.... 26
5. The Title List Menu for Recorded Videos 27
5.1 Title List Menu 27
5.2 Playing Back Titles 28
5.3 Deleting Titles 28
5.4 Renaming Titles 28
5.5 Sorting Files 29
5.6 Title Edit Menu 30
5.7 Tools....32
5.8 Saving Your Recorded Titles 33
6. Timer Record Menu 34
6.1 Create a New Schedule ...... 34
6.2 Editing Schedule 34
6.3 Deleting Schedules 35
6.4 Viewing Schedule Status 35
6.5 Viewing Recording History 36
7. Setup Menu 37
7.1 Changing DVB-T TV settings 37
7.2 Changing Analog TV settings 39
7.3 Changing Video Settings 40
7.4 Changing Audio Settings 42
7.5 Changing Record Settings 43
7.6 Changing Network Settings 45
7.7 Changing System Settings 52
7.8 Miscellaneous 57
8. Browser Menu 59
8.1 Browsing All 59
8.2 Browsing Music 59
8.3 Browsing Photos 60
8.4 Browsing Movies 60
8.5 Browsing via Network 61
8.6 Renaming / Deleting Files ...... 64
8.7 Managing the Playlist 65
9. File Copy Menu 67
10. NAS Function 69
11. Listening to Internet Radio 70
11.1 Station List Menu 70
11.2 Genre List Menu 71
11.3 My Favorite Station 72
11.4 Recording Radio Programs 72
12. Upgrading the Firmware 73
13. Appendixes.... 75
13.1 Specifications 75
13.2 Frequently Asked Questions 77
13.3 Copyrights and Trademarks 79
13.4 Warranty 79
1. Introduction
1.1 Preface
Dear Customer,
Thank you very much for purchasing our product. In the digital era, this product is a great home entertainment partner. With the outstanding design, you can enjoy movies and music, view photos of precious moments, and record your favorite TV or movie programs and view them in your own time. The editing function provides you with an easy way to save these. It's easy to use this product as a portable external storage device with its built-in HDD and high-speed USB 2.0.
This player has the following functionality:
Video Recording - supports one button recording and scheduled recording, can easily record programs from DVB-T / Analog TV, DVD player, DV, etc., and save as MPEG-2 (.mpg, or .ts) format; also can edit the recorded titles;
Time Shift pause and enjoy chasing playback of live TV programs;
Movie Playback - supports VOB (DVD), IFO (DVD), MPG (MPEG-2/1), AVI (MPEG-4 ASP: XviD), DAT (VCD), and MPEG-2 TS files; resolution up to 1080i;
Music Playback - supports MP3, OGG, and WMA files; - supports one button playlist music playback;
Photo Playback - supports digital camera JPEG, and BMP files;
Data Storage - works as a portable hard disk using USB 2.0 port;
USB HOST - supports two USB 2.0 host ports.
Network Function - Ethernet & WLAN streaming playback and NAS function (Wireless function supported by the optional Wireless LAN USB Adapter);
HDMI - High-Definition Multimedia Interface transmits the highest quality digital video and audio via a single cable, simplifies cabling and provides high quality home theater experience.
Analog TV - supports analog PAL B/G, D/K, I, SECAM L and L' reception.
DVB-T TV - supports Digital Video Broadcasting Terrestrial (DVB-T) TV reception;
- supports Electronic Program Guide (EPG) and Teletext.
We hope that this product will bring you a lot of enjoyment. We are committed to apply multimedia technology in your work, entertainment, family, daily life, car and everywhere!
Welcome to be with us. Thank you again for choosing our product.
Note: WMA Pro & Advanced Profile and WMA with DRM are not supported.
1.2 Packing List
| Part Quantity | |
| Player 1 | |
| A/V cable 2 | |
| YUV cable 1 | |
| USB cable 1 | |
| Remote Control 1 | |
| Remote Control Battery 2 | |
| AC/DC adaptor 1 | |
| AC/DC adaptor Power Cord 1 | |
| Wireless LAN USB Adapter 1 (optional) | |
| DVB-T Antenna 1 (optional) | |
| 2-Way RF Splitter 1 | |
| User Manual (printed) 1 | |
| Quick Start Guide 1 | |
| Driver CD 1 |
Note:
The actual contents in the package might be different from the packing list in this manual.
1.3 Caution
This player's design and manufacture has your safety in mind. In order to safely and effectively use this player, please read the following before usage.
1.3.1 Usage cautions
User should not modify this player. If commercial hard disk is being used, the environmental temperature should be within +5^ +35^ .
1.3.2 Power
The player's power voltage: DC 12V.
When using this player, please connect the supplied AC adapter or AC adapter cable to the player's power jack. When placing the adapter cable, make sure it can not get damaged or be subject to pressure. To reduce the risk of electric shock, unplug the adapter first before cleaning it. Never connect the adapter to the player in a humid or dusty area. Do not replace the adapter or cable's wire or connector.
1.3.3 Radio interference/compatibility
- If not properly shielded, almost all electronic devices will get radio interference. Under some conditions, your player might get interference.
- The design of this player has followed the FCC/CE standard, and has followed the following rules:
(1) This player may not cause harmful interference;
(2) This player could accept some interference received including interference that may cause undesired operation.
1.3.4 Repair
If the player has a problem, you should take it to an appointed repair center and let the specialists do the repair, never repair the player yourself, you might damage the player or endanger yourself or your data.
1.3.5 Disposing of the player
When you dispose of the player, be sure to dispose it appropriately. Some countries may regulate disposal of electrical device, please consult with your local authority.
1.3.6 Hard disk cautions
The player uses an internal hard disk for data storage, in normal case, format or repair is not required.
You should carefully read the < Frequently Asked Questions > chapter, and check our website for latest information before formatting the hard disk.
- Physical impact may create bad sector in the hard disk, you can use CHKDSK to fix the problem.
- All data stored in the player may be lost due to physical impact, electrical shock, power lost,
HDD format etc. Please backup your data.
- It is suggested to do defragment after a long period of usage.
- Regularly backup the data in the hard disk so that it can be recovered in the event of data corruption or loss. Our company takes no responsibility for loss of data stored on the hard disk.
1.3.7 Others
When using this player, please do not let the player come into contact with water or other liquid, if water is accidentally spilled on the player, please use a dry cloth to absorb the spillage.
Electronic products are vulnerable, when using please avoid shaking or hitting the player, and do not press the buttons too hard.
Do not let the player come into contact with water or other liquid.
Do not disassemble the player, repair the player or change the design of the player, any damage done will not be included in the repair policy.
Do not press the buttons of the player too hard.
Avoid hitting the player with hard object, avoid shaking the player, and stay away from magnetic fields.
During electrostatic discharge and the strong electromagnetic field, the product will malfunction, then unplug the power cable and the product will return to normal performance next time it is powered on.
1.4 Connection
1.4.1 Connect to Computer
(1) Make sure the player is powered on;
(2) Plug in the squarish connector of the USB cable to this player's USB DEVICE port;
(3) Plug in the rectangular connector of the USB cable to computer.
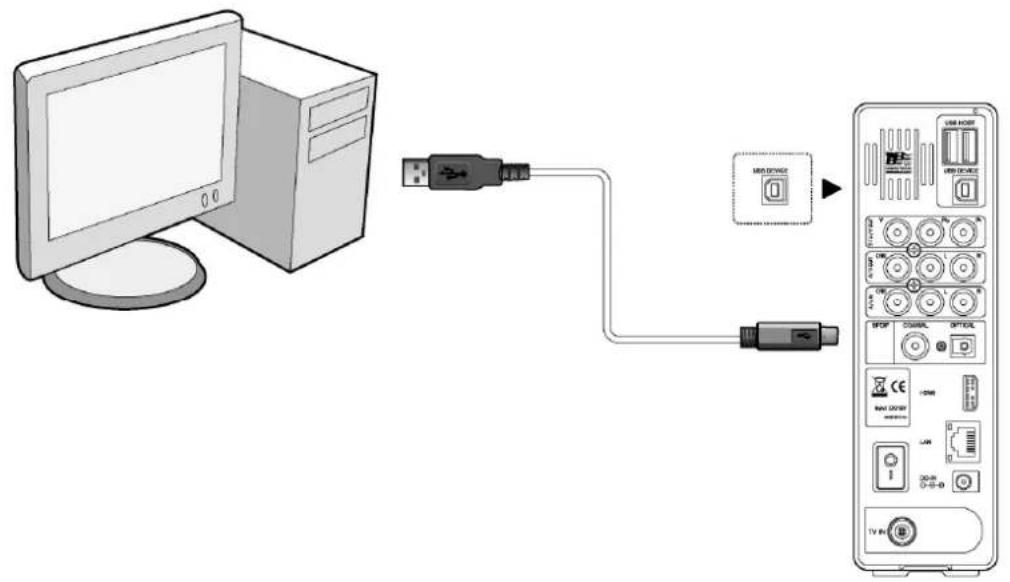
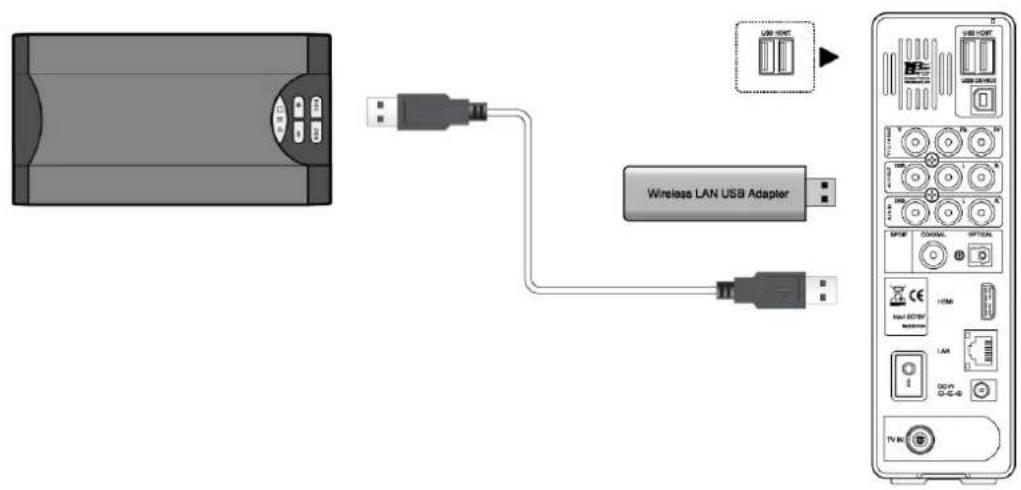
1.4.2 USB Mass Storage Device (like USB stick, MP3, USB HDD etc.) Connection
(1) Make sure the player is powered on;
(2) Plug in the USB stick or USB HDD etc. to one of the USB host ports of this player.
flowchart
graph TD
    A["USB PORT"] --> B["Wireless LAN USB Adapter"]
    B --> C["TV Interface"]
1.4.3 A/V connection
1.4.3.1 A/V IN
(1) Follow the picture and plug in the 3 color connector to the player's A/V IN jack;
(2) Follow the picture and plug in the 3 color connector to the A/V OUT jack of the TV/IPTV Set-Top Box (STB).
In this way, you can record TV programs from the TV/IPTV Set-Top Box.
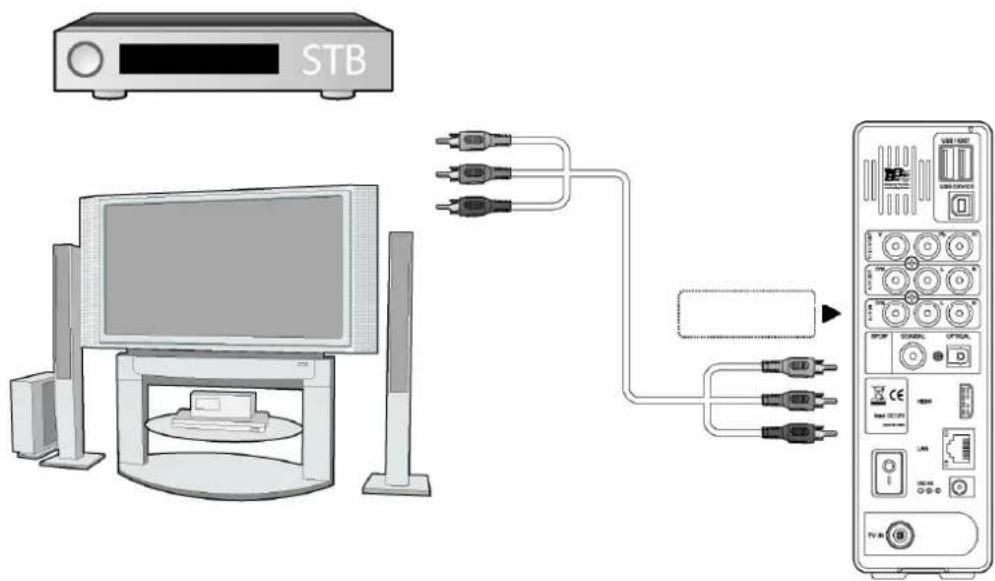
1.4.3.2 A/V OUT
(1) Follow the picture and plug in the 3 color connector to the player's A/V OUT jack;
(2) Follow the picture and plug in the 3 color connector to the TV's A/V IN jack. In this way, you can enjoy the content in the player on TV or other display devices.
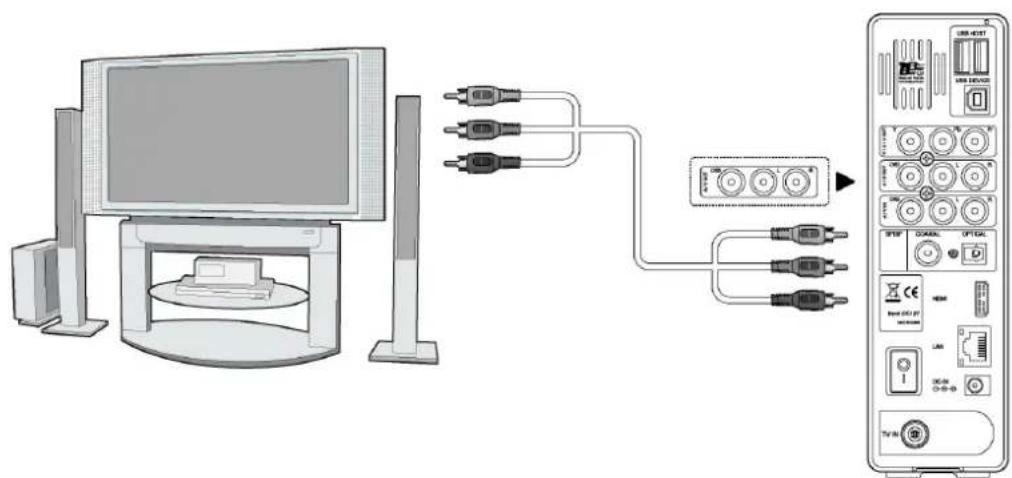
1.4.3.3 Y/Pb/Pr Component OUT
(1) Follow the picture and plug in the 3 color connector to the player's Y/Pb/Pr jack;
(2) Follow the picture and plug in the 3 color connector to the TV's Y/Pb/Pr jack.
Audio Connection while using Y/Pb/Pr Video out:
First method: use the audio output from the A/V OUT jack;
Second method: use the audio output from the S/PDIF Coaxial or Optical jack.
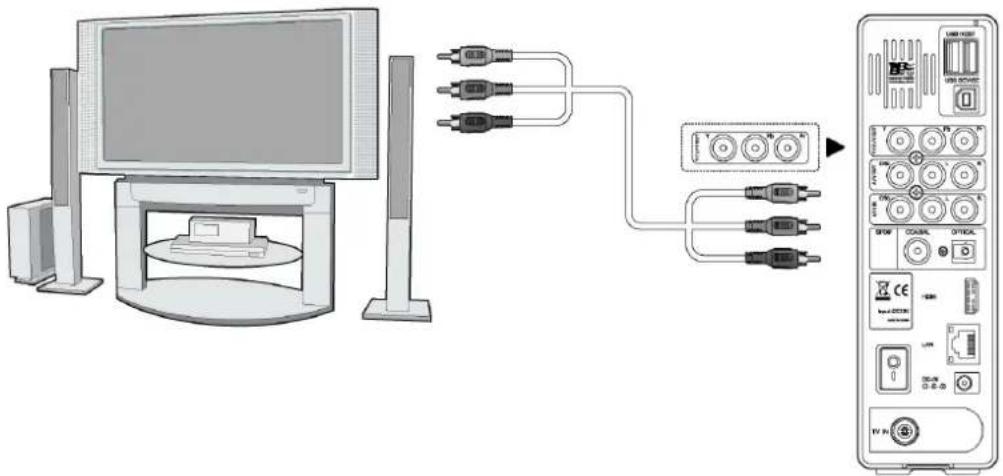
In this way, you can also enjoy videos, music, and photos in the player on TV.
1.4.3.4 HDMI OUT
(1) Follow the picture and plug one connector on your HDMI cable to the player's HDMI jack;
(2) Follow the picture and plug the other connector on your HDMI cable to the TV's HDMI jack.

natural_image
Diagram showing connection between a computer monitor, USB cable, and an electronic device (no text or symbols present)In this way, you can have the highest quality video and audio via a single cable.
1.4.3.5 TV IN
Follow the picture and plug a TV Antenna or analog TV cable to the TV IN socket;
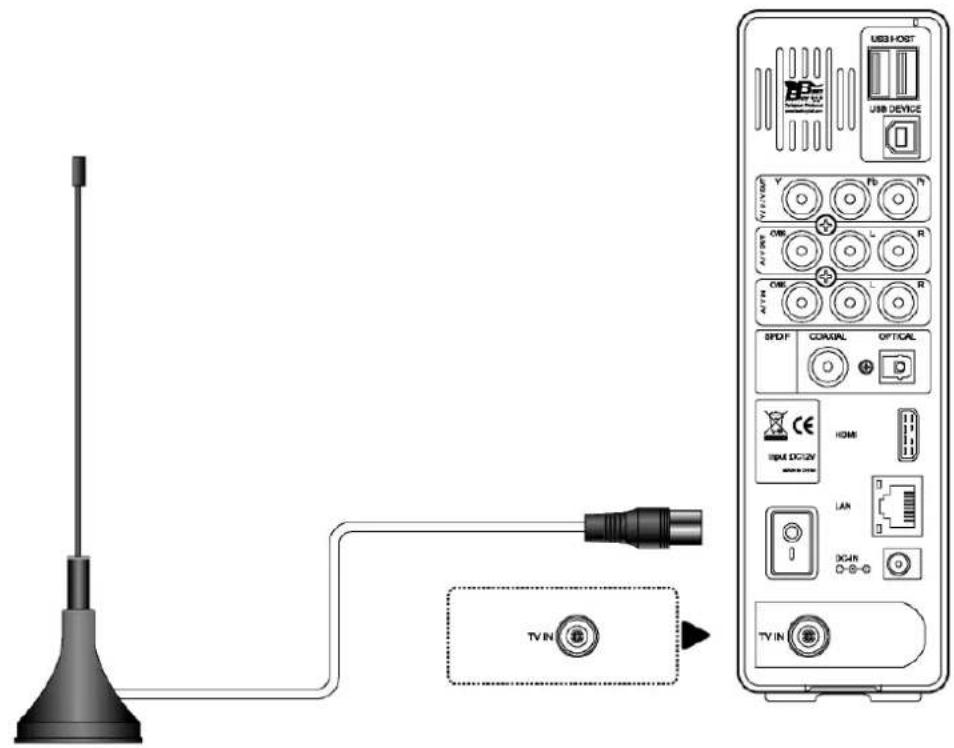
1.4.4 Digital Audio Device connection
(1) Follow the picture and plug in the RCA connector on your coaxial cable to the player's S/PDIF Coaxial jack. Or if you use optical fiber, please plug in the Toslink connector on your optical fiber to the player's S/PDIF Optical jack; (not supplied)
(2) Follow the picture and plug in the other connector on your coaxial cable or optical fiber to the digital audio device.(not supplied)
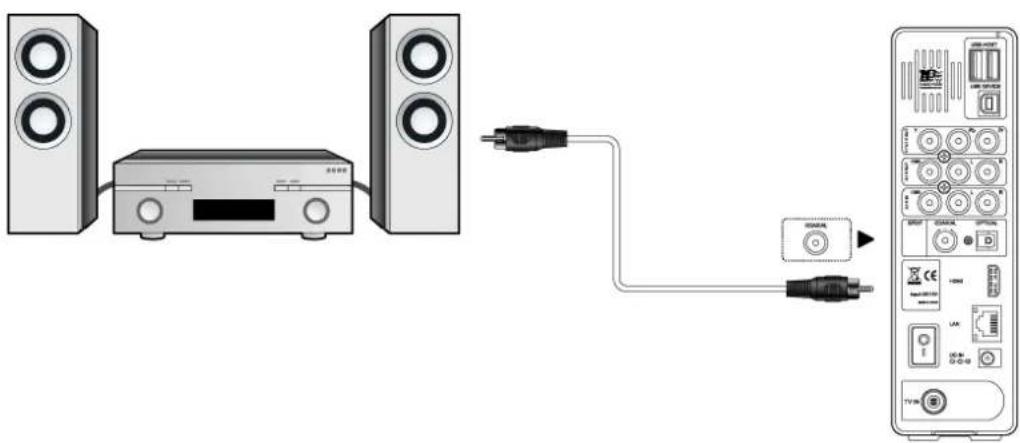
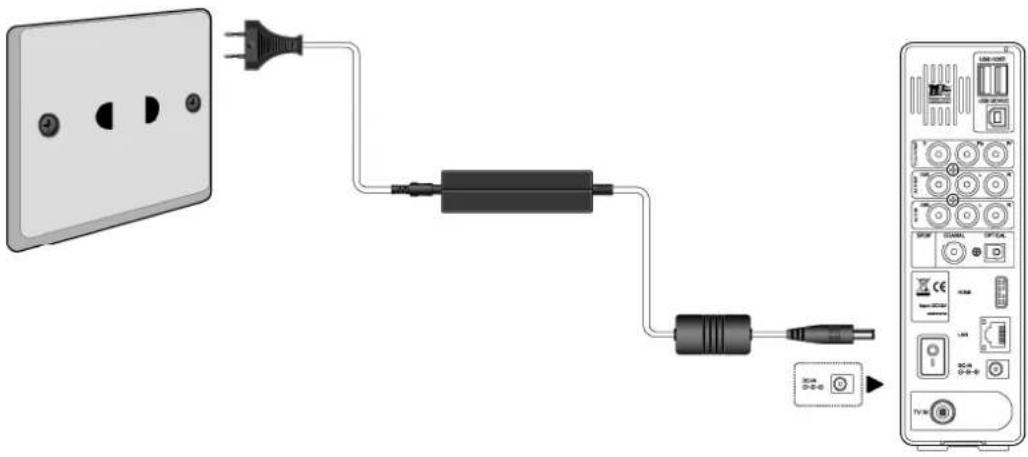
1.4.5 Power connection
(1) Follow the picture and connect the AC adaptor to the player's DC IN jack;
(2) Follow the picture and plug in the AC adaptor to the power outlet.
1.4.6 Ethernet connection
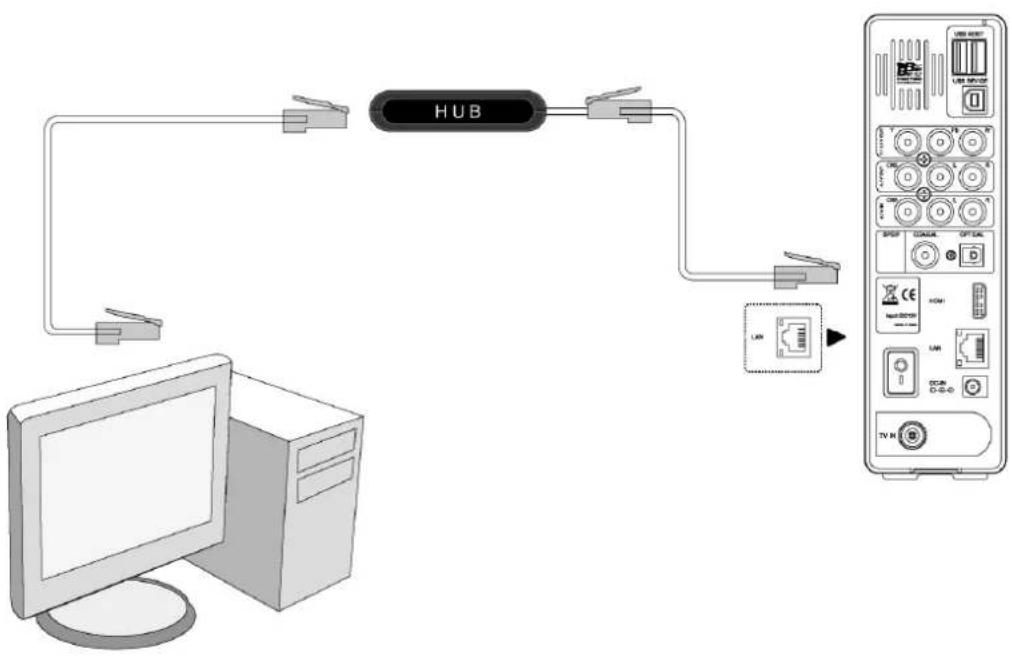
To connect to a LAN (Local Area Network) you require a cat5, cat5e or cat6 network cable.
(1) Connect one of the crystal plugs on the cable to the player's RJ45 LAN socket;
(2) Connect the other crystal plug on the cable to a RJ45 LAN port on your router, switch, or hub devices.
flowchart
graph TD
    A["Computer"] -->|USB Connection| B["HUB"]
    B --> C["TV Screen"]
    D["Computer"] -->|USB Connection| E["USB Interface"]
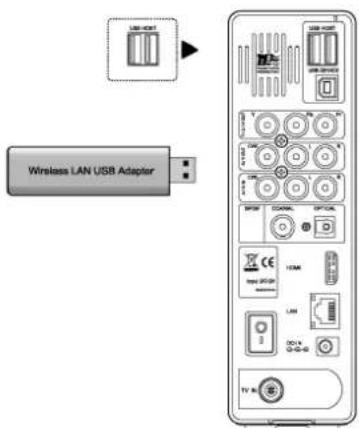
1.4.7 WLAN connection
(1) Make sure the player is powered on;
(2) Plug the Wireless LAN USB Adapter (i.e. Wi-Fi USB Dongle) to the USB HOST port of the player.
For users who bought the player without a HDD inside, and want to install a SATA HDD, please see 'HDD Format' in '7.7 Changing System Settings' for details.
1.5.2 Remote Control
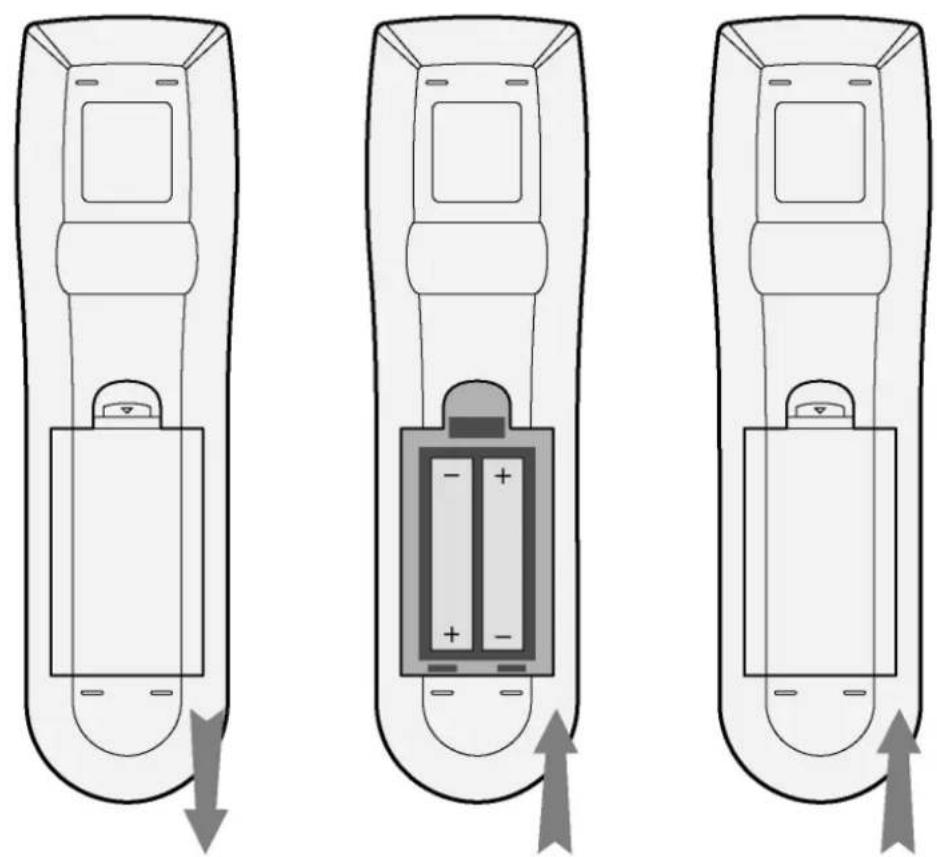
First time usage of Remote control
Install the batteries before using the remote control, installation steps are as the picture shows:
natural_image
Three identical wireframe monitors with battery and indicator lights, shown from top to bottom with arrows indicating motion (no text or symbols)1.5.3 Power on/off, language control
1. Power on
After connecting the power supply cord and turning on the POWER switch, the player will soon enter the main interface, and the POWER indicator on the front panel will turn blue.
2. Power off
When the system is running, press the POWER / STANDBY button on the front panel or remote control, the player will enter standby mode.
3. Language control
The system language of this player can be set to English or other languages. In the setup interface is language setup, the selected language will take effect immediately.
2. About the Player
2.1 Remote Control
All procedures in this manual can be carried out using the remote control buttons. See the following for details on each button and its function:
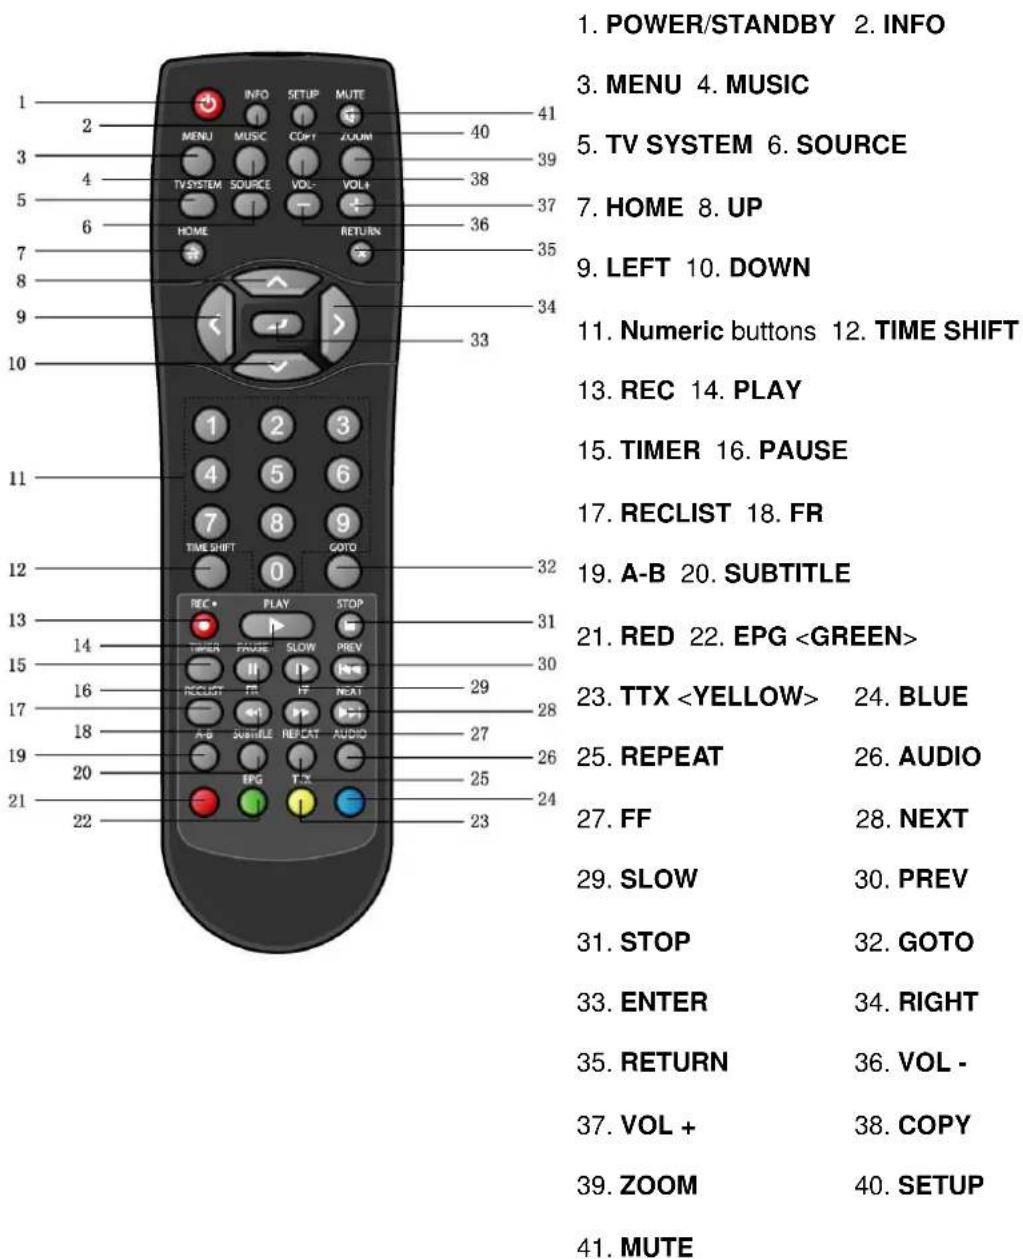
| No. | Name Function | |
| 1 | POWER/STANDBY | POWER / STANDBY button:Press to enter standby mode or wake up. |
| 2 | INFO INFO button: | Press to display current status.Press during playback and an onscreen display appears, showing track number and time elapsed/remaining.Press during recording and an onscreen display appears, showing the recording quality setting and time elapsed.Press during live TV and an onscreen display appears, showing the current channel number and time.Press during time shifting to turn the time shifting bar on/off. |
| 3 | MENU MENU button: | Press to activate tools menus:Press in the browser menu to rename and delete files.Press in My_Shortcuts in NET of the browser menu to add shortcuts for network access. |
| 4 | MUSIC MUSIC button: | Press to start playing music in the playlist. |
| 5 | TV SYSTEM TV SY | STEM button:Press to switch between NTSC, PAL, 480P, 576P, 720P, and 1080I. |
| 6 | SOURCE SOURCE | button:Reserved button. No function has been assigned to it yet. |
| 7 | HOME HOME button: | Press to enter the main interface. |
| 8 | UP UP button: | Press to move the highlight up while navigating menus.Press to switch to the previous channel while watching DVB-T / Analog TV. |
| 9 | LEFT LEFT button: | Press to move the highlight left while navigating menus. |
| 10 | DOWN DOWN button:Press to move the highlight down while navigating menus.Press to switch to the next channel while watching DVB-T / Analog TV. | |
| 11 | Numeric buttons Numeric buttons:Press to enter channel numbers or numeric input when changing settings. | |
| 12 | TIME SHIFT TIME SHIFT button:While in the DVB-T / Analog TV or A/V IN mode, press to activate the time shift function, which allows you to pause live TV and resume the program from the point you left it. While paused, the program is recorded to the internal HDD as long as the space is available.Press to activate the time shift function and wait for the play arrow to appear on the screen.Press the PAUSE button and the program will be paused.Press the PLAY button to resume viewing the program.Time shift mode remains active until you press the STOP button or the TIME SHIFT button again. | |
| 13 | REC REC button: | Press to begin recording or to resume when recording has been paused. Press repeatedly to set one touch recording (OTR) length (30 MIN. / 60 MIN. / 90 MIN. / 120 MIN. / 180 MIN. / 240 MIN. / Off). |
| 14 | PLAY PLAY button: | Press to begin playback. |
| 15 | TIMER TIMER button: | Press to enter the timer menu directly to add, edit and delete recording schedules. |
| 16 | PAUSE PAUSE / STEP button: | |
| Press to pause the current playback.Press again to step to the next frame.Press thePLAYbutton to resume the playback. | ||
| 17 | RECLIST RECLIST | button:Press to enter the playback menu and show the recording list. |
| 18 | FR FAST REWIND | button:Press to fast rewind the current playback. Press repeatedly to select speeds. |
| 19 | A-B A-B button: | Press to set the beginning and end points of a section to repeat. |
| 20 | SUBTITLE SUBTITLE | button:Press to set subtitle options. |
| 21 | RED RED button: | Press to select file while managing the playlist. |
| 22 | EPG | EPGbutton:Press to enter the Electronic Program Guide which displays an on-screen list of programs for the coming week when watching Digital Terrestrial TV.Press to add the selected files to the playlist. |
| 23 | TTX | TTXbutton:Press to open Teletext OSD if it is available in the broadcasted stream of Digital Terrestrial TV. |
| 24 | BLUE BLUE button: | Reserved button. No function has been assigned to it yet. |
| 25 | REPEAT REPEAT | 1/ALLbutton:Press to set repeat option. |
| 26 | AUDIO AUDIO button: | Press to select an audio track. |
| 27 | FF FAST FORWARD | Dbutton:Press to fast forward the current playback. Press repeatedly to select speeds. |
| 28 | NEXT NEXT button: | Press to view the next chapter / file / TV channel. |
| 29 | SLOW | SLOW MOTIONbutton:Press to play back in slow motion. Press the PLAY button to resume regular playback. |
| 30 | PREV PREVIOUS button:Press to view the previous chapter / file / TV channel. | |
| 31 | STOP | STOP button:Press to stop playback. |
| 32 | GOTO | GOTO button:Press to jump to a specific point on a title. Specify the point using Title, Chapter and Time.Press to recall, i.e. switch between the last two viewed channels while watching DVB-T TV. |
| 33 | ENTER | ENTER button:Press to select options in menus. |
| 34 | RIGHT | RIGHT button:Press to move the highlight right while navigating menus. |
| 35 | RETURN | RETURN button:Press to return to the previous screen while navigating menus. |
| 36 | VOL - | VOL - button:Press to decrease the volume. |
| 37 | VOL + | VOL + button:Press to increase the volume. |
| 38 | COPY | COPY button:Press to enter the file copy menu. |
| 39 | ZOOM | ZOOM button:Press to zoom in/out the image (photo or video). |
| 40 | SETUP | SETUP button:Press to enter the setup menu. |
| 41 | MUTE | MUTE button:Press to mute audio output, and press again to resume. |
2.2 Front Panel
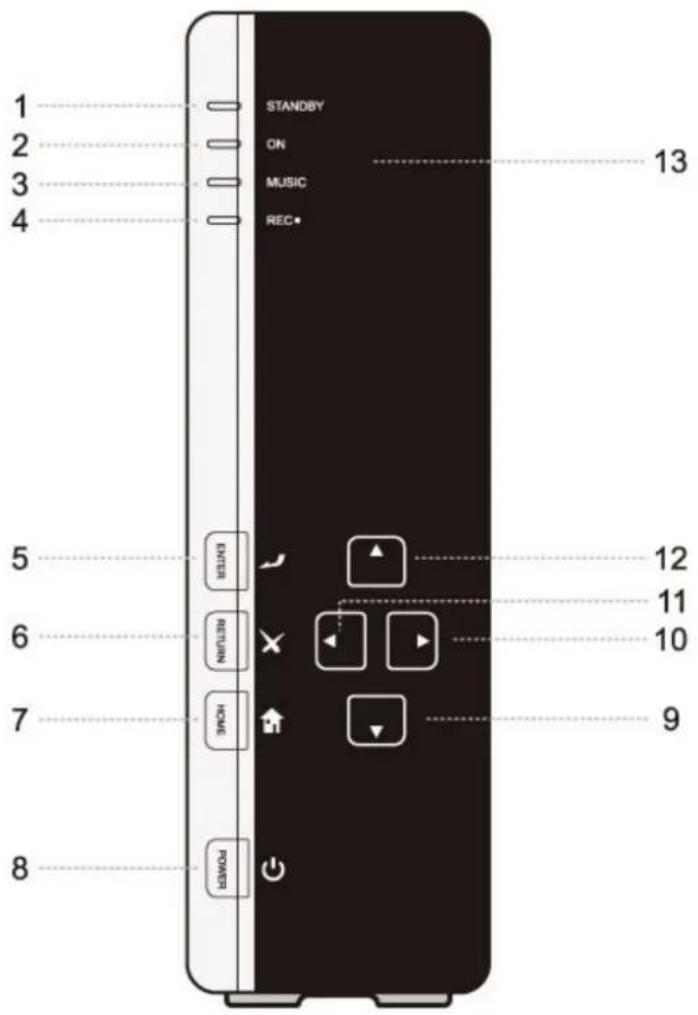
| No. | Name Function | |
| 1 | STANDBY indicator | Indicator (red) turns on when the system is in standby mode. |
| 2 | ON indicator | Indicator (blue) turns on when the system is alive. |
| 3 | MUSIC indicator | Indicator (blue) turns on during music playback. |
| 4 | REC indicator | Indicator (red) turns on when recording starts. |
| 5 | ENTER button | Enter/play. |
| 6 | RETURN button | Cancel/Exit. |
| 7 | HOME button | Press to view the Guide menu. |
| 8 | POWER/STANDBY button | Press to enter standby mode or wake up. |
| 9 | DOWN button | Move the highlight down. |
| 10 | RIGHT button | Move the highlight right. |
| 11 | LEFT button | Move the highlight left. |
| 12 | UP button | Move the highlight up. |
| 13 | Infrared receiver window | Receiving IR signals from the remote control. |
2.3 Rear Panel
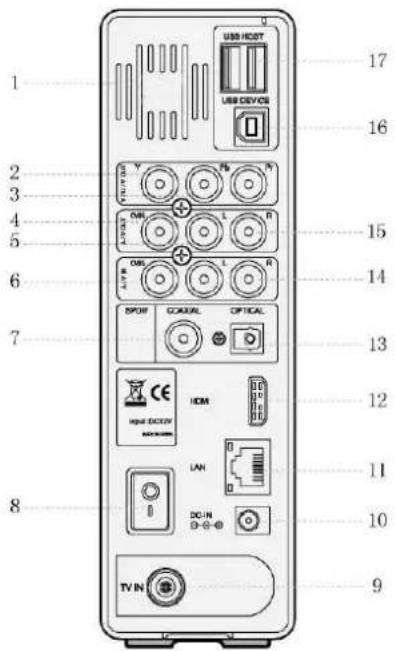
- Air Flow hole
- Y/Pb/Pr OUT jack (Component Video)
- Audio OUT jack (Left Channel)
- Video OUT jack
- Audio IN jack (Left Channel)
- Video IN jack
- S/PDIF Coaxial jack
- POWER switch
- TV / RF IN socket
- DC IN jack
- RJ45 LAN socket
- HDMI jack
- S/PDIF Optical jack
- Audio IN jack (Right Channel)
- Audio OUT jack (Right Channel)
- USB DEVICE port
- USB HOST port x 2
3. Getting Started
Power on the system, and after a few seconds, the system will enter the main interface. To return to this menu, you can also press the HOME button on the remote control.

3.1 Selecting DVB-T TV
In this menu, you can watch and record Digital Terrestrial TV programs, or have the time shift function.
Select the DVB-T icon on the main interface to enter this menu.
3.2 Selecting Analog TV
In this menu, you can watch and record Analog TV programs, or have the time shift function.
Select the Analog TV icon on the main interface to enter this menu.
3.3 Selecting A/V In - Signal from the A/V IN jack
In this menu, you can watch and record audio-visual signal from the A/V IN jack on the rear panel of the unit, or have the time shift function.
Select the A/V In icon on the main interface to enter this menu.
3.4 Selecting Playback – Playback and Edit Recorded Titles
A clip recorded on HDD or USB device is called a title.
In this menu, you can playback the recorded video or TV programs; you can also merge, split, delete, or edit all the recorded titles.
Select the Playback icon on the main interface to access the title list menu.
3.5 Selecting Browser – Playback Multimedia Files
You can browse all the multimedia (Videos/Music/Photos) files on the internal HDD, USB or Network, and playback them on TV.
Press the browser button on the remote control or select the Browser icon on the main interface to browse movie, photo, and music files stored either on a HDD, USB device, or Network.
3.6 Selecting Setup
To enter the setup menu, press the SETUP button on the remote control or select the Setup icon on the main interface.
4. Watching DVB-T & Analog TV programs
Equipped with an internal Hybrid TV Tuner, this player integrates Digital Terrestrial and Analog TV receiving. Please refer to '7.1 Changing DVB-T TV settings' and '7.2 Changing Analog TV settings' in order to make correct settings before reading the following chapters.
4.1 Watching DVB-T TV programs
To enter the DVB-T TV mode, select the DVB-T icon on the main interface.
The following are some functional buttons on the remote control available during watching Digital TV programs.
| Name Function | |
| ENTER | Press to view the program list menu. |
| UP / DOWN | Press to switch channels. (Channels cannot be switched in the recording mode.) |
| PREV / NEXT | |
| Numeric buttons | Press to input channel numbers. Press the ENTER button to confirm. |
| GOTO | Press to switch between the last two viewed channels. |
| REC | Press to start recording the current TV program. |
| TIME SHIFT | Press to activate the time shift function. |
| TIMER | Press to edit scheduled recordings. |
| EPG | Press to activate the EPG menu if available. |
| TTX | Press to activate the Teletext menu if available. |
| SUBTITLE | Press to activate the subtitle list menu if available. |
| ZOOM | Press to zoom out the image. |
4.1.1 Program List Menu
Press the ENTER button when watching DVB-T TV programs, and the program list menu where you can see the program number and name will be displayed.
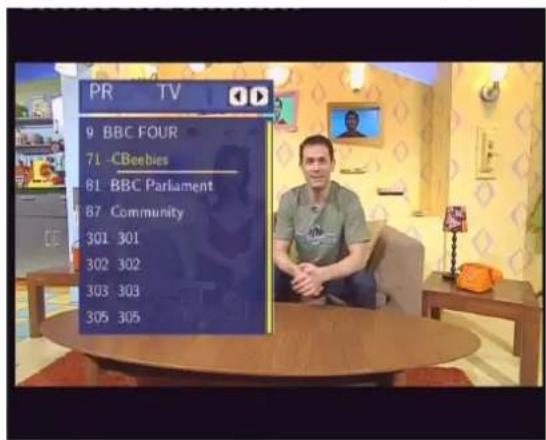
Press the LEFT / RIGHT button to select from TV and Radio. Press the PREV / NEXT button to page up /down. Press the UP / DOWN button to select channels, and press the ENTER
button to confirm.
4.1.2 Info Bar
While switching channels by the UP / DOWN button, an info bar will be displayed to show the channel information.

There're 4 strings displayed on the bar. Taking the info bar in the above photo for example:
11+ – Stands for TV rating;
N/A – Stands for the voice language;
SS – Stands for subtitle;
TT – Stands for Teletext;
SD – Stands for resolution (SD - Standard Definition, HD - High Definition);
When the string looks concave, the option will be available.
4.1.3 Electronic Programming Guide
Press the EPG button when watching DVB-T TV programs, the Electronic Programming Guide will be displayed.
![E ELENTROME PROGRAM G 04 May.08 09.02 Fri 9 BBC TOUR 51 Edition 61 BBC Parlor 52 Community 53 52 Today 3 Sat 6 Sat 7 Mon 8 Tue 9 Wed 10 Thu 09:00 09:30 Big Creek Little Creek 10:30 09:40 (Recovery) 8:00 12:00 The Shry Show 18:00 19:20 Get Scarping 18:30 14:00 Forx TV 10:30 11:00 In the Night Garden The Shry Show G 55 Dogaby the dog, Makka the monkey and Tips the tiger play their own quiz game. Watch the film and answer the questions with them. In this programme, Tips is the quizzer and the theme is building. [S] CHANNEL Date Program](/content/2026/05/1066406/images/2851b834cb32fcb6c3e130e981c55e96d444cd8f61a93ee12c2b72eeeb51b25b.jpg)
Press the PREV / NEXT button to change channels. Press the LEFT / RIGHT button to change date. Press the UP / DOWN button to change program. Press the TIMER button to add / delete scheduled recording.
4.1.4 Teletext Menu
If the broadcasted stream supports Teletext, press the TTX button to enter the Teletext menu.

Press the Navigational and Numeric buttons to view the content in the Teletext menu.
4.1.5 Subtitle List Menu
Press the SUBTITLE button when watching DVB-T TV programs, the Subtitle List menu will be displayed. Press the LEFT / RIGHT button to switch between Subtitle and TTX Subtitle List


Press the UP / DOWN button to select the subtitle, and press the ENTER button to confirm.
4.2 Watching Analog TV programs
To enter the Analog TV mode, select the Analog TV icon on the main interface.
The following are some functional buttons on the remote control available during watching Analog TV programs.
| Name Function | |
| UP / DOWN | Press to switch channels. (Channels cannot be switched in the recording mode.) |
| PREV / NEXT | |
| Numeric buttons | Press to input channel numbers. Press the ENTER button to confirm. |
| REC | Press to start recording the current TV program. |
| TIME SHIFT | Press to activate the time shift function. |
| TIMER | Press to edit scheduled recordings. |
| ZOOM | Press to zoom out the image. |
5. The Title List Menu for Recorded Videos
The Title List menu allows you to play and edit all saved titles. To enter the menu, select the Playback icon on the main interface.

Press the UP / DOWN button on the remote control to select from DVB-T and Analog TV & A/V IN to view and edit recorded DVB-T or Analog TV programs.
5.1 Title List Menu
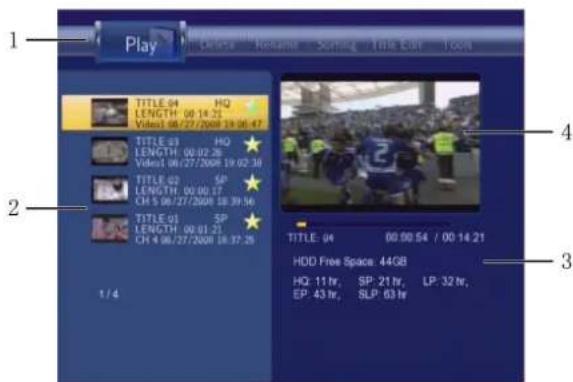
| Number Function Description | ||
| 1 Menu Bar | Press the LEFT / RIGHT button to scroll through the menu.Here you can Play / Delete / Rename / Sort / Edit a recorded title. | |
| 2 Title Lists | Here lists all recorded titles. Here you can see thumbnail / length / quality / recorded channel / recorded date & time of a title.A sign shows this recorded title has not been watched.A sign shows this title is being recorded now. | |
| 3 Information | Here you can see a playback progress bar of a title, the remained free space of HDD, and remained recording time of each quality. | |
| 4 Preview Shows the preview window. | ||
5.2 Playing Back Titles
To play a recorded title, do the following:
- Press the LEFT / RIGHT button on the remote control to select the Play tab from the menu bar.
- Press the UP / DOWN button on the remote control to select the title you wish to play.
- Press the ENTER button on the remote control to play the file.
- Press the STOP or the RETURN button on the remote control to stop playback and return to the Title List menu screen.
5.3 Deleting Titles
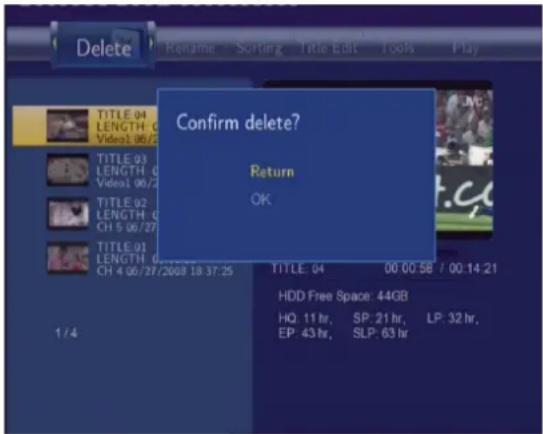
To delete a title, do the following:
- Press the LEFT / RIGHT button on the remote control to select the Delete tab from the menu bar.
- Press the UP / DOWN button on the remote control to select the title you wish to delete.
- Press the ENTER button to confirm and delete the file.
- A confirmation message appears. Press the UP / DOWN button and select OK.
- Press the ENTER button to delete the selected file. To cancel delete, select Return.
5.4 Renaming Titles
To rename a title, do the following:
- Press the LEFT / RIGHT button on the remote control to select the Rename tab from the menu bar.
- Press the UP / DOWN button on the remote control to select the file you wish to rename.
- Press the ENTER button on the remote control. The name entry screen appears.
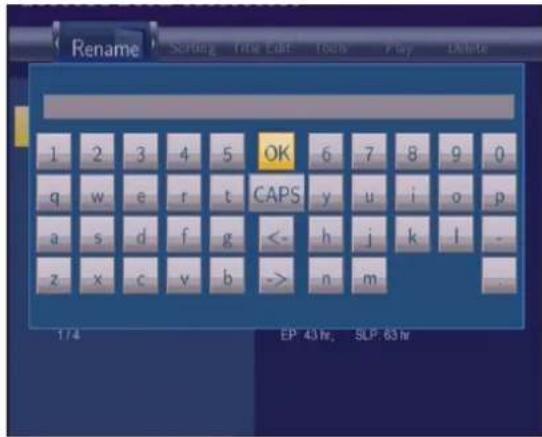
- Press the navigation buttons to select letters and numbers. Select CAPS to toggle between uppercase and lowercase letters. Press <- to delete a letter. Press -> to insert a space. Press the ENTER button to input each letter or number.
- Once you have entered the new name, select OK and press the ENTER button to confirm all changes.
If you want to cancel the renaming during the process, press the RETURN button.
5.5 Sorting Files
Press the LEFT / RIGHT button on the remote control to select the Sorting tab from the menu bar.
Press the ENTER button, and the menu appears.

 | Return | Select to return to the main screen. |
 | Title Number | Select to sort all files according to title numbers. |
 | Recording Time | Select to sort all files according to the length of the recordings |
 | Title Name | Select to sort all files alphabetically, according to title name. |
 | Fresh Titles | Select to sort all files according to freshness (i.e. the most recent recordings), listing the most recent recording first. |
5.6 Title Edit Menu
Press the LEFT / RIGHT button on the remote control to select the Title Edit tab from the menu bar. Press the ENTER button, and the menu appears.

 | Return | Select to return to the main screen. |
 | Set Thumbnail | Select to change a thumbnail of the selected video. Press the UP / DOWN button on the remote control to select Set Thumbnail, an editing screen appears. You can press the FF / FR button to fast forward or fast rewind when searching a proper point. When you reach the point at which you wish to insert a thumbnail, press the LEFT / RIGHT button to select CONFIRM and press the enter button.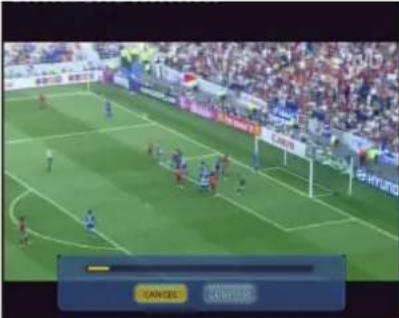 |
 | AB Erase | Delete a specified clip in a title.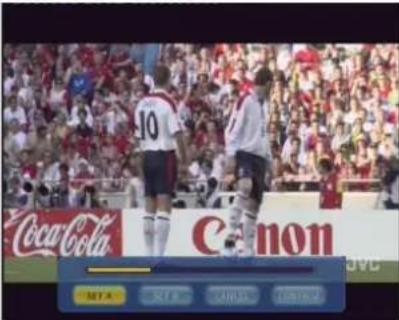 Select SET A and press the ENTER button to mark the start for the section to be deleted. Select SET B and press the ENTER button to mark the end of the section to be deleted. Select CONFIRM and press the ENTER button to delete the section. Select SET A and press the ENTER button to mark the start for the section to be deleted. Select SET B and press the ENTER button to mark the end of the section to be deleted. Select CONFIRM and press the ENTER button to delete the section. |
| Split Title | Select a title and divide it into sections.When you reach the point at which you wish to split the track, press the ENTER button to confirm. | |
| Merge Title | Select more than two titles and combine them into one title. A confirmation message appears. Select CONFIRM to merge the files.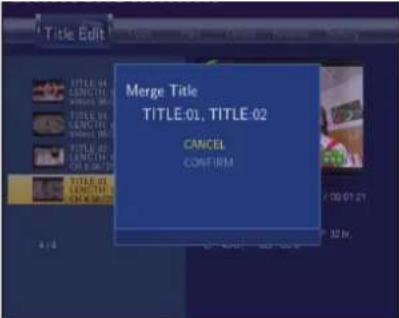 | |
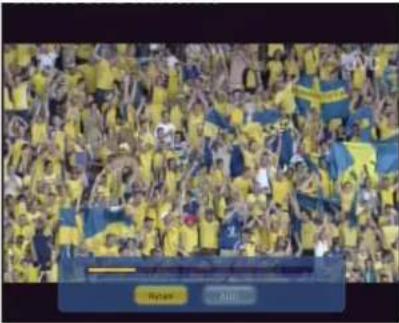
| Add Chapter Mark | Add a chapter mark to the selected file.A chapter mark is a marker inserted into the title. You can jump between marked sections by pressing the PREV / NEXT button on the remote control.An editing screen appears. When you reach the point at which you wish to add the mark, press the ENTER button to confirm. | |
 | ||
 | Remove Chapter Mark | Remove a chapter mark that you have inserted. An editing screen appears. Use the PREV / NEXT button to select the mark you wish to remove and press the ENTER button to delete. 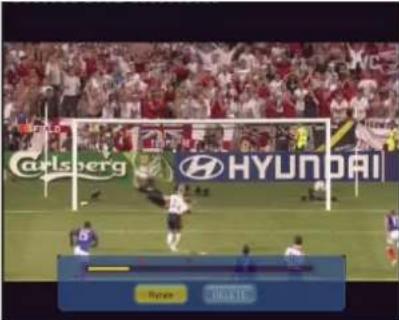 |
 | Copy to FAT32 partition | Copy function. In the Title List Menu, press the UP / DOWN button on the remote control to select which title you want to copy from the UDF partition to the FAT32 partition. |
5.7 Tools
Press the LEFT / RIGHT button on the remote control to select the Title Edit tab from the menu bar. Press the ENTER button and the menu appears.

 | Return | Select to return to the main screen. |
| Delete All Title | Select to delete all titles. |
5.8 Saving Your Recorded Titles
All the recorded titles are stored temporarily in a recording disc partition (UDF format) which cannot be identified by personal computers. If you want to share the recorded titles on your computer, please copy the titles from the recording disc to the multimedia disc which is in FAT32 format first. See Copy to FAT32 partition in '5.6 Title Edit Menu' for more details.
6. Timer Record Menu
The Timer Record menu allows you to create, edit and delete recording schedules and view all schedule status and history. Press the TIMER button on the remote control to enter the menu.
6.1 Create a New Schedule
Press the LEFT / RIGHT button on the remote control to select the Edit tab from the menu bar. Select Add a New Schedule and press the ENTER button. The schedule setting screen appears.

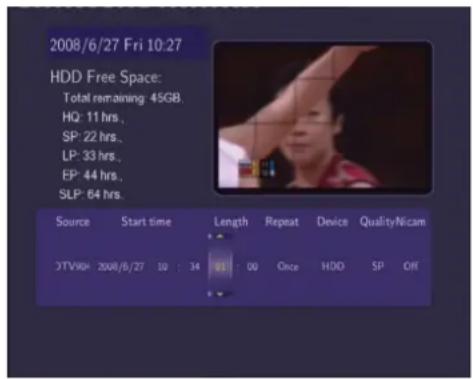
Use the LEFT / RIGHT button on the remote control to move between fields and press the UP / DOWN button to adjust each setting.
| Source | Select the video source or TV channels for the recording. |
| Start Time | Enter the date and time of the recording. |
| Length | Enter the length of the recording |
| Repeat | Select how often you want the schedule to record. Choose from Once, Everyday, Mon-Fri, Mon-Sat or for an individual day of the week. |
| Quality | Select the recording quality. Choose from HQ, SLP, EP, LP and SP.The higher the quality, the more space required on the hard drive. See HDD Free Space on the left of the screen for details of how long you can record for using each setting. |
| Preview | This small preview window will show the current program of the selected channel. |
6.2 Editing Schedule
Press the LEFT / RIGHT button on the remote control to select the Edit tab from the menu bar.
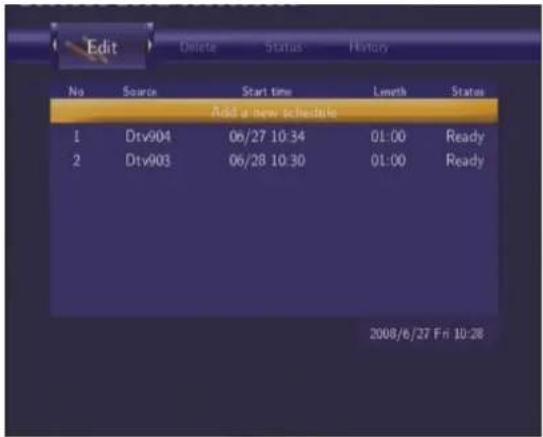
Select the schedule you want to edit from the list and press the ENTER button. The schedule setting screen appears. Modify the schedule as described in '6.1 Creating a New Schedule'.
6.3 Deleting Schedules
Press the LEFT / RIGHT button on the remote control to select the Delete tab from the menu bar.
Select the schedule you want to delete and press the ENTER button. A confirmation message appears.

Select CANCEL, Delete the selected schedule, or Delete all schedules. Press the ENTER button to confirm.
6.4 Viewing Schedule Status
Press the LEFT / RIGHT button on the remote control to select the Status tab from the menu bar.
The schedule list is displayed. Select a schedule and press the ENTER button.
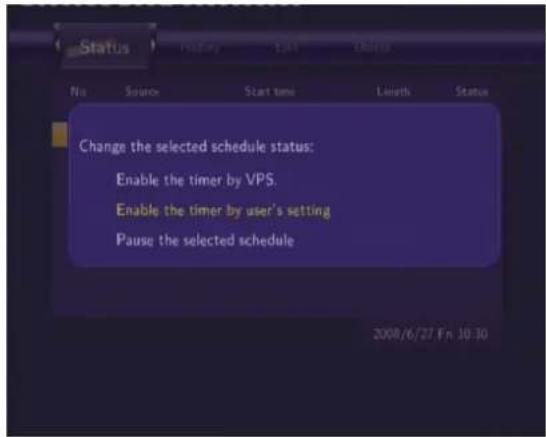
Select Enable the timer by VPS, Enable the timer by user's setting or Pause the selected schedule. Press the ENTER button to confirm.
6.5 Viewing Recording History
Press the LEFT / RIGHT button on the remote control to select the History tab from the menu bar.
Here you can view a complete history of all recordings that were set.
| Result | Source | Start time | Length | Device |
| OK | Video1 | 07/28 12:56 | 00.05 | HDD |
| OK | Video1 | 07/28 13:05 | 00.05 | HDD |
| OK | Dtv902 | 07/28 14:40 | 00.02 | HDD |
| OK | Dtv903 | 07/28 14:45 | 00.01 | HDD |
| OK | Dtv901 | 07/28 15:00 | 00.05 | HDD |
7. Setup Menu
The setup menu allows you to configure DVB-T / Analog TV, Video, Audio, Record, Network and System settings. To enter the menu, press the SETUP button on the remote control.
7.1 Changing DVB-T TV settings
Press the LEFT / RIGHT button on the remote control to select the DVB-T tab from the menu bar.
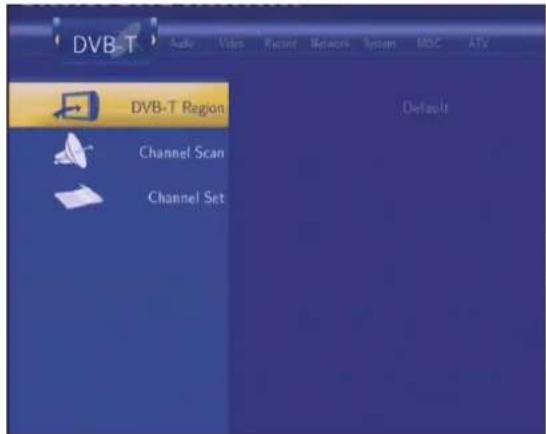
| DVB-T Region | Select to set the region for Digital Terrestrial TV. Press the UP / DOWN button to select, and the ENTER button to confirm. Press the UP / DOWN button to select, and the ENTER button to confirm. |
| Channel Scan | Select to scan for available Digital Terrestrial TV channels. Press the UP / DOWN button to select from AUTO SCAN and MANUAL SCAN, and press the ENTER button to confirm. Press the UP / DOWN button to select from AUTO SCAN and MANUAL SCAN, and press the ENTER button to confirm. |
| AUTO SCAN |
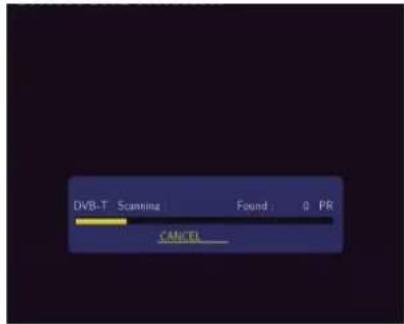
In AUTO SCAN mode, the system will automatically scan for available DVB-T TV channels.
MANUAL SCAN
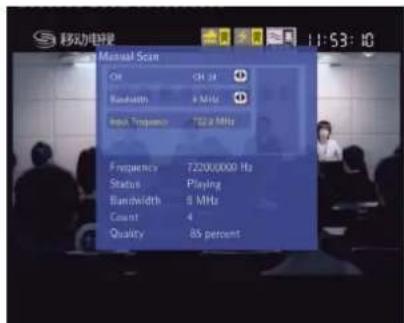
In MANUAL SCAN mode, you can select the CH name, Bandwidth, and Input Frequency. Use the Navigational and Numeric buttons on the remote control to select or input. Press the ENTER button to confirm.
Channel Set
Select to edit channel information.

Press the UP / DOWN button to select DVB-T, and press the ENTER button to confirm.

In this menu, you can edit the Name, and sequence for the DVB-T TV channels. Use the Navigational buttons to select and modify the
| settings, and press the ENTER button to confirm. You can also press the RED button to select Default, and press the BLUE button to select Sort. |
7.2 Changing Analog TV settings
Press the LEFT / RIGHT button on the remote control to select the ATV tab from the menu bar.

| Analog TV Region | Select to set the region for Analog TV. Press the UP / DOWN button to select, and the ENTER button to confirm. Press the UP / DOWN button to select, and the ENTER button to confirm. |
| Channel Scan | Select to scan for available Analog TV channels.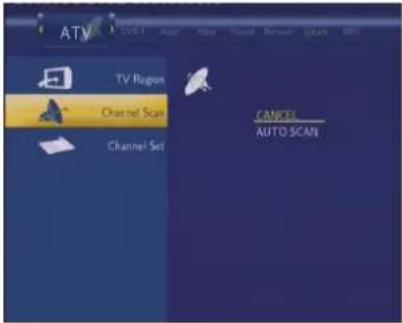 Press the UP / DOWN button to select from AUTO SCAN, and press the ENTER button to confirm. Press the UP / DOWN button to select from AUTO SCAN, and press the ENTER button to confirm. In this menu, the system will automatically scan for available Analog TV channels. In this menu, the system will automatically scan for available Analog TV channels. |
| Channel Set | Select to edit channel information.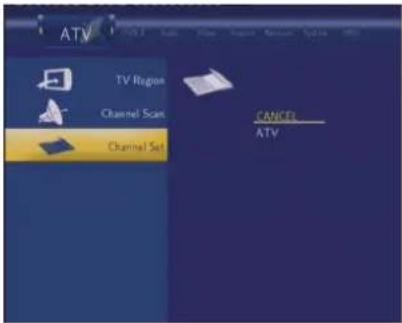 Press the UP / DOWN button to select Analog TV. Press the UP / DOWN button to select Analog TV. |
 In this menu, you can edit the Status, Name, Fine Tune, TV System, and sequence for the Analog TV channels. Use the navigational buttons to select and modify the settings, and press the ENTER button to confirm. In this menu, you can edit the Status, Name, Fine Tune, TV System, and sequence for the Analog TV channels. Use the navigational buttons to select and modify the settings, and press the ENTER button to confirm. |
7.3 Changing Video Settings
Press the LEFT / RIGHT button on the remote control to select the Video tab from the menu bar.

Aspect Ratio
Select to set aspect ratio.

Press the UP / DOWN button to select from Pan Scan 4:3, Letter Box 4:3, or 16:9. Press the ENTER button to confirm.
Pan Scan 4:3: Display a wide picture on the entire screen and cuts off the redundant portions. Select when a standard 4:3 TV is connected.
Letter Box 4:3: Display a wide picture with two black borders on the top and bottom of 4:3 screen. Select when a standard 4:3 TV is connected.
16:9: Compress the image to convert the whole image. Select when a 16:9 TV is connected.
| Brightness | Select to set brightness levels. Press the UP / DOWN button to adjust brightness. The new setting is previewed on screen. Press the ENTER button to confirm. Press the UP / DOWN button to adjust brightness. The new setting is previewed on screen. Press the ENTER button to confirm. |
| Contrast | Select to set contrast levels. Press the UP / DOWN button to adjust contrast. The new setting is previewed on screen. Press the ENTER button to confirm. Press the UP / DOWN button to adjust contrast. The new setting is previewed on screen. Press the ENTER button to confirm. |
| TV System | Select to adjust TV system. Press the UP / DOWN button to set the TV system, depending on your viewing preferences. Press the ENTER button to confirm. Press the UP / DOWN button to set the TV system, depending on your viewing preferences. Press the ENTER button to confirm. |
7.4 Changing Audio Settings
Press the LEFT / RIGHT button on the remote control to select the Audio tab from the menu bar.

| Night Mode | Select to set night mode.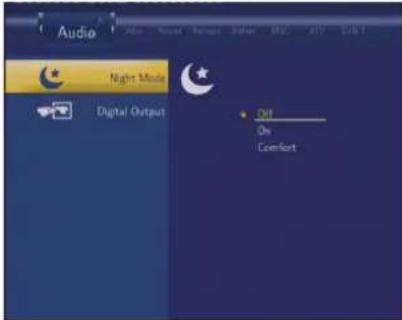 Press the UP / DOWN button to select from Off, On, and Comfort. Press the ENTER button to confirm. Press the UP / DOWN button to select from Off, On, and Comfort. Press the ENTER button to confirm. |
| Digital Output | Select to set Digital Output (S/PDIF) mode. Press the UP / DOWN button to select from RAW, and LPCM. Press the ENTER button to confirm. Press the UP / DOWN button to select from RAW, and LPCM. Press the ENTER button to confirm. |
7.5 Changing Record Settings
Press the LEFT / RIGHT button on the remote control to select the Record tab from the menu bar.
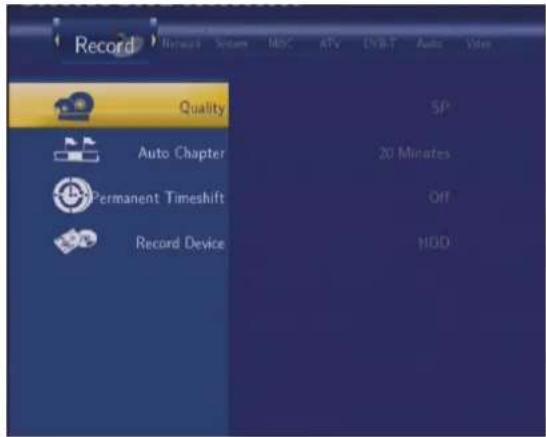
| Quality | Select to set the default recording quality setting. |
 | |
| Press the UP / DOWN button to select the quality setting you require.The highest quality setting is HQ which requires the most storage space. The other settings reduce recording quality sequentially but also require less storage space. Press the ENTER button to confirm. | |
| Auto Chapter | Select to add chapter marks automatically at set intervals. |
 | |
| Press the UP / DOWN button to select the interval you require. An automatic chapter mark will be added at each interval, allowing you browse titles easily after recording. Press the ENTER button to confirm. | |
| Permanent Timeshift | Select to set Time Shift mode. Press the UP / DOWN button to select from On and Off. Press the ENTER button to confirm. If On, the time shift will start automatically while in Video In mode. Press the UP / DOWN button to select from On and Off. Press the ENTER button to confirm. If On, the time shift will start automatically while in Video In mode. |
| Record Device | Select to set device to restore the recorded files. Press the UP / DOWN button to select from HDD and USB. Press the ENTER button to confirm. Press the UP / DOWN button to select from HDD and USB. Press the ENTER button to confirm. |
7.6 Changing Network Settings
Press the LEFT / RIGHT button on the remote control to select the Network tab from the menu bar.
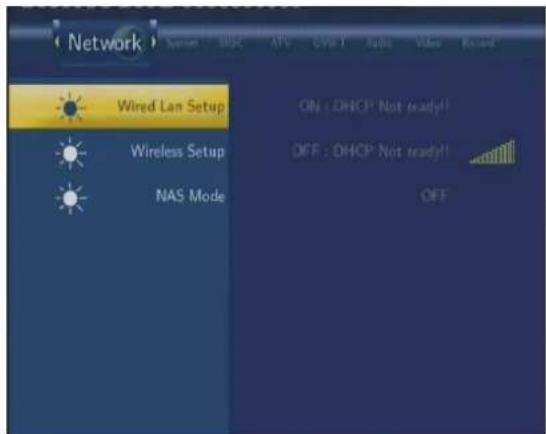
| Wired LAN Setup | Select to set the Ethernet settings.Before using the network functions, please check following items:1) Connect the player to network first;2) Please enable NetBIOS of TCP/IP on computer;3) Please turn off your PC's firewall;4) Please enable your PC's 'Guest' account;5) Please share the folders which you wish to browse on your PC, and make sure that 'Everyone' or 'Guest' has the right to access. Press the UP / DOWN button to select DHCP (AUTO) or FIXED IP (MANUAL). Press the ENTER button to confirm. Press the UP / DOWN button to select DHCP (AUTO) or FIXED IP (MANUAL). Press the ENTER button to confirm. |
DHCP (AUTO)Set the IP address by auto. Press the ENTER button to confirm. Press the ENTER button to confirm. | |
FIX IP (MANUAL)Using Fixed IP, it is required to enter the followings: IP Address Subnet Mask, and Default Gateway. For further assistance tothe above settings, please contact the network administrator.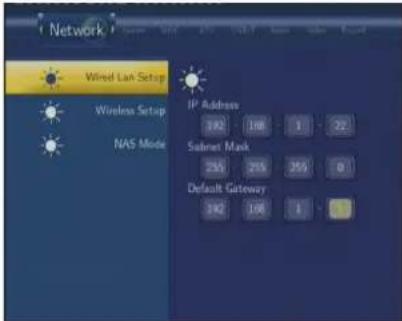 Use Navigational and Numeric buttons to enter IP address.Press the ENTER button to confirm. Use Navigational and Numeric buttons to enter IP address.Press the ENTER button to confirm. | |
| Wireless Setup | Before configuring the WLAN settings, please check the following:1) Make sure the WLAN USB Adapter is connected to the USB HOST port;2) Make sure there is a wireless router or an AP (Access Point) on |
the network, or your PC is equipped with a wireless network adapter/card;
3) Make sure your player is in the effective range of the WLAN.
Select a connection profile.
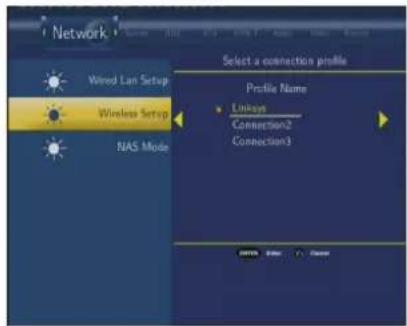
Press the ENTER button to rename for the profile. Press the RIGHT button for next step. And then select Modify if it is your first time to connect to a wireless network.

There appear two connection modes: Infrastructure (AP) mode and Peer to Peer (Ad Hoc) mode.

Press the LEFT button to cancel, and the RIGHT button for next step. Press the UP / DOWN button to select items, and the ENTER button to confirm.
Infrastructure (AP)
Infrastructure mode is used to connect computers with wireless network adapters, also known as wireless clients, to an existing wired network with the help from wireless router or access point.
1) Get SSID Name
Select Auto to search for an existing SSID (Service Set Identifier).
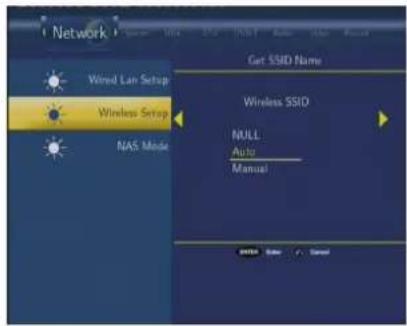
Select the access point you wish to access from the SSID list.

Note: In the Security list, WEP (Wired Equivalent Privacy) and WPA (Wi-Fi Protected Access) means the network is encrypted, i.e. an encryption key is needed to access the network. NONE means it is an open system network.
2) Confirm SSID Name
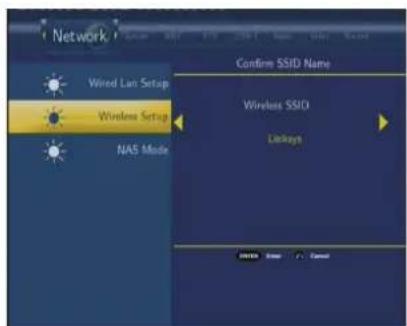
3) WLAN Security Setting
Select Open System if the network is not encrypted. Otherwise, select Shared Key (WEP) or WPA Key to enter the encryption key.

4) Wireless Address Setup
Select DHCP IP (AUTO) to set the IP address automatically. Or select FIX IP (MANUAL) to set the IP address manually.
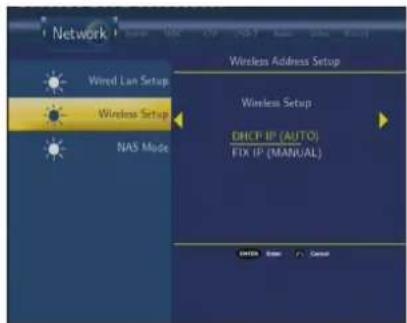
5) Setting List
The Setting List displays the network settings just now you configured.
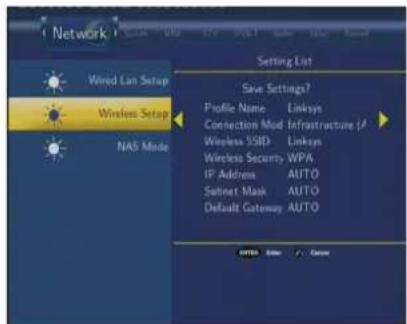
6) Test Connection
The test will take for a while, please be patient to wait.

If the test is ok, the network information will be displayed.

Peer to Peer (Ad Hoc)
Peer to Peer mode, which is also called Ad Hoc mode or computer-to-computer mode, is used to connect wireless clients directly together, without the need for a wireless router or access point.
1) Ad Hoc Setup
Select Manual if you wish to change the default settings.
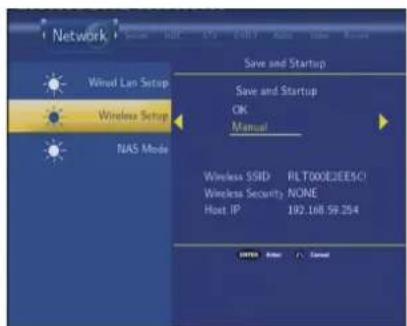
Then set the Wireless SSID, Wireless Security, and Host IP for the Ad Hoc connection.

Note: Both the player and your PC need to use the Ad Hoc mode, share a common SSID, and be put into the same IP range.2) Save and StartupSelect OK to confirm the above settings.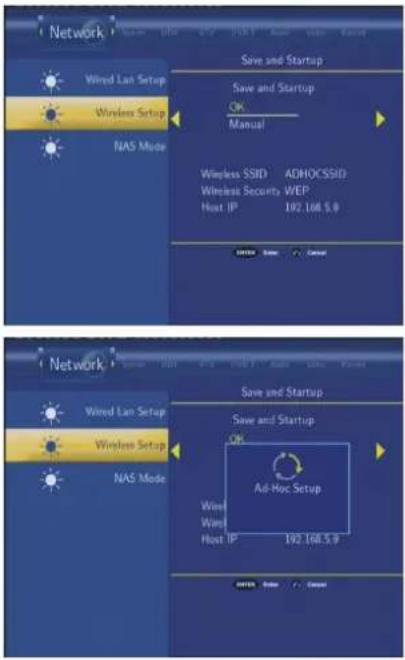 If the test is ok, the network information will be displayed. If the test is ok, the network information will be displayed.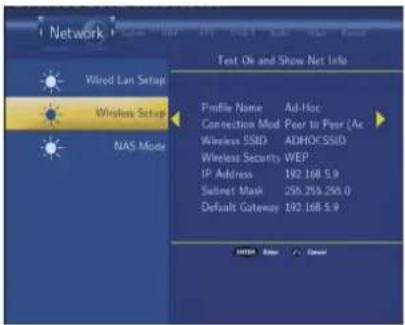 | |
| NAS Mode | Select to turn the NAS mode on / off. Press the UP / DOWN button to select from Off, and On. Press the ENTER button to confirm. Press the UP / DOWN button to select from Off, and On. Press the ENTER button to confirm. |
7.7 Changing System Settings
Press the LEFT / RIGHT button on the remote control to select the System tab from the menu.

| Menu Language | Select to choose the OSD (On Screen Display) language.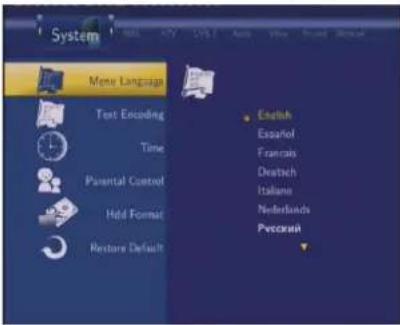 Press the UP / DOWN button to select the language. Press the ENTER button to confirm. Press the UP / DOWN button to select the language. Press the ENTER button to confirm. |
| Text Encoding | Select to set text encoding. Press the UP / DOWN button to select from Unicode, Chinese GBK, BIG5, and etc. Press the ENTER button to confirm. Press the UP / DOWN button to select from Unicode, Chinese GBK, BIG5, and etc. Press the ENTER button to confirm. |
| Time | Select to set the system time. |

Press the UP / DOWN button to select from Manual and Auto (via TV). Press the ENTER button to confirm.
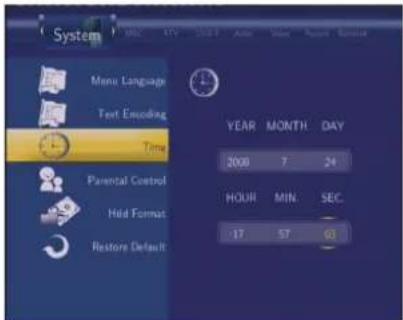
Press the LEFT / RIGHT button to select each field and the UP / DOWN button to adjust each setting. Press the ENTER button to confirm.
Parental Control
Select to set the TV parental control options.

Lock System

Press the UP / DOWN button to turn on or off the parental system. Press the ENTER button to confirm.

A password will be needed for the modification. The default one is '0000'. Press the Numeric buttons to input, and the ENTER button to confirm.
Region

Press the UP / DOWN button to select the region. Press the ENTER button to confirm.
Password

Press the Numeric buttons to input and change the password. Press the ENTER button to confirm.
TV Rating
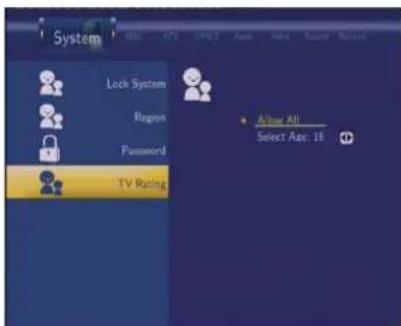
Press the Navigational buttons to select. Press the ENTER button
| to confirm, and the RETURN button to exit. | |
| HDD Format | Select to format the HDD.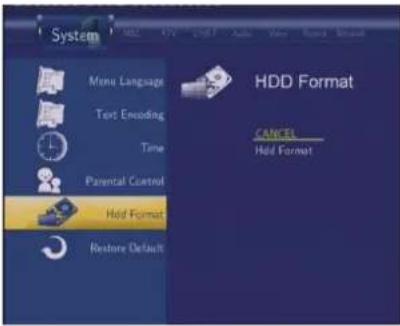 Press the UP / DOWN button to select HDD Format. Press the ENTER button to confirm. Press the UP / DOWN button to select HDD Format. Press the ENTER button to confirm. |
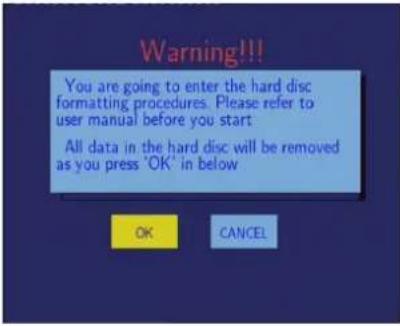 Press the LEFT / RIGHT button to select OK. Press the ENTER button to confirm. Press the LEFT / RIGHT button to select OK. Press the ENTER button to confirm. | |
 Press the UP / DOWN button to adjust the capacity of time shift buffer. Press the LEFT / RIGHT button to select Next, and the ENTER button to confirm. Press the UP / DOWN button to adjust the capacity of time shift buffer. Press the LEFT / RIGHT button to select Next, and the ENTER button to confirm. | |
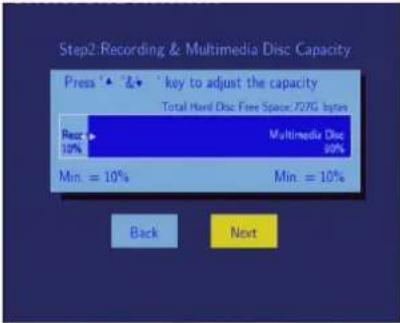 Press the UP / DOWN button to adjust the capacities of recording and multimedia partitions. Press the LEFT / RIGHT button to selectNext, and the ENTER button to confirm. Press the UP / DOWN button to adjust the capacities of recording and multimedia partitions. Press the LEFT / RIGHT button to selectNext, and the ENTER button to confirm. | |
 Press the UP / DOWN button to adjust the capacities of FAT32 and NTFS partitions. Press the LEFT / RIGHT button to select Next, and the ENTER button to confirm. Press the UP / DOWN button to adjust the capacities of FAT32 and NTFS partitions. Press the LEFT / RIGHT button to select Next, and the ENTER button to confirm. | |
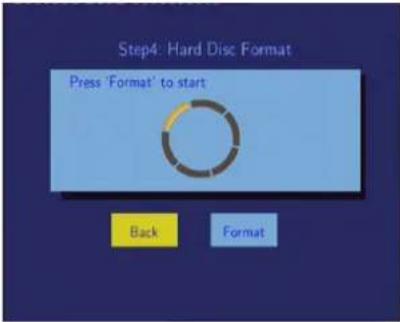 Press the LEFT / RIGHT button to select Format. Press the ENTER button to confirm. And the formatting will start, which will take for several minute, please be patient to wait. Press the LEFT / RIGHT button to select Format. Press the ENTER button to confirm. And the formatting will start, which will take for several minute, please be patient to wait. | |
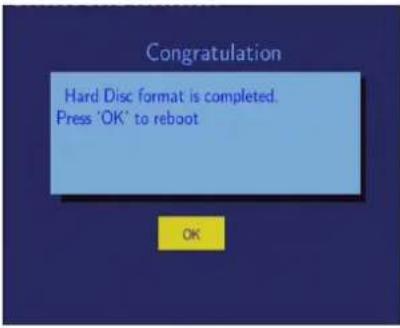 When formatting is completed, press the ENTER button to reboot. When formatting is completed, press the ENTER button to reboot. | |
| Restore Default | Select to restore factory defaults. A confirmation message appears. Select OK and press the ENTER button to restore all settings to defaults. A confirmation message appears. Select OK and press the ENTER button to restore all settings to defaults. |
7.8 Miscellaneous
Press the LEFT / RIGHT button on the remote control to select the MISC tab from the menu.

| Slide Show Timing | Select to set the interval time for photo slide show.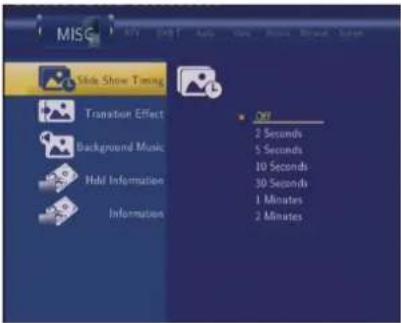 Press the UP / DOWN button to select. Press the ENTER button to confirm. Press the UP / DOWN button to select. Press the ENTER button to confirm. |
| Transition Effect | Select to set the transition effect for photo slide show. Press the UP / DOWN button to select. Press the ENTER button to confirm. Press the UP / DOWN button to select. Press the ENTER button to confirm. |
| Background Music | Select to set the background music options while view pictures. Press the UP / DOWN button to select from off, Folder, and All. Press the ENTER button to confirm. Press the UP / DOWN button to select from off, Folder, and All. Press the ENTER button to confirm. |
| HDD Information | Select to view the HDD capacities. The capacities of the recording, time shift and multimedia partitions are listed here. Press the ENTER button to confirm. The capacities of the recording, time shift and multimedia partitions are listed here. Press the ENTER button to confirm. |
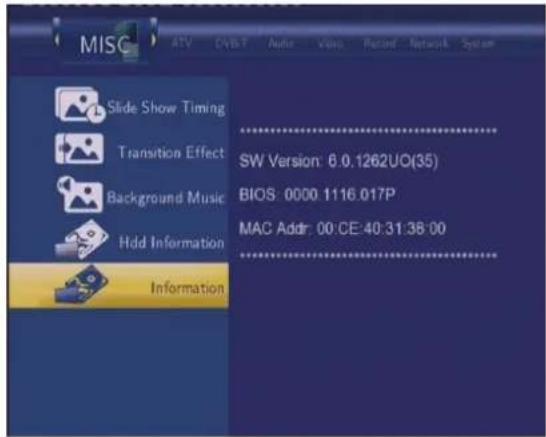
| Information | Select to view the system information. The version of the firmware, BIOS, and the MAC Address, etc. are listed here. Press the ENTER button to confirm. The version of the firmware, BIOS, and the MAC Address, etc. are listed here. Press the ENTER button to confirm. |
8. Browser Menu
The Browser menu allows you to browse and play music, photo and movie files stored on a HDD, an external USB device, and Network. To enter the menu, select the Browser icon from the main interface
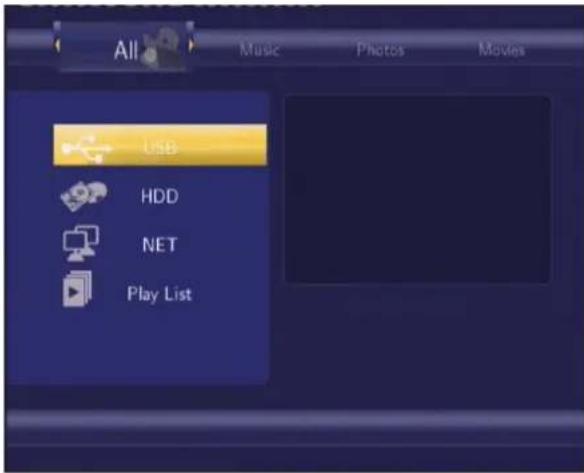
Press the UP / DOWN button to select the device on which the media is stored. Choose from USB, HDD, NET, Playlist, and press the ENTER button.
When data on HDD, USB device is connected or connect the system to network, you can also browse photos, listen to music, and watch movies.
8.1 Browsing All
Use the LEFT / RIGHT button on the remote control to select the All tab.

All directories and supported contents will be displayed. Press the UP / DOWN button to select the directory or file you wish to browse, and press the ENTER button to confirm.
8.2 Browsing Music
Use the LEFT / RIGHT button on the remote control to select the Music tab.

All directories and supported audio files in current directory will be displayed. Press the UP / DOWN button to select the file you want to play and press the ENTER button.
8.3 Browsing Photos
Use the LEFT / RIGHT button on the remote control to select the Photos tab.
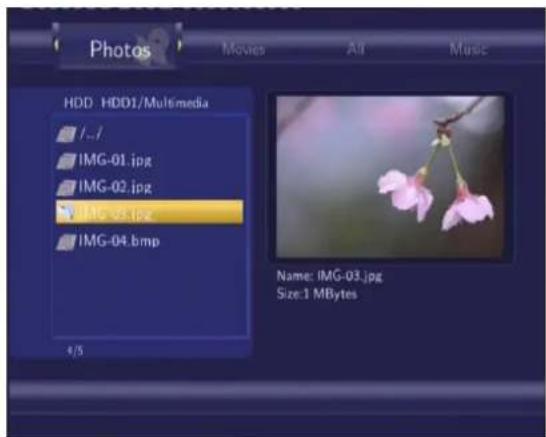
All directories and supported image files in current directory will be displayed. Press the UP / DOWN button to select the photo you want to view and press the ENTER button. The photo will be displayed full screen.
Note:
- When the photo is displayed in full screen mode, the slide show starts automatically.
- While listening to music files, you can browse the photos at the same time.
While browsing a photo, you can press the LEFT / RIGHT button to rotate a photo in any angle. Besides rotating a photo, you can press the ZOOM button to zoom in/out that photo. Four zoom levels are available.
8.4 Browsing Movies
Use the LEFT / RIGHT button on the remote control to select the Movies tab.
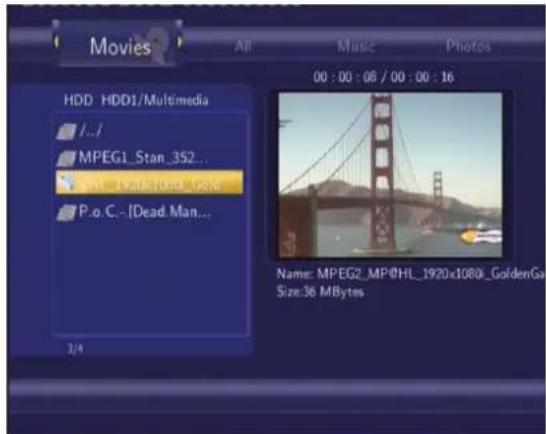
All directories and supported video files in current directory will be displayed. Press the UP / DOWN button to select the movie you want to view and press the ENTER button. The movie will be played in full screen mode.
This browsing movies function supports DAT, VOB, IFO, MPG, AVI, and TS file formats.
While browsing a movie in full screen mode, you can press the ZOOM button to zoom in/out the image. Four zoom levels are available.
8.5 Browsing via Network
You can streaming playback the multimedia files shared on the local area network (Ethernet or WLAN).
Before viewing the following, please make sure that you have read 7.6 Changing Network Settings and made the right settings.
When selecting NET in the Browser menu, there are two ways to locate the multimedia files shared on your local network. One way is to browse through workgroup; the other way is to browse through 'My Shortcuts'.

8.5.1 Browsing through Workgroup
You can choose the workgroup which your PC belongs to from the workgroup list, find your PC name, and press the ENTER button to confirm.
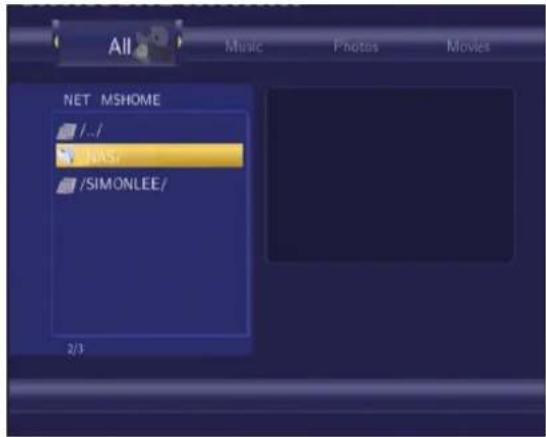
Then select the shared multimedia file that you want to browse.
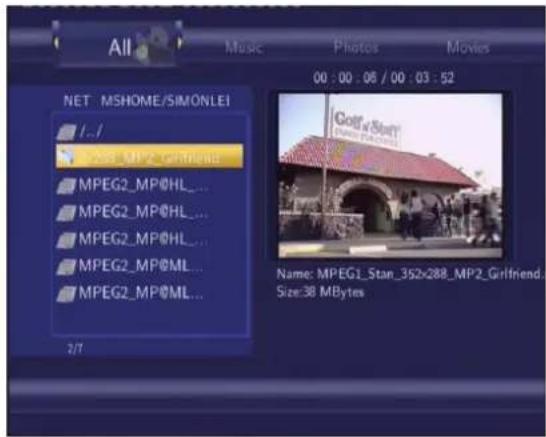
Note:
- While browsing high definition video files (resolution up to 720p / 1080i / 1080p) via Ethernet or WLAN, the video might be buffering. It is normal due to the limit of network speed or signal strength.
- Due to different network conditions, sometimes the workgroup might not be accessed or shown in the list. And then you need to use 'My_Shortcuts' to browse shared files.
8.5.2 Browsing through 'My\_Shortcuts'
You can also set 'Specific File Server IP' and access it from 'My_Shortcuts' in the menu. Press the MENU button and a tools menu appears.
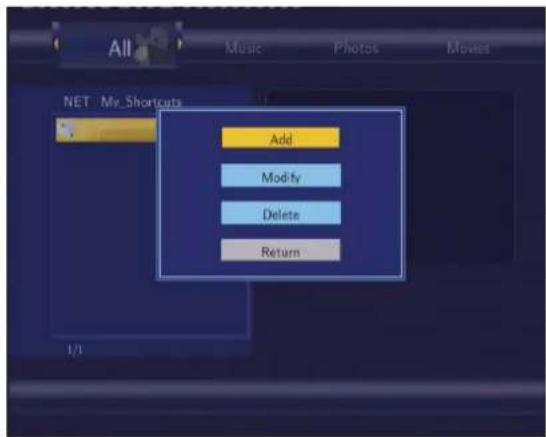
| Network Browser | Select to set Net User ID, Net Password, and Specific File Server IP, which enables to browse files on NET through ‘My_Shortcuts’. |
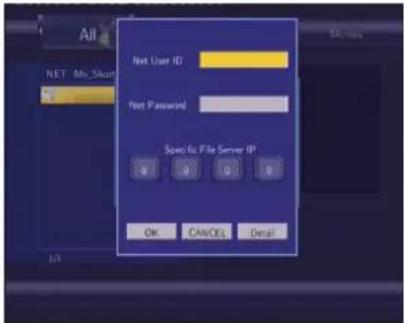 | |
 | |
| Select Net User ID and the entry screen will appear. Press theNavigationbuttons to select letters and numbers. SelectCAPSto toggle between uppercase and lowercase letters. Press<-to delete a letter. Press -> to insert a space. Press theENTERbutton to input each letter or number. SelectOKand press theENTERbutton to confirm all changes. | |
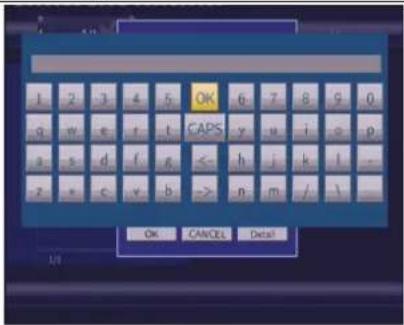 | |
| Select Net Password and the entry screen will appear. See above. | |
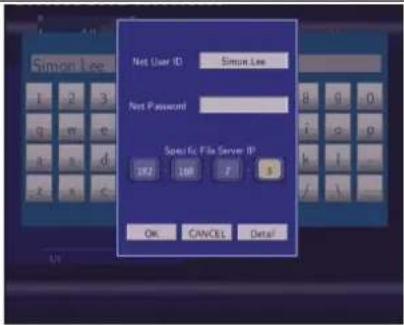 | |
| Select Specific File Server IP, and useNavigationalandNumeric buttons to enter IP address. |
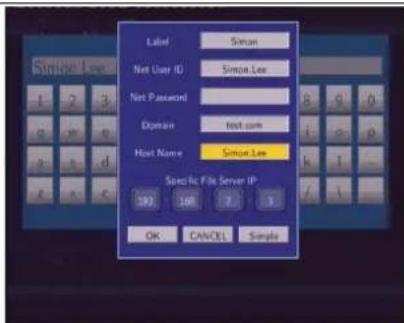
You can also select Detail to set the Label, Domain, and Host Name of the shortcut. Then select OK and press the ENTER button to confirm.
Select the shortcut you added and press the ENTER button to confirm.

Then select the shared multimedia file that you want to browse.
8.6 Renaming / Deleting Files
When navigating in the browser menu, you can press the MENU button to activate a popup menu where you can rename and delete files or folders.
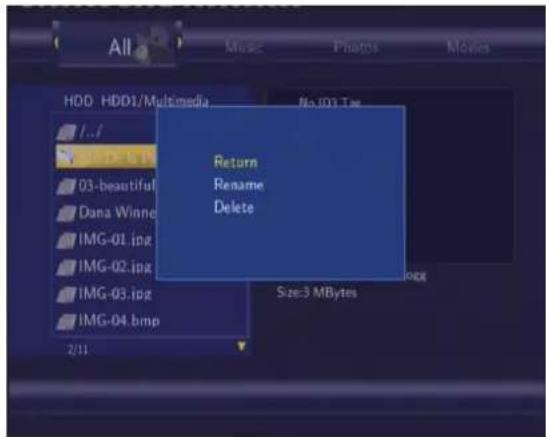
Press the UP / DOWN button to select from Return, Rename, and Delete. And press the ENTER button to confirm.
8.6.1 Renaming Files

Press the Navigation buttons to select letters and numbers. Select CAPS to toggle between uppercase and lowercase letters. Press <- to delete a letter. Press -> to insert a space. Press the ENTER button to input each letter or number. Select OK and press the ENTER button to confirm all changes.
8.6.2 Deleting Files

Press the UP / DOWN button to select OK. And press the ENTER button to confirm the deleting operation. Or select Return to cancel.
Note: Partitions of NTFS file system format on the hard disc drive might be read-only.
8.7 Managing the Playlist
This player supports the playlist function, which allows you to add your favorite content to the playlist, and enjoy them at any time.
8.7.1 Adding files to the playlist
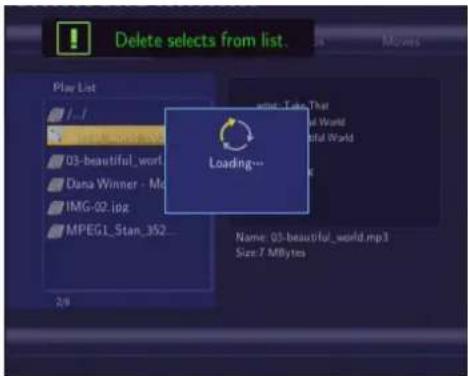
Select the favorite file you wish to add, press the RED button on the bottom of the remote control, and the file will be ticked. Press the GREEN button on the bottom of the remote control to confirm, and then an on-screen message 'Add selects to list' will be shown. Multiple
selections are allowed. See photo below.


8.7.2 Browsing the playlist
Press the UP / DOWN button to select Play List in the browser menu. And press the ENTER button to confirm. Then you will enter the playlist.

If you wish to delete a file from the playlist, press the RED button to select, and then press the GREEN button to confirm.

9. File Copy Menu
Press the COPY button on the remote control to enter the File Copy menu, which allows you to copy files between HDD, USB devices, and Network.
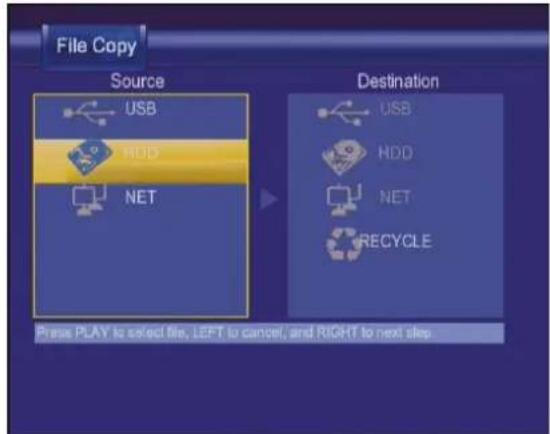
Step 1: Select the source device and destination device.

Press the UP / DOWN button to select device. Press the LEFT button to cancel, and the RIGHT button for next step.
Step 2: Select the source files you want to copy.

Press the PLAY button to select files, the LEFT button to cancel, and the RIGHT button to next
step.
Step 3: Select the destination folder to store the above files.

Press the UP / DOWN button to select folder. Press the LEFT button to cancel, and the RIGHT button for next step.
Step 4: Proceed to copy selected files.
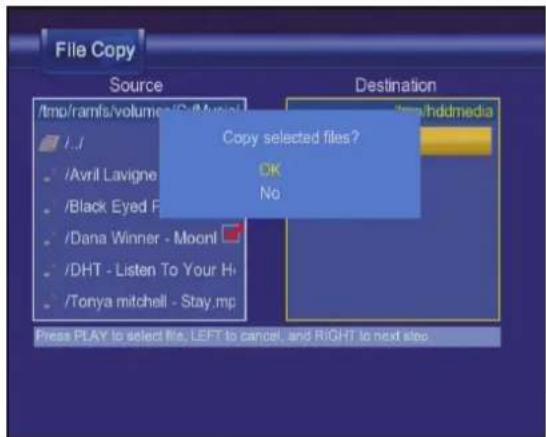
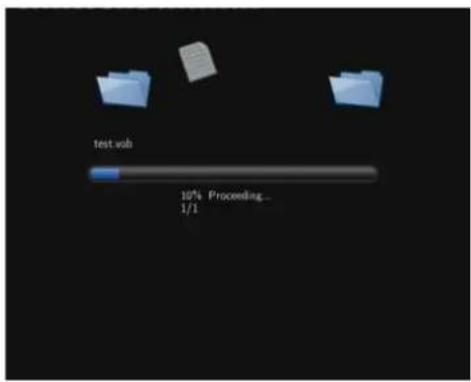
Press the UP / DOWN button to select OK, press the ENTER button to confirm. And the copy will start.

10. NAS Function
This player can be used as a NAS (Network-Attached Storage) device. It can be attached to the home network via either Ethernet or WLAN. This feature allows homes to store and retrieve large amounts of data more affordably than ever before.
When the network connection is done correctly and ready for use, please activate the NAS mode in the setup menu in advance (refer to 7.6 Changing Network Settings for more details), and then type: \NAS or \IP Address in the Run window (click Run in the start menu) or the address bar of Internet Explorer on your PC (For example, if the IP address of the player is 192.168.0.9, please type: \192.168.0.9 or \NAS), and click OK or press the Enter button on the keyboard.

Then you can view, and edit the files stored on the hard disk installed on the player. In this way, you can also playback and copy files via network between your PC and the player.
Note: Partitions of NTFS file system format on the hard disc drive might be read-only.
11. Listening to Internet Radio
This player integrates the SHOUTcast free Internet radio function. Select the Internet Radio icon on the main interface to enter this menu.

Note:
- Make sure the player is connected properly to a LAN or WLAN with Internet access, please refer to '7.6 Changing Network Settings' for more details;
- When you enter the Internet Radio menu at the first time, it will take several seconds to download data from the Internet, please be patient to wait;
- For more about SHOUTcast, please refer to the website: www.shoutcast.com
11.1 Station List Menu
Press the UP / DOWN button to select STATION, and press the ENTER button to confirm.
![STATION 1 RMF FM 2 RADIO ZET 3 Europa FM Romania 4 .977 The Hitz Channel 5 KissFM Romania- www.myKiss.ro -Hit M 6 Radio ZU Live - www.radiozu.ro 7 S K Y . F M - Absolutely Smooth Jazz - 8 Radio21 Romania Genre: [AC] Listeners/Max:6448/11560 Bitrate:32Kbps Type:AAC+ PAGE 1 / 1187](/content/2026/05/1066406/images/851fa039325ed6e9054471fcdb0fbde30a0c1e1d250c7db239b9eb15c351d1d2.jpg)
Press the UP / DOWN button to select the station you wish to visit from the list. Press the ENTER button to confirm. You can also press the PREV / NEXT button to page up and down.
When a station is selected, then you will enter the CHANNEL List menu. Press the UP / DOWN button to select the channel you wish to listen to.

Press the ENTER button or the PLAY button to start listening to the channel. And press the STOP button or the RETURN button to stop.
When a station is highlighted, you can press the MENU button to add it to the favorite.
![add favorite success! 1 RMF FM 2 RADIO ZET 3 Europa FM Romania 4 .977 The Hitz Channel 5 KissFM Romania- www.myKiss.ro -Hit M 6 Radio ZU Live - www.radiozu.ro 7 S K Y . F M - Absolutely Smooth Jazz - 8 Radio21 Romania Genre: [AC] Listeners/Max:6448/11560 Bitrate: 32Kbps Type:AAC+ PAGE 1 / 1187](/content/2026/05/1066406/images/ea5492023984c78a544fd0d0d3f9a037e44b055f7c131cb260a89e7bf5d06638.jpg)
11.2 Genre List Menu
Press the UP / DOWN button to select GENRE, and press the ENTER button to confirm.

Press the UP / DOWN button to select the genre you wish to visit from the list. Press the ENTER button to confirm. You can also press the PREV / NEXT button to page up and down. In this way, you can search your favorite stations via genre.
11.3 My Favorite Station
Press the UP / DOWN button to select FAVORITE, and press the ENTER button to confirm.
![FAVORITE 1 977 The Hitz Channel 2 RMF FM 3 Europa FM Romania 4 KissFM Romania- www.myKiss.ro -Hit M Genre: [Pop Rock Top 40] Listeners/Max:6655/17700 Bitrate:128Kbps Type:MP3 ITEM 1 / 4](/content/2026/05/1066406/images/affc0688f25518f882c900e343fb093d134288fc7f689a509ca23a48d48a7275.jpg)
All the favorite stations you added from the station list menu can be found and managed here.
When a station is highlighted, you can press the MENU button to delete it from the favorite.
![del favorite success! 1 RMF FM 2 Europa FM Romania 3 KissFM Romania- www.myKiss.ro -Hit M Genre: [AC] Listeners/Max:0196/11560 Bitrate: 32Kbps Type:AAC+ ITEM 1 / 3](/content/2026/05/1066406/images/4500591ca1c463544d50af7b01bfc0205f3dac7e1ad8c2df042ff170d2e64f25.jpg)
Note: You can have a maximum of 20 favorite stations in the list.
11.4 Recording Radio Programs
While radio channels are being played, you can press the REC button to record the audio tracks, and press the STOP button to stop the recording.
Note: Recorded audio tracks will be stored under directory: HDD1/REC/
12. Upgrading the Firmware
The firmware is the operating system (OS) installed on the device. Firmware upgrades can bring new features, improvements and bug fixes.
To check whether you have the latest version of firmware:
- Select MISC -> Information in the Setup menu;
- The firmware version number is displayed behind SW Version;
- Compare it with the latest firmware released.
Download the latest firmware from our official website.
Step 1: Prepare the USB Pen Drive
You will need a USB Pen Drive for firmware upgrade. Copy the 5 files for upgrade to the root directory of your USB Pen Drive.

Step 2: Connect the USB Pen Drive
Plug the USB Pen Drive into one of the USB HOST ports of the player.
Step 3: Hold the POWER / STANDBY button
Press and hold the POWER / STANDBY button on the front panel, and do not loosen.
Step 4: Connect the power cable
Plug the power cable into the DC IN jack, wait for about 3 seconds or more, and then loosen your finger on the POWER / STANDBY button;
Firmware installation will start in about 30 seconds. The LED indicators on the front panel will be enlightened and flashing during installation. If it is connected to a TV set, a blue install page
will appear on the TV screen.
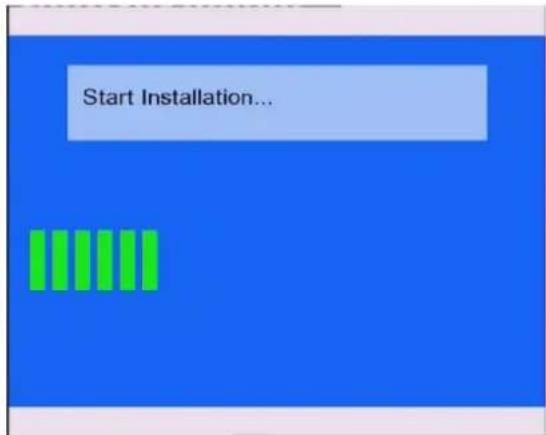
Please wait for about 3 minutes, the installation will be completed, the LED indicators will go off, and the player will be powered off automatically. Then you can press the POWER / STANDBY button to turn on the player and enjoy.
Note:
Do not turn off the power during installation;
The USB Pen Drive is not allowed to be unplugged during installation.
13. Appendixes
13.1 Specifications
USB SUPPORTED:
- USB HDD
● Other USB Mass Storage Devices - USB 2.0 Interface
CONTENT FORMATS SUPPORTED:
● DAT/VOB/IFO/MPG/AVI/MPEG-2 TS
- MP3/OGG/WMA
● Compression rate: between 32 kbps and 320 kbps
- JPEG/BMP
VIDEO CODECS SURPORTED:
- MPEG-1/MPEG-2
- MPEG-4 ASP: XviD
AUDIO CODECS SURPORTED:
- MP2/MP3 /OGG Vorbis/WMA Standard (DRM, Pro & Advanced Profile not supported)/PCM
SUBTITLE FORMATS SURPORTED:
● SRT, SMI, SSA, IDX/SUB, SUB
RECORDABLE DEVICES SUPPORTED:
- Built in HDD
- USB HDD
| HQ | 16hrs | 24hrs | 33hrs |
| SP | 32hrs | 48hrs | 66hrs |
| LP | 48hrs | 72hrs | 99hrs |
| EP | 64hrs | 96hrs | 132hrs |
| SLP | 96hrs | 144hrs | 198hrs |
- HQ/SP/LP/EP/SLP mode: MPEG-2 MP@ML
● HQ/SP/LP/EP/SLP mode: MP2 2-chanel
| Ethernet | 10/100Mbps Auto-Negotiation |
| WLAN | IEEE 802.11b/g, up to 54Mbps (supported by the optional WLAN USB Adapter) |
ANALOG TV SYSTEM
| Frequency Range | 44.25MHz~863.25MHz (VHF I/III / UHF) |
| Video | PAL B/G, D/K, I, SECAM L and L' |
| Audio | Stereo, Mono |
| Analog TV Tuner | 75 Ohm (VHF / UHF) TV Analog Antenna or cable |
DIGITAL TERRESTRIAL TV SYSTEM
| Frequency Range | 44.25MHz~863.25MHz (VHF I/III / UHF) |
| COFDM | 2K FFT or 8K FFT COFDM demodulator(Fully DVB-T compliant : ETS 300-744) |
| Code Rate | 1/2, 2/3, 3/4, 5/6, and 7/8 |
| Guard Interval | 1/4, 1/8, 1/16, 1/32 |
| Constellation QPSK | 16QAM, 64 QAM |
| Bandwidth | 6, 7 or 8MHz |
| Digital TV Tuner | 75 Ohm (VHF / UHF) TV Digital Antenna |
GENERAL
| Power Supply | AC 100~240V | 50~60Hz |
| Power Consumption | Approx. 35 W | |
| Operating | +5°C to +35°C (+36°F to +95°F) | |
| Temperature | |
| Operating Humidity | 5% to 80% RH |
| Hard Disk | 3.5” SATA HDD |
| Dimensions(W/H/D) | 61x198x171mm |
| Net Weight | Approx 1.5 kg |
Note: The specifications and design of this product are subject to change without notice.
13.2 Frequently Asked Questions
Question 1. My computer does not recognize my player.
Answer:
(1) Make sure the player is powered on. If it is off, the computer will not be able to find the player;
(2) Make sure the player is connected to computer. (Refer to 1.4.1 for connecting player to computer);
(3) When using Windows 98SE, install the USB driver first. After installation, restart the computer. Then reconnect the player to the computer. (Refer to 1.4.1 for connecting player to computer);
(4) If you installed the Windows 98SE driver over your Windows® XP, 2000, or ME edition, problems might occur;
(5) It is not recommend using the USB ports in the front of your computer, try to use the USB ports in the rear, because the USB ports in the front are often from non-powered hubs.
Question 2. When I try to disconnect the USB device, I keep on getting “The device ‘Generic volume’ cannot be stopped right now. Try stopping the device again later.” message, what should I do?
Answer:
Close any program that might be accessing data on the player, including Windows® Explorer. If it does not work, close all programs and wait for another 20 seconds, then try the green arrow icon again. If it still does not work, you should shut down the player and disconnect the USB cable.
Question 3. I find new file names and folder names that I never created before or they have strange gibberish names.
Answer:
Most likely, the player's file allocation table (FAT) has been corrupted. This might be due to the player shutting down (due to low battery power) while reading or writing to your computer by the USB connection. Windows and Macintosh often write extra files to the hard disk such as finder.def or System volume info. These are normal and will not do any harm to the player.
Question 4. I used my player to transfer files back and forth between different
computers. Will defragmenting the player hard disk do any harm to it?
Answer:
Defragmenting the player hard disk may be useful after having transferred many files to and from the player. It is never harmful to use the defragment on the player. Make sure no other programs are running while using the Windows® defragment utility. Make sure you have connected the player with the external power adapter during this procedure.
Question 5. My files have disappeared from the player.
Answer:
Make sure that you browse your files via the correct Browser mode which means correct filtered views such as Photos, Music, or Movies.
Question 6. Why do some supported photo formats, cannot be shown in the photo function?
Answer:
In the JPEG format there are different modes. The player doesn't support all the modes. So you have to change your photo format first as follow:
(1) Use Photoshop to open the photo;
(2) Choose "File" then "save as" from the menu, as the picture on the left hand side shows, select the picture format as JPEG, input the file name and click the "save" icon;
(3) After click on the "save" icon, a new window will appear as the picture on the right hand side shows, select "Baseline (standard)" or "Baseline optimized";


(4) Click the "OK" icon.
Question 7. During power on, why does the TV will have a short flashing, blue screen or screensaver?
Answer:
This is normal, when the system initializes, it will setup the corresponding parameters so it can output the correct video signal to the TV, during the initializing time, the TV will receive incorrect signals or the signals will not be stable and will cause the TV screen to flash, some TV's will treat this as no signal, and will display a blue screen or screensaver.
Question 8. Why when I switch to Y/Pb/Pr 480P, 576P, 720P, 1080I, does the TV screen display an unwatchable picture?
Answer:
Please check if your TV supports Y/Pb/Pr 480P, 576P, 720P, 1080I output, if your TV does not support, please use the A/V signal display instead, press the TV SYSYEM button on the remote control, then switch the TV's video input to NTSC or PAL.
Question 9. Why is there no sound on movie or music playback when using Y/Pb/Pr component output?
Answer:
Y/Pb/Pr output is a video output only, and does not include sound signals, when using Y/Pb/Pr output, please plug the A/V OUT or the S/PDIF jack to output sound.
Question10. Why couldn't the player find the hard disc?
Answer:
Make sure the firmware is installed correctly, and no system partitions on the HDD were deleted. If hard disc failure occurs, please backup your data and reinstall the firmware.
Question11. Some functions like recording, time shift etc. do not work. What should I do?
Answer:
If you find some functions do not work properly on the player, please change system settings to the default (Refer to 6.6 for changing system settings).
13.3 Copyrights and Trademarks
Copyrights
All rights reserved. No part of this manual may be reproduced, stored in a retrieval system, or transmitted in any form or by any means, electronic, mechanical, photocopying, recording or otherwise, without the prior written permission from the copyright holder. According to copyright law, no recorded data may be used for purposes other than personal enjoyment without permission from the copyright holder.
Trademarks
Microsoft and Windows are registered trademarks of Microsoft Corporation.
All other trademarks are property of their respective holders.
13.4 Warranty
What your warranty does not cover:
-Acts of nature, such as fire, static discharge.
-Damage from unauthorized repair, alteration or accident.
-Damage from misuse or neglect.
-A unit that has been modified or incorporated into other products or is used for institutional or other commercial purposes.
-Loss of customer's software, firmware, information, or memory data.
-Improper handling or installation.
TECHNICAL INFORMATION
License information for the software used in the unit.
This product contains Free Software which is licensed under the GNU General Public License. After you purchase this product, you may procure, modify or distribute the source code of the GPL/LGPL software that is used in this product.
If you contact our Support Center, we will provide you with a CD-ROM of the source code that is used, charging only the actual expensed involved. However, please be noted that we can not provide guarantee with the source code, and there is also no technical support for the source code from us.

- Getting Started.... 22
- Watching DVB-T & Analog TV programs 24
- The Title List Menu for Recorded Videos 27
- Timer Record Menu 34
- Setup Menu 37
- Browser Menu 59
- File Copy Menu 67
- NAS Function 69
- Listening to Internet Radio 70
- Upgrading the Firmware 73
- Appendixes.... 75
- Introduction
- Preface
- Packing List
- Note:
- Caution
- Usage cautions
- Power
- Radio interference/compatibility
- Repair
- Disposing of the player
- Hard disk cautions
- Others
- Connection
- Connect to Computer
- USB Mass Storage Device (like USB stick, MP3, USB HDD etc.) Connection
- A/V connection
- A/V IN
- A/V OUT
- Y/Pb/Pr Component OUT
- HDMI OUT
- TV IN
- Digital Audio Device connection
- Power connection
- Ethernet connection
- WLAN connection
- Remote Control
- Power on/off, language control
- Power on
- Power off
- Language control
- About the Player
- Remote Control
- Front Panel
- Rear Panel
- Getting Started
- Selecting DVB-T TV
- Selecting Analog TV
- Selecting A/V In - Signal from the A/V IN jack
- Selecting Playback – Playback and Edit Recorded Titles
- Selecting Browser – Playback Multimedia Files
- Selecting Setup
- Watching DVB-T & Analog TV programs
- Watching DVB-T TV programs
- Program List Menu
- Info Bar
- Electronic Programming Guide
- Teletext Menu
- Subtitle List Menu
- Watching Analog TV programs
- The Title List Menu for Recorded Videos
- Title List Menu
- Playing Back Titles
- Deleting Titles
- Renaming Titles
- Sorting Files
- Title Edit Menu
- Tools
- Saving Your Recorded Titles
- Timer Record Menu
- Create a New Schedule
- Editing Schedule
- Deleting Schedules
- Viewing Schedule Status
- Viewing Recording History
- Setup Menu
- Changing DVB-T TV settings
- MANUAL SCAN
- Channel Set
- Changing Analog TV settings
- Changing Video Settings
- Aspect Ratio
- Changing Audio Settings
- Changing Record Settings
- Changing Network Settings
- Infrastructure (AP)
- 1) Get SSID Name
- 4) Wireless Address Setup
- 5) Setting List
- 6) Test Connection
- Peer to Peer (Ad Hoc)
- 1) Ad Hoc Setup
- Changing System Settings
- Parental Control
- Lock System
- Miscellaneous
- Browser Menu
- Browsing All
- Browsing Music
- Browsing Photos
- Browsing Movies
- Browsing via Network
- Browsing through Workgroup
- Browsing through 'My\_Shortcuts'
- Renaming / Deleting Files
- Renaming Files
- Deleting Files
- Managing the Playlist
- Adding files to the playlist
- Browsing the playlist
- File Copy Menu
- NAS Function
- Listening to Internet Radio
- Station List Menu
- Genre List Menu
- My Favorite Station
- Recording Radio Programs
- Upgrading the Firmware
- Step 1: Prepare the USB Pen Drive
- Step 2: Connect the USB Pen Drive
- Step 3: Hold the POWER / STANDBY button
- Step 4: Connect the power cable
- Appendixes
- Specifications
- USB SUPPORTED:
- CONTENT FORMATS SUPPORTED:
- VIDEO CODECS SURPORTED:
- AUDIO CODECS SURPORTED:
- SUBTITLE FORMATS SURPORTED:
- RECORDABLE DEVICES SUPPORTED:
- Frequently Asked Questions
- Question 1. My computer does not recognize my player.
- Answer:
- Question 2. When I try to disconnect the USB device, I keep on getting “The device ‘Generic volume’ cannot be stopped right now. Try stopping the device again later.” message, what should I do?
- Question 3. I find new file names and folder names that I never created before or they have strange gibberish names.
- Question 4. I used my player to transfer files back and forth between different
- Question 5. My files have disappeared from the player.
- Question 6. Why do some supported photo formats, cannot be shown in the photo function?
- Question 7. During power on, why does the TV will have a short flashing, blue screen or screensaver?
- Copyrights and Trademarks
- Copyrights
- Trademarks
- Warranty
- What your warranty does not cover:
- TECHNICAL INFORMATION
Brand : AC Ryan
Model : Playon!DVR TV
Category : DVD player