Aurora - Uncategorized Crystal Video - Free user manual and instructions
Find the device manual for free Aurora Crystal Video in PDF.

| Product Type | 4K UHD Professional Wireless Video Transmission System |
| Model | Aurora (Transmitter 7120, Receiver 3120) |
| Video Input/Output | 12G-SDI and HDMI 2.0 up to 4096x2160 60Hz / 3840x2160 60Hz |
| Video Compression | H.265 with 10-bit 4:2:2 chroma sampling |
| Latency | Ultra-low, 70ms |
| Wireless Technology | 5GHz, 4x4 MIMO with Beamforming |
| Transmission Distance | 500m (line-of-sight, 50Mbps bitrate) |
| Frequency Channels | 11 channels (5190 MHz to 5795 MHz) |
| Modulation | OFDM |
| Transmitting Power | 23dBm |
| Video Bitrate Range | 20-60 Mbps |
| Audio Formats | MPEG-AAC, 48 kHz, 16-bit |
| Streaming Protocol | RTSP |
| Network Encryption | WPA2/WPS |
| Interfaces | 12G-SDI, HDMI, LAN, USB, RS232/422, Tally, Headset, Power (XLR) |
| Power Consumption | Transmitter: 16W, Receiver: 13W |
| Operating Voltage Range | 9-36 V DC |
| Operating Temperature | -10°C to +55°C |
| Antenna Type | 4x4 MIMO, 5 dBi external antenna |
| Mounting | V-mount plate (transmitter), 3/8" screw hole (receiver) |
| Safety | Use only provided power adapter; avoid water, heat, and metal enclosures |
| Maintenance | No user-serviceable parts; contact factory for repair |
| Compliance | WEEE (EU Environmental Protection) |
Frequently Asked Questions - Aurora Crystal Video
User questions about Aurora Crystal Video
0 question about this device. Answer the ones you know or ask your own.
Ask a new question about this device
Download the instructions for your Uncategorized in PDF format for free! Find your manual Aurora - Crystal Video and take your electronic device back in hand. On this page are published all the documents necessary for the use of your device. Aurora by Crystal Video.
USER MANUAL Aurora Crystal Video
Broadcast Grade Quality

12G-SDI

500m+

Ultra-Low Latency

HDMI

CRYSTAL VIDEO
Aurora
4K UHD Professional Wireless Video Transmission System
EU Environmental Protection
Waste electrical products should not be disposed of with household waste. Please recycle where facilities exist.


SHENZHEN CRYSTAL VIDEO TECHNOLOGY CO.,LTD
ADD: F12, FS18 ideas Land, Banyuan Road, Baoan Central Area, Shenzhen, China
Post code: 518102
Fax: +86-755-29188427
Tel: +86-755-27750518-6652
www.cv-hd.com
E-mail: Sales@cv-hd.com
E-mail: Marketing@cv-hd.com
USER MANUAL
This user manual applies to Aurora:
Transmitter: 7120
Receiver: 3120
Important Information
Please read this user manual carefully before using this product. In accordance with the safety precautions and operating instructions listed on this user manual, please use the product in a correct way. It does not apply in cases as follows:
● Repair or product modification have been executed by unqualified personnel
- The damage is caused by accidents including but not limited to lightning, fire, exposed to rain or water, and moisture.
- Don't use provided CVW power adapter.
- The model label on the product has been modified or removed by unqualified personnel.

Safety Precaution
 | To avoid electric shock, do not remove or open the cover. No user-serviceable parts are inside, please contact original factory for maintenance. |
 | The high temperature in the process of operating the device may cause the high risk of scalding. |
 | Please use our standard power adapter. As for the detailed information, please refer to the rated voltage shown on the CVW power adapter. |
 | Handle with care! |

Danger: Be careful with electricity
- When connecting to any devices, please turn off the product before any operation.
- Power outlet: To avoid electric shock or fire, short circuit, please make sure that the input voltage of adapter is AC110V-220V.
● Lightning: Unplug the product if it has not been used for a time or in lightning weather.

Warning
- This product should not be exposed to dripping or splashing. Please keep any liquid thing off the product.
- To avoid electric shock, please do not stick anything on the air vent of product; do not remove the cover or put the object like pins, steel wire into the gap of the air vent.
- Ventilation: Please do not block the air vents on the receiver/transmitter or place any object on top of them.
- Water Exposure: To avoid electric shock or fire, please do not expose the receiver/transmitter to rain or moisture.
- We assume no responsibility for any damage or result caused by not using original adapters.
Special Notice
- This product operates at 5GHz band, when it's in the complex environment, its transmission capability may be affected by metals, walls, or crowd etc.
- This product has been tested and manufactured to comply with international electrical safety regulations, however, there may be noise caused by the interference with other equipment in rare cases. If the interference is happened, please keep a certain distance away from other equipment.
- The product is susceptible to interference from 5GHz internet (LAN) or other wireless devices.
- The optimal transmission distance between transmitter and receiver is 500 meters in an open and unobstructed environment.
- Please do not deploy the transmitter and receiver on metal cages or shelves, or it may affect the wireless communication.
- It takes approximately 50 seconds to start up and establish the connection between the transmitter and receiver.
Contents
Cautions 01
About the User Manual 02
Product Overview 02
Product Highlights 02
System Connectivity Diagram 04
Packing List 05
Ports and Buttons 06
Transmitter 06
Receiver 08
OLED Display 10
OLED Display of Transmitter 10
OLED Display of Receiver 11
Buttons Operation 12
Product Installation 14
Installation of Transmitter 14
Installation of Receiver 16
Tally 19
RTSP Streaming 21
Firmware Upgrade 22
Product Specifications 23
Troubleshooting 24
Cautions
Thank you for choosing CVW professional wireless video transmission system.
Before using this product, please read carefully the following cautions:
* Avoid prolonged exposure to the direct sunlight or use this product in dusty environments.
* Be sure to use the product within the temperature and humidity range.
* Do not expose this product to violent vibration, or strong magnetic fields.
* Do not contact conductive materials with the interior of the product
* Do not dissemble the product enclosure without the guidance.
* Be sure to use the proprietary power adapter to power up the device.
* Make sure the antennas has been installed before powering up.
* This product is a 5GHz Wi-Fi device. Try to change a channel if this product is interfered by other 5GHz devices.
* The operating band of this product is 5GHz band, when it's in a complex environment, its transmission distance may be affected by metals, walls, or crowd etc. Please ensure that the antennas at the transmitter and the receiver are visible.
Special Precautions:
* When installing the articulating arm on the device, please do not hold the device by hand to rotate and fasten it.
* The RS232/422 and Tally ports are proprietary pinout. If you need these functions, please refer to the RS232/422 and Tally pinout definitions section below.
About the User Manual
This manual includes the product's specifications and a detailed introduction to its troubleshooting. Before using this product, please carefully read this manual. If you have any question or concern while using this product, please contact us or our dealers as soon as possible.
Product Overview
Aurora is a set of broadcast-grade 4K UHD wireless video transmission system, supporting the resolution up to 4096x2160 60Hz, 3840x2160 60Hz. This system is based on 5GHz wireless network and advanced 4x4MIMO technology. It adopts H.265 video encoding, the technology enables a higher image quality with lower latency.
Product Highlights
■ High quality and low latency
This product supports 12G-SDI input and output, supports HDMI 2.0 UHD input and output, and the resolution is up to 4096x2160 60Hz, 3840x2160 60Hz. H.265 technology enables a high-quality video with low latency of 70ms.
■ Support 10-bit 4:2:2 chroma sampling rate
This product supports 10-bit 4:2:2 chroma sampling rate, which can meet the professional broadcast-grade requirements, and is suitable for more extensive applications.
■ Beamforming
With the combination of 4x4 MIMO and Beamforming technologies, this product is superior to other WiFi products in terms of transmission distance and video quality.
■ Support simultaneous point-to-point and RTSP streaming output
This product supports simultaneous operation of point-to-point and RTSP streaming modes. In the point-to-point mode, the video output is from HDMI or SDI. In the RTSP streaming mode, the video streaming port is the LAN port (RJ45), and can output video simultaneously with the HDMI or SDI port.
Note:
-
HDMI input matches HDMI/SDI output; SDI input matches HDMI/SDI output. The SDI and HDMI output cannot be supported simultaneously by the receiver. The corresponding input and output operations can be selected based on the display instructions. For details, please refer to the button instruction below.
-
In the RTSP streaming mode, the maximum resolution of SDI and HDMI outputs are 4096x2160 60Hz, 3840x2160 60Hz, the resolution of RTSP streaming is 1280x720/60Hz by default.
■ RS232/RS422 transparent transmission
The product supports RS232/422 transparent transmission that enables the device connected to the receiver to send control commands to the camera side.
■ Support intercom and Tally
The product supports voice intercom and Tally function.

System Connectivity Diagram
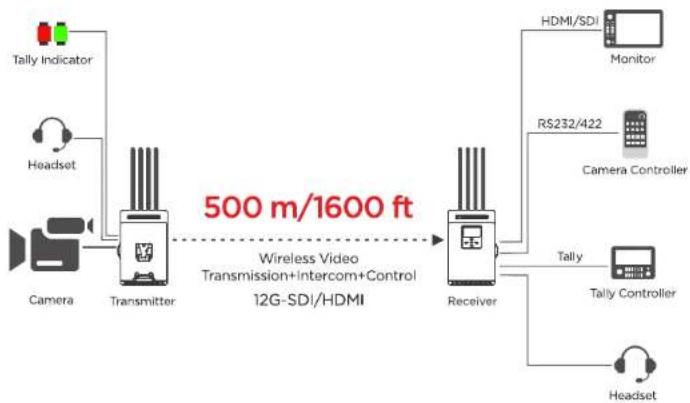
flowchart
graph LR
    A["Tally Indicator"] --> B["Headset"]
    B --> C["Camera"]
    C --> D["Transmitter"]
    D --> E["500 m/1600 ft Wireless Video Transmission+Intercom+Control 12G-SDI/HDMI"]
    E --> F["Receiver"]
    F --> G["HDMI/SDI Monitor"]
    F --> H["RS232/422 Camera Controller"]
    F --> I["Tally Tally Controller"]
    F --> J["Headset"]

Packing List
Please check the following items carefully after unpacking. If any of them is missing, please contact your seller.
Transmitter x1
Receiver x1

Antenna x10
Power adapter x1
12G-SDI cable x2

D-tap to 4-pin XLR adapter x2

USB OTG adapter x1

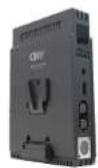
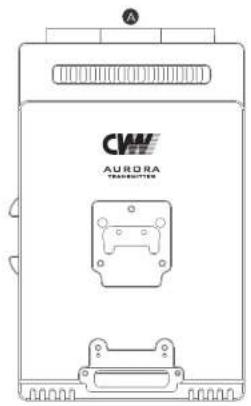
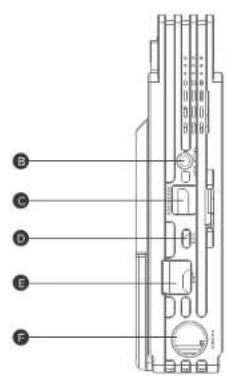
Ports and Buttons
TX: 7120
natural_image
Technical line drawing of a mechanical component with mounting holes and internal channels (no text or symbols)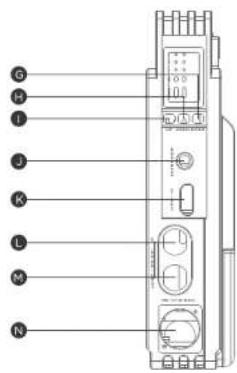
Transmitter ports introduction:
| Item | Description |
| A | Antenna Connectors |
| B | Tally Output |
| C | RS-232/422 |
| D | USB |
| E | LAN Port |
| F | Power Button |
| G | DOWN Button |
| H | MENU Button |
| I | UP Button |
| J | Headset Jack |
| K | HDMI Input |
| L | 12G-SDI Input |
| M | 12G-SDI Loop Output |
| N | Power Input |
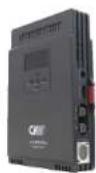
RX: 3120
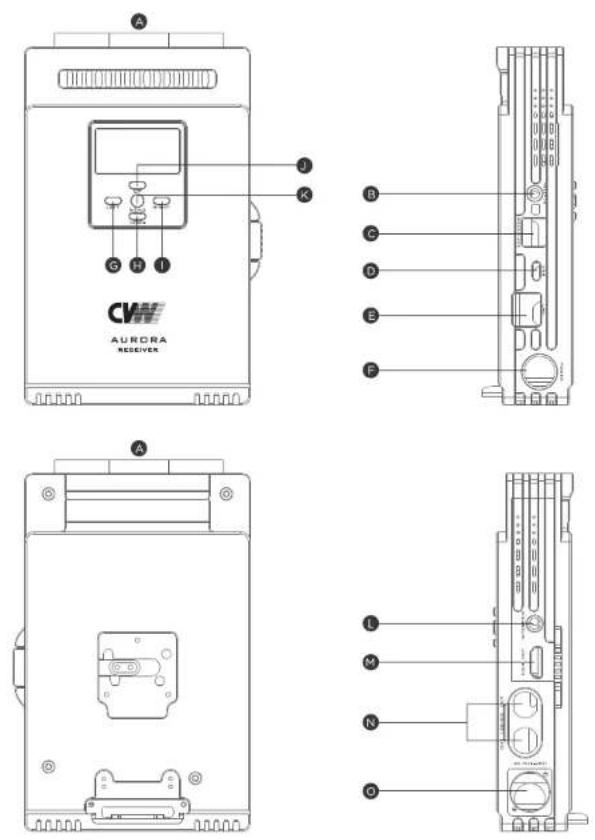
Receiver ports introduction:
| Item | Description |
| A | Antenna Connectors |
| B | Tally Input |
| C | RS-232/422 |
| D | USB |
| E | LAN Port |
| F | Power Button |
| G | LEFT Button |
| H | DOWN Button |
| I | RIGHT Button |
| J | UP Button |
| K | MENU Button |
| L | Headset Jack |
| M | HDMI Output |
| N | 12G-SDI Output |
| O | Power Input |
OLED Display
TX:7120
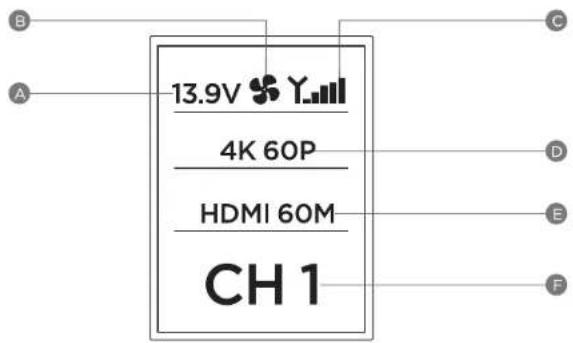
| Item | Icon | Content | Status |
| A | Battery voltage | 13.9V | Current battery voltage |
| B | Fan status | Blank | OFF |
| ON | |||
| C | Signal strength | No signal strength indication | No connection |
| Successful connection | |||
| D | Video signal | No Video | No video input |
| 4K 60P | Input video resolution | ||
| E | Signal source SDI/HDMI and bitrate | HDMI 60M | HDMI input, bitrate 60M |
| SDI 60M | SDI input, bitrate 60M | ||
| F | Working channel | CHI | Current channel |
RX:3120
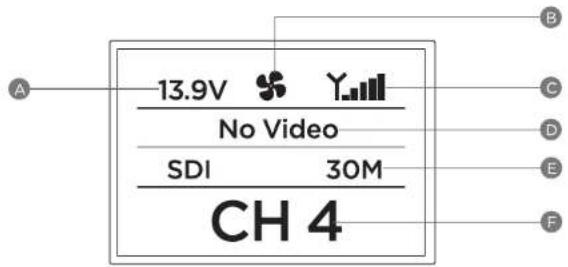
| Item | Icon | Content | Status |
| A | Battery voltage | 13.9V | Current battery voltage |
| B | Fan status | Blank | OFF |
| ※ | ON | ||
| C | Signal strength | No signal strength indication | No connection |
| Y. | Successful connection | ||
| D | Video signal | No Video | No video output |
| Shows a resolution | Output video resolution | ||
| E | Signal source SDI/HDMI and bitrate | HDMI 30M | HDMI output, bitrate 30M |
| SDI 30M | SDI output, bitrate 30M | ||
| F | Working channel | CH4 | Current channel |
Buttons Operation
TX:7120
| Function | Operation | Description |
| Channel Switch | In the main menu, the UP button is used to change to a higher channel, the DOWN button to lower, and the MENU button to confirm. | Press the UP or DOWN button to cycle switch between channels, then press the MENU button to confirm the change. If the MENU button is not pressed in 10 seconds to confirm, the channel will be automatically restored to original channel. |
| Go to the submenu | In the main menu, press and hold the MENU button for about 3 seconds. | Go to the submenu |
| Video | In the main menu, press and hold the MENU button for about 3 seconds to enter the submenu, press the UP or DOWN button to select "Video", then press the MENU button to enter, press the UP or DOWN button to select the functions, and finally press the MENU button to confirm. | "Video-Interface-HDMI/SDI", to select HDMI input or SDI input."Video-RTSP-Enable/Disable", to enable or disable RTSP streaming mode"Video-Bitrate-20M/30M/40M/50/M60M", to set the bitrate |
| Intercom | In the main menu, press and hold the MENU button for about 3 seconds to enter the submenu, press the UP or DOWN button to select "Intercom", then press the MENU button to enter, press the UP or DOWN button to select the functions, and finally press the MENU button to confirm. | "Intercom-ON/OFF", to enable or disable intercom function."Intercom-Volume-Low/Normal/High", to the adjust headset output volume. |
| UART | In the main menu, press and hold the MENU button for about 3 seconds to enter the submenu, press the UP or DOWN button to select "UART", then press the MENU button to enter, press the UP or DOWN button to select the required baud rate, and finally press the MENU button to confirm. | "UART-Baudrate-4800/9600/19200/38400/57600/15200/230400", to set the RS232/R5422 baudrate |
| Fan | In the main menu, press and hold the MENU button for about 3 seconds to enter the submenu, press the UP or DOWN button to select "Fan", then press the MENU button to enter, press the UP or DOWN button to select the fan status, and finally press the MENU button to confirm. | "Fan-OFF/30%/50%/75%/100%", to turn on/off the fan, and adjust the fan speed. |
| System | In the main menu, press and hold the MENU button for about 3 seconds to enter the submenu, press the UP or DOWN button to select "System", then press the MENU button to enter, press the UP or DOWN button to select the functions, and finally press the MENU button to confirm. | "System-Pair-Yes/No", to pair the transmitter and receiver."System-LNA-High/Low", to select high/low gain."System-restore-Yes/No", to restore the factory settings."System-upgrade-Yes/No", to upgrade the system."System-ENC RST-Yes/No", to reset encoder."System-RF RST-Yes/No", to reset wireless module."System-Language-English/Chines", to select language. |
| Status | In the main menu, press the MENU button for about 3 seconds to enter the submenu, press the UP or DOWN button to select "Status", then press MENU to enter, press the UP or DOWN button to select the "IP Address" or "Firmware Version", and finally press the MENU button to confirm. | "Status-IP address-0.0.0.0", to view the IP address."Status-Version-V0.0.0", to view the firmware version. |
RX:3120
| Function | Operation | Description |
| Channel Switch | In the main menu, the LEFT button is used to change to a higher channel, the RIGHT button to lower, and the MENU button to confirm. | Press the LEFT or RIGHT button to cycle switch between channels, then press the MENU button to confirm the change. If the MENU button is not pressed in 10 seconds to confirm, the channel will be automatically restored to original channel. |
| Go to the submenu | In the main menu, press and hold the MENU button for about 3 seconds. | Go to the submenu. |
| Video | In the main menu, press and hold the MENU button for about 3 seconds to enter the submenu, press the UP or DOWN button to select "Video", then press the MENU button to enter, press the UP or DOWN button to select the video output options, and finally press the MENU button to confirm. | "Video-Interface-HDMI/SDI", to select HDMI output or SDI output. |
| Intercom | In the main menu, press and hold the MENU button for about 3 seconds to enter the submenu, press the UP or DOWN button to select "Intercom", then press the MENU button to enter, press the UP or DOWN button to select the intercom options, and finally press the MENU button to confirm. | "Intercom-ON/OFF", to enable or disable intercom function. "Intercom-Volume-Low/Normal/High", to adjust the headset output volume. |
| UART | In the main menu, press and hold the MENU button for about 3 seconds to enter the submenu, press the UP or DOWN button to select "UART", then press the MENU button to enter, press the LEFT or RIGHT button to select the required baud rate, and finally press the MENU button to confirm. | "UART-Baudrate-9600/19200/38400/57600 11S200/230400", to set the RS232/RS422 baudrate. |
| Fan | In the main menu, press and hold the MENU button for about 3 seconds to enter the submenu, press the UP or DOWN button to select "Fan", then press the MENU button to enter, press the LEFT or RIGHT button to select the fan status, and finally press the MENU button to confirm. | "Fan-OFF/30%/50%/75%/100%", to turn on/off the fan, and adjust the fan speed. |
| Channel Scan | In the main menu, press and hold the MENU button for about 3 seconds to enter the submenu, press the UP or DOWN button to select "Scan", then press the MENU button to enable it. | The characters of "Scan" is displayed on the OLED screen. Once the scanning is completed, the channel quality of all available channels will be displayed as column charts on the OLED display. |
| System | In the main menu, press and hold the MENU button for about 3 seconds to enter the submenu, press the UP or DOWN button to select "System", then press the MENU button to enter, press the UP or DOWN button to select the functions, and finally press the MENU button to confirm. | "System-Pair-Yes/No", to pair the transmitter and receiver. "System-LNA-High/Low", to select high/low gain. "System-restore-Yes/No", to restore the factory settings. "System-upgrade-Yes/No", to upgrade the system. "System-DEC RST-Yes/No", to reset decoder. "System-RF RST-Yes/No", to reset wireless module. "System-Language-English/Chinese", to select language. |
| Status | In the main menu, press and hold the MENU button for about 3 seconds to enter the submenu, press the UP or DOWN button to select "Status", then press the MENU button to enter, press the UP or DOWN button to select the "IP Address" or "Firmware Version", and finally press the MENU button to confirm. | "Status-IP address-0.0.0.0", to view the IP address. "Status-Version-V0.0.0", to view the firmware version. |
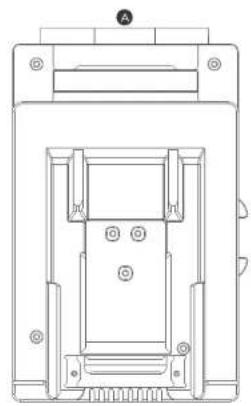
Product Installation
Installation of Transmitter
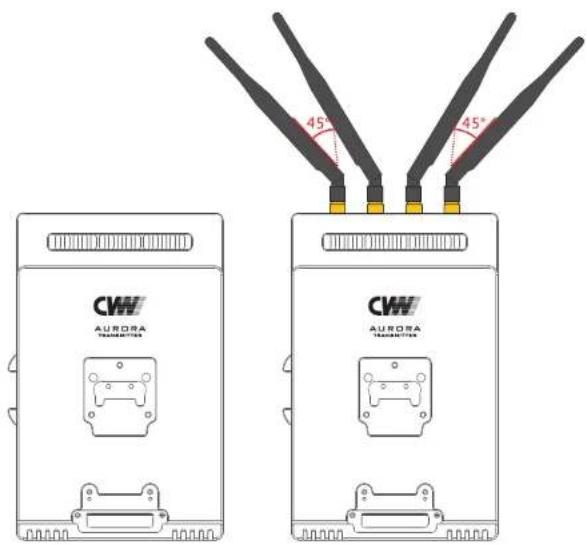
- Install the antennas to the antenna connectors, and arrange them to be fan-shaped.(As shown in the figure below)
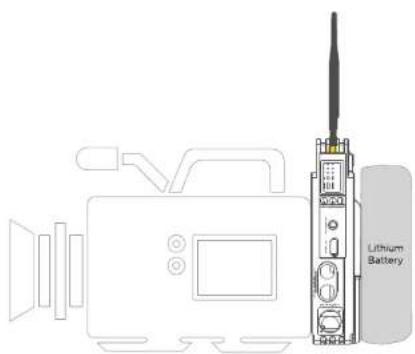
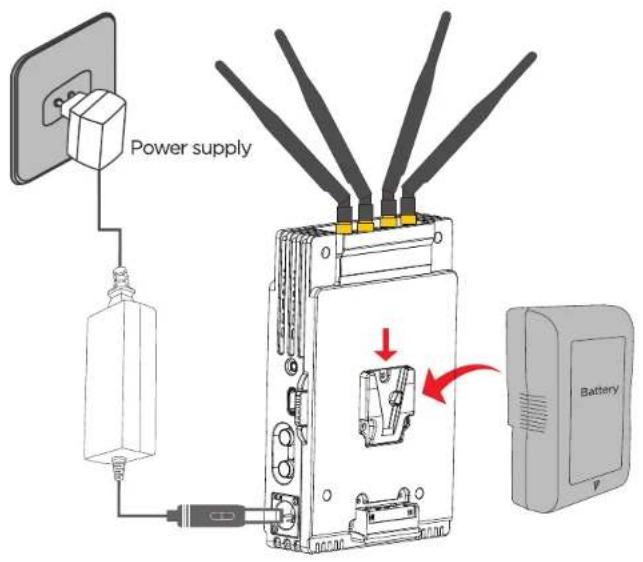
- Please install the transmitter on the 4K camera through the V-mount plate on its back, and use the V-mount battery to power up the transmitter and the camera simultaneously. (As shown in the figure below)
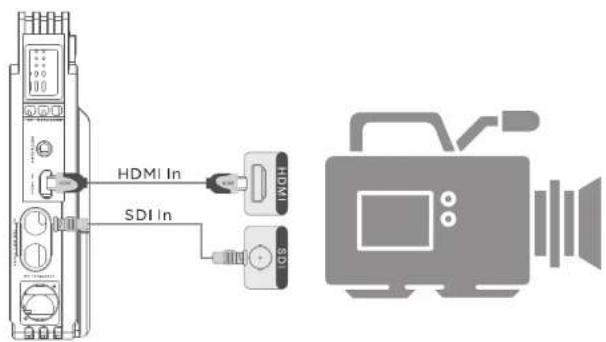
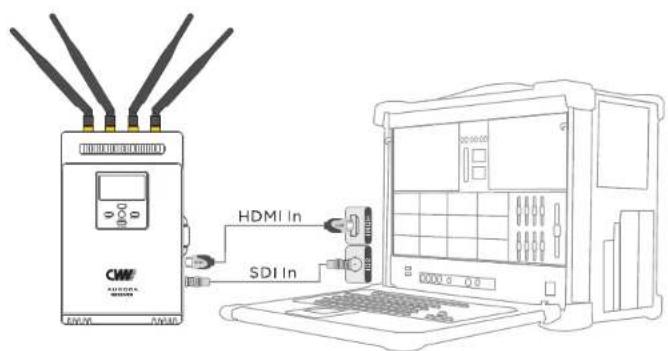
- Please connect the transmitter properly to the camera using a HDMI/SDI cable. (Please note that "HDMI" or "SDI" will appear on the OLED display when the corresponding cable is connected.)
Installation of Receiver
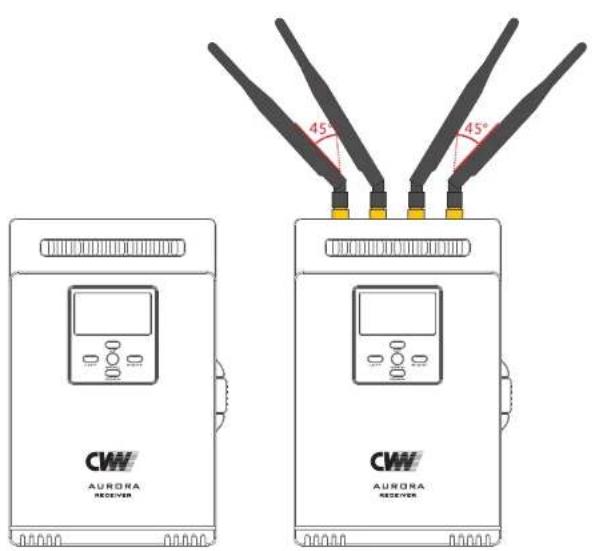
- Install the antennas to the antenna connectors, and arrange them to be fan-shaped. (As shown in the figure below)
- Please place the receiver at a height of around 1.5 to 2 meters above the ground. The receiver can be installed through the 3/8" screw hole in the bottom.
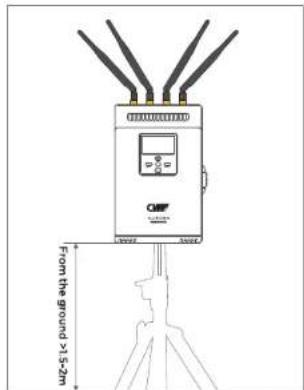
- Please connect the receiver to a monitor with a HDMI/SDI cable. (Please note that "HDMI" or "SDI" will appear on the OLED display when the corresponding cable is connected.)
- The receiver can be powered by the battery mounted on the V-mount plate, or connected to the XLR port via a power adapter. If both are connected, the battery will be used in priority, and will automatically switch to the power adapter when the battery runs out.

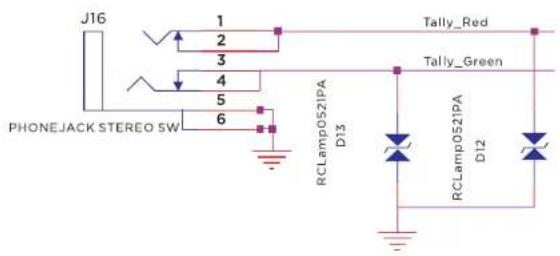
Tally
Tally
- First, plug the Tally indicator into the transmitter's Tally output, and connect the switch console to the receiver's Tally input. Then, the transmitter's Tally indicator can be controlled by the switch console. The transmitter's Tally indicator is turned on when the receiver is triggered by low level.
■ The Tally port is 3.5 mm phone jack.
Tally output pinout
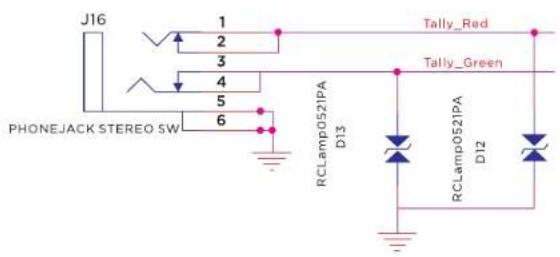
Tally input pinout
RS232/RS422 transparent transmission
RS232&422 port is RJ45 connector, baud rate can be modified through the display menu UART-Baudrate. The pinout is shown as below:
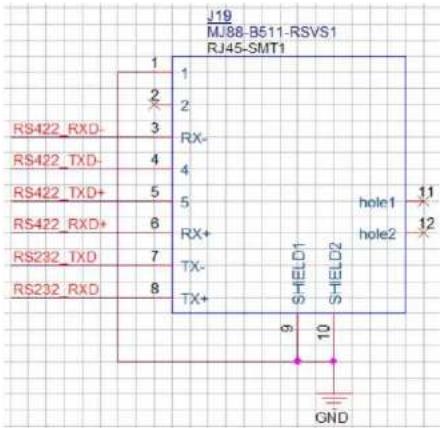
| Pin No. | Name | Description |
| 1 | GND | GND |
| 2 | NC | NC |
| 3 | RX- | 422 receives data R- |
| 4 | TX- | 422 transmits data T- |
| 5 | TX+ | 422 transmits data T+ |
| 6 | RX+ | 422 transmits data R+ |
| 7 | TX- | 232 transmits data TX |
| 8 | TX+ | 232 transmits data RX |
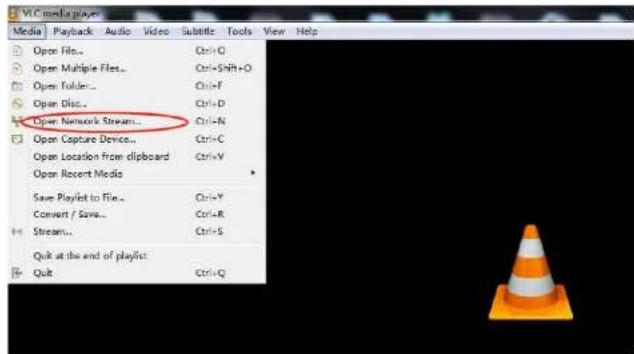
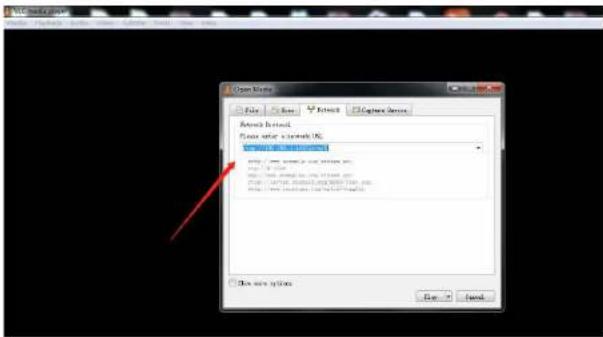
RTSP Streaming
Please select "Video-RTSP" from the sub-menu to enable the RTSP function. After the setting is completed, please connect the LAN port of the transmitter or receiver to a PC or other device.
Take the VLC application as an example. After opening the VLC application, please select "Open Network Stream" and fill in "rtsp:// IP address of the corresponding transmitter encoding board: 10000/live" in the address field, then click "Play" to start streaming.
Notes:
■ The IP address is on the label on the back of the device.
■ The transmitter must be connected to the video source, and the IP address of the terminal streaming device (such as a computer) must be in the same network segment as the IP of the encoding board in the transmitter. Otherwise, the RTSP streaming mode will not work.
Firmware Upgrade
Firmware upgrade through USB port
Please copy the latest firmware to the root directory of a USB disk(FAT-32 format) and connect it to the transmitter and receiver respectively, and select "System-upgrade-yes" in the menu bar on the display. The display will show "PIs Wait...", which means the upgrade is in progress. Once the upgrade is completed, the system will restart automatically.
Note: The firmware for the transmitter is different from that of the receiver. The upgrade process may take approximately one minute.
Product Specifications
| Item | Transmitter: 7120 | Receiver: 3120 |
| Frequency | 5190 MHz (1), 5230 MHz (2), 5270 MHz (3), 5310 MHz (4), 5510 MHz (5), 5550 MHz (6), 5590 MHz (7), 5630 MHz (8), 5670 MHz (9), 5755 MHz (10), 5795 MHz (11) | |
| Antenna mode | 4x4MIMO SdBi external antenna | |
| Modulation mode | OFDM | |
| Transmitting power | 23dBm | |
| Network encryption | WPA2/WPS | |
| Streaming protocol | RTSP | |
| Transmission distance | 500m (50Mbps bitrate, Line-of-Sight) | |
| Transmission latency | 70ms | |
| Video bitrate range | 20-60Mbps | |
| Video compression format | H.265 encoding/decoding | |
| Video formats | SDI resolutions: 3840x2160 23.98/24/25/29.97/30/50/59.94/60Hz1080P 60/59.94/50Hz (A&B)1080I 60/59.94/50 1080P 30/29.97/25/24/23.98Hz1080PsF 30/29.97/25/24/23.98Hz720P 60/59.94/50Hz | |
| HDMI resolutions: 3840x2160 23.98/24/25/29.97/30/50/59.94/60Hz1080P 60/59.94/50/30/29.97/25/24/23.98Hz1080I 60/59.94/50Hz720P 60/59.94/50Hz | ||
| Audio formats | MPEG-AAC sampling rate 48KHz bits : 16 bits | |
| Power consumption | 16 W | 13 W |
| Operating voltage range | 9-36 V | |
| Operating temperature | -10 °C to +55 °C | |
Troubleshooting
1) HDMI input matches HDMI/SDI output; SDI input matches HDMI/SDI output. The SDI and HDMI output cannot be supported simultaneously by the receiver. The corresponding input and output operations can be selected based on the display instructions. For details, please refer to the button operation.
2) Please connect the transmitter to the video source, and the receiver to the monitor, then power them up.
3) If the connection fails, please restart the transmitter and receiver. If the connection still fails, please refer to the button operation instructions to do re-pairing.
4) If no video source is displayed on the monitor after switching the video source resolution, please re-plug the HDMI cable of the transmitter or receiver. If there is still no signal after unplugging and plugging the HDMI cable, please restart the transmitter and receiver.
5) If the connection cannot be established after switching the channel, please restart the transmitter and receiver.
6) If the image is interfered, please try to switch the channel. For channel switching, please refer to the channel switching instructions.
7) Never power up the product without the original antennas and power adapter.
8) During use, the surrounding environment might affect wireless transmission quality. These situations are below:
a: Walls, large metal plates, and appliances may disrupt wireless transmission.
b: When using the equipment in crowded environment, please place the transmitter and receiver at the height of around 1.5-2 meters above the ground.
c: If 5GHz wireless devices are used nearby, these may also increase interference, which can be solved by switching to a different channel.
d: To achieve best wireless transmission performance, please arrange the antennas to be fan-shaped at the transmitter and receiver side with a clear line of sight.
- Aurora
- EU Environmental Protection
- USER MANUAL
- Important Information
- Safety Precaution
- Danger: Be careful with electricity
- Warning
- Special Notice
- Contents
- Cautions
- Special Precautions:
- About the User Manual
- Product Overview
- Product Highlights
- ■ High quality and low latency
- ■ Support 10-bit 4:2:2 chroma sampling rate
- ■ Beamforming
- ■ Support simultaneous point-to-point and RTSP streaming output
- Note:
- ■ RS232/RS422 transparent transmission
- ■ Support intercom and Tally
- Packing List
- Ports and Buttons
- Transmitter ports introduction:
- OLED Display
- Buttons Operation
- Product Installation
- Installation of Transmitter
- Installation of Receiver
- Tally
- RS232/RS422 transparent transmission
- RTSP Streaming
- Notes:
- Firmware Upgrade
- Firmware upgrade through USB port
- Troubleshooting
Brand : Crystal Video
Model : Aurora
Category : Uncategorized